Building Web Apps with WordPress (2014)
Chapter 15. Ecommerce
At some point, you may want to charge for access to your app or otherwise accept payments on your site. In this chapter, we’ll go over the best ecommerce and membership plugins available and give you a few pointers for choosing between them. We’ll also go through setting up a typical paywall in the software as a service (SaaS) model.
Choosing a Plugin
There are many different plugins that will allow you to accept payments on your site. Each has its strengths and weaknesses. Choosing between the various plugins can be daunting, but we’re here to help.
WordPress ecommerce plugins generally fall into two main categories: shopping cart plugins and membership plugins. We’ll also cover a couple of plugins that don’t fall inside these categories exactly.
All plugins in this section have these features in common:
§ Integration with multiple payment gateways
§ Secure checkout forms
§ Saved order information
§ Products (or membership levels) with pricing
Shopping Cart Plugins
The plugins we’ll cover in this section focus around offering products for sale on your site.
Features of these plugins include:
§ A products custom post type
§ The ability to browse products
§ The ability to search through products
§ The ability to purchase multiple products at once
§ Support for shipping addresses and shipping price calculations
§ Support for custom tax rules
Our favorite: Jigoshop
Why: the Jigoshop ecommerce plugin is released under the GPL license and available in the WordPress plugin repository. Dozens of extensions exist for Jigoshop that do everything from add support for different payment gateways to customize your emails to conform to Norwegian tax rules.
The base plugin, which includes all of the functionality to add products and process orders, is free. Most of the extensions are available for under $50 each, or you can purchase a membership to gain access to all of the extensions sold through the main Jigoshop store.
Jigoshop works well with any WordPress theme you might be using. There are Jigoshop-specific themes, and you can also easily customize the default CSS that Jigoshop provides with the plugin itself.
The code behind Jigoshop includes a lot of hooks and filters you can use to override the default behavior. And the source code for the base Jigoshop plugin is managed on GitHub, making it easy to do a pull request to add your own hooks and filters or to get involved in the development of the plugin. The Jigoshop developers are very responsive with merging in new code that is clean and improves the plugin.
Notable runner-up: WooCommerce
WooCommerce, which was forked from Jigoshop, has improved both the underlying code and the number and quality of extensions. The community is definitely behind WooCommerce in a big way as WooCommerce is quickly eclipsing Jigoshop (and ecommerce platforms in general) in terms of both user and developer adoption.
WooCommerce extensions are pricier than Jigoshop extensions. They run about $50–$200 each, with no membership with access to all extensions. More important for many app developers is the fact that licenses for each individual extension must be maintained to ensure updates. In practice this isn’t so bad, but we worry about the added overhead around using the licensed extensions versus a system like Jigoshop’s where you simply pay for access to GPL code and get it.
Other shopping cart plugins include WP e-Commerce, Shopp Plugin, and Cart 66.
Membership Plugins
Plugins in this section focus around accepting payment for a membership access to a WordPress site or app.
Features of these plugins include:
§ Recurring pricing for subscriptions
§ Tools for locking down content based on membership level
Our favorite: Paid Memberships Pro
Why: Besides being developed by our coauthor Jason Coleman, Paid Memberships Pro is the only WordPress membership plugin that is 100% GPL and available for free in the WordPress repository. Other plugins have either paid modules or upgraded versions that are necessary to gain access to all of the plugin’s features.
All of the Paid Memberships Pro code is managed on GitHub and open to developer input. Like Jigoshop, there are a lot of hooks and filters available to change the default behavior of the plugin.
Nearly every membership site has a slightly different way of calculating upgrades or special offers, or exactly how and when to lock down content. Instead of offering an extra long settings page, Paid Memberships Pro carefully designed its hooks and filters to make it easy to setup nearly any pricing model with just a few lines of code.
Another key difference between Paid Memberships Pro and some other membership plugins is that Paid Memberships Pro uses its own table to define membership levels and their relationships to users and orders. Some membership plugins use the built-in WordPress user roles so that each membership level is also a user role. User roles are very important in some membership sites (see Chapter 6), but in general, it’s better to separate the concept of a membership level and a user role, allowing you for example to have members who are admins and members who are subscribers. If you do need to assign roles based on membership level, that is easy to do with Paid Memberships Pro, and we have an example later in this chapter.
Other membership plugins include s2Members, Restrict Content Pro, Members, WPMU Membership, and MemberPress.
Digital Downloads
Our favorite: Easy Digital Downloads
All of the ecommerce and membership plugins mentioned so far can be used for digital products and downloads as well as physical goods. However, if you are only planning on selling digital goods, you should consider Easy Digital Downloads, which was developed specifically for this use case.
Like Jigoshop, the core Easy Digital Downloads plugin is available for free in the WordPress repository, while extensions are available for purchase at the plugin’s website. Extension prices range from $6–$83. There is a core extensions bundle that includes many of the most popular extensions at a reduced price.
Notable extensions that could be useful to app developers include the Software Licensing and Product Support add-ons. The core plugin and all of the extensions are well coded and well supported.
Payment Gateways
A payment gateway is a service that processes and sometime stores customer credit cards and makes sure that the money winds up in your bank account.[26] Popular gateways in the United States include Stripe, PayPal, Authorize.net, and Braintree Payments. There are dozens of gateways, many specializing in particular parts of the world or in particular markets.
These are the important things to look out for when choosing a gateway:
§ Does the gateway support the country and currency you do business in?
§ Does the gateway integrate with the plugin you are using for ecommerce?
§ Does the gateway work with the type of business you are in? Some gateways will not work with adult sites, gambling sites, or other “high-risk merchants.”
§ Does the gateway offer the features you need like recurring billing or stored credit cards?
§ How does the gateway handle Payment Card Industry (PCI) compliance?[27]
§ Will the gateway work with my merchant account? (See the merchant account section below.)
§ Finally, what are the fees? 1% of $10 million is a lot of money, and it is worth fighting for lower fees. However, in general, the fees are fairly standard across gateways, and you should first look for a gateway that will work with your business setup. As your business grows in revenue and volume, it becomes very easy to negotiate lowering your fees to the standard minimums in your industry.
Merchant Accounts
Merchant accounts are often confused with payment gateways, but are actually a separate thing you need to process payments on your website. Part of the confusion comes from the fact that some gateways use their own merchant accounts.
In any case, both a payment gateway and merchant account are required to make money online, and both kinds of providers will help you secure the other service. That is, you can shop for a payment gateway and have it help you find a merchant account, or you can shop for a merchant account and have it help you find a payment gateway. We find that younger companies typically get better fees when they start with a payment gateway and get a merchant account with their help, rather than going to their bank to open a merchant account.
Here is how the credit card information and money flows from a customer on your website into your checking account: WordPress → Ecommerce Plugin → Payment Gateway → Merchant Account → Your Checking Account.
One way to think of the difference between gateways and merchant accounts is that the payment gateway is largely technology related, and the merchant account is largely business related.
The payment gateway provides the technology to validate and charge a credit card and setup recurring payments, and some can store customer information for later billing.
The merchant account is a kind of bank account that stores incoming money until it can be moved to your bank account. Why not just put the money directly into your bank account? The delay is kind of like waiting for a check to clear. If for some reason the credit card company needs to request the money back, because of an error or a customer request, it can pull it out of your merchant account.
These are the important things to look out for when choosing a merchant account:
§ Will my gateway work with this merchant account?
§ Will this merchant account underwrite my type of business? Some merchant accounts will not work with adult sites, gambling sites, or other “high-risk merchants.”
§ Will this merchant account underwrite my size of business? Some merchant accounts will not approve new businesses that sell high-priced (thousands of dollars) goods.
§ Finally, what are the fees? Sometimes these fees are bundled into the payment gateway fees, and sometimes they are separate.
The best route to accepting credit cards online is usually to choose a plugin first, then choose a payment gateway that works with that plugin, and then work with the gateway to find a merchant account.
SSL Certificates and HTTPS
When accepting sensitive information through a web form, for example, a credit card number, you should encrypt that information by loading and submitting the form over SSL or HTTPS.
First some definitions: SSL stands for “Secure Sockets Layer” and is the technology that encrypts data that is transferred to and from a web page. HTTP stands for “Hypertext Transfer Protocol.” This is the standard protocol for serving web pages without encryption. HTTPS stands for “HTTP Secure.” This is the protocol for serving web pages with SSL encryption.
Installing an SSL Certificate on Your Server
First make sure that you have SSL enabled on your web server. How to do that will depend on your specific host and web server. O’Reilly’s ONLamp has great instructions for setting up SSL on a server running Apache.
When setting up SSL, you’ll need an SSL certificate. You can use self-signed certificates for testing purposes, but modern-day browsers will show some fairly dire warnings when browsing to a site using a self-signed certificate. Figure 15-1 shows the warning shown to Chrome users.
For production environments, you’ll want to use a public key certificate from a certificate authority or CA. Public key certificates must be purchased, and are usually bundled or offered as an add-on to your web hosting package. You can also use public key certificates (SSL certificates) purchased from third parties; visit this book’s website for a list of vendors we like. A good CA certificate will be trusted by all modern web browsers, which is what gives you the green or golden padlock icon on your website instead of a broken or red padlock.
What you’re really doing is paying for the confirmation that you really own the domain you are using the certificate on. Ownership of the domain is usually confirmed via email to an address on the domain.
Internet consumers are trained to look for that padlock (see Figure 15-2). Both savvy and nonsavvy users will feel better seeing it. So even if you aren’t accepting credit card information directly on your page (e.g., if you are sending users to PayPal to pay), it’s still a good idea to purchase a CA certificate and serve your checkout page over SSL.
Besides using a CA certificate, the other thing to do when setting up SSL is to have your HTTPS directory point to your HTTP directory through a symbolic link, or symlink for short. A symlink is like a shortcut in a Windows PC. The symlink points to another directory rather than being a directory of its own.
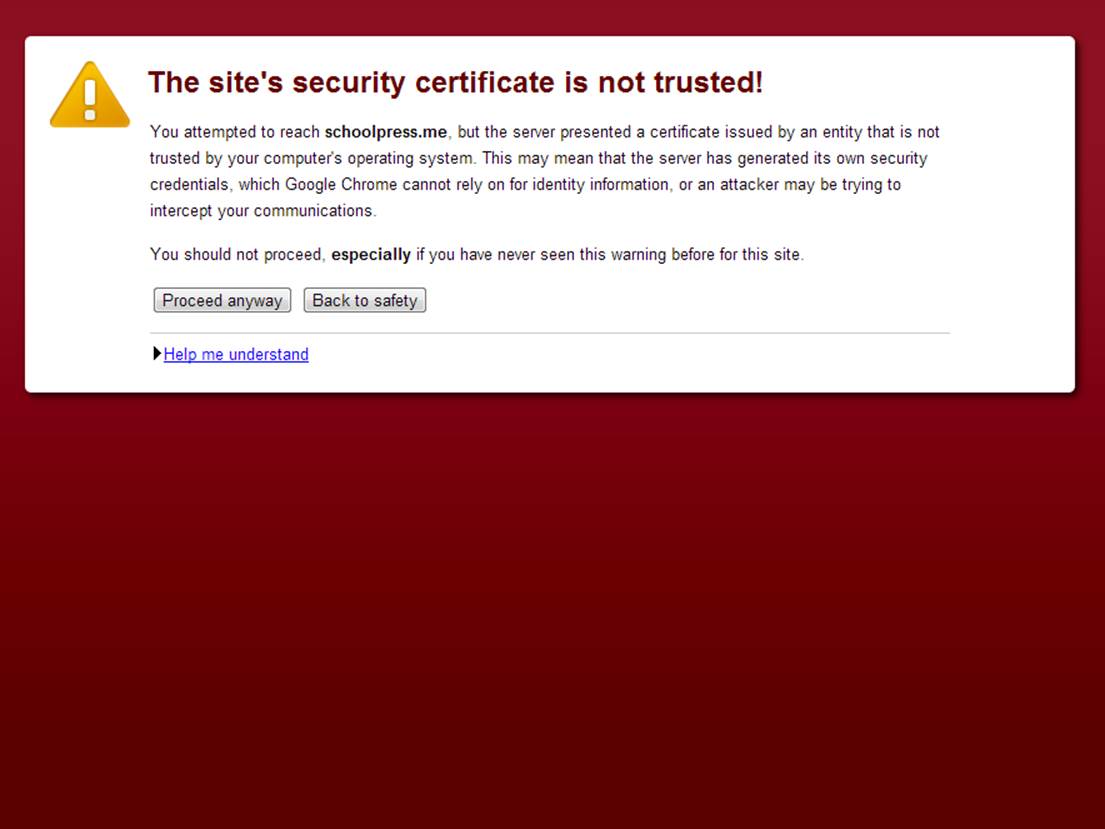
Figure 15-1. Chrome SSL warning
The end result of using a symlink for your HTTPS directory is that the same .php source files will be loaded when people visit https://yoursite.com as when they visit http://yoursite.com. Your server will make sure that the traffic through the HTTPS link is encrypted and both WordPress and your ecommerce plugin will make sure that the correct secure page is shown to the user when being served over SSL.
Assuming your HTTP directory is called “html” and you want your HTTPS directory to be called “ssl_html,” you would issue the following Linux command to create a symlink to that directory: ln -s http ssl_http.
Next you’ll need to tell your ecommerce plugin to use SSL on your checkout page.
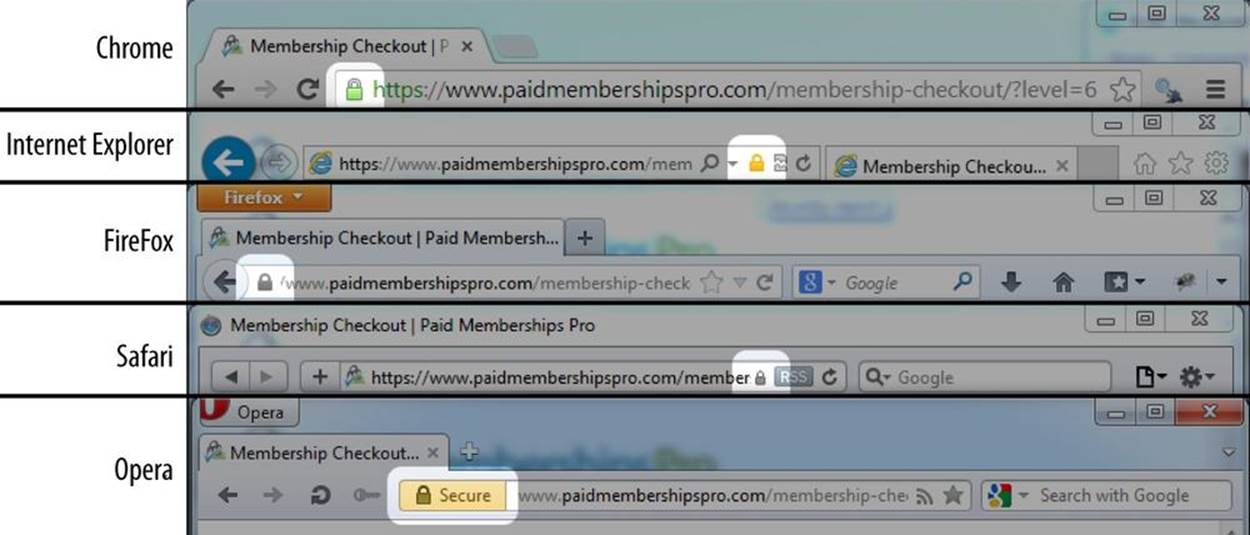
Figure 15-2. Various padlocks across browsers
SSL with Paid Memberships Pro
Figure 15-3 shows the Payment Settings tab of the Membership settings in your WordPress dashboard.
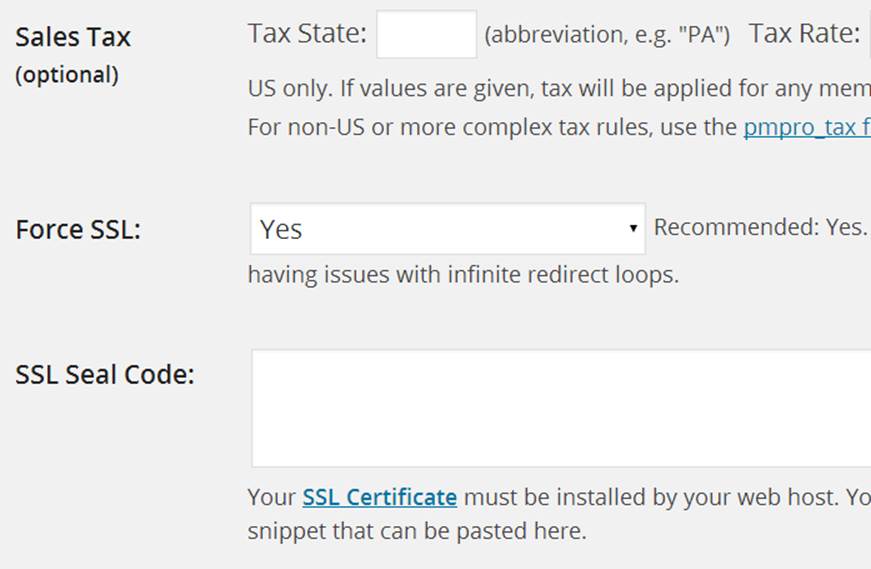
Figure 15-3. Paid Memberships Pro payment settings
To get Paid Memberships Pro to serve your checkout page over SSL, set the Force SSL option to Yes. Depending on which payment gateway you are using, this option will either be forced to Yes or will give you the option to choose Yes or No. Set to Yes and click the Save Settings button.
When this setting is enabled, a user browsing to the HTTP version of the page will be redirected to the HTTPS version of the page. Conversely, users browsing to an HTTPS version of a noncheckout page will be redirected to the HTTP version.
SSL with Jigoshop
To get Jigoshop to serve your checkout page over HTTPS, go to Jigoshop → Settings in your WordPress dashboard, click the General tab, then check the “Force SSL on checkout” option (Figure 15-4) and click the Save General Changes button.
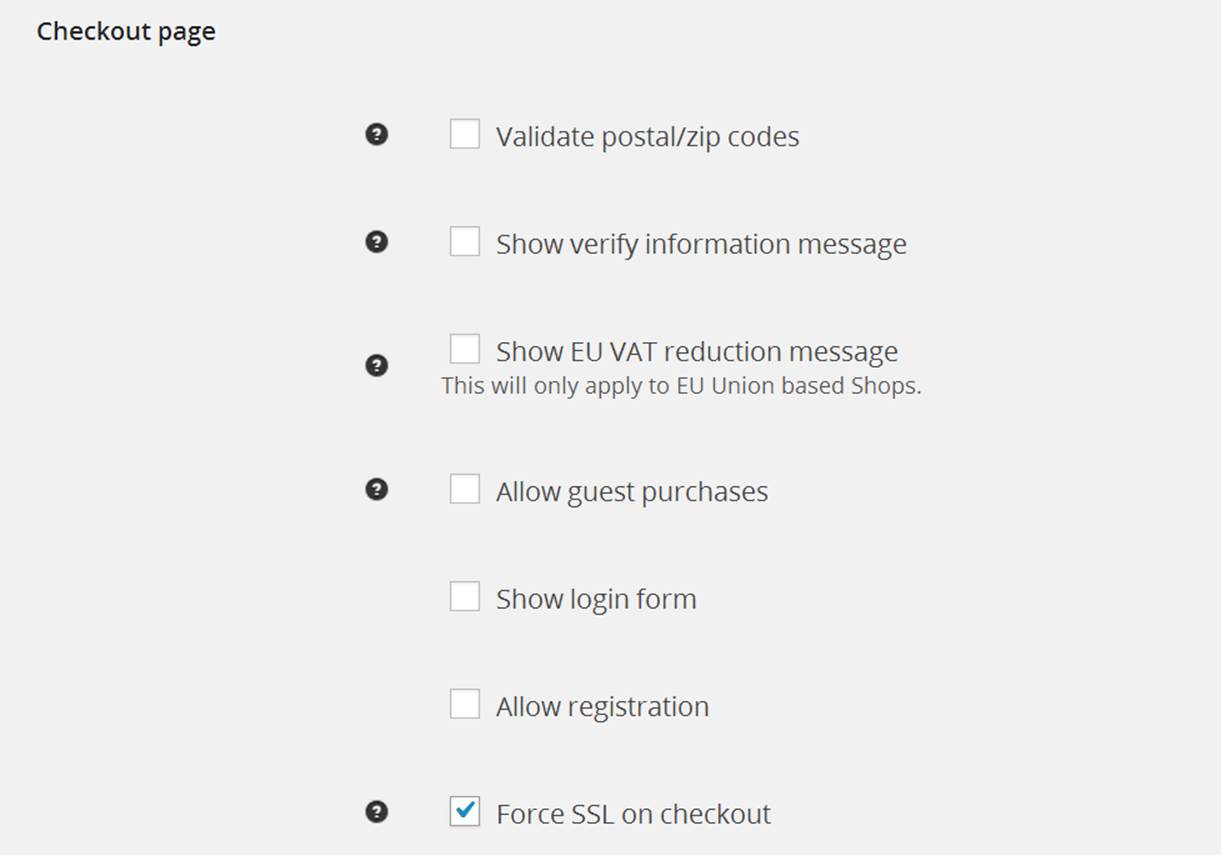
Figure 15-4. Jigoshop “Force SSL on checkout” option
Other ecommerce plugins will have similar settings.
WordPress Login and WordPress Admin over SSL
Serving your checkout page over SSL is the minimum you can do to secure the private data passed to and from your site. You can also set up WordPress to use SSL on the login page, in the admin dashboard, across the entire site, or only on select pages.
SSL logins in WordPress are done by setting the FORCE_SSL_LOGIN constant to true in your wp-config.php file. Place the following line of code above the “That’s all, stop editing! Happy blogging.” comment at the end of the file:
define('FORCE_SSL_LOGIN', true);
To use SSL on the login page and in the admin dashboard, use the following FORCE_SSL_ADMIN constant instead:
define('FORCE_SSL_ADMIN', true);
NOTE
The FORCE_SSL_ADMIN constant supersedes the FORCE_SSL_LOGIN constant. You should only set one or the other constant to true. If FORCE_SSL_LOGIN is false and FORCE_SSL_ADMIN is true, your login page will still be served over SSL.
WordPress Frontend over SSL
You might think, “Why not serve my entire site over SSL?” The reason not to is that the SSL encryption adds a small bit of CPU computation and a few microseconds to each page load. This may not matter, but on larger sites at scale, it could add up.
There are occasions when you may need to use SSL across the entire frontend and backend of your site. Maybe you don’t mind the extra bit of CPU use and just want to set your members at ease. Maybe you have secure forms and information on many pages in your frontend. In these cases, you can set the FORCE_SSL_ADMIN constant to true in your wp-config.php file and then include this plugin:
<?php
/*
Plugin Name: Always HTTPS
Plugin URI: http://www.strangerstudios.com/wp/always-https
Description: Redirect all URLs to the HTTPS version.
Version: .1
Author: strangerstudios
*/
/*
Make sure to set FORCE_SSL_ADMIN to true.
Add the following to your wp-config.php:
define('FORCE_SSL_ADMIN', true);
*/
//redirect to https
function always_https_redirect()
{
//if FORCE_SSL_ADMIN is true and we're not over HTTPS
if(force_ssl_admin() && !is_ssl())
{
//redirect to https version of the page
wp_redirect("https://" . $_SERVER['HTTP_HOST'] .
$_SERVER['REQUEST_URI']);
exit;
}
}
add_action('wp', 'always_https_redirect', 2);
//(optional) Tell Paid Memberships Pro to get on board with the HTTPS redirect.
add_filter("pmpro_besecure", "__return_true");
?>
If FORCE_SSL_ADMIN is on, but the current page is not already being served over HTTPS, the user is redirected to the HTTPS version of the page.
This code can cause an infinite redirect loop in a few situations. Sometimes plugins, like Paid Memberships Pro, will have their own idea on which pages should and shouldn’t be served over HTTPS. In the preceding code, we use a filter in Paid Memberships Pro to tell it that all pages should be served over HTTPS. Other plugins should have similar filters.
Another situation that comes up is that certain server setups, particularly those that are using a proxy like the Varnish caching system (covered in Chapter 16), will fail to properly set the $_SERVER['HTTPS'] global, which the is_ssl() function checks to see if the current page is being served over HTTPS. These conflicts are harder to handle. Sometimes, you can update your wp-config.php to set the $_SERVER['HTTPS'] global based on some other global being set by the proxy. Or you can adjust the check in the Always HTTPS plugin to check for the particular values set by your proxy.
We’re going to go through two more techniques, which we’ve bundled into the Paid Memberships Pro plugin. We’ll show you how to use these features in Paid Memberships Pro and also how to set them up yourself if you aren’t using the Paid Memberships Pro plugin.
SSL on Select Pages
Sometimes you will want to serve only certain pages over SSL. Paid Memberships Pro does this, where by default only the checkout page is served over SSL, and all other pages are served over regular HTTP.
If you’re using the Paid Memberships Pro plugin, and there are other pages you’d like to serve over SSL, you can add a custom field to the post, page, or CPT called “besecure” and set the value to “1” or “true.” Paid Memberships Pro will then make sure that the page is served over SSL.
Let’s see how Paid Memberships Pro does this so you can understand what’s going on and potentially use the same method for your site that isn’t running the Paid Memberships Pro plugin.
NOTE
The code in this section is similar to the code found in the Paid Memberships Pro plugin, but is slightly altered for clarity.
To serve certain pages over SSL, we’ll need a few things:
§ A way to detect if the user is on the login page, so we can respect the FORCE_SSL_LOGIN or FORCE_SSL_ADMIN constants
§ A way to set which pages should be served over SSL and a function to redirect pages to either the HTTP or HTTPS version of a page depending on that setting
§ A way to filter URLs used on a page to use the correct protocol (HTTP or HTTPS)
First up, our function to detect if the user is on the login page. This function checks if we’re on the /wp-login.php or /wp-register.php pages or if the current page has the slug “login”:
function my_is_login_page()
{
return (in_array(
$GLOBALS['pagenow'], array('wp-login.php', 'wp-register.php')) ||
is_page("login")
);
}
WordPress sets the pagenow global to the filename of the PHP script loaded. Typically this is index.php, but the login page will be accessed via wp-login.php.
NOTE
Fresh installs of WordPress will not have a wp-register.php file, but we’re still checking for it here. WordPress sites set up before version 3.4 included a wp-register.php file. A redirect from wp-register.php to the actual registration page at wp-login.php?action=register was added in WP 3.4, but the old wp-register.php file wasn’t deleted if you upgraded. Since it doesn’t hurt anything, we can check for wp-register.php too just in case the WordPress site includes it.
The is_page() function can take a post ID or slug as a parameter and will return true if the current page has that ID or slug. If you use a plugin like Theme My Login or a similar method to place your login page within your theme on the frontend, you’ll have a WordPress page for your login page. Tweak the code to check for whatever you set the slug to on your login page.
Next up is a function to redirect the user to the correct version of a page (HTTP or HTTPS), depending on if the page is set to be served over SSL or not:
function my_besecure()
{
global $besecure, $post;
//check the post meta for a besecure custom field
if(!empty($post->ID) && !$besecure)
$besecure = get_post_meta($post->ID, "besecure", true);
//if forcing ssl on admin, be secure in admin and login page
if(!$besecure && force_ssl_admin() && (is_admin() || my_is_login_page()))
$besecure = true;
//if forcing ssl on login, be secure on the login page
if(!$besecure && force_ssl_login() && my_is_login_page())
$besecure = true;
//a hook so we can filter this setting if need be
$besecure = apply_filters("my_besecure", $besecure);
if($besecure && (!is_ssl())
{
//need to be secure
wp_redirect("https://" . $_SERVER['HTTP_HOST'] . $_SERVER['REQUEST_URI']);
exit;
}
elseif(!$besecure && is_ssl())
{
//don't need to be secure
wp_redirect("http://" . $_SERVER['HTTP_HOST'] . $_SERVER['REQUEST_URI']);
exit;
}
}
add_action('wp', 'my_besecure', 2);
add_action('login_init', 'my_besecure', 2);
Stepping through the preceding code, first we check for a “besecure” custom field in the current post’s post meta. If this custom field is set, we’ll want to serve over SSL.
Then we check if we’re on the login page and if either the FORCE_SSL_LOGIN or FORCE_SSL_ADMIN constant is set to true. If so, we’ll want to serve over SSL.
We add a hook in there to allow other code throughout our application to override the $besecure variable at this point.
Then we figure out if we need to redirect. We’re using WP’s built-in is_ssl() function, which will return true if $_SERVER['HTTPS'] is turned on or if $_SERVER['SERVER_PORT'] is set to 443 (the typical port number for SSL).
NOTE
As explained above, some server setups with proxies may not properly set the $_SERVER globals. You can add a check to your wp-config.php for the value they do set and set $_SERVER['HTTPS'] to true if you are over HTTPS.
If $besecure is true, but we’re not serving over SSL, we redirect the browser to the HTTPS version of the page.
Similarly, if $besecure is false, but we are serving over HTTPS, we redirect the browser to the HTTP version of the page.
We’re rebuilding the current URL by appending the appropriate protocol to the $_SERVER['HTTP_HOST'] and $_SERVER['REQUEST_URI'] globals set up by PHP.
The two lines at the bottom of the previous code block set up this function to fire during the wp and login_init events in WordPress. The wp hook is activated on the frontend of WordPress after loading the theme, but before generating any output. The login_init hook is found in thewp-login.php file. We’re setting the priority to 2 here so this will fire before any actions set up using the default priority (10), but after any action that may be set up with a priority 1 or lower. You may need to tweak this depending on the other plugins and custom code you are running using these hooks.
Finally, we’re going to write a quick little function to filter URLs generated by WordPress to use the same protocol as the current page. Remember earlier we talked about how URLs like http://yoursite.com/some-page/ (HTTP) that show up on a page like https://yoursite.com/checkout/(HTTPS) will cause your browser to show a security warning:
function my_https_filter($s)
{
global $besecure;
if($besecure)
return str_replace("http:", "https:", $s);
else
return str_replace("https:", "http:", $s);
}
add_filter('bloginfo_url', 'my_https_filter');
add_filter('wp_list_pages', 'my_https_filter');
add_filter('option_home', 'my_https_filter');
add_filter('option_siteurl', 'my_https_filter');
add_filter('logout_url', 'my_https_filter');
add_filter('login_url', 'my_https_filter');
add_filter('home_url', 'my_https_filter');
Since we saved $besecure to a global variable in the my_besecure() function, we don’t need to recalculate it. Then we use the str_replace function to swap “http:” for “https:” or vice versa. We set this filter to run on a number of built in WordPress hooks used at various places throughout the WordPress code base where URLs are generated.
When you output URLs in other places of your custom application code, be sure to use the home_url() function to make sure the URL is generated correctly and the my_https_filter is run on it.
Avoiding SSL Errors with the “Nuclear Option”
The my_https_filter function will make sure links that show up on a page use the correct protocol. However, sometimes raw http://… URLs may be hardcoded into your posts, or maybe a plugin you use doesn’t use the built-in WordPress functions like it should when outputting same site URLs or loading JavaScript or CSS files. Figure 15-5 shows the Chrome Developer Tools Console, which can help locate errors.
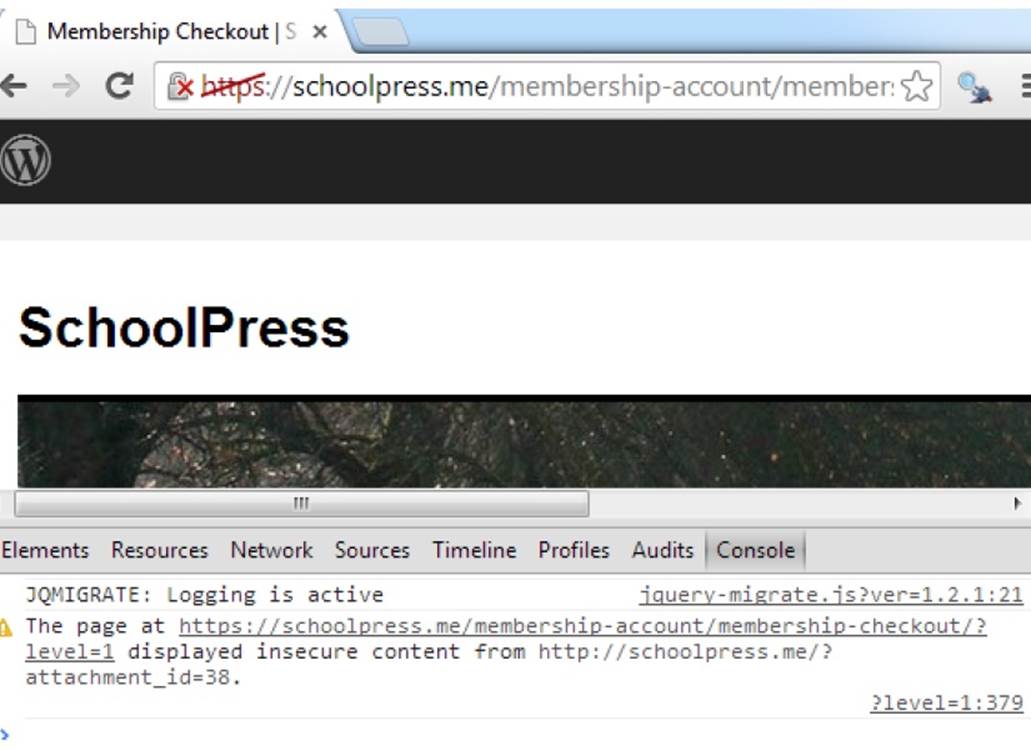
Figure 15-5. An SSL error in the Chrome Developer Tools Console. Use the Chrome Developer Tools Console to find SSL errors, or use the Nuclear Option to avoid them.
In these cases, you can try to find each case of a bad URL and fix the link in your posts or code to use a relative URL or the proper WordPress function to make sure it will output on the frontend using the proper protocol. However, it’s sometimes easier to use what we call the Nuclear Option:
constant('MY_SITE_DOMAIN', 'yoursite.com');
function my_NuclearHTTPS()
{
ob_start("my_replaceURLsInBuffer");
}
add_action("init", "my_NuclearHTTPS");
function my_replaceURLsInBuffer($buffer)
{
global $besecure;
//only swap URLs if this page is secure
if($besecure)
{
/*
okay swap out all links like these:
* http://yoursite.com
* http://anysubdomain.yoursite.com
* http://any.number.of.sub.domains.yoursite.com
*/
$buffer = preg_replace(
'/http\:\/\/([a-zA-Z0-9\.\-]*'.str_replace('.','\.',MY_SITE_DOMAIN).')/i',
'https://$1',
$buffer
);
}
return $buffer;
}
First we need to make sure we define a constant MY_SITE_DOMAIN and set it to the second-level domain (SLD) for your site. Your site_url() set in WordPress may be www.yoursite.com, but we are interested here in just the yoursite.com part of that.
Then my_NuclearHTTPS() fires on the init hook and uses the PHP function ob_start() to turn on output buffering. Output buffering means that all output generated by PHP (e.g., via echo function calls or inline HTML) goes into a buffer string instead of straight to the browser. Then, when PHP is finished generating all output (or if you call the ob_end_flush() function first), the buffer string is passed to a callback function, which is my_replaceURLsInBuffer() in this case.
The my_replaceURLsInBuffer() function filters the buffer string, swapping out “http:” for “https:” on every link. The regular expression magic we’re doing in the preg_replace() call there makes sure that links to any subdomain using the same domain (why we needed to set theMY_SITE_DOMAIN constant) will also be filtered.
So you might have caught on by now why we call this the “Nuclear Option.” Instead of finding the source of bad URLs in your app and fixing them, we just fix all of the URLs at once before sending the output to the browser. There will be a small performance hit here, depending on how large your HTML output is. But this method can be useful in a pinch, especially if you are using many third-party plugins that you can’t or don’t want to fix to output site URLs properly.
Setting Up Software as a Service (SaaS) with Paid Memberships Pro
The model of charging for access to a web app is called software as a service, or SaaS (pronounced “sass”) for short.
In this section, we will go through setting up Paid Memberships Pro on our SchoolPress app, with a $10/month membership.
The Software as a Service Model
The software as a service model (of SaaS) basically means that instead of purchasing your software in a shrink-wrapped box and installing it on your computer, you pay—typically a monthly or annual fee—for access to a cloud-enabled web app.
Examples of companies using the SaaS model are GitHub, Dropbox, Evernote, and Google Apps, and now even Microsoft Office can be purchased under a SaaS plan.
SaaS is popular because it generates relatively predictable recurring revenue. But SaaS is also an important way to make money off of open source software like WordPress. Because WordPress is GPL, if you were to sell and distribute the code for your software, your customers would be entitled under the GPL to redistribute that code…potentially for free. So using the SaaS service model allows your customers to use your software without having to distribute your source code to them.
The following instructions will help you if you want to charge a one-time, monthly, or annual fee for access to your app.
Step 0: Figure Out How You Want to Charge for Your App
Is it a lifetime fee, or a monthly subscription? Is it an annual subscription? Does the subscription automatically bill every year, or does the customer have to renew?
These are questions you will want to answer as best as you can before you start integrating Paid Memberships Pro or coding up customizations. Jason has a good series for how to price your web apps and premium content sites.
For our SchoolPress app, we will be charging each school account a $1,000 annual fee. When a school signs up, we will create a WordPress network site for it (e.g., myschool.schoolpress.com) and give it admin access to that site so it can start adding teachers and other content.
We will set the membership level to automatically bill the schools each year.
Step 1: Installing and Activating Paid Memberships Pro
Paid Memberships Pro is available in the WordPress plugin repository, which makes installing and activating the plugin a breeze (Figure 15-6).
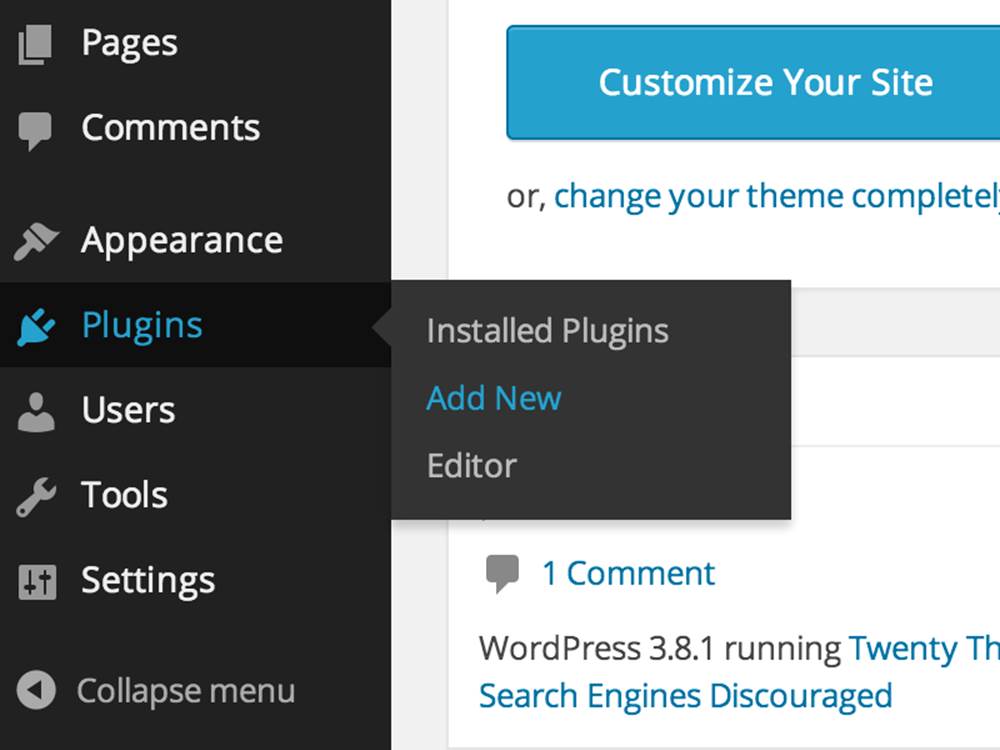
Figure 15-6. Add new plugin
1. From your WordPress dashboard, go to Plugins → Add New.
2. Search for Paid Memberships Pro.
3. Find Paid Memberships Pro and click the Install link.
4. Optionally enter your FTP information here. (Some hosting setups will not require this.)
5. When the plugin installs successfully, click the Activate link.
Step 2: Setting Up the Level
1. From your WordPress dashboard, go to the newly created Memberships page.
2. Click the “Add new level” link or button.
3. Enter the membership information in the boxes, as shown in Figure 15-7. For our level, that will be:
a. Name:
b. Description: School administrators should sign up here to create and gain access to your SchoolPress site.
c. Confirmation Message: (can leave it blank)
d. Initial Payment: 1000
e. Recurring Subscription: Checked
i. Billing Amount: 1000
ii. Per: 1
iii. Days/Weeks/Years: Years
iv. Billing Cycle Limit: 0
v. Custom Trial: Unchecked
f. Disable New Signups: Unchecked
g. Membership Expiration: Unchecked
h. Categories: All Unchecked
4. Click Save Level.
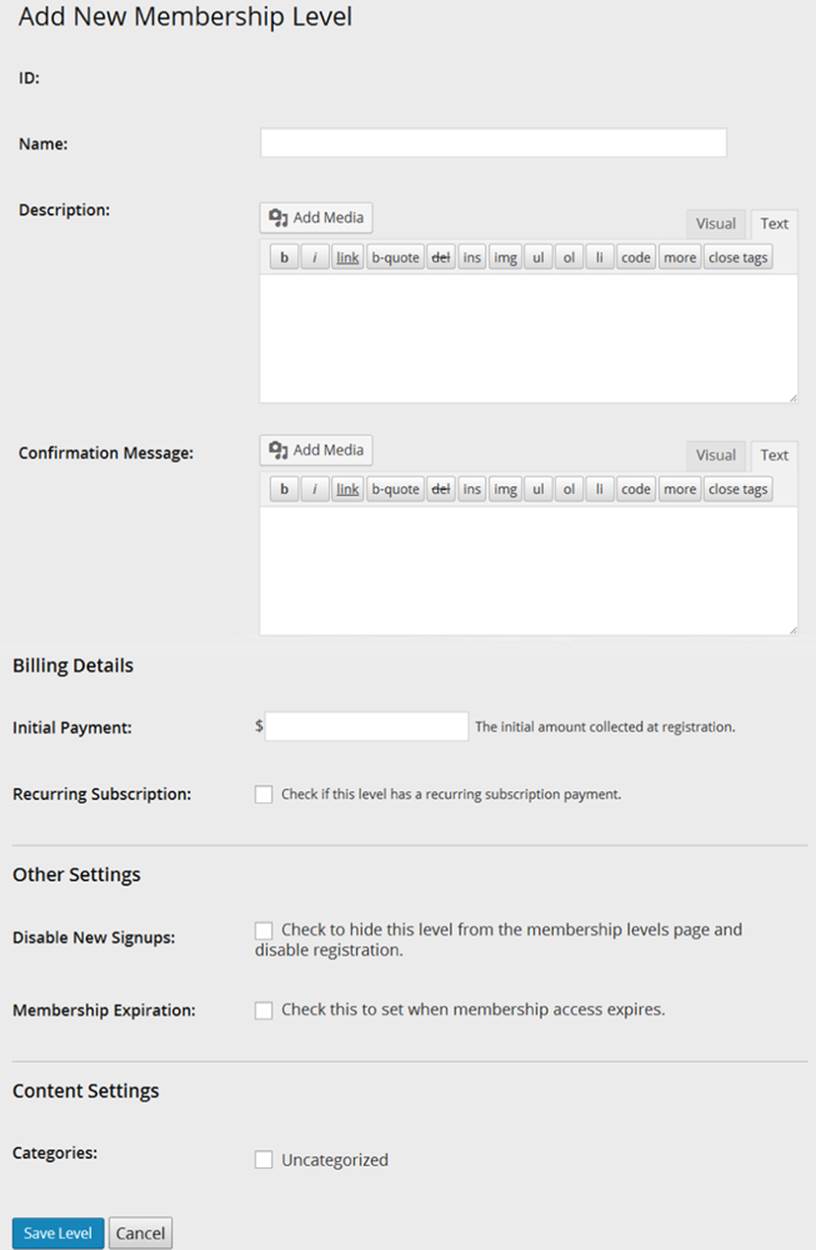
Figure 15-7. Paid Memberships Pro New Level screen
Step 3: Setting Up Pages
Paid Memberships Pro needs several pages to facilitate checkout and other member-related functions. When you click on the “Page” tab of the PMPro settings, you will see a form like the one shown in Figure 15-8.
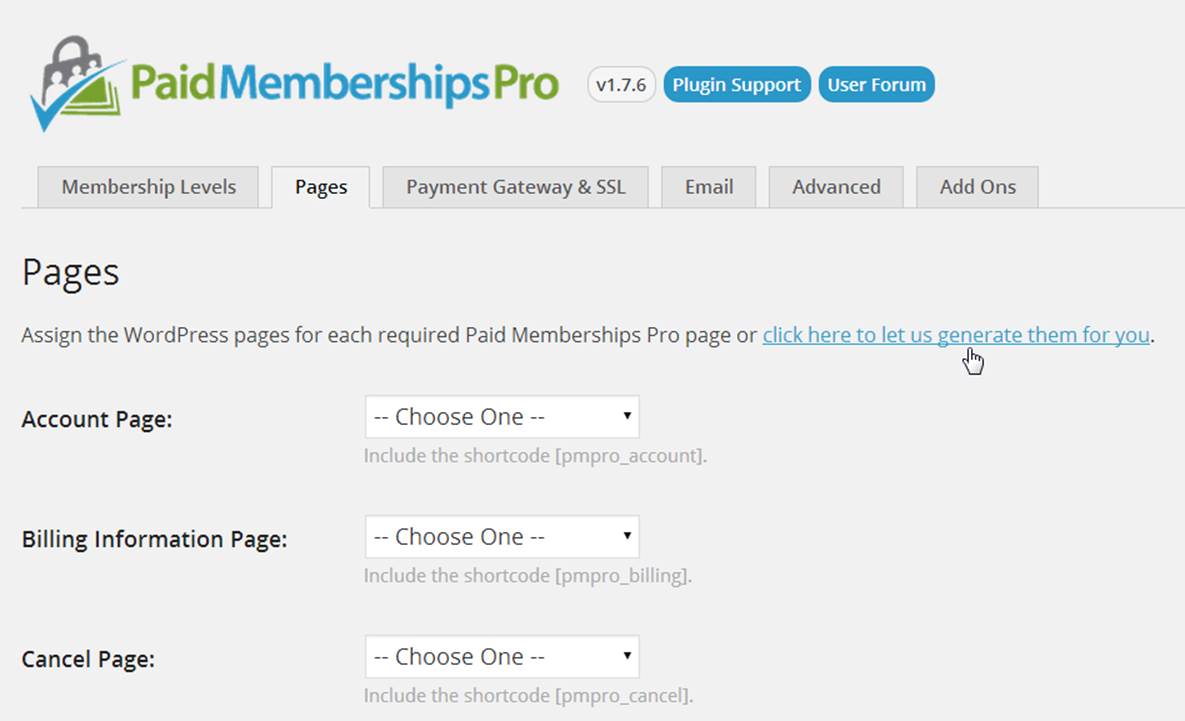
Figure 15-8. Generate pages for Paid Memberships Pro
If you already have pages dedicated to describing your levels or for a user account, you can choose those pages through the dropdowns on the Pages tab of the Paid Memberships Pro settings. In most cases though, you will just want to click the “click here to let us generate them for you” link and pages will be created for the Account, Billing Information, Cancel, Checkout, Confirmation, Invoice, and Levels pages. Figure 15-9 shows what this page looks like once the script has generated these pages for you.
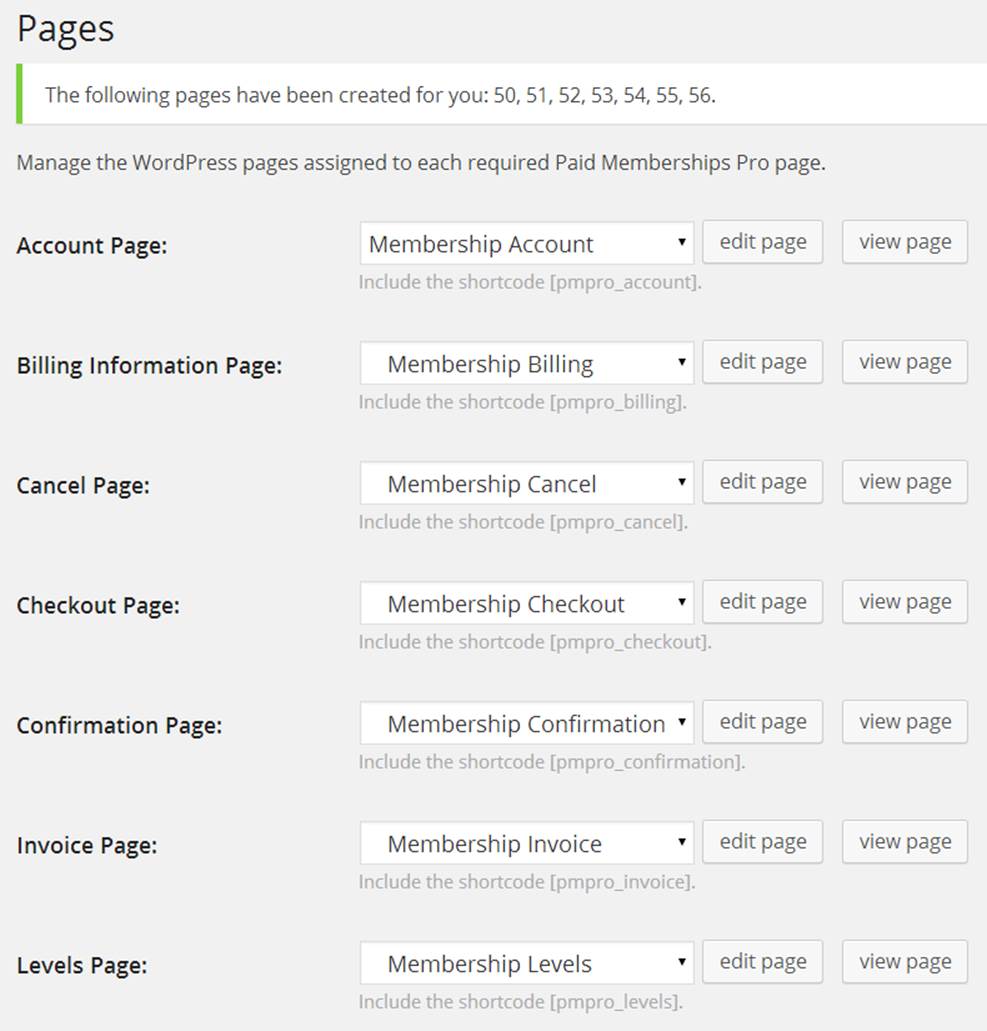
Figure 15-9. Default pages generated by Paid Memberships Pro
Step 4: Payment Settings
Figure 15-10 shows the Payment Gateway & SSL tab of the PMPro settings. Here you will choose your gateway and then fill out of corresponding user and/or API values. Depending on which gateway option you choose, this page will also allow you to change the currency used, which credit cards are available, whether to use SSL or not (remember you should always install SSL unless it is a test site), and whether to use the Nuclear Option for SSL or not.
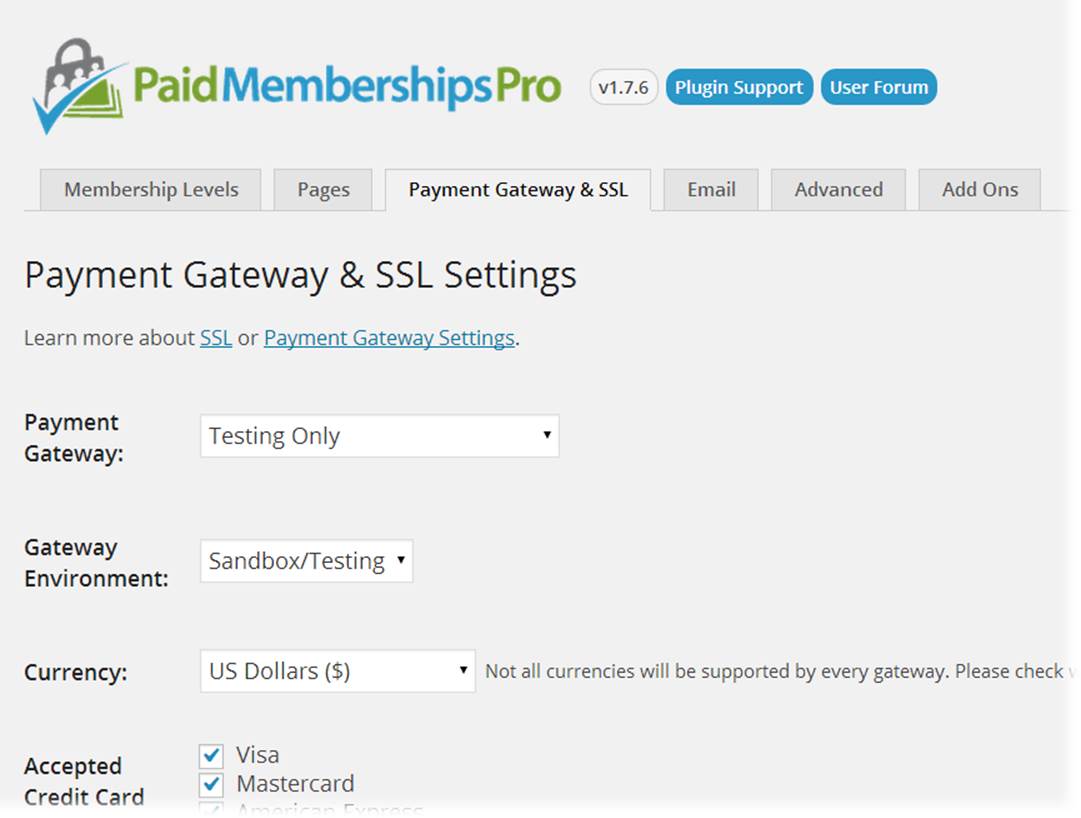
Figure 15-10. Paid Memberships Pro payment settings
The payment settings page will also give you a place to paste in your SSL Seal Code and enter a tax state and percentage. The tax calculation can also be done programmatically through the pmpro_tax filter (described below).
The payment settings page will also show you the URL you should share with your gateway to enable behind-the-scenes communication from the gateway to your site. This function has various names depending on the gateway: PayPal calls it an “IPN handler”; Authorize.net calls it a “silent post URL”; and Stripe and Braintree will call it a “webhook.”
Step 5: Email Settings
By default, WordPress will send emails from your site from “WordPress” at wordpress@yoursite.com. This doesn’t look nice and is often not a real email address. The Email tab of the Paid Memberships Pro settings, shown below in Figure 15-11, allows you to override these values and also check or uncheck which membership-related admin emails you would like to receive.
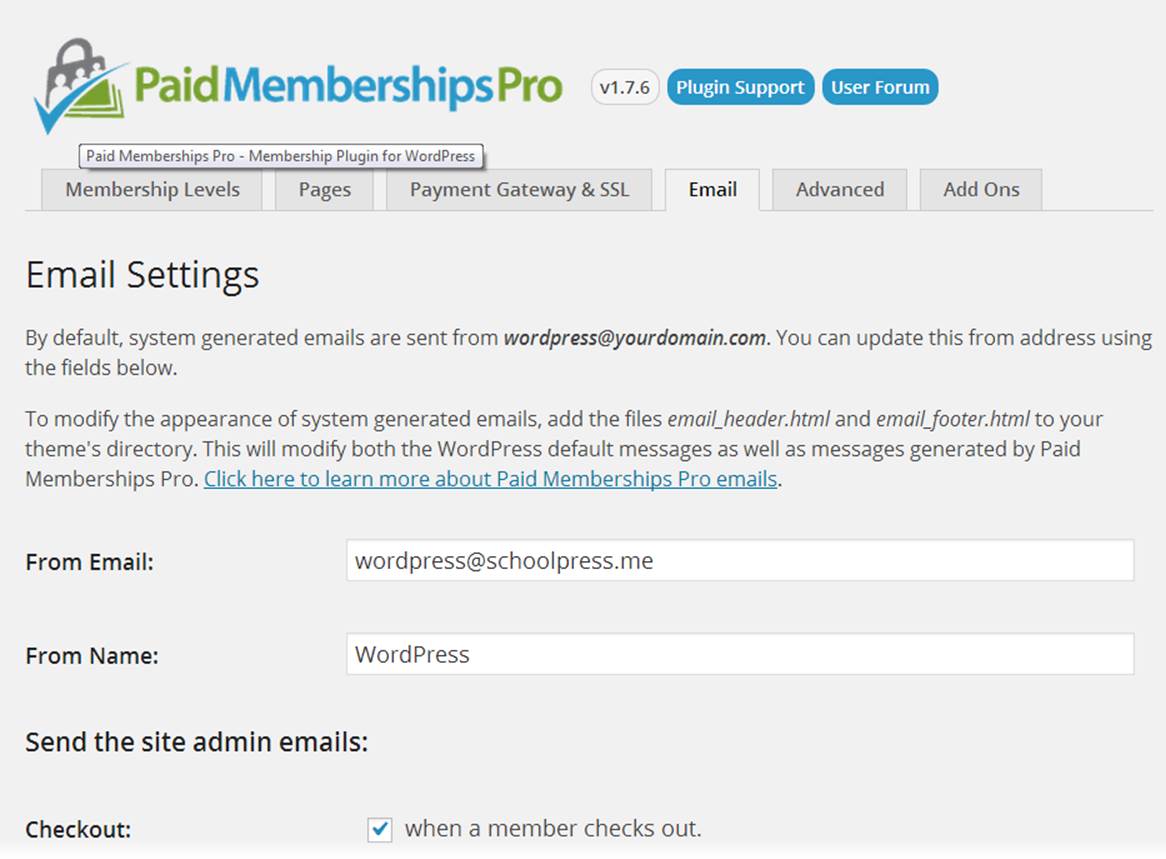
Figure 15-11. Paid Memberships Pro email settings
Step 6: Advanced Settings
Figure 15-12 shows the Advanced Settings tab, which has a few built-in options for running Paid Memberships Pro. Of particular interest may be the option to choose a Terms of Service page to show users on sign up. They will see a scrollable text box with the TOS page content shown within it and will have to check a box to agree to the Terms of Service.
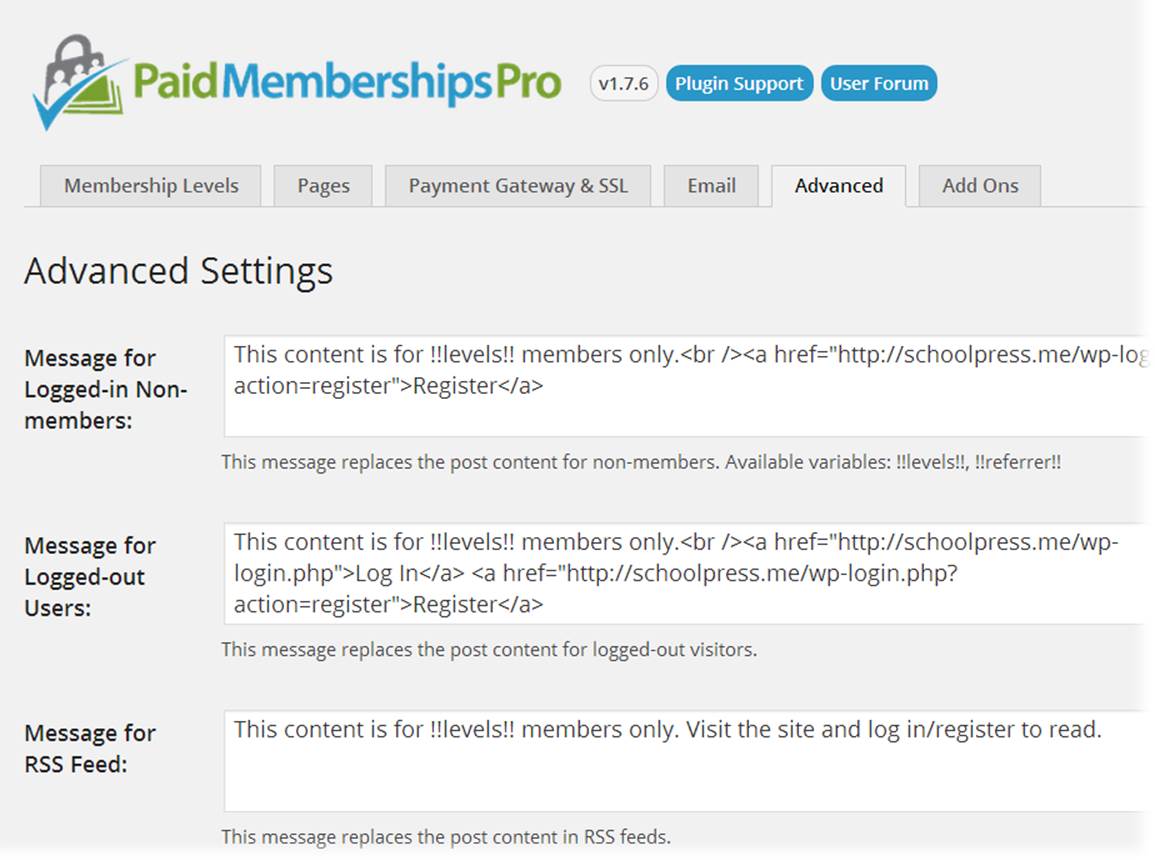
Figure 15-12. Paid Memberships Pro advanced settings
Step 7: Locking Down Pages
Besides generating a checkout page and integrating with your payment gateway, the main functionality added by Paid Memberships Pro is the ability to lock down certain pages or portions of pages based on a user’s membership level. There are a few different ways to do this.
Lock down a specific page
Paid Memberships Pro adds a Require Membership box to the sidebar of the edit post and edit page pages in the WordPress dashboard. An example of the Require Membership box is shown in Figure 15-13. To lock down a page for a certain membership level, check the box next to that level.
If more than one level is checked, members of either level will be able to view that page. If no levels are checked, anyone (including nonusers) will be able to view that page.
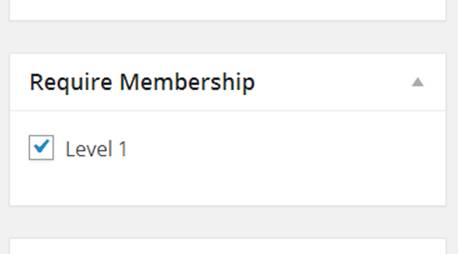
Figure 15-13. Check which levels are required to view this page
Lock down a page by URL
Sometimes it may be easier to restrict access to a page or group of pages by checking the page’s URL. For example, to keep nonmembers out of certain BuddyPress groups, you could add the following code to a custom plugin:
//lock down our members group
function my_buddy_press_members_group()
{
$uri = $_SERVER['REQUEST_URI'];
if(strtolower(substr($uri, 0, 16)) == "/groups/members/")
{
//make sure they are a member
if(!pmpro_hasMembershipLevel())
{
wp_redirect(pmpro_url("levels"));
exit;
}
}
}
add_action("init", "my_buddy_press_members_group");
The workhorse here is the pmpro_hasMembershipLevel() function. This function can take two parameters. The first is the ID or name of a membership level to check for. The second parameter is the user ID of the user you want to check. If no parameters are set, the function will check if the current user has any membership level.
You can also do negative checks by passing, for example, “-1” as the level ID. pmpro_hasMembershipLevel(-1) will return true if the current user doesn’t have level 1. If you pass a zero specifically, the function will check that the user has no level at all. Sopmpro_hasMembershipLevel(0) will return true if the current user does not have a membership level. (You could also do !pmpro_hasMembershipLevel().)
Multiple level IDs and names can be passed in an array. For example, to check for members with level 1 or 2, use this code:
if(pmpro_hasMembershipLevel(array(1,2)))
{
//do something for level 1 and 2 members here
}
Lock down a portion of a page by shortcode
Another way to restrict access to content is to use shortcodes in your post body content. The following is an example of some page content that will show different messages to different membership levels:
Welcome to SchoolPress!
[membership level="1"]Thanks for your continuing membership.[/membership]
[membership level="-1"]Sign up your school now![/membership]
The [membership] shortcode is fairly simple. It takes one parameter level that, similar to the parameter for the pmpro_hasMembershipLevel() function, can take a level ID, name, or a zero or negative level ID. Any content within the shortcode will be shown based on the stated level. Multiple level IDs can be passed separated by commas.
Lock down a portion of a page by PHP code using the pmpro_hasMembershipLevel() function
When locking down the BuddyPress members group, we used the pmpro_hasMembershipLevel() function. You can also use this function within your page templates or other code to restrict access to content or portions of code. For example, you might find code like this in your header:
<?php if(is_user_logged_in()) { ?>
<div class="user-welcome">
Welcome
<?php if(function_exists("pmpro_hasMembershipLevel")
&& pmpro_hasMembershipLevel()) { ?>
<a href="<?php echo pmpro_url("account"); ?>">
<?php echo $current_user->display_name;?>
</a>
<?php } else { ?>
<a href="<?php echo home_url("/wp-admin/profile.php"); ?>">
<?php echo $current_user->display_name;?>
</a>
<?php } ?>
</div> <!-- end user-welcome -->
<?php } ?>
The preceding code will show members a link to the PMPro account page. Users without a membership level are shown a link to their WP profile page.
Step 8: Customizing Paid Memberships Pro
Below are a few common customizations for Paid Memberships Pro. The general process for customizing a plugin like Paid Memberships Pro is to:
1. Figure out what you want to change.
2. Find out where the default behavior for your change is coded.
3. Locate or add a hook to support the customization you want.
4. Write an action or filter to use the hook.
Restricting nonmembers to the homepage
By default, Paid Memberships Pro does not lock down any part of your site unless you specifically tell it to. For some sites, you will want very limited public access (just the sales, about, and contact pages). You can do this by redirecting nonmembers away from any nonapproved page. Use the following code:
function my_template_redirect()
{
$okay_pages = array(
pmpro_getOption('billing_page_id'),
pmpro_getOption('account_page_id'),
pmpro_getOption('levels_page_id'),
pmpro_getOption('checkout_page_id'),
pmpro_getOption('confirmation_page_id')
);
//if the user doesn't have a membership, send them home
if(!is_user_logged_in()
&& !is_home()
&& !is_page($okay_pages)
&& !strpos($_SERVER['REQUEST_URI'], "login"))
{
wp_redirect(home_url('wp-login.php?redirect_to='.
urlencode($_SERVER['REQUEST_URI'])));
}
elseif(is_page()
&& !is_home()
&& !is_page($okay_pages)
&& !pmpro_hasMembershipLevel()
{
wp_redirect(home_url());
}
}
add_action('template_redirect', 'my_template_redirect');
In the preceding code, we set up an array of post IDs for pages that nonmembers should be able to see. We use the pmpro_getOption() function to get the IDs of the pages generated by PMPro and also allow access to the home page by using the WordPress is_home() function. We also allow access to any page with the word “login” in the URL, which on our setup will just the login page.
Locking down files
Some of the pages you are locking down may have images or other files attached to them. If the page is locked down, the link or image will not show up on the site for your users. However, users who know the direct URL to the file will be able to download to the file without first being logged in as a member.
This is because when Apache processes a URL like http://schoolpress.me/wp-content/uploads/logo.png, it serves the file directly to the user without checking with PHP or WordPress first.
You can change this behavior by adding a rule to your site’s .htaccess file that will redirect any URL like the preceding one through a special script bundled with Paid Memberships Pro. Add the following code to the top of your .htaccess file, above the other rewrite rules:
RewriteEngine On
RewriteBase /
RewriteRule ^wp-content/uploads/(.*)$ \
/wp-content/plugins/paid-memberships-pro/services/getfile.php [L]
How does this work? In WordPress, images and files can be uploaded to a post or page. These files, called attachments by WordPress, are all stored in the /wp-content/uploads/ folder, but they are also associated with the post they were attached to via an entry in the wp_posts table.
Attachments are stored in the wp_posts table with the post_status set to “attachment” and the post_parent set to the ID of the post they are attached to.
The getfile.php script will find the corresponding entry in the wp_posts table for the requested file; and if the attachment’s parent requires membership, it will check to make sure a valid member is logged in before serving the file.
Change user roles based on membership levels
For most of the examples in this section, we assume that members only have access to the frontend application of your site. However, sometimes you may want to give members access to the WordPress dashboard, give them the “author” role so they can post to the blog, or otherwise assign a role other than “subscriber” to them.
This code will add the author role to any new member of a particular level. It will also downgrade the member to a subscriber role if her membership level is removed:
function my_pmpro_after_change_membership_level($level_id, $user_id)
{
if($level_id == 1)
{
//New member of level #1.
//If they are a subscriber, make them an author.
$wp_user_object = new WP_User($user_id);
if(in_array("subscriber", $wp_user_object->roles))
$wp_user_object->set_role('author');
}
else
{
//Not a member of level #1.
//If they are an author, make them a subscriber.
$wp_user_object = new WP_User($user_id);
if(in_array("author", $wp_user_object->roles))
$wp_user_object->set_role('subscriber');
}
}
add_action(
"pmpro_after_change_membership_level",
"my_pmpro_after_change_membership_level",
10,
2
);
More information on users and roles is in Chapter 6.
International and long-form addresses
By default, the Paid Memberships Pro checkout form will show address fields with the city, state, and zip code formatted on one line and the country hidden and assumed to be “US.” The default Paid Memberships Pro billing address form is shown in Figure 15-14.
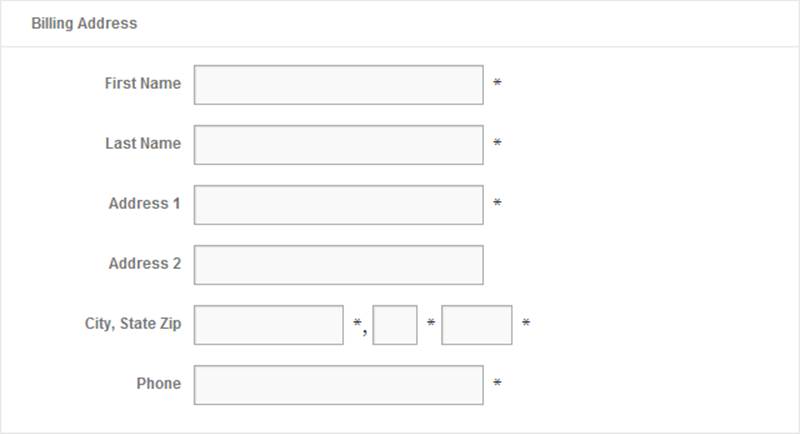
Figure 15-14. Paid Memberships Pro billing address
If you anticipate international users, you will want to show a long-form address with a dropdown to select your country. This is done with the following code:
add_filter("pmpro_international_addresses", "__return_true");
add_filter("pmpro_longform_address", "__return_true");
That’s it, two lines. The pmpro_international_addresses hook/setting will show a country dropdown if true. The pmpro_longform_address hook/setting will show each address field on its own line if true.
Figure 15-15 shows the updated billing address fields.
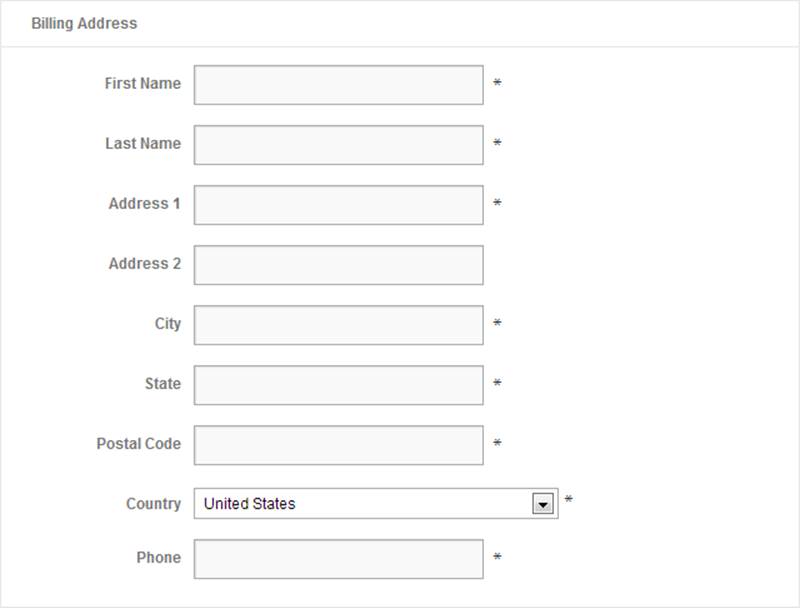
Figure 15-15. Paid Memberships Pro international billing address
You may also want to change the default country, change the list of countries, or make some of the address fields not required. Here is some example code doing that:
/*
Change the Default Country from US to GB (Great Britain)
*/
function my_pmpro_default_country($default)
{
return "GB";
}
add_filter("pmpro_default_country", "my_pmpro_default_country");
/*
Add/remove some countries from the default list.
*/
function my_pmpro_countries($countries)
{
//remove the US
unset($countries["US"]);
//add The Moon (LN short for Lunar?)
$countries["LN"] = "The Moon";
//You could also rebuild the array from scratch.
//$countries = array("CA" => "Canada", "US" => "United States",
// "GB" => "United Kingdom");
return $countries;
}
add_filter("pmpro_countries", "my_pmpro_countries");
/*
(optional) You may want to add/remove certain countries from the list.
The pmpro_countries filter allows you to do this.
The array is formatted like
array("US"=>"United States", "GB"=>"United Kingdom");
with the acronym as the key and the full
country name as the value.
*/
function my_pmpro_countries($countries)
{
//remove the US
unset($countries["US"]);
//add The Moon (LN short for Lunar?)
$countries["LN"] = "The Moon";
//You could also rebuild the array from scratch.
//$countries = array("CA" => "Canada", "US" => "United States",
// "GB" => "United Kingdom");
return $countries;
}
add_filter("pmpro_countries", "my_pmpro_countries");
/*
Change some of the billing fields to be not required.
Default fields are: bfirstname, blastname, baddress1, bcity, bstate,
bzipcode, bphone, bemail, bcountry, CardType, AccountNumber,
ExpirationMonth, ExpirationYear, CVV
*/
function my_pmpro_required_billing_fields($fields)
{
//remove state and zip
unset($fields['bstate']);
unset($fields['bzipcode']);
return $fields;
}
add_filter("pmpro_required_billing_fields", "my_pmpro_required_billing_fields");
Upgrade/downgrade pricing
By default, when an existing member checks out for a new membership level, the member’s old level is cancelled immediately and he’s charged full price for the new membership level starting on the day he is checking out.
This works for some setups, but sometimes you might want to either (1) keep your member’s payment date the same or (2) give him some credit from his old membership level toward his new membership level. In other words, you want to prorate his payment.
You can do the math in many different ways, but the following code will show the idea behind overriding the subscription start date and the checkout price based on factors like old membership level:
/*
Calculate the prorated membership cost.
*/
function my_pmpro_checkout_level($level)
{
//does the user have a level already?
if(pmpro_hasMembershipLevel())
{
//get current level
global $current_user;
$clevel = $current_user->membership_level;
//get the difference in amount
$diff = $level->billing_amount - $clevel->billing_amount;
//only prorate if the difference is positive (upgrading)
if($diff > 0)
{
//what day is it?
$now = time();
$today = intval(date("j", $now));
//get their payment date
$morder = new MemberOrder();
$morder->getLastMemberOrder();
$payment_day = intval(date("j", $morder->timestamp));
//how many days in that month?
//either 1 for months with 31 days or -2 for Feb
$days_in_month = date("t", $morder->timestamp);
$extra_days = $days_in_month - 30;
//how many days are left in this payment period?
$days_left = $payment_day - $today + $extra_days;
//if negative, we need to "flip it"
if($days_left < 0) $days_left = 30 + $days_left;
//as a % (decimal)
$per_left = $days_left / $days_in_month;
//how many days have passed
$days_passed = $days_in_month - $days_left;
//as a % (decimal)
$per_passed = $days_passed / $days_in_month;
/*
Now figure out how to adjust the price.
(a) What they should pay for new level
= $level->billing_amount * $per_left.
(b) What they should have paid for current level
= $clevel->billing_amount * $per_passed.
What they need to pay = (a) + (b) - (already paid)
*/
$new_level_cost = $level->billing_amount * $per_left;
$old_level_cost = $clevel->billing_amount * $per_passed;
$level->initial_payment = round($new_level_cost +
$old_level_cost - $morder->total, 2);
//just in case we have a negative payment
if($level->initial_payment < 0)
$level->initial_payment = 0;
}
else
{
//let's just zero out the initial payment for
//downgrades or you could figure out how to do a credit
$level->initial_payment = 0;
}
}
return $level;
}
add_filter("pmpro_checkout_level", "my_pmpro_checkout_level");
/*
If you have an old membership level, keep your startdate.
*/
function my_pmpro_checkout_start_date_keep_startdate($startdate, $user_id,
$level)
{
if(pmpro_hasMembershipLevel())
{
global $wpdb;
$sqlQuery = "SELECT startdate FROM $wpdb->pmpro_memberships_users
WHERE user_id = '" . $wpdb->escape($user_id) . "'
AND membership_id = '" . $wpdb->escape($level->id) . "'
AND status = 'active'
ORDER BY id DESC
LIMIT 1";
$old_startdate = $wpdb->get_var($sqlQuery);
if(!empty($old_startdate))
$startdate = "'" . $old_startdate . "'";
}
return $startdate;
}
//remove the default PMPro filter
remove_filter("pmpro_checkout_start_date",
"pmpro_checkout_start_date_keep_startdate", 10, 3);
//our filter works with ANY level
add_filter("pmpro_checkout_start_date",
"my_pmpro_checkout_start_date_keep_startdate", 10, 3);
The integration with Paid Memberships Pro here is pretty straightforward. We are filtering the initial (first month) cost of a membership level using the pmpro_checkout_level filter. We also filter the subscription start date (or payment date) using thepmpro_checkout_start_date filter.
In both cases, we check if the user checking out already has a membership, meaning this is an upgrade or downgrade.
The rest of the code is simply math to figure out what percentage of a payment period has passed or what the user’s next payment date was going to be.
[26] Minus any fees.
[27] At the high end, PCI compliance requires more expensive server setups and full-time resources to maintain and document them properly. Some gateways have technology and processes to help you avoid those costs while still keeping your customer data secure.
All materials on the site are licensed Creative Commons Attribution-Sharealike 3.0 Unported CC BY-SA 3.0 & GNU Free Documentation License (GFDL)
If you are the copyright holder of any material contained on our site and intend to remove it, please contact our site administrator for approval.
© 2016-2026 All site design rights belong to S.Y.A.