Professional WordPress: Design and Development, 3rd Edition (2015)
Chapter 9. Theme Development
WHAT’S IN THIS CHAPTER?
· Understanding the various files and templates that constitute a theme
· Modifying an existing theme to meet your own needs
· Identifying the different reasons to use a project theme or a child theme
Content is king, right? That is certainly true. Nothing is going to drive visitors to your site, and keep them coming back, except for your content. Even if you have the best content on the Internet for your topic, you have to present it to the reader, the browser, and to the search engines so that your content can be consumed.
That is what themes are for. Themes control the presentation layer of your site, including both the user experience and how it is offered to the consumer. Themes also control the logic that determines which type of page and, therefore, which type of loop is to be used.
This chapter reviews how to install a theme on your website and then takes you through the various aspects of a theme and how they apply to the presentation of your content. You will also review different strategies for creating your theme, whether specifically for a project, or as an adaptation of a theme framework. By the end of this chapter, you will have an understanding of theme functionality and a solid foundation on which to build your own custom project or child themes from scratch for use in your own projects.
WHY USE A THEME?
Your website theme is essentially the face of your website. It is what makes the first impression on your visitor. Even though surely none of us is shallow enough to judge a book simply by its cover, if your website has valuable content but your theme makes thecontent hard to read, hard to find, or generally inaccessible in any way, or your site is slow to load, not to mention downright ugly, you have probably lost that visitor. You may never have had that visitor to lose.
The theme accomplishes many things for your website. Generally, people think of the theme as the appearance of your site. It is the look and feel that gives your website that certain style or flair. It is the x-factor that gives your site a personality and makes your site stand out from the crowd. Your theme is all that; a picture really is worth a thousand words.
But this is simply the graphical aspect of your site; your theme is so much more than the cohesive marketing and branding façade. Your theme encompasses the entire user experience and more. It controls what content gets rendered, including any error conditions. Your theme converts your content and look and feel into the raw HTML that is delivered to the browser through its various templates.
In general, that is what this chapter is about: using your theme to structure and control the content delivery and the overall personality of your website. Your theme also has other functions, including user experience and search engine optimization, which are addressed in later chapters.
INSTALLING A THEME
Starting back in 2010, WordPress began shipping a new default theme each year. The Twenty Ten theme, released in—you guessed it, 2010—was the first to replace the venerable Kubrick theme that had been around since 2005. The Twenty Eleven and Twenty Twelve themes—both general purpose themes—came next. Automattic began specializing themes with the Twenty Thirteen theme. Twenty Thirteen was designed to focus on blogging and includes special formatting for all the different post formats. Twenty Fourteen is what is called a magazine theme and includes sliders and gratuitous use of featured images. At the time of this writing, planning for the Twenty Fifteen theme is currently underway. These default themes are all pretty solid themes to use for your site, but they are the defaults. That means you see them on many sites across the web. Being unique, or custom, may or may not be important to you or your goals, but for the sake of this chapter, pretend it is and you do not want to use a stock, out-of-the box theme.
How do you make WordPress use a new theme? First, you either have to find one you like or make one. Countless WordPress theme resources are available, and they all vary in quality. It is best to try some out and see how they work with your content and if they match the personality and branding you want your site to convey.
You have two simple ways to activate a new theme on your website. There is the traditional FTP installation and, as of WordPress 2.8, there is a new integrated theme browser and installer. The Theme Browser is limited in that it allows you to install themes only from the sanctioned WordPress Theme Directory on WordPress.org. This is not inherently bad because plenty of solid, good-looking themes are in the Theme Directory and they are all GPL licensed and free (two of the requirements for being listed in the Directory). However, the Directory is a limited market; heaps of other sites offer valuable WordPress themes, still of varying quality, both for free and for premiums. In order to install these non-Directory themes, you will have to use the FTP method.
FTP Installation
File Transfer Protocol, or FTP, is the old standby for transferring files from your local workstation to the server. If your host supports it, you should use a secure form of transfer, such as SFTP or SCP, to move the files, but the concepts here are similar.
Download a theme package fromhttp://wordpress.org/themes that you would like to try to your local computer and unzip it to a local directory. If you have shell access on your server, you can unzip on the server to save in transfer time. Using your FTP client, connect to your web server. FTP or copy the files into your themes directory of your site. Your themes folder is located in /example.com/wp-content/themes/.
Once your theme files are on the server, log in to your site’s WordPress Dashboard. Under Appearance, select Themes, then select your theme to preview it, and then activate it. Your website is now using the new theme. This is an instantaneous change for your visitors.
Theme Installer
The Themes menu reveals which themes are currently available to your WordPress installation. WordPress 2.8 introduced a new Theme Installer. Currently, the theme installer is offered as a new button on your Themes screen.
The Add New button allows the site administrator (or anyone else with proper permissions) to search and filter the online WordPress Theme Directory for existing published themes. All themes in the Directory are subject to certain conditions in order to be listed; most notably, they must be licensed to be GPL-compatible.
This new Theme Installer is pretty slick. You simply peruse the pre-selected menus or work the filters and search terms to browse the Directory. Browse the thumbnail screenshots until you find one you like. Then you can either click Install Now to make it available to your current WordPress installation or you can preview the theme in a larger format with a variety of HTML elements displayed for you to examine the CSS styling. Finally, you can read the theme details and user star ratings in the sidebar. Notice also that the sidebar includes Previous and Next buttons to actually browse the themes in the directory.
On a development system running Microsoft Windows 7 and WAMP, this just works, which is a little disconcerting. It is a permissions issue in your Webroot. Although this raises some concerns about what else could so easily be installed on the site, in this case, it is just a development machine, and the convenience of being able to test drive new themes outweighs the concerns.
Trying the Theme Installer on a production server for a WordPress site running on Ubuntu Linux may yield different results. After selecting an appropriate obnoxious theme to try out, the Theme Installer asks for FTP credentials to put the files on the server, in this case because the file security permissions on the production server are properly set for production and to not allow this sort of thing. Again, there is some concern about the actual security implications of giving out FTP credentials that are required to proceed. This is similar to how the WordPress core updates and plugin updates work.
NOTE See Chapter 13 on securing your WordPress installation for information about directory permissions.
In short, the Theme Installer is really slick and convenient for development to test out new themes, but because of possible security implications, carefully consider its use in a production environment. The balance of convenience and security is often a difficult choice.
WHAT IS A THEME?
What actually makes up a theme? You have an idea of what themes do, but how do they do it and what is really involved? As previously mentioned, a theme does several things, including structuring your content and providing the personality of your website. This is done through a combination of files and file types. You will notice a mix of PHP files, CSS files, and JavaScript files in the theme. A good WordPress theme keeps the style, which is CSS, separate from the structure and logic, which make up the PHP files. Although there are always reasons for breaking the rules, striving to keep these separate will improve the maintainability and efficiency of your theme. Each theme has variations on these files and each theme’s files are different.
Template Files
Template files are the meat of your theme. Template files are PHP code files that control what content is shown to your visitor. These files also generate the HTML for the browser to control how your content is shown. WordPress actually decides which template file to use based on the content requested. Certain template files are used for different tasks. At first glance, the quantity of template files in a theme can be daunting. Although each theme is different, some have only a couple of files, while others can be very complex. After you learn the different files involved in a theme, you will review the template hierarchy, which is the mechanism WordPress uses to determine which templates to use when.
This template hierarchy, covered later in this chapter, and the numerous types of template files available can be overwhelming when you are starting out on theme design, but you will develop an appreciation for the power of this setup. This flexibility allows for a huge amount of control over your site and what is delivered to the browser, which is the beauty of WordPress and definitely one of its strongest traits.
CSS
WordPress themes truly strive to separate content from style. A theme developer can ignore these guidelines and create a poorly divided theme, but a good theme developer does this well.
A theme must have at least one cascading style sheet. The primary style sheet for the theme must be named style.css. In addition, the first few lines of this style sheet file must adhere to certain guidelines. These specific requirements are covered later in this chapter in the “Style.css” section. WordPress uses this information to determine which themes are available to the WordPress site and to make them show up in the Themes screen. If the style sheet header is not coded to the standard expectation of WordPress, it will not show up in the Administration screen.
The style sheet is just what it sounds like. It is where you put all your CSS styles. How you structure it, or what you do with it, is entirely up to the theme developer. CSS development is both an art and a science and a whole topic worthy of its own discussion. This book does not cover the intricacies of CSS, but Wrox has a number of excellent CSS titles that can assist you on this topic.
Images and Assets
The theme probably includes some image files and other creative assets or JavaScript files such as jQuery plugins. These assets are used in your theme to give your website a special look and feel—the look you want. How these files are structured in your theme is up to you; generally, they are placed in a subfolder of the theme’s main directory, such as img/, images/, assets/, orjs/ depending on the file type. One of the nice things about themes being compartmentalized and packaged as they are is that the images can be referenced with relative paths from your CSS file.
In addition, these creative assets can be referenced from your template files using built-in WordPress functions such as bloginfo('stylesheet_directory'). This keeps the theme very portable, if done properly.
Plugins
As covered in Chapter 8, plugins contribute advanced functionality to a website. Some themes require specific plugins because the functionality is part of the theme’s personality, or they are needed to achieve a certain purpose in the theme. These plugins may be packaged with the theme or may require separate downloads. All plugins reside in the plugin folder. So while plugins are not directly part of the theme, they may be required to make the theme behave as the theme creator intended.
CREATING YOUR OWN THEME
Now you know how to install and activate a theme on your site as well as what the different aspects of the theme are. It is time to take the next step and make your own theme. You can start a theme from scratch, but why not stand on the shoulders of giants and start with a theme that is similar to the look you want? Or, if you cannot find one, start with a theme framework where most of the heavy lifting is already done for you. There is no sense in reinventing the wheel, especially when you can use the power of open source software and start from working code.
Project Themes vs. Child Themes
Before diving in, let’s talk about theme development strategies. Essentially, there are two classes of themes used in daily development. Which kind you choose to create depends on the amount of customization and the specific project you are producing. The goal of this section is not to show that one is better than the other; you, as the developer, will have to determine what meets your needs and goals.
Let’s first discuss project themes. These are one-off themes, often a modification of an existing theme to meet the specific needs and design goals of a single project. These could be greenfield project themes built entirely from scratch or they could be a fork of an existing theme that you modify for the purpose of your project. In addition, there are starter themes that are designed to be the foundation for a project theme. Sometimes these themes are called bare-bones or naked themes. They intentionally have minimal styling and function as a blank slate with just enough to get you started. The reason to choose a project theme for your project is you have full flexibility to edit the PHP and template files. However, in doing so, you lose the ability to update the starter theme without steamrolling your customizations. Automattic’s Underscores (_s) theme is an example of a starter theme available at http://underscores.me/.
A second option is what is called a child theme. A child theme inherits from a parent theme. That means you get all the functionality and styling of the parent theme and then override certain aspects with your child theme. A child theme can take two different approaches. If you have found a theme that mostly fits your project’s needs and you can make cosmetic changes or minor functionality adjustments, then this is the way to go. The Genesis themes from StudioPress are examples of child themes. Check out StudioPress’s themes at http://www.studiopress.com/features.
Another approach is to use a theme framework. Theme frameworks are much like starter themes for project themes, except they are designed to be parent themes to your child theme. Theme frameworks create the groundwork for your theme. You create a child theme of that theme framework with all your modifications. By using a child theme and a theme framework, you can make modifications to your child theme and retain the ability to update the framework as new revisions come out. Again, StudioPress’s Genesis Theme is a prime example.
You may have put it together already that technically there is a third approach. You can develop your own theme framework or parent theme to use in your own projects first, and then use that to make your child theme for your specific project.
The strategy you take really depends on your project’s goals and needs. To reiterate, every project is different and every developer is different. You will ultimately have to decide which method works for you and your project, and balance future maintainability with functionality requirements. In general, if you are modifying a theme, a child theme is the proper approach. However, in the real world (including but not limited to deadlines and budgets), project themes can offer the flexibility you need.
For the sake of going in-depth, you are going to explore a project theme in this chapter. With the basics of a project theme under your belt, you will be able to apply these principles to child themes as well. You will come back to child themes and theme frameworks at the end of this chapter for some more discussion.
What to Look for in a Starter Theme
Sometimes it is easiest to find a theme close to what you have in mind, use this as your starter theme, and modify it. At the minimum, you can add your own logo. Of course you have to pay special attention to the licensing on the theme. Conveniently, themes in theWordPress.org Theme Directory are all GPL themes, so you can modify and use them however you desire. Exploring a working theme is also an excellent learning method. Open Source Software, being part of the maker culture, encourages the breaking and fixing of things to learn how they work.
Things to consider when starting from a working theme include:
· Licensing on the original theme
· Code quality
· How much modification will be required
· Source artwork for the creative assets
You will want to make sure that you are permitted to change the source theme you are starting with. You will also want to review the code quality of the theme because you will be the one making the modifications going forward. Does the theme accomplish the same presentation goals as your site, template-wise; does it convey your data the way you want it conveyed? There is no point in starting with a theme that you have to completely retool; if this is the case, you would be better off starting with a theme framework and making a child theme. Does the theme have enough CSS hooks for you to style? Was search engine optimization (SEO) a consideration when the theme was developed? How much modification will be needed to meet your requirements and will you be happy with the end result? Finally, does the theme come with source art, like the original Photoshop document, for you to modify? If not, do you need it, or will you be able to re-create any assets you must have?
There are many considerations when developing a new project theme or modified child theme for either yourself or a client. The convenience of modifying a pre-built theme is quite a temptation when you need to get a site up and running and out the door quickly. In practice, many sites have been built this way, where a client could select a stock template with a few minor modifications needed to quickly launch a new site. The catch is when a site goes beyond these simple modifications and you are stuck with modifying a poorly built theme. For that reason, even if a client likes a particular theme preview, you may find it easier in the long run to rebuild a similar theme from scratch with a starter theme as the launching point.
CREATING YOUR OWN THEME: GETTING STARTED
Creating your own theme can be as simple or as complicated as you want it to be. Sometimes, you merely want to change a logo or a color and it is a basic process. Often, you are creating a theme from scratch to meet a certain need or condition, or solely to obtain a specific design look and feel. Whatever your motivations are, this section discusses the basics for getting a new theme and site design up quickly using the Twenty Fourteen theme as a foundation. This example uses Twenty Fourteen because it ships with WordPress, not because it is endorsed as the best choice for a starter theme. In practice, however, it has been used both as a starter theme and a parent theme for client projects. The Twenty Fourteen theme is a magazine theme, so it fills a certain niche for certain projects. While it is not widely considered a general purpose theme, the code quality is excellent and makes for a decent starting point.
In the next several sections, you will tour the Twenty Fourteen theme as an example of the elements of a working theme. You will also take this opportunity to modify the theme into your own version with your own customizations allowing you to leave the existing Twenty Fourteen theme intact. It should also be mentioned that the Twenty Fourteen theme uses HTML5 elements and an HTML5 shim. HTML5 is covered in more detail in Chapter 12, but just be forewarned that while using HTML5 is becoming more and more commonplace every day, it is still on the newer edge of web technology and all browsers may not support it. It all depends on which browser you choose, or are forced, to support.
Essential File: Style.css
The style.css file is what WordPress uses to reference your theme, and this file is required for your theme to work. You could create a new theme with only a style sheet and index.php template file, although the index file can be empty. Using the power of WordPress’s theme hierarchy, WordPress automatically substitutes missing templates if your new theme does not have them. More on that later, but understand that a customized style sheet is what allows you to get started creating your own theme.
NOTE In practice, a style.css file is all you need to create a new theme. See the section “Theme Hierarchy and Child Themes” later in the chapter.
When creating your own styles.css for your new theme, the first few lines are absolutely critical. These lines provide information to WordPress to use in the Theme screens and further reference your theme in the core. Your first few lines should read as follows (substitute your information, of course):
/*
Theme Name: My Theme
Theme URI: http://mirmillo.com/mytheme
Author: The Professional WordPress team
Author URI: http://mirmillo.com/
Description: Theme for my new site. Based on Twenty Fourteen
Version: 1.0
License: GNU General Public License v2 or later
License URI: http://www.gnu.org/licenses/gpl-2.0.html
Tags: black, green, white, light, dark, two-columns, three-columns,
left-sidebar, right-sidebar, fixed-layout, responsive-layout,
custom-background, custom-header, custom-menu, editor-style,
featured-images, flexible-header, full-width-template, microformats,
post-formats, rtl-language-support, sticky-post, theme-options,
translation-ready, accessibility-ready
Text Domain: twentyfourteen
*/
The information here is pretty self-explanatory. There is an additional optional field for theme hierarchy, covered later in the chapter. Make sure your theme name is unique to your installation. If you intend to release your theme for public use, either for free or for a premium, you should try to come up with a unique name to reduce naming collisions in the directory and other installations. In addition, if you are deriving your theme from another theme, license permitting of course, you should uphold the license and copyright information from the original theme. Once you have addressed this required information for WordPress, the remainder of the file is traditional CSS and subject to the rules and structure imposed as such.
To reiterate, in this example, you are making a copy of the Twenty Fourteen theme and making it your own. This is not a child theme process. Child theme functionality will be covered later. In some cases, the workflow fits better if a new theme is created by copying and renaming the starter theme to a new folder and revising the style.css to reflect the new project. This technique has pros and cons, but it works well for some teams because the foundation theme does not change often enough to warrant more complex methodologies. Plus, when you have a theme in production, you do not want a change to the parent theme to cause a cascading rendering issue in your successfully deployed site. Creating a copy and making a working theme in this new directory removes the dependency on future browser rendering testing, which is a time- and human-intensive procedure—that is, no one has automated this procedure yet. In the event that there is a substantial change to the parent theme, changes can be ported to the derivative themes on a case-by-case basis and tested as needed. Making a copy of the starter theme also enables you to create a handcrafted CSS file by modifying the actual theme files rather than overriding the styles and carrying that additional byte baggage.
Moving forward, CSS rules are written out in the style.css file to turn your minimal layout into the professionally designed theme you are creating. Because you are working on your own copy of Twenty Fourteen, a fork of it, so to speak, you can edit your own theme’s style sheet directly. CSS coding is outside the scope of this book and if done well, is an art and skill. Again, Wrox has several great books on working with CSS.
Showing Your Content: Index.php
When creating your theme, you often have a chicken-and-egg problem. Maybe you are lucky and you know exactly what content is going to be published on your WordPress site, and exactly how it is going to be structured. Maybe you even know exactly how the final theme is going to look, or you have had a professional designer create some mock-ups for you. But odds are, your site is going to grow organically, and to see how the design, and therefore the style sheet, is going to play out, you need to have some content to display.
NOTE You can use various stock content files to import into your site and work through all the styles, or you can start building your site. Theme Unit Tests and stock content files are covered in Chapter 3.
The index.php file is the default template of your site. WordPress has a built-in decision engine that decides which type of information your visitor is requesting and then determines if there is a template file available for that information type. This hierarchy is covered later in the chapter, but the index.php template is the default, or template of last resort. If WordPress does not determine that there is a more specific template to use, index.php is it.
Usually, the index.php file contains your standard loop. This is a traditional blog format where the posts are displayed in reverse chronological order. For example, the following is some of the code from Twenty Fourteen’s index file:
<?php
if ( have_posts() ) :
// Start the Loop.
while ( have_posts() ) : the_post();
/*
* Include the post format-specific template for the content.
* If you want to use this in a child theme, then include a file called
* called content-___.php (where ___ is the post format) and that will be
* used instead.
*/
get_template_part( 'content', get_post_format() );
endwhile;
// Previous/next post navigation.
twentyfourteen_paging_nav();
else :
// If no content, include the "No posts found" template.
get_template_part( 'content', 'none' );
endif;
?>
As covered in Chapter 5, the loop is really the heart of WordPress. It is the most important concept to grasp because this is how your content is selected and ordered for publishing. You may look at the preceding code snippet and notice that the loop is really a small part of the code and that the content of the posts is not even being rendered in HTML.
And you would be correct. The preceding snippet uses the get_template_part() function, which was introduced in WordPress 3.0. This is a WordPress function that is very similar to PHP’s include() and require() functions, but it is more powerful because it is WordPress-specific. The get_template_part() function allows the theme developer to pull out specific code components for reuse, or for replacing in child themes.
In the preceding example, WordPress is looking for a specific PHP file to include as the rendering of the posts in the HTML. This is actually a fairly complex example because it uses the get_post_format() function to fill in the second parameter of the include. This function will do exactly what it says and return the format of the post. Post formats are covered a little later in this chapter. For the sake of this example, just know that if the post were marked as an image, this function would return image, or if it were published as a traditional post or marked as standard in the Post screen, it would return “false.”
The get_template_part() function will look for the template file in the current theme directory, first as the specific version using the second parameter and then for the generic version ignoring the second parameter. That is, if you use the following code in your theme:
<?php get_template_part( 'content', 'link' ); ?>
WordPress will first look for a file named content-link.php in your theme folder and, if it cannot find that file, will settle for content.php. If you are creating a child theme and neither of the preceding files is found, WordPress will continue the search in the parent theme folder.
In the Twenty Fourteen example, the get_post_format() function is performing as a switch to pull in the desired content template for the appropriate post format. You will notice in the Twenty Fourteen theme that there are many content templates—one for each post format type. This allows the theme developer to control how the different post formats are rendered in the browser.
Another advantage of this tactic is breaking your code into smaller, manageable portions. You will find this compartmentalization makes it easier to debug should you develop any problems with future changes, or need to add new functionality.
Showing Your Content in Different Ways: Index.php
The index.php file is really the most important template file in your theme. Although you cannot have an active theme in WordPress without styles.css—because that is how WordPress knows you have the theme available—index.php does the heavy lifting.
In the early days of WordPress, the index template was the only template. The whole theme was just this one file, and it was really just the loop. That worked fine for WordPress when you used it as a traditional blog and this bloggy look is probably why WordPress is occasionally still derided as a blog engine.
Hopefully you are reading this book because you know WordPress can be so much more, or if you did not know, you are realizing it now. Your index template is very important; this cannot be stressed enough. It is the template of last resort that WordPress will use when it cannot find a more specific one to use (see the section, “Template Hierarchy,” later in the chapter.)
Nevertheless, your index file does not have to be a single loop showing your most recent posts. That is very traditional, and may work well for your site, but you can branch out. Your index file can be structured in so many different ways that it is truly limitless. It could contain multiple different loops from different tags or categories, or it could contain no loops at all. The index template could function as your error page, where you have more specific templates for every other piece of content in your site.
CREATING YOUR OWN THEME: DRY
As just discussed, these are the basics; WordPress requires a style.css file with properly formatted header information, and a theme must have an index.php template. Now you want to expand your theme to use more template files and capitalize on the robust theme engine found in WordPress.
A good developer knows that you do not want to repeat code in multiple places; it is a bad design and gives your code one of those nasty smells. (You knew that right?) The code smell is called Don’t Repeat Yourself (DRY) and is, in fact, one of the easiest smells to get a whiff of and avoid. When you find yourself tempted to cut and paste a code block from one template to another, that should be your first whiff. Here is your opportunity to break out your templates into reusable parts. There are three obvious places where you can do this because you will reuse these components on nearly all pages on your site to give it that cohesive look and feel and structure. The header, the footer, and the sidebar information is essentially the same on all pages. You will also learn how to tweak these included files with additional logic to handle design exceptions.
Header.php
You may think this file is a misnamed, but it is the standard name of this file that WordPress looks for. The header.php file includes everything at the top of your rendered page, up to the content area. This can be confusing because a properly formatted HTML document includes its own <head> information, which has its own special requirements. This header.php template file includes the HTML head, but it also includes the start of the HTML document and usually includes the site logo and navigation, assuming you are using an across-the-top horizontal navigation scheme. It can also include any additional elements at the top of your page, such as secondary navigation or a search area.
Because this file includes so much more than the HTML header, the tendency is to take the printing term and call this area the nameplate, as in the nameplate of a newspaper or magazine. However, stick with tradition and leave the file name header.php in order to remain compatible with the built-in functionality of WordPress.
When creating your header template file, a very important WordPress function must be included: wp_head(). This is a hook for WordPress to be able to attach certain functionality into your site header and is also used by plugins.
The wp_head() function is dropped in your HTML <head> node and is critical to the long-term compatibility and functionality of your theme so make sure this is included.
Now that you have broken out the nameplate section of your pages into the separate header.php template, if you were building a theme complete from scratch you would need to adjust your index.php file to include it. You could use the traditional PHP include orrequire family of functions, but the WordPress core functionality has a handy function to get around the theme paths. This is similar to the get_template_part() function discussed earlier, but there is a specific function for the header template. At the top of yourindex.php (and subsequent template files discussed later) simply add the following code:
<?php
get_header();
?>
This function automatically includes the filename header.php from the current theme’s directory into the current file for rendering. This function does not have any additional functionality over a PHP include besides determining the correct include path for you, but it is much more readable when working on a theme.
Optionally, you could split out additional components from your header.php file and include them back in with PHP includes. Occasionally, if a site has a particularly long or complex global navigation, it is broken out for inclusion. In practice, working on smaller files is easier for editing because each template file has a specific function and reduces the complexity of debugging.
NOTE In a past life, one of the authors of this book was called in to work on a web application where the entire application was created in a single file and the functionality was handled by triggering specific functions. Although the functions were nicely broken out, any time the application had to be debugged, the error messages were nearly meaningless. Although the line number would change (and skyrocket into the multiple thousands) they all occurred in index.php and inevitably the whole application had to be traced to determine what happened.
Imagine how much easier it would be to troubleshoot a problem on the application if the error message indicated that the error took place in a 100-line navigation file, rather than a 10,000-line complete application file.
Everyone writes bad code in his or her career, and certainly we (the authors) are no exception, although none of us wrote this atrocity. What we are saying is this: Do yourself a favor and break code into smaller, manageable files whenever possible.
Footer.php
In the same vein as the header.php file, everything below your content area should be separated out into a footer file. The nature of footer files has changed in recent years. Historically, footers have been reserved for the copyright and contact information, but the current web trend is to use this real estate to include additional navigation options and information relevant to your site. Most modern themes, including Twenty Fourteen, include widget areas in the footer for customizable content. Widget areas are discussed later in this chapter. What you put in your footer is up to you, but because it remains by and large the same on every page, it is a prime candidate for breaking out into a separate include.
Again, make sure you incorporate the wp_foot() function into your footer template. This function allows WordPress to inject any necessary information from your active plugins. Make sure this function is invoked before your </body></html> closing tags.
Similar to the way your header template is included, WordPress offers the same functionality for your footer information with its own special include function. At the bottom of your template files, add the following code:
<?php
get_footer();
?>
Sidebar.php
Another candidate for breaking out is the sidebar, which is everything to the right or left of your content. Your sidebar could include the navigation of your site, if you have elected a vertical navigation scheme, or perhaps less important supporting information for your site content.
The Twenty Fourteen theme includes both a right or left sidebar using the sidebar.php, sidebar-content.php andsidebar-footer.php files. The Twenty Eleven theme allows for both a right and left sidebar using the same sidebar.php template and places it with CSS. However, you could have multiple sidebar files for each column or specific sidebars for different pages, depending on your design.
You need to consider a number of different issues when working with sidebars. You have to decide first how many sidebars you are going to have. Second, you have to decide if they are going to be static sidebars, widgetized sidebars, or a hybrid. Finally, you have to determine how the HTML is structured so that you can make the CSS put the sidebars in the correct spots. Then you have to test in your target browsers and in all likelihood start over. Such is the life of the web developer.
As mentioned, the Twenty Eleven theme’s stock sidebars are both the same file, whether on the right or left, and are fully widgetized. Twenty Fourteen also has two sidebars, but using separate template files. These sidebars are also widgetized. Widgetized sidebars enable you to sketch up a site with relative ease and use the WordPress Administration screen to place widgets as needed.
In your template files, place the following code to include the sidebar.php file:
<?php get_sidebar(); ?>
Sometimes having both sidebars in the same file does not pan out in the design, or more likely, the CSS. Or, you have broken out the sidebars into individual files for each sidebar location, in the Twenty Fourteen theme. For whatever reason, you can create two sidebar files for the traditional left and right places. For example,
<?php
get_sidebar('right');
?>
gets the file named sidebar-right.php, as indicated in the parameter of the function call, and includes it in the appropriate place. Again, this is similar to the get_template_part() function but is specifically designed for sidebars and is much more readable in the code. In the Twenty Fourteen theme, you see this as
<?php
get_sidebar('content');
?>
to include the right-hand content sidebar.
More advanced theme frameworks have multiple sidebars that deviate from the common notion that a sidebar is only vertical space on the left and right of your content. Some of these theme frameworks have what are essentially sidebars above, below, and even in the middle of the post loops. Having multiple widgetized areas like this transfers some power to the site administrator who can now place WordPress widgets all over the layout of the page. Twenty Fourteen does this with footer area sidebars, which is now pretty common among theme developers.
An important consideration when working with sidebars is keeping the balance between what portions are widgetized—meaning they can be controlled and managed by the content creator in the Administration screens—and what portions are hard-coded in PHP into the template file. Widgets can be very powerful, especially with many of the plugins that are available. But there are also cases where PHP code in the template file will get the job done and the content does not need to be updated by the administrator or is using built-in WordPress functionality to keep itself updated. Keeping this balance right is a developer decision.
Deviations from the Norm: Conditional Tags
You have been a good developer and broken out all your repeating code snippets into their own templates or inclusion files. Good job, but the marketing director just called, and even though the site is almost done, and he signed off on the design, he forgot to tell you that all the pages and posts in the Ponies category are supposed to have a pretty rainbow in the nameplate next to the site’s logo. Personal taste aside, this sucks, because you just made all the header.php files the same, and now only a handful of them need some special consideration.
As with all things open source, there are many ways to handle this situation. You could probably handle such a simple example with some well-crafted CSS and the theme’s body class alone. Alternatively, you could create a whole category template file (discussed later) to style just this category. But because you are dealing with only a tiny element, it seems like overkill to create a whole new template file.
But wait—all is not lost. WordPress developers have had to deal with marketing directors before and knew this type of situation would come up eventually, which is why they included conditional tags. WordPress has many conditional tags built in, and covering each one is outside the scope of this book, not to mention particularly boring. But rest assured—these conditional tags exist and can address specific needs such as what type of page is being viewed, or the meta information about the content on the page.
To appease the marketing director, you might include something like this in the header.php file:
<header id="masthead" class="site-header" role="banner">
<div class="header-main">
<h1 class="site-title">
<a href="<?php echo esc_url( home_url( '/' ) ); ?>"
rel="home"><?php bloginfo( 'name' ); ?>
</a>
</h1>
if (is_category('Ponies')) { ?>
// overlay a pretty rainbow on the logo for the ponies category
<img id="rainbow"
src="<?php bloginfo('template_directory');?>/img/rainbow.png"
alt="OMG! Ponies! " />
<?php } ?>
...
</header>
Now, any time the category of the content of the current page is in the Ponies category, your header also includes the rainbow.png. With PNG’s alpha transparency, it actually turns out nicely. This example only works for the category pages and not for the individual single-post pages in the Ponies category.
CREATING YOUR OWN THEME: CONTENT DISPLAY
A good theme enhances the content on your site. Not only is it visually appealing, suitable for the nature of the site, and brand appropriate, but the theme should also structure the content properly. WordPress has a variety of different templates and functionality to meet the needs of every site type. The challenge here is to uncover the best combination of template files to include in order to achieve the optimal organization of your content. Not all themes need to have every template file type, and most do not; it is best to mix and match templates to meet your needs.
Customizing Your Homepage: Front-Page.php
Homepage—who uses that term anymore? It sounds so 1990s, but what else should you call it? This section covers the first page on your site when a visitor goes to your root URL. Apache users know that the index page of your site, the homepage if you will, is called “index.” It is usually called “default” on a Microsoft IIS server. The WordPress Dashboard refers to this as the front page; you can run with it for consistency’s sake.
A theme should always have an index.php template file because after all else, index.php is the template of last resort. What if want your front page to have a special layout, perhaps one that features something about your site—product pages, for example? You do not want to mess with your index.php layout because you do not want to reinvent your entire theme just to accommodate this one special layout.
Plugins and other tricks are available to handle this scenario; in fact, you can even use the WordPress Administration screen to set a static front page that is one of your existing published pages. But in this case, you are talking about a custom layout or HTML rendering, not a traditional page. The easiest way is to use the built-in template hierarchy and set a special front page by using a front-page.php template.
There are actually two template files that can function as your front page: front-page.php or home.php. In some older themes and even in the first edition of this book, home.php was the only option. With WordPress 3.0, front-page.php became the preferred template file name for the front page. There is a little more involved here, depending on how you set your reading preferences in the Dashboard. Later in this chapter, you will see the template hierarchy and how these two templates actually rank.
Creating a special layout, and therefore template file, for your front page is useful when your front page is unique. By and large, creating a unique front page is a marketing tool. Some reasons for creating a unique front page include:
· Featuring or showcasing a product or service
· Featuring or showcasing other portions of your website
· Driving traffic to a certain portion of your site
· Explanatory steps of the processes involved with your product
· Delineating tiered levels of service that you provide
Take a look at the basic example of how this looks using the Twenty Fourteen theme in Figure 9.1, where the front page is showcasing products or services that the website is marketing. These products would have their own supporting pages or posts in your site. Your front page has a nice image showcase front and center with links to the individual pages. Twenty Fourteen uses jQuery to enhance this showcase and rotate through the images. Alternatively, you could use a different JavaScript toolkit or Adobe Flash, but jQuery is already included with WordPress and, frankly, it rocks, so why not use that. The bottom portion of the layout will include a recent news section.
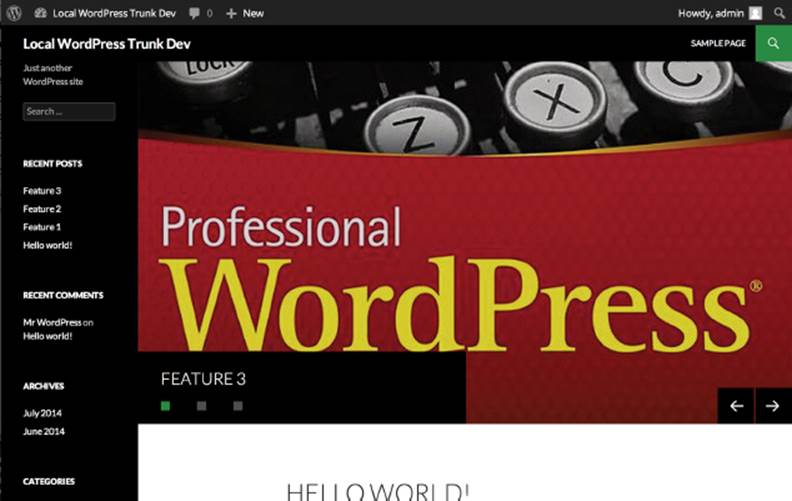
Figure 9.1 An index page slider can make your front page look unique.
While we accomplished this look with the Twenty Fourteen theme, interestingly enough none of the default themes from Automattic actually use this template file. Instead, they all utilize conditional tags as discussed in the previous section. If you look at the index.php template from Twenty Fourteen you will see:
<?php
if ( is_front_page() && twentyfourteen_has_featured_posts() ) {
// Include the featured content template.
get_template_part( 'featured-content' );
}
?>
which accomplishes the slideshow functionality. This works, but because this section is about the front-page.php template file, let’s look at how you accomplish something similar using a standalone file.
For this example, you will add a front-page.php template to the Twenty Eleven theme. Having two sets of content, the showcase slides and the news, is going to involve multiple loops. You will use the first loop to create the content for the showcase. This loop will pull posts from a specific category or a custom post type. That way, the site admin can add and remove content from the showcase as needed, without visiting the code at all. Of course there will be certain design restrictions, such as image size and format and possibly certain conventions that must be followed in the post, but the capability to change this information in the WordPress Dashboard screens is a very powerful tool.
The showcase loop, sometimes called slideshows, could look something like this:
<div id="showcase">
<?php
global $post;
$args = array(
'post_type' =>'slides',
'numberposts' => -1,
'orderby' => 'rand'
);
$slider_posts = get_posts($args);
// show showcase only if slides exist
if($slider_posts) {
foreach($slider_posts as $post) : setup_postdata($post);
// get image
$thumbnail = wp_get_attachment_image_src(get_post_thumbnail_id(),
'home-slide');
if ($thumbnail[1] == "600" && $thumbnail[2] == "160") {
//checking thumbnail dimensions in css ?>
<div id="feature-<?php echo $post->ID; ?>" class="slide">
<a href="<?php the_permalink(); ?>" title="<?php the_title(); ?>">
<img src="<?php echo $thumbnail[0]; ?>" title="<?php the_title(); ?>" />
</a>
</div>
<?php } ?>
<?php endforeach; ?>
<?php wp_reset_postdata(); ?>
<?php } ?>
</div>
NOTE In this example, you are using custom post types, which are covered in Chapter 7.
This creates an HTML rendering, as shown in Figure 9.2, using the Twenty Eleven theme.
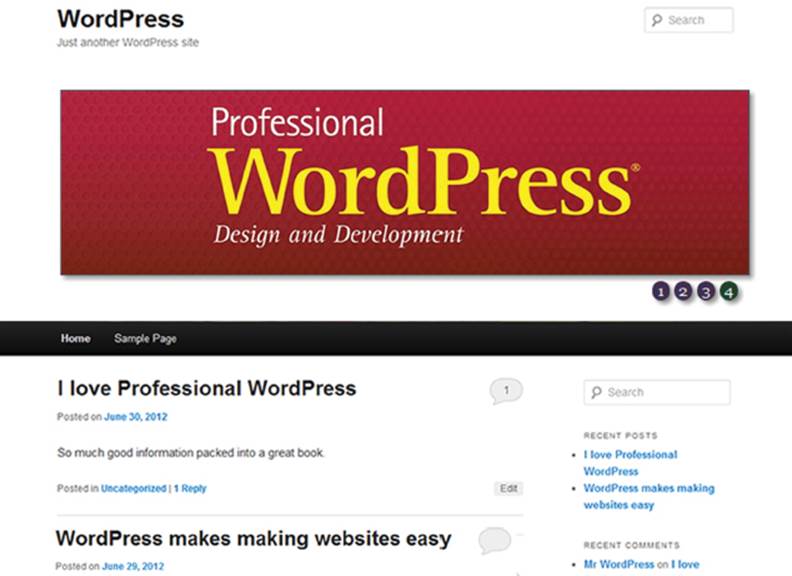
Figure 9.2 An index page slider using the front-page.php template
Take a look at what is happening here. The whole showcase loop is wrapped in a <div> with an ID of showcase. This is for the jQuery to hook onto later. In the PHP code, you are creating a custom query for the loop. The query is looking for custom post types called slides, which you would have previously established in the themes functions.php file and also set up in the WordPress Dashboard. This query is pulling all the slides from the custom post type and returning them in random order. The loop then proceeds to create<div> elements, each with a unique ID, again for jQuery and CSS hooks. The custom post type is set up to use the WordPress featured image as the slide content. This allows the site maintainer to upload the slide image that, in turn, links to a special landing page with more information in the post body. The preceding code snippet will only display the slide graphic if it is set to the specific dimensions, 600px wide by 160px tall in this case. Finally, countless jQuery plugins are available that can turn this now unwieldy block of content on your page into a very elegant slideshow. The bottom section could be a traditional loop similar to the index.php template stock loop.
Also, this is still not the only way to get this functionality. As of WordPress 2.1, you can control what is shown on your front page and set it to any static page you have created and then create a special page template to accomplish the previously described design decisions. You can also build multiple loops—one using posts in a category for the slides, the other loop excluding the category for the news. This is how you used to do it. Again, how you choose to skin this cat is one of those choices you have to make as a developer as you balance the needs of your client with the ease of maintenance for your developers.
Show Your Older Posts by Date: Archive.php
Eventually, if you are diligent, your site will have older content. And if you are really industrious you will be able to do those fun “One year ago on my site I told you about X” posts. Eventually, you may have copious amounts of content, so much that it is not feasible or appealing to show it all on the front page. That is, if content is being generated on a regular schedule, there will come a point in time when you will want to refer to something that is no longer on the front page or in the Recent Posts lists; this is the time when you need to delve into the vault of past content.
This is where the archive.php template steps in. You have many ways to present your older content. Harkening back to WordPress’s blogging origins, the most obvious method is to continue in reverse chronological order of your posts.
If you do not have an archive template, WordPress simply uses your index template to show the older posts. The Twenty Fourteen theme has an interesting take on the archive.php template that dates back to some of the original starter themes such as the Sandbox theme. This approach is very flexible and creates date-based format visuals for the archives. Consider this code from the Twenty Fourteen archive.php template:
<h1 class="page-title">
<?php
if ( is_day() ) :
printf( __( 'Daily Archives: %s', 'twentyfourteen' ), get_the_date() );
elseif ( is_month() ) :
printf( __( 'Monthly Archives: %s', 'twentyfourteen' ), get_the_date(
_x( 'F Y', 'monthly archives date format',
'twentyfourteen' ) ) );
elseif ( is_year() ) :
printf( __( 'Yearly Archives: %s', 'twentyfourteen' ), get_the_date(
_x( 'Y', 'yearly archives date format',
'twentyfourteen' ) ) );
else :
_e( 'Archives', 'twentyfourteen' );
endif;
?>
</h1>
This code block shows how the theme’s archive template displays a unique header depending on whether the visitor is looking at the archived posts for a day, a month, or a whole year, or traversing by conventional pagination.
Except for the fact that WordPress is inherently date-based, the specific archive template is not all that important. Although having the date information is useful when determining how recent certain information is, in reality, do you ever go back and look for posts published in May of 2007? More likely, you are looking for posts on a certain topic or filed in a particular category or topic.
Showing Only One Category: Category.php
Enter the category template. The category.php template creates a loop of posts from only a specific category. The category template is invoked when a visitor hits a specific URL with the category name in it. This could be something likehttp://example.com/category/zombies. In the category.php template, WordPress has already determined that your visitor is looking for posts in the particular category request, so the default loop automatically makes this query for you, no special interaction required.
When you use this template, you can generically display category posts and information; this is exactly how the Twenty Fourteen theme is set up. For example, the Twenty Fourteen theme places a header and optional category explanation information pulled from the category description, if it is available:
<header class="archive-header">
<h1 class="archive-title">
<?php printf( __( 'Category Archives: %s', 'twentyfourteen' ),
single_cat_title( '', false ) ); ?>
</h1>
<?php
// Show an optional term description.
$term_description = term_description();
if ( ! empty( $term_description ) ) :
printf( '<div class="taxonomy-description">%s</div>', $term_description );
endif;
?>
</header>
This covers the default category case, which is a nice default fallback template to have. But what if you want to make each category template have a unique look—for example, a color scheme or an icon?
Assume your pony-and-rainbow–fascinated marketing director now wants a Zombie category. Instead of using conditional tags, you can make a specific category template. Following the template hierarchy, WordPress will look to see if there exists a category template that is specific to the category requested in the URL. If you have not noticed yet, WordPress works from most specific to least specific until it finds the proper template. WordPress will select the most specific template for the type of information requested and work toward the more generic templates until it defaults to the index.php template. This is a critical aspect to learn when deciding on your theme templates, and it is something you will review again.
For the marketing director, you can make a category-3.php template, for example, because the Zombies category has an ID of 3.
The easiest way to find a category ID number is to hover over the category name in the Edit Category screen and look in the status bar at the bottom of the browser window, as shown in Figure 9.3.
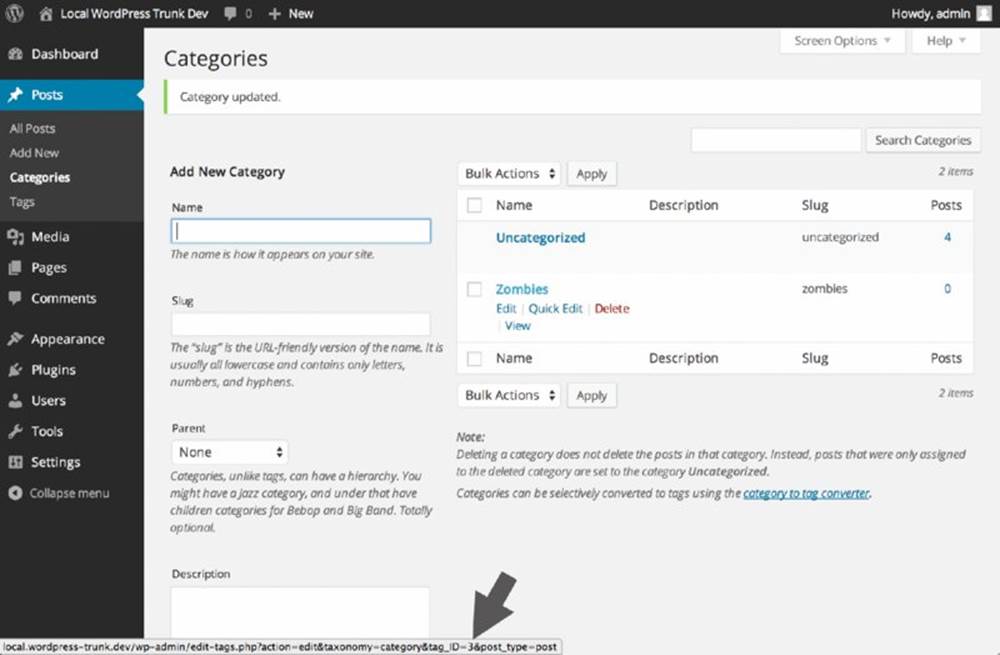
Figure 9.3 Hover over the category name in the Category Screen to see the category ID in the status bar.
There is a little bit of a chicken-and-egg problem when you want to create a category template for a specific category. In order to name the template file correctly, you must create the category first to get the category ID.
Lucky for you, there is also another way. Since WordPress 2.9, users have been able to make category templates that use the slug. And the slug template file is preferred by WordPress over the ID-based one. So to avoid the chicken-and-egg problem, you can create the category first and assign it a slug, in this case zombies. If you have this planned out ahead of time, you can make a category template file called category-zombies.php and be off to the races.
These specific category templates work exactly the same as the generic category templates and pull the posts for that category automatically. Technically, it works the other way around: WordPress already knows which posts it is going to show you; it is just determining how to show them to you. What you are gaining with using a specific category template is the flexibility to style each category individually.
You have probably noticed by now that with WordPress there is always more than one way to do something. In the simple example of the marketing director, you can solve his problem with conditional tags or category-specific templates, or most likely, you can meet his requirements by using CSS because most themes have rich CSS hooks. But the extensibility of this feature is the killer aspect. Just knowing that WordPress has the feature built in will save you one day.
Show Posts of a Specific Tag: Tag.php
The tag.php template functions nearly identically to the category.php template. It is invoked when a visitor requests a specific tag. This template is only beneficial if you are actively tagging the content on your site. Most likely, you are assigning categories to content because that is a natural human organization structure, but tagging is not as clear-cut and often feels like an additional step.
Nevertheless, if you are diligent in tagging content, a tag template is a nice addition to your layouts and can be beneficial to cross-pollinate posts with related content; in the Twenty Fourteen slideshow, tagging is what allocates specific posts for the slideshow. When this template is called, the loop automatically fills with posts of a particular tag for rendering.
NOTE See Chapter 5 for a more in-depth look at how the loop actually works.
Likewise, you can create a template for a specific tag. As with categories, you can use either the tag’s ID or slug to make the template file. If you want a special template for the Zombies tag, you use the slug of the tag to create a new template titled tag-zombies.php. You need to verify the tag’s slug on the Tags screen in the Dashboard.
Using the category and tag templates may not be the way you envisioned your content being viewed, especially if you are using WordPress more as a content management system. However, simply including these templates delivers free functionality and customizability from the WordPress core. These templates enable your visitors to explore your content in different ways and perhaps add a little stickiness to your site because your content is viewed in new and interesting ways. Categories and tags group related content and using these templates create an organic presentation for discovery of your site.
Do not brush these templates off as simply reverse chronological listings of related content, such as an archives page. Envision creative ways to present your data; because you have visitors who are interested in at least some of your content, why not expose them to related items?
Other Archival Templates
With that in mind, WordPress’s archival templates really bloomed recently. In addition to the templates discussed previously, you can also create special archive templates for custom taxonomies or custom post types. Although these templates fall in the archival template hierarchy, you can really think of any of these views as just groupings on a certain aspect of the content.
If you have custom post types set up in your theme or content, as you did with the slides in the showcase example previously in this chapter, you can have custom archive page templates for those, too. This template file has a slightly different naming convention than the rest. For the slides, you would create a template file called archive-slides.php where slides is the custom post type’s name.
Likewise, if you are employing custom taxonomies in your theme, you can make custom archive templates for both the taxonomy and the specific term. WordPress will choose the most specific template file it can, so the term templates will be chosen before the general taxonomy templates.
NOTE Custom post types and custom taxonomies were covered in depth in Chapter 7.
How to Show a Single Post: Single.php
You have set the bait with a great post headline, something witty and engaging. After the nibble, you set the hook with your excerpt of the post, and now you caught the visitor. He has clicked through to read the rest of the article.
The single.php template view is most likely the landing page on your site when a visitor arrives via a search engine. Assuming you have great content, the search engine will rank the explanatory page of your site higher than the index page, which usually only lists the excerpt. Therefore, it is best to invest some time in this template because it is very commonly viewed, perhaps the second most used template after your index page template. Enhancing this template with related posts and other teaser content only increases the possibility of enticing a visitor to further explore your site, bookmark it, subscribe to your feeds, or best of all, link back to you. All of these events increase your search engine respectability.
You can display the full content of a single post with the single.php template file. WordPress has decided that the visitor has requested the full content of a single post; thus this template does not need to contain a loop, but simply a call to the the_post() function to get the data from the database. If you look at the Twenty Fourteen theme, you will notice that the single.php template does, in fact, use a loop and the get_content_part() function to maintain consistency with the other templates, but because only one post is being shown, this is superfluous.
If you have a very long post, you can break it up among several pages by using the built-in WordPress functionality or special plugins. Internet users have very mixed feelings on this. Although general guidelines and studies have shown certain line lengths and content lengths improve readability, some vocal visitors detest the load time wait when paginating. This is a design choice based on your content type and site design.
Adding links that are related to this post is a great way to entice visitors to explore your site more. Several plugins add related content to the bottom of a single post page or scan your content for keywords and links. In practice, you will have to try these out and see how they work with your site.
Alternatively, the poor man’s solution is to add a simple category or tag loop to grab some related-topic posts to the bottom of the page. It could be something as simple as this:
<h2>Other posts in this category</h2>
<ul id="related">
<?php
$category = get_the_category();
$my_query = new WP_Query("category_name=".$category[0]->name."
&showposts=5&orderby=rand");
while ($my_query->have_posts()) : $my_query->the_post();
echo '<li><a href="'. $post->permalink.'">"' . $post->post_title .'"</a>
</li>';
endwhile;
?>
</ul>
Here you are taking five random posts from the first category of the current post. It is not the most sophisticated method, but it is a simple way to show some related content links on the single post view. Another option is to show additional posts by the same author:
<h2>Other posts by this author</h2>
<ul id="related">
<?php
$author = get_the_author_meta('id');
$my_query = new WP_Query("author=".$author&posts_per_page=5&orderby=rand");
while ($my_query->have_posts()) : $my_query->the_post();
echo '<li><a href="'. $post->permalink.'">"' . $post->post_title .'"</a>
</li>';
endwhile;
?>
</ul>
While having a single single.php template will suffice for most sites, WordPress does offer some more customizability for handling the individual custom post types. Using the slideshow showcase example from before, instead of rendering the clicked through landing page using single.php, you could create a special single-slide.php template. This template might leverage the featured image or other custom fields to make it more enticing or actionable.
Display a Page: Page.php
When you are using WordPress as a content management system, you have to make some decisions such as whether to use pages or posts. This is like cats or dogs—people have strong feelings about each. For the most part, this chapter has been talking about posts and custom post types.
When working with a client, you generally create hybrid designs that use both pages and posts. Posts are used for temporal-based items, such as news and promotions, whereas pages are used for static information that does not change very often, such as products or services. Product pages are then augmented with related posts. This gives the client the benefit of using the posts facets of the website to drive traffic to the static product pages. This is a very common website strategy.
The page.php template works essentially the same as the single post template. There is no loop—unless you have created a special page template, but technically that is a different template file—only the call to the_post(). Yes, this is the same function as in single.php. WordPress considers the posts and pages to be fundamentally the same type of content and the_post() gathers the content from the database.
As with previous examples, you can also have specific page templates for specific pages based on the ID of the page or the page’s slug. These follow the same pattern as before. In addition, you can also have custom page templates that you can assign to any page on your site, but you will cover this in more depth later in this chapter.
Display Post Attachments: Attachment.php
To be honest, we (the authors) do not think we have ever used these template files in a production website intentionally. First introduced with WordPress 2.5, image.php was a special template just for showing—you guessed it—images from your gallery. Since then, this branch of the template hierarchy has grown and generalized to show any of the attachments you might add to a post based on MIME type. Many themes do not even have this set of templates; the Twenty Fourteen theme includes an image.php but not anattachment.php template. In essence, this template works very similarly to single.php, so much so that single.php is the next default if this template does not exist in your theme.
The most common use for this type is to create an image.php template. This template provides a special display strictly for viewing your media gallery. A gallery can contain many different types of media; that is, it is not limited to images. This template will be called for any media item, unless there is a more specific match, and usually includes a description of the media and comment functionality. A great use of this template file would be for a portfolio site, such as a photography studio or another artistic collection. Again, this template functions nearly identically to the single post template, with slight variation to render an image rather than a paragraph.
Similarly, template types can be used with media types other than images. You could create templates for video, audio, or applications; however, these would probably be very specific use cases, and in the wild you would rarely see or need these templates unless you were creating a specific niche website.
Display Custom Post Types
We touched on this briefly during the single.php template section, but if your site is leveraging Custom Post Types for specific content needs, you probably want a specific method to render them.
Custom Post Types, as discussed in Chapter 7, can be used to force a structure to the content being created. You might have specific fields or entries that the site admin will continually use to make these content pieces consistent.
Once you have set up your Custom Post Type, you can create a template file that renders that content very similarly to the single.php template. However, because you have structured data in the Custom Post Type, this template file will usually have that structure reflected in the HTML.
NOTE See Chapter 7 for information on using Custom Post Type content in your template files.
Template Hierarchy
With all these template files to choose from, how does WordPress decide which one to use? The WordPress core is pretty smart in this regard. Based on the URL, WordPress determines what type of content is being requested and can make a starting determination. Then WordPress works out the specificity of the template to be used, using the most specific template that matches the criteria first, and falling back to more general templates until it finds a match. This system works well in that it is fault tolerant by always cascading back to index.php but extremely powerful because, as the developer, you can make custom templates for very specific situations if needed.
This is best illustrated with the flowchart in Figure 9.4 adapted from the WordPress Codex. There is a more complete version online.
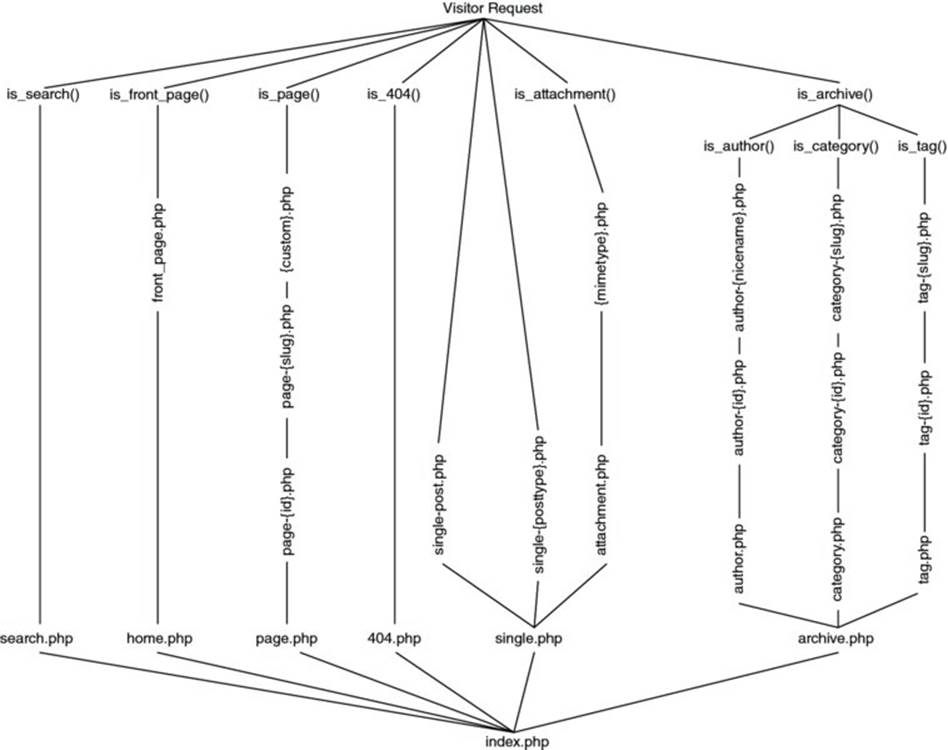
Figure 9.4 The WordPress template hierarchy
As you can see, there is a nice decision tree happening here, and the flexibility is very powerful. Not all themes have or need all template files. But certain more customized or special use case themes can capitalize on this hierarchy and create a unique application of WordPress.
It is also worth mentioning that the search template hierarchy is defined in template-loader.php, where a hook is defined before the search tree is started—template_redirect—which lets you change the template selection process. This is used mostly for handling URL redirections, such as a “shortlink” defined for a page, which might hide some of the URL information normally used to decipher what templates WordPress applies.
WARNING On some sites we have built, there have been occasions where categories, tags, pages, and even authors have had the same or similar taxonomies. For example, on a corporate news site, you may have a page about a department and a department category for news about that department, and some information may be tagged by the department name. In cases like these, the WordPress template decision tree can get confused and make unintended choices. You can work around this in several ways: either by carefully crafting your taxonomy, by ensuring each slug is sufficiently unique to avoid collisions, or by enforcing your desired behavior via the .htaccess file. The crux of the issue here is how WordPress handles permalinks, which boils down to pattern matching on the slug metadata.
CREATING YOUR OWN THEME: ADDITIONAL FILES
It is tough to sort out the various template files into which ones are critical, which are essential, and which are just nice to have. Each theme’s template file collection will be different and tailored to match the content or design goals of the author. The truly critical and essential templates have already been covered. In some circles, many of the following templates would fall into the categories already discussed, so you will have to make your own decisions here. Do not think that because these templates are being covered later, they are any less important than any other template. Consider each template type a tool, and how you use the tools is what truly matters.
Handling 404 Errors: 404.php
A 404 page is a fact of life. Eventually, your visitors will find something that went stale. In contrast to a traditional website, WordPress really helps you avoid them because typically all the navigation items are dynamically created by content that actually exists. But it is still possible that your visitor will find a link that is no longer around, so your 404 page comes up.
The Twenty Fourteen theme provides a really good practice with the stock 404 template by including a search box. This way, visitors who stumble across this page have an opportunity to search for what they are looking for.
Other good practices include showing a list of possibly related content, in the form of “I couldn’t find what you asked for, but maybe one of these posts would interest you.” You do not want a 404 page to be a dead end; always offer something else to view and a way out.
At our shop, we trigger a developer e-mail or Twitter warning to let you know someone asked for a lost URL. Especially if there is a referrer in the HTTP headers, you can track down where the broken link originated. At the least you know something went wrong and can do some research.
Also, your 404 page should be funny. Humor is good medicine and it is nice to disarm visitors who might be upset that what they were looking for is not there. It is good practice to expose errors to your developers but show something useful and meaningful to your site visitor. Think back to the days of the Twitter fail whale. As Twitter was growing, it often had scalability issues and the fail whale was seen more often than not. But by keeping the error message lighthearted, the Twitter fail whale quickly emerged as an Internet icon and garnered its own cult following.
Although not strictly a template file, another error to hide from your visitors is a database connection error. The default database connection error is ugly and exposes a little too much information to your visitor, who hopefully is a good guy and not going to use that information against your website.
WordPress introduced a new function in version 2.5 and later back-ported it to previous versions where, if the database connection fails, WordPress looks for a db-error.php file in your wp-content directory.
NOTE This file resides outside of your theme directory. Because there is no database connection, WordPress does not know what theme to display.
You can put whatever code and CSS in the db-error.php template you want, except dynamic data or WordPress functions, because they will not work without the database. This is another situation where we place a stock db-error.php in all of our WordPress sites, with a generic but friendly error message, and then notify the development team that an error has occurred.
The following is a sample db-error.php file:
<?php
//error_reporting('E_ERROR');
mail('developers@example.com','WP SQL Connection Issue on '.$_SERVER['HTTP_HOST'],
'This is an automated message from the wordpress custom db error message file.');
?>
<html>
<head>
<title>Temporarily Unavailable</title>
<style>
body { background-color: #000; }
#wrapper
{
width: 600px;
height: 300px;
margin: 2em auto 0;
border: 4px solid #666;
background-color: #fff;
padding: 0 2em;
}
p { font-size: larger; }
</style>
</head>
<body>
<div id="wrapper">
<center>
<!-- /* This is the generic database error page that will be shown when a fatal
db connection issue arises */ -->
<h1><?php echo $_SERVER['HTTP_HOST']; ?> is Temporarily Unavailable</h1>
<p>The webmaster has been alerted. Please try again later.</p>
</center>
</div>
</body>
</html>
In the rare occurrence that WordPress cannot connect to the MySQL database, rather than showing an ugly database error, site visitors get a friendlier error message and the developers receive an e-mail. This also informs the visitors that no further action is required on their part, besides checking back later, because the error occurred on the web-hosting server and not on their side. This acknowledgment removes confusion or uncertainty on the visitor’s side. The caveat to this is that when things go really wrong, beyond just a hiccup, the developers can get flooded with e-mails.
Author.php
Earlier, you were grouping historical content by category or tag; you can similarly use the author.php template to group all of an author’s content into one view. In addition, you can create specific author templates either by the author’s ID or by the author’s nicename, which is the author’s username. As before, the human readable nicename template is preferred by WordPress over the ID-based one.
Sometimes your site has multiple authors, such as your development team site at work. In such cases, a visitor may want to find additional articles posted by the same individual. The author.php template file shows only posts written by a specific author.
The author template behaves just like a category or tag loop. One nice feature of the Twenty Fourteen theme is that this template also includes any author information that the author chose to submit in the Administration screen.
<?php if ( get_the_author_meta( 'description' ) ) : ?>
<div class="author-description"><?php the_author_meta( 'description' ); ?></div>
<?php endif; ?>
If the author submitted some biographical data, that information is published here. This functionality could be enhanced if the profile page had a rich text editor for the biographical information, and possibly some expanded custom fields.
In production sites, these fields have been used to create a multi-business partner site where each author was, in effect, a company. You can also create a Rolodex-type site using this method.
Comments.php
The comments template used to be one of the more complex templates. This template file handles both the comment loop, including trackbacks and pings, and the input form for a visitor to submit the comment in both logged-in and logged-out cases. Although these tasks are functionally related, sorting through this template file, you used to see a lot of “if . . . else” conditionals that make it difficult to theme. Your theme may not even include comments, especially if you are using WordPress as a CMS, but if it does, you can include the comments functionality templates in your other templates with the following code:
<?php comments_template(); ?>
Countless variations on the comments theme exist for the look and feel—way too many to discuss the merits of any in particular. One thing to consider when working on this template file is the threaded comments functionality introduced in WordPress 2.7. See the WordPress Codex for more information about using wp_list_comments().
It should also be noted that in WordPress 2.7, the comments loop was simplified to look more like a traditional post loop in the code. In addition, many new functions have been introduced to make the comment templates much more straightforward, and the Twenty Fourteen theme does a great job of utilizing these functions. The Twenty Fourteen comment template is a good place to start if you are looking at overhauling the comment section of your site.
One particular improvement is the comment_form() function. This function now handles the rendering of the actual comment form in the comment template. Prior to this function, all of the form and form logic was handled in the template itself, which added extensively to the complexity. This function was introduced in WordPress 3.0 and is pretty extensible if you need to customize your comment form.
Adding Functionality to Your Templates: Functions.php
The functions.php template is not a display template, so it is not like the other templates you have covered, but it is a very important file even though it does not directly display content on your website. Chiefly, the functions.php file is where the special sauce that makes your theme sizzle goes. It is the place where you can put what has traditionally been called “library code.” If, in your templates, you find repeating code or need some special functionality, this is where it can go. WordPress automatically includes this file during execution so the functions are available in all of your template files.
Often, when you are adding functionality you have to decide if the code belongs in functions.php or in a plugin. A general rule of thumb is that if you are adding something that is configurable, as in the user may want to disable it without affecting the look and feel of the site, it belongs in a plugin. If you are including something that is essential, truly essential, to the theme and is always on, it belongs in functions.php. This template includes the setup features for your theme, such as menus and sidebars and also any helper functions for your templates.
The stock functions.php theme is very well commented. Each function and logic block of a function has a one-line comment explaining what it does. This makes functions.php easy to modify and extend. However, the majority of these functions will not need to be modified in your production site, unless you have very specific needs. Most of them simply add to the template files to create a hook-rich HTML template for your CSS styling skills.
One thing that is important to consider when adding on to your theme’s functions.php file is whether the functionality you are adding really belongs compartmentalized by theme or whether it is standalone functionality that belongs in a plugin. This is about determining if the code you are adding is directly applicable to the theme or if it is portable and can be used no matter what theme the site is running—for example, if the functionality you are adding will be used on multiple sites with different themes. This can often be a difficult choice, especially when you realize that you use the same hooks and filters discussed in Chapter 8. In essence, the functions file is a library of plugins all nestled into one file, or occasionally structured as PHP includes of multiple files for more complex themes.
One of the main purposes of the functions.php file is to enable or disable certain WordPress features for your theme. In the Twenty Fourteen theme, this is all done during the twentyfourteen_setup() function. You will notice it enables support for various features including HTML5 elements, post-formats, custom background, featured content, and a few others. These are all features of WordPress that the Twenty Fourteen theme uses; therefore, they must be enabled. Think of this as feature flags. How each feature is enabled and configured is dependent on the specific feature. For example, enabling post-thumbnails or featured images is as simple as this:
// Enable support for Post Thumbnails, and declare two sizes.
add_theme_support( 'post-thumbnails' );
set_post_thumbnail_size( 672, 372, true );
add_image_size( 'twentyfourteen-full-width', 1038, 576, true );
Some feature flags can take, or may require, configuration information, such as the following:
/*
* Enable support for Post Formats.
* See http://codex.wordpress.org/Post_Formats
*/
add_theme_support( 'post-formats', array(
'aside', 'image', 'video', 'audio', 'quote', 'link', 'gallery',
) );
However, each feature is different and will need to be enabled and configured based on your theme’s needs.
In addition, the functions file establishes and identifies your navigation menus. In your functions file, you introduce how many menus your theme will have and assign them names. Later in this chapter, you will learn how to place menu locations in your template files and assign menus to these locations in the WordPress Administration screens.
Similar to menus, you also identify and create widget areas in your functions.php file. Generally, widget areas take more configuration than menus do. Like menus, you register widget areas, or sidebars, in the functions file and later in this chapter you will learn how to place these locations in your template files.
This file is for creating your own behavior and functionality for your theme. You could be introducing new presentation logic or new features that are specific to your needs and goals. But also, you can override or augment existing WordPress features—for example, in the Twenty Fourteen theme:
function twentyfourteen_body_classes( $classes ) {
if ( is_multi_author() ) {
$classes[] = 'group-blog';
}
if ( get_header_image() ) {
$classes[] = 'header-image';
} else {
$classes[] = 'masthead-fixed';
}
if ( is_archive() || is_search() || is_home() ) {
$classes[] = 'list-view';
}
if ( ( ! is_active_sidebar( 'sidebar-2' ) )
|| is_page_template( 'page-templates/full-width.php' )
|| is_page_template( 'page-templates/contributors.php' )
|| is_attachment() ) {
$classes[] = 'full-width';
}
if ( is_active_sidebar( 'sidebar-3' ) ) {
$classes[] = 'footer-widgets';
}
if ( is_singular() && ! is_front_page() ) {
$classes[] = 'singular';
}
if ( is_front_page() && 'slider' == get_theme_mod(
'featured_content_layout' ) ) {
$classes[] = 'slider';
} elseif ( is_front_page() ) {
$classes[] = 'grid';
}
return $classes;
}
add_filter( 'body_class', 'twentyfourteen_body_classes' );
This function adds more parameters to the body_class() function that assigns CSS classes to the body HTML node. The default body_class() function returns many useful classes that you can hook into with your CSS styling, but sometimes you need something special. In the case of the Twenty Fourteen theme, the preceding function appends classes to the array that is returned based on certain criteria.
When modifying the starter theme functions, you have to make a choice. Sometimes, if you are making minimal changes to the file, you can just modify the file directly, accepting that this will break any upgradeability of the theme. Alternatively, you can include your own custom_functions.php from the functions.php file and make all your own custom changes here. The caveat is that if you overwrite the functions.php file, either through a theme update or other user error, you have to remember to put the include back in that file before your head gets too bloody from beating it against the wall wondering why your custom functions are not running. In practice, both of these scenarios have been used successfully.
The amount of power and control available to you in the functions file can be staggering and this power can quickly grow your file size out of control. For example, some of the more advanced themes and the premium theme frameworks include their own control panels to modify theme settings. These other theme frameworks are covered later in this chapter. Theme control panel code resides in the functions.php file.
For example, consider the popular Thematic theme framework which is available online at http://themeshaper.com/thematic/. To keep things manageable and distinct, the Thematic functions.php is simply a list of includes of other function files. This logically breaks up and separates the different facets of the theme framework and keeps the files from becoming unwieldy. This theme also includes a basic control panel to control some of the theme settings.
To create your own theme control panel, you have to register your theme control panel functions with WordPress. In addition, you have to create the HTML form for your control panel within your functions.php file. This is one of the reasons we like the way Thematic has broken up the files into separate areas of concern; the mixing of PHP and HTML code never turns out pretty or readable. It is best to keep this information separate and in maintainable file sizes.
Creating your own theme control panel is outside the scope of this book, but it is definitely a great feature to have and most of the premium theme frameworks include this functionality. Having a theme control panel helps your WordPress theme bridge that gap from blogging engine to full-fledged content management platform for the average user. However, the new Theme Customizer, released in WordPress 3.4 and covered later in this chapter, may work for many sites as a simpler theme control panel. For a coder, WordPress is easily extendable through the code and the vast WordPress functionality, but for the average user, who is probably your client, avoiding code is crucial, which makes these control panels and theme customizers ideal for your end user.
Search.php
The search template file is really a misnomer. This template is actually the search engine result page (SERP). The search form itself is called searchform.php and is covered in the next section. The concept of a search engine result page is pretty self-explanatory. It is going to show the results of what the visitor looked for, by default in reverse chronological order.
NOTE Chapter 12 covers some of the weaknesses with the built-in search functionality of WordPress and addresses some alternatives to enhance the user experience.
This is all that the basic Twenty Fourteen search template does. If there are results, this template presents them to the browser, but if not, it shows a new search form.
You can do a couple of things to your search engine result page to improve on the default. First, you do not want your results page to be a dead end if there are not any search results. Plugins are available to offer related searches or spelling variation searches based on what was initially entered. This will make the search itself behave more like a traditional search engine.
Still, if you do not have any search results, offer up some alternative content that the visitor might be interested in. This might be a good place for a tag cloud or a list of your most popular content. Plugins are available for showcasing your most popular content or you could create a custom query, but you would have to decide what your metrics are.
For some sites, the top content was essentially a known issue—that is, we decided what the top content would be. In this case, we created a special post category and made a new loop to show only this category in the SERP page.
If you do have results, some people like to see the search terms highlighted in the search engine results page. The Twenty Fourteen theme uses the_excerpt() to display the content excerpt in the results. This is where you will make some changes to highlight the search terms. The downside of having your theme split up into many template files is that you have to chase the include() and the get_template_part() functions to find the correct file to edit. In the case of Twenty Fourteen, the get_template_part() is looking for the content template for the proper file type. For the sake of brevity, you can chase this back to content.php for general post content. In the content.php template, there is an “if” statement around line 47, checking if the content is being displayed on a search engine results page or not. This is where the theme decides whether it is showing all of the content or just an excerpt, so you can modify the way excerpts are displayed.
Replace this line:
<?php the_excerpt(); ?>
with the following:
<?php
$excerpt = get_the_excerpt();
$keys = explode(" ",$s);
$excerpt = preg_replace('/('.implode('|', $keys) .')/iu',
'<span class="searchTerm">\0 </span>',$excerpt);
echo $excerpt;
?>
Because the_excerpt() echoes the content directly to the rendering, you have to use the plugin API function get_the_excerpt(), which returns a string instead. Run this string through the PHP regular expression replace function to put span elements around all the search terms and then echo this out to the rendering. In your CSS, you can add a nice rule to highlight these span elements to match your theme.
Finally, if your visitors did not find what they were looking for after reviewing the search results, rather than forcing them to scroll back up to the top, you can provide a second search form at the bottom to refine their search. After the results loop, add something like the following:
<h2>Not seeing what you're looking for? Try again</h2>
<?php get_search_form(); ?>
The Twenty Fourteen theme has the search form already enabled for you.
NOTE Chapter 12 discusses improving the way search works through plugins and some alternatives.
SearchForm.php
The generic search form is pulled from the WordPress core template files and is pretty basic looking. In cases where your theme needs a customized search input field, create a new template named searchform.php. This form can then be styled to match the rest of your theme. The search widget automatically uses this template to include this form in your regular templates with the following code:
<?php get_search_form(); ?>
The basic Twenty Fourteen search form looks like this (note that it is using HTML5 elements because Twenty Fourteen has the HTML5 flag set):
<form role="search" method="get" class="search-form"
action="<?php echo home_url( '/' ); ?>">
<label>
<span class="screen-reader-text">Search for:</span>
<input type="search" class="search-field" placeholder="Search …"
value="" name="s" title="Search for:" />
</label>
<input type="submit" class="search-submit" value="Search" />
</form>
Because this same form could be used in the unordered lists of the sidebar as well as wherever else you may include it, the HTML markup may need to be adjusted to be generic.
Another option is for special-case search forms, often seen in the nameplates of sites, to create a traditional PHP include for the search form. Make sure the filename is not one of the reserved filenames for the template engine, and then include it in the appropriate place in your other template:
<?php include($bloginfo['template_directory'].'includeThis.php'); ?>
Remember to use the bloginfo[] array to keep the theme portable. You can also use this method to comply with the DRY principle when there are consistent elements across multiple pages but outside of the header and footer templates. WordPress itself does an excellent job of enforcing DRY through the variety of page templates, assuming you, as a developer, stick to the rules. But there are always more ways to skin a cat and traditional PHP operations can help out here. This functionality is often used to keep the template sizes manageable.
Other Files
Here are some other files that polish off your theme. For the Themes Administration screen, you will want to include a screenshot for easy visual recognition of your theme. Create an image file to represent your theme that is 880px wide by 660px tall and save it as a PNG. GIF and JPG are also accepted and preferred in that order. This is a large graphic size that will be scaled down for viewing in the Dashboard. Traditionally, this image is an actual screenshot of your site using your theme. The remainder of the information for each theme on the Manage Themes screen comes from your style.css header information.
Many themes include several language files and are ready out of the box for localization. If you intend to launch your site in multiple languages, pay attention to the special considerations involved. Localization and internationalization are well outside the scope of this book. Just bear in mind that WordPress supports this functionality when you need it.
CUSTOM PAGE TEMPLATES
Occasionally, you will have a specific page that requires a unique layout, relative to the rest of your website. This could be a contact page, or it could be that each product on a brochure website has its own specific page. It could be that you are making a custom-landing page for a marketing campaign or a QR code. Maybe using a general page.php template is not going to meet the needs of your site because each page has its own distinctive qualities. Possibly, you have widgets you would like to display on certain pages and not others, although you could probably accomplish this with a plugin like Widget Logic. Or perhaps you are integrating a third-party web application into your WordPress site. This is where page templates step in.
You can assign page templates to a page using the Page screen in the Administration Dashboard. WordPress will assign which page template to use when displaying your content following the already established specificity pattern. For example, if your page is assigned a page template, that will be selected because a page template is the most specific option. If the default page template is set, the traditional page.php template discussed earlier will be used to render your content. Finally, if neither of those templates is available, WordPress will use your index.php template.
In Figure 9.5, you can see several page templates to choose from, including the default page template; Twenty Fourteen’s templates for a contributor page and full width (no-sidebar) page, discussed later; and the two added as examples, Boring and Fancy.
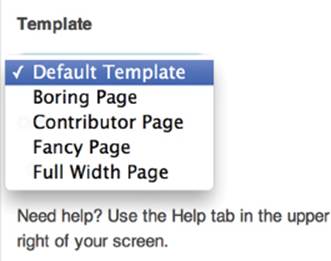
Figure 9.5 Selecting the page template
When to Use Custom Page Templates
Many reasons exist for having custom page templates in your site. Custom page templates are very powerful tools to add to your arsenal, and when used effectively they can extend the breadth of your site immensely. Custom page templates are yet another way to assign templates to specific pages. Unlike previous examples, which relied on an inherent attribute of a page, such as the page slug or ID, category, or tag, custom page templates can be assigned arbitrarily through the Page screen to any page in your site.
A simple example is to create page templates for unique product pages, where the sidebar of each product page has unique data and links specific to that product. As with everything in WordPress, there are many ways to achieve this functionality, but sometimes all that is needed when creating custom page templates is a simple, straightforward method. And often, simplest is best.
Another simple example is to create a custom page template that uses an iFrame HTML element to include a third-party web application. Depending on the exact needs and aspirations of the site (not to mention budget), this can be a quick and dirty way to integrate two sites into one. The caveats to this method are the same as those you would usually find when using iFrames, that is, bookmarking does not work as expected and you introduce a competing look and feel from another website. But admittedly, this method has been used before because sometimes the quick and dirty method is all that you need.
More complex examples include integrating different web applications into your WordPress site. For example, a page template could be used to create a custom order page that posts directly back into your e-commerce package. This would be a nightmare to set up and maintain inside the WordPress Dashboard, but when using custom page templates, it is all in the code, and you still get the gooey goodness of WordPress to wrap it all in.
In real life, custom page templates are used for event calendaring and registration. On one occasion, an expansive education class was built offering web applications for searching and displaying courses as well as registering for attendance either in person or via the web. This system had been in place for several years and was heavily used. The simplest way to integrate this education registration system into WordPress client sites was to create custom page templates.
In essence, this extended the existing registration system with some REST web service commands. Then a set of custom page templates was created that communicated with the web services but displayed the contents locally inside the WordPress site wrapper, using the local style sheet. Although setting up the page templates was daunting at first, the benefits in the end were enormous:
· Continued use of the existing system that corporate staff was already knowledgeable about and trained to use.
· Extended registration options to multiple sites, therefore increasing the potential audience.
· Even though the registrations were spread across multiple web properties, they were still centralized into the one system.
· The education system matched the look and feel of the local website because it utilized the local theme of the WordPress site.
How to Use Custom Page Templates
Creating the custom page templates themselves is really easy. The goal of the templates and making the templates achieve the goals is what really complicates the matter.
To create a page template, copy an existing template that is similar to the new template you are going to make; usually this is the page.php template. Name this new template file whatever you want and keep it in your theme directory. However, in our development shops, we tend to follow a convention that page templates are named t_templatename.php. That is, they are prefixed with the t_ so it is easy to distinguish between traditional template files and individual page templates, although the name of this file really does not matter as long as you avoid the reserved filenames in the hierarchy.
Since WordPress 3.4, you can also save your page template files inside a subfolder of your theme. This makes organizing your theme significantly cleaner and you will notice the Twenty Fourteen theme uses a page-templates folder for this purpose.
To make your new template a page template, you must include a special comment section at the top of the file:
<?php
/*
Template Name: Fancy Page Template
*/
?>
This must be in the first couple of lines of your file for WordPress to scan and register as a page template. In practice, the only thing above this stanza is the source code control comment.
The name of your template can be anything you want. It should be meaningful, but not too long, because WordPress will use this PHP comment to populate the drop-down box in the Dashboard screen. Your page template is now registered with WordPress.
The remainder of your page template can be whatever you need to accomplish your page template goals. You can, and most likely should, use the built-in WordPress functions such as get_header() and get_footer() as well as the content gatherers. Basically you can do whatever you need to do here; just remember you will have to sleep in the bed that you make.
For example, if you remove the dynamic WordPress sidebar generation and replace it with static HTML, you have also removed all the functionality from the Dashboard to manage widgets on this page template. It would be a better practice to register a new widget area on this page template and continue to use the Widget screen to manage this content.
Keep in mind that page templates are not restricted to displaying page information. You could create a page template that displays a traditional post loop or do something that is completely unrelated to the WordPress content. Then just leave the page text editor blank, or use it to write instruction notes to yourself.
Stock Twenty Fourteen Page Templates
The Twenty Fourteen theme comes standard with two page templates for use on your site. Twenty Fourteen has a special folder for the page templates files unsurprisingly titled page-templates. You will look at those briefly here, since you have them available.
The first page template that comes with the Twenty Fourteen theme is full-width.php. This template is pretty simple and straightforward. Basically, it is a page without any sidebar content, hence full width. Pretty self-explanatory.
The second custom page template is not really more complicated. It is called contributor.php. The contributor page template is designed to be a fancier index page for your WordPress site authors or contributors. This page template uses a function found in thefunctions.php template to list all the authors who have published content on the site and includes their avatar image and biographical data from the user profile. Finally, the function displays links to the actual content.
Custom page templates are very powerful tools. Truly, if you cannot fit your content into the predefined template types, you always have this last trick up your sleeve to make a custom page template and override everything. This is also a great way to add special non-WordPress functionality to your website.
OTHER THEME ENHANCEMENTS
These are some additional enhancements that you can make to your theme. Most of the following ends up in your functions file and not as individual files. These are enhancements to your theme that enrich the site administrator’s content management capabilities.
Menu Management
As mentioned before, most WordPress sites that are being used in a CMS capacity have a mixed bag of pages and posts. The most difficult part of the hybrid pages and posts layout is creating a meaningful navigation. Your site’s global navigation is a very important aspect of your site if you intend to have any stickiness with your visitors. Visitors should be able to explore your content organically and experimentally through related posts and pages, but there should also be a strategy to your content organization and this is the function of your global navigation. On occasion, we have lucked out on the structure of a site and have been able to create two tiers of navigation, one for the page content and one for the post content. Before WordPress 3.0, the two content types essentially needed to be intertwined and the navigation had to be hand-coded using the wp_list_pages() functions with many different parameters to get the menus you wanted. This was all coded in the templates and not very flexible for the site administrator.
However, those days are gone. With WordPress 3.0, a new menu management system has been introduced. This menu management gives all the control to the site administrator. As a theme developer, you just have to set it up for your theme presentation.
The first step is to register the menus for your theme. Basically this means assigning named locations for each menu to earmark the HTML real estate for the menu. You will use the register_nav_menu() function for this. This function takes two parameters. The first one is a nickname or handle that you will use in the template files. The second parameter is a friendly human-readable name that is used in the WordPress Dashboard. For example, the following will create a single global navigation menu for use in your theme:
register_nav_menu('primary', 'Global navigation menu');
You can actually have as many menu locations in your theme as you want or need. Just feed the register_nav_menus() function an array of locations, as seen in Twenty Fourteen:
// This theme uses wp_nav_menu() in two locations.
register_nav_menus( array(
'primary' => __( 'Top primary menu', 'twentyfourteen' ),
'secondary' => __( 'Secondary menu in left sidebar', 'twentyfourteen' ),
) );
This will notify WordPress that you have menu locations available and identified, but you also need to assign their position in the template files. Usually, because of the way websites are designed, this occurs in your header.php template. To place the desired menu in your template file, use the wp_nav_menu() function like so:
wp_nav_menu( array( 'theme_location' => 'primary', 'menu_class' => 'nav-menu' ) );
This function can take many parameters, passed in as an array, to control the HTML styling, but the important parameter is to identify which menu you want placed at this location. In the preceding example, the real estate is allocated for the menu nicknamedprimary.
Finally, to glue this all together, your site administrator can use the Menus screen to manage the menu. Notice that you are identifying a menu location and then assigning that location to an actual position in the HTML hierarchy. This is all at the code level. In turn, the site administrator assigns content to these named locations through the Dashboard. So while they all must be set up together so that they work together, they are actually disconnected. Assigning meaningful names to the menu locations is important for the Dashboard aspect of menu management, but how the site administrator uses that menu may be different than you intend.
What is meant by “disconnected”? Let’s go back in time to how WordPress used to build menus before the new menu system. This process involved using the wp_list_pages() function with many parameters to hand-craft the exact menu you needed. In fact, the first edition of this book devoted many pages to reviewing this topic. Creating the menus programmatically in the template file worked because it was directly tied to actual content of the site and the hierarchy of pages.
However, it was not perfect. You had to use tricks such as building a blank page to show up in the automated navigation menu, and then use the Page Links To plugin by Mark Jaquith to redirect that page to category or archive templates. In addition, the PageMash plugin was recommended to manage the page hierarchy and page order for the wp_list_pages() function. This tried and true method is frequently employed for many sites. It works because it is programmatic, meaning it is predictable. It works because it is directly tied to content. It sometimes does not work when the content gets a major change.
Sometimes, a change in the content means the wp_list_pages() parameters need to be adjusted. With this method, the changes have to be made at the code level, and the power is taken away from the site administrator. Whether this is good or bad is a choice you have to make based on the convenience and needs of your site.
The predictability of the new menu management system is another problem. With the menu system, your site navigation is arbitrary. It is not directly tied to your content. You can automatically add top-level pages to a menu, but you cannot automatically add the child pages. In addition, the page hierarchy is not reflected in the menu system. You have to manually manage the menu above and beyond the management of content. One possible trap is that when you delete a page from your site, the menu item remains. With the new menu system, you cannot programmatically plan for sub-tree menus to use as subsection navigation; you have to actually manage an additional menu structure.
This disconnect can be both a pro and a con. On the one hand, the site administrator really has complete control over the menu content. He can hand-craft the menu to meet his needs. However, it is important for your site administrator to understand that he has to manage the content and the menu. There can be confusion when some aspects of the site navigation are programmatically created in the theme templates, but the menu is handmade.
For example, imagine you have built a new theme for a client that has multiple product pages. These are special pages to highlight individual products with their specific information and details. To further enhance the user experience, and perhaps cross-sell some product, you have built a custom page template for the products pages that has a built-in related products section at the bottom. This related products section is generated by code in the imaginary t_product_page.php custom page template. The challenge is that when a site administrator adds a new product page, it will show up automatically in this related product page code on some other sites, but will not show up automatically in the menu. The site administrator will have to manually edit the menu to add this page.
This is not a devastating issue; it is just disconnected and an extra step. The challenge is in empowering the site administrator and asking him or her to manually configure things, as opposed to simply adding code to have things happen automatically.
Widget Areas
Widget areas work very much the same way as menus. In your functions.php file, you identify and name different areas for different parts of the site. These are often thought of as sidebars but can be so much more. Do not restrict yourself to thinking widget areas only belong in the sidebars of your site. Many themes, including Twenty Fourteen, are expanding the number and location of widget areas to include the masthead or header area, the footer, and even the middle of the loop. We have even seen themes that have hundreds of widget areas.
The nice thing about widget areas is their flexibility. The number of widgets that can be placed into a widget area is immense. Having multiple widget areas empowers the site administrator to control subject matter in areas of the site that are really outside the primary content areas of the site.
As previously mentioned, setting up widget areas is very similar to setting up menus. In your functions.php file, you must identify and name your locations. Because widget areas have more flexible and varied content than menus, which are pretty much unordered lists, you generally pass some HTML wrapper information for use when rendering the widgets. Also, because widget areas have evolved from the traditional sidebar use, the function to register them is still namedregister_sidebar(), but again, do not let this pigeonhole them. Here is a widget area code snippet from Twenty Fourteen:
register_sidebar( array(
'name' => __( 'Primary Sidebar', 'twentyfourteen' ),
'id' => 'sidebar-1',
'description' => __( 'Main sidebar that appears on the left.',
'twentyfourteen' ),
'before_widget' => '<aside id="%1$s" class="widget %2$s">',
'after_widget' => '</aside>',
'before_title' => '<h1 class="widget-title">',
'after_title' => '</h1>',
) );
Similar to menus, you pass the function a friendly name for use in the Dashboards and an identifier for use in the theme templates. Beyond that, the additional parameters are for styling the widget consistently. In this example, Twenty Fourteen is using HTML5asideelements to wrap each widget and widget titles in h1 tags. This code notifies WordPress that there is a widget area available for content.
The next step is to assign the HTML real estate position to this widget area. For this example, you will look at sidebar.php in Twenty Fourteen, but again, widget areas can be anywhere in your template. Here’s the code:
<?php if ( is_active_sidebar( 'sidebar-1' ) ) : ?>
<div id="primary-sidebar" class="primary-sidebar widget-area"
role="complementary">
<?php dynamic_sidebar( 'sidebar-1' ); ?>
</div><!-- #primary-sidebar -->
<?php endif; ?>
A couple of things are going on in this code snippet. First and foremost, the first line is looking to see if the widget area named sidebar-1 has content assigned in the Dashboard, and if it does, it will display it. This is one of the big benefits of widget areas: If they do not have content, they do not display.
Post Formats
This is simply a feature flag that you can turn on or off in your functions.php file. If your theme intends to use the built-in post formats, or a subset of them, you can enable them.
Post formats are essentially a way to customize the display of certain types of posts. This is most commonly seen when you are using WordPress for blogging or archiving a journal. The different post formats can be used to pull different loop HTML rendering as you saw earlier in this chapter. This allows you to present quotes or links differently than full posts.
WordPress currently supports ten post formats for varying content. You can enable any or all of these formats depending on the goals of your theme. The standard format is for traditional posts and is enabled automatically. This is the format used in WordPress forever; it just now has a name assigned to it.
In addition, there are nine new formats as of WordPress 3.1. Here they are, with the recommended styling, although using the flexibility of WordPress, you can style these to fit your needs:
· Aside—This is similar to a quick note. It is usually presented without the post title.
· Audio—Obviously, this format is for an audio file, perhaps a podcast or a band releasing a single.
· Chat—This format is usually a chat transcript. This is usually styled using the pre HTML element to keep the line breaks.
· Gallery—This is a gallery of image media attachments. The actual post content will typically contain a gallery shortcode. This format is for styling the gallery.
· Image—This post format is for a single image. The single image can be embedded in the post content, or a URL in the post content will pull that image to your site.
· Link—This format is for a link to another URL. Generally, these are presented as simply the link, without the title. This format is often used for creating your own bookmark site or reminders about URLs that interested you.
· Quote—Another self-explanatory one—this format is for quotes. This format is used to archive quotes that have some special meaning to you. You can present this format without the title or flip it around and use the title information as the attribution to the quote.
· Status—Think of this format as Twitter or Facebook updates. Typically presented without a title. You can use this format to make your own Twitter clone.
· Video—Similar to image and audio, this format is for presenting a single video to your visitors. The video can be embedded in the content or as an external URL.
To enable post formats for your theme, simply select which formats you intend to use and pass them as a parameter array. For example, the Twenty Fourteen theme is supporting a subset of the previous formats:
/*
* Enable support for Post Formats.
* See http://codex.wordpress.org/Post_Formats
*/
add_theme_support( 'post-formats', array(
'aside', 'image', 'video', 'audio', 'quote', 'link', 'gallery',
) );
Remember that the standard post format for traditional post content is always enabled. Post formats can tailor your theme to specific niche uses or broaden your theme to present different content types in unique and customized ways.
Theme Settings
Many of the theme frameworks offer a special Theme Settings screen for customizing the theme framework. This is a coded solution that comes from the theme developer but creates a new Administration screen with whatever settings the theme developer has opted to include. This is yet another feature that is a balance of empowering the site administrator as opposed to handling aspects in the theme template code.
Creating your own Theme Settings screen is a very complex endeavor that is outside the scope of this book. Each theme is different, and it is the developer’s goals that determine which features or aspects of your theme are configurable.
To create a Theme Settings Administration screen you first have to build the control panel code and forms and register them with WordPress. You then have to take the configurable options and use them in your template files. The control you give to your site administrator can be very powerful, but it does make developing your templates a little trickier.
For more information about creating your own Theme Settings screen, check out the WordPress Codex and other theme frameworks; there are also many good tutorials online.
Theme Customizer
Some of the functionality of the Theme screen has been moved into the new Theme Customizer, which was introduced in WordPress 3.4.
This is a new screen for customizing the theme. The really neat thing is that it can show the site administrator a live preview of the site while he is customizing it. This is truly the biggest benefit of this component. This real-time live preview allows the site administrator to experiment with the site and see how it would look without affecting the live production site until he is done. In the past, this process involved making a change in a Theme screen, discussed previously, in the code, or in other customizable places, and publishing those changes to the live site. Then the site administrator had to browse to the live site to see the outcome. At the same time, any visitors browsing the site saw the in-process design changes. The change may or may not have been what the site administrator intended, or worse, may have broken some display aspect. The live preview presents this whole process while allowing great control.
Basically, the Theme Customizer screen uses the WordPress settings API to store configurable design information. Then using specially crafted functions in the functions.php file, WordPress applies the changes to the HTML.
In the Twenty Fourteen function for changing the header color, the functions.php file injects a new CSS stanza into the HTML head that overrides the style sheet. In practice, this is not really optimal code for a high-traffic site; however, this is yet another example of trading optimization for site administrator configurability.
THEME HIERARCHY AND CHILD THEMES
So far in this chapter, you have looked through the template files that make up a complete theme, focusing on the stock Twenty Fourteen theme. You even considered renaming it and making your custom theme in that new directory using the Twenty Fourteen theme as a starter theme. This is a good way to get started with theme creation as it helps you dive into the internals of how a theme works. And, in the real world, this is how many development teams work today. This method works well because you know exactly where your template files and CSS files are that need to be edited. The whole theme is self-contained, which minimizes workflow and deployment efforts—not that it’s perfect, but it is very solid.
However, with the release of WordPress 2.7, child themes became a functional reality. While you could implement child themes prior to WordPress 2.7, it was not until template file inheritance was included that child themes became a viable development option. Child themes let you take an existing theme or theme framework and use the best parts of it, and then extend and modify it, license permitting, to meet your own theme’s needs while maintaining future updates to the parent theme. After you have the basics of theme development down, it is highly recommend that you pick a theme framework you are comfortable with (a few are mentioned in the next section) and create child themes. Child themes are the future of theme development for WordPress.
This concept is pretty revolutionary for several reasons. First, it certainly opened the door for theme frameworks. Starting with a solid foundation, you can now make countless variations on the theme simply through inheritance. Theme frameworks tend to be very plain, and intentionally so, but by using child themes, you can inherit all the CSS semantic hooks and microformat gooey centers and build your own candy shell around it, basically taking the best parts and making a new creation.
Second, updates to the parent theme or theme framework will not overwrite your customizations. Previously, when you made modifications to your copy of the theme, you had to keep track of the changes you made so that you could reapply them when the theme was upgraded. This can be somewhat automated via a source code management solution, but it is arduous at best, when it works. And there is always the day when you forget to make a modification to the updated files.
Third, child themes led the way for auto-updating themes in the Theme screen Dashboard. Occasionally theme templates are vulnerable to security exploits such as cross-site scripting. Using a properly inherited child theme means the parent theme can auto-update to address security issues while not affecting your child theme. This creates a more secure implementation for your site.
There are a couple of caveats here. The functionality that keeps your child theme customizations unaffected works both ways. If you override a particular template file with your own customizations, any enhancements to the parent template file of the same name will not cascade to your unique file. In practice, this could create a false sense of security, where you may have copied a poorly coded template file to modify, and then changes were made to the parent version but your file is unaffected and still vulnerable. That is, because you are carrying forward the vulnerability in your extended code, you continue to override any repaired code. This would not only apply to security amendments but would also apply to any feature enhancements. That is, child themes do not totally remove you from the code management process.
In addition, there is a little bit of CSS overhead here. Generally, a child theme builds upon the CSS of the parent theme. And, in truth, that is exactly how CSS is designed to work, hence the word cascading in the name. So, for this to work in child themes, the child theme has to include the CSS from the parent theme, even the rules that get overridden in the child theme. That means that the byte weight of the CSS in your child theme may be quite a bit larger than what you actually use in the browser, but you have to transfer it all anyway. This is exactly the opposite thinking of the current “mobile first” design principles.
That said, child themes are a fantastic feature of WordPress, and we recommend using this methodology when the situation warrants it. Certainly, maintaining a pristine theme framework and then extending that theme to individual sites adds to the benefits of a common theme vernacular of CSS and functions, as well as the other benefits mentioned previously. Again, using child themes is the future for WordPress theme development and is a best practices recommendation.
Take a look at how child themes actually operate and what is required in making your first child theme. The first thing you need to do is find the theme you are using as the parent. Your parent theme does not have to be labeled a theme framework. You can extend any theme as long as it meets the following conditions:
· The licensing permits you to extend or modify the theme.
· The parent theme is not a child theme itself.
In this example, you will continue to build on the stock Twenty Fourteen theme, but you could use any theme or theme framework as the parent. As alluded to earlier in the chapter, to make your custom theme a child theme of another theme, you must add a line to the header information of your style.css file. This line informs WordPress of the location of the parent theme. Therefore, the variable in the comment should be the folder name of the theme. Although it depends on the server, it is best to be case-sensitive when naming your theme. In this instance, you are adding the following line:
Template: twentyfourteen
To illustrate this, the entire header comment block from the sample child theme reads as follows:
/*
Theme Name: A Twenty Fourteen Child Theme
Theme URI: mirmillo.com
Description: A sample child theme
Author: David Damstra
Author URI: mirmillo.com
Template: twentyfourteen
Version: 1.0
*/
As discussed previously, having the style.css file with the properly formatted header information in your uniquely named folder registers your theme with WordPress.
To retain backward compatibility with older themes that do not import their stylesheets, the next step is to import the CSS from the parent theme so that your custom theme has base rules to work with:
/* import the base styles */
@import url('../twentyfourteen/style.css');
This CSS import is not required in your child theme if your parent theme includes its stylesheets the correct WordPress way using the wp_enqueue_style() function.
At this point, you can activate your theme in the WordPress Theme screen. You have a fully functional child theme of the Twenty Fourteen theme. It will look exactly like the Twenty Fourteen theme because it is, in essence, an exact copy of the parent theme. The remainder of your style sheet operates like traditional CSS where you can override previous rules through the CSS rules of specificity and precedence, including the order in which they are listed—because your custom styles appear later, they will take precedence.
Again, working with CSS is outside the scope of this book, so let’s, go ahead and extend the child theme a little bit. Although you can make these same changes with the Theme Customizer presented earlier, for the sake of this example make the changes in CSS. Update the child theme with a nice pink background and change the base font. Here’s what the complete style.css file might look like:
/*
Theme Name: A Twenty Fourteen Child Theme
Theme URI: mirmillo.com
Description: A sample child theme
Author: David Damstra
Author URI: mirmillo.com
Template: twentyfourteen
Version: 1.0
*/
/* import the base styles */
@import url('../twentyfourteen/style.css');
body {
background: #E0A3BD;
color: #333;
font: 100%/1.5 calibri, arial, verdana, sans-serif;
}
From here on out, your browser developer tool is your best friend. Use the inspector to see the current style rules applied to various elements and make the appropriate changes in your child theme’s CSS file. Again, remember to follow the precedence and specificity rules of CSS.
Your child theme can be as simple or complex as you make it. You can create a completely unique theme by simply editing the style sheet, as you have done previously. Or your child theme can turn into a completely new theme with all new templates, although this most likely defeats the purpose of using a child at all.
Here is how it works. When WordPress makes a decision on which template file to use, first it scans your child theme directory for that file. If that file does not exist, the parent theme directory is scanned. WordPress will prefer your template files over those of the parent theme, which means you can override the functionality of specific templates while maintaining the core of the parent theme. Or, your child theme could introduce custom page templates, but the foundation templates are pulled from the parent. There is a wide scope of opportunities here, although keep in mind the previously mentioned limitations.
The easiest way to accomplish this is to copy the template file you want to modify from the parent theme directory into your child theme directory and then modify as needed.
For example, the author template in the Twenty Fourteen theme is perfectly functional, but suppose you want to add an author image from Gravatar to this template. Again, this is an intentionally simple example and there are many ways to copy this.
First, copy the author.php template from the Twenty Fourteen theme into your child theme directory. Second, edit your child copy to include the avatar image. You could add it around line 33 of the code, where the author’s biographical content is displayed. It might read something like this:
<?php if ( get_the_author_meta( 'description' ) ) : ?>
<div class="author-description"><?php the_author_meta( 'description' ); ?>
<?php echo get_avatar( get_the_author_meta( 'user_email' )); ?>
</div>
?>
In this example, you only show the author’s avatar if the author has included biographical content in his user profile. You can see an example of what this looks like in Figure 9.6.
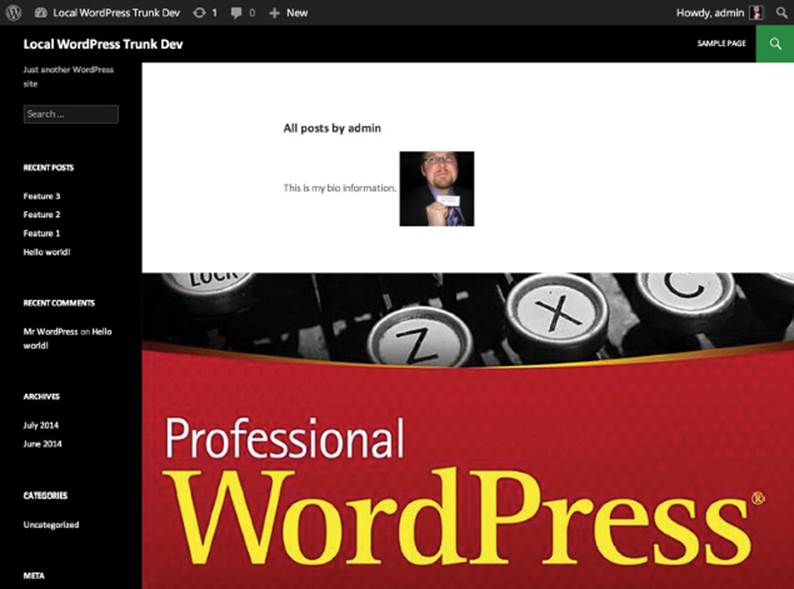
Figure 9.6 Child themes make it easy to apply styles and content to specific pages.
You can further extend the child theme with your own functions.php file. WordPress automatically includes the parent theme’s functions, but in addition, it also includes your child theme functions. You do have to be conscientious about function naming. Be very careful not to create functions in your own theme that have the same name as a parent theme function. If you need to override functionality, our advice is to make a new function in your own theme with a new name to avoid name resolution conflicts and adjust the template files as necessary to call your function instead.
In addition, theme frameworks have advanced significantly and many include multitudes of custom hook locations and filters for you to capitalize on. Using these custom hooks and filters, you can actually use your child theme’s functions.php to inject and modify the parent theme’s HTML without making a second copy of the template files. This is a process that builds on the topics covered in Chapter 8. This is a much more complex way to build child themes but provides you the most safety because you are able to update the parent theme in the future as your child theme uses the hooks of the parent to amend and change the theme to make it your own.
As you can see, child themes are yet another powerful tool in the WordPress theme arsenal. You can quickly get a theme up and running using an established theme as a base, and then modify and extend only what is required to create your own theme, all the while future proofing the upgradeability of your foundation theme.
This really is a game changing feature once you grasp it. It is not a simple concept, especially when you use a framework with custom hooks and filters. Even if your design team hand-codes each theme from scratch, having a foundation to start from offers a number of benefits, including increasing efficiencies because commonly implemented features are already being implemented consistently, and they also have the familiar CSS and markup vocabulary that your team is intimately familiar with. Regardless of whether your parent theme is one of the popular theme frameworks or something you have developed in-house, the benefits are quite tangible.
PREMIUM THEMES AND OTHER THEME FRAMEWORKS
Thus far in this chapter, you have explored the Twenty Fourteen theme and used it in most of the examples. But certainly, it is not the only theme or theme framework out there and may not be the best match for you or your development team.
Many of these other themes you will look at briefly include another layer of abstraction in them or a flurry of functions in the functions.php file. Generally, this abstraction brings the ability to modify the theme into the WordPress Dashboard. This may be ideal for certain clients who are not PHP-savvy and want that control delegated to the site administrator rather than the developers.
The best way to make a choice here is to try each theme out and kick the tires. Find a theme or theme framework that fits your coding style and needs and then run with it. Remember that you can make child themes or modify themes to meet your needs (license permitting, of course) from basically any theme out there, but with the new child theme functionality from back in WordPress 2.7, there has been a growth spurt in theme frameworks. You take a cursory look at some of the more popular theme frameworks (at the time of this writing) here. Many are out there, so be sure to look around.
Please keep in mind that various terms are thrown about with regard to themes. Magazine themes and premium themes mean different things to different people. Sometimes “premium” means the theme costs money; other times it means it includes an administration screen. Some themes that are available for a fee are called commercial themes. A theme framework is typically developed to be built upon. Although they may stand by themselves, they are intentionally written for extension. Starter themes are meant to be forked and edited in place. Your needs may vary with every project, and certainly you need to find a theme that speaks to you.
The following is just a sampling of some more popular themes that we have used in the past. There are many more to choose from and we are not endorsing any one over another.
Underscores (_s) Theme
Underscores (_s) is Automattic’s version of a starter theme. Available online at http://underscores.me, this very minimal theme is the starting point for most of Automattic’s home grown themes on WordPress.com. Automattic does not recommend using _s as a parent theme, but rather this theme was designed to be explored and used as a starter for your next great masterpiece. This theme uses many cutting edge WordPress features and design patterns, so check it out.
Bones Theme
Bones is a starter theme by Eddie Machado. The Bones theme is built on top of HTML5 boilerplate as a foundation, meaning that it is pretty forward thinking. We like Eddie’s philosophy that child themes and theme frameworks are great, but sometimes they make things more complicated than they need to be. The simplicity of taking a starter theme and making a one-off project theme for a site appeals to many seasoned developers and this is the goal of the Bones theme.
In addition to HTML5, the Bones theme is a responsive base using media queries and a mobile-first mentality. Responsive web design is covered a little more in Chapter 12, but know that if you are making sites that you expect to be viewed on smartphones, having responsive views from the get-go helps. Bones recently dropped LESS support but continues to support Sass CSS pre-processor functionality for advanced developers. Check out the Bones theme at http://themble.com/bones.
Carrington Core Theme
Carrington Core is a theme framework by Alex King’s Crowd Favorite. Carrington is designed for child themes and is built to be very modular, meaning you add in what functionality you need. Carrington does this by abstracting code into small components. This allows code reusability and keeps things organized. At first glance, Carrington can seem complicated, but once you digest the processes involved, it makes sense.
Crowd Favorite also has some other interesting WordPress projects, including RAMP, which was mentioned in Chapter 3, and the Carrington Build theme, which is a drag-and-drop pay layout generator. Learn more about the Carrington theme athttp://crowdfavorite.com/carrington-core/.
Genesis Theme
The Genesis theme framework by Brian Gardner’s StudioPress is one of the most, if not the most, popular theme frameworks around. The Genesis theme framework is designed exclusively for child themes, and StudioPress even sells many variations. To this end, the Genesis framework has many additional hooks and filters for customizing your child theme to make it unique.
The Genesis theme framework is an evolution of the Revolution theme. The Revolution theme was a pioneer in WordPress themes and really raised the bar to change theme development standards. Revolution was one of the first themes to embrace the magazine theme style that helped WordPress transcend the blog stereotype and become a viable CMS solution. Magazine-style themes made WordPress look less bloggy and more like a traditional website. In addition, the Revolution theme was one of the early commercial themes. The Revolution theme has since been retired and is no longer available. However StudioPress has taken its experience and created Genesis and many child themes.
You can find the Genesis Theme online at http://studiopress.com.
Hybrid Core Theme
The Hybrid theme by Justin Tadlock is free; a club membership fee is charged for access to the theme documentation, tutorials, and support forums. This theme includes a nice control panel to toggle various features and CSS hooks on and off. The Hybrid theme has several ready-made child themes available.
This theme has rich CSS hooks throughout the posts and body tags. It also includes numerous widget-ready areas and many custom page templates in the stock installation. These custom page templates cover a variety of use cases and really add to the theme, if you know how to use them. The Hybrid Core theme is modular with many features and extensions that can be enabled if you need them.
You can find more information about the Hybrid Core theme at http://themehybrid.com/.
Other Themes
The themes mentioned are some of the venerable tried and true themes that have made the WordPress theme ecosystem what it is today. That is not to say that they are the greatest, the most current, or the best choices for the foundation of your new projects. New theme frameworks and starter themes appear all the time and finding the best one for the underpinning of your project is a task unto itself. You would be remiss if you did not do your own searching and exploration of the current crop of themes, many of which are adopting new development processes such as grunt and bower JavaScript tasks and Sass and LESS CSS preprocessors, to name a few.
SUMMARY
In this chapter, you covered how to use themes to organize, structure, and present your content. Your theme is the face of your site, and no matter how good your content is, this presentation is what really seals the deal on the user experience. A theme that looks amateurish can hurt the credibility of your site, whereas a sharp, professional theme can enhance the whole experience.
In the next chapter, you will look at taking external content sources and incorporating them into your WordPress site to further develop the quality of your content and the user experience.