Professional WordPress: Design and Development, 3rd Edition (2015)
Chapter 8. Plugin Development
WHAT’S IN THIS CHAPTER?
· Creating plugin files
· Data validation and plugin security
· Using WordPress filter and action hooks
· How to properly use the Settings API
· Creating a widget and dashboard widget
· Creating custom shortcodes
· Supporting language translation
· Publishing a plugin to the official Plugin Directory
· Plugin Directory header and icon assets
WROX.COM CODE DOWNLOADS FOR THIS CHAPTER
The wrox.com code downloads for this chapter are found at www.wrox.com/go/wordpress3e on the Download Code tab. The code is in the Chapter 8 download file and individually named according to the code filenames noted throughout the chapter.
One of the main reasons WordPress is such a popular software platform is the ease with which it can be extended. Plugins are the primary reason for this and allow endless possibilities in extending WordPress. This chapter discusses everything you need to know to create amazing plugins in WordPress.
You are going to look at plugins from both a functional and structural perspective. Starting with the packaging of plugin files, you’ll dig into the API hooks that connect your custom plugin code to the WordPress core and show how to integrate a plugin into various parts of the WordPress editing, management, and display processes. Finally, you will see how to publish a plugin for others to use. At the end of this chapter, you build a WordPress plugin from the ground up. You’ll utilize many of the features discussed in this chapter and learn the proper way to extend WordPress through a custom plugin.
PLUGIN PACKAGING
When developing plugins in WordPress, it’s best to follow a standard plugin packaging template—that is, certain functional and descriptive components that will exist in all plugins you create for WordPress. This chapter discusses the requirements for a plugin, as well as recommended additions such as software license and internationalization. While the actual code implementation of the plugin is the exciting part of the process, consider the plugin packaging as you would elementary grammar rules for a new language: necessary for making yourself understood.
Creating a Plugin File
The first step in creating a WordPress plugin is to create a new PHP file for your plugin code. The plugin file name should be descriptive of your plugin so it’s easy to identify your plugin in the plugins directory. It should also be unique because all WordPress plugins exist in the same folder. If your plugin file name is too generic, you run the risk of another plugin having the same file name, which would be an obvious problem.
A plugin can also exist in a folder containing all of the necessary files the plugin needs to run. A folder should always be used because it helps keep the user’s plugin folder organized. It’s also a good idea to maintain a clean folder structure, which refers to keeping all similar files together. For example, if your plugin includes images, you should create a /images folder inside your plugin folder to store any custom images your plugin might use.
Let’s look at a standard folder structure for a plugin:
· /unique-plugin-name (no spaces or special characters)
· unique-plugin-name.php—Primary plugin PHP file
· uninstall.php—The uninstall file for your plugin
· /js—Folder for JavaScript files
· /css—Folder for style sheet files
· /includes—Folder for additional PHP includes
· /images—Folder for plugin images
Keeping your files organized using a clean folder structure can make it much easier to track the flow of your plugin over time.
Creating the Plugin Header
A requirement for all WordPress plugins is a valid plugin header. The plugin header must be defined at the very top of your main PHP file as a PHP comment. It does not need to exist in every file for your plugin, only the main PHP file. This header tells WordPress that your PHP file is in fact a legitimate WordPress plugin and should be processed as such. Following is an example of a standard plugin header:
<?php
/*
Plugin Name: Halloween Plugin
Plugin URI: http://example.com/wordpress-plugins/halloween-plugin
Description: This is a brief description of my plugin
Version: 1.0
Author: Michael Myers
Author URI: http://example.com
Text Domain: prowp-plugin
License: GPLv2
*/
The only required line in the plugin header is the Plugin Name. The rest of the information is optional but highly recommended. The information listed in your plugin header is used on the Manage Plugins section of WordPress. You can see what the header looks like in WordPress in Figure 8.1.

Figure 8.1 Example plugin listing
You can see how important the plugin header information is, including all optional data. The information should be accurate and provide good links to your website and the plugin URI for additional information and support regarding your plugin.
Plugin License
When developing a plugin you plan on releasing to the public, it’s customary to include the software license that the plugin is released under just below your plugin header. This is not a requirement for the plugin to function, but is a good idea to clearly state what software license your plugin uses. A license comment block will also state that there is no warranty, which protects you from liability should someone decide your plugin destroyed his or her site. Following is a standard GPL license, under which most WordPress plugins are released:
<?php
/* Copyright YEAR PLUGIN_AUTHOR_NAME (email : PLUGIN AUTHOR EMAIL)
This program is free software; you can redistribute it and/or modify
it under the terms of the GNU General Public License as published by
the Free Software Foundation; either version 2 of the License, or
(at your option) any later version.
This program is distributed in the hope that it will be useful,
but WITHOUT ANY WARRANTY; without even the implied warranty of
MERCHANTABILITY or FITNESS FOR A PARTICULAR PURPOSE. See the
GNU General Public License for more details.
You should have received a copy of the GNU General Public License
along with this program; if not, write to the Free Software
Foundation, Inc., 51 Franklin St, Fifth Floor, Boston, MA 02110-1301 USA
*/
?>
To use this license in your plugin, fill in the year, plugin author name, and plugin author e-mail in the preceding comment. By doing so, your plugin will be licensed under the GPL.
WordPress is licensed under the GPLv2 software license. This is a very common software license for open source projects. Since plugins are dependent on WordPress to function, they should also be released under a GPL, or compatible, software license. For more information on GPL licensing visit http://www.gnu.org/licenses/licenses.html.
Activating and Deactivating Functions
You’ll want to utilize some important functions when creating plugins. The first of these is called the register_activation_hook() function. This function is executed when your plugin is activated in the WordPress Plugins screen. The function accepts two parameters: the path to the main plugin file and the function to execute when the plugin is activated.
In most of the code examples in this chapter, you’re going to use prowp as a function and variable prefix, as well as a descriptive name for your plugin. It’s just a unique short name prefix, but one that you’re going to see in a lot of code. The following example executes the function prowp_install() when the plugin is activated:
<?php
register_activation_hook( __FILE__, 'prowp_install' );
function prowp_install() {
//do something
}
?>
This is an extremely useful function if you need to execute any actions when your plugin is activated. For example, you may want to check the current WordPress version to verify that your plugin is compatible. You may also want to create some default option settings.
One important check you should always do when your plugin is activated is to verify that the version of WordPress the user is running is compatible with your plugin. This ensures any functions, hooks, and so on that your plugin requires are available in WordPress.
register_activation_hook( __FILE__, 'prowp_install' );
function prowp_install() {
global $wp_version;
if ( version_compare( $wp_version, '4.1', '<' ) ) {
wp_die( 'This plugin requires WordPress version 4.1 or higher.' );
}
}
The preceding function uses the global variable $wp_version, which stores the currently running version of WordPress and verifies that it is not running a version lower than 4.1. You do the version comparison using the version_compare() PHP function. If the WordPress version is lower than 4.1, you display an error message to the users that they need to update. The register_activation_hook is only triggered when the user activates the plugin and not when an automatic plugin update occurs.
There is also a function that executes when a plugin is deactivated called register_deactivation_hook(). This function is executed when your plugin is deactivated in the WordPress Plugins screen. This function accepts the same two arguments as theregister_activation_hook function. Following is an example using the deactivation function:
<?php
register_deactivation_hook( __FILE__, 'prowp_deactivate()' );
function prowp_deactivate() {
//do something
}
?>
NOTE It’s important to remember that deactivating is not uninstalling. You should never include uninstall functionality in your deactivation function. Imagine that a user accidentally deactivates your plugin and all of their settings are deleted. That would not be a good user experience and should be avoided.
Internationalization
Internationalization, sometimes shortened to “i18n” in the WordPress Codex, is the process of making your plugin or theme ready for translation, or localized. In WordPress, this means marking strings that should be translated. Localization is the process of translating the text displayed by the theme or plugin into different languages. This isn’t a requirement, but internationalization should be used on any plugin you plan on distributing. This opens up your plugin to the widest possible audience.
WordPress features many different functions to make a string translatable. The first function is __(). That isn’t a typo; the function is two underscores, as shown here:
<?php $howdy = __( 'Howdy Neighbor!', 'prowp-plugin' ); ?>
The first parameter you pass is the string that you want to be translated. This string is what will be displayed to the browser if the text is not translated into a different language. The second parameter is the text domain. In the case of themes and plugins, the domain should be a unique identifier, which is used to distinguish between all loaded translations.
If your code should echo the translatable string to the browser, you’ll want to use the _e() function, as shown here:
<?php _e( 'Howdy Neighbor!', 'prowp-plugin' ); ?>
This function works exactly the same as __(); the only difference is that the value is echoed to the browser.
Placeholders need special consideration when internationalizing your plugins and themes. As an example, look at an error message you want to make translatable:
Error Code 6980: Email is a required field
The obvious, but incorrect, way to attempt to split a string into translatable parts is to separate the field name, error number, and descriptive string:
<?php
$error_number = 6980;
$error_field = "Email";
$error = __( 'Error Code ', 'prowp-plugin' ) .$error_number. ': '
.$error_field .__( ' is a required field', 'prowp-plugin' );
echo $error;
?>
This is actually the wrong way to include dynamic values in your translatable string because your translatable string is cut into two parts. These two parts may not work independently in another language. This could also seriously confuse the translator viewing a bunch of cryptic phrases that mean nothing when separated. The proper way is shown here:
<?php
$error_number = 6980;
$error_field = "Email";
printf( __( 'Error Code %1$d: %2$s is a required field', 'prowp-plugin' ),
$error_number, $error_field );
?>
As you can see, this uses the PHP printf() function, which outputs the formatted string. Your two variables are passed to printf() and inserted into the string in the designated spots. In this example, a developer translating your plugin messages into another language would see the line as Error Code %1$d: %2$s is a required field and know it’s possible to move around the error number and field values to make sense in the target language. Splitting the strings leads to split translations and possibly unintentionally funny translated grammar. Alternatively, you could use the PHP sprintf() function if you want to store the error message value in a variable prior to displaying it.
Plurals also need special consideration when defining your translatable strings. Say you need to translate a string like this:
<?php
$count = 1;
printf( __( 'You have %d new message', 'prowp-plugin' ), $count );
?>
This works great if you have one new message, but what if you have more than one new message? Fortunately, WordPress contains a function you can use to handle this problem called _n(). The following code shows it in action:
<?php
$count = 34;
printf( _n( 'You have %d new message', 'You have %d new messages',
$count, 'prowp-plugin'), $count );
?>
This function accepts four parameters: the singular version, the plural version, the actual number, and the domain text for your plugin. The _n() function uses the number parameter ($count in the example) to determine whether the singular or plural string should be returned.
WordPress also features a translation function you can use to add comments to your translatable strings. This is helpful if you have a string set up for translation that might have multiple meanings. To do this, you use the _x() function, as shown in the following code:
<?php
echo _x( 'Editor', 'user role', 'prowp-plugin' );
echo _x( 'Editor', 'rich-text editor', 'prowp-plugin' );
?>
As you can see, there are three parameters for this function. The first is the text string to translate. The second, and most important, is the context information for the translators. This allows you to add custom comment messages that the translator can read to explain the context of your text to be translated. The final parameter is the text domain.
Now that you’ve prepared your plugin for translation, you must load the localization file to do the translation. To do so, you execute the load_plugin_textdomain() function as shown here:
<?php
add_action( 'init', 'prowp_init' );
function prowp_init() {
load_plugin_textdomain( 'prowp-plugin', false,
plugin_basename( dirname( __FILE__ ) .'/localization' ) );
}
?>
The first parameter you pass is the domain text name that you’ve used to identify all of your translatable strings. The second parameter is the path relative to the ABSPATH variable; however, this parameter is now deprecated in favor of the third parameter. The final parameter is the path to your translation files from the /plugins directory. To store these files, you should create a folder inside your plugin directory called /localization. You use the plugin_basename() and dirname() functions to retrieve the path to your localization folder.
You can learn more about the process of creating translation files in the WordPress Codex at http://codex.wordpress.org/I18n_for_WordPress_Developers.
Determining Paths
When creating WordPress plugins, you will often need to reference files and folders throughout the WordPress installation and your plugins. Installing a fresh copy of WordPress, you have the ability to move this directory anywhere you want. Because of this, you should never use hard-coded paths in a plugin. WordPress has a set of functions to determine the path to the wp-content and plugins directories, as well as directories within your plugins. You can use these functions in your plugins to verify that any paths you are referencing are correct regardless of where the actual directory might exist on the server.
Local Paths
To determine the local server path to your plugin, you’ll use the plugin_dir_path() function. This function extracts the physical location relative to the plugins directory from its file name.
<?php echo plugin_dir_path( __FILE__ ); ?>
You can see that you pass the __FILE__ PHP constant to the plugin_dir_path() function. This returns the full local server path to your plugin directory:
/public_html/wp-content/plugins/halloween-plugin/
Now let’s assume you need to reference the local path to a file in a subdirectory in your plugin. You can use the plugin_dir_path() function along with the subdirectory and files you want to reference, as shown here:
<?php echo plugin_dir_path( __FILE__ ) .'js/script.js'; ?>
The preceding example would produce the following result:
/public_html/wp-content/plugins/halloween-plugin/js/script.js
URL Paths
To determine the full URL to any file in your plugin directory, you’ll use the plugins_url() function as shown here:
<?php echo '<img src="' .plugins_url( 'images/icon.png', __FILE__ ). '">'; ?>
You can see the plugins_url() function accepts two parameters. The first parameter is the path relative to the plugins URL. The second parameter is the plugin file that you want to be relative to. In this case, you’ll use the __FILE__ PHP constant. The preceding example will return a full URL to your plugin’s icon.png file located in the images directory, as shown here:
<img src="http://example.com/wp-content/plugins/halloween-plugin/images/icon.png">
The following is a list of the many advantages of using the plugins_url() function to determine plugin file URLs:
· Supports the /mu-plugins plugin directory.
· Auto-detects SSL. If SSL is enabled, the returned URL would contain https://.
· Can detect the location of the plugin even if the user has moved his /wp-content directory to a custom location.
· Supports Multisite.
WordPress also features various functions to determine URLs in WordPress. The following is a list of the functions available:
· admin_url()—Admin URL (http://example.com/wp-admin/)
· site_url()—Site URL for the current site (http://example.com)
· home_url()—Home URL for the current site (http://example.com)
· includes_url()—Includes directory URL (http://example.com/wp-includes/)
· content_url()—Content directory URL (http://example.com/wp-content/)
· wp_upload_dir()—Returns an array with location information on the configured uploads directory
Understanding the proper way to access files in your plugins is essential to ensure maximum compatibility with all WordPress installations, regardless of how customized they are.
PLUGIN SECURITY
One of the most important steps in creating a plugin is making sure it is secure from hacks and exploits. If a plugin contains security holes, it opens up the entire WordPress website for malicious hackers to wreak havoc. WordPress features some built-in security tools that you should always utilize to make sure your plugins and themes are as secure as can be.
Remember that all data external to your plugin code is suspect until proven valid. Always validate your data before displaying to the browser or inserting into the database to help keep your plugins secure from hacks and exploits. You’ll be using the mentioned escape and sanitize functions discussed in this section throughout the chapter.
NOTE Even though this chapter is specific to plugin development, the development security tools described in this section should be used for all WordPress development, including themes.
Nonces
Nonces, which stands for “number used once,” are used in requests (saving options, form posts, Ajax requests, actions, and so on) to stop unauthorized access by generating a secret key. This secret key is generated prior to generating a request (that is, form post). The key is then passed in the request to your script and verified to be the same key before anything else is processed. Now let’s look at how you can manually create and check nonces. The following example uses a nonce in a form:
<form method="post">
<?php wp_nonce_field( 'prowp_settings_form_save', 'prowp_nonce_field' ); ?>
Enter your name: <input type="text" name="text" /><br />
<input type="submit" name="submit" value="Save Options" />
</form>
When creating a form nonce, the function wp_nonce_field() must be called inside of your <form> tags. There are actually no required parameters for this function to work, but for increased security there are two parameters you should set. The first parameter is$action, which should be a unique string that is descriptive of the action being performed. The second parameter is a unique name for the field, $name. By default, the field name will be _wpnonce, but you can define a custom unique name in this parameter. When thewp_nonce_field() function is called, it will generate a unique secret key that will be added as a hidden form field and passed with your form data. Viewing the source of the form would look something like this:
<form method="post">
<input type="hidden" id="prowp_nonce_field"
name="prowp_nonce_field" value="1cfd4c0539" />
<input type="hidden" name="_wp_http_referer"
value="/wp-trunk/contact/" />
Enter your name: <input type="text" name="text" /><br />
<input type="submit" name="submit" value="Save Options" />
</form>
After your form is posted, the first thing you need to do is check your nonce secret key using the wp_verify_nonce() function like so:
if ( isset( $_POST['submit'] ) ) {
//check nonce for security
wp_verify_nonce( 'prowp_settings_form_save', 'prowp_nonce_field' );
//nonce passed, now do stuff
}
Verifying that the nonce is valid is as simple as calling the wp_verify_nonce() function and passing it your unique nonce action and name that you defined earlier. If the nonce secret key does not match the secret key created on your form, WordPress will stop processing the page and issue an error message. This primarily protects it from cross-site request forgery, or CSRF.
Nonces can also be used on links that perform actions. To create a URL nonce, you use the wp_nonce_url() function. This can be used in conjunction with multiple query strings in your URL like so:
<?php
$link = 'my-url.php?action=delete&ID=15';
?>
<a href="<?php echo wp_nonce_url( $link, 'prowp_delete_action',
'prowp_nonce_url_check' ); ?>">Delete</a>
The wp_nonce_url() function accepts three parameters: the URL to add the nonce to, the action being performed, and the unique nonce name you are creating. The preceding code would generate a link that looks like this:
http://example.com/wp-admin/my-url.php?
action=delete&ID=15& prowp_nonce_url_check=e9d6673015
Notice how the prowp_nonce_url_check query string is appended to the link. This is the secret key value that was generated for your URL nonce. If your URL has no query strings, the wp_nonce_url() function will add the nonce value as the only query string being passed. If your URL contains query strings, that nonce value will be added to the end of the URL. You can verify that the nonce is correct just as you did with your form—by using the wp_verify_nonce() function:
if ( isset( $_GET['action'] ) ) {
//check nonce for security
wp_verify_nonce( 'prowp_delete_action', 'prowp_nonce_url_check' );
//do stuff
}
This function verifies that your action query string is set before checking your nonce value. Once the nonce has been validated, the script will continue. Remember that if the nonce is not validated, the page execution will stop, preventing any type of hack attempt.
Data Validation and Sanitization
Any data that comes from somewhere external to your code (such as user input) needs to be scrubbed to verify that it’s free from illegal characters and potentially unsafe data. Data validation is essential to proper plugin security. Improperly validated data can lead to SQL injection hacks, exploits, errors, and much more.
WordPress features a set of escaping functions that you can use to verify that your data is escaped properly when being displayed to the screen. These escaping functions follow a set naming standard (see the following list), which makes it easy to identify what they are escaping. Figure 8.2 shows the escaping function naming template.
· esc_: The prefix for the escaping functions.
· attr: The escaping context (attr, html, textarea, js, sql, url, and url_raw).
· _e: The optional translation suffix. Available suffixes are __ and _e.
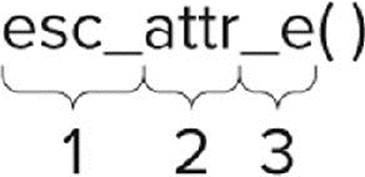
Figure 8.2 Escaping API breakdown
The esc_html() function is used for escaping data that contains HTML. This function encodes special characters into the equivalent HTML entities. These characters include &, <, >, ", and ' as follows:
<?php esc_html( $text ); ?>
The esc_attr() function is used for escaping HTML attributes. This function should be used whenever you need to display data inside an HTML element:
<input type="text" name="first_name" value="<?php echo esc_attr( $text ); ?>">
The esc_textrea() function is used for escaping HTML <textarea> values. This function should be used to encode text for use in a <textarea> form element as follows:
<textarea name="description"><?php echo esc_textarea( $text ); ?></textarea>
WordPress also features a function for validating URLs called esc_url(). This function should be used to scrub the URL for illegal characters. Even though the href is technically an HTML attribute, you should use the esc_url() function like so:
<a href="<?php echo esc_url( $url ); ?>">
The esc_js() function escapes text strings in JavaScript:
<script>
var bwar='<?php echo esc_js( $text ); ?>';
</script>
The esc_sql() function escapes data for use in a MySQL query. This function is really just a shortcut for $wpdb->escape() as follows:
<?php esc_sql( $sql ); ?>
The optional translation suffix (__ or _e) is used for translating the escaped data. The _e suffix will echo the escaped translated text, whereas __ only returns the escaped translated value.
<?php
//escapes, translates, and displays the text
esc_html_e( $text, 'prowp-plugin' );
//escapes, translates, but does NOT display
$text = esc_html__( $text, 'prowp-plugin' );
?>
If the data you are validating is supposed to be an integer, use the intval() PHP function to verify that. The intval() function will return the integer value of a variable. If the variable is a string, and therefore not an integer, it will return 0.
$variable = 12345;
$variable = intval( $variable );
Another useful function for working with integers is the absint() WordPress function. This function ensures that the result is a non-negative integer:
$variable = 12345;
$variable = absint( $variable );
WordPress also features some very useful sanitizing functions. These functions should be used to sanitize any data prior to saving it in the database. One of those functions is sanitize_text_field(). This function will remove all invalid UTF-8 characters, convert single < into HTML entities, and remove all HTML tags, line breaks, and extra white space.
<?php sanitize_text_field( $text ); ?>
The sanitize_text_field() function is the perfect function to use when verifying that user-submitted data is safe, especially when storing in the database.
You can also sanitize an e-mail address using sanitize_email(). This function will strip out all characters that are not allowable in an e-mail address. Consider the following code:
<?php
$sanitized_email = sanitize_email( ' éric@loremipsum.com!' );
echo $sanitized_email; //will output: ric@loremipsum.com
?>
You can see that the sanitize_email() function removes the extra spaces and illegal characters from the e-mail address submitted.
A very powerful function for processing and sanitizing untrusted HTML is wp_kses(). This function is used in WordPress to verify that only allowed HTML tags and attributes can be submitted by users. By defining allowed HTML tags, you can avoid cross-site scripting (XSS) attacks through your code. Consider the following example:
$allowed_tags = array(
'strong' => array(),
'a' => array(
'href' => array(),
'title' => array()
)
);
$html = '<a href="#" class="external">link</a>.
This is <b>bold</b> and <strong>strong</strong>';
echo wp_kses( $html, $allowed_tags );
The first step is to define an array of all HTML tags and attributes. In this example, you are allowing the <strong> and <a> tags. The <a> tag is allowed to include the href and title attributes. Next, you build an $html variable to test out the function. The final step is to pass the $html string and $allowed_tags arguments to the wp_kses() function.
The preceding example would display the following code:
<a href="#">link</a>. This is bold and <strong>strong</strong>
Notice the <b></b> tags have been completely removed. The function also removed the class attribute from the <a> tag because you didn’t specify that as an allowed attribute. This basic example really shows the power of this function. Any time you need to allow users to input HTML code, you should always use the wp_kses() function to verify that only acceptable HTML tags and attributes are allowed.
For more information on data validation in WordPress, check out the following Codex article: http://codex.wordpress.org/Data_Validation.
NOTE Throughout this chapter, you’ll be using various data validation techniques in the code examples. The goal of this is to stress the importance of keeping security in the front of your mind when developing plugins for WordPress.
KNOW YOUR HOOKS: ACTIONS AND FILTERS
One of the most important features for extending WordPress is called a hook. Hooks are simply a standardized way of “hooking” into WordPress. Using hooks, you can execute functions at specific times in the WordPress process, allowing you to alter how WordPress functions and the expected output. Hooks are the primary way plugins interact with your content in WordPress. Up to this point, you’ve focused on the structure and format of plugins, but now you’re actually going to make a plugin do something!
A hook is simply a PHP function call with various parameters that can be sent. Following is an example showing a properly formatted Action hook call:
<?php add_action( $tag, $function_to_add, $priority, $accepted_args ); ?>
Actions and Filters
Two types of hooks can be used: actions and filters. Action hooks are triggered by events in WordPress. For example, an Action hook is triggered when a new post is published. Filter hooks are used to modify WordPress content before saving it to the database or displaying it to the screen. For example, a Filter hook is available for the content of the post or page. This means you can alter that content after it is retrieved from the database but before it is displayed in your browser.
Look at an example of a Filter hook in action. Remember that Filter hooks modify content, so this example modifies the post content:
<?php add_filter( 'the_content', 'prowp_function' ); ?>
The add_filter() function is used to execute a Filter action. You are using the filter called the_content, which is the filter for your post content. This tells WordPress that every time the content is displayed, it needs to pass through your custom function calledprowp_function(). The add_filter() function can accept four parameters:
· filter_action (string)—The filter to use.
· custom_filter_function (string)—The custom function to pass the filter through.
· priority (integer)—The priority in which this filter should run. When multiple callback functions are attached to the same hook, the priority parameter determines the execution order.
· accepted args (integer)—The number of arguments the function accepts.
Here’s an example of the_content filter in action:
<?php
add_filter( 'the_content', 'prowp_profanity_filter' );
function prowp_profanity_filter( $content ) {
$profanities = array( 'sissy', 'dummy' );
$content = str_ireplace( $profanities, '[censored]', $content );
return $content;
}
?>
The prowp_profanity_filter() function will replace the words “sissy” and “dummy” with [censored] automatically on all posts and pages on your website. You are using the str_ireplace() PHP function to handle the replacement. This function will replace some characters in a string with other characters in a string. The str_ireplace() function is also case-insensitive. Because you are using a Filter hook, the content isn’t actually modified in the database; instead, it’s modified during processing of the_post(), before being displayed, when this filter is invoked. The content in the database is not affected so the words “sissy” and “dummy” will still exist in your content, and if you ever disable or change the plugin, those words will appear in the displayed text. Filter hooks always receive data; in this case, the $content variable is passed to your function and contains your post content. Also notice the last line of your function returns the $content variable. Remember that you must always return the content you are modifying or else it returns empty and therefore displays nothing.
Now that you’ve seen the Filter hook in action, take a look at the Action hook and what it can do. The Action hook is triggered by events in WordPress. WordPress doesn’t require any return values from your Action hook function; the WordPress Core just notifies your code that a specific event has taken place. The Action hook is structured exactly like a Filter hook, as you can see in the following code:
<?php add_action( 'hook_name', 'prowp_function' ); ?>
The add_action() function accepts four parameters just like the add_filter() function. Here you can set the hook name you want to hook into, the custom function name you are going to execute when the event is triggered, and the priority and the number of accepted args. Here’s a real example using an Action hook:
<?php
add_action( 'comment_post', 'prowp_email_new_comment' );
function prowp_email_new_comment() {
wp_mail( 'me@example.com', 'New blog comment',
'There is a new comment on your website: http://example.com' );
}
?>
Notice that you are using the comment_post Action hook. This action is triggered whenever a new comment is posted in WordPress. As you can see, the prowp_email_new_comment() function will send an e-mail any time a new comment is created. Also notice that you are not sending in any variables to your function or returning any values out of your function. Action hooks don’t require this, but if needed, you can pass values into your function.
Popular Filter Hooks
More than 2,000 different hooks are available in WordPress, which is a bit overwhelming at first. Fortunately, a handful of them are used much more often than the rest. This section explores some of the more commonly used hooks in WordPress.
Some of the more common Filter hooks are:
· the_content—Applied to the content of the post, page, or custom post type before displaying
· the_content_rss—Applied to the content of the post , page, or custom post type for RSS inclusion
· the_title—Applied to the post, page, or custom post type title before displaying
· comment_text—Applied to the comment text before displaying
· wp_title—Applied to the page <title> header tag before displaying
· the_permalink—Applied to the permalink URL
Let’s look at some of the more popular Filter hooks in WordPress, starting with a more practical example than your profanity filter, which uses the_content Filter hook. This hook allows you to alter the content for posts, pages, and custom post types prior to it being displayed in the browser. By using this hook, you can add your custom content either before, in the middle, or after the content:
<?php
add_filter ( 'the_content', 'prowp_subscriber_footer' );
function prowp_subscriber_footer( $content ) {
if( is_single() ) {
$content.= '<h3>Enjoyed this article?</h3>';
$content.= '<p>Subscribe to my
<a href="http://example.com/feed">RSS feed</a>!</p>';
}
return $content;
}
?>
In this example, you are adding your subscribe text to the bottom of the content of your posts. Notice that you are also using the is_single() conditional tag to verify that your subscribe text is added only on a single post page. If you did not use this conditional tag, the subscribe text would show up below all content on your website, including pages and custom post types. The $content variable stores all of the post content, so by appending your subscribe text you are adding it to the bottom of your post content. This is the ideal way to add content to the bottom of all posts because you aren’t actually modifying the post. In the future, if you decide to change this message you can change it in one place, rather than updating every post in your website.
Another powerful Filter hook is the_title. This hook is used for changing the post or page title prior to being displayed. Here’s an example that uses this filter:
<?php
add_filter( 'the_title', 'prowp_custom_title' );
function prowp_custom_title( $title ) {
$title .= ' - By Example.com';
return $title;
}
?>
This example adds “By Example.com” to all of your post and page titles. Remember that this doesn’t actually modify the title in the database but instead modifies the display of the title generated for the end user.
The default_content Filter hook is useful for setting the default content when creating a new post or page. This is helpful if you have a set format for all of your posts as it can save you valuable writing time:
<?php
add_filter( 'default_content', 'prowp_default_content' );
function prowp_default_content( $content ) {
$content = 'For more great content please subscribe to my RSS feed';
return $content;
}
?>
Filter hooks are exceptionally powerful for inserting your own processing into a variety of points in the Loop processing of each post. Realizing the full power of the WordPress plugin system means also using action hooks to fire your own code in response to events within the WordPress core.
Popular Action Hooks
Some of the more common Action hooks are:
· publish_post—Triggered when a new post is published.
· create_category—Triggered when a new category is created.
· switch_theme—Triggered when you switch themes.
· admin_head—Triggered in the <head> section of the admin dashboard.
· wp_head—Triggered in the <head> section of your theme.
· wp_footer—Triggered in the footer section of your theme usually directly before the </body> tag.
· init—Triggered after WordPress has finished loading, but before any headers are sent. Good place to intercept $_GET and $_POST HTML requests.
· admin_init—Same as init but only runs on admin dashboard pages.
· user_register—Triggered when a new user is created.
· comment_post—Triggered when a new comment is created.
One of the most commonly used Action hooks is the wp_head hook. Using the wp_head hook, you can insert any custom code into the <head> section of the WordPress theme. Consider the following example:
<?php
add_action( 'wp_head', 'prowp_custom_css' );
function prowp_custom_css() {
?>
<style type="text/css">
a {
font-size: 14px;
color: #000000;
text-decoration: none;
}
a:hover {
font-size: 14px
color: #FF0000;
text-decoration: underline;
}
</style>
<?php
}
?>
This code will drop anything inside your prowp_custom_css() function into the header of the WordPress theme, in this case your custom CSS script.
The wp_footer hook is also a very commonly used Action hook. Using this hook you can insert any custom code in the footer of the WordPress theme. This is a great method for adding analytic tracking code to your website:
<?php
add_action( 'wp_footer', 'prowp_site_analytics' );
function prowp_site_analytics() {
?>
<script type="text/javascript">
var gaJsHost = (("https:" == document.location.protocol) ?
"https://ssl." : "http://www.");
document.write(unescape("%3Cscript src='" + gaJsHost +
'google-analytics.com/ga.js' type='text/javascript'%3E%3C/script%3E"));
</script>
<script type="text/javascript">
var pageTracker = _gat._getTracker("UA-XXXXXX-XX");
pageTracker._trackPageview();
</script>
<?php
}
?>
In the preceding example, you can see how you can easily insert your Google Analytics tracking code to the footer of every page on your website.
The admin_head Action hook is very similar to the wp_head hook, but rather than hooking into the theme header, it hooks into the admin dashboard header. This is useful if your plugin requires custom CSS on the admin dashboard, or any other custom header code.
The user_register Action hook is executed when a new user is created in WordPress. This user can be created by an admin or by the new user. This is a useful hook if you want to set some default values for a new user or to e-mail your new members thanking them for joining your website.
Hooks are probably one of the most under-documented features in WordPress. It can be a real challenge finding the correct hooks to use for the job. The first resource to use is always the Codex. Here you can find the Filter Reference (http://codex.wordpress.org/Plugin_API/Filter_Reference) and Action Reference (http://codex.wordpress.org/Plugin_API/Action_Reference) sections helpful in tracking down appropriate hooks.
Another highly recommended reference is the Plugin Directory (https://wordpress.org/plugins/) on WordPress.org. Sometimes the best way to figure something out is to see how other developers accomplished a similar task. Find a plugin in the directory that is similar in functionality to what you want to build. Most likely, the plugin author will have already dug up the correct hooks for WordPress that you will be using. It never hurts to learn by example, and published plugins are the perfect examples in this case!
PLUGIN SETTINGS
Most plugins feature a settings page. This helps users configure the plugin to act in different ways without actually modifying the code behind the plugin by saving various option settings. The first step in this process is saving and retrieving options in WordPress.
Saving Plugin Options
Chances are that, when building a plugin, you will need to save some options for your plugin. WordPress features some very easy-to-use functions to save, update, and delete options. Two functions are available for creating options: add_option() and update_option(). Both functions create options, but update_option() also updates the option if it already exists. Here’s an example of adding a new option:
<?php add_option( 'prowp_display_mode', 'Spooky' ); ?>
The first parameter you send to the add_option() function is the name of your option. This is a required field and must be unique from all other options saved in WordPress, including from other plugins. The second parameter is the option value. This is also a required field and can be a string, an array, an object, or a serialized value. You can also use update_option() to create new options. This function checks whether the option exists first, and if not creates it. If, however, the option already exists, it updates the value with the new option value you are sending in. You call the update_option() function exactly as you did when adding an option like so:
<?php update_option( 'prowp_display_mode', 'Scary' ); ?>
Generally, the update_option() function is used for both adding and updating options in plugins. It’s much easier to stay consistent with one function call for both rather than calls to different functions for adding and updating your plugin options.
Retrieving an option value is just as easy. To retrieve any option, use the get_option() function, as shown here:
<?php echo get_option( 'prowp_display_mode' ); ?>
The only required field for get_option() is the name of the option you want to retrieve. If the option exists, it is returned to display or it is stored in a variable. If the option doesn’t exist, the function returns FALSE.
Options can be deleted as easily as they are created. To delete an option, use the delete_option() function. The only parameter is the option name that you want to delete:
<?php delete_option( 'prowp_display_mode' ); ?>
A good rule of thumb is to start all of your option names with the same prefix, like prowp_ in the preceding examples. This is useful for a couple of reasons: uniqueness and readability. Using a prefix will help validate the uniqueness of your option names. If you have a number of options, it is a smart idea to store them in an array (see the next section). This also makes it much easier to follow your code logic when there is a set naming convention used on variables, functions, and so on.
Options in WordPress are not reserved for just plugins. Themes can also create options to store specific theme data. Many of the themes available today offer a settings page, enabling you to customize the theme through settings rather than code.
Array of Options
Every option you create in WordPress adds a new record to the wp_options database table. Because of this, it’s a smart idea to store your options in an array, thus creating fewer records in the database and fewer update_option() calls you need to make.
<?php
$prowp_options_arr = array(
'prowp_display_mode' => 'Spooky',
'prowp_default_movie' => 'Halloween',
'prowp_default_book' => 'Professional WordPress'
);
update_option( 'prowp_plugin_options', $prowp_options_arr );
?>
In this code, you are creating an array to store your plugin option values. So rather than call update_option() three times, and save three records in the database, you need to call it only once and save your array to the option named prowp_plugin_options. This is a small example but imagine a collection of plugins that store 50 options to the database’s options table. That would really start to clutter up your options table and would most likely slow down your website load speeds due to the repeated database queries to fetch or set those options individually.
To retrieve the array of options, you use the same get_option() function as before:
<?php
$prowp_options_arr = get_option( 'prowp_plugin_options' );
$prowp_display_mode = $prowp_options_arr['prowp_display_mode'];
$prowp_default_movie = $prowp_options_arr['prowp_default_movie'];
$prowp_default_book = $prowp_options_arr['prowp_default_book'];
?>
The next section discusses how to create a menu for your plugin settings page.
Creating a Menu and Submenus
WordPress features two different ways to create a custom menu for your plugin. The first thing you’ll want to decide is where to locate your options page. The options page link can be located in its own top-level menu (My Plugin Settings), or as a submenu item of an existing menu (Settings ➢ My Plugin Settings). This section explores both methods and how to configure each.
Creating a Top-Level Menu
The first method you’ll explore is creating a new top-level menu. Using a top-level menu is useful if your plugin has multiple settings pages that need to be separate. To create your own top-level menu, you’ll use the add_menu_page() function, as shown here:
<?php add_menu_page( page_title, menu_title, capability,
menu_slug, function, icon_url, position ); ?>
Here’s a breakdown of the parameters allowed:
· page_title—Text used for the HTML title (between <title> tags).
· menu_title—Text used for the menu name in the Dashboard.
· capability—Minimum user capability required to see menu.
· menu_slug—Unique slug name for your menu.
· function—Displays page content for the menu settings page.
· icon_url—Path to custom icon for menu (default: images/generic.png).
· position—The position in the menu order the menu should appear. By default, the menu will appear at the bottom of the menu structure.
You can also create submenu items for your new menu. You use the add_submenu_page() function to create additional submenu items:
add_submenu_page( parent, page_title, menu_title, capability,
menu_slug,[function] );
Create a custom menu for a plugin with multiple submenu items, as shown in Figure 8.3.
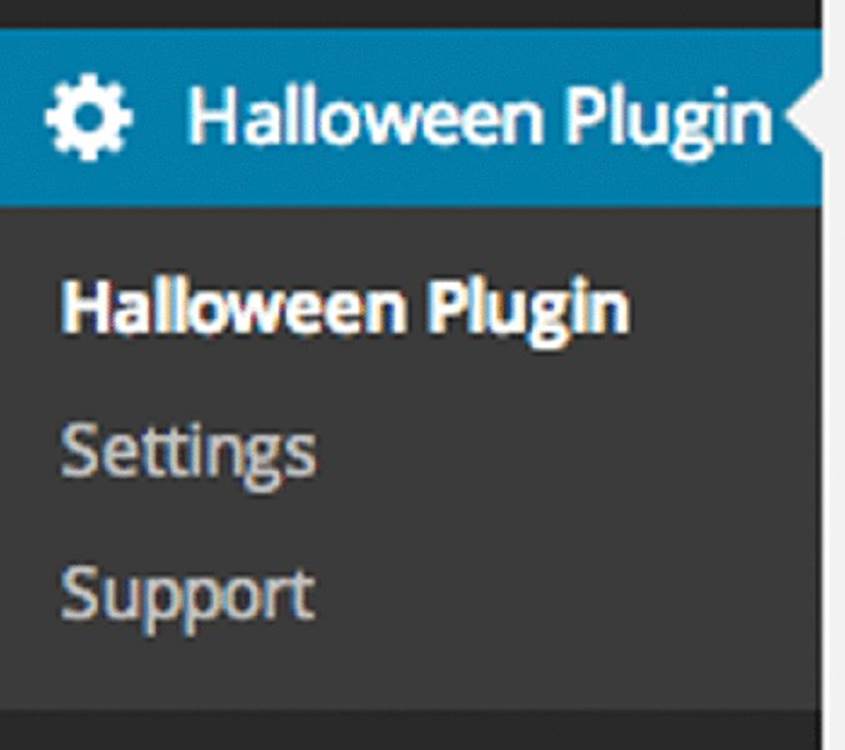
Figure 8.3 Custom top-level menu
<?php
// create custom plugin settings menu
add_action( 'admin_menu', 'prowp_create_menu' );
function prowp_create_menu() {
//create new top-level menu
add_menu_page( 'Halloween Plugin Page', 'Halloween Plugin',
'manage_options', 'prowp_main_menu', 'prowp_main_plugin_page',
plugins_url( '/images/wordpress.png', __FILE__ ) );
//create two sub-menus: settings and support
add_submenu_page( 'prowp_main_menu', 'Halloween Settings Page',
'Settings', 'manage_options', 'halloween_settings',
'prowp_settings_page' );
add_submenu_page( 'prowp_main_menu', 'Halloween Support Page',
'Support', 'manage_options', 'halloween_support', 'prowp_support_page' );
}
?>
First you call the admin_menu Action hook. This hook is triggered after the basic admin panel menu structure is in place and is the only hook you should use when registering a custom menu. Once triggered, you call your custom function prowp_create_menu() to build your menu.
To create your menu, you call the add_menu_page() function. The first two parameters set your page title and menu title. You also set the capability level to manage_options so only an admin will see this new menu. Next, you set the menu slug to propwp_main_menu, which is the unique slug for your menu. Your custom menu function name is next, in this case prowp_main_plugin_page. Remember that you haven’t created this function yet so when viewing the settings page, you will get a PHP warning. Finally, you set the custom icon location to display the WordPress logo.
Notice your top-level menu sits just below the Settings menu. That’s because you didn’t set the $position parameter when registering your custom menu. To define where you menu is located, simply set the integrator position. The following is a list of the integer positions for each core WordPress menu:
· Dashboard—2
· Posts—5
· Media—10
· Pages—20
· Comments—25
· Appearance—60
· Plugins—65
· Users—70
· Tools—75
· Settings—80
For example, if you wanted your menu to appear between the Dashboard and Posts menus, set your $position parameter to 3.
Now that you’ve created your top-level menu, you need to create your submenu items. In this example, you are creating two submenu items: Settings and Support. To do this, you use the add_submenu_page() function.
The first parameter you send is the menu slug of the top-level menu you want this to fall under. Remember that you set this to prowp_main_menu, which is a unique slug for your plugin menu. Next, you set the page title and menu title just like before. You also set the access level for viewing to manage_options. You also have to create a unique menu slug for your submenu items; in this example, you’ll use a custom named value, halloween_settings and halloween_support. The final value is the custom function to build the settings page for each submenu.
Adding to an Existing Menu
Next, you’ll explore how to add a submenu item to an existing menu in WordPress. Most plugins have only one options page and therefore do not require an entirely separate top-level menu. To accomplish this, you can add a plugin option page to any existing menu in WordPress. Add a submenu to the Setting menu:
<?php
add_action( 'admin_menu', 'prowp_create_settings_submenu' );
function prowp_create_settings_submenu() {
add_options_page( 'Halloween Settings Page', 'Halloween Settings',
'manage_options', 'halloween_settings_menu', 'prowp_settings_page' );
}
?>
WordPress features multiple functions to make adding submenus extremely easy. To add your Halloween Settings submenu you use the add_options_page() function. The first parameter is the page title followed by the submenu display name. Like your other menus, you set the capability to manage_options, so the menu is viewable only by administrators. Next, you set the unique menu handle to halloween_settings_menu. Finally, you call your custom prowp_settings_page() function to build your options page. The preceding example adds your custom submenu item Halloween Settings at the bottom of the settings menu.
Following is a list of the available submenu functions in WordPress. Each function can be used exactly as the preceding example; just swap out the function name called with one of the functions listed here:
· add_dashboard_page()—Adds submenu items to the Dashboard menu
· add_posts_page()—Adds submenu items to the Posts menu
· add_media_page()—Adds a submenu item to the Media menu
· add_pages_page()—Adds a submenu item to the Pages menu
· add_comments_page()—Adds a submenu item to the Comments menu
· add_plugins_page()—Adds a submenu item to the Plugins menu
· add_theme_page()—Adds a submenu item to the Appearance menu
· add_users_page()—Adds a submenu item to the Users page (or Profile based on role)
· add_management_page()—Adds a submenu item to the Tools menu
· add_options_page()—Adds a submenu item to the Settings menu
Now that you’ve created your menu and submenu items, you need to create an options page to display your plugin configuration.
Creating an Options Page
WordPress includes a Settings API that you will be using for all of the option methods you use in this section. The Settings API is a powerful set of functions to help make saving options in WordPress easy and secure. One of the major benefits of the Settings API is that WordPress handles the security checks, meaning you don’t need to include a nonce in your form.
The first option page method you’ll explore is to create a unique option page for your top-level menu. Remember that when using the add_menu_page() and add_submenu_page() functions, you defined your menu item function name to display your options page. To create an options page, you need to create this function to display your options. First set up your plugin menu:
<?php
// create custom plugin settings menu
add_action( 'admin_menu', 'prowp_create_menu' );
function prowp_create_menu() {
//create new top-level menu
add_menu_page( 'Halloween Plugin Page', 'Halloween Plugin',
'manage_options', 'prowp_main_menu', 'prowp_settings_page' );
//call register settings function
add_action( 'admin_init', 'prowp_register_settings' );
}
?>
Notice that you’ve added a new Action hook for admin_init to execute your prowp_register_settings() function, as shown in the following code:
<?php
function prowp_register_settings() {
//register our settings
register_setting( 'prowp-settings-group', 'prowp_options',
'prowp_sanitize_options' );
}
?>
Using the Setting API’s register_setting() function, you define the option you are going to offer on your plugin options page. Your settings page will have three options, but you are going to store those three options in a single options array, so you only need to register a single setting here. The first parameter is the options group name. This required field needs to be a group name to identify all options in this set. The second parameter is the actual option name and must be unique. The third parameter is a callback function to sanitize the option values. Now that you’ve registered your options, you need to build your options page. To do so, you’ll create the prowp_settings_page() function as called from your menu:
<?php
function prowp_settings_page() {
?>
<div class="wrap">
<h2>Halloween Plugin Options</h2>
<form method="post" action="options.php">
<?php settings_fields( 'prowp-settings-group' ); ?>
<?php $prowp_options = get_option( 'prowp_options' ); ?>
<table class="form-table">
<tr>
<th scope="row">Name</th>
<td><input type="text" name="prowp_options[option_name]"
value="<?php echo esc_attr( $prowp_options['option_name']
); ?>" /></td>
</tr>
<tr>
<th scope="row">Email</th>
<td><input type="text" name="prowp_options[option_email]"
value="<?php echo esc_attr( $prowp_options['option_email']
); ?>" /></td>
</tr>
<tr>
<th scope="row">URL</th>
<td><input type="text" name="prowp_options[option_url]"
value="<?php echo esc_url( $prowp_options['option_url'] );
?>" /></td>
</tr>
</table>
<p class="submit">
<input type="submit" class="button-primary" value="Save Changes" />
</p>
</form>
</div>
<?php
}
?>
As you can see, this looks like a standard form with a couple of noticeable differences. The <form> tag must be set to post to options.php. Inside your form, you need to define your settings group, which you set to prowp-settings-group when you registered your settings. This establishes the link between your options and their values. You do so with this line of code:
<?php settings_fields( 'prowp-settings-group' ); ?>
Next, you’ll load the existing options array, if there are any, to the $prowp_options variable using the get_option() function. You’ll use this variable to display the existing options that are set in your form.
Then you build the table to display your form options. Notice the name of the form field needs to be in the format of option_name[field_name]. This is because you are storing all option values in a single array.
<input type="text" name="prowp_options[option_email]"
value="<?php echo esc_attr( $prowp_options['option_email'] ); ?>" />
After you have displayed all of your form fields, you need to display a Submit button to post the form and save your options. The final step is to create the prowp_sanitize_options() function. This function will be used to sanitize all data submitted in your plugin settings prior to saving in the database. This is an extremely important step because unsanitized data could potentially open up a security vulnerability in your plugin.
<?php
function prowp_sanitize_options( $input ) {
$input['option_name'] = sanitize_text_field( $input['option_name'] );
$input['option_email'] = sanitize_email( $input['option_email'] );
$input['option_url'] = esc_url( $input['option_url'] );
return $input;
}
?>
Notice how each option value is being sanitized with a specific function. The name option uses the WordPress function sanitize_text_field() to strip any HTML, XML, and PHP tags from the submitted value. You use the sanitize_email() WordPress function to sanitize the e-mail value and esc_url() to sanitize the URL value.
That’s it! You have just created a very basic plugin options page using the Settings API in WordPress. Listing 8-1 shows the entire code to build an options page.
Listing 8-1: Building the Options Page (filename: prowp3-settings-api-plugin.zip)
<?php
/*
Plugin Name: ProWP3 Settings Example
Plugin URI: http://strangework.com/wordpress-plugins
Description: This is a plugin demonstrating the WordPress Settings API
Version: 1.0
Author: Brad Williams
Author URI: http://strangework.com
License: GPLv2
*/
// create custom plugin settings menu
add_action( 'admin_menu', 'prowp_create_menu' );
function prowp_create_menu() {
//create new top-level menu
add_menu_page( 'Halloween Plugin Page', 'Halloween Plugin',
'manage_options', 'prowp_main_menu',
'prowp_settings_page' );
//call register settings function
add_action( 'admin_init', 'prowp_register_settings' );
}
function prowp_register_settings() {
//register our settings
register_setting( 'prowp-settings-group',
'prowp_options', 'prowp_sanitize_options' );
}
function prowp_sanitize_options( $input ) {
$input['option_name'] =
sanitize_text_field( $input['option_name'] );
$input['option_email'] =
sanitize_email( $input['option_email'] );
$input['option_url'] =
esc_url( $input['option_url'] );
return $input;
}
function prowp_settings_page() {
?>
<div class="wrap">
<h2>Halloween Plugin Options</h2>
<form method="post" action="options.php">
<?php settings_fields( 'prowp-settings-group' ); ?>
<?php $prowp_options = get_option( 'prowp_options' ); ?>
<table class="form-table">
<tr>
<th scope="row">Name</th>
<td><input type="text"
name="prowp_options[option_name]"
value="<?php echo esc_attr(
$prowp_options['option_name'] ); ?>" /></td>
</tr>
<tr>
<th scope="row">Email</th>
<td><input type="text"
name="prowp_options[option_email]"
value="<?php echo esc_attr(
$prowp_options['option_email'] ); ?>" /></td>
</tr>
<tr>
<th scope="row">URL</th>
<td><input type="text"
name="prowp_options[option_url]"
value="<?php echo esc_url(
$prowp_options['option_url'] ); ?>" /></td>
</tr>
</table>
<p class="submit">
<input type="submit" class="button-primary"
value="Save Changes" />
</p>
</form>
</div>
<?php
}
The second option page method is to add your plugin settings to an existing Settings page in WordPress, as shown in Figure 8.4. You will also be using the WordPress Settings API functions to hook into these pages and add your plugin settings.
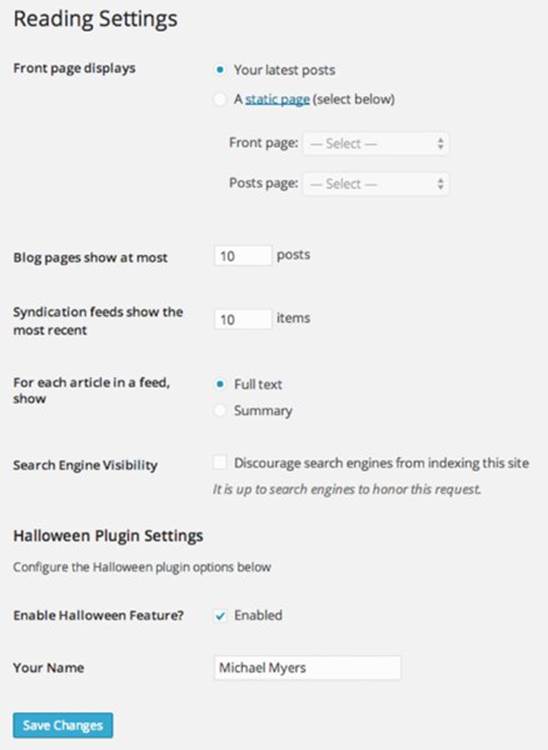
Figure 8.4 Custom settings section
Now look over at the code to create your custom settings section. In the following example, you are going to add a new settings section at the bottom of the Settings ➢ Reading Settings page. This section will contain options for your plugin.
<?php
//execute our settings section function
add_action( 'admin_init', 'prowp_settings_init' );
function prowp_settings_init() {
//create the new setting section on the Settings > Reading page
add_settings_section( 'prowp_setting_section',
'Halloween Plugin Settings', 'prowp_setting_section', 'reading' );
// register the two setting options
add_settings_field( 'prowp_setting_enable_id', 'Enable Halloween Feature?',
'prowp_setting_enabled', 'reading', 'prowp_setting_section' );
add_settings_field( 'prowp_saved_setting_name_id', 'Your Name',
'prowp_setting_name', 'reading', 'prowp_setting_section' );
// register the setting to store our array of values
register_setting( 'reading', 'prowp_setting_values',
'prowp_sanitize_settings' );
}
?>
First, you use the admin_init Action hook to load your custom function prowp_settings_init() before any admin page is rendered. Next, you call the add_settings_section() function to create your new section:
<?php
add_settings_section( 'prowp_setting_section', 'Halloween Plugin Settings',
'prowp_setting_section', 'reading' );
?>
The first parameter passed is a unique ID for the section. The second parameter is the display name output on the page. Next, you pass in the callback function name to display the actual section itself. The final parameter sets what settings page to add your section to. The accepted default WordPress values are general, writing, reading, discussion, media, and permalink.
<?php
// register the individual setting options
add_settings_field( 'prowp_setting_enable_id', 'Enable Halloween Feature?',
'prowp_setting_enabled', 'reading', 'prowp_setting_section' );
add_settings_field( 'prowp_saved_setting_name_id', 'Your Name',
'prowp_setting_name', 'reading', 'prowp_setting_section' );
?>
Now that you’ve registered your custom settings section, you need to register your individual setting options. To do this, you’ll be using the add_settings_field() function. The first parameter you are passing is a unique ID for the field. Next, you pass in the title of the field, which is displayed directly to the left of the option field. The third parameter is the callback function name, which you’ll use to display your option field. The fourth parameter is the settings page where the field should be displayed. The final parameter is the name of the section you are adding the field to, which in this example is the prowp_setting_section you created with the add_setting_section() function call.
<?php
register_setting( 'reading', 'prowp_setting_values', 'prowp_sanitize_settings' );
?>
Next, you need to register your setting field. In this example, you are going to register two different settings: one for an enable/disable check box and one for the user’s name. Even though you have two setting fields, you are going to store both values in an array, so you only need to register one setting called prowp_setting_values. The first parameter you pass is the option group. In this example, you are saving your options in the reading group with the rest of the reading options. The second parameter is the option name. The option name should be unique and is used to retrieve the value of the option. A third optional parameter can be set for a custom function used to sanitize the option values. In this example, you’ll create a function called prowp_sanitize_settings() to sanitize the option values entered by the user.
<?php
function prowp_sanitize_settings( $input ) {
$input['enabled'] = ( $input['enabled'] == 'on' ) ? 'on' : '';
$input['name'] = sanitize_text_field( $input['name'] );
return $input;
}
?>
As always, you’ll want to sanitize all option values that are entered by the user. The enabled option is a check box, and therefore can only be one of two values: either checked or not. The preceding example uses a PHP ternary operator to determine the value of Enabled. If the check box equals “on,” you know the value is enabled and should save the option value as “on.” If not, the option will save the value as empty, which means the check box is not checked. Now that you’ve registered your setting section, you need to create your custom functions to display it. The first function you’ll create is the prowp_setting_section() that you called in when you created your setting section:
<?php
function prowp_setting_section() {
echo '<p>Configure the Halloween plugin options below</p>';
}
?>
This is where you can set the subheading for your settings section. This section is great for plugin instructions, configuration information, and more. Next, you need to create the function to display your first settings field, Enabled:
<?php
function prowp_setting_enabled() {
//load plugin options
$prowp_options = get_option( 'prowp_setting_values' );
//display the checkbox form field
echo '<input '.checked( $prowp_options['enabled'], 'on', false ).'
name="prowp_setting_values[enabled]" type="checkbox" /> Enabled';
}
?>
This is the callback function you defined when you used the add_settings_field() function. The first step is to load the options array if it exists. Because this option is a check box, you know that if it is set, the check box should be checked. In this example, you’ll use the checked() WordPress function. This function has three parameters. The first and second parameters are two values to compare. If the two values are the same, the function will echo checked="checked" thus checking the form element. The third parameter determines whether to echo the value or just return it. In this case, you just want to return it so you set that value to False.
Next, you display the actual setting field that will be used in the setting section. Your field input name needs to be the same setting name you registered previously. Because you are saving your options as an array, you need to define the array name value; in this example, it’s prowp_setting_values[enabled]. This is how the Settings API knows what option to save and where. Your Enabled check box field will display at the bottom of the Settings ➢ Reading page. Now you need to create the function for your second setting field:
<?php
function prowp_setting_name() {
//load the option value
$prowp_options = get_option( 'prowp_setting_values' );
//display the text form field
echo '<input type="text" name="prowp_setting_values[name]"
value="'.esc_attr( $prowp_options['name'] ).'" />';
}
?>
As with your check box option, the first thing to do is load the current option value. Then you display your input text field with the same name as defined previously in the register_setting() function. As always, be sure to escape the value before displaying in the form field.
That’s it! You have successfully created your custom settings section and added it to the Settings ➢ Reading screen. Listing 8-2 shows the full code.
Listing 8-2: Custom Settings Section (filename: prowp3-reading-settings-plugin.zip)
<?php
//execute our settings section function
add_action( 'admin_init', 'prowp_settings_init' );
function prowp_settings_init() {
//create the new setting section on the Settings > Reading page
add_settings_section(
'prowp_setting_section',
'Halloween Plugin Settings',
'prowp_setting_section',
'reading'
);
// register the two setting options
add_settings_field(
'prowp_setting_enable_id',
'Enable Halloween Feature?',
'prowp_setting_enabled',
'reading',
'prowp_setting_section'
);
add_settings_field(
'prowp_saved_setting_name_id',
'Your Name',
'prowp_setting_name',
'reading',
'prowp_setting_section'
);
// register the setting to store our array of values
register_setting(
'reading',
'prowp_setting_values',
'prowp_sanitize_settings'
);
}
function prowp_sanitize_settings( $input ) {
$input['enabled'] = ( $input['enabled'] == 'on' ) ? 'on' : '';
$input['name'] = sanitize_text_field( $input['name'] );
return $input;
}
// settings section
function prowp_setting_section() {
echo '<p>Configure the Halloween plugin options below</p>';
}
// create the enabled checkbox option to
// save the checkbox value
function prowp_setting_enabled() {
//load plugin options
$prowp_options = get_option( 'prowp_setting_values' );
//display the checkbox form field
echo '<input '.checked( $prowp_options['enabled'], 'on',
false ).' name="prowp_setting_values[enabled]"
type="checkbox" /> Enabled';
}
// create the text field setting to save the name
function prowp_setting_name() {
//load the option value
$prowp_options = get_option( 'prowp_setting_values' );
//display the text form field
echo '<input type="text" name="prowp_setting_values[name]"
value="'.esc_attr( $prowp_options['name'] ).'" />';
}
WORDPRESS INTEGRATION
Integrating your plugin into WordPress is an essential step for users to interact with your plugin in the admin dashboard. WordPress features many different areas where your plugin can be integrated, including a meta box, sidebar and dashboard widgets, and custom shortcodes.
Creating a Meta Box
WordPress features multiple meta boxes on the Add New Post and Page screens. These meta boxes are used for adding additional information to your posts, pages, and content. For example, when creating a new post, you will see a Category meta box, which allows you to select what categories your post will be in.
Meta boxes can be created in a plugin using the add_meta_box() function in WordPress. This function accepts seven parameters, as shown here:
<?php add_meta_box( $id, $title, $callback, $page,
$context, $priority, $callback_args ); ?>
Each parameter helps define where and how your meta box is displayed.
· $id—The HTML ID attribute for the meta box
· $title—The title displayed in the header of the meta box
· $callback—The custom function name to display your meta box information
· $page—The page you want your meta box to display on ('post', 'page', or custom post type name)
· $context—The part of the page where the meta box should be displayed ('normal', 'advanced', or 'side')
· $priority—The priority within the context where the meta box should display ('high', 'core', 'default', or 'low')
· $callback_args—Arguments to pass into your callback function
Now that you understand the add_meta_box() function, you can build your first custom meta box in WordPress:
<?php
add_action( 'add_meta_boxes', 'prowp_meta_box_init' );
// meta box functions for adding the meta box and saving the data
function prowp_meta_box_init() {
// create our custom meta box
add_meta_box( 'prowp-meta', 'Product Information',
'prowp_meta_box', 'post', 'side', 'default' );
}
?>
The first step to adding your own meta box is to use the add_meta_boxes Action hook to execute your custom function prowp_meta_box_init(). In this function, you will call the add_meta_box() function to create your custom meta box for Product Information.
You set the HTML ID attribute to prowp-meta for your meta box. The second parameter is the title, which you set to Product Information. The next parameter is your custom function prowp_meta_box(), which will display the HTML for your meta box. Next you define your meta box to display on the post page and in the sidebar. Finally, you set the priority to default. Now create your custom prowp_meta_box() function to display your meta box fields:
<?php
function prowp_meta_box( $post, $box ) {
// retrieve the custom meta box values
$prowp_featured = get_post_meta( $post->ID, '_prowp_type', true );
$prowp_price = get_post_meta( $post->ID, '_prowp_price', true );
//nonce for security
wp_nonce_field( plugin_basename( __FILE__ ), 'prowp_save_meta_box' );
// custom meta box form elements
echo '<p>Price: <input type="text" name="prowp_price"
value="'.esc_attr( $prowp_price ).'" size="5" /></p>';
echo '<p>Type:
<select name="prowp_product_type" id="prowp_product_type">
<option value="normal" '
.selected( $prowp_featured, 'normal', false ). '>Normal
</option>
<option value="special" '
.selected( $prowp_featured, 'special', false ). '>Special
</option>
<option value="featured" '
.selected( $prowp_featured, 'featured', false ). '>Featured
</option>
<option value="clearance" '
.selected( $prowp_featured, 'clearance', false ). '>Clearance
</option>
</select></p>';
}
?>
The first step in your custom function is to retrieve the saved values for your meta box. If you are creating a new post, there won’t be any saved values yet. Next you display the form elements in your meta box. Notice that you don’t need any <form> tags or a submit button. Also notice that you are using the wp_nonce_field() function to create a custom nonce field in your form.
The custom function you just created will generate your custom meta box, as shown in Figure 8.5.
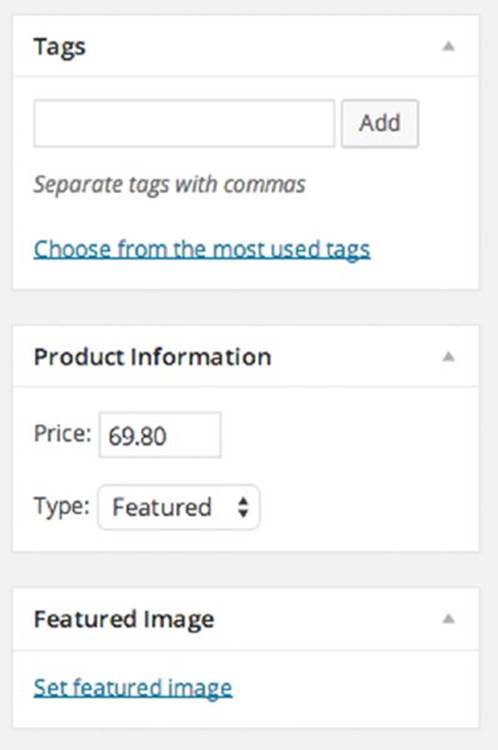
Figure 8.5 Custom meta box
Now that you have your meta box and form elements, you need to save that data when your post is saved. To do so, you’ll create a custom function, prowp_save_meta_box(), which is triggered by the save_post Action hook:
<?php
// hook to save our meta box data when the post is saved
add_action( 'save_post', 'prowp_save_meta_box' );
function prowp_save_meta_box( $post_id ) {
// process form data if $_POST is set
if( isset( $_POST['prowp_product_type'] ) ) {
// if auto saving skip saving our meta box data
if ( defined( 'DOING_AUTOSAVE' ) && DOING_AUTOSAVE )
return;
//check nonce for security
wp_verify_nonce( plugin_basename( __FILE__ ), 'prowp_save_meta_box' );
// save the meta box data as post meta using the post ID as a unique prefix
update_post_meta( $post_id, '_prowp_type',
sanitize_text_field( $_POST['prowp_product_type'] ) );
update_post_meta( $post_id, '_prowp_price',
sanitize_text_field( $_POST['prowp_price'] ) );
}
}
?>
The save_post Action hook runs whenever a post is saved in WordPress. Because you only want to work with the custom metadata in the meta box, the first thing you’ll do is verify that the $_POST['prowp_product_type'] value is set. Next, you need to verify that the post being saved is an active post and not an auto save. To do so, you check that the post is not auto-saving and, if so, you exit the function. The next step is to verify that the nonce value is the expected value. If the post is active and your form elements have been set, you save the form data. Once all checks have passed, you use update_post_meta() to save your meta box data as metadata against your post.
As you can see, you send in the post ID as the first parameter to update_post_meta(). This tells WordPress what post the meta data will be attached to. Next, you pass in the name of the meta key you are updating. Notice the meta key name is prefixed with an underscore. This prevents these values from being listed in the custom fields meta box on the post edit screen. Because you’ve provided a UI to edit these values, you don’t need them in the custom fields box. The final parameter you send is the new value for the meta key, which is being sanitized using the sanitize_text_field() WordPress function.
You now have a fully functional custom meta box that saves individual data against each post. Listing 8-3 shows the full custom meta box code.
Listing 8-3: Custom Meta Box (filename: prowp3-custom-meta-box.zip)
<?php
/*
Plugin Name: ProWP3 Custom Meta Box Plugin
Plugin URI: http://strangework.com/wordpress-plugins
Description: This is a plugin demonstrating meta boxes in WordPress
Version: 1.0
Author: Brad Williams
Author URI: http://strangework.com
License: GPLv2
*/
add_action( 'add_meta_boxes', 'prowp_meta_box_init' );
// meta box functions for adding the meta box and saving the data
function prowp_meta_box_init() {
// create our custom meta box
add_meta_box( 'prowp-meta', 'Product Information',
'prowp_meta_box', 'post', 'side', 'default' );
}
function prowp_meta_box( $post, $box ) {
// retrieve the custom meta box values
$prowp_featured = get_post_meta( $post->ID, '_prowp_type',
true );
$prowp_price = get_post_meta( $post->ID, '_prowp_price',
true );
//nonce for security
wp_nonce_field( plugin_basename( __FILE__ ),
'prowp_save_meta_box' );
// custom meta box form elements
echo '<p>Price: <input type="text" name="prowp_price"
value="'.esc_attr( $prowp_price ).'" size="5" /></p>';
echo '<p>Type:
<select name="prowp_product_type" id="prowp_product_type">
<option value="normal" '
.selected( $prowp_featured, 'normal', false )
. '>Normal</option>
<option value="special" '
.selected( $prowp_featured, 'special', false )
. '>Special</option>
<option value="featured" '
.selected( $prowp_featured, 'featured', false )
. '>Featured</option>
<option value="clearance" '
.selected( $prowp_featured, 'clearance', false )
. '>Clearance</option>
</select></p>';
}
// hook to save our meta box data when the post is saved
add_action( 'save_post', 'prowp_save_meta_box' );
function prowp_save_meta_box( $post_id ) {
// process form data if $_POST is set
if( isset( $_POST['prowp_product_type'] ) ) {
// if auto saving skip saving our meta box data
if ( defined( 'DOING_AUTOSAVE' ) && DOING_AUTOSAVE )
return;
//check nonce for security
wp_verify_nonce( plugin_basename( __FILE__ ),
'prowp_save_meta_box' );
// save the meta box data as post meta using the post ID as a unique prefix
update_post_meta( $post_id, '_prowp_type',
sanitize_text_field( $_POST['prowp_product_type'] ) );
update_post_meta( $post_id, '_prowp_price',
sanitize_text_field( $_POST['prowp_price'] ) );
}
}
Now that you’ve saved your meta box data, you’ll probably want to display it somewhere. You can easily display your saved meta box data in your theme using the get_post_meta function inside the Loop like so:
<?php
$prowp_type = get_post_meta( $post->ID, '_prowp_type', true );
$prowp_price = get_post_meta( $post->ID, '_prowp_price', true );
echo '<p>Price: ' .esc_html( $prowp_price ). '</p>';
echo '<p>Type: ' .esc_html( $prowp_type ). '</p>';
?>
Adding a custom meta box is a great way to extend the data on posts and pages and is very intuitive for users as well.
Shortcodes
WordPress features a Shortcode API that can be used to easily create shortcode functionality in your plugins. Shortcodes are basically text macro codes that can be inserted into a post, page, or custom post type. When being displayed, these shortcodes are replaced by some other type of content. Consider a simple example using the Shortcode API:
<?php
add_shortcode( 'mytwitter', 'prowp_twitter' );
function prowp_twitter() {
return '<a href="http://twitter.com/williamsba">@williamsba</a>';
}
?>
Now any time you use the [mytwitter] shortcode in your content, it will be replaced with an HTML link to my Twitter account when displayed in the browser. As you can see, this is a very powerful feature in WordPress, which many plugins out there currently take advantage of, often inserting small pieces of JavaScript to place a button or advertisement in the specific spot in a post.
Shortcodes can also be configured to accept attributes. This is very useful for passing arguments to your custom functions, thereby altering the output of the shortcode based on those arguments. Modify your shortcode function to accept a site parameter:
<?php
add_shortcode( 'mytwitter', 'prowp_twitter' );
function prowp_twitter( $atts, $content = null ) {
extract( shortcode_atts( array(
'person' => 'brad' // set attribute default
), $atts ) );
if ( $person == 'brad' ) {
return '<a href="http://twitter.com/williamsba">@williamsba</a>';
}elseif ( $person == 'david' ) {
return '<a href="http://twitter.com/mirmillo">@mirmillo</a>';
}elseif ( $person == 'lisa' ) {
return '<a href="http://twitter.com/lisasabinwilson">@lisasabinwilson</a>';
}
}
?>
This code creates the same shortcode as before, but now you are defining an attribute called person. With this attribute, you can specify which person you want to display a Twitter link for. To display the Twitter URL for David, you would use the shortcode [mytwitter person="david"]. Alternatively, you can also easily display the Twitter URL for Lisa like so: [mytwitter person="lisa"]. Shortcodes can also accept multiple attributes from the array set in your shortcode function.
Creating a Widget
Widgets are a common feature included in many WordPress plugins. By creating a widget with your plugin, you can easily give users a way to add your plugin information to their sidebar or other widgetized areas.
To understand how widgets work, it’s helpful to view an overview of the WP_Widget class in WordPress. The widget class features built-in functions for building a widget, each with a specific purpose, as shown in the following code:
<?php
class My_Widget extends WP_Widget {
function My_Widget() {
// process the widget
}
function form($instance) {
// widget form in admin dashboard
}
function update($new_instance, $old_instance) {
// save widget options
}
function widget($args, $instance) {
// display the widget
}
}
?>
For the purposes of this lesson, you’ll create a basic bio widget. This widget will allow you to set a person’s name and custom bio to display in a widgetized sidebar in WordPress.
The first step in creating your own widget is to use the appropriate hook to initialize your widget. This hook is called widgets_init and is triggered right after the default WordPress widgets have been registered:
add_action( 'widgets_init', 'prowp_register_widgets' );
function prowp_register_widgets() {
register_widget( 'prowp_widget' );
}
Calling the Action hook widgets_init executes the function prowp_register_widgets(), as shown in the preceding code. Here you register your widget called pro_widget. You could also register multiple widgets in this function if needed.
The Widget API makes creating a widget in WordPress fairly straightforward. To begin, you have to extend the preexisting WP_Widget class by creating a new class with a unique name, as shown here:
class prowp_widget extends WP_Widget {
Next, you’ll add your first function. This is referred to as the constructor:
function __construct() {
$widget_ops = array(
'classname' => 'prowp_widget_class',
'description' => 'Example widget that displays a user\'s bio.' );
parent::__construct( 'prowp_widget', 'Bio Widget', $widget_ops );
}
In your prowp_widget() function, you define your classname for your widget. The classname is the class name that will be added to the HTML tag wrapping the widget when it’s displayed. Depending on the theme the class may be in a <div>, <aside>, <li>, or other HTML tag. You also set the description for your widget. This is displayed on the widget dashboard below the widget name. These options are then passed to WP_Widget. You also pass the HTML ID name (prowp_widget_class) and the widget name (Bio Widget).
Next, you need to create the function to build your widget settings form. Widget settings are located on the widget admin page upon expanding any widget listed on a sidebar. The widget class makes this process very easy, as shown in the following code:
function form( $instance ) {
$defaults = array(
'title' => 'My Bio',
'name' => 'Michael Myers',
'bio' => '' );
$instance = wp_parse_args( (array) $instance, $defaults );
$title = $instance['title'];
$name = $instance['name'];
$bio = $instance['bio'];
?>
<p>Title:
<input class="widefat"
name="<?php echo $this->get_field_name( 'title' ); ?>"
type="text" value="<?php echo esc_attr( $title ); ?>" /></p>
<p>Name:
<input class="widefat"
name="<?php echo $this->get_field_name( 'name' ); ?>"
type="text" value="<?php echo esc_attr( $name ); ?>" /></p>
<p>Bio:
<textarea class="widefat"
name="<?php echo $this->get_field_name( 'bio' ); ?>" >
<?php echo esc_textarea( $bio ); ?></textarea></p>
<?php
}
The first thing you do is define your default widget values. If the user doesn’t fill in the settings, you can default these values to whatever you like. In this case, you’re setting the default title to My Bio and default name to Michael Myers. Next, you pull in the instance values, which are your widget settings. If the widget was just added to a sidebar, there are no settings saved so these values will be empty. Finally, you display the three form fields for your widget settings: title, name, and bio. The first two values are using text input boxes and the bio value is using a text area box. Notice that you don’t need <form> tags or a submit button; the widget class will handle this for you. Remember to use the appropriate escaping functions when displaying your data, in this case esc_attr() for the two text fields and esc_textarea() for the text area field. Next, you need to save your widget settings using the update() widget class function:
function update( $new_instance, $old_instance ) {
$instance = $old_instance;
$instance['title'] = sanitize_text_field( $new_instance['title'] );
$instance['name'] = sanitize_text_field( $new_instance['name'] );
$instance['bio'] = sanitize_text_field( $new_instance['bio'] );
return $instance;
}
This function is pretty straightforward. You’ll notice you don’t need to save the settings yourself, the widget class does it for you. You pass in the $new_instance values for each of your setting fields. You’re also using sanitize_text_field() to strip out any HTML that might be entered. If you want to accept HTML values, you’d use wp_kses() instead, which was covered in the section “Data Validation and Sanitization,” earlier in this chapter.
The final function in your prowp_widget class displays your widget:
function widget( $args, $instance ) {
extract( $args );
echo $before_widget;
$title = apply_filters( 'widget_title', $instance['title'] );
$name = ( empty( $instance['name'] ) ) ? ' ' : $instance['name'];
$bio = ( empty( $instance['bio'] ) ) ? ' ' : $instance['bio'];
if ( !empty( $title ) ) { echo $before_title . esc_html( $title )
. $after_title; };
echo '<p>Name: ' . esc_html( $name ) . '</p>';
echo '<p>Bio: ' . esc_html( $bio ) . '</p>';
echo $after_widget;
}
The first thing you do is extract the $args parameter. This variable stores some global theme values such as $before_widget and $after_widget. These variables can be used by theme developers to customize what code will wrap your widget—for example, a custom <div>tag. After extracting the $args parameter, you display the $before_widget variable. The $before_title and $after_title are also set in this variable. This is useful for passing custom HTML tags to wrap the widget title in.
Next, you display your widget values. The title is displayed first and wrapped by $before_title and $after_title. Next, you echo out the name and bio values. Remember to escape the widget values for security reasons. Finally, you display the $after_widget value.
That’s it! You’ve just created a custom widget for your plugin using the widget class in WordPress. Remember that by using the new widget class, you can add multiple copies of the same widget to the sidebar or additional sidebars. Listing 8-4 shows the completed widget code.
Listing 8-4: Custom Widget (filename: prowp3-custom-widget.zip)
<?php
/*
Plugin Name: ProWP3 Custom Widget Plugin
Plugin URI: http://strangework.com/wordpress-plugins
Description: This is a plugin demonstrating how to create a widget
Version: 1.0
Author: Brad Williams
Author URI: http://strangework.com
License: GPLv2
*/
// use widgets_init Action hook to execute custom function
add_action( 'widgets_init', 'prowp_register_widgets' );
//register our widget
function prowp_register_widgets() {
register_widget( 'prowp_widget' );
}
//prowpwidget class
class prowp_widget extends WP_Widget {
//process our new widget
function __construct() {
$widget_ops = array(
'classname' => 'prowp_widget_class',
'description' => 'Example widget that displays
a user\'s bio.' );
parent::__construct( 'prowp_widget', 'Bio Widget',
$widget_ops );
}
//build our widget settings form
function form( $instance ) {
$defaults = array(
'title' => 'My Bio',
'name' => 'Michael Myers',
'bio' => '' );
$instance = wp_parse_args( (array) $instance, $defaults );
$title = $instance['title'];
$name = $instance['name'];
$bio = $instance['bio'];
?>
<p>Title:
<input class="widefat" name="<?php
echo $this->get_field_name( 'title' ); ?>"
type="text" value="<?php
echo esc_attr( $title ); ?>" /></p>
<p>Name:
<input class="widefat" name="<?php
echo $this->get_field_name( 'name' ); ?>"
type="text" value="<?php
echo esc_attr( $name ); ?>" /></p>
<p>Bio:
<textarea class="widefat" name="<?php
echo $this->get_field_name( 'bio' ); ?>">
<?php echo esc_textarea( $bio ); ?>
</textarea></p>
<?php
}
//save our widget settings
function update( $new_instance, $old_instance ) {
$instance = $old_instance;
$instance['title'] =
sanitize_text_field( $new_instance['title'] );
$instance['name'] =
sanitize_text_field( $new_instance['name'] );
$instance['bio'] =
sanitize_text_fiel( $new_instance['bio'] );
return $instance;
}
//display our widget
function widget( $args, $instance ) {
extract( $args );
echo $before_widget;
$title = apply_filters( 'widget_title', $instance['title'] );
$name = ( empty( $instance['name'] ) )
? ' ' : $instance['name'];
$bio = ( empty( $instance['bio'] ) )
? 'nbsp;' : $instance['bio'];
if ( !empty( $title ) ) { echo $before_title
. esc_html( $title ) . $after_title; };
echo '<p>Name: ' . esc_html( $name ) . '</p>';
echo '<p>Bio: ' . esc_html( $bio ) . '</p>';
echo $after_widget;
}
}
Creating a Dashboard Widget
Dashboard Widgets are the widgets displayed on the main Dashboard of your WordPress installation. Along with these widgets comes the Dashboard Widgets API, which allows you to create any custom Dashboard Widget that you would like.
To create a custom Dashboard Widget, you’ll use the wp_add_dashboard_widget() function, as shown here:
<?php
add_action( 'wp_dashboard_setup', 'prowp_add_dashboard_widget' );
// call function to create our dashboard widget
function prowp_add_dashboard_widget() {
wp_add_dashboard_widget(
'prowp_dashboard_widget',
'Pro WP Dashboard Widget',
'prowp_create_dashboard_widget'
);
}
// function to display our dashboard widget content
function prowp_create_dashboard_widget() {
echo '<p>Hello World! This is my Dashboard Widget</p>';
}
?>
First you call the wp_dashboard_setup Action hook to execute the function to build your custom Dashboard Widget. This hook is triggered after all of the default Dashboard Widgets have been built. Next you execute the wp_add_dashboard_widget() function to create your Dashboard Widget. The first parameter is the widget ID slug. This is used for the class name and the key in the array of widgets. The next parameter is the display name for your Dashboard Widget. The final parameter you send is your custom function name to display your widget contents. An optional fourth parameter can be sent for a control callback function. This function would be used to process any form elements that might exist in your Dashboard Widget.
After executing the wp_add_dashboard_widget() function, your custom function is called to display your widget contents. In this example, you display a simple string. The result is a custom Dashboard Widget, as shown in Figure 8.6.
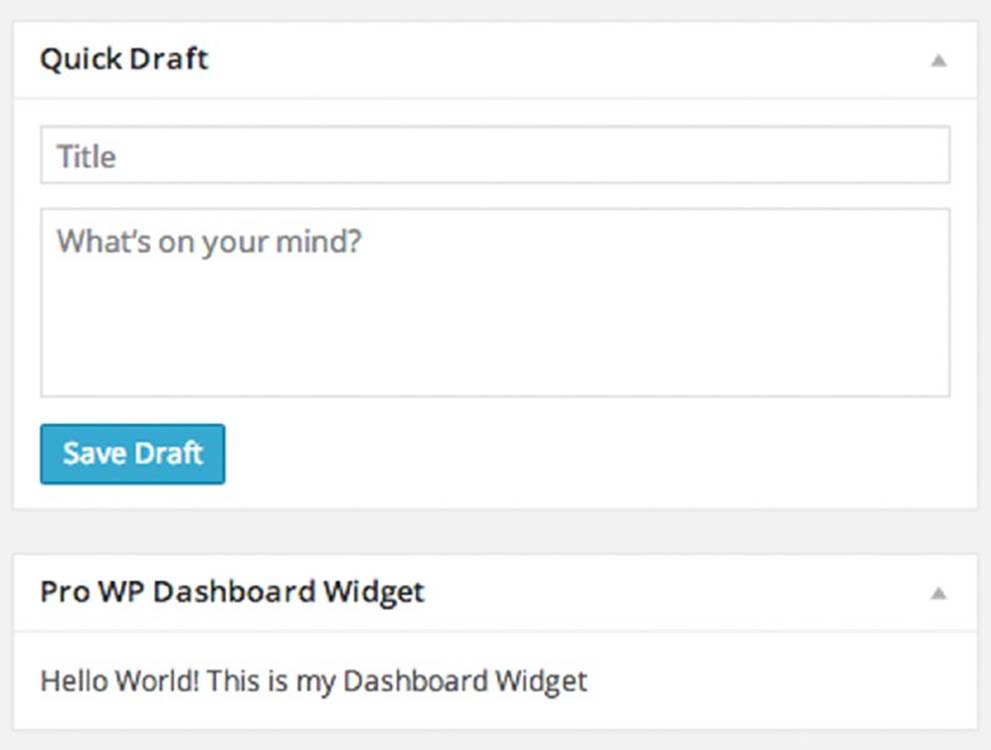
Figure 8.6 Example dashboard widget
Creating Custom Tables
WordPress contains a variety of tables in which to store your plugin data. However, you might find that your plugin needs a custom table or two to store plugin data. This can be useful for more complex plugins such as an e-commerce plugin, which stores order history, product and inventory data, and other data that is accessed using database SQL semantics rather than the simple key and value pairing of the options table.
The first step in creating a custom database table is to create an installation function. You will execute this function when the plugin is activated to create your new table.
<?php
register_activation_hook( __FILE__, 'prowp_install' );
function prowp_install() {
}
?>
Now that you have an installation function, you need to define your custom table name. Remember that the table prefix can be custom defined by the user in wp-config.php, and as discussed in Chapter 10, WordPress Multisite can insert additional prefix data into the table names so you need to incorporate these table prefixes for your custom table name. To get the table prefix, you use the global $wpdb->prefix value like so:
global $wpdb;
//define the custom table name
$table_name = $wpdb->prefix .'prowp_data';
This code stores your table named wp_prowp_data in the $table_name variable, assuming your WordPress table prefix is set to wp_.
Now it’s time to build your SQL query for creating your new table. You’ll create your query in a variable called $sql before executing it. You also need to include the upgrade.php file prior to executing your query like so:
$sql = "CREATE TABLE " .$table_name ." (
id mediumint(9) NOT NULL AUTO_INCREMENT,
time bigint(11) DEFAULT '0' NOT NULL,
name tinytext NOT NULL,
text text NOT NULL,
url VARCHAR(55) NOT NULL,
UNIQUE KEY id (id)
);";
require_once( ABSPATH . 'wp-admin/includes/upgrade.php' );
//execute the query creating our table
dbDelta( $sql );
After this executes, your new table has been created in the database. The dbDelta() function will verify first that the table you are creating doesn’t exist so you don’t have to worry about checking if a table exists before creating it. It’s also a good idea to save the version number for your database table structure. This can help down the road if you upgrade your plugin and need to change the table structure. You can check what table version the users have installed for your plugin and determine if they need to upgrade:
$prowp_db_version = '1.0';
add_option( 'prowp_db_version', $prowp_db_version );
Look at the full function in action:
register_activation_hook( __FILE__, 'prowp_install' );
function prowp_install() {
global $wpdb;
//define the custom table name
$table_name = $wpdb->prefix .'prowp_data';
//build the query to create our new table
$sql = "CREATE TABLE " .$table_name ." (
id mediumint(9) NOT NULL AUTO_INCREMENT,
time bigint(11) DEFAULT '0' NOT NULL,
name tinytext NOT NULL,
text text NOT NULL,
url VARCHAR(55) NOT NULL,
UNIQUE KEY id (id)
);";
require_once( ABSPATH . 'wp-admin/includes/upgrade.php' );
//execute the query to create our table
dbDelta( $sql );
//set the table structure version
$prowp_db_version = '1.0';
//save the table structure version number
add_option( 'prowp_db_version', $prowp_db_version );
}
If you want to upgrade your table structure for a new version of your plugin, you can just compare the table structure version numbers:
$installed_ver = get_option( 'gmp_db_version' );
if( $installed_ver != $prowp_db_version ) {
//update database table here
//update table version
update_option( 'gmp_db_version', $prowp_db_version );
}
Before creating a custom table for your plugin, you should consider whether this is the best method. It’s generally a good idea to avoid creating custom tables unless there is no alternative. Remember that you can easily store options in WordPress using the options API. You can also utilize the wp_*meta tables for storing extended data about posts, pages, comments, and users. Custom post types are also a great place to store data.
To work with a custom table once you’ve created it, you’ll need to use the WordPress database class, as shown in Chapter 6.
Uninstalling Your Plugin
A nice feature to include with your plugin is an uninstall feature. WordPress features two ways to register the uninstaller for your plugin: the uninstall.php method and the uninstall hook. Both methods are executed when a deactivated plugin is deleted in the WordPress admin dashboard.
The first method you’ll look at is the uninstall.php uninstaller method. This is the preferred method for uninstalling a plugin. The first step to using this method is to create an uninstall.php file. This file must exist in the root directory of your plugin, and if it does, it will execute in preference to the uninstall hook.
<?php
// If uninstall/delete not called from WordPress then exit
if( !defined( 'ABSPATH' ) && !defined( 'WP_UNINSTALL_PLUGIN' ) )
exit();
// Delete option from options table
delete_option( 'prowp_options_arr' );
// Delete any other options, custom tables/data, files
?>
The first thing your uninstall.php file should check is that ABSPATH and WP_UNINSTALL_PLUGIN constants have been defined, meaning they were actually called from WordPress. This is a security measure to ensure this file is not executed except during the uninstall process of your plugin. The next step is to remove any options and custom tables your plugin created. In a perfect uninstall scenario there would be no trace of your plugin left over in the database once it had been uninstalled. The preceding example usesdelete_option() to delete the option array. Remember that once this function runs, all custom plugin data saved will be destroyed.
The second method for uninstalling a plugin is to use the Uninstall hook. When a plugin is deleted, and uninstall.php does not exist but the Uninstall hook does exist, the plugin will be run one last time to execute the Uninstall hook. After the hook has been called, your plugin will be deleted. Here’s the Uninstall hook in action:
<?php
register_uninstall_hook( __FILE__, 'prowp_uninstall_hook' );
function prowp_uninstall_hook() {
delete_option( 'prowp_options_arr' );
//remove any additional options and custom tables
}
?>
First you call your custom uninstall function to properly uninstall your plugin options. If you do include uninstall functionality in your plugin, such as removing custom tables and options, make sure to warn the users that all plugin data will be deleted if they delete the plugin.
The difference between this method and the register_deactivation_hook is that the register_uninstall_hook is executed when a deactivated plugin is deleted. The register_deactivation_hook is executed when the plugin is deactivated, which means the user may want to activate the plugin again eventually. You wouldn’t want to delete all of the plugin settings if the user is planning on using your plugin again.
CREATING A PLUGIN EXAMPLE
Now that you’ve seen the many different options WordPress provides for use in your plugins, you can put that knowledge to work! In this example, you will utilize many of the features covered in this chapter. At the end of this section, the entire plugin source code will be available.
The example plugin you are going to build is a basic Halloween Store. The goal of this plugin is to create an easy way to add products to WordPress and display the products in your Halloween Store. This plugin will include the following features:
· Settings page using the Settings API
· Widget for displaying newest products using the Widget class
· Post meta box for adding product metadata
· Shortcode support to easily display product data in a post
· Internationalization support using translation functions
The first step in creating your plugin is to create your plugin files. For this plugin, you’ll have two files: halloween-store.php and uninstall.php. Because your plugin contains two files, you’ll need to save these files in a separate folder for your plugin named halloween-store. Next, you need to set up your plugin header and license.
To start, you’ll be working in halloween-store.php. First you want to define your plugin header, as shown here:
<?php
/*
Plugin Name: Halloween Store
Plugin URI: https://github.com/williamsba/HalloweenStore
Description: Create a Halloween Store to display product information
Version: 3.0
Author: Brad Williams
Author URI: http://webdevstudios.com
License: GPLv2
*/
/* Copyright 2015 Brad Williams (email : brad@webdevstudios.com)
This program is free software; you can redistribute it and/or modify
it under the terms of the GNU General Public License as published by
the Free Software Foundation; either version 2 of the License, or
(at your option) any later version.
This program is distributed in the hope that it will be useful,
but WITHOUT ANY WARRANTY; without even the implied warranty of
MERCHANTABILITY or FITNESS FOR A PARTICULAR PURPOSE. See the
GNU General Public License for more details.
You should have received a copy of the GNU General Public License
along with this program; if not, write to the Free Software
Foundation, Inc., 51 Franklin St, Fifth Floor, Boston, MA 02110-1301 USA
*/
As you can see, you created the appropriate plugin header for your new plugin. Because you will be releasing this plugin, you’ll want to include the GPL software license below your plugin header.
Next you are going to call the register_activation_hook() function to set up your default plugin settings. Remember that this function is triggered when a user activates your plugin in WordPress.
// Call function when plugin is activated
register_activation_hook( __FILE__, 'halloween_store_install' );
function halloween_store_install() {
//setup default option values
$hween_options_arr = array(
'currency_sign' => '$'
);
//save our default option values
update_option( 'halloween_options', $hween_options_arr );
}
As you can see, this plugin will store an array of settings in a single option called halloween_options. When the plugin is activated, you set the default currency_sign value to $.
Next, you call the init hook to register the custom post type for Products. This is how you will add and manage your Halloween Store products.
// Action hook to initialize the plugin
add_action( 'init', 'halloween_store_init' );
//Initialize the Halloween Store
function halloween_store_init() {
//register the products custom post type
$labels = array(
'name' => __( 'Products', 'halloween-plugin' ),
'singular_name' => __( 'Product', 'halloween-plugin' ),
'add_new' => __( 'Add New', 'halloween-plugin' ),
'add_new_item' => __( 'Add New Product', 'halloween-plugin' ),
'edit_item' => __( 'Edit Product', 'halloween-plugin' ),
'new_item' => __( 'New Product', 'halloween-plugin' ),
'all_items' => __( 'All Products', 'halloween-plugin' ),
'view_item' => __( 'View Product', 'halloween-plugin' ),
'search_items' => __( 'Search Products', 'halloween-plugin' ),
'not_found' => __( 'No products found', 'halloween-plugin' ),
'not_found_in_trash' => __( 'No products found in Trash',
'halloween-plugin' ),
'menu_name' => __( 'Products', 'halloween-plugin' )
);
$args = array(
'labels' => $labels,
'public' => true,
'publicly_queryable' => true,
'show_ui' => true,
'show_in_menu' => true,
'query_var' => true,
'rewrite' => true,
'capability_type' => 'post',
'has_archive' => true,
'hierarchical' => false,
'menu_position' => null,
'supports' => array( 'title', 'editor', 'thumbnail', 'excerpt' )
);
register_post_type( 'halloween-products', $args );
}
Notice that you are wrapping each translatable term in the __() translation function. This allows users to translate the terms into any language they want. You’ll see these translation functions used throughout this plugin example.
Now you’ll create the Halloween Store settings page. The first step is to add a Settings submenu item for your settings page using the add_options_page() function:
// Action hook to add the post products menu item
add_action( 'admin_menu', 'halloween_store_menu' );
//create the Halloween Masks sub-menu
function halloween_store_menu() {
add_options_page( __( 'Halloween Store Settings Page',
'halloween-plugin' ), __( 'Halloween Store Settings',
'halloween-plugin' ), 'manage_options', 'halloween-store-settings',
'halloween_store_settings_page' );
}
As you can see, this function is used to create your submenu item. Your Halloween Store Settings submenu item will be located at the bottom of the Settings menu in your Dashboard. You also set this menu item to be viewable by an administrator only.
Now you need to build the actual settings page. As shown in the preceding code, the Halloween Store Settings page triggers your custom halloween_store_settings_page() function.
//build the plugin settings page
function halloween_store_settings_page() {
//load the plugin options array
$hween_options_arr = get_option( 'halloween_options' );
//set the option array values to variables
$hs_inventory = ( ! empty( $hween_options_arr['show_inventory'] ) ) ?
$hween_options_arr['show_inventory'] : '';
$hs_currency_sign = $hween_options_arr['currency_sign'];
?>
<div class="wrap">
<h2><?php _e( 'Halloween Store Options', 'halloween-plugin' ) ?></h2>
<form method="post" action="options.php">
<?php settings_fields( 'halloween-settings-group' ); ?>
<table class="form-table">
<tr>
<th scope="row"><?php _e( 'Show Product Inventory',
'halloween-plugin' ) ?></th>
<td><input type="checkbox" name="halloween_options[show_inventory]"
<?php echo checked( $hs_inventory, 'on' ); ?> /></td>
</tr>
<tr>
<th scope="row"><?php _e( 'Currency Sign', 'halloween-plugin' ) ?></th>
<td><input type="text" name="halloween_options[currency_sign]"
value="<?php echo esc_attr( $hs_currency_sign ); ?>"
size="1" maxlength="1" /></td>
</tr>
</table>
<p class="submit">
<input type="submit" class="button-primary"
value="<?php _e( 'Save Changes', 'halloween-plugin' ); ?>" />
</p>
</form>
</div>
<?php
}
Your Halloween Store plugin has two options: whether to show product inventory and the currency sign to use. First you load your plugin options array value. Next, set the two option values to variables. You use a PHP ternary operator to set the default value for Inventory. You also load in the current currency value into a variable for display. Next, you display your settings page form with both option form fields listed. Notice that you are using the settings_fields() function to link your settings form to your registered setting that you will define in the code that follows. The settings_fields() function will also include a form nonce for security. This is the proper way to save your setting options in an array using the Settings API.
When the form is submitted, WordPress will use the Settings API to sanitize the form values and save them in the database. To make this work, you need to register your settings field and sanitization functions:
// Action hook to register the plugin option settings
add_action( 'admin_init', 'halloween_store_register_settings' );
function halloween_store_register_settings() {
//register the array of settings
register_setting( 'halloween-settings-group',
'halloween_options', 'halloween_sanitize_options' );
}
function halloween_sanitize_options( $options ) {
$options['show_inventory'] = ( ! empty( $options['show_inventory'] ) ) ?
sanitize_text_field( $options['show_inventory'] ) : '';
$options['currency_sign'] = ( ! empty( $options['currency_sign'] ) ) ?
sanitize_text_field( $options['currency_sign'] ) : '';
return $options;
}
Using the register_setting() function, you register the settings group, halloween-settings-group, and the option name, halloween-options, to be used in your settings form. The halloween_sanitize_options() function is used to sanitize the user input for each setting prior to saving in WordPress. This is a very important security step to verify that the data being submitted is properly sanitized before being saved in the database.
Now that your plugin settings are saved, it’s time to register the Meta Box for saving Product metadata:
//Action hook to register the Products meta box
add_action( 'add_meta_boxes', 'halloween_store_register_meta_box' );
function halloween_store_register_meta_box() {
// create our custom meta box
add_meta_box( 'halloween-product-meta',
__( 'Product Information','halloween-plugin' ),
'halloween_meta_box', 'halloween-products', 'side', 'default' );
}
Using the add_meta_boxes action hook, you’ll call your custom function for registering the Products meta box. The add_meta_box() function is used to do the actual registering. Now that the meta box is registered, you need to build the meta box form:
//build product meta box
function halloween_meta_box( $post ) {
// retrieve our custom meta box values
$hs_meta = get_post_meta( $post->ID, '_halloween_product_data', true );
$hween_sku = ( ! empty( $hs_meta['sku'] ) ) ? $hs_meta['sku'] : '';
$hween_price = ( ! empty( $hs_meta['price'] ) ) ? $hs_meta['price'] : '';
$hween_weight = ( ! empty( $hs_meta['weight'] ) ) ? $hs_meta['weight'] : '';
$hween_color = ( ! empty( $hs_meta['color'] ) ) ? $hs_meta['color'] : '';
$hween_inventory = ( ! empty( $hs_meta['inventory'] ) ) ?
$hs_meta['inventory'] : '';
//nonce field for security
wp_nonce_field( 'meta-box-save', 'halloween-plugin' );
// display meta box form
echo '<table>';
echo '<tr>';
echo '<td>' .__('Sku', 'halloween-plugin').':</td>
<td><input type="text" name="halloween_product[sku]"
value="'.esc_attr( $hween_sku ).'" size="10"></td>';
echo '</tr><tr>';
echo '<td>' .__('Price', 'halloween-plugin').':</td>
<td><input type="text" name="halloween_product[price]"
value="'.esc_attr( $hween_price ).'" size="5"></td>';
echo '</tr><tr>';
echo '<td>' .__('Weight', 'halloween-plugin').':</td>
<td><input type="text" name="halloween_product[weight]"
value="'.esc_attr( $hween_weight ).'" size="5"></td>';
echo '</tr><tr>';
echo '<td>' .__('Color', 'halloween-plugin').':</td>
<td><input type="text" name="halloween_product[color]"
value="'.esc_attr( $hween_color ).'" size="5"></td>';
echo '</tr><tr>';
echo '<td>Inventory:</td><td><select
name="halloween_product[inventory]" id="halloween_product[inventory]">
<option value="In Stock"'
.selected( $hween_inventory, 'In Stock', false ). '>'
.__( 'In Stock', 'halloween-plugin' ). '</option>
<option value="Backordered"'
.selected( $hween_inventory, 'Backordered', false ). '>'
.__( 'Backordered', 'halloween-plugin' ). '</option>
<option value="Out of Stock"'
.selected( $hween_inventory, 'Out of Stock', false ). '>'
.__( 'Out of Stock', 'halloween-plugin' ). '</option>
<option value="Discontinued"'
.selected( $hween_inventory, 'Discontinued', false ). '>'
.__( 'Discontinued', 'halloween-plugin' ). '</option>
</select></td>';
echo '</tr>';
//display the meta box shortcode legend section
echo '<tr><td colspan="2"><hr></td></tr>';
echo '<tr><td colspan="2"><strong>'
.__( 'Shortcode Legend', 'halloween-plugin' ).'</strong></td></tr>';
echo '<tr><td>' .__( 'Sku', 'halloween-plugin' )
.':</td><td>[hs show=sku]</td></tr>';
echo '<tr><td>' .__( 'Price', 'halloween-plugin' )
.':</td><td>[hs show=price]</td></tr>';
echo '<tr><td>' .__( 'Weight', 'halloween-plugin' )
.':</td><td>[hs show=weight]</td></tr>';
echo '<tr><td>' .__( 'Color', 'halloween-plugin' )
.':</td><td>[hs show=color]</td></tr>';
echo '<tr><td>' .__( 'Inventory', 'halloween-plugin' )
.':</td><td>[hs show=inventory]</td></tr>';
echo '</table>';
}
Your Halloween Store plugin saves five different product values on every product: SKU, price, weight, color, and inventory. For efficiency reasons, you are storing all five product values as a single options array. As you can see, the first step is to load these five custom field values. Next, you display the meta box form and fill in the current values if any exist. Below the meta box form, you display a simple shortcode legend to show the user what shortcode options are available for displaying the product metadata. Once completed, your custom meta box will look like Figure 8.7.
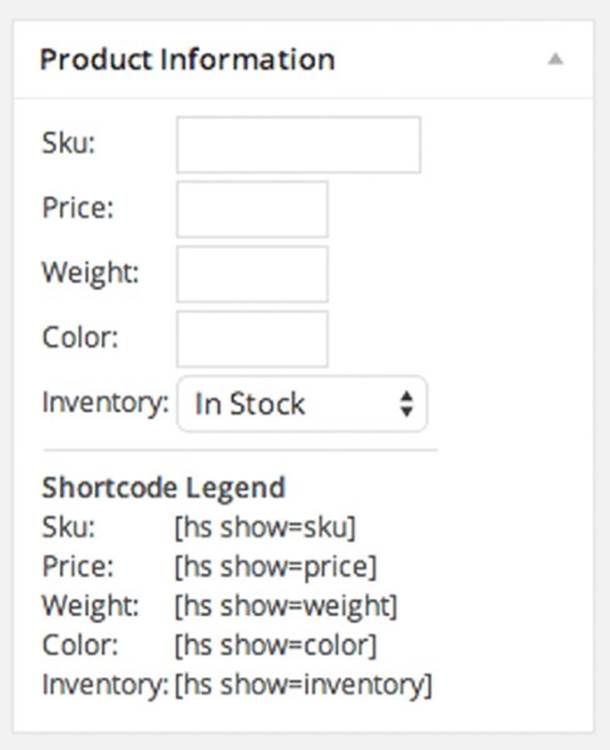
Figure 8.7 Post product meta box
Now that you’ve created your custom meta box, you need to save the data entered in the form, as shown in the following code:
// Action hook to save the meta box data when the post is saved
add_action( 'save_post','halloween_store_save_meta_box' );
//save meta box data
function halloween_store_save_meta_box( $post_id ) {
//verify the post type is for Halloween Products and metadata has been posted
if ( get_post_type( $post_id ) == 'halloween-products'
&& isset( $_POST['halloween_product'] ) ) {
//if autosave skip saving data
if ( defined( 'DOING_AUTOSAVE' ) && DOING_AUTOSAVE )
return;
//check nonce for security
wp_verify_nonce( 'meta-box-save', 'halloween-plugin' );
//store option values in a variable
$halloween_product_data = $_POST['halloween_product'];
//use array map function to sanitize option values
$halloween_product_data =
array_map( 'sanitize_text_field', $halloween_product_data );
// save the meta box data as post metadata
update_post_meta( $post_id, '_halloween_product_data',
$halloween_product_data );
}
}
First you need to verify that the post being saved is a halloween-products custom post type entry. You also verify that the $_POST['halloween_product'] value is set before proceeding. After you have verified that an SKU exists, you need to verify that the post is not an autosave. You also need to verify the nonce for security using wp_verify_nonce(). After all checks have passed, you save your custom product fields as product metadata for the product you are creating or updating. Notice how the PHP array_map() function is used to pass each value of the product data array through the sanitize_text_field() function. This will sanitize each value in the array prior to saving the meta data.
Next, you’re going to set up the plugin shortcode. This will allow you to easily display any or all Product metadata in the Product content.
// Action hook to create the products shortcode
add_shortcode( 'hs', 'halloween_store_shortcode' );
//create shortcode
function halloween_store_shortcode( $atts, $content = null ) {
global $post;
extract( shortcode_atts( array(
"show" => ''
), $atts ) );
//load options array
$hween_options_arr = get_option( 'halloween_options' );
//load product data
$hween_product_data = get_post_meta( $post->ID,
'_halloween_product_data', true );
if ( $show == 'sku') {
$hs_show = ( ! empty( $hween_product_data['sku'] ) )
? $hween_product_data['sku'] : '';
}elseif ( $show == 'price' ) {
$hs_show = $hween_options_arr['currency_sign'];
$hs_show = ( ! empty( $hween_product_data['price'] ) )
? $hs_show . $hween_product_data['price'] : '';
}elseif ( $show == 'weight' ) {
$hs_show = ( ! empty( $hween_product_data['weight'] ) )
? $hween_product_data['weight'] : '';
}elseif ( $show == 'color' ) {
$hs_show = ( ! empty( $hween_product_data['color'] ) )
? $hween_product_data['color'] : '';
}elseif ( $show == 'inventory' ) {
$hs_show = ( ! empty( $hween_product_data['inventory'] ) )
? $hween_product_data['inventory'] : '';
}
//return the shortcode value to display
return $hs_show;
}
The first thing you do is initialize the global variable $post. This will bring in the $post->ID value for the post in which you are using the shortcode. Next, you extract the shortcode attributes that you’ve defined, in this case show. Finally, you check what attribute value is being sent to the shortcode to determine what value to show. Using the shortcode like [hs show=price] would display the price of the product. If the price metadata is being displayed, you’ll need to retrieve the currency sign option value that was set by the user.
Next up, you are going to create your products widget:
// Action hook to create plugin widget
add_action( 'widgets_init', 'halloween_store_register_widgets' );
//register the widget
function halloween_store_register_widgets() {
register_widget( 'hs_widget' );
}
//hs_widget class
class hs_widget extends WP_Widget {
First you have to register your widget as hs_widget using the register_widget() function. Next, you extend the Widget class as hs_widget. Now you need to create the four widget functions needed to build your widget:
//process our new widget
function __construct() {
$widget_ops = array(
'classname' => 'hs-widget-class',
'description' => __( 'Display Halloween Products',
'halloween-plugin' ) );
parent::__construct( 'hs_widget', __( 'Products Widget','halloween-plugin')
, $widget_ops );
}
The first function you create is the __construct() function, also known as the constructor. Here, you set the widget title, description, and class name for your custom widget:
//build our widget settings form
function form( $instance ) {
$defaults = array(
'title' => __( 'Products', 'halloween-plugin' ),
'number_products' => '3' );
$instance = wp_parse_args( (array) $instance, $defaults );
$title = $instance['title'];
$number_products = $instance['number_products'];
?>
<p><?php _e('Title', 'halloween-plugin') ?>:
<input class="widefat"
name="<?php echo $this->get_field_name( 'title' ); ?>"
type="text" value="<?php echo esc_attr( $title ); ?>" /></p>
<p><?php _e( 'Number of Products', 'halloween-plugin' ) ?>:
<input name="
<?php echo $this->get_field_name( 'number_products' ); ?>"
type="text" value="<?php
echo absint( $number_products ); ?>"
size="2" maxlength="2" />
</p>
<?php
}
The second function you define is the form() function. This builds the form for saving your widget settings. You are saving two settings in your widget: the widget title and the number of products to display. First, you define the setting defaults if no settings have been saved. Next, you load in the saved values for your two settings. Finally, you display both setting form fields with the setting values if they exist.
//save our widget settings
function update( $new_instance, $old_instance ) {
$instance = $old_instance;
$instance['title'] = sanitize_text_field( $new_instance['title'] );
$instance['number_products'] = absint( $new_instance['number_products'] );
return $instance;
}
The next function you create is the update() function. This function saves your widget settings. Notice how you utilize the sanitize_text_field()function to sanitize your widget title. You also use the PHP absint() function to verify that the value for the number of products is a non-negative integer.
//display our widget
function widget( $args, $instance ) {
global $post;
extract( $args );
echo $before_widget;
$title = apply_filters( 'widget_title', $instance['title'] );
$number_products = $instance['number_products'];
if ( ! empty( $title ) ) { echo $before_title
. esc_html( $title ) . $after_title; };
//custom query to retrieve products
$args = array(
'post_type' => 'halloween-products',
'posts_per_page' => absint( $number_products )
);
$dispProducts = new WP_Query();
$dispProducts->query( $args );
while ( $dispProducts->have_posts() ) : $dispProducts->the_post();
//load options array
$hween_options_arr = get_option( 'halloween_options' );
//load custom meta values
$hween_product_data =
get_post_meta( $post->ID, '_halloween_product_data', true );
$hs_price = ( ! empty( $hween_product_data['price'] ) )
? $hween_product_data['price'] : '';
$hs_inventory = ( ! empty( $hween_product_data['inventory'] ) )
? $hween_product_data['inventory'] : '';
?>
<p>
<a href="<?php the_permalink(); ?>" rel="bookmark"
title="<?php the_title_attribute(); ?> Product Information">
<?php the_title(); ?>
</a>
</p>
<?php
echo '<p>' .__( 'Price', 'halloween-plugin' )
. ': '.$hween_options_arr['currency_sign'] .$hs_price .'</p>';
//check if Show Inventory option is enabled
if ( $hween_options_arr['show_inventory'] ) {
//display the inventory metadata for this product
echo '<p>' .__( 'Stock', 'halloween-plugin' ). ': '
.$hs_inventory .'</p>';
}
echo '<hr>';
endwhile;
wp_reset_postdata();
echo $after_widget;
}
}
The final function defined is the widget() function. This function displays your widget on the public side of your website. First you initialize the global $post variable and extract the $args for the widget. Then you display the $before_widget variable. This variable can be set by theme and plugin developers to display specified content before and after the plugin. Next, you retrieve your two setting values. If the $title value is not empty, you use it, but if it is, you’ll use the default title you defined earlier.
To display the products in your widget, you are creating a custom Loop using WP_Query, as discussed in Chapter 5. Remember that because this is not your main Loop, you’ll want to use WP_Query to create your custom Loop. To define your custom Loop, you pass in two parameters: one for the post type and one for number of products to display. The first value (post_type=halloween-products) tells your custom Loop to only return Halloween product entries. The second value, posts_per_page, determines how many products to display. This number is pulled from the widget options value set by the user.
Next, you load your option values and the custom metadata values you will be displaying in your widget. Finally, you display your product values in the widget. If the option Show Inventory is enabled, the inventory value will be displayed. After successfully creating the Products widget, it should look like Figure 8.8.

Figure 8.8 Products widget
The final step for your Halloween Store plugin is to create your uninstall.php file:
<?php
//if uninstall/delete not called from WordPress exit
if( ! defined( 'ABSPATH' ) && ! defined( 'WP_UNINSTALL_PLUGIN' ) )
exit ();
// Delete options array from options table
delete_option( 'halloween_options' );
?>
The first thing you check is that ABSPATH and WP_UNINSTALL_PLUGIN constants exist. This means they were called from WordPress and add a layer of security on the uninstaller. After you have verified that the request is valid, you delete your single option value from the database. You could also define other uninstall functionality here, if needed, such as removing every product metadata value you saved in the database.
That’s it! You just successfully built an entire plugin that includes many of the features covered in this chapter. This is a fairly basic plugin but should give you the examples and tools needed to expand upon. Listing 8-5 shows the plugin source code in its entirety. To access this code online, visit https://github.com/williamsba/HalloweenStore.
Listing 8-5: Complete Plugin Source Code (filename: halloween-store.zip)
<?php
/*
Plugin Name: Halloween Store
Plugin URI: https://github.com/williamsba/HalloweenStore
Description: Create a Halloween Store to display product information
Version: 3.0
Author: Brad Williams
Author URI: http://webdevstudios.com
License: GPLv2
*/
/* Copyright 2015 Brad Williams (email : brad@webdevstudios.com)
This program is free software; you can redistribute it and/or modify
it under the terms of the GNU General Public License as published by
the Free Software Foundation; either version 2 of the License, or
(at your option) any later version.
This program is distributed in the hope that it will be useful,
but WITHOUT ANY WARRANTY; without even the implied warranty of
MERCHANTABILITY or FITNESS FOR A PARTICULAR PURPOSE. See the
GNU General Public License for more details.
You should have received a copy of the GNU General Public License
along with this program; if not, write to the Free Software
Foundation, Inc., 51 Franklin St, Fifth Floor, Boston, MA 02110-1301 USA
*/
// Call function when plugin is activated
register_activation_hook( __FILE__, 'halloween_store_install' );
function halloween_store_install() {
//setup default option values
$hween_options_arr = array(
'currency_sign' => '$'
);
//save our default option values
update_option( 'halloween_options', $hween_options_arr );
}
// Action hook to initialize the plugin
add_action( 'init', 'halloween_store_init' );
//Initialize the Halloween Store
function halloween_store_init() {
//register the products custom post type
$labels = array(
'name' => __( 'Products',
'halloween-plugin' ),
'singular_name' => __( 'Product',
'halloween-plugin' ),
'add_new' => __( 'Add New',
'halloween-plugin' ),
'add_new_item' => __( 'Add New Product',
'halloween-plugin' ),
'edit_item' => __( 'Edit Product',
'halloween-plugin' ),
'new_item' => __( 'New Product',
'halloween-plugin' ),
'all_items' => __( 'All Products',
'halloween-plugin' ),
'view_item' => __( 'View Product',
'halloween-plugin' ),
'search_items' => __( 'Search Products',
'halloween-plugin' ),
'not_found' => __( 'No products found',
'halloween-plugin' ),
'not_found_in_trash' => __( 'No products found in Trash',
'halloween-plugin' ),
'menu_name' => __( 'Products', 'halloween-plugin' )
);
$args = array(
'labels' => $labels,
'public' => true,
'publicly_queryable' => true,
'show_ui' => true,
'show_in_menu' => true,
'query_var' => true,
'rewrite' => true,
'capability_type' => 'post',
'has_archive' => true,
'hierarchical' => false,
'menu_position' => null,
'supports' => array( 'title', 'editor',
'thumbnail', 'excerpt' )
);
register_post_type( 'halloween-products', $args );
}
// Action hook to add the post products menu item
add_action( 'admin_menu', 'halloween_store_menu' );
//create the Halloween Masks sub-menu
function halloween_store_menu() {
add_options_page(
__( 'Halloween Store Settings Page', 'halloween-plugin' ),
__( 'Halloween Store Settings', 'halloween-plugin' ),
'manage_options',
'halloween-store-settings',
'halloween_store_settings_page'
);
}
//build the plugin settings page
function halloween_store_settings_page() {
//load the plugin options array
$hween_options_arr = get_option( 'halloween_options' );
//set the option array values to variables
$hs_inventory = (
! empty( $hween_options_arr['show_inventory'] ) )
? $hween_options_arr['show_inventory'] : '';
$hs_currency_sign = $hween_options_arr['currency_sign'];
?>
<div class="wrap">
<h2><?php _e( 'Halloween Store Options',
'halloween-plugin' ) ?></h2>
<form method="post" action="options.php">
<?php settings_fields( 'halloween-settings-group' ); ?>
<table class="form-table">
<tr>
<th scope="row"><?php _e( 'Show Product Inventory',
'halloween-plugin' ) ?></th>
<td><input type="checkbox"
name="halloween_options[show_inventory]" <?php
echo checked( $hs_inventory, 'on' ); ?> /></td>
</tr>
<tr>
<th scope="row"><?php _e( 'Currency Sign',
'halloween-plugin' ) ?></th>
<td><input type="text"
name="halloween_options[currency_sign]"
value="<?php echo esc_attr( $hs_currency_sign ); ?>"
size="1" maxlength="1" /></td>
</tr>
</table>
<p class="submit">
<input type="submit" class="button-primary"
value="<?php _e( 'Save Changes',
'halloween-plugin' ); ?>" />
</p>
</form>
</div>
<?php
}
// Action hook to register the plugin option settings
add_action( 'admin_init', 'halloween_store_register_settings' );
function halloween_store_register_settings() {
//register the array of settings
register_setting( 'halloween-settings-group',
'halloween_options', 'halloween_sanitize_options' );
}
function halloween_sanitize_options( $options ) {
$options['show_inventory'] = (
! empty( $options['show_inventory'] ) )
? sanitize_text_field( $options['show_inventory'] ) : '';
$options['currency_sign'] = (
! empty( $options['currency_sign'] ) )
? sanitize_text_field( $options['currency_sign'] ) : '';
return $options;
}
//Action hook to register the Products meta box
add_action( 'add_meta_boxes',
'halloween_store_register_meta_box' );
function halloween_store_register_meta_box() {
// create our custom meta box
add_meta_box( 'halloween-product-meta',
__( 'Product Information','halloween-plugin' ),
'halloween_meta_box', 'halloween-products',
'side', 'default' );
}
//build product meta box
function halloween_meta_box( $post ) {
// retrieve our custom meta box values
$hs_meta = get_post_meta( $post->ID,
'_halloween_product_data', true );
$hween_sku = ( ! empty( $hs_meta['sku'] ) )
? $hs_meta['sku'] : '';
$hween_price = ( ! empty( $hs_meta['price'] ) )
? $hs_meta['price'] : '';
$hween_weight = ( ! empty( $hs_meta['weight'] ) )
? $hs_meta['weight'] : '';
$hween_color = ( ! empty( $hs_meta['color'] ) )
? $hs_meta['color'] : '';
$hween_inventory = ( ! empty( $hs_meta['inventory'] ) )
? $hs_meta['inventory'] : '';
//nonce field for security
wp_nonce_field( 'meta-box-save', 'halloween-plugin' );
// display meta box form
echo '<table>';
echo '<tr>';
echo '<td>' .__('Sku', 'halloween-plugin').':</td>
<td><input type="text" name="halloween_product[sku]"
value="'.esc_attr( $hween_sku ).'" size="10"></td>';
echo '</tr><tr>';
echo '<td>' .__('Price', 'halloween-plugin').':</td>
<td><input type="text" name="halloween_product[price]"
value="'.esc_attr( $hween_price ).'" size="5"></td>';
echo '</tr><tr>';
echo '<td>' .__('Weight', 'halloween-plugin').':</td>
<td><input type="text" name="halloween_product[weight]"
value="'.esc_attr( $hween_weight ).'" size="5"></td>';
echo '</tr><tr>';
echo '<td>' .__('Color', 'halloween-plugin').':</td>
<td><input type="text" name="halloween_product[color]"
value="'.esc_attr( $hween_color ).'" size="5"></td>';
echo '</tr><tr>';
echo '<td>Inventory:</td>
<td>
<select name="halloween_product[inventory]"
id="halloween_product[inventory]">
<option value="In Stock"'
.selected( $hween_inventory, 'In Stock', false )
. '>' .__( 'In Stock', 'halloween-plugin' ). '</option>
<option value="Backordered"'
.selected( $hween_inventory, 'Backordered', false )
. '>' .__( 'Backordered', 'halloween-plugin' )
. '</option>
<option value="Out of Stock"'
.selected( $hween_inventory, 'Out of Stock', false )
. '>' .__( 'Out of Stock', 'halloween-plugin' )
. '</option>
<option value="Discontinued"'
.selected( $hween_inventory, 'Discontinued', false )
. '>' .__( 'Discontinued', 'halloween-plugin' )
. '</option>
</select></td>';
echo '</tr>';
//display the meta box shortcode legend section
echo '<tr><td colspan="2"><hr></td></tr>';
echo '<tr><td colspan="2"><strong>'
.__( 'Shortcode Legend',
'halloween-plugin' ).'</strong></td></tr>';
echo '<tr><td>'
.__( 'Sku', 'halloween-plugin' ) .':</td>
<td>[hs show=sku]</td></tr>';
echo '<tr><td>'
.__( 'Price', 'halloween-plugin' ).':</td>
<td>[hs show=price]</td></tr>';
echo '<tr><td>'
.__( 'Weight', 'halloween-plugin' ).':</td>
<td>[hs show=weight]</td></tr>';
echo '<tr><td>'
.__( 'Color', 'halloween-plugin' ).':</td>
<td>[hs show=color]</td></tr>';
echo '<tr><td>'
.__( 'Inventory', 'halloween-plugin' ).':</td>
<td>[hs show=inventory]</td></tr>';
echo '</table>';
}
// Action hook to save the meta box data when the post is saved
add_action( 'save_post','halloween_store_save_meta_box' );
//save meta box data
function halloween_store_save_meta_box( $post_id ) {
//verify the post type is for Halloween Products
// and metadata has been posted
if ( get_post_type( $post_id ) == 'halloween-products'
&& isset( $_POST['halloween_product'] ) ) {
//if autosave skip saving data
if ( defined( 'DOING_AUTOSAVE' ) && DOING_AUTOSAVE )
return;
//check nonce for security
wp_verify_nonce( 'meta-box-save', 'halloween-plugin' );
//store option values in a variable
$halloween_product_data = $_POST['halloween_product'];
//use array map function to sanitize option values
$halloween_product_data =
array_map( 'sanitize_text_field',
$halloween_product_data );
// save the meta box data as post metadata
update_post_meta( $post_id, '_halloween_product_data',
$halloween_product_data );
}
}
// Action hook to create the products shortcode
add_shortcode( 'hs', 'halloween_store_shortcode' );
//create shortcode
function halloween_store_shortcode( $atts, $content = null ) {
global $post;
extract( shortcode_atts( array(
"show" => ''
), $atts ) );
//load options array
$hween_options_arr = get_option( 'halloween_options' );
//load product data
$hween_product_data = get_post_meta( $post->ID,
'_halloween_product_data', true );
if ( $show == 'sku') {
$hs_show = ( ! empty( $hween_product_data['sku'] ) )
? $hween_product_data['sku'] : '';
}elseif ( $show == 'price' ) {
$hs_show = $hween_options_arr['currency_sign'];
$hs_show = ( ! empty( $hween_product_data['price'] ) )
? $hs_show . $hween_product_data['price'] : '';
}elseif ( $show == 'weight' ) {
$hs_show = ( ! empty( $hween_product_data['weight'] ) )
? $hween_product_data['weight'] : '';
}elseif ( $show == 'color' ) {
$hs_show = ( ! empty( $hween_product_data['color'] ) )
? $hween_product_data['color'] : '';
}elseif ( $show == 'inventory' ) {
$hs_show = ( ! empty( $hween_product_data['inventory'] ) )
? $hween_product_data['inventory'] : '';
}
//return the shortcode value to display
return $hs_show;
}
// Action hook to create plugin widget
add_action( 'widgets_init', 'halloween_store_register_widgets' );
//register the widget
function halloween_store_register_widgets() {
register_widget( 'hs_widget' );
}
//hs_widget class
class hs_widget extends WP_Widget {
//process our new widget
function __construct() {
$widget_ops = array(
'classname' => 'hs-widget-class',
'description' => __( 'Display Halloween Products',
'halloween-plugin' ) );
parent::__construct( 'hs_widget', __( 'Products Widget',
'halloween-plugin'), $widget_ops );
}
//build our widget settings form
function form( $instance ) {
$defaults = array(
'title' =>
__( 'Products', 'halloween-plugin' ),
'number_products' => '3' );
$instance = wp_parse_args( (array) $instance, $defaults );
$title = $instance['title'];
$number_products = $instance['number_products'];
?>
<p><?php _e('Title', 'halloween-plugin') ?>:
<input class="widefat" name="<?php
echo $this->get_field_name( 'title' ); ?>"
type="text" value="<?php
echo esc_attr( $title ); ?>" /></p>
<p><?php _e( 'Number of Products',
'halloween-plugin' ) ?>:
<input name="<?php
echo $this->get_field_name( 'number_products' ); ?>"
type="text" value="<?php
echo absint( $number_products ); ?>"
size="2" maxlength="2" />
</p>
<?php
}
//save our widget settings
function update( $new_instance, $old_instance ) {
$instance = $old_instance;
$instance['title'] =
sanitize_text_field( $new_instance['title'] );
$instance['number_products'] =
absint( $new_instance['number_products'] );
return $instance;
}
//display our widget
function widget( $args, $instance ) {
global $post;
extract( $args );
echo $before_widget;
$title = apply_filters( 'widget_title',
$instance['title'] );
$number_products = $instance['number_products'];
if ( ! empty( $title ) ) {
echo $before_title . esc_html( $title ) . $after_title;
};
//custom query to retrieve products
$args = array(
'post_type' => 'halloween-products',
'posts_per_page' => absint( $number_products )
);
$dispProducts = new WP_Query();
$dispProducts->query( $args );
while ( $dispProducts->have_posts() ) :
$dispProducts->the_post();
//load options array
$hween_options_arr = get_option( 'halloween_options' );
//load custom meta values
$hween_product_data =
get_post_meta( $post->ID,
'_halloween_product_data', true );
$hs_price = ( ! empty( $hween_product_data['price'] ) )
? $hween_product_data['price'] : '';
$hs_inventory = (
! empty( $hween_product_data['inventory'] ) )
? $hween_product_data['inventory'] : '';
?>
<p>
<a href="<?php the_permalink(); ?>"
rel="bookmark"
title="<?php the_title_attribute(); ?>
Product Information">
<?php the_title(); ?>
</a>
</p>
<?php
echo '<p>' .__( 'Price', 'halloween-plugin' )
. ': '.$hween_options_arr['currency_sign']
.$hs_price .'</p>';
//check if Show Inventory option is enabled
if ( $hween_options_arr['show_inventory'] ) {
//display the inventory metadata for this product
echo '<p>' .__( 'Stock', 'halloween-plugin' )
. ': ' .$hs_inventory .'</p>';
}
echo '<hr>';
endwhile;
wp_reset_postdata();
echo $after_widget;
}
}
PUBLISHING TO THE PLUGIN DIRECTORY
Now it’s time to release your plugin to the world! Releasing your plugin on WordPress.org is not a requirement, but it is the best way to get your plugin publicized and have other WordPress users download and install it. Remember that the Plugin Directory on WordPress.org is directly hooked to every installation of WordPress, so if your plugin exists in the directory then anyone running WordPress can easily download and install it.
Restrictions
A few restrictions exist to submitting your plugin to the Plugin Directory:
· Plugin must be compatible with GPLv2 or any later version.
· Plugin must not do anything illegal or morally offensive.
· Must use the Subversion (SVN) repository to host your plugin.
· Plugin must not embed external links on the user’s site (such as a “powered by” link) without asking the plugin user’s permission.
Make sure to follow these guidelines or your plugin will be removed from the Plugin Directory.
Submitting Your Plugin
The first step is to create an account on WordPress.org if you don’t already have one. To register a new account, visit the registration page at http://wordpress.org/support/register.php. This WordPress.org account is used in the Plugin Directory as well as the support forums.
After you have registered your account and signed in, it’s time to submit your plugin for inclusion in the Plugin Directory on WordPress.org. To submit your plugin, visit the Add Your Plugin page at https://wordpress.org/plugins/add/.
The first required field is the Plugin Name. The plugin name should be the exact name you want to use for your plugin. Keep in mind that the plugin name will be used as the URL in the directory. For example, if you submit a plugin named WP Brad, the URL to your plugin in the Plugin Directory will be https://wordpress.org/ plugins/wp-brad/. As you can see, the name you insert here is very important and cannot be changed.
The second required field is the Plugin Description. This field should contain a detailed description about your plugin. Remember that the description is really the only information used to decide whether or not to allow your plugin in the directory. Clearly state the plugin functionality, the purpose of the plugin, and installation instructions for the plugin.
The final field is the Plugin URL. This is not a required field, but it’s highly recommended that you include a download link to your plugin. This enables the reviewer of your plugin to download and look at your plugin if needed. Again this is not a required field but you are strongly encouraged to fill it in.
After you have filled out all of the information, click the Send Post button to submit your plugin request. The Plugin Directory states, “Within some vaguely defined amount of time, someone will approve your request.” This doesn’t really tell you much, but most plugins are approved within a day or so. The fact that your plugin has been approved does not mean you are done. The next step is to upload your plugin to the Subversion Repository that has been created for it.
Creating a readme.txt File
One file that is required to submit your plugin to the Plugin Directory is readme.txt. This file is used to fill in all of the plugin information on the Plugin detail page in the Directory. WordPress has developed the readme file standard, which details exactly how yourreadme.txt file should be defined. Here’s an example readme.txt file:
=== Plugin Name ===
Contributors: williamsba1, jtsternberg, coreymcollins
Donate link: http://example.com/donate
Tags: admin, post, images, page, widget
Requires at least: 3.8
Tested up to: 4.2
Stable tag: 1.1.0.0
License: GPLv2
Short description of the plugin with 150 chars max. No markup here.
== Description ==
This is the long description. No limit, and you can use Markdown
Additional plugin features
* Feature 1
* Feature 2
* Feature 3
For support visit the [Support Forum](http://example.com/forum/ " Support Forum")
== Installation ==
1. Upload 'plugin-directory' to the '/wp-content/plugins/' directory
2. Activate the plugin through the 'Plugins' screen in WordPress
3. Place '<?php prowp_custom_function(); ?>' in your theme templates
== Frequently Asked Questions ==
= A question that someone might have =
An answer to that question.
= Does this plugin work with WordPress Multisite? =
Absolutely! This plugin has been tested and
verified to work on the most current version of WordPress Multisite
== Screenshots ==
1. Screenshot of plugin settings page
2. Screenshot of plugin in action
== Changelog ==
= 1.1 =
* New feature details
* Bug fix details
= 1.0 =
* First official release
== Upgrade Notice ==
= 1.1 =
* Security bug fixed
For an online readme.txt example, visit the Readme Standard at https://wordpress.org/plugins/about/readme.txt.
WordPress.org also features a readme.txt validator so you can verify you have a properly formatted readme.txt file before submitting to the Subversion directory. You can access the validator at https://wordpress.org/plugins/about/validator/. Let’s break down the individual readme.txt sections:
=== Plugin Name ===
Contributors: williamsba1, jtsternberg, coreymcollins
Donate link: http://example.com/donate
Tags: admin, post, images, page, widget
Requires at least: 3.8
Tested up to: 4.2
Stable tag: 1.1.0.0
License: GPLv2
Short description of the plugin with 150 chars max. No markup here.
The Plugin Name section is one of the most important parts of your readme.txt file. The first line lists the contributors to the plugin. This is a comma-separated list of WordPress.org usernames that helped contribute to the plugin. The donate link should be a URL to either a donate link or a web page that explains how users can donate to the plugin author. This is a great place for a PayPal donation link. Tags are a comma-separated list of tags describing your plugin.
The “Requires at least” field is the minimal version of WordPress required to run the plugin. If your plugin won’t run on anything prior to 3.8, then 3.8 would be the “Requires at least” value. Likewise, “Tested up to” is the latest version the plugin has been tested on. This will typically be the latest stable version of WordPress. The Stable tag is also a very important field and should be the current version of the plugin. This value should always match the version number listed in the plugin header. Last is a short description of the plugin, which should be no more than 150 characters and cannot contain any markup.
== Description ==
This is the long description. No limit, and you can use Markdown
Additional plugin features
* Feature 1
* Feature 2
* Feature 3
For support visit the [Support Forum](http://example.com/forum/ " Support Forum")
The Description section features a detailed description of your plugin. This is the default information displayed on the plugin detail page in the Plugin Directory. There is no limit to the length of the description. You can also use unordered lists, shown in the preceding example, and ordered lists in your description. Links can also be inserted.
== Installation ==
1. Upload 'plugin-directory' to the '/wp-content/plugins/' directory
2. Activate the plugin through the 'Plugins' screen in WordPress
3. Place '<?php prowp_custom_function(); ?>' in your theme templates
The Installation section details the steps involved to install a plugin. If your plugin has very specific installation requirements, make sure they are listed here in detail. It’s also a good idea to list the function name and shortcode that can be used with the plugin.
== Frequently Asked Questions ==
= A question that someone might have =
An answer to that question.
= Does this plugin work with WordPress Multisite? =
Absolutely! This plugin has been tested and
verified to work on the most current version of WordPress Multisite
The FAQ section is the perfect place to list frequently asked questions, of course! This helps answer commonly asked questions and can eliminate many support requests. You can list multiple questions with answers, as this example shows:
== Screenshots ==
1. Screenshot of plugin settings page
2. Screenshot of plugin in action
The Screenshots section is used to add individual screenshots of your plugin to the plugin detail page. This is actually a two-step process. The first step is to list out each screenshot description in an ordered list. The next step is to place image files in your trunk directory (which is discussed in more detail next). These image file names must match the listing number. For instance, the screenshot of your settings page should be named screenshot-1.png. The screenshot of your plugin in action should be named screenshot-2.png. The file types accepted are .png, .jpg, .jpeg, and .gif.
== Changelog ==
= 1.1 =
* New feature details
* Bug fix details
= 1.0 =
* First official release
The next section is the Changelog. This section is important for listing out what each plugin version release has added or fixed. This is a very helpful section for anyone looking to upgrade to the latest version. It’s always nice to know exactly what is being added and fixed to determine how critical the plugin update is. A new item should be added for each version you release to the Plugin Directory, regardless of how minor that update may be.
== Upgrade Notice ==
= 1.1 =
* Security bug fixed
The final section is the Upgrade Notice section. This section allows you to send specific upgrade notice messages to the WordPress user. These messages are shown on the Dashboard ➢ Updates screen when a new version of your plugin is released.
The readme.txt file can also accept arbitrary sections in the same format as the rest. This is useful for more complicated plugins that need to provide additional information. Arbitrary sections will be displayed below the built-in sections described previously.
Setting Up SVN
The Plugin Directory uses Subversion (SVN) for handling plugins. To publish your plugin to the directory, you’ll need to set up and configure an SVN client. If you are familiar with command-line SVN, that would also be an option. In this example, you are going to use TortoiseSVN for Windows. TortoiseSVN is a free GUI client interface for SVN. For a list of additional SVN clients for different platforms, visit http://subversion.apache.org/.
First you’ll need to download the appropriate installer at http://tortoisesvn.net/downloads.html. After installing TortoiseSVN, you’ll need to reboot your computer. The next step is to create a new directory on your computer to store your plugin files. It is recommended that you make a folder to store all of your plugins in, such as c:\projects\wordpress-plugins. This makes it much easier going forward if you create and release multiple plugins to WordPress.org.
Next, navigate to your new wordpress-plugins directory and create a new directory for your plugin. Right-click this new folder to pull up a context menu. You’ll notice the new TortoiseSVN options listed: SVN Checkout and TortoiseSVN. Select SVN Checkout and a dialog box appears, as shown in Figure 8.9.
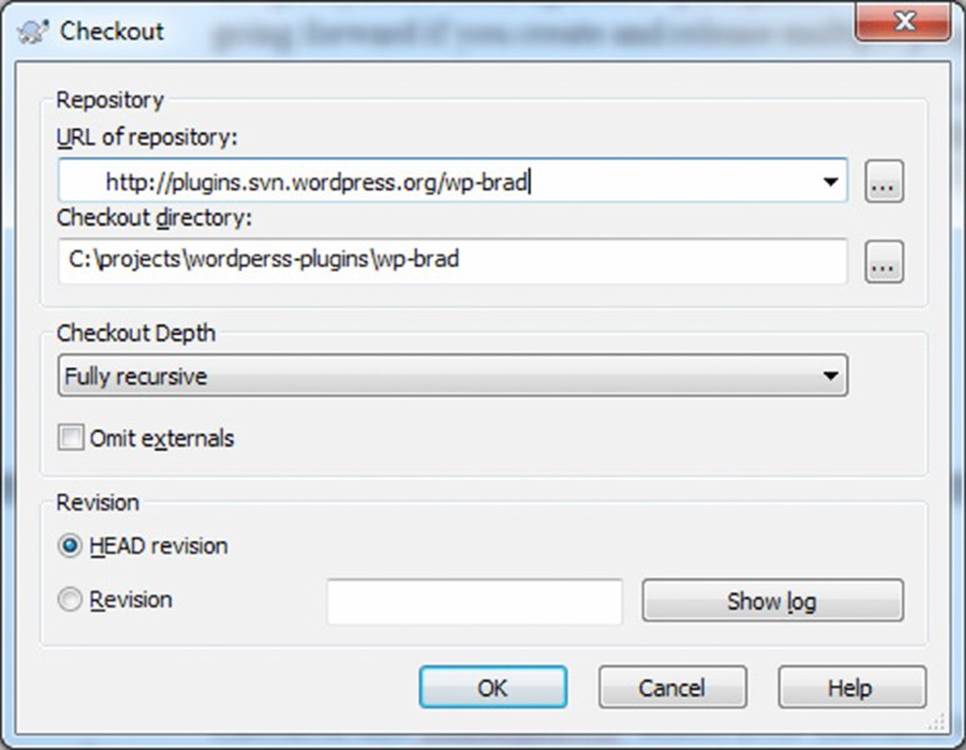
Figure 8.9 SVN Checkout dialog box
The URL of the repository was provided to you in the e-mail you received when your plugin was approved. This URL should be the same as the plugin URL so in this example the URL would be http://plugins.svn.wordpress.org/wp-brad. The Checkout directory is the local folder in which to store your plugin. In this case, you will use the new folder you created at c:\projects\wordpress-plugins\wp-brad. Make sure Checkout Depth is set to Fully Recursive. Also verify that the Revision is set to HEAD Revision. Finally, click OK. TortoiseSVN will connect to the SVN Repository for your plugin and, if all goes well, will create three new directories in your folder called branches, tags, and trunk. These three folders each serve a specific purpose for SVN:
· Branches—Every time a new major version is released, it gets a branch. This allows for bug fixes without releasing new functionality from trunk.
· Tags—Every time a new version is released, you’ll make a new tag for it.
· Trunk—Main development area. The next major release of code lives here.
Now that you’ve connected to your plugin’s SVN Repository, you need to move your plugin files to the trunk directory. Remember to also place your readme.txt file and any screenshots, includes, and so on in the trunk directory for your plugin. Remember that you’re just staging the plugin files to publish to the plugin directory. Publishing the files to WordPress.org is covered in the next section.
Once you’ve verified all of the plugin files are in trunk, you are ready to publish your plugin to the Plugin Directory!
Publishing to the Plugin Directory
Publishing your plugin to the Plugin Directory is a two-step process. First you need to SVN Commit the trunk folder to your SVN Repository. Second, you need to tag your plugin release. Once both steps have been completed, your new plugin will appear in the Plugin Directory within about 15 minutes.
To commit your plugin trunk, simply right-click the trunk folder and select SVN Commit. You’ll be presented with a dialog box to enter a log message and to select which files to commit to the trunk. Fill in a brief log message, such as “Adding WP-Brad 1.1,” and select all of the files you want to commit. TortoiseSVN will automatically select all files that have changed so you probably won’t need to change this. Next, click OK and you will be prompted to enter a username and password. This is the username and password you created on WordPress.org.
Next, you need to tag your plugin version. To tag your plugin version, simply right-click the trunk directory and select TortoiseSVN ➢ Branch/tag from the context menu. In the dialog box that appears, fill in the path to your tag directory. Using this example, the URL would be http://plugins.svn.wordpress.org/wp-brad/tags/1.1.0.0/. This tag version should match the stable tag in your plugin’s readme.txt file—in your case, version 1.1.0.0. Also type in a log message, such as “tagging version 1.1.0.0” and verify that “HEAD revision in the repository” is selected for the Create Copy option. Click OK and your plugin will create a new directory in your tags folder for version 1.1.0.0 with the appropriate plugin files.
That’s it! If everything worked successfully, your plugin should appear in the Plugin Directory within about 15 minutes. Once your plugin is successfully published, you’ll want to verify that all of the information is correct. One way to verify that your plugin was published successfully is to visit the Subversion URL, which for this example would be http://plugins.svn.wordpress.org/wp-brad/. Here you can ensure the trunk and tag directories were uploaded successfully. After 15 minutes, you can also verify your plugin by visiting the official Plugin Directory page at https://www.wordpress.org/plugins/wp-brad.
If you need to make any changes to your readme.txt file, simply edit it locally in your trunk folder, right-click the file, and click SVN Commit.
Releasing a New Version
A great feature of WordPress plugins is that you can easily release updates for your plugins in the Plugin Directory. When a new plugin version is released, a notice is displayed on any WordPress site that currently has that plugin uploaded to its server, whether or not it is activated. The user can use the automatic upgrade process to easily upgrade the plugin to the latest version. This is especially important if there are security patches in your plugin to help keep WordPress secure.
To release a new plugin version, make sure you copy the updated plugin files to the /trunk directory you set up earlier. This folder should contain all files for the updated plugin version. Once you have verified that all of the updates plugin files exist, simply right-click the trunk directory and select SVN Commit. Remember to type in a brief message such as “Committing version 1.2.” TortoiseSVN should have already selected all of the files that have changed, but if not, select all of the files you want to publish and click OK.
The final step is to tag your new version. To tag your new release, right-click the trunk directory and select TortoiseSVN ➢ Branch/tag. For this example, the URL would be http://plugins.svn.wordpress.org/wp-brad/tags/1.2.0.0/. Remember to write a brief log entry such as “Tagging version 1.2” and click OK. That’s it! Your new plugin version will be published in the Plugin Directory within 15 minutes. After the new version has been released, your plugin will appear at the top of the Recently Updated Plugins list on WordPress.org.
The WordPress Plugin Directory is a great source for inspiration and reference when building custom plugins. Don’t be scared to look at another plugin source code for reference. Find a plugin that functions similarly to what you want and see how the plugin author structured the code or used hooks to interpose his or her plugin ideas in the WordPress core processing.
Plugin Assets
When publishing plugins to the WordPress.org Plugin Directory, there are certain assets you can include to make your plugins really pop! The first asset is a Plugin Header image. This image appears on your plugin detail page, as shown in Figure 8.10.

Figure 8.10 Plugin header image
It’s easy to see how a plugin header image can really make your WordPress plugin stand out. Including a header image is very easy. First create an assets directory in the root of your plugin’s SVN directory. The assets directory should sit alongside your trunk,branches, and tags directories. This directory will contain all plugin assets, such as the header image. Next, add a 772 × 250 pixel .jpg or .png file. This image file will be used as the header image on your plugin’s detail page. The image name must be formatted likeassets/banner-772x250.(png|jpg).
The plugin header image can also support high-DPI displays, also known as retina displays. To include a retina-friendly header image, simply include a 1544 × 500 .jpg or .png file to your assets directory in the same format as before: assets/banner-1544x500.(png|jpg).
A newer plugin asset, introduced with WordPress 4.0, is the plugin icon. The plugin icon is used in the plugin installer in WordPress, shown in Figure 8.11, and on the plugin listing screens in the WordPress.org Plugin Directory.
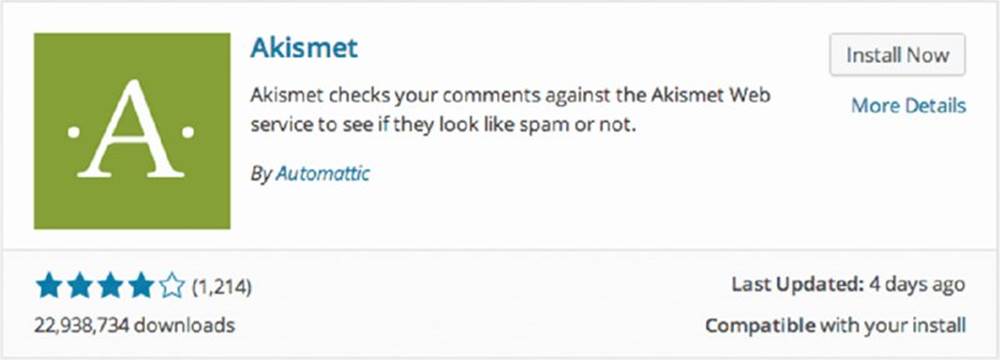
Figure 8.11 Plugin icon example
Plugin icons support standard resolutions as well as retina displays. To include a plugin icon, simply add a 128 × 128 .jpeg or .png file to your assets directory for standard display and a 256 × 256 icon for retina displays. The format for both icons would beassets/icon-128x128.(png|jpg) and assets/icon-256x256.(png|jpg).
Including high-quality plugin assets helps give your plugin a polished look and really stand out from the pack.
SUMMARY
In this chapter, you learned WordPress plugin packaging with the required plugin header, including a WordPress compatible software license with your plugin, and activating and deactivating functions. You also covered very important data validation and sanitization for plugin security. The chapter also covered powerful hooks, plugin setting options, and multiple ways to integrate your plugins into WordPress.
Plugins are only half of the WordPress extensibility story; they give you the power to add custom functions and event-driven processing to your site. If you want to change the look and feel of your site, change the way in which WordPress displays posts, or provide slots for those widgets you created, you’ll want to extend WordPress through theme development, which is the focus of Chapter 9.
All materials on the site are licensed Creative Commons Attribution-Sharealike 3.0 Unported CC BY-SA 3.0 & GNU Free Documentation License (GFDL)
If you are the copyright holder of any material contained on our site and intend to remove it, please contact our site administrator for approval.
© 2016-2026 All site design rights belong to S.Y.A.