Professional WordPress: Design and Development, 3rd Edition (2015)
Chapter 2. Code Overview
WHAT’S IN THIS CHAPTER?
· Downloading WordPress
· Configuring wp-config.php and .htaccess
· Exploring the wp-content directories
· Enabling maintenance mode in WordPress
WordPress is a software package that comprises groups of source code files that perform specific tasks within the system. Understanding the code, including file and folder structure, is essential to understanding how WordPress works as a whole.
After reading this chapter, you will be familiar with downloading and exploring the WordPress filesystem. This chapter also discusses configuring key WordPress files, including the powerful wp-config.php and .htaccess files. It also covers some advanced configuration options available in WordPress.
DOWNLOADING
The first step to installing WordPress is to download the source files required for WordPress to run. This section digs deeper into the core of WordPress.
Download Locations
You can download the latest stable release of WordPress directly from WordPress.org by visiting the download page located at http://wordpress.org/download/.
You can also update WordPress directly from your current WordPress installation by visiting the Updates WordPress section under the Dashboard ➢ Updates screen. Click the Download button to download the latest version of WordPress to your computer.
WordPress also features Subversion (SVN) access. Subversion is a free, open source version control system. WordPress uses Subversion to manage files and directories and the changes made to them. You can download the latest WordPress source code by checking out http://core.svn.wordpress.org/trunk/.
The SVN trunk directory contains the bleeding edge version of WordPress that is actively being developed. Typically, this version of WordPress contains bugs and is generally used for testing purposes. Running a production website using the trunk version of WordPress is not recommended.
SVN is the mechanism developers use to actively develop on the WordPress core software. With SVN, you can create and submit patch files for inclusion into the WordPress core. Chapter 16 covers this in detail.
Git is another very popular source code management system. Many developers, and not just in the WordPress community, have switched from SVN to Git for version control because of the many benefits Git offers over SVN. The WordPress core team has set up a Git mirror for WordPress core development. To access the Git repository run the command git clone git://develop.git.wordpress.org/. For more information on working with Git and WordPress core development, visit http://make.wordpress.org/core/2014/01/15/git-mirrors-for-wordpress/.
The SVN and Git repositories are considered equals, so if you plan to work with the WordPress core you can use the version control system that you are most comfortable with.
Available Formats
The default format for the WordPress software download is in a compressed zip archive named latest.zip. You can also download WordPress in a compressed tar archive named latest.tar.gz. There is no difference between the files in the archive, only the compression method used.
You can download the zip and tar archives directly from these URLs:
· http://wordpress.org/latest.zip
· http://wordpress.org/latest.tar.gz
These download links never change. Each new version of WordPress is automatically compressed and saved at this location when the version is tagged. When you save the archive to your computer, you should rename the file to include the WordPress version number, such as wordpress-4.1.zip. This will help you remember what version of WordPress you saved to your computer.
Release Archive
WordPress.org features a release archive for WordPress. The Release Archive features a list of downloadable archives for every release of WordPress since version 0.71. The archive is located at http://wordpress.org/download/release-archive/.
Remember that only the most current version of WordPress is actively maintained so these downloads are more for reference than actual use. “Actively maintained” means that critical fixes for security, performance, or reliability problems are made to the active branch and not applied retroactively to previous releases. If you need the fix, you’ll need to upgrade your installed version of WordPress.
Another great use for these older versions of WordPress is to roll a website back to a previous version. For example, if you update a very old version of WordPress to the latest stable version and run into problems, you could easily download the old version that the website was originally running to revert to. The Release Archive also features a download for every beta and release candidate version of WordPress as well. This is great to see the overall growth of WordPress as a software platform.
The release archives are also useful if you need to update an old version of WordPress that has hacks made to the core. Simply compare the website’s WordPress source code with the same version of WordPress from the release archive and any differences, or core hacks, will be discovered.
DIRECTORY AND FILE STRUCTURE
The WordPress source code features many different PHP, JavaScript, and CSS code files. Each file serves a specific purpose in WordPress. The beauty of open source software is that all code is publicly available, which means you can easily explore the code to better understand how WordPress functions. The best resource for learning WordPress is the WordPress software itself.
After extracting the WordPress download, you will notice the set file structure for WordPress, as shown in Figure 2.1.
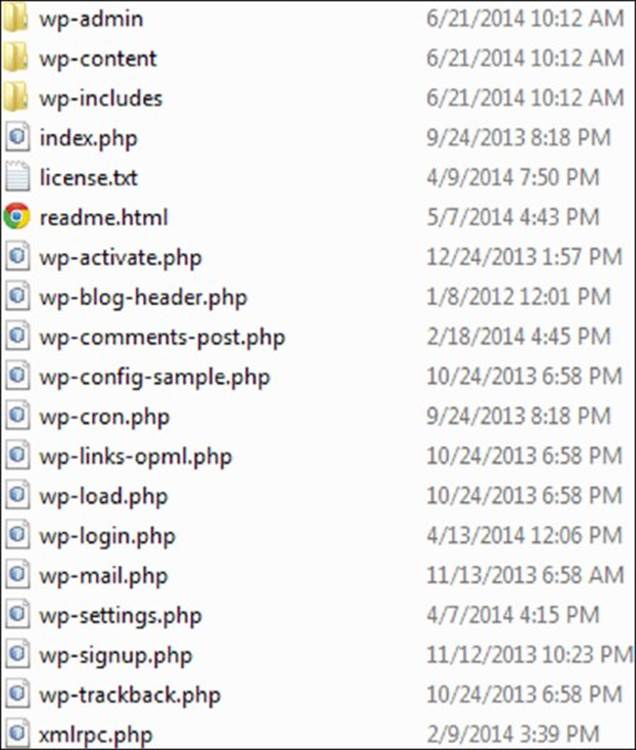
Figure 2.1 Default WordPress file and folder structure
WordPress comes with three directories by default: wp-admin, wp-content, and wp-includes. Core files are all files in the wp-admin and wp-includes directories and the majority of the files in the root WordPress directory. The wp-content directory holds all of your custom files, including themes, plugins, and media. This directory contains the code that controls content manipulation and presentation in WordPress. WordPress HTML content, such as pages and posts, is stored in the MySQL database along with metadata such as tag and category structures, both of which are covered in detail in Chapter 6.
Modifying any of the core WordPress files can result in an unstable website. An innocuous but badly executed change to the Dashboard or login functions, for example, will leave you with a WordPress installation that can’t be managed. Core changes also make it very difficult to update WordPress because all changes made are overwritten when the updated version of WordPress is installed. As discussed in the previous section, critical fixes to the WordPress core are only made in the current branch, so if you are forced to update WordPress to pick up a security fix, you’re going to have to re-integrate any core changes you’ve made and hope they don’t conflict with the changes you want. Maintaining the integrity and stability of your WordPress installation over time is much simpler when you’re not changing files in the core.
In general, the wp-admin, wp-includes, and root directory core WordPress files should never be edited, but the next section covers some core root directory files that can be modified as part of advanced configuration. In general, however, follow this rule that is revisited in Chapter 4: Don’t hack the core!
WORDPRESS CONFIGURATION
WordPress features specific files that can be edited for different purposes. These files can alter how WordPress functions. Always test changes in a development environment before publishing to a production server.
This section covers database connections, storing FTP info, enabling debugging tools, and more using wp-config.php. It also covers the power of the .htaccess file, including increasing PHP memory limits and max upload sizes, creating redirects, and setting access restrictions.
wp-config.php File
The most important file in any WordPress installation is the wp-config.php file. This file contains all database connection settings, including the database name, username, and password, to access your MySQL database. This file also stores additional database and other advanced WordPress settings. The wp-config.php file was originally named wp-config-sample.php. Renaming the file to wp-config.php is one of the first steps to installing WordPress.
The wp-config.php file is typically stored in the root directory of WordPress. Alternatively, you can move the wp-config.php file out of the WordPress root directory and into the parent directory. So if your WordPress directory is located here:
/public_html/my_website/wp-config.php
you can safely move the file to here:
/public_html/wp-config.php
WordPress looks for the wp-config.php file in the root directory first, and if it can’t find that file it looks in the parent directory. This happens automatically so no settings need to be changed for this to work.
NOTE Moving the wp-config.php out of the root WordPress directory is a good security measure, making it nearly impossible to potentially access this file from a web browser.
Some options in WordPress are stored as constants and these can be seen in the wp-config.php file. The constants all have the same format:
define('OPTION_NAME', 'value' );
OPTION_NAME is the name of the option constant being set; value is the option value and can be updated to whatever setting you would like to save for that option. When adding new options to the wp-config.php file, it’s important the options are added above the line that reads:
/* That's all, stop editing! Happy blogging. */
If your WordPress installation is having problems connecting to your database, this is the first place to start troubleshooting. If you receive the error message “Error establishing a database connection,” the first thing to do is verify that the DB_NAME, DB_USER, andDB_PASSWORD options are correctly set for your database server. Also verify that the DB_HOST name is set to the correct host for your server. Typically, this is set to localhost, but some hosting companies configure WordPress packages with web servers and MySQL servers on different machines, necessitating a host company–specific configuration option to locate the MySQL database. Contact your hosting tech support or consult their online documentation for the correct host value to set here.
You can change the database character set (charset) by changing the DB_CHARSET option value. By default, this is set to utf8 (Unicode UTF-8), which supports any language, and is almost always the best option.
Since WordPress 2.2, the DB_COLLATE option has allowed designation of the database collation, that is, sort order of the character set. (A character set is a collection of symbols that represents words in a language. The collation determines the order to use when sorting the character set, usually alphabetical order.) This option, by default, is blank and should typically stay that way. If you would like to change the database collation, just add the appropriate value for your language. You should change this option before installing WordPress. Altering this value after installation could cause problems in WordPress.
WordPress security can be strengthened by setting secret keys in your wp-config.php file. A secret key is a hashing salt, which makes your site harder to hack by adding random elements (the salt) to the password you set. These keys aren’t required for WordPress to function, but they add an extra layer of security on your website.
To have secret keys auto-generated for you, visit the link to WordPress.org for secret key generation in your wp-config.php file (https://api.wordpress.org/secret-key/1.1/salt/), shown in Figure 2.2. Alternatively you can just type a bunch of random characters in place of “put your unique phrase here.” The goal is to use secret keys that are 100 percent random and unique.
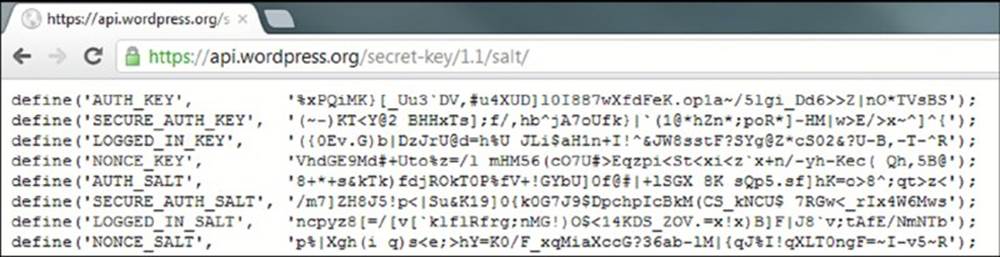
Figure 2.2 Randomly generated secret keys
You can add or change these keys at any time; the only thing that will happen is all current WordPress cookies will be invalidated and your users will be required to log in again.
Another security feature included in wp-config.php is the ability to define the database table prefix for WordPress. By default, this option value is set to wp_. You can change this value by setting the $table_prefix variable value to any prefix, like so:
$table_prefix = 'lecter_';
If a hacker is able to exploit your website using a SQL injection attack, this will make it harder for them to guess your table names and quite possibly keep them from doing SQL injection at all. Setting the table prefix to a unique value also makes it possible to run multiple WordPress installations in a single database. If you want to change the table prefix after you have installed WordPress, you can use the Change DB Prefix plugin (http://wordpress.org/plugins/db-prefix-change/) to do so. Make sure you make a good backup before doing this, however.
The wp-config.php file also contains the option for localizing your installation of WordPress. WordPress has the built-in capability to be used in many different languages. Setting the WPLANG option value sets the default language for WordPress to use. A corresponding MO (machine object) file for the selected language must be installed to wp-content/languages for this option to work. MO files are compressed PO (portable object) files, which contain translations for WordPress messages and text strings in a specific language. The MO and PO files are components of the GNU “gettext” subsystem that underlies the WordPress multi-language capabilities. For a full list of available MO language files, visit the following resources:
· WordPress in Your Language Codex page—http://codex.wordpress.org/WordPress_in_Your_Language
· WordPress Language File Repository—http://svn.automattic.com/wordpress-i18n/
Debugging errors in WordPress can be made easier using the WP_DEBUG option. Enabling WP_DEBUG displays WordPress errors on the screen, rather than suppressing those errors with a white screen. To enable WP_DEBUG, just set the option value to true:
define( 'WP_DEBUG', true );
New installations of WordPress will have this option defined in wp-config.php as false. If this option is not defined, it defaults to false and error messages are not displayed. Remember to disable or remove this option when you are done debugging because error messages might help hackers find vulnerabilities in your website.
NOTE We recommend that you always keep WP_DEBUG enabled when developing in WordPress to address any warnings or errors that might be displayed.
Advanced wp-config.php Options
You can set additional advanced options in your wp-config.php file. These options are not in the wp-config.php file by default so you will need to manually add them to the file.
To set your WordPress address and blog address, use the following two options:
define( 'WP_SITEURL', 'http://example.com/wordpress' );
define( 'WP_HOME', 'http://example.com/wordpress' );
The WP_SITEURL option allows you to temporarily change the WordPress site URL. This does not alter the database option value for siteurl, but instead temporarily changes the value. If this option is removed, WordPress reverts back to using the siteurl database setting. The WP_HOME option works the exact same way, letting you temporarily change the home value for WordPress. Both values should include the full URL including http://.
NOTE This is a useful technique if you are building a WordPress website under a temporary development URL, such as new.example.com. You can simply remove these two options when you go live and WordPress will load using the production URL instead.
WordPress version 3.7 introduced automatic background updates for WordPress. By default, only minor releases (for example, 4.1.x, 4.2.x, and so on) are updated automatically. There are currently four types of automatic background updates:
· Core updates
· Plugin updates
· Theme updates
· Translation file updates
To completely disable all automatic updates, which includes all four types just listed, you’ll set the AUTOMATIC_UPDATER_DISABLED constant to true, as shown here:
define( 'AUTOMATIC_UPDATER_DISABLED', true );
Alternately, you can enable automatic updates for major releases and development purposes. Using the WP_AUTO_UPDATE_CORE constant, you can define auto updates in one of three ways:
· true—Major, minor, and development automatic updates are all enabled.
· false—Major, minor, and development automatic updates are all disabled.
· minor—Minor updates are enabled. Major and development updates are disabled.
As an example, let’s look at the various ways you can configure the automatic update settings:
// Enables all core updates, including minor and major:
define( 'WP_AUTO_UPDATE_CORE', true );
// Disables all core updates:
define( 'WP_AUTO_UPDATE_CORE', false );
// Enables core updates for minor releases (default):
define( 'WP_AUTO_UPDATE_CORE', 'minor' );
For more information on configuring WordPress automatic updates, visit http://codex.wordpress.org/Configuring_Automatic_Background_Updates.
WordPress also features an option that allows you to move the wp-content directory. The two required options are:
define( 'WP_CONTENT_DIR', $_SERVER['DOCUMENT_ROOT'] .
'/blog/wp-content' );
define( 'WP_CONTENT_URL', 'http://example.com/blog/wp-content');
The WP_CONTENT_DIR option value is the full local path to your wp-content directory. The WP_CONTENT_URL is the full URI of this directory. Optionally, you can set the path to your plugins directory like so:
define( 'WP_PLUGIN_DIR', $_SERVER['DOCUMENT_ROOT'] . '/blog/wp-content/plugins' );
define( 'WP_PLUGIN_URL', 'http://example/blog/wp-content/plugins');
WP_PLUGIN_DIR and WP_PLUGIN_URL are options used by developers to determine where your plugin folder resides. If a developer is not using these constants, there is a very good chance their code will break if you move your wp-content directory. Never move the wp-content directory on your production server without first testing in a development environment.
As with the wp-content and plugin directories, you can also move the uploads directory in WordPress. This directory is where WordPress stores all files uploaded through the WordPress dashboard. To set a custom location for the uploads directory, you’ll use theUPLOADS constant shown here:
define( 'UPLOADS', 'blog/wp-content/my-filez' );
The uploads directory must exist within the directory containing your WordPress core files or a subdirectory within and cannot exist outside of the WordPress folder structure.
WordPress saves post revisions for each saved edit made to a post or page. Edits are saved by clicking either the Save or Publish button, and also by the built-in auto-save feature of WordPress. Imagine if each post you create has 10 revisions. If you had 100 posts, that would be 1,000 records in your database. This can quickly increase the size of your database and may even slow down your website because table records can take longer to fetch in larger databases. Luckily, WordPress has a built-in post revisions option calledWP_POST_REVISIONS. You can set this option to false to completely disable post revisions altogether, or you can specify a maximum number of revisions to keep for each post or page. Following are examples of both scenarios:
define( 'WP_POST_REVISIONS', false );
define( 'WP_POST_REVISIONS', 5 );
You can also configure the auto-save interval by setting the AUTOSAVE_INTERVAL option. WordPress uses AJAX when editing a post to auto-save revisions. By default, this interval is 60 seconds. You can set the interval in seconds for auto-save in wp-config.php. Set auto-save to 5 minutes by using this code:
define( 'AUTOSAVE_INTERVAL', 300 );
A great debugging option is SAVEQUERIES. Activating this option saves all database queries into a global array that can be displayed on your page. This can help you debug query issues, and also to see exactly what WordPress is executing on each page load. If you are working on a theme or plugin, and can’t seem to get the right set of posts back, this debug option will show you exactly what WordPress is asking for out of the database. Enable this option by setting the value to true:
define( 'SAVEQUERIES', true );
To display the query array in your theme, add the following code to any theme template file to view:
if ( current_user_can( 'manage_options' ) ) {
global $wpdb;
print_r( $wpdb->queries );
}
The preceding code displays the saved query array only if the logged-in user has the ability to manage options, essentially locking it down so only site administrators will see the output. Themes and template files are covered in Chapter 9.
You can also enable logging directly from your wp-config.php file. To enable logging, first you need to create a php_error.log file and upload it to your root WordPress directory. Then simply turn on the log_errors PHP option and point to your logging file:
@ini_set( 'log_errors','On' );
@ini_set( 'display_errors','Off' );
@ini_set( 'error_log','/public_html/wordpress/php_error.log' );
All errors will now be logged to this file. This will also log any errors produced by enabling the WP_DEBUG option discussed earlier. In the preceding example display_errors is set to Off, which is perfect for a production website because you don’t want error messages displayed. If you are debugging and want to view errors in real time, just set that option to On. Remember the error_log value is relative to the web server’s document root, not the WordPress root.
You can also set the memory limit WordPress is allowed to use with the WP_MEMORY_LIMIT option. If your website hits the memory limit set for WordPress to run, you will see the error “Allowed memory size of xxxxx bytes exhausted.” Increasing the memory limit fixes this problem. The memory limit is set by defining the megabytes needed:
define( 'WP_MEMORY_LIMIT', '64M' );
Setting this option only works if your hosting company allows it. Some hosting companies will not allow you to dynamically change the memory limit and will have this value set very low. This problem is usually found on lower-cost hosting companies that maintain their price points by packing more web server instances onto a single physical host, creating contention for memory footprint.
This increases the memory only for WordPress and not other applications running on your server. To increase the memory limit across all of your websites, set the php_value memory_limit variable in your php.ini file. For example, when importing large amounts of content, say months or years worth of blog posts, it’s likely you’ll hit this memory limit.
One amazing feature of WordPress is the built-in localizer. WordPress displays in English by default, but can easily be set to display any language that has been translated. Setting the WPLANG option triggers WordPress to load the specified language files:
define ( 'WPLANG', 'en-GB' );
The option value shown previously comprises the ISO-639 language code followed by the ISO-3166 country code. So en-GB would be English-Great Britain. This setting will reference your .mo and .po files for language translation.
You can also define the LANGDIR option. This option defines what directory will hold your language .mo files. By default, WordPress looks in wp-content/languages for the .mo file. If you would like to move this folder, just set the LANGDIR option like so:
define( 'LANGDIR', '/wp-content/bury/my/languages' );
WordPress will now look in the new location for your .mo files.
CUSTOM_USER_TABLE and CUSTOM_USER_META_TABLE are also very powerful options. They are useful if you want to have two or more individual WordPress installs use the same user accounts. Remember to set this prior to installing WordPress.
define( 'CUSTOM_USER_TABLE', 'joined_users' );
define( 'CUSTOM_USER_META_TABLE', 'joined_usermeta' );
Setting these two options enables you to define the name of the default WordPress user and usermeta database tables. Doing this means both websites share user information including usernames, passwords, author bios, and so on. This is a great way to set up a new installation of WordPress but not lose sync with your current user accounts.
If you would like your users to have different roles on each WordPress install, but still share user accounts, don’t set the CUSTOM_USER_META_TABLE option. Everything stored in the user tables will stay the same, but everything else will be blog-specific (that is, user level, first and last name, and so on).
You can set multiple cookie options such as COOKIE_DOMAIN, COOKIEPATH, and SITECOOKIEPATH. These options are typically used in a WordPress Multisite installation utilizing subdomains for websites. This allows you to set the primary domain so cookies can be created and validated on all subdomains in the network.
define( 'COOKIE_DOMAIN', '.domain.com' );
define( 'COOKIEPATH', '/' );
define( 'SITECOOKIEPATH', '/' );
Typically, you won’t need to use or change this option, but if you run into issues with cookies, this is the first place to check.
Since the inclusion of the automatic installer functionality for plugins and themes, as well as the automatic update process, you can set FTP settings directly in your wp-config.php file. This is only needed if your host is not configured to support the automatic install process. This is easily detectable because each time you try to install a plugin or theme you are asked for your FTP information.
To save your FTP information in WordPress, add the following options in your wp-config.php file:
define( 'FTP_USER', 'username' );
define( 'FTP_PASS', 'password' );
define( 'FTP_HOST', 'ftp.example.com:21' );
Just enter your FTP username, password, and host with port and you’re all set! WordPress will no longer ask for your FTP information when using the automatic installer.
You can set additional FTP/SSH options for various configurations:
// sets the filesystem method: "direct", "ssh", "ftpext", or "ftpsockets"
define( 'FS_METHOD', 'ftpext' );
// absolute path to root installation directory
define( 'FTP_BASE', '/public_html/wordpress/' );
// absolute path to wp-content directory
define( 'FTP_CONTENT_DIR', '/public_html/wordpress/wp-content/' );
// absolute path to wp-plugins directory
define( 'FTP_PLUGIN_DIR ', '/ public_html /wordpress/wp-content/plugins/' );
// absolute path to your SSH public key
define( 'FTP_PUBKEY', '/home/username/.ssh/id_rsa.pub' );
// absolute path to your SSH private key
define( 'FTP_PRIVKEY', '/home/username/.ssh/id_rsa' );
// secure FTP SSL-connection if supported by the hosting company
define( 'FTP_SSL', false );
You can also override default file permissions in WordPress using the FS_CHMOD_FILE and FS_CHMOD_DIR options:
define( 'FS_CHMOD_FILE', 0644 );
define( 'FS_CHMOD_DIR', 0755 );
The numeric single digit values represent the User, Group, and World permissions set for files and folders on your web server. To learn more about WordPress and file permissions visit http://codex.wordpress.org/Changing_File_Permissions.
These settings can help with certain hosting companies that use restrictive permissions for all user files. This will override the server settings and should allow WordPress updates and auto installations to work.
The WP_CACHE option is required for some caching plugins to work. Enabling this option will include the file wp-content/advanced-cache.php. To enable this option, use the following code:
define( 'WP_CACHE', true );
WordPress has numerous constant options that you can set. There is a PHP function to view all constants currently set on your installation:
print_r( @get_defined_constants() );
An advanced option is forcing SSL on login to your WordPress site. This requires users to log in via the HTTPS access link and encrypts all data being transferred to and from your website. To activate SSL on login, add the FORCE_SSL_LOGIN option like so:
define( 'FORCE_SSL_LOGIN', true );
You can also force all admin pages to use SSL. This is activated with the FORCE_SSL_ADMIN option, like so:
define( 'FORCE_SSL_ADMIN', true );
This forces all admin dashboard pages (/wp-admin) to be encrypted with SSL. Keep in mind that activating this setting slows down your admin page load times, but all data passed to and from WordPress will be encrypted using SSL. Also remember that your website must be configured to work with SSL. The quick way to test is to visit your site using https, as in https://example.com. If the page loads, SSL is set up on your server.
NOTE Forcing SSL on the admin side of WordPress is a great security enhancement. All data passed to and from WordPress will be encrypted, preventing someone from potentially stealing your WordPress login credentials.
Since version 2.9, WordPress has featured a trash bin. This trash bin contains any posts, pages, attachments, and comments that have been deleted. This allows you to recover any content that you might have accidentally deleted in WordPress. By default, the trash bin is emptied every 30 days. Emptying the trash bin will permanently delete any items in the trash. You can modify this interval by setting the EMPTY_TRASH_DAYS option like so:
define( 'EMPTY_TRASH_DAYS', 7 );
The trash will now automatically be emptied every 7 days. You can also disable the trash completely by setting the option value to 0. The trash link will now be replaced with a Delete Permanently link. Keep in mind that WordPress will not ask for a confirmation when you click Delete Permanently.
There is also an option to disable WordPress cron. Cron is used to execute scheduled tasks in WordPress. Some common schedule tasks include posting a scheduled post and checking for new versions of WordPress, themes, and plugins. To disable WordPress cron, add this option to your wp-config.php file:
define( 'DISABLE_WP_CRON', true );
You can also define WordPress Multisite options in your wp-config.php file. To enable the Multisite feature of WordPress, simply add the WP_ALLOW_MULTISITE constant:
define( 'WP_ALLOW_MULTISITE', true );
Setting this option to true will expose a new submenu under Tools ➢ Network Setup. The Network Setup section of the dashboard allows you to enable and configure WordPress Multisite. You’ll learn more about the Multisite feature of WordPress in Chapter 10.
This section covered a lot of common options for wp-config.php. There are many more, less common, options for wp-config.php available in WordPress. A great resource for learning about wp-config.php options is the Codex: http://codex.wordpress.org/Editing_wp-config.php.
.htaccess
The .htaccess file is used primarily for creating pretty permalinks and keyword injected URLs for your website. WordPress by default creates ugly query-string formed URLs, usually with an ID present, such as http://example.com/?p=45. These URLs are completely functional but aren’t very friendly to search engines and site visitors. By enabling pretty permalinks, WordPress creates URLs based on site content, such as post and page titles, category and tag names, and dates for archives.
Enabling Permalinks
To enable permalinks, visit the Settings ➢ Permalinks screen on your WordPress Dashboard, as shown in Figure 2.3. Select any permalink structure other than Default and click the Save Changes link.
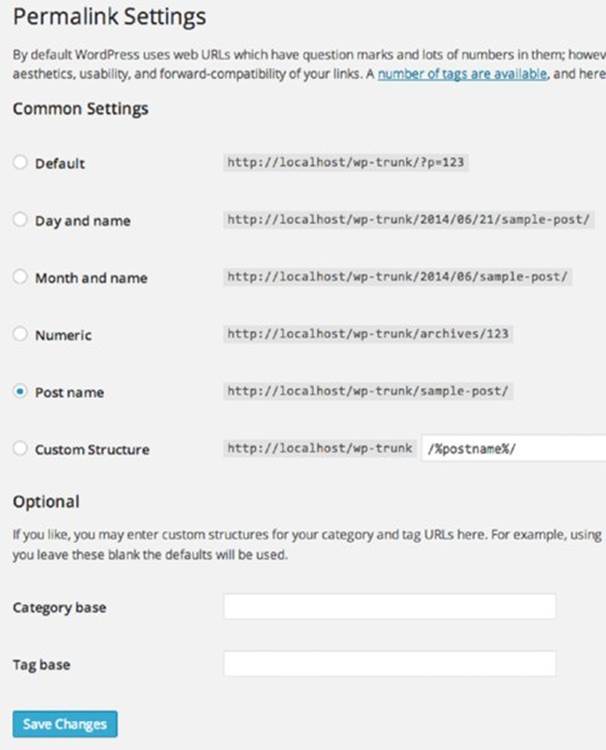
Figure 2.3 Enabling permalinks in WordPress
Upon saving your changes, WordPress tries to create your default .htaccess file. If your root WordPress directory is writable by the server, the file is created automatically. If WordPress is unable to create the .htaccess file, you will see instructions on how to manually create the file, as shown in Figure 2.4.
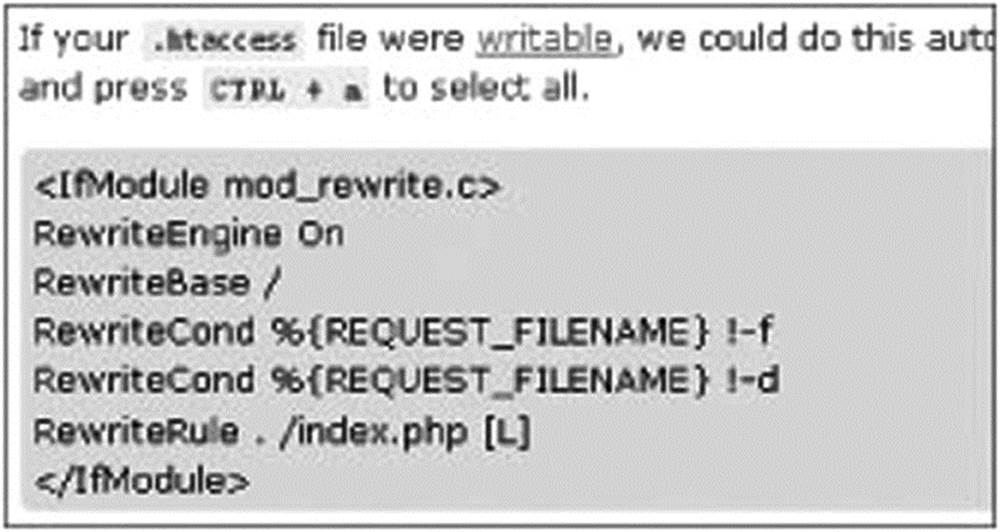
Figure 2.4 Manual info for creating the .htaccess file
Setting a permalink structure using the month and year like this:
/%year%/%monthnum%/%postname%/
creates a permalink like this:
http://example.com/2015/10/happy-halloween/
Using permalinks offers many advantages, such as:
· Search Engine Optimization (SEO)—Keywords in your URL can give your website a big SEO boost. Search engines will use these keywords in their algorithm for positioning in their search results.
· Forward compatibility—Regardless of what platform your website uses (WordPress, Drupal, Joomla!), having a solid permalink structure can be easily replicated should you ever migrate.
· Usability—Visitor-unfriendly ID URLs make it equally unpleasant to share a link with a friend. It’s difficult to differentiate the content between your ID-driven URLs.
· Sharing—In this Internet era of social networking, sharing is a natural extension of your online presence. Keywords in the URL would make finding your link extremely easy and convey an immediate context for the content.
By default, pretty permalinks are controlled by the mod_rewrite Apache module. If your web server does not support mod_rewrite, or pretty permalinks, WordPress will use standard querystring based URLs like http://example.com/?p=3416.
.htaccess Rewriting Rules
Usually a web server takes a URL that references a file in the server’s document filesystem, loads that file, and processes the content in it to generate HTML sent back to the user’s browser. For WordPress files such as wp-login.php, that’s exactly how the login screen is generated. When presented with a pretty permalink such as example.com/2015/travel/haddonfield/, the web server just needs to load the main loop of WordPress so that the core code can parse the URL and turn it into a database query that finds a post with the title Haddonfield in the category Travel. Unlike a static website where you would have created a file with that name, WordPress stores its content in a database—only a few files are loaded directly.
The “secret sauce” behind the WordPress permalink mechanism is summarized in three rewriting rules added to the .htaccess file when you enable permalinks:
RewriteCond %{REQUEST_FILENAME} !-f
RewriteCond %{REQUEST_FILENAME} !-d
RewriteRule . /index.php [ L]
Quite simply, these rules check the URL used to access your site to see if it refers to an existing file or directory in the filesystem hierarchy. The !-f and !-d notations are negations; .htaccess is ensuring that the URL does not refer to any valid file or directory pathname. If the URL does, in fact, match a valid file—for example, a WordPress administrative function such as wp-login.php—then no rewriting is done and the web server tries loading that file (to execute the PHP code contained within). If there’s no file or directory at the path specified by the supplied URL, then the incoming URL is rewritten to index.php, invoking the core of the WordPress system. You’ll dig into the steps used to convert a URL string into a MySQL query in a bit more detail as a preface to the discussion of the content display loop in Chapter 5.
NOTE The simple check for whether a file or directory exists can have unintended side effects if you put non-WordPress web server content in the same directory structure as the WordPress code. For example, consider a directory of images as a peer directory of wp-content: example.com/wp-content and example.com/images. You might choose to bypass the WordPress media library because those images are managed by their own set of ingest processes. What happens when a user forms a URL with a mistyped image name that points to a nonexistent file? The .htaccess rewriting rule will fire because there is no file with that name, and the WordPress core will be started. A user expecting to see an image will instead get the default WordPress site content when they should have received a 404 error for a nonexistent URL target. If you are going to add directories around your WordPress installation, either place WordPress in its own subdirectory (example.com/wordpress) or add a rewrite rule to .htaccess that recognizes your added peer directories and immediately hands those URLs off to the web server:
RewriteRule ^images/(.*) images/$1 [L]
This rule effectively says, “Take any URL that starts with the component images, and pass it off to the web server.” The [L] directive means “stop processing after matching this rule,” and the rewrite itself simply echoes back what it was passed. If you’re going to have a few directories sitting in parallel with the WordPress installation, you’ll need one rewrite rule for each.
The .htaccess file can also manage URL redirects. If you change your About page from http://example.com/about to http://example.com/about-me, anyone who visits your original URL will hit a 404 page. A URL redirect will redirect from the old URL to the new URL so your visitors won’t get lost. This also alerts search engines about the new URL so they can update their index.
Following is an example of a 301 permanent redirect to a static page:
redirect 301 /about http://example.com/about-me
WordPress does some additional rewriting and cleanup of URLs to improve search engine results, as you’ll see in Chapter 5.
Configuration Control Through .htaccess
The .htaccess file is very powerful and can control more than just URL structure. For instance, you can control PHP configuration options using the .htaccess file. To increase the memory allotted to PHP use this command:
php_value memory_limit 64M
This increases the memory limit in PHP to 64MB. You can also increase the max file size upload and post size:
php_value upload_max_filesize 20M
php_value post_max_size 20M
Now the maximum file size you can post from a form and upload is set to 20MB. Most hosting companies set these values to around 2MB by default so these are settings that will be used often for larger file uploads. Not all hosting companies will allow these values to be set in your .htaccess file, and they could create an error on your website if that is the case.
The .htaccess file can also be used for security purposes. Using .htaccess allows you to restrict access to your website by IP address, essentially locking it down from anonymous visitors. To lock down your website by IP addresses, add the following code to your.htaccess file:
AuthUserFile /dev/null
AuthGroupFile /dev/null
AuthName "Access Control"
AuthType Basic
order deny,allow
deny from all
#IP address to whitelist
allow from xxx.xxx.xxx.xxx
Replace xxx.xxx.xxx.xxx with any IP address that you want to grant access to your website. You can have multiple allow from lines so add as many IP addresses as you need. This allows access to your website only if you are using an IP address defined here.
A more widely used option is to lock down your wp-admin directory. This means that only IP addresses you specify can access your admin dashboard URLs. This makes it much harder for anyone else to try to hack your WordPress back end. To accomplish this, create a separate .htaccess file in your wp-admin directory with the preceding code.
Remember that most ISPs assign client addresses dynamically so the IP address of the computer you are using will change on occasion. If you get locked out, just update your .htaccess file with your new IP address or delete the file altogether. This is not a good tip if you allow open registrations on your website because you need to allow your users access to the wp-admin directory.
You can also allow wildcard IP addresses. For example, 123.123.123.* would allow access to anyone who matches the first three IP address octets, with the final digit being a wildcard. You can also allow a range of IP addresses. For example 123.123.123.110-230 would allow anyone with an IP address between 123.123.123.110 and 123.123.123.230.
You can also enable error logging from the .htaccess file. The first step is to create a php-errors.log file in your WordPress root directory. Then add the following code to your .htaccess file to enable error logging:
php_flag display_startup_errors off
php_flag display_errors off
php_flag html_errors off
php_flag log_errors on
php_value error_log /public_html/php-errors.log
This enables error logging but suppresses any error messages from displaying. Again this is a perfect setup for a production environment because you don’t want errors publicly displayed.
The .maintenance File
WordPress has a built-in maintenance mode that can be enabled by the .maintenance file. The .maintenance file is used by WordPress during the auto-update process. This prevents visitors from seeing any error messages as WordPress core files are updated. To test this feature, simply create a new .maintenance file and add the following line of code:
<?php $upgrading = time(); ?>
Add this file to your WordPress root directory and your website will instantly enter maintenance mode. This locks down your website for all visitors and displays a generic maintenance message “Briefly unavailable for scheduled maintenance. Check back in a minute.” The time() function can be replaced with any UNIX-formatted timestamp.
You can set a custom maintenance page by creating a maintenance.php file and placing it in your wp-content directory. WordPress uses this file to display during any forced maintenance periods that you set. This allows you to create a custom maintenance notice to your website visitors.
This file is also used by the WordPress automatic update process. A .maintenance file is created right before WordPress installs the new core files during an update. This ensures there are never any error messages for your visitors during this process.
WP-CONTENT USER PLAYGROUND
The wp-content directory stores just about every file for customizing WordPress. This directory stores your plugins, themes, uploaded media, and additional files to extend WordPress in any way imaginable.
The wp-content directory has a single PHP file, index.php. The contents of this file are shown here:
<?php
// Silence is golden.
So what’s the point of this file? Actually this is a very important file. The index.php file blocks anyone from viewing a directory listing of your wp-content folder. If the index.php file didn’t exist, and your web server allowed directory listings, visitinghttp://example.com/wp-content/ would display all of the files and folders in that directory. This can help hackers gain access to key files that might help exploit your website; for example if a vulnerability were discovered in a plugin, being able to view the list of directories in the WordPress plugin directory would quickly and easily inform an attacker if your site was a viable target.
If you are manually updating WordPress, make sure you avoid overwriting your wp-content directory.
Plugins
Plugins are stored in the wp-content/plugins directory. A plugin can be a single file or multiple files inside of a folder. Any files inside the /plugins directory are scanned by WordPress to determine if the file is a properly formatted WordPress plugin. If the file is determined to be a plugin, it appears under the Plugins ➢ Installed Plugins screen on your admin dashboard ready to be activated.
NOTE Remember that to automatically deactivate a plugin, you can remove it from your /plugins folder. If an active plugin’s files are missing, WordPress deactivates the plugin before trying to load the missing plugin code.
Your wp-content directory might also include a /mu-plugins directory. Must-use (mu) plugins are plugins that are automatically enabled in WordPress. Any plugins that exist in this folder will be executed just like a standard activated plugin. The major difference is mu-plugins cannot exist in a subdirectory or they will be ignored. To learn more about mu-plugins visit http://codex.wordpress.org/Must_Use_Plugins.
You’ll be revisiting plugins in Chapter 8.
Themes
Themes are stored in the wp-content/themes directory. Each theme must exist in its own subdirectory and must consist of the proper template files for WordPress to recognize it as a usable theme. At a minimum, an index.php and a style.css file must exist in the theme directory, along with proper tagging to display under the Appearance ➢ Themes screen on your admin dashboard.
WordPress can store as many themes in this directory as your server allows. You can easily view a preview of any theme, or activate a new theme, under the Appearance ➢ Themes screen. Chapter 9 covers themes in much more detail.
Uploads and Media Directory
WordPress stores uploaded media in the wp-content/uploads folder. This directory does not exist in a default installation of WordPress. The /uploads directory is created the first time you successfully upload a file to WordPress.
By default, WordPress stores uploads in month- and year-based folders. So your uploaded image would be stored like so:
/wp-content/uploads/2015/06/image.png
Before you can upload any images or files in WordPress, you need to set the /wp-content directory to be writable. When you upload your first image, WordPress auto-creates the /uploads directory and any needed subdirectories. After you have successfully uploaded your first image, reset the /wp-content permissions to not be writable, typically 755. Currently, there is no way to import images uploaded via FTP into the WordPress Media Library. If making the uploads directory writeable is not an option, there are plugins available (such as NextGen Gallery, described in detail in the Custom Directories section that follows) that include this functionality.
WordPress Multisite stores uploaded media in a different manner. Instead of one uploads directory, Multisite creates a sites directory inside the standard uploads directory. Inside this folder are multiple subdirectories named with a numerical ID. This ID is the blog ID the folder is attached to. Every site in a Multisite network has a unique blog ID. Chapter 10 covers this in more detail. For example, your second WordPress Multisite site upload directory would look like this:
/uploads/sites/2/files/
This helps keep individual site uploads separated and easier to maintain.
Upgrade Directory
The wp-content/upgrade directory is automatically created by WordPress when you use the automatic update process. This folder is used by WordPress to store the new version of WordPress that is downloaded from WordPress.org. The compressed WordPress download is extracted in this folder prior to the update. This folder should remain untouched for automatic updates to process successfully. If this directory is deleted, WordPress re-creates it the next time you run the auto-updater.
Custom Directories
Some plugins that require a lot of custom files will store those files in a directory in your wp-content folders.
The W3 Total Cache plugin (https://wordpress.org/plugins/w3-total-cache/) creates a /wp-content/cache directory to store all of the cached pages created for your website. A cached page is simply a fully generated page on your website saved as a static HTML file. Instead of generating the page each time a user clicks one of your links, the cache plugin serves up the static HTML file to the visitor. This dramatically decreases WordPress load times and increases performance because pages aren’t generated on each view, but rather only when the cache is regenerated based on your settings.
The W3 Total Cache plugin also adds one file to your wp-content directory: advanced-cache.php. This file is required for W3 Total Cache to function correctly. When W3 Total Cache is activated, it tries to create this file. If it fails, a notice appears alerting you of this. The file exists in the W3 Total Cache plugin directory and can be manually moved to the wp-content directory.
The most popular image gallery plugin, NextGen Gallery (http://wordpress.org/extend/plugins/nextgen-gallery/), creates a /wp-content/gallery directory to store all of the images uploaded to your NextGen image galleries. Each gallery created is a subdirectory under/gallery. This helps keep your gallery image files very organized and easy to work with.
The WP-DB Backup plugin (http://wordpress.org/extend/plugins/wp-db-backup/) creates a /wp-content/backup-b158b folder (where b158b is a random string) to store local backups of your database. When you select the Save to Server option, all database backup files will be stored in this directory. It’s important to not delete your backups unless you are sure they are not needed anymore.
SUMMARY
This chapter covered downloading WordPress. It also covered configuring key WordPress core files, wp-config.php and .htaccess, along with more advanced configurations for each. You also reviewed the wp-content directory and how WordPress interacts with custom directories.
With that structural and configuration view of WordPress, it’s time to learn how to create a local development environment so that you can begin customization and development without impacting a public website.