Professional WordPress: Design and Development, 3rd Edition (2015)
Chapter 3. Working with WordPress Locally
WHAT’S IN THIS CHAPTER?
· Developing locally
· Getting started with a local development environment
· Configuring a local development environment—tips and tricks
· Moving your local project to production
Now that you know how to obtain WordPress as well as what the basic lay of the land looks like, let’s take a look at how to get started doing something with WordPress, something beyond simply using WordPress as a website engine. Any user can install WordPress and use it to power a website, as you saw in Chapter 1, which is one of the reasons why WordPress has been so successful.
As a developer, however, you need a full-featured but sandboxed place to experiment, try out new ideas, and figure out what has failed, without taking down a production or public site. As the first step in building something, to take WordPress to the next step in your own projects, let’s look at the benefits of setting up a local development environment on your workstation or laptop. This chapter starts with a brief swing outside the realm of WordPress to talk about general software development.
BENEFITS OF WORKING LOCALLY
Developing locally is considered a best practice. In general, you do not want to be actively developing on a live production website because you could have visitors accessing the site at any time and development involves iterations of breaking code and making it work again. This is not the experience you want to provide to your visitors.
What is “developing locally?” In short, it means you have a full WordPress installation to which you can make changes, add new code, and fail with impunity. It is a sandbox, and it is the first element in a successful deployment cycle.
Typical Deployment Cycle
Before diving into the reasons to develop locally first, let’s explain the different phases of deployment. Deployment involves taking your code from the base development versions that you feel are now ready for the world through staging and testing to a production website. In general, there are three levels. Some workflows will have more, but these three steps are the essentials: development, staging, and production. This is a basic software development workflow and applies to more than just WordPress development.
First is the development environment, where you do all of your day-to-day work. As you will see in this chapter, this is typically your local workstation or laptop, but in some scenarios it might be a development location on a remote server. While it is best practice to develop your solution on a platform that is the same type of system as the production environment, this is not always practical. For example, your production web servers are high-end server class hardware running Linux, but because your developers need access to corporate resources such as Microsoft Exchange, they run Windows workstations for development.
This is why the second tier is introduced, which is the staging or testing environment. After the developer has tested his solution on his development environment, he prepares to deploy it on a staging server. The intention of the staging server is to bridge the gap between the development environment and the target production environment without the risk of breaking the live website. As you will see later in this chapter, there are variances you have to consider when developing cross-platform code—that is, code that can run on Windows, Mac OS X, or Linux. This staging environment gives the developer an opportunity to make sure his code will run on a server that is similar to the production server. For WordPress development, this staging environment could be a secret test site on your production server.
Finally, if the solution behaves as expected on the staging server, it can then be deployed to the live production server. The production server or servers are the ones that serve the website to the Internet. Using this three-tier workflow, developers are able to capitalize on the benefits of local development.
As explained, this is a very traditional, tried-and-true approach. The recent adoption of virtual machines for desktop development has changed this approach for some development environments. We will take a look at how to use VMs as your development platform later in this chapter.
Why So Much Process?
Now that you have a basic understanding of the workflow, let’s circle back to why a developer should take these extra steps on the path to code deployment. While multiple phases seem at odds with a “get code working quickly” mantra, the benefits outweigh the overhead.
First, as explained earlier, developing locally allows the developer to test and try things without breaking the live website. Truly, this can be one of the most important aspects of this system. Once your website has grown beyond the hobbyist audience, you want to minimize downtime. Developers should not be trying things on the live website.
The second benefit is privacy. Developing locally means your project is only available on your local workstation, or sometimes your local area network. You are in control of who is able to access it. If you are developing on a public web server, however, while there are ways to restrict access, your potential audience is global.
This privacy gives you the opportunity to try things and play around. Think of it as your own private WordPress sandbox with no one watching. For example, you might want to try the Ninja Warrior obstacle course or even the Wipeout obstacle course, but you do not want a global audience while you try to figure it out. There is no shame in attempting something and failing, but when working on a project, you probably do not want it to be globally accessible while still in the development phase. While in development, your project could have security issues that have not been addressed yet and putting those on a production server puts the server at risk.
Developing locally can save time and is often one of the biggest boosts to productivity. When working locally, you do not need a connection to the Internet to test your code. Your project is self-contained on your workstation. This also means you do not have to push your files to a remote server to test them. You simply need to save your edits and refresh your browser. The time waiting for FTP connections can add up.
If you are developing a new theme, you can test your theme using different sets of content. For example, you may be building a custom theme for a specific project with an initial set of content, but you want to ensure that, in the future, new content added to the site is properly styled. Or you want to release your theme to the WordPress repository. While developing your theme on your local workstation, you can use different content than what is on the live site to make sure every element is formatted how you expect. This is part of the privacy of developing locally. Just because the initial website will have a certain content set for launch does not mean your local version must have the exact same content. This concept is covered in greater detail later in this chapter.
Locally, you can run multiple instances of WordPress. Furthermore, each instance can be a different version of WordPress. This allows you to track changes to the core WordPress and make sure your code will continue to run on future revisions. For example, you can test your theme or plugin on one local site that is running the current stable version of WordPress, but you can also have a second WordPress site on your workstation that is running the beta version of the next release, or tracking the nightly development release. This helps you keep on top of changes to the WordPress core that might affect your project.
There are many benefits and reasons to develop locally. In addition, for individual developers, there may be other reasons in addition to the privacy, security, and flexibility benefits outlined here. Every developer will have to do his own cost benefit analysis for each reason and determine if the risk or extra steps are worth the effort. At the end of this chapter, we touch on some of the ongoing challenges with developing locally and moving your project through the development and deployment workflow.
It is remarkably easy to set up a local WordPress development environment, using freely available tools that manage the major underlying components of the WordPress system: the web server with a PHP interpreter and the MySQL database.
TOOLS FOR COMPONENT ADMINISTRATION
Think about the prerequisites for WordPress, and then make a shopping list of the components you need for WordPress. WordPress is a web application. That means you need a web server. WordPress runs on PHP, a programming language for the web. That means your web server must support PHP. Apache is a good (and very popular) general-purpose web server that supports PHP, although there are many others that will work as well, including Microsoft IIS or Nginx. With WordPress version 4.1, the minimum version of PHP that is required is version 5.2.4. Ideally, you would like a web server that supports URL rewriting to make your permalinks work. Apache has a module called mod_rewrite to make this work.
WordPress also needs a database to store the content of the site. WordPress only supports MySQL for the database and, as of version 3.2, the MySQL version must be 5.0 or greater. In addition, your PHP must have the appropriate MySQL libraries to make the database connection. Finally, you will also want a client to manage your database.
Getting Your Development Stack
This sounds like a confusing and daunting list. But while many of us think of WordPress as the platform that you build your projects on, WordPress is, in turn, built on a platform. Commonly called the LAMP (Linux, Apache, MySQL, and PHP) stack, it has been the foundation for many Internet projects, including Facebook. And it is also the same foundation needed for WordPress. This means that the WordPress community is not the only one that has these requirements.
As previously mentioned, this foundation is commonly called LAMP where the L stands for Linux. If you are running Linux as your workstation operating system, you can install the LAMP stack using your Linux distribution’s package management system. For example, if you are on a Debian or Debian derivative you could run apt-get install apache to install the Apache web server. A common trick is to install PHPMyAdmin as the MySQL client—that is, run apt-get install phpmyadmin. PHPMyAdmin is a web application that requires Apache, PHP, and MySQL, and because it is the MySQL client, it will install the appropriate libraries to connect PHP and MySQL.
More than likely, you are not running Linux as your desktop operating system. You can install each component individually and connect all the moving parts for it to work. That would be the hard way. Luckily for us, there are some industrious people who have put together several packages that make installing and configuring this LAMP foundation easy, and these packages exist for the various operating systems.
If you are running Mac OS X, you can use the MAMP installer. We hope you can put together that this stands for Macintosh, Apache, MySQL, and PHP. You can download MAMP from http://www.mamp.info.
Download MAMP, unpack it, and install it as you would any other Mac application. Once you drop it in your Applications folder, you can start MAMP and open your control panel. This is the control panel that controls the whole MAMP foundation, including your settings. One thing that we do not like about MAMP is that it does not use the default port for Apache. The standard for web servers to answer and respond is port 80, and browsers know this, which is why you never see an 80 in your browser’s address bar. MAMP, however, defaults to port 8888. That means that when you try to access your local web server, you will have to browse to http://localhost:8888 with your browser. Just keep that in mind as the examples in this book will be treated as though they are running on the standard port 80.
If you are running a Windows workstation, you have a couple of options. Notably, there are WAMP and XAMPP. WAMP is Windows-specific and available from http://wampserver.com. WAMP, obviously, stands for Windows, Apache, MySQL, and PHP. XAMPP runs on Windows but is also cross-platform and is available from http://www.apachefriends.org. The X in XAMPP stands for cross-platform and the extra P is included because XAMPP includes PERL, another programming language. They are both good options.
Download and install WAMP as you would any other Windows application. Once it is installed, you will have a new Windows system tray icon for WAMPSERVER that functions as your control panel.
Note that this foundation is actually several different applications working together in unison to provide you with a web development platform that happens to power WordPress. These WAMP and MAMP installers are purely automating the wiring of these packages together for a general-purpose use. Each individual application also has individual configuration files that you can adjust to meet your needs. Some common configuration changes are covered later in this chapter.
Adding WordPress to the Local Install
Now that you have a working foundation, you need to install WordPress. You will want to stop and consider how you intend on using this local development environment. Do you need only one installation of WordPress? If you want more than one, are you going to use subfolders or set up individual websites using virtual hosts? Are you going to use WordPress Multisite functionality for multiple sites? The next section discusses some of these options, but for now, take the simple route and set up one WordPress site.
To install WordPress, you can use the same source code control method using Git or Subversion, as shown in Chapter 2. Or you can use the traditional method of downloading the installation files from http://wordpress.org.
Either way, once you have the WordPress core files you will need to put them in your web server’s document root. For MAMP, this is set up under the MAMP control panel ➢ Preferences ➢ Apache. You can accept the default or set this document root to wherever you would like. Commonly, Mac users put the document root in the Sites folder of their Mac.
The WAMP document root defaults to c:\wamp\www. You can quickly access this folder using the www directory option from the WAMPSERVER start tray option.
Copy your WordPress core files to the appropriate document root folder on your workstation.
Now open a web browser and browse to http://localhost. Do not forget that if your local web browser is not on the standard port, you may need to add that to the address bar. Also, if you copied WordPress into a subfolder of the document root, you may need to add that suffix to the URL—for example, http://localhost/ddamstra/Documents/www.
If your web and database servers are configured correctly, WordPress will create its databases and edit configuration files, and you should see the first page of the WordPress installation where you select your preferred language. Continuing on you will begin the WordPress installation as shown in Figure 3.1.
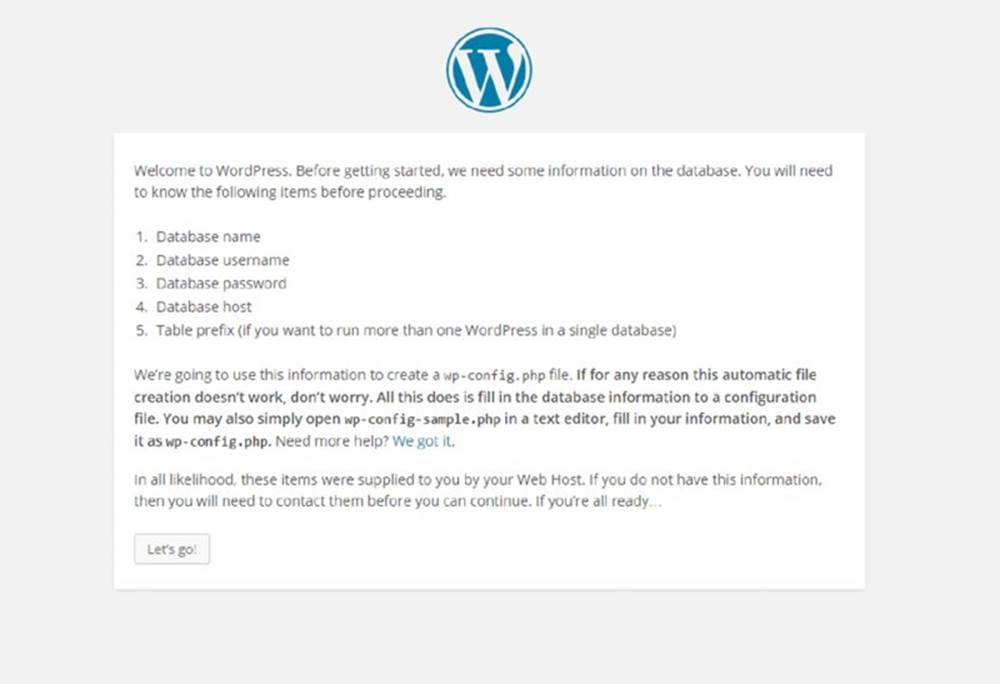
Figure 3.1 WordPress installation
As with any WordPress installation, you will need to have your database and database access credentials set up. Both WAMP and MAMP come with PHPMyAdmin to manage the MySQL. Use the WAMP or MAMP control panel to access PHPMyAdmin and set these up.
Finally, do the infamous five-minute WordPress install, as covered in Chapter 1.
If you have problems with getting your local development environment working, seek assistance through the appropriate support communities and documentation. While they are designed to be simple installations of the various components, every workstation is different and managing the configuration of these assorted moving parts is outside the scope of this book, and only tangentially WordPress-related.
CONFIGURATION DETAILS
The previous section walked you through how to set up a local development environment. While that section did not include an in-depth discussion, the basic idea is there. This section is about extending that environment and covers some tips to help you get the most out of working locally. Again, some of these pointers are about the LAMP foundation itself.
Here you will dig into configuration options in more detail. This section walks you through managing the filesystem tree seen by the web server, enabling debug data, and creating virtual server names.
Managing the Web Server Document Tree
In the previous section, you accepted the default document root for Apache. However, for various reasons, that may not be the best spot for your workflow or backup systems.
For example, in your development shop with multiple web developers, you may remap your Apache document root to c:\www. This way, everyone’s document roots are all identical and it is a top-level folder that is easily accessible. Conversely, on your personal laptop, you may remap your document root to C:\Users\ddamstra\Documents\www because the Documents folder is backed up when connected to your home local area network.
Use caution when making changes to the configuration. As mentioned many times, there are multiple moving parts involved and throwing one part out of alignment can have significant consequences. MAMP allows you to change your document root through the control panel. With WAMP, you edit the configuration file for Apache. This file is called httpd.conf and can be found in your WAMPSERVER control panel under the Apache flyout.
Change the line that reads document root to indicate your chosen location, as shown in Figure 3.2.
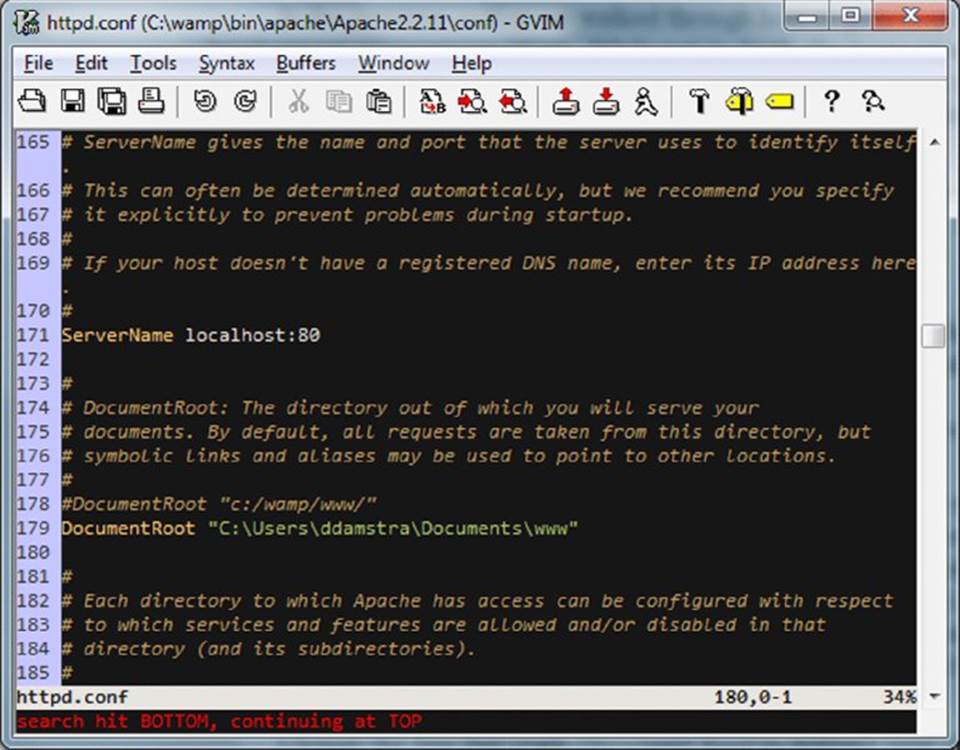
Figure 3.2 Apache document root
You will also need to change the Directory directive to match, as shown in Figure 3.3.
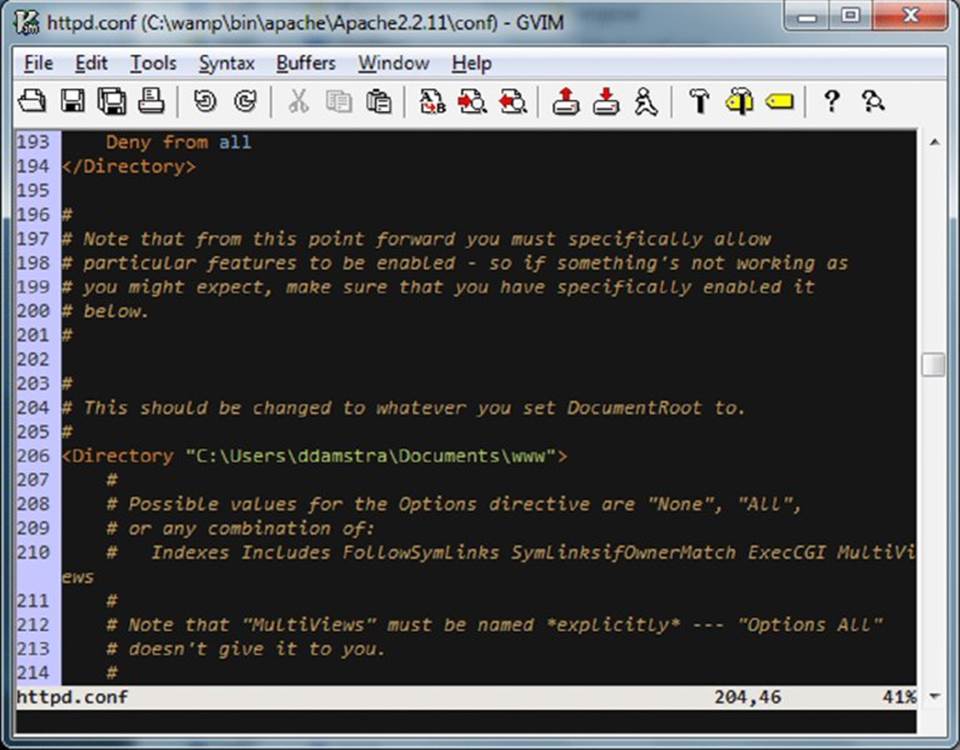
Figure 3.3 Apache Directory directive
Using the WAMP control panel, you will need to restart Apache (or all services) for this change to take effect. If you previously had files in the old document root, you will need to move them to the new document root for them to be accessible.
Take a moment to contemplate what you are publishing in your document root. You do not want to publish any private or confidential data. Consider which source code control system you are going to use. Is your source code control system also part of your deployment strategy? Make sure that if you are using a public repository such as GitHub that you do not push your wp-config.php file and expose your passwords. Likewise, if your development environment is accessible on your local area network, ensure you are not checking in configuration files with sensitive information. Some source code control systems, notably Subversion, store revisions in plain text in files in your project folder, potentially exposing credentials. This has happened to us on more than one internal penetration test exercise and the following is now part of our standard Apache configuration. You can configure your Apache to not serve these .svn directories by adding the lines shown in Figure 3.4 to your httpd.conf file.
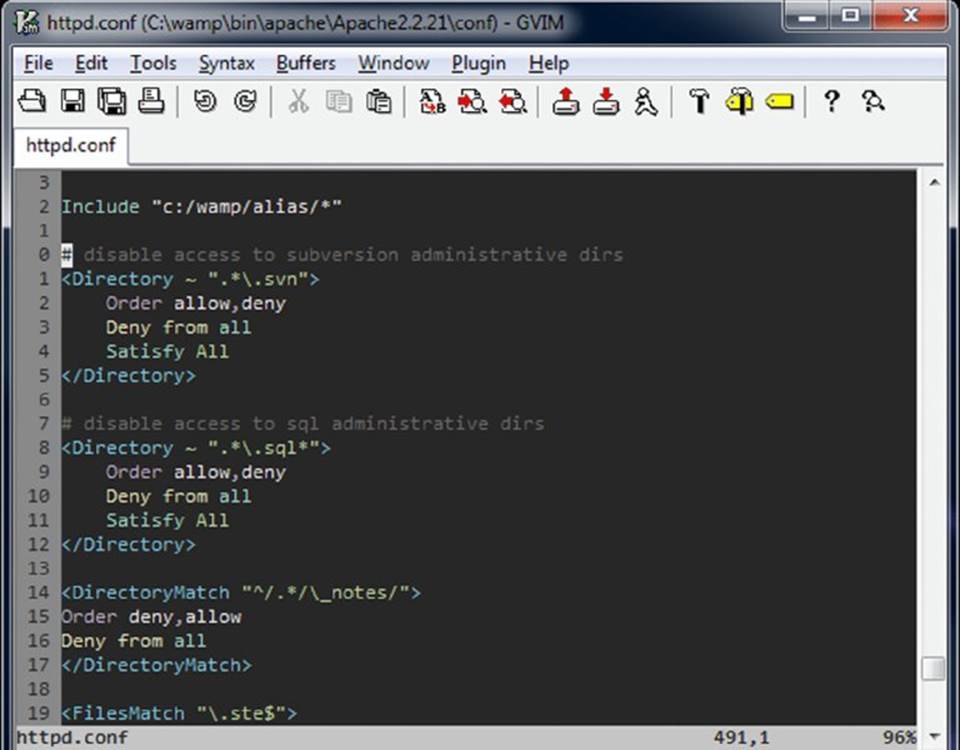
Figure 3.4 Apache block .svn files
Enabling Debug Information
When developing locally, you want to address as many potential errors and warnings as possible. At the very least, you need to be aware of them. For development, you should set your PHP error condition as high as possible to show these errors to you so that you can attend to them.
As discussed in Chapter 13, this is the exact opposite of what you want to do on your production server. On your production server, you want to hide all the errors from your visitors. On your local workstation, you are the only visitor, so you want to see them all since the errors are what you are working on.
You set your PHP error level in the php.ini file. With WAMP, you can access this file through the WAMP control panel, under the PHP flyout. Set your error reporting directive to be E_ALL and E_STRICT, as shown in Figure 3.5.
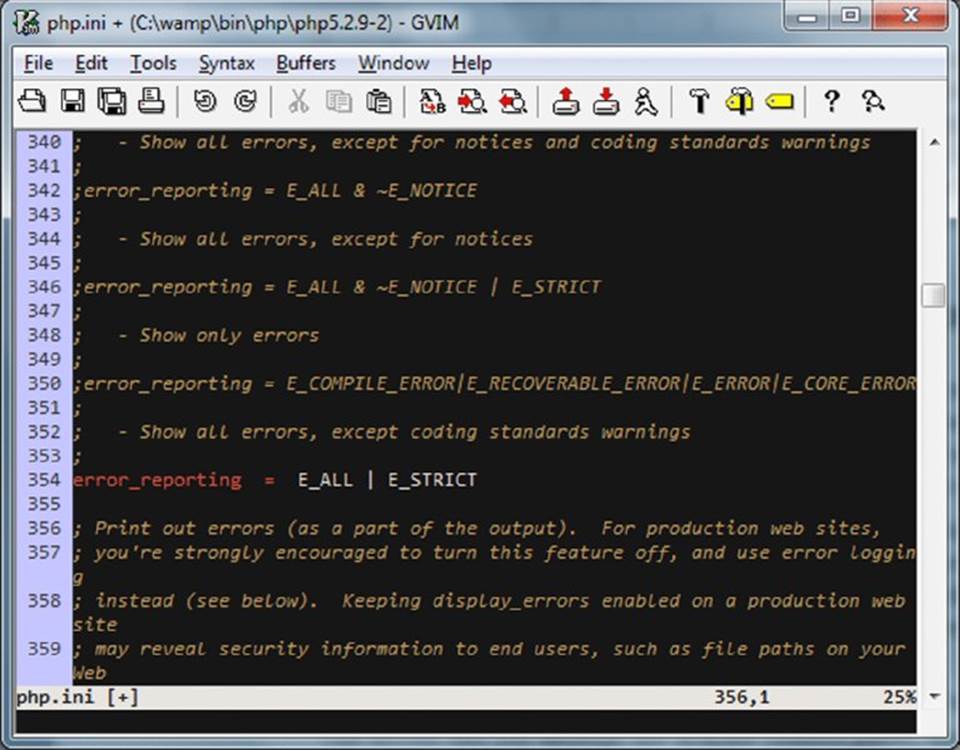
Figure 3.5 PHP error level
Until PHP version 5.4, the strict warnings and notices have not been included in the E_ALL level. By setting the error reporting directive as mentioned, you will ensure that you are seeing the most error reporting possible, and coding to reduce these notices will ensure that you are providing the most PHP interoperability. Again, you will need to restart Apache to make this setting take effect.
As previously mentioned, when developing on one operating system and deploying on another, you have to consider that not all systems have the same PHP API. For example, the PHP $_SERVER[] has values on Windows machines that are not on Linux machines. Windows is not case sensitive in the filesystem but Linux is. Developers have to remember that the target system may not be their development system. This is why you want the staging server to match the production server, so that discrepancies can be caught before being deployed.
When developing locally, enable WordPress debugging. Similar to the PHP error reporting, this allows the developer to see and address WordPress issues. Likewise, this should always be disabled on production websites.
Enable WordPress debugging by editing your wp-config.php file and setting WP_DEBUG to true, as shown in Figure 3.6. Unlike the previous Apache and PHP settings, which were global to all sites on your workstation, this setting is per WordPress installation.
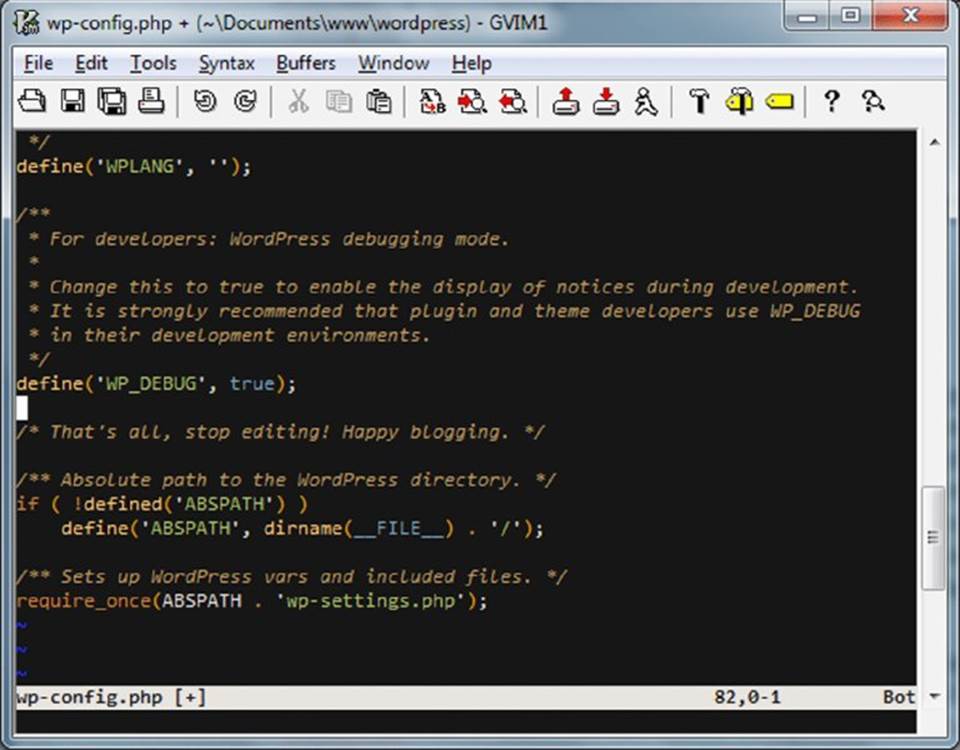
Figure 3.6 WordPress debug
Handling Local and Production Database
Out of the box, WordPress has configuration for one database. When working locally, you want your development site to connect to your local MySQL so you do not risk messing up the production database. Fundamentally, that is one of the reasons you are doing this.
A common method is to set the database host to be localhost and set your MySQL credentials and table name locally to the same as the production site. This is bad for security.
Mark Jaquith offers an alternative solution that allows for both a production and a local workstation set of database access credentials on his site at http://markjaquith.wordpress.com/2011/06/24/wordpress-local-dev-tips/. Essentially, he changes the wp-config.php file to look for an overriding set of credentials that exist on his development machine only. He then ignores this wp-config-local.php file in his source code control so that each developer can have his or her own controlled local credentials and so that this file never makes it to production.
Creating Virtual Local Server Names
Initially, you set up WordPress in the document root of your local Apache. If you wanted more than one local website, you could set each website in its own folder. This works and you could use it for many development sites. However, you can also set up each web server to respond to a local “fake” domain name. Sometimes, when moving to production, using this method makes the conversion from development to production easier. We address a migration method at greater length in Chapter 11.
Here is how it works using some networking magic. Everyone is familiar with the common top-level domain names, such as .com, .net, and .org, but there are, in fact, many more with even more on the horizon. These fully qualified domain names work through the DNS system where web browsers ask these Internet-accessible DNS servers for the IP address of the website domain you typed in.
However, your web browser uses the DNS resolver to check a local file first to see if there is predefined mapping. This file is called the hosts file. You can use this file and matching Apache configurations to make your workstation access local sites with fake fully qualified domain names.
There are a couple of approaches to this. Some developers set the domain name of the actual site they are working on to be their local workstation instead, pre-empting DNS requests. That means that until they revert these changes, they cannot access the live site, and all requests will go to the local site. For example, instead of having requests for mirmillo.com go to the server’s publicly accessible IP address, these requests are intercepted and are redirected to the localhost IP address, which is always 127.0.0.1.
The other option is to set the development site with a fake name that is easy to replace in SQL during the deployment phase. In this case, we set the local development site to be mirmillo.local, which is an invalid top-level domain name (for now). This way, we can access mirmillo.com through traditional DNS and still work on our local development version by accessing mirmillo.local in our web browser. This is the example you are going to follow in this book.
First, you have to set up your Apache to support virtual hosts. The actual configuration here is going to vary depending on your Apache installation. Using WAMP, the first step was to set up a virtual host in Apache. This is done by editing the httpd-vhosts.conf file found in C:\wamp\bin\apache\Apache2.2.11\conf\extra. The default example comes with two sample virtual hosts. Change one of the existing examples to become your localhost virtual host. Then change the second example to match the settings you need for your local installation, such as mirmillo.local, as shown in Figure 3.7.
Next, you have to direct Apache to include this file. This is done by editing your httpd.conf file as you have done previously in this chapter. As shown in Figure 3.8, uncomment the line to include the virtual host configurations settings.
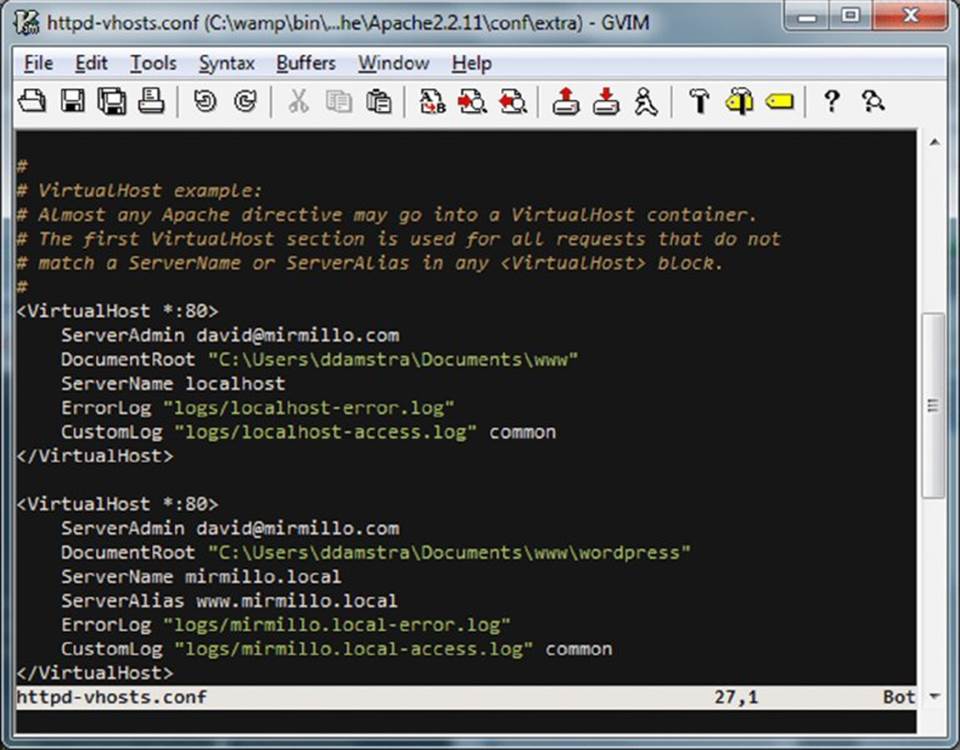
Figure 3.7 mirmillo.local virtual host
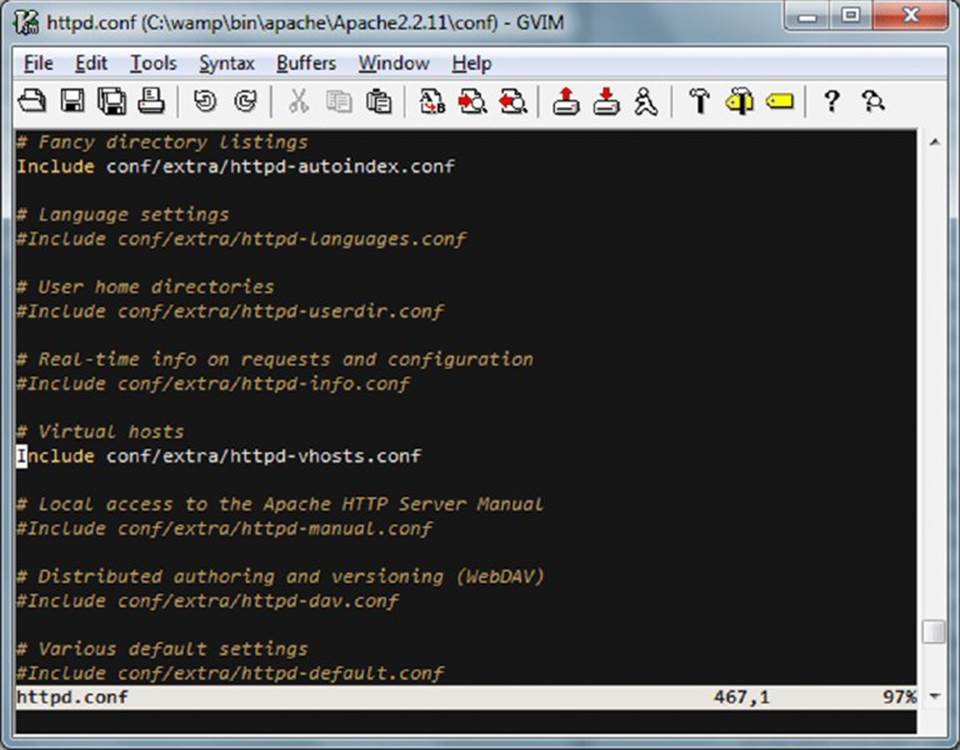
Figure 3.8 Apache includes virtual host config
Next, edit your hosts file. On Mac OS X, this file is found in /private/etc/hosts and Linux has this file at /etc/hosts. On Windows, this file is C:\Windows\System32\drivers\etc. In short, this file is made up of IP address and domain name pairings. As shown in Figure 3.9, you can add a new mapping for mirmillo.local.
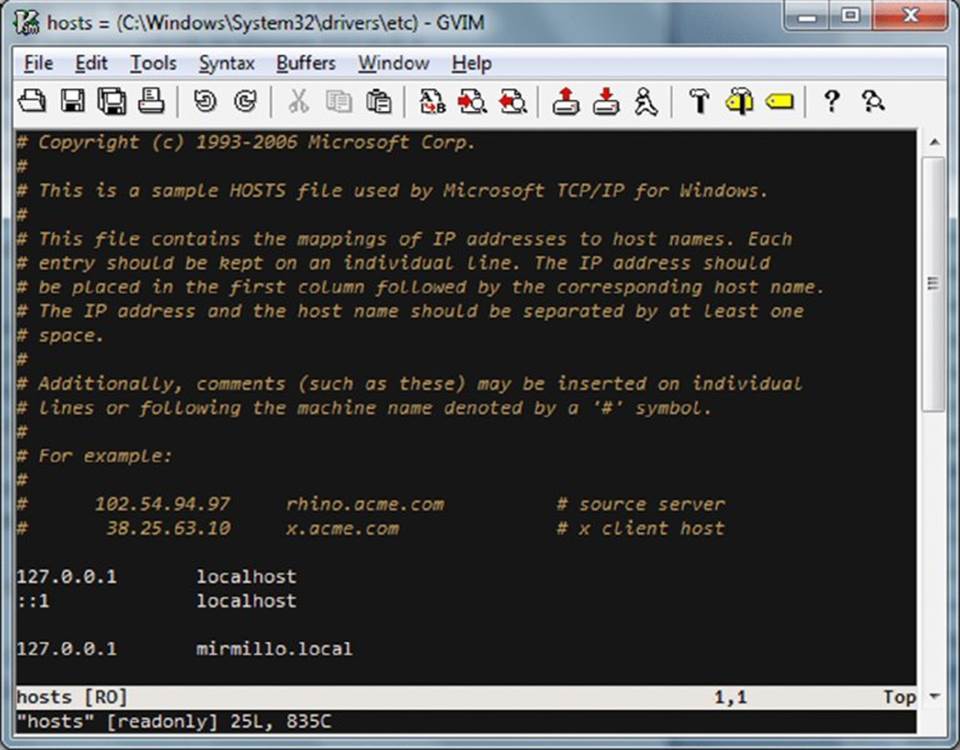
Figure 3.9 Hosts file mapping for virtual host
Finally, restart Apache and browse to http://mirmillo.local to complete the WordPress installation, as you did in Chapter 1.
Local Theme and Plugin Development
If you are developing a theme, one of the benefits of developing locally is that you do not have to use the content that will be on the live site. In fact, if you are developing a theme that you plan to release to the population at large, you should use a content filler to make sure you style the vast spectrum of content. For example you can use the WordPress sample content available at http://codex.wordpress.org/Theme_Unit_Test. There are several alternative sample content import files such as the one provided by WPCandy athttp://wpcandy.com/made/the-sample-post-collection, but the WordPress Theme reviewers will use theirs to approve your theme to be in the repository. You can review the entire Theme Repository checklist at http://codex.wordpress.org/Theme_Development_Checklist. This is covered in greater detail in Chapter 9.
Say you are developing a theme and you want to test it with the sample content mentioned in the previous paragraph, but you also need to target specific content for the actual site you are developing the theme for. Here is a good use for WordPress Multisite. WordPress Multisite is covered in depth in Chapter 10, including how to set it up. But once you have it set up locally, WordPress Multisite allows you to leverage the same themes and plugins across multiple WordPress sites in a WordPress network. We set this up so that one of our WordPress sites has the sample content. Then we created a second site for the site-specific content. When you give this a try, you should network-enable the theme you are developing and activate it on both sites. This allows you to jump back and forth in your browser to two different WordPress content sets but only edit one set of theme files.
Likewise, if you are developing a new plugin, test it in WordPress Multisite to make sure it works. You can also set up several virtual hosts on your machine running different versions of WordPress, both a few revisions back and also development releases to make sure your plugin will continue to work with the next update. Although we all preach to users to keep WordPress current, the reality is that some sites lag behind, either because of hosting restrictions, ignorance, or laziness. It is important to make sure your plugin continues to work if you want people to use it.
NOTE See Chapter 8 for more information on using plugins.
This local development method as explained is a tried and true environment used by developers around the world. As an essential skill for a WordPress developer, it is important to understand how the various components work together, and getting them set up yourself solidifies that knowledge. However, there are some new tools on the scene that are changing the way the developers work. The next section will briefly touch on this new methodology.
VIRTUAL MACHINES
Virtual machines have been used in the enterprise for many years; recently several tools have made them much more approachable for desktop development use. Using tools such as Oracle’s VirtualBox and VMWare’s Fusion, developers are able to run additional virtual machines on their desktop, which enables them to work in the different environments. Virtual machines are software-based emulations of an entirely different operating system, and therefore workstation or server, running locally.
As the use of virtual machines for desktop development has become more common, tools to manage these virtual machines have also been born. The challenge of managing the provisioning and configuration of virtual machines has prompted developers to create tools such as Vagrant, Puppet, and Chef to make their lives easier. These tools have focused on making the foundational server manageable; now developers are using these tools to generate entire development environments.
One such virtual machine development environment for WordPress is called Varying Vagrant Vagrants or VVV for short (https://github.com/varying-vagrant-vagrants/vvv/). VVV was developed by 10up for their internal development and workflow needs and recently released as a community project on GitHub. While using virtual machines for desktop development is a more advanced method, VVV’s goal is to make WordPress development in this way much more approachable.
VVV used Oracle’s VirtualBox and Vagrant to create a dedicated WordPress development platform. The VVV environment includes both the latest stable version of WordPress as well as the development branch so that developers can work either on their own projects or contribute to the WordPress core codebase. Additionally, several tools are included for debugging and profiling your code. VVV is extensible and can be used to create your own custom environments for your projects. While this is a more advanced method, VVV is well documented on the GitHub site.
Now that you have your new project working locally, either through a virtual machine or directly on your workstation, and you have removed all the errors and notices from WordPress and PHP, you are ready to push it to a live server. In the next section, you will look at some of the challenges and tactics for pushing code live.
DEPLOYING LOCAL CHANGES
First, distinguish between the different types of objects you are deploying. There is code, which could be plugin code, or theme and theme assets. There is content, which is the website subject matter from the posts and pages and is stored in the database. Finally, there is the configuration, which is also stored in the database.
Deploying the code is easy. Developers do this every day. One of the advantages of PHP and WordPress is that you can generally drop code into the document root and it runs at the next request. Deploying code is simple and you can use your FTP client to do it. But please use SFTP, if possible, because it is a secure protocol, whereas FTP is not. There are also more advanced methods for deploying code through continuous integration tools.
Deploying the content and the configuration is more difficult. WordPress uses fully qualified links in all the content. So every internal HREF and menu item has the full domain name embedded. Likewise, the configuration of the site is also tied to the domain name that WordPress was installed at. You cannot simply take a database dump and move it.
There is, however, an intermediate step to change the domain names in the database export before importing it into the production site. Use caution here that you are not going to steamroll any updated content on the live site with your content from the development site. How exactly you do this in your situation is dependent on your exact needs, but overall, this process is very similar to a situation in which you are moving your site from one domain to another. The process is extensively documented in various websites, the WordPress codex at http://codex.wordpress.org/Moving_WordPress, and many other tutorials. This is just one method.
In short, this is how the process works for us, assuming you want to move all content from your development database to the live site.
You are going to remove all the fully qualified links from the content on your development site. All future content you add to the production site, once the content is moved, will be fully qualified, but this is a method to make all the URLs root relative and then they will work on both your development site and the live site.
For this process you use the wp-DBManager plugin by Lester Chan available online at https://wordpress.org/plugins/wp-dbmanager/. This plugin allows you to make database backups and also perform SQL queries on the data. You could also use WordPress’s built-in database export functionality and PHPMyAdmin to do the same.
Pretend you are moving from the local development site mirmillo.local to the live production site of mirmillo.com. This is where using the “fake” domain name virtual host option mentioned previously comes in handy.
Using the plugin, make a backup of your working test site. Download and save this backup file in case things go awry.
Next, in the SQL page of the plugin, you will run the queries shown in Figure 3.10 to update the URLs in your site’s content. Essentially, you are removing the domain name from the URLs in the HTML code. Later, in Chapter 11, we introduce you to a new tool called WP-CLI that can help with this process, but as an introduction, it is important to see the fundamental steps.
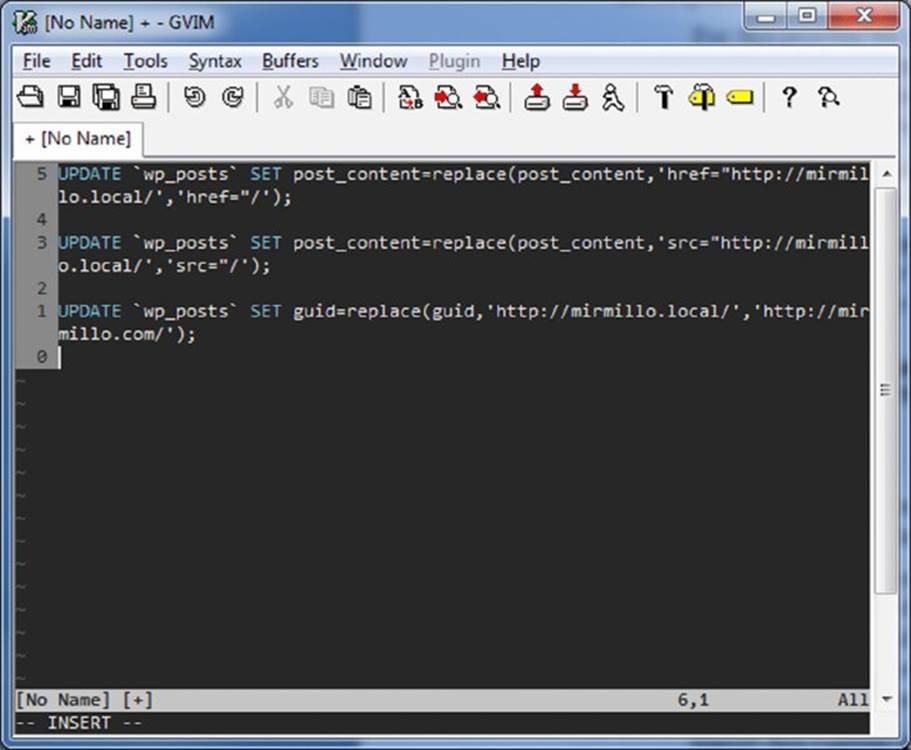
Figure 3.10 SQL queries to remove domain names
Now export your content from your development site. Content export is found in your WordPress Dashboard under Tools ➢ Export. Download this file. This is your movable content with root relative links.
Import this content into your live site. The import functionality is found in your WordPress Dashboard under Tools ➢ Import. Again, be cautious that you do not overwrite newer content or content you want to keep.
Truly, it is not a difficult process; it is just one that requires some planning and coordination. There are some developers who are working on tools to make this process easier. In particular, we have been keeping an eye on RAMP by Alex King’s Crowd Favorite, available online at http://crowdfavorite.com/ramp/. While we have not tried it yet, it looks promising. The challenge is always that, when using WordPress as a content management system, users can and will log in to the production site and make changes—that is the point. But in doing so, your development content gets out of sync. Ultimately, the goal will be to have a way to synchronize WordPress databases between live, staging, and development and be able to handle conflict resolution. There is no silver bullet here, but it seems to be a challenge that many developers are working on.
SUMMARY
This chapter reviewed some of the reasons and processes for a proper development workflow. In addition, it covered how to enable a local WordPress development environment in your own private sandbox. Finally, you examined a process to push a development site to a production server. The next chapter digs into the core files of WordPress and reviews how WordPress works.
All materials on the site are licensed Creative Commons Attribution-Sharealike 3.0 Unported CC BY-SA 3.0 & GNU Free Documentation License (GFDL)
If you are the copyright holder of any material contained on our site and intend to remove it, please contact our site administrator for approval.
© 2016-2026 All site design rights belong to S.Y.A.