Professional WordPress: Design and Development, 3rd Edition (2015)
Chapter 7. Custom Post Types, Custom Taxonomies, and Metadata
WHAT’S IN THIS CHAPTER?
· Understanding and creating custom post types
· Displaying and using custom post type content
· Creating and using custom taxonomies
· Understanding and using metadata
The most important part of any WordPress website is the content. WordPress, by default, has various types of content and taxonomies defined, but often, you will need to define your own types of content to build the exact website you want.
WordPress includes some very advanced, and easy-to-use, tools for working with all sorts of custom content. This has helped WordPress evolve into a full-fledged content management system capable of powering absolutely any type of website setup, regardless of the content.
In this chapter, you learn how to create custom post types and content in WordPress. You also learn how to work with custom taxonomies to group and classify your content. Finally, you learn how to attach and retrieve arbitrary pieces of metadata to your content.
UNDERSTANDING DATA IN WORDPRESS
When working with various types of data in WordPress, it’s important to understand what that data is and how it can be customized. WordPress has five predefined post types in a default installation:
· Post—Posts or articles generally ordered by date
· Page—Hierarchical static pages of content
· Attachment—Media uploaded to WordPress and attached to post type entries, such as images and files
· Revision—A revision of a post type used as backup and can be restored if needed
· Nav Menus—Menu items added to a nav menu using WordPress’s menu management feature
For a basic blog or smaller website, these default post types are all you might need. However, if you plan on building a more complex CMS-type website, you’ll want to utilize the power of custom post types.
What Is a Custom Post Type?
A custom post type in WordPress is a custom defined piece of content. It really is that simple. Using custom post types, you can define any type of content in WordPress, and you are no longer forced to use just the default post types listed in the previous section. This opens the door to an endless number of possibilities.
Potential custom post type ideas include, but are not necessarily limited to, the following:
· Products
· Events
· Videos
· Rotator
· Testimonials
· Quotes
· Error Log
Remember that custom post types can be absolutely anything, not just public-facing pieces of content. For example, you can set up a custom post type as an error log to track errors in your application. When it comes to custom post types, the only limitation is your imagination.
Register Custom Post Types
To create a new custom post type, you’ll use the register_post_type() function, as shown here:
<?php register_post_type( $post_type, $args ); ?>
The register_post_type() function accepts two parameters:
· $post_type—The name of the post type. Should contain only lowercase letters, no spaces, and a max length of 20 characters.
· $args—An array of arguments that define the post type and various options in WordPress.
Now look at a basic example of registering a custom post type. You can register a post type in WordPress in two different places. The first is in your theme’s functions.php file. The second is in a custom plugin.
NOTE When registering custom post types and taxonomies in WordPress, it’s generally recommended to do so in a plugin. The primary reason for this is to avoid losing your custom post type and taxonomy registrations if you switch your WordPress theme in the future.
You could add the following code to a custom plugin, but for this example, add the following code to your theme’s functions.php file.
<?php
add_action( 'init', 'prowp_register_my_post_types' );
function prowp_register_my_post_types() {
register_post_type( 'products',
array(
'labels' => array( 'name' => 'Products' ),
'public' => true,
)
);
}
?>
Now visit your WordPress admin dashboard. You’ll notice that a new menu called Products has appeared just below Comments, as shown in Figure 7.1. That is the new custom post type you just registered with the preceding code.
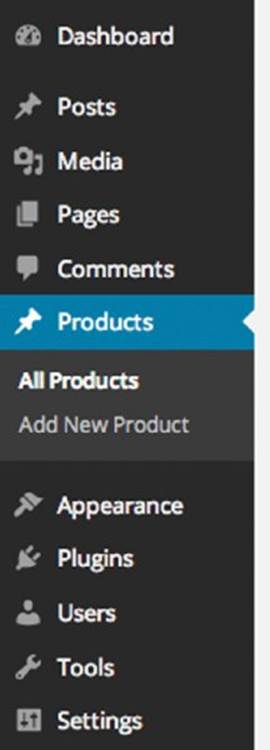
Figure 7.1 Products custom post type
As you can see, WordPress will automatically create the admin UI for your new custom post type. The new menu item allows you to create new post type product entries as well as edit existing entries, just like posts and pages in WordPress. This is a basic example, but you can already tell the ease with which you can define custom content in WordPress.
NOTE You should always use the init action hook when registering your custom post types. This is the first hook available after WordPress is fully initialized and will verify that your custom post type is registered early enough in the process.
There are many different arguments available when registering your custom post type. It’s important to understand these arguments to know what’s available.
public
The public argument sets whether a post type is publicly available on the admin dashboard or front-end of your website. By default, this is set to false, which will hide the post type from view. The default settings for show_ui, exclude_from_search, publicly_queryable, and show_in_nav_menus are inherited from this setting.
show_ui
The show_ui argument determines whether or not to create a default UI in the WordPress admin dashboard for managing this post type. It defaults to the value defined by the public argument.
publicly_queryable
The publicly_queryable argument determines if the post type content can be publicly queried on the front end of your website. If it is set to false, all front end queries for entries under the custom post type will return a 404, since it is not allowed to be queried. It defaults to the value defined by the public argument.
exclude_from_search
The exclude_from_search argument allows you to exclude custom post type entries from the WordPress search results. It defaults to the value defined by the public argument.
show_in_nav_menus
The show_in_nav_menus argument determines if the post type is available for selection in the menu management feature of WordPress. It defaults to the value defined by the public argument.
supports
The supports argument allows you to define what meta boxes appear on the screen when creating or editing a new post type entry. This defaults to the title and editor. Several options are available:
· title—Sets the post title.
· editor—Displays the content editor on the post editing screen with a media uploader.
· author—Selects box to choose the author of the post.
· thumbnail—Featured image meta box for the post.
· excerpt—Displays an excerpt editor on the post type editing screen.
· comments—Sets whether comments will be enabled for posts of this type.
· trackbacks—Sets whether trackbacks and pingbacks will be enabled for posts of this type.
· custom-fields—Displays the custom field editing area meta box.
· page-attributes—Displays the attributes box for choosing the post order. The hierarchical argument must be set to true for this to work.
· revisions—Displays the post revisions meta box.
· post-formats—Displays the post formats meta box with registered post formats.
To disable the title and editor defaults, set the supports argument to false.
labels
The labels argument sets an array of labels that represents your post type in the admin dashboard. See the section “Setting Post Type Labels” later in this chapter for details on each label.
hierarchical
The hierarchical argument allows you to define if the post type is hierarchical, like pages in WordPress. A hierarchical post type allows you to have a tree-like structure for your post-type content. By default, this argument is set to false.
has_archive
The has_archive argument enables your post type to have an archive page. A post type archive page is like the WordPress posts page, which displays the site’s latest blog entries. This allows you to display a list of your post type entries, with the order being defined in your theme’s template file.
can_export
The can_export argument determines if the post type content is available for export using the built-in WordPress export feature under Tools ➢ Export. This argument is set to true by default.
taxonomies
The taxonomies argument names an array of registered taxonomies to attach to the custom post type. For example, you can pass in category and post_tag to attach the default Categories and Tags taxonomies to your post type. By default, there are no taxonomies attached to a custom post type.
menu_position
The menu-position argument enables you to set the position in which the custom post type menu shows in the admin menu. By default, new post types are displayed after the Comments menu.
menu_icon
The menu_icon argument sets a custom menu icon for your post type. By default, the posts icon is used.
WordPress 3.8 introduced Dashicon support. To view a full list of the Dashicons available in WordPress visit http://melchoyce.github.io/dashicons/. To set a specific Dashicon, simply click the icon and copy the icon name to the menu_icon value. For example, to use the Carrot icon, set menu_icon => 'dashicons-carrot'.
show_in_menu
The show_in_menu argument determines whether or not to display the admin menu for your post type. This argument accepts three values: true, false, or a string. The string can be either a top-level page, such as tools.php or edit.php?post_type=page. You can also set the string to the menu_slug parameter to add the custom post type as a submenu item to an existing custom menu. It defaults to the value defined by the show_ui argument.
show_in_admin_bar
The show_in_admin_bar argument sets whether or not to show your custom post type in the WordPress admin bar. It defaults to the value defined by the show_in_menu argument.
capability_type
The capability_type argument names a string or an array of the capabilities for this post type. By default, the value is set to post.
capabilities
The capabilities argument is an array of custom capabilities required for editing, deleting, viewing, and publishing posts of this post type.
query_var
The query_var argument sets the query variable for posts of this post type. The default value is true and is set to the $post_type value.
rewrite
The rewrite argument creates the unique permalinks for this post type. This allows you to customize the post type slug in your URL. This argument can be set to true, false, or an array of values. If passing an array, it accepts the following values:
· slug—Sets a custom permalink slug. Defaults to the $post_type value.
· with_front—Sets whether your post type should use the front base from your permalink settings. For example, if you prefixed your permalinks with /blog, and with_front is set to true, your post type permalinks would include /blog at the beginning.
· pages—Sets whether the permalink provides for pagination. Defaults to true.
· feeds—Sets whether a feed permalink will be built for this post type. Defaults to has_archive value.
By default, the rewrite argument is set to true and the $post_type is used as the slug.
This section has covered a lot of custom post type arguments. The following example puts some of the more common arguments to use.
<?php
add_action( 'init', 'prowp_register_my_post_types' );
function prowp_register_my_post_types() {
$args = array(
'public' => true,
'has_archive' => true,
'labels' => array( 'name' => 'Products' ),
'taxonomies' => array( 'category' ),
'rewrite' => array( 'slug' => 'product' ),
'supports' => array( 'title', 'editor', 'author',
'thumbnail', 'comments' )
);
register_post_type( 'products', $args );
}
?>
In this example, you first set the post type to be public. You also enabled the post type to have an archive page by setting the has_archive argument to true. The labels argument sets the display name of your post type; in this example you set the name to Products. Using the taxonomies argument, you attached the default Category taxonomy to your product’s custom post type.
In this example, you want to change the permalink slug for your post type. Instead of http://example.com/products/zombie-bait, using the default slug products from the post type name, you want to set your post type slug to the singular product. This will generate your permalink as http://example.com/product/zombie-bait. This is done using the rewrite argument and defining a custom slug for your post type. The final argument you set is supports. The code adds the title, editor, author, featured image, and comments meta box to your custom post type create and edit screens.
NOTE When registering a new custom post type, it’s important to flush the rewrite rules in WordPress. You can do this by calling the function flush_rewrite_rules() in your plugin’s activation hook or manually by going to Settings ➢ Permalinks and saving your permalink settings. This will eliminate 404 errors on your new post type permalinks.
To learn more about the register_post_type() function, visit the official Codex page at http://codex.wordpress.org/Function_Reference/register_post_type.
Setting Post Type Labels
When creating a custom post type in WordPress, several text strings are shown throughout the WordPress admin dashboard for your post type. These text strings are typically a link, button, or extra information about the post type. By default, the term “post” is used for non-hierarchical post types and “page” for hierarchical post types.
For example, when you use the basic custom post type registration code earlier in this chapter, you’ll notice the text “Add New Post” at the top of the page when you add a new Product. The reason for this is Product is a post of type Product. This isn’t very accurate, as you aren’t actually adding a post, but rather a new Product. Setting the labels argument when registering your custom post type will allow you to define exactly what is shown.
The available labels for your custom post types include:
· name—General name for the post type, which is usually plural. Used in the WordPress admin and by other plugins and themes.
· singular_name—The singular version of the name for the post type. It is also used in the WordPress admin and by other plugins and themes.
· add_new—The label for the Add New submenu item. The text defaults to “Add New.”
· add_new_item—Used as the header text on the main post listing page to add a new post. By default, the text is “Add New Post/Page.”
· edit_item—Used as the text for editing an individual post. Defaults to “Edit Post/Page.”
· new_item—Text for creating a new post. By default, it is set to “New Post/Page.”
· view_item—Text for viewing a single post entry. Defaults to “View Post/Page.”
· all_items—Text used for the all items text in the menu. This is the text displayed directly below the top-level menu name. Defaults to the value of name.
· menu_name— Text used in the admin menu. Defaults to the value of name.
· name_admin_bar—Text used in the admin bar. Defaults to singular_name if it exists, otherwise the name value.
· search_items—Text displayed for searching the posts of this type. It defaults to “Search Posts/Pages.”
· not_found—The text shown when no posts were found in a search. By default, it displays “No posts/pages found.”
· not_found_in_trash—The text shown when no posts are in the trash. Defaults to “No posts/pages found in Trash.”
· parent_item_colon—Text shown when displaying a post’s parent. This text is only used with hierarchical post types and displays “Parent Page:” by default.
Setting each value makes for a much better user experience when administering a WordPress website. In the following code, the original custom post type registration code has been modified, and the labels for the Product post type have been set.:
<?php
add_action( 'init', 'prowp_register_my_post_types' );
function prowp_register_my_post_types() {
$labels = array(
'name' => 'Products',
'singular_name' => 'Product',
'add_new' => 'Add New Product',
'add_new_item' => 'Add New Product',
'edit_item' => 'Edit Product',
'new_item' => 'New Product',
'all_items' => 'All Products',
'view_item' => 'View Product',
'search_items' => 'Search Products',
'not_found' => 'No products found',
'not_found_in_trash' => 'No products found in Trash',
'menu_name' => 'Products'
);
$args = array(
'labels' => $labels,
'public' => true
);
register_post_type( 'products', $args );
}
?>
Working with Custom Post Types
Now that you understand how to register a custom post type, let’s explore how you use them in your WordPress website. Typically it’s the job of your theme to display posts on the front end of your site. However, that may not always be the case as certain custom post types may not need to be publicly displayed—for example, an error log. It all depends on what the function of your post type is.
To display custom post type data, you can use the WP_Query custom Loop example from Chapter 5. Remember that WP_Query accepts a post_type parameter that determines what type of content to return. In the example that follows, you’ll return all of your product entries in WordPress:
$args = array(
'posts_per_page' => '-1',
'post_type' => 'products',
);
$myProducts = new WP_Query( $args );
// The Loop
while ( $myProducts->have_posts() ) : $myProducts->the_post();
?><a href="<?php the_permalink(); ?>"><?php the_title(); ?></a><br /><?php
endwhile;
// Reset Post Data
wp_reset_postdata();
Notice the post_type parameter is set to products, which is the $post_type parameter value used when you registered the Products custom post type.
Now modify the custom Loop to return only products in the Specials category:
$args = array(
'posts_per_page' => '-1',
'post_type' => 'products',
'tax_query' => array(
array(
'taxonomy' => 'category',
'field' => 'slug',
'terms' => 'specials'
)
)
);
$myProducts = new WP_Query( $args );
// The Loop
while ( $myProducts->have_posts() ) : $myProducts->the_post();
?><a href="<?php the_permalink(); ?>"><?php the_title(); ?></a><br /><?php
endwhile;
// Reset Post Data
wp_reset_postdata();
Using the tax_query parameter in WP_Query, the custom Loop will return only product post type entries assigned to the Specials category.
You can use all of the same methods for creating custom Loops with WP_Query, as covered in detail in Chapter 5, to display your custom post type content. It’s easy to see the power custom post types bring to WordPress when developing more complex websites.
Custom Post Type Template Files
Earlier in the chapter, you learned about the has_archive argument when registering a custom post type. Enabling this argument will allow you to create an archive template file that will display all of your custom post type entries by default. The archive template for a custom post type must be named in the form of archive-{post-type}.php. For example, an archive template for your Products custom post type would be named archive-products.php. This archive template is a perfect place to display all of your products.
Just like the archive template, WordPress will also recognize a single template for your post type entries. This is the template that is loaded when you visit a single entry for your custom post type. The single template must be named in the form of single-{posttype}.php. So your products single template would be named single-products.php. When visiting a single product URL, such as http://example.com/products/zombie-bait, the single-products.php template would load if it exists.
Theme template files, including custom post types, are covered in more detail in Chapter 9.
Special Post Type Functions
WordPress features many different post type–specific functions to make working with custom post types that much easier. In this section, you will review some of the more common functions you might use when building your websites.
To return a list of all registered post types in WordPress, you’ll use the get_post_types() function:
<?php get_post_types( $args, $output, $operator ); ?>
This function accepts three optional parameters:
· $args—An array of arguments to match against the post type.
· $output—The type of output to return, either names or objects. Defaults to names.
· $operator—Operator to use with multiple $args. Defaults to and.
Using the get_post_types() function, use the following to return a list of all custom post types registered in WordPress:
$args = array(
'public' => true,
'_builtin' => false
);
$post_types = get_post_types( $args, 'names', 'and' );
foreach ( $post_types as $post_type ) {
echo '<p>'. $post_type. '</p>';
}
As shown in the preceding code, you’ll set two arguments in the $args array: public and _builtin. The public argument will only return custom post types that are set to be publicly viewable. The _builtin argument is set to false, which will not return default post types like posts and pages. You also set the $output argument to return just the post type name, and the $operator argument to use “and” for the multiple $args you passed to the function.
To determine what post type a piece of content is, you’ll use the get_post_type() function:
<?php get_post_type( $post ); ?>
This function accepts only one parameter—$post—which is a post object or a post ID. If the parameter is empty, the current post will be used.
You can display the post type of a post in a loop using the following code:
<?php echo 'The post type is: '.get_post_type( get_the_ID() ); ?>
There may be a time when you want to work with a custom post type that was created by a plugin or theme. The first thing you should always do is to verify that the custom post type you are looking for exists. To do so, you’ll use the post_type_exists() function.
<?php post_type_exists( $post_type ); ?>
The function accepts a single required parameter—$post_type—which is the post type you want to verify has been registered.
If you wanted to verify the products custom post type exists, you use this code:
if( post_type_exists( 'products' ) ) {
echo 'The Products post type exists';
}
Another useful function when working with other custom post types is add_post_type_support(). This function allows you to register support for certain features on a post type, such as the featured image meta box.
<?php add_post_type_support( $post_type, $supports ) ?>
This is a useful function if the existing post type doesn’t have support for a feature that you need. The add_post_type_support() function accepts two parameters:
· $post_type—The post type name you are adding support to
· $supports—A string or array of features to add
As an example, assume the products post type does not support featured images or comments. To add support for both of these features, use the following code example:
add_post_type_support( 'products', array( 'thumbnail', 'comments' ) );
This function is very useful if you need to work with a custom post type that is defined in a separate plugin or theme. Rather than hacking the registration code in that plugin or theme, you can use the add_post_type_support() function to enable any feature needed for your code to work.
You can also remove post type feature support using the remove_post_type_support() function. This function works exactly like the preceding function, but will remove feature support for a given post type:
remove_post_type_support( 'products', array( 'thumbnail', 'comments' ) );
WordPress also features a function to change the post type of a post entry. You can do so by using the set_post_type() function:
<?php set_post_type( $post_id, $post_type ); ?>
The function accepts two parameters:
· $post_id—The ID of the post you want to update. This field is required.
· $post_type—The post type name to change the post to. This is an optional field and defaults to post.
WORDPRESS TAXONOMY
Taxonomy is defined as a way to group similar items together. This basically adds a relational dimension to your website’s content. In the case of WordPress, you use categories and tags to group your posts. By grouping these posts, you are defining the taxonomy of those posts. Taxonomy can be hierarchical (that is, categories and subcategories), but it is not required. Tags are a perfect example of a taxonomy without a hierarchy.
Default Taxonomies
By default, WordPress comes loaded with two taxonomies:
· Category—A bucket for grouping similar posts together
· Tag—A label attached to a post
Categories are hierarchical and defined when creating a post. Tags do not use hierarchy and are also defined when creating a post. Both out-of-the-box taxonomies are available for use in a default installation of WordPress.
Each category or tag you create is a term of that taxonomy. For example, a category named Music is a term of the category taxonomy. A tag named Ketchup is a term of the tag taxonomy. Understanding taxonomy and terms will help you when defining your own custom taxonomies in WordPress.
Understanding how you can classify your content using a solid taxonomy structure will make structuring website content in WordPress much easier from the start. Developing a solid taxonomy framework enables easy and accurate information access throughout your website.
Taxonomy Table Structure
WordPress features three database tables that store all taxonomy information: wp_terms, wp_term_relationships, and wp_term_taxonomy. This taxonomy schema, which was added in WordPress 2.3, makes the taxonomy functionality extremely flexible in WordPress. This means you can create and define any type of custom taxonomy to use on your website.
The wp_terms table stores all of your taxonomy terms. This can be categories, tags, link categories, and any custom taxonomy terms you have defined. The wp_term_taxonomy table defines what taxonomy each term belongs to. For example, all of your tag IDs will be listed in this table with a taxonomy value of post_tag. If you created a custom taxonomy, the taxonomy value would be the name of your custom taxonomy. The wp_term_relationships table is the cross-reference table that joins taxonomy terms with your content. For example, when you assign a tag to your post, a new record is created here joining your post ID and the term ID together.
Understanding Taxonomy Relationships
To really understand the relationship between the taxonomy tables, it’s helpful to look at a database diagram of the taxonomy table structure, as shown in Figure 7.2.
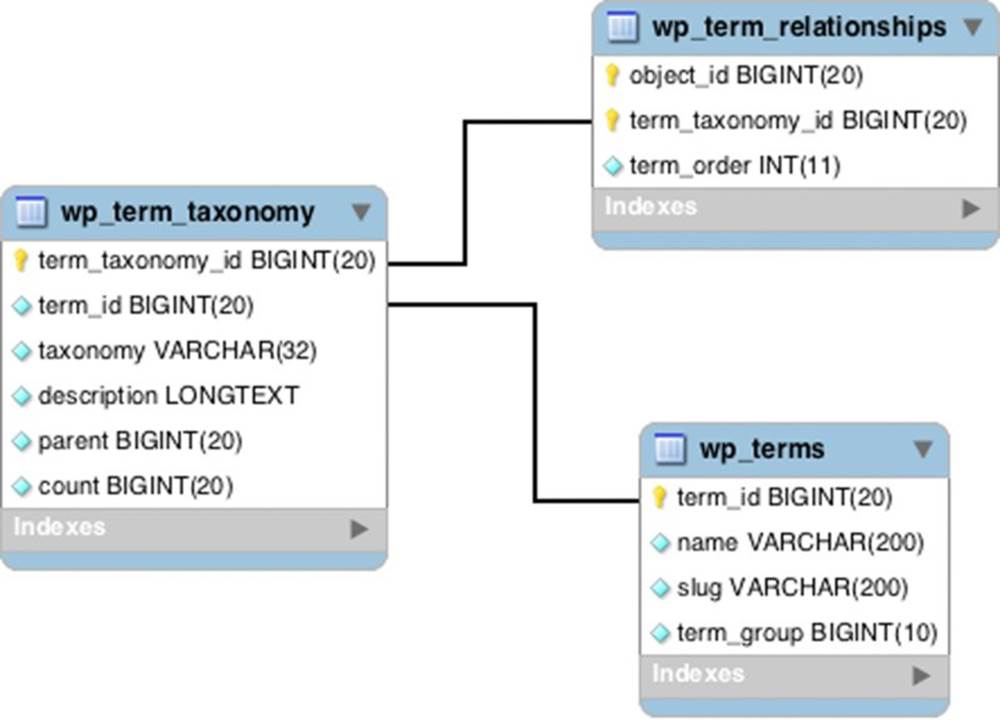
Figure 7.2 WordPress taxonomy table structure
As you can see, the three taxonomy tables are joined together by unique IDs. The following is a query to display all posts along with all taxonomy terms assigned to those posts:
SELECT wt.name, wp.post_title, wp.post_date FROM wp_terms wt
INNER JOIN wp_term_taxonomy wtt ON wt.term_id = wtt.term_id
INNER JOIN wp_term_relationships wtr ON wtt.
term_taxonomy_id = wtr.term_taxonomy_id
INNER JOIN wp_posts wp ON wtr.object_id = wp.ID
WHERE wp.post_type = 'post'
Notice how you are joining on the table fields, as depicted in Figure 7.2. The preceding example returns only three fields: the taxonomy term, post title, and the post date. This query example returns all posts in your WordPress database along with all taxonomy terms attached to those posts.
NOTE To learn more about taxonomy table relationships and why WordPress needs to decompose these multi-valued relationships into multiple tables, see the “WordPress Taxonomy Tables” section of Chapter 6.
BUILDING YOUR OWN TAXONOMIES
Creating your own custom taxonomies has many benefits. Imagine running a food blogging website. When creating new posts, you’ll want to label a certain recipe as Asian, but you also may want to label the individual ingredients, heat factor, prep time, and so on. Building custom taxonomies allows you the freedom to define these different methods of categorizing your content and really expands WordPress from blogging software into a full-fledged content management system (CMS).
Custom Taxonomy Overview
With the revamp of the taxonomy schema in WordPress 2.3, you now have the capability to define custom taxonomies for your content. WordPress makes it easier than ever to create custom taxonomies, as well as integrate your new taxonomies into WordPress.
WordPress includes the ability to automatically display a meta box to the post type edit screen for adding taxonomy terms directly to your posts. WordPress will also create a menu item to access the new taxonomy admin panel for administering your taxonomy terms.
Creating Custom Taxonomies
Now it’s time to build your first custom taxonomy! You are going to create a simple taxonomy for defining Types for your products custom post type registered earlier in this chapter. If you are selling Products online, you’ll need a way to group specific Product types together. You are going to set up a custom taxonomy to define each type of Product in WordPress.
First, you are going to define your new taxonomy using the register_taxonomy() WordPress function. This function allows you to customize how your new taxonomy will work and look. The following code would work in a custom plugin, but for this example, you’ll use the functions.php file in your theme folder. Open up functions.php in your theme and add the following code:
<?php
add_action( 'init', 'prowp_define_product_type_taxonomy' );
function prowp_define_product_type_taxonomy() {
register_taxonomy(
'type',
'products',
array(
'hierarchical' => true,
'label' => 'Type',
'query_var' => true,
'rewrite' => true
)
);
}
?>
The taxonomy definition starts by calling the init hook, which tells WordPress to execute your custom prowp_define_product_type_taxonomy() function during initialization. Your function then calls the WordPress function register_taxonomy(). This function is used to create your custom taxonomy based on what values you send.
You can now break down the parameters you are sending to the register_taxonomy() function. The first parameter is the taxonomy name, in this case type. This is the name that will define this taxonomy in the database. The second parameter is the object type. For this example, you will use products, which is the name of your custom post type. The third and final parameter is for arguments, meaning you actually send multiple values to this parameter.
In this example, you’ll pass four arguments. The first is hierarchical, which defines whether or not your custom taxonomy can support nested taxonomies, forming a hierarchy. In the preceding example, you set this to true, so your taxonomy will function just like WordPress’s built-in categories that may contain sub-categories. The next argument, label, is used to set the name of your taxonomy for use in admin pages within WordPress. If the query_var argument is set to false, then no queries can be made against the taxonomy; if true, then the taxonomy name (with dashes replacing spaces) is used as a query variable in URL strings. Specifying a string value for the query_var overrides the default. For example, query_var => 'strength' would permit URL strings of the formexample.com/?strength=weapons to be used to select content from the custom taxonomy.
The final argument is for rewrite, which you set to true. This tells WordPress whether or not you want a pretty permalink when viewing your custom taxonomy. By setting this to true, you can access your custom taxonomy posts such as example.com/type/weaponsrather than the ugly method of example.com/?type=weapons.
Now that you have created your custom taxonomy for type, take a look at what WordPress has done with your new taxonomy. The first thing you will notice on your admin dashboard is a new link under the Products menu for your taxonomy labeled Type, as shown in Figure 7.3.
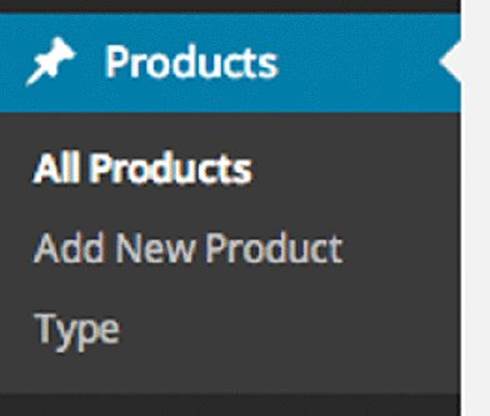
Figure 7.3 Custom taxonomy menu option
Clicking this new menu item brings you to the custom taxonomy admin panel for types, shown in Figure 7.4. This admin panel works exactly as the post categories admin panel does. Here you can create new taxonomy terms, edit and delete existing terms, find how many products are assigned to each, and also search taxonomy terms.
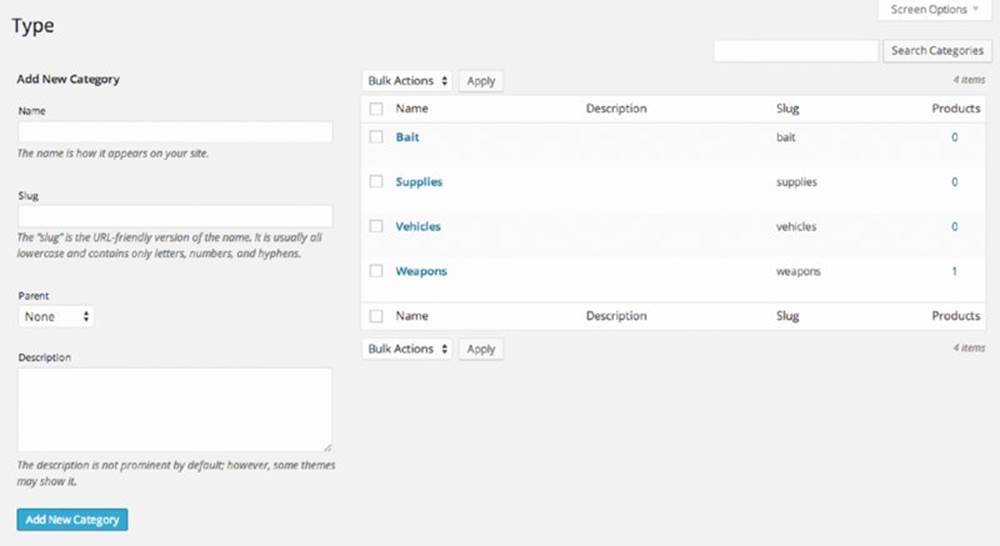
Figure 7.4 Custom taxonomy admin panel
The final new item added for your custom taxonomy is a meta box on the product edit screen, shown in Figure 7.5. To view this, click Add New Product. The meta box appears on the right side of your screen and looks very similar to the Category meta box. Here you can easily add and delete new types on your products.
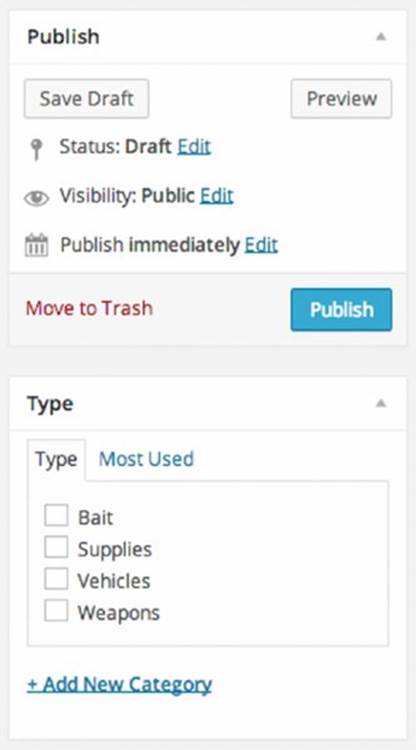
Figure 7.5 Custom taxonomy meta box
As with custom post types, you can set a variety of different arguments when registering a custom taxonomy:
· public—Sets whether a custom taxonomy is publicly available on the admin dashboard or front-end of your website. By default, this is set to true. The default settings for show_ui and show_in_nav_menus are inherited from this setting.
· show_ui—Sets whether to create a default UI in the WordPress admin dashboard for managing this taxonomy. Defaults to the value defined by the public argument.
· show_in_nav_menus—Sets whether the post type is available for selection in the menu management feature of WordPress. Defaults to the value defined by the public argument.
· show_tagcloud—Sets whether to allow the built-in Tag Cloud widget to use this taxonomy. Defaults to the value defined by the show_ui argument.
· show_admin_column—Sets whether to display the taxonomy column on the post listing screen.
· hierarchical—Sets whether this custom taxonomy is hierarchical (like categories) or not hierarchical (like tags). By default, this argument is set to false.
· update_count_callback—Function name that will be called when a term in your taxonomy gets a count update. The default value is none.
· query_var—Enables the public query var for the taxonomy. Acceptable values are true, false, or a string to set a custom query var value.
· rewrite—The rewrite argument sets the URL parsing rules for permalinks referring to this taxonomy. This allows you to customize the taxonomy slug in your URL. This argument can be set to true, false, or an array of values. If passing an array, it accepts the following values. By default this argument is set to true and the $taxonomy name is used as the slug.
· slug—Set a custom permalink slug. Defaults to the taxonomy name value.
· with_front—Sets whether your taxonomy should use the front base from your permalink settings. For example, if you prefixed your permalinks with /blog, and with_front is set to true, your taxonomy permalinks would include /blog at the beginning.
· hierarchical—Allow hierarchical URLs. Defaults to false.
To learn more about the register_taxonomy() function, visit the official Codex page at http://codex.wordpress.org/Function_Reference/register_taxonomy.
Setting Custom Taxonomy Labels
Similar to creating a custom post type in WordPress, custom taxonomies feature several text strings that are shown throughout the WordPress admin dashboard for your taxonomy. These text strings are typically a link, button, or extra information about the custom taxonomy. By default, the term “Tag” is used for non-hierarchical taxonomies and “Category” for hierarchical taxonomies.
The available labels for your custom taxonomy include the following:
· name—General name for the taxonomy, which is usually plural.
· singular_name—The singular version of the name for the taxonomy.
· search_items—Text for the search items button.
· popular_items—Label for popular items text.
· all_items—Label for all items text.
· parent_item—The parent item text. Not used on non-hierarchical taxonomies.
· parent_item_colon—Same as parent_item, but with a colon at the end.
· edit_item—Used as the text for editing an individual taxonomy term.
· view_item—Used as the view item text.
· update_item—Used as the text for updating an individual taxonomy term.
· add_new_item—Text for creating a new taxonomy term.
· new_item_name—The new item text name text.
· separate_items_with_commas—The separate items with commas text used in the taxonomy meta box. Not used on hierarchical taxonomies.
· add_or_remove_items—Text displayed in the taxonomy meta box when JavaScript is disabled. Not used on hierarchical taxonomies.
· choose_from_most_used—The “choose from most used” text used in the taxonomy meta box. Not used on hierarchical taxonomies.
· menu_name—The menu name text. Defaults to the value of name.
· not_found—The text displayed when you click “Choose from the most used tags” and no tags are available.
Setting these labels makes it much easier on users when administering custom taxonomy terms. Now modify the custom taxonomy registration code from earlier with custom labels:
<?php
add_action( 'init', 'prowp_define_product_type_taxonomy' );
function prowp_define_product_type_taxonomy() {
$labels = array(
'name' => 'Type',
'singular_name' => 'Types',
'search_items' => 'Search Types',
'all_items' => 'All Types',
'parent_item' => 'Parent Type',
'parent_item_colon' => 'Parent Type:',
'edit_item' => 'Edit Type',
'update_item' => 'Update Type',
'add_new_item' => 'Add New Type',
'new_item_name' => 'New Type Name',
'menu_name' => 'Type',
'view_item' => 'View Types'
);
$args = array(
'labels' => $labels,
'hierarchical' => true,
'query_var' => true,
'rewrite' => true
);
register_taxonomy( 'type', 'products', $args );
}
?>
Using Your Custom Taxonomy
Now that you’ve created your custom taxonomy, you need to know how to use it on your website. As always, WordPress features some very easy-to-use functions for working with your custom taxonomy. The following shows how you can display a tag cloud showing your custom taxonomy terms:
<?php wp_tag_cloud( array( 'taxonomy' => 'type', 'number' => 5 ) ); ?>
The wp_tag_cloud() function can accept many different arguments, but in this example, you’re using only two: taxonomy and number. First, you set your taxonomy to type; this tells WordPress to return only taxonomy terms defined under the custom taxonomy you created for types. Next, you define the number of terms you want to display, which in this example is 5. Calling this function in your theme sidebar displays a nice tag cloud that shows the five taxonomy terms with the most products assigned to them.
You can also create a custom Loop using WP_Query to display products for a specific taxonomy term. Say you want to create a custom Loop to display only products that have the term weapons attached as the type custom taxonomy:
<?php
$args = array(
'post_type' => 'products',
'tax_query' => array(
array(
'taxonomy' => 'type',
'field' => 'slug',
'terms' => 'weapons'
)
)
);
$products = new WP_Query( $args );
while ( $products->have_posts() ) : $products->the_post();
?><a href="<?php the_permalink(); ?>"><?php the_title(); ?></a><br /><?php
endwhile;
wp_reset_postdata();
?>
That’s it! The two WP_Query arguments you send are the post_type, products in this case, and the tax_query, which specifies which taxonomy term to use.
You can also easily display custom taxonomy terms assigned to each post. To do this, you’ll be using the get_the_term_list() WordPress function. This function works very similarly to get_the_tag_list() but is for building a custom taxonomy term list instead.
<?php echo get_the_term_list( get_post_ID(), 'type', 'Product Type: ',
', ', '' ); ?>
The preceding code displays all custom taxonomy terms assigned to the post you are viewing. This code does need to be in the Loop in your theme template file to work correctly. To execute the function, you send in the post ID, custom taxonomy name, and the title you want displayed next to the terms. Remember that you can always visit the function reference to learn more about this function and what parameters are allowed: http://codex.wordpress.org/Function_Reference/get_the_term_list.
The get_terms() function can also be used to retrieve an array of your custom taxonomy values. In the following example, you retrieve all of the terms for your type taxonomy and loop through the values displaying the term name:
<?php
$terms = get_terms( 'type' );
foreach ( $terms as $term ) {
echo '<p>' .$term->name. '</p>';
}
?>
Keep in mind that you need to make sure the taxonomy is defined before you start working with custom taxonomy values. If any of the preceding examples return blank, that means they were executed before your register_taxonomy() function was called to define your custom taxonomy.
Defining custom taxonomies in WordPress is a very powerful way to organize your website content. Using the preceding methods can help transform your website into a content management system using the power of WordPress.
METADATA
In this chapter, you’ve learned how to create custom post types to add to the basic content types managed by WordPress, and custom taxonomies to organize and collect those content types. This chapter wraps up with a look at extending the content management descriptors of a post with custom metadata.
What Is Metadata?
Metadata in WordPress refers to additional pieces of data attached to a post. For example, your products custom post type might need a price stored with each Product entered. The price could be stored as metadata and easily displayed on the Product detail page.
Post metadata is often referred to as Custom Fields in WordPress terminology. This is a more user-friendly term in the admin dashboard of WordPress. WordPress adds a Custom Fields meta box on the post-editing screen by default, as shown in Figure 7.6. If a custom post type has the custom-fields value defined for the supports argument, this meta box will also appear.
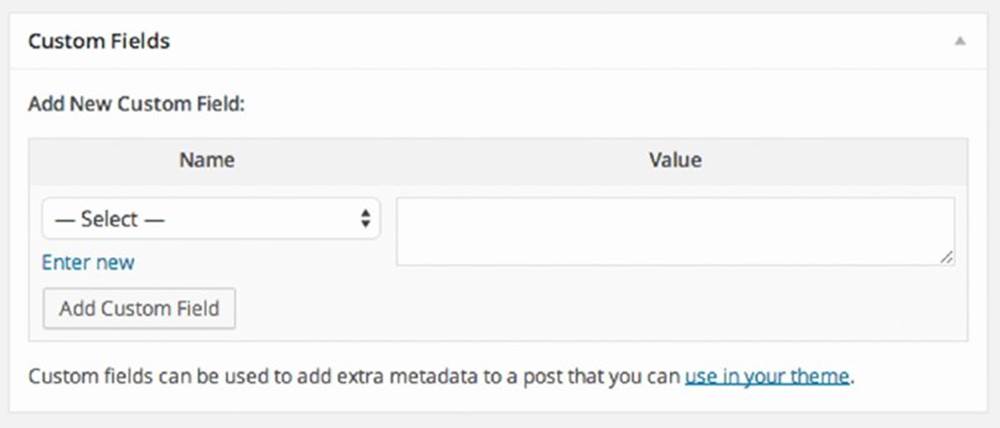
Figure 7.6 Custom Field meta box
All post metadata is stored in the wp_postmeta table in your WordPress database.
Adding Metadata
WordPress features a simple function to add new post metadata called add_post_meta(). This function will attach a piece of metadata to the post specified as follows:
<?php add_post_meta( $post_id, $meta_key, $meta_value, $unique ); ?>
This function accepts the following four parameters:
· $post_id—The ID of the post to add metadata.
· $meta_key—The name of the metadata field.
· $meta_value—The value of the metadata field.
· $unique—A value identifying whether or not the key should be unique. The default value is false.
Now that you understand the parameters for the add_post_meta() function, you can use it to add some metadata to your products.
<?php add_post_meta( 420, 'prowp_price', '34.99', true ); ?>
This code example adds a metadata entry called prowp_price with a value of 34.99 to product ID 420. You also set the $unique value to true, which means there cannot be multiple entries for the prowp_price field on this product. Now if you edit the product in WordPress, you will see a prowp_price field and value in the custom fields meta box.
NOTE To prevent metadata keys from appearing in the Custom Fields meta box on the Post Edit screen, prefix the meta key with an underscore like _prowp_price. This will hide the data from the user and is common practice when creating custom meta boxes.
Updating Metadata
As easy as it is to add new metadata to a post, you can also update metadata using the update_post_meta() function. This function will update a piece of metadata attached to a post specified, as shown here. If the meta key does not already exist, the function will create it.
<?php update_post_meta( $post_id, $meta_key, $meta_value, $prev_value ); ?>
This function accepts the following parameters:
· $post_id—The ID of the post to update metadata.
· $meta_key—The name of the metadata field.
· $meta_value—The value of the metadata field.
· $prev_value—The old value of the metadata field to update. This is to differentiate between several fields with the same key and is an optional field.
For example, you can update the price on your product from earlier as follows:
<?php update_post_meta( 420, 'prowp_price', '6.99' ); ?>
The preceding code example updates the previously added metadata field prowp_price to 6.99 for product ID 420.
Deleting Metadata
Now that you understand how to add and update post metadata, you can learn how to delete that data. To delete post metadata, you’ll use the delete_post_meta() function.
<?php delete_post_meta( $post_id, $meta_key, $meta_value ); ?>
This function accepts the following parameters:
· $post_id—The ID of the post to delete metadata from.
· $meta_key—The name of the metadata field.
· $meta_value—The value of the metadata field. This is to differentiate between several fields with the same key and is an optional field.
Let’s delete the post metadata you created earlier:
<?php delete_post_meta( 420, 'prowp_price' ); ?>
The preceding code example will delete the prowp_price metadata from product ID 420. You did not define the $meta_value parameter, so all prowp_price entries will be deleted from product ID 420.
Retrieving Metadata
You’ve covered how to add, update, and delete metadata, so now you will review how to retrieve and display metadata. WordPress makes it easy to retrieve post metadata for display or use in other code. A good place to use this code is within a Loop to display custom metadata for a particular piece of content.
To retrieve metadata, you’ll use the get_post_meta() function:
<?php $meta_values = get_post_meta( $post_id, $key, $single ); ?>
The function accepts these parameters:
· $post_id—The ID of the post to retrieve metadata for.
· $meta_key—The name of the metadata field.
· $single—A value identifying whether to return a single meta value field (true) or return an array of values (false). By default, this parameter is set to false.
Let’s retrieve and display the price for your product created earlier:
<?php
$product_price = get_post_meta( 420, 'prowp_price', true );
echo 'Price $' .$product_price;
?>
The product price is retrieved and displayed for product ID 420. Now assume you want to store various colors for the product. Instead of creating a separate metadata entry for each color, you’ll create an array of color entries in a single metadata field:
<?php
add_post_meta( 420, 'prowp_colors', 'orange', false );
add_post_meta( 420, 'prowp_colors', 'black', false );
$product_colors = get_post_meta( 420, 'prowp_colors', false );
echo '<ul class="product-colors">';
foreach ( $product_colors as $color ) {
echo '<li>' .$color .'</li>';
}
echo '</ul>';
?>
First you have to create the metadata entries for the product colors. This is done using the add_post_meta() function. Next, set the meta key name to the same and the $unique parameter to false, which will allow multiple entries under the same meta key.
Next, you’ll use the get_post_meta() function to retrieve the product colors you just set. Notice the $single parameter is set to false, which allows you to return all entries for prowp_colors for product ID 420 as an array. Finally, you’ll loop through the colors array and display each product color.
Another powerful function for retrieving post metadata is the get_post_custom() function. This function returns a multidimensional array of all metadata for a particular post.
<?php get_post_custom( $post_id ); ?>
This function accepts a single required parameter—$post_id—the ID of the post whose custom fields will be retrieved.
Let’s retrieve and display all metadata entries for your product:
<?php
$product_metadata = get_post_custom( 420 );
foreach( $product_metadata as $name => $value ) {
echo '<strong>' .$name .'</strong> => ';
foreach( $value as $nameAr => $valueAr ) {
echo '<br />' .$nameAr." => ";
echo var_dump( $valueAr );
}
echo '<br />';
}
?>
The preceding code example will retrieve all metadata for product ID 420. Because the value returned is a multidimensional array, you have to do multiple loops to display all of the data. This is the preferred method when retrieving multiple pieces of metadata for a post because it retrieves all metadata in a single database query instead of running separate queries for each piece of data requested. As you can tell, this is a more advanced method for retrieving post metadata.
COMMUNITY PROJECTS
Custom post types, taxonomies, and metadata are a big part of many WordPress projects. This has led to a large number of community projects to help make the process of registering these content types much easier. Below is a list of some of the more popular community projects focused on custom post types, taxonomies, and metadata:
· CMB2—Custom Metaboxes and Fields 2 is a tool that allows you to create custom metaboxes and forms with custom fields in WordPress. These fields can be attached to your posts, comments, and even users. You can get this tool athttps://github.com/WebDevStudios/CMB2.
· Custom Meta Boxes—This is a framework that can be used to easily add custom fields to the WordPress post edit page. You can get it at https://github.com/humanmade/Custom-Meta-Boxes.
· CPT_Core—This is a helper class used for registering custom post types in WordPress. You can get it at https://github.com/WebDevStudios/CPT_Core.
· Taxonomy_Core—This is a Helper class used for registering custom taxonomies in WordPress. You can get it at https://github.com/WebDevStudios/Taxonomy_Core.
· Custom Post Type UI—This tool provides an easy-to-use admin interface to register custom post types and taxonomies in WordPress. You can get it at https://wordpress.org/plugins/custom-post-type-ui/.
SUMMARY
It’s very easy to see how using a combination of custom post types, custom taxonomies, and metadata in WordPress opens the doors to endless possibilities. These features have morphed WordPress from a simple blogging platform into a full-fledged content management system capable of handling any type of data you can conceive.
In the next chapter you’ll dive into creating custom plugins for WordPress. You’ll learn the proper ways to integrate into various areas of WordPress, understanding data validation to develop secure code, and even how to publish your plugins to the WordPress.org Plugin Directory.