WordPress To Go - How To Build A WordPress Website On Your Own Domain, From Scratch, Even If You Are A Complete Beginner (2013)
IN-DEPTH GUIDE - DRILL DOWN TO THE WONDERS OF WORDPRESS
Lesson 11. The Power Of Text Widgets
We looked at the basics of Widgets in Lesson 8 but there are a number of other things you can do with widgets that will provide much more functionality.
The best way to see what widgets in general can do is to experiment with the options available (from the dashboard, click ‘Appearance’, ‘Widgets’…) and view the results. As before, all you usually have to do is drag the widget into the appropriate area on the sidebar, configure the options and save it. If you don’t like it, you can delete it.
But there is one widget that will provide almost endless variations and possibilities and that is the Text Widget.
Basically, the text widget enables you to insert text into your sidebar or other areas of your website, but the good news is that the text can also be computer code: HTML and JavaScript in particular, instead of simply plain text. When WordPress sees that the text is actually computer code, it executes it and renders the results where you have placed the text widget.
This facility can, for example, enable you to display graphics and ads in your sidebar and here I’ll show you how.
Add An Image Using A Text Widget
There isn’t, as yet, a simple WordPress widget that lets you place a picture in the sidebar but it can be done easily enough with a bit of HTML. This example will include an easy piece of HTML code that you can copy and edit into a text widget that will place a graphic in your own site.
The first thing you need to do is upload the image file to your Media Library (see Lesson 9) and copy the File URL of the image file to your clipboard.
The easiest way to construct the HTML for this to type it into a text editor such as NotePad. So type this piece of text (exactly!) into NotePad:
<img src=“ “ />
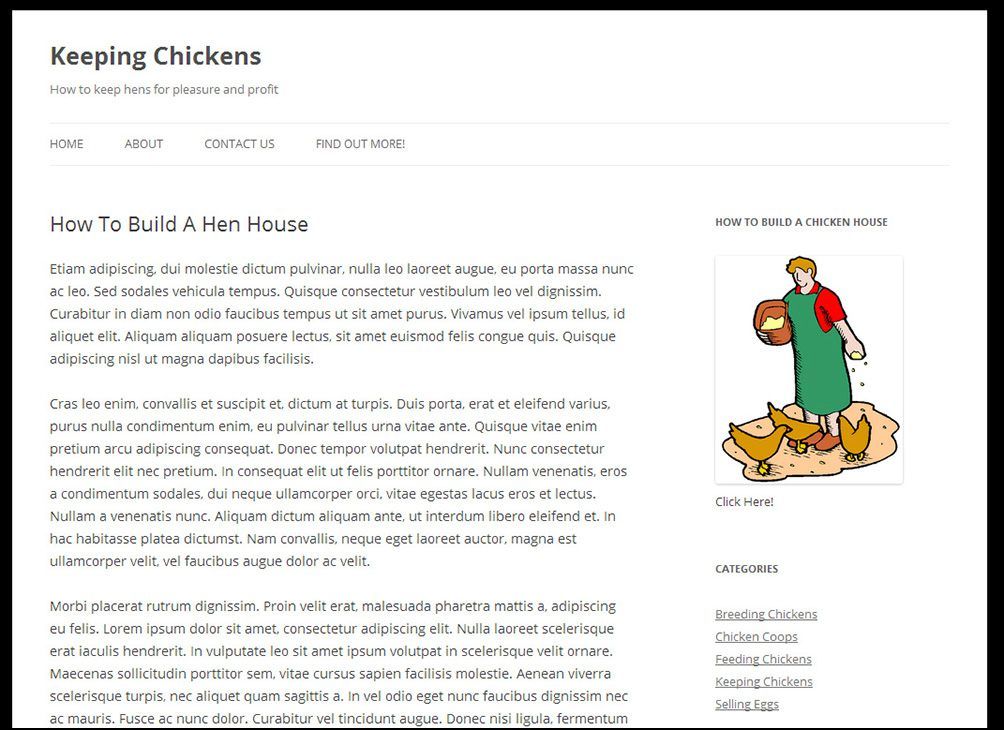
and then place your cursor between the two quotation marks and paste the File URL you just copied to the clipboard into that space. This is what this looks like for my chicken keeping site:
<img src=“http://1.keepingchickens.net/wpcontent/uploads/2012/01/keepingchickens.jpg” />
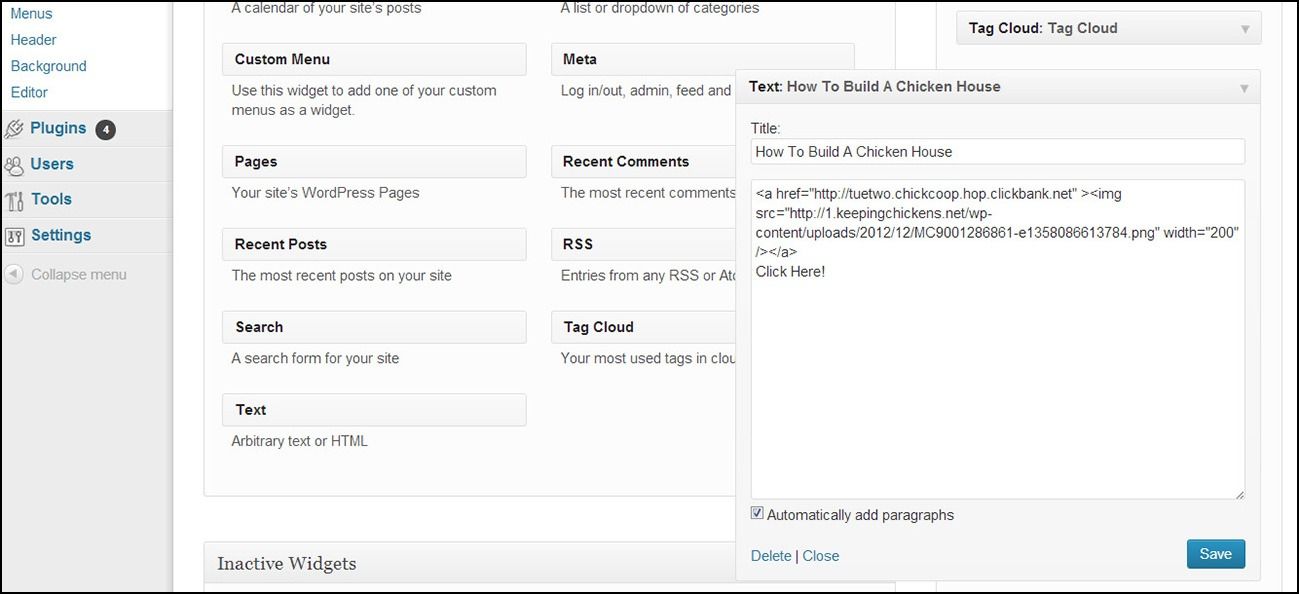
Now, go to ‘Appearance’, ‘Widgets’ and drag a text widget to the sidebar where you want to display that file. Then copy and paste the snippet of NotePad text into the text widget, ‘Save’ and ‘Close’.
View your site to see the results. Figure 11.1 shows what my site now looks like, with a little graphic image in the sidebar:
Use A Text Widget To Display A Banner Ad
One of things that webmasters like to do is to use space on their website to advertise products, either their own or someone else’s. They want to place a small graphic (a ‘banner’) in the sidebar of their website which is clickable, and which will send the visitor through to a sales or order page.
If you are advertising a third-party product, the merchant or agent will often provide the complete code to display the ad. All you have to do is to copy and paste it into a Text widget, as in the previous example. Then click ‘Save’ and ‘Close’ and the banner will display where you placed it.
But what if the product or service you are advertising is your own, or the advertiser wants you to host their graphic on your website?
Advertisers sometimes do this because it saves them bandwidth. What you need to do in this case is to download the banner graphic from their website and upload it to your site’s Media Library (see Lesson 9).
The method of displaying the banner graphic is the same as the previous example but the difference is that you want the image to be ‘clickable’, that is, the code must include a link.
I will illustrate this by actually making the image on my website a clickable link. I’ll make the target of the link a sales page of a product that my visitor could buy.
The advertisers have given me the URL of the link I need to use to direct the visitor to their sales page.
The outline HTML code to display a clickable image looks like this:
<a href=“ “ ><img src=“ “ /></a>
In between the first set of quotation marks you need to paste the URL of the webpage where you want to send your visitors when they click on the image. Between the second set of quotation marks paste the File URL of the image in your Media Library.
So, the HTML for this on my chicken keeping site is:
<a href=“http://tuetwo.chickcoop.hop.clickbank.net” ><img src=“http://1.keepingchickens.net/wpcontent/uploads/2012/01/keepingchickens.jpg” /></a>
This is illustrated in Figure 11.2:
I leave you to play around and experiment with text widgets on your website. All you have to do (in most cases) is to drag and drop the widget into your sidebar, ‘Save’ and ‘Close’.
FAQ
How do I show Google Adsense ads in my sidebar?
AdSense ads are the little the chunks of code links you see on many websites which advertise goods and services available from third parties. This is a program run by Google where people pay them to display ads and Google pays web publishers (you!) to display them.
You have to sign up with Google as an AdSense publisher and then you are allowed to display AdSense ads on your site and (hopefully) get paid for doing so.
You have to have a completed website which is getting some traffic before Google will allow you to sign up to AdSense. But once accepted you can display ads on any site registered to you.
Google provides snippets of Javascript code for you to display text and image ads in various shapes and sizes, depending on where on your site you want to display the ads. A ‘skyscraper’ or other narrow vertical format would be suitable for a sidebar.
Drag and drop a text widget into your sidebar (or anywhere else you want to display ads), copy the Javascript code and paste it into the text widget. Then click ‘Save’ and ‘Close’. Google then displays ads related to the content of the page it is displayed on.
___
Now let’s get on to another vital element of a successful WordPress website: Custom Menus.
All materials on the site are licensed Creative Commons Attribution-Sharealike 3.0 Unported CC BY-SA 3.0 & GNU Free Documentation License (GFDL)
If you are the copyright holder of any material contained on our site and intend to remove it, please contact our site administrator for approval.
© 2016-2026 All site design rights belong to S.Y.A.