WordPress To Go - How To Build A WordPress Website On Your Own Domain, From Scratch, Even If You Are A Complete Beginner (2013)
IN-DEPTH GUIDE - DRILL DOWN TO THE WONDERS OF WORDPRESS
Lesson 12. Custom Menus And Why You Should Use Them
Custom Menus are a relatively new feature of WordPress but they add a lot of flexibility and power to the design of a WordPress website.
What Is A Custom Menu?
If you look at most websites you will see that they have somewhere a row of tabs which consist of links to pages or areas within the site. This row of tabs is called a ‘menu’.

As shown in Figure 12.1, menus are often in a prominent position at the top of the page and their labels provide clues as to where you will be taken if you click on them.
Before Custom Menus were introduced, WordPress would automatically create a menu from all of the pages in your website and, every time you added a page, another tab would be added to the menu. The menu would be displayed wherever the theme placed it, usually somewhere across the top of the page.
The problem was that, if you had a lot of pages (or pages with long titles), your menu would become very crowded and could even confuse your visitors.
By default, this is how WordPress will still behave. If you have only a few pages in your website then maybe this is sufficient and you may not need to have Custom Menus.
But if you want to choose what goes in your menu and/or decide whether to have more than one menu, then you should make use of custom menus.
How To Create A Primary Menu
A ‘Primary Menu’ is one that your theme has already configured into its design. The Twenty Twelve theme has built the primary menu into the horizontal menu bar at the top of the page, as shown in Figure 12.2. Other themes may designate the primary menu as links or buttons down the right or left sidebar, or elsewhere on the site.

To construct your primary menu, from the dashboard, click on ‘Appearance’, ‘Menus’. In the box labeled ‘Menu Name’ type a name for the menu (it doesn’t matter what the name is) and click ‘Create Menu’. I’ve created a menu called ‘blank’ in Figure 12.3:

You can see that there are a number of options here that make this a very powerful feature:
· ‘Custom Links’ are links to anywhere you like: a page, post or even a picture inside your site, or a link to another website. Type the full URL of the location you want to link to, enter the ‘Label’, which is the text that will appear on the menu tab and click ‘Add to Menu’. You can add as many of these as you like to the menu.
· ‘Pages’ enables you to pick and choose from the pages you have so far published. The beauty of this option is that you can put some pages in one menu and some in another and you can also order them however you want. Check the pages that you want to include on this menu and click ‘Add to Menu’.
· ‘Categories’ refers to the categories recorded on Posts. If your website consists mostly of posts you can have a menu that enables your user to browse selected categories from your menu.
As you can see, you have to check the items that you want to include on the menu and click ‘Add to Menu’. You can mix and match the different types of menu items in one menu if you like.
If you want, you can also change the ‘Navigation Label’ to a different title than the one that would appear as default. Expand the menu item by clicking on the down arrow to see the box where you can do this.
The items within the menu can be dragged and dropped into the order you want them to appear, and another neat option is that, if you have a lot of items in the menu, you can arrange them into a hierarchy by simply dragging pages slightly to the right and they will nest beneath the ones above.
When the menu items are assembled how you want, just click ‘Save Menu’ and it’s done.
Now you must tell WordPress that you want this menu to appear as your site’s ‘Primary Navigation’ which, in the case of the Twenty Twelve theme, is horizontally across the top of the page. Under ‘Theme Locations’, select the menu that you just created from the drop-down list and click on ‘Save’.
How To Create A Secondary Custom Menu
In addition to the Primary Menu, you can create a secondary menu (and additional menus) that you can display in the sidebar or other areas of your site. When you have a lot of pages, or categories, or other destinations where you want to send your visitors, this can be a useful way of dividing the navigation of your site into more meaningful sections.
For example, you could have the more important and interesting pages in the Primary Menu up at the top but other, less important, pages such as Privacy Policy, Terms of Service, and Site Map as a secondary menu in less visible locations such as the sidebar or front-page footer (see Lesson 13).
To create another Custom Menu, from the dashboard, click ‘Appearance’, ‘Menu’ and click the tab marked with a + at the top of the screen. (See Figure 12.3)
Then enter another menu name, as before, and click ‘Create Menu’. You can then populate that menu with the pages, Custom Links or categories that you want and click ‘Save Menu’.
Position Your Custom Menus Using Widgets
When you have created a secondary custom menu you can position it where you want it by using the ‘Custom Menu’ widget.
To do this, from the dashboard, click ‘Appearance’, ‘Widgets’ and drag a Custom Menu widget into the sidebar or other widget area provided by your theme, as shown in Figure 12.4:
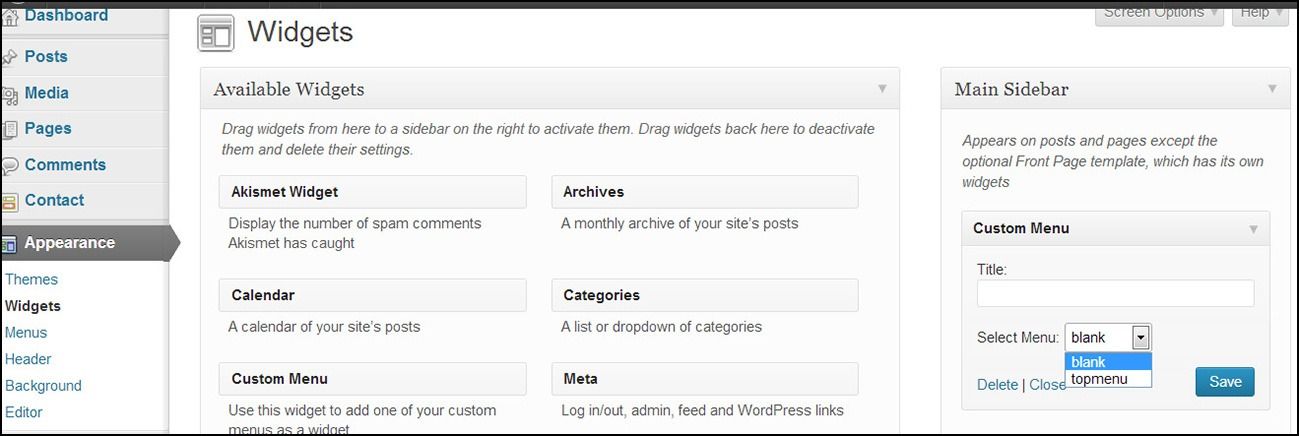
Select the menu to appear in that space and then click ‘Save’.
As you can imagine, the possible combinations and variations on how you can use this are endless.
___
I hope I have demonstrated some of the ways you can use Custom Menus, but you can experiment for yourself and discover how you can use this feature to make your website look and behave the way you want.
FAQ
Help - I have just changed the theme on my website and my custom menu has disappeared! What’s happened?
First, you need to check that your new theme actually supports custom menus. Most up-to-date themes do, but there may be a few who have yet to catch up with this recent feature.
If your theme does support custom menus then read on.
When you change your WordPress theme the new theme may not automatically register that you have set up a custom menu so you have re-set the primary menu.
From the dashboard, click ‘Appearance’, ‘Menus’, ‘Theme Locations’. Select your primary menu from the drop-down list and click on ‘Save’. That tells the theme that you do have a custom menu and it should then display it, as required.