WordPress Responsive Theme Design (2015)
Chapter 10. Submitting Your Theme to WordPress.org
If you have been patient enough to stick with us until here, you should have a clear understanding of WordPress's responsive theme development and the steps involved in it. Your responsive WordPress theme looks beautiful and there is only one thing left to do before you introduce it to the world. Yeah, you guessed it correctly.
In this chapter, you will learn about fine-tuning your theme to follow the WordPress Codex in order to submit it to the WordPress.org repository.
There is still a lot of work left and without further ado, in this chapter, you will learn about:
· Polishing code before submission
· Applying the editor styles
· Validating the HTML and CSS code
· Validating the JavaScript and PHP code
· Adding the readme.txt file
· Adding the screenshot.png file
· Running a theme check plugin
· Submitting your theme to WordPress
Polishing code before submission
In order for our theme to be accepted, we have to make sure it meets the standards of WordPress.org, and in order to do that we have to test it and apply proper fixes. I have intentionally saved this for the last chapter as this should be the most important step before we submit the code to the WordPress.org repository. So let's do this together.
Note
Please check the look/behavior before and after applying each change as that is the best way to learn.
Let's take a look at the following steps:
1. On a front-page.php file please add this code:
<?php include_once(ABSPATH.'wp-admin/includes/plugin.php'); ?>
The preceeding code is added just before the code that checks whether the nyto-services plugin is installed:
<?php if ( is_plugin_active( 'nyto-services- cpt/nyto_services_cpt.php' ) ) {
This code is adding the plugin.php library to the frontend pages as this library is used only in wp-admin backend. If we don't add this code to our home page, it will be broken.
2. When we check our theme on the cell phone, our main navigation is expanding too much on the sections where we have child elements. To fix this, delete the position: relative; property inside .main-navigation ul uldeclaration which is located around line 623 in styles.css.
3. We want to have proper padding for our content when viewed on all devices. The best way to do this is to delete padding properties from class .content-area in all media queries (desktop, tablet, and cell phone) and just add this code:
4. .content-area { padding: 3rem;
}
The preceding code needs to be added to the neutral area (area before those queries) in the content-sidebar.css file. We are not adding that code to the content.css file as there we have the slider and code from the servicesplugin, and that content doesn't need any padding.
5. To make the header section with site branding look better, delete this code from style.css:
6. .logo-container {
7. padding: 0 10px;
}
Then, add the following code to end of the style.css file:
.site-branding{
padding: 1rem;
}
With this code, we are adding a padding of 1rem to our logo
8. In style.css, find the .site-footer .widget class and change it with this code:
9. .site-footer .widget {
10. float: left;
11. margin: 0 1rem 2rem 0rem;
12. width: 30%;
}
This code makes sure that widget margins are proper (text or images are not going outside of their blocks)
13.If we are logged in in frontend preview, the wp-admin toolbar may be broken. Just delete wp_deregister_style( 'open-sans' ); from functions.php in order to fix the broken wp-admin toolbar in frontend view.
14.We want to make the site's tagline to be of the same color:
In style.css, find the .site-description class and change the color property from #2B2B2B to #0480B5
In content-sidebar.css, find the .site-description class and delete the color property together with its value
In content.css, find the .site-description class and delete the color property together with its value
15.We now want to improve the look of services that are listed on our home page. Since we have borders and paddings there, we should update those classes in content.css:
16..perc33{
17. max-width: 31%;
18. }
19. .perc25{
20. width: 23%;
21. }
22. .perc50{
23. width: 47%;
}
As we can see from the preceding code, we have just reduced the values in order to make the services fit in one row
Also, we should add this code to content.css in order to make sure our services are top-aligned:
.perc33, .perc25, .perc50,.perc100 {
vertical-align: top;
}
24.We also have to make sure that our blue color is the same in all places, so in style.css, change the background color from #579DB5 to #0480B5 around lines 542, 560, 581, 585.
In style.css, on line 505, we should change font-weight: 800; to font-weight: 500.
In style.css, on line 524, we should add border-right: 1px solid #666;.
In style.css, on line 527, consider the following code:
.main-navigation a {
font-size: 15px;
font-size: 1.5rem;
display: block;
text-decoration: none;
color: white;
padding: 14px 10px;
}
Change the preceding code to:
.main-navigation a {
color: #FFF;
display: block;
height: auto;
margin: 0;
padding: 14px 10px;
text-decoration: none;
}
We have added height:auto here and have taken out the font sizes.
In style.css, on line 559, consider the following block of code:
.main-navigation li:hover > a {
color: #FFF;
background: #0480B5;
}
Change this to the following block of code:
.main-navigation li:hover > a {
color: #FFF;
background: #543018;
}
Here, we have changed the background color from blue to brown.
In style.css, on line 566, consider the following code:
.main-navigation ul ul a:hover {
background: #0480B5;
}
Change this to the following block of code:
.main-navigation ul ul a:hover {
background: #543018;
}
We have changed the background color here from blue to brown.
In style.css, on line 578, consider the following code:
.main-navigation .current_page_item > a,
.main-navigation .current-menu-item > a,
.main-navigation .current_page_item > a:hover,
.main-navigation .current-menu-item > a:hover {
background: #0480B5;
}
Change this to the following block of code:
.main-navigation .current_page_item > a,
.main-navigation .current-menu-item > a,
.main-navigation .current_page_item > a:hover,
.main-navigation .current-menu-item > a:hover {
background: #543018;
}
We have changed the background color here from blue to brown.
In content-sidebar.css and content.css, in @media only screen and (min-width:769px) and @media only screen and (min-width:481px) and (max-width:768px), add the following code:
#menu-main-menu li {
width: 130px;
text-align: center;
}
Here we are making menu size fixed, 130px on the desktop and tablet.
In content-sidebar.css and content.css in media query for phones, add this code:
@media only screen and (max-width:480px)
#menu-main-menu li a{
width: 100%;
}
We are making menu items to have a width of 100% in mobile styles.
In styles.css, add this code to end of file:
.main-navigation
{
font-size: 1.2rem;
font-size: 12px;
}
Here we are making menu items to have the font size of 1.2rem.
Finally, we have to make sure that all menu items are having the same right border. In order to do that, we have to add this fix to global.js:
jQuery("#menu-main-menu").addClass('clear');
var containerheight = jQuery("#menu-main menu").height();
jQuery("#menu-main- menu").children().css("height",containerheight);
25.In functions.php, find this code:
26.add_theme_support( 'custom-header', apply_filters( 'topcat_custom_header_args', array(
27. 'default-image' => '',
28. 'default-text-color' => '000000',
29. 'width' => 150,
30. 'height' => 200,
31. 'flex-height' => true,
32. 'wp-head-callback' => 'topcat_header_style',
33. 'admin-head-callback' => 'topcat_admin_header_style',
34. 'admin-preview-callback' => 'topcat_admin_header_image',
) ) );
Here, change the width and height as follows:
'width' => 220,
'height' => 100,
I think that the logo with bigger width and smaller height will fit better on our template and this is the fix.
Applying the editor styles
Before we submit our work to WordPress.org, we have to double-check our theme to make sure it's valid and meets all requirements of WordPress.org. As the _underscores theme is a starter theme, it currently doesn't provide editor styles. Editor styles are the styles for the WordPress editor in wpadmin (the backend). The purpose of these styles is to match the look of pages or posts on frontend when the end user goes to the editor. For example, if we go to the http://localhost/topcat/markup-html-tags-and-formatting/ post, we'll see the following screenshot:
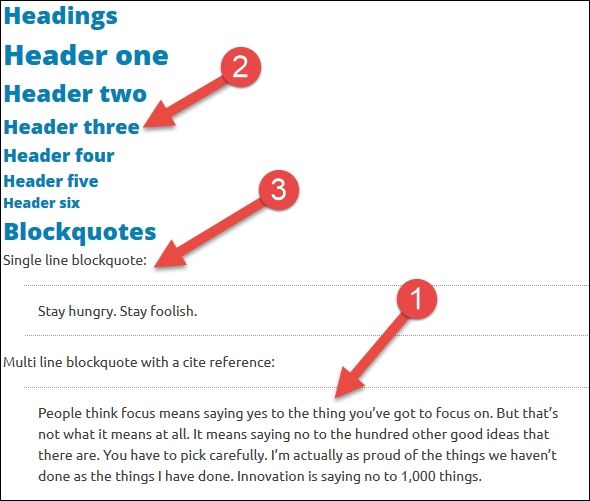
Then, if we open the same post in the editor in wpadmin, we get the following:
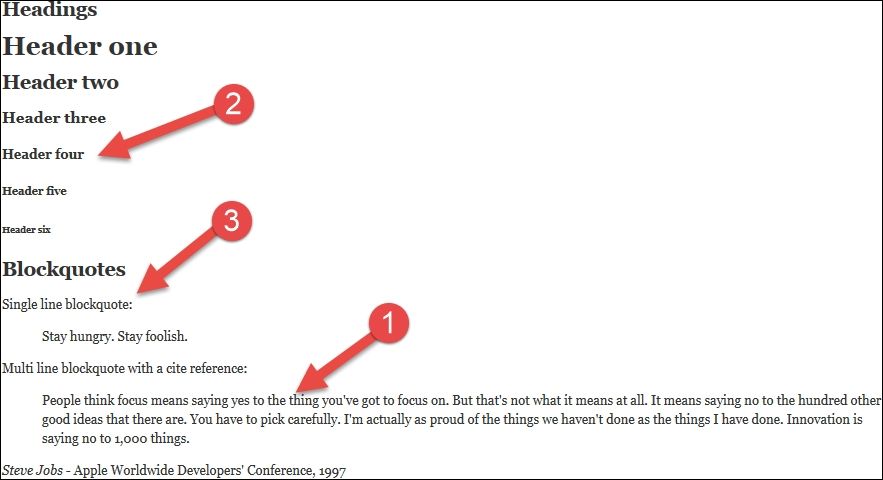
From the preceding screenshot, we can see that the font family is not the same (step 1), the font color is not the same (step 2), and the blockquote styling (custom HTML tag styling) is not applied (step 3). To fix this issue, we have to do the following two things:
1. Implement custom editor styles, custom-editor-style.css. In this file, we just have to add this code:
2. @import url( 'style.css' );
3. body {
4. background: none repeat scroll 0 0 #FFF;
5. font-family: "Open Sans",sans-serif;
6. line-height: 14px;
7. margin: 5px 10px;
8. padding: 5px ;
}
Here, we are importing our theme's styles first, and then we are making sure that the background color is white in the editor (as from our theme's styles, the silver color would be the default one and we don't want that in the editor). We are making sure our font family is applied too.
9. Add editor styles in functions php:
10.function topcat_add_editor_styles()
11.{
12. add_editor_style( array( 'custom-editor-style.css', get_template_directory_uri() . '/css/open-sans.css' ) );
13.}
add_action( 'after_setup_theme', 'topcat_add_editor_styles' );
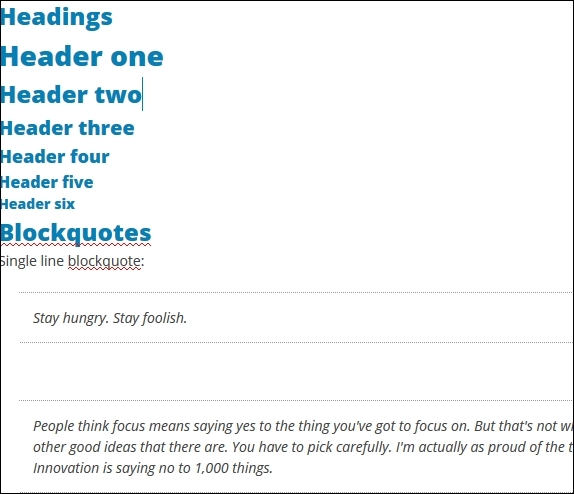
Here, we are adding our custom Google fonts and hooking our custom styles to the core. This is the result:
Validating the HTML and CSS code
In order for our theme to be accepted at WordPress.org, we have to validate our HTML and CSS code.
Note
For this operation, I strongly recommend that you use two browsers [being logged in with one—for example, IE—and testing (logged out) with the other, for example, FF]. As you stay logged in in the FF, you might see some validation errors/warnings from the WordPress toolbar. As they are not our errors, they should be ignored.
For this purpose, I am using the Web Developer plugin for Firefox, which can be downloaded from this location: https://addons.mozilla.org/en-US/firefox/addon/web-developer/. When you install this plugin, you will get a Web Developer toolbar just under the URL (address) bar:

The great thing about the Web Developer plugin is the validation options under the Tools section. If you want to validate the code without the plugin, you will have to go to the www.w3.org website manually. With the WD plugin, you just go to the Tools section, and you will be able to choose many options. My favorite timesavers are the Validate Local CSS and Validate Local HTML options. When we click on these options, our page will be validated against w3.org's validator, and we will see the following result:
![]()
Tip
You may have more errors or less errors than I have.
Note
Take a look at the results carefully. Some of the errors I've had were actually the errors of a Meta Slider plugin and we should not fix these as plugins are not part of our theme.
I would strongly recommend that you go trough as many posts as you can in order to validate HTML and CSS. If we are creating a custom page template, such as front-page.php in the previous chapter, we should also make sure that they are tested thoroughly. We should not have any errors or warnings there, although some posts use deprecated tags, like this one: http://localhost/topcat/markup-html-tags-and-formatting/. For this post, I've got a number of errors, for example, The acronym element is obsolete. Use the abbr element instead. These errors should be ignored, as these posts are just old examples.
I also strongly recommend that you subscribe to the theme review team mailing list, and if you have any questions, feel free to ask them there. The theme review team's page is available here: https://make.wordpress.org/themes/. I highly recommend that you follow the blog of the Automattic's theme division, which is available at http://themeshaper.com/.
Validating the JavaScript code
To validate and debug the JS code, I recommend that you use a Console tab in Firebug.
Note
Firebug is an FF plugin that really helps with debugging HTML, CSS, and JS. It can be downloaded from https://addons.mozilla.org/en-US/firefox/addon/firebug/.
Chrome users should use Chrome Developer Tools, which are part of Chrome.
To access both of these tools, you can just press F12 and they will show up on your page.
Now, just choose the Console tab in any of these tools and browse the test pages or posts. If there is a warning or an error, it will appear here.

Validating the PHP code
The PHP code should be valid all the time, but sometimes, fixing errors and warnings just takes too much of our time. Displaying errors and warnings can sometimes be so distracting that we have to disable displaying them. If we do that, then we should fix these problems at least before we submit our code, in this case, the theme to the public repository.
Debugging the setup
In order to see the errors, we should add this code to the wp-config.php file that is located in the root folder of our WordPress installation:
define('WP_DEBUG', true);
// Enable Debug logging to the /wp-content/debug.log file
define('WP_DEBUG_LOG', true);
// Disable display of errors and warnings
define('WP_DEBUG_DISPLAY', true);
@ini_set('display_errors',1);
// Use dev versions of core JS and CSS files (only needed if you are modifying these core files)
define('SCRIPT_DEBUG', false);
Tip
Note that we have set display errors to true:
@ini_set('display_errors',1);
Note
This setting (displaying errors) should only be applied to our local/dev environment. It should always be disabled on the staging and production environments, as it's unprofessional for end users to see the errors. At the same time, it is also a security risk, as we are providing the system information to everybody.
More information on setting a debug environment can be found at http://codex.wordpress.org/Debugging_in_WordPress.
Multiple wp-config.php sets
As we want to test our code in as many different environments as we can, I recommend that you code and test in two environments: local (XAMPP on Windows) and dev server (Linux/Centos). Because of this, we have to have two different wp-config.php solutions as our credentials are different on different servers (and yours should be too). For this purpose, I am using a wordpress-multi-env-config setup that can be downloaded from https://github.com/studio24/wordpress-multi-env-config. Although this approach has a number of files, it's very easy to set up. In our setup, we should use:
· wp-config.php
· wp-config.env.php
· wp-config.development.php
· wp-config.staging.php
In wp-config.php, we should comment out:
// Define WordPress Site URLs if not already set in config files
/*
if (!defined('WP_SITEURL')) {
define('WP_SITEURL', $protocol . rtrim($hostname, '/'));
}
if (!defined('WP_HOME')) {
define('WP_HOME', $protocol . rtrim($hostname, '/'));
}
*/
In wp-config.env.php, we should set up our environments:
switch ($hostname) {
case 'localhost':
define('WP_ENV', 'development');
break;
case 'topcat.mywebsite.com':
define('WP_ENV', 'staging');
break;
/*
case 'www.domain.com':
default:
define('WP_ENV', 'production');
*/
}
I strongly recommend that you set up at least a development and staging environment; if you have a similar setup, which means you have at least one local computer and server.
In wp-config.development.php, we should set database credentials:
define('DB_NAME', 'your_db_name');
/** MySQL database username */
define('DB_USER', 'your_db_user_name');
/** MySQL database password */
define('DB_PASSWORD', 'your_db_password);
/** MySQL hostname */
define('DB_HOST', 'localhost_or_your_servers_host_name');
We should also put here our debugging settings, which we just mentioned.
In wp-config.staging.php, we should have the database and debugging settings, and that's it.
If we have an error/warning or a notice, we should see something like this:

Let's see the code that was creating a problem:
echo edit_post_link( __( ' Edit ', 'topcat'), '| <i class="fa fa-pencil-square-o"></i> <span class="edit">', '</span>');
The issue here was that we didn't put the topcat value in single quotes.
Let's take a look at the comparison among notices, errors, and warnings.
The following data is found at http://php.net/manual/en/errorfunc.constants.php.
"Run-time notices. Indicate that the script encountered something that could indicate an error, but could also happen in the normal course of running a script."
In our case, we didn't use the single quotes and our code didn't break the page, but it was pointed to us by the debugger that we should fix the code.
"Fatal run-time errors. These indicate errors that can not be recovered from, such as a memory allocation problem. Execution of the script is halted."
This means that when we have errors in our code, it will break the page/script, and that should be fixed immediately.
"Run-time warnings (non-fatal errors). Execution of the script is not halted."
This means that we are being warned of an issue but that issue is not breaking the code.
We should do our best to avoid having any of these (notices, errors, or warnings) in our production-ready code.
Adding the readme.txt file
Every theme that is submitted to the WordPress.org repository should have the readme.txt file. In that file, we should put the information regarding the theme's contributors/authors and tags that describe theme features.
The readme.txt file for our theme is available together with other files provided with this chapter and also on the GitHub page for our theme at https://github.com/dejanmarkovic/topcat-final.
Adding the screenshot.png file
The screenshot.png file is an important file as we can provide the screenshot or some other information regarding our theme there (in our case, we are providing the logo for our theme). The screenshot.png file should be of the size 880 x 600px or 387 x 290px. The screenshot.png file for our theme is available together with other files provided with this chapter and also on the GitHub page for our theme: https://github.com/dejanmarkovic/topcat-final.
More info regarding screenshot.png can be found at https://codex.wordpress.org/Theme_Development#Screenshot.
Running a theme check plugin
As we have validated all the code, we still have one more check to do, and that is to run a theme check plugin. Before we run it, we first have to enable it. To do that, we have to go again to Developer plugin Tools | Developer and click on INACTIVE - Click to Activate; the result is:
![]()
Then, we should run the theme check by going to Appearance | Theme Check and choosing our theme from the drop-down menu and clicking on the Check it! option:
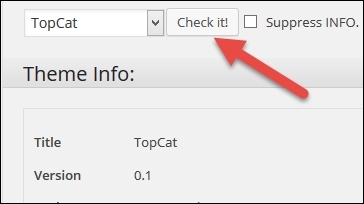
After this, we will get a result like this:

As we can see from the preceding screenshot, we have to fix the things that are marked in red. All these errors/warnings are self-explanatory. The first two mention that we should take out Git references (directories and files) before we submit the code, as the WordPress.org repository is using subversion and also because we don't want to mix our own repository stuff with the public repository.
I also strongly recommend that you look into RECOMMENDED and INFO.
After we fix all the errors, we should go and submit our theme here: https://wordpress.org/themes/upload/.
I also strongly advise that you read the theme Handbook here: https://make.wordpress.org/themes/handbook/review/.
Summary
In this chapter, we learned about applying the editor styles; validating the HTML, CSS, JavaScript and a PHP code; running theme unit tests; and submitting your theme to WordPress.org. This concludes our book.
By now, you have learned how to develop a responsive theme in WordPress and how to submit the theme to WordPress.org, following the WordPress Codex.
You are now ready for your own WordPress theme adventure and that can be working for the agency by creating the themes, starting your own freelance business, or maybe starting your own WordPress theme development company. The choice is yours. Good luck in your future endeavors!