Foundation ActionScript 3, Second Edition (2014)
Chapter 8. Using Audio
This chapter covers the following topics:
· How to load sound files
· How to control audio behavior
· How to read and display audio ID3 information
· How to display the sound spectrum
· How to control sound volume and panning
The value of sound is subtle and undervalued. Often, it makes the difference between a good site and a great site. Sound is similar in many ways to video in ActionScript 3.0. It contains overhauled properties and functionality, which were long overdue in ActionScript 2.0.
In this chapter, you will learn about the basics of using sound, including how to load, play, and control audio, as well as some of the new funky sound capabilities that are exposed in ActionScript 3.0. By the end of this chapter, there won’t be a dry eye in the house, and you’ll be using audio in every site you make (although you probably shouldn’t—the watchword is appropriate).
For this chapter’s example, you’ll build a basic audio player that will play any MP3 file. You’ll also create a comprehensive control and display system for the player. So let’s get started by looking at importing and converting sound files.
Importing and Converting Sound Files
ActionScript 3.0 supports files encoded in both MP3 and AAC format. But for our examples in this chapter, we’ll look at using MP3 files. Just as with video, there are numerous ways to import sound files before converting them into MP3 files, but we will stick with loading external MP3 files as (and when) we need them. There may be times when pragmatism demands that you load the sound file directly into the timeline; however, these are fairly rare and really used only in demos and tutorials. Just be aware that although all the examples in this chapter use MP3 files externally, that is not the only choice—although it is usually the best choice.
There are many sound encoders available, both as freeware and to purchase. Here, I’ll cover the ubiquitous and freely available iTunes and a sound editor called Soundbooth.
Using iTunes
Although WAV and AIFF formats are very popular, most of the files in your iTunes directories will have been ripped off your CDs or downloaded from the iTunes Store in M4A format. iTunes has the facility to convert unprotected M4A files to MP3 (see Figure 8-1). iTunes also has a useful little ID3 editor.
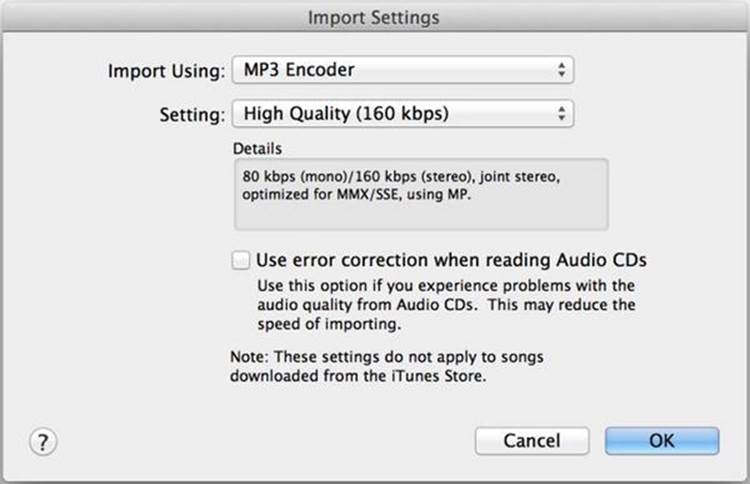
Figure 8-1. Mac version of MP3 conversion settings in iTunes 11
Converting to MP3 Format
Here are the steps to convert your sound files to MP3 format:
1. In iTunes, select ITunes ![]() Preferences from the main menu; then choose the General tab in the dialog box that appears.
Preferences from the main menu; then choose the General tab in the dialog box that appears.
2. Click the Import settings button. In the Import Using field, choose MP3 Encoder; then click OK.
3. Go back to your iTunes Library and select the files you want to convert from M4A to MP3 (see Figure 8-2).
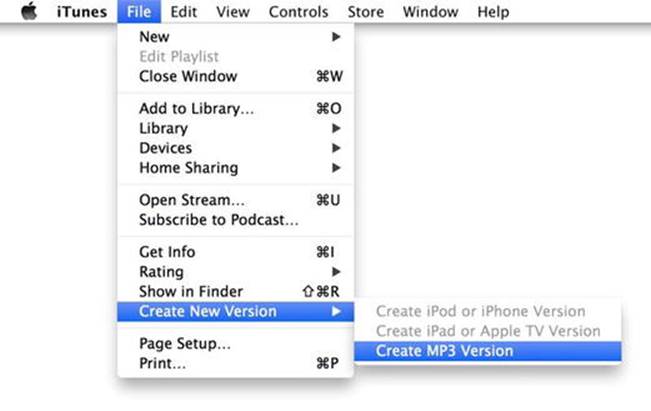
Figure 8-2. Mac version of MP3 conversion settings in iTunes
This will export an MP3 version of the selected sound track to your iTunes directory.
Adding ID3 Information
If you want to attach information to the MP3 file that relates to the track (such as the name of the artist, song title, name of the album, and so on), you will need to add the ID3 information that is the MP3 metadata. When you convert a file to MP3, it will often have no ID3 information attached, which is pretty useful information to have. You can add ID3 information to your MP3 files in several ways; one is to use the iTunes ID3 editor, as described next.
Once you have converted your file to MP3 inside iTunes, you will see a second version of the same track. This is the MP3 version. You can add ID3 information to it as follows:
1. Select the MP3 version, right-click (Ctrl-click on a Mac), and choose Get Info from the menu that pops up.
2. In the dialog box that appears, select the Info tab, as shown in Figure 8-3. Here you can fill in all the ID3 information (most MP3 files will have some information already filled in). After you have entered any extra information, just click the OK button.
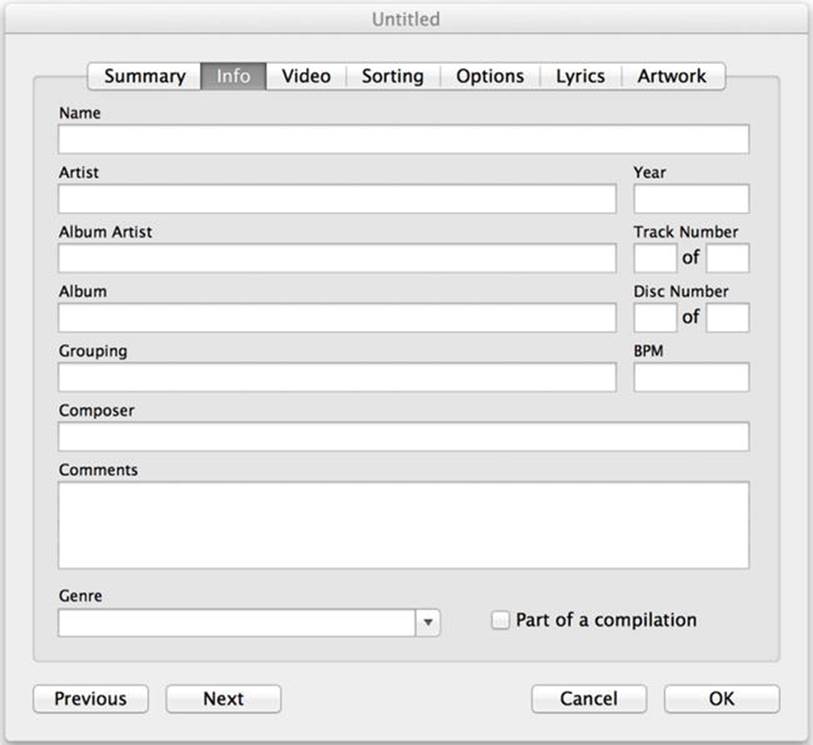
Figure 8-3. Adding ID3 metadata using iTunes
3. With your track still selected, select Advanced ![]() Convert ID3 Tags.
Convert ID3 Tags.
4. In the Convert ID3 Tags dialog box, check the ID3 tag version check box. From that option’s drop-down list, shown in Figure 8-4, choose v2.4. Version 2.4 is the latest version of the ID3 tagging standards, and ActionScript 3.0 has no problems reading these tags. Finally, click the OK button.
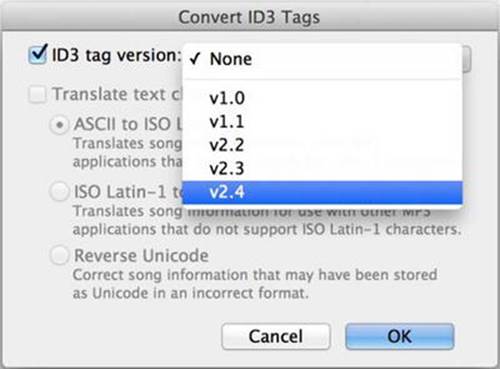
Figure 8-4. Adding ID3 tags
Your MP3 file will now be saved again with all the ID3 information in place, and ActionScript 3.0 is ready to read in the details of your favorite rock band (if rock is your preference).
Using Adobe Audition
Audition comes packaged with Adobe Creative Cloud, so check your Applications folder; it may be lurking in a dark corner. So dust it off and open it up because it is a powerful sound editing tool. For example, you can look through a sound waveform to see a graphical representation of the sound, and if there’s an aberration present (a mobile phone ringing, for example), you can remove it from the sound waveform graphically—yes, graphically! You can literally cut out (select and cut) the section of the waveform pattern that represents the aberration and then play back the track. Presto, the section is gone. It’s obviously not perfect because you can still lose some of the sound’s required waveform at the same time if the frequencies overlap, but it’s a great feature and one of many intuitive tools that Audition makes available. It’s also full of easy-to-use effects and tasks.
Now back to the task at hand of converting audio files to MP3s. Soundbooth offers a remarkably easy-to-use and quick tool (I did it in about 5 seconds). You can import a music file of any format and encode a version to MP3 format. Just open Audition, open your sound file (WAV file, for example), and export it as type MP3. That’s it!
With your MP3 files ready, you can now use ActionScript 3.0 to play them, so enough chatter about converting let’s get ready to rumble!
Using ActionScript to Play Sound
Before we get into the fun stuff and start coding, let’s take a look at the main classes that are associated with sound:
· Sound: Makes it possible to create a Sound object to load, control, and access metadata from the MP3 file you are loading.
· SoundChannel: Allows you to treat each sound you load as a separate channel, so you can control the sound, get/set its playhead position, and assign a SoundTransform object.
· SoundLoaderContext: Provides contextual information for the Sound class at load time.
· SoundTransform: Allows you to control the volume and panning of your loaded sound.
· SoundMixer: Provides global sound control.
· ID3Info: Contains properties that reflect ID3 metadata.
· Microphone: Lets you capture audio from a microphone attached to the computer that is running Flash Player.
There are some other classes without which we couldn’t use sound, such as the URLRequest class, which we use to load the sound file. You’ll see how to use all those classes in the examples throughout this chapter, but first you’ll concentrate on the direct sound classes because without them you have no sound to manipulate.
Accessing Sound Files with the Sound Class
The Sound class (flash.media.Sound) lets you create a new Sound object, load and play an external MP3 file into that object, close the sound stream, and access data about the sound, such as information about the number of bytes in the stream and ID3 metadata. More detailed control of the sound is performed through the sound source—the SoundChannel or Microphone object for the sound—and through the properties in the SoundTransform class that control the output of the sound to the computer’s speakers. Table 8-1 briefly summarizes the public properties of the Sound class.
Table 8-1. Sound class public properties
|
Property |
Type |
Description |
|
bytesLoaded |
uint |
Returns the currently available number of bytes in this Sound object |
|
bytesTotal |
int |
Returns the total number of bytes in this Sound object |
|
id3 |
ID3Info |
Provides access to the metadata that is part of an MP3 file |
|
isBuffering |
Boolean |
Returns the buffering state of external MP3 files |
|
length |
Number |
Returns the length of the current sound in milliseconds |
|
url |
String |
Returns the URL from which this sound was loaded |
What the heck, let’s create a quick demo so you can see how fast it is to actually just play an MP3 using the Sound class on the timeline (I know I said the timeline; well, this is just a demo after all).
Open Flash and add the following code to frame 1 on the timeline, replace Demo.MP3 with your newly converted rock MP3, and test your movie:
//Import the two main classes needed to play sound
import flash.media.Sound;
import flash.net.URLRequest;
//Create and asign the new sound object
var snd:Sound = new Sound();
snd.load(new URLRequest("Demo.MP3"));
snd.play();
You should hear your MP3 playing unless you haven’t got speakers or haven’t plugged in your headphones. I will not decompile the code this time because there is plenty of code to come, so it’s back to the books before you get to play again.
Controlling Sound Channels with the SoundChannel Class
The SoundChannel class (flash.media.SoundChannel) controls a sound in an application. Each sound playing is assigned to a sound channel, and the application can have multiple sound channels that are mixed together. The SoundChannel class contains a stop() method, properties for monitoring the amplitude (volume) of the channel, and a property for setting a SoundTransform object to the channel. Table 8-2 briefly summarizes the public properties of the SoundChannel class.
Table 8-2. SoundChannel class public properties
|
Property |
Type |
Description |
|
leftPeak |
Number |
The current amplitude (volume) of the left channel, from 0 (silent) to 1 (full amplitude) |
|
position |
Number |
The current position of the playhead within the sound |
|
rightPeak |
Number |
The current amplitude of the right channel, from 0 (silent) to 1 (full amplitude) |
|
soundTransform |
SoundTransform |
The SoundTransform object assigned to the sound channel |
Doing Security Checks with the SoundLoaderContext Class
The SoundLoaderContext class (flash.media.SoundLoaderContext) provides security checks for SWF files that load sound. SoundLoaderContext objects are passed as an argument to the constructor and the load() method of the Sound class, and specify things such as preload buffer size. Table 8-3 briefly summarizes the public properties of the SoundLoader class.
Table 8-3. SoundLoader class public properties
|
Property |
Type |
Description |
|
bufferTime |
Number |
Returns the number of seconds to preload a streaming sound into a buffer before the sound starts to stream; set to 1000 milliseconds by default |
|
checkPolicyFile |
Boolean |
Specifies whether Flash Player should try to download a cross-domain policy file from the loaded sound’s server before beginning to load the sound; set to false by default |
Controlling Volume and Panning with the SoundTransform Class
The SoundTransform class (flash.media.SoundTransform) allows control of volume and panning. Microphone, NetStream, SimpleButton, SoundChannel, SoundMixer, and Sprite objects all contain a SoundTransform property, the value of which is aSoundTransform object. Table 8-4 briefly summarizes the public properties of the SoundTransform class.
Table 8-4. SoundTransform class public properties
|
Property |
Type |
Description |
|
leftToLeft |
Number |
A value ranging from 0 (none) to 1 (all), specifying how much of the left input is played in the left speaker |
|
leftToRight |
Number |
A value ranging from 0 (none) to 1 (all), specifying how much of the left input is played in the right speaker |
|
pan |
Number |
The left-to-right panning of the sound, ranging from -1 (full pan left) to 1 (full pan right), with 0 (the default) as equal panning left and right for central balanced sound |
|
rightToLeft |
Number |
A value ranging from 0 (none) to 1 (all), specifying how much of the right input is played in the left speaker |
|
rightToRight |
Number |
A value ranging from 0 (none) to 1 (all), specifying how much of the right input is played in the right speaker |
|
volume |
Number |
The volume, ranging from 0 (silent) to 1 (full volume) |
Controlling Sounds Globally with the SoundMixer Class
The SoundMixer class (flash.media.SoundMixer) contains static properties and methods for global sound control. The ActionScript 3.0 documentation states that “The SoundMixer class controls embedded streaming sounds in a SWF; it does not control dynamically createdSound objects (that is, Sound objects created in ActionScript).” However, this is not strictly true. Although the public properties reflect this position, the public methods it exposes do not. In fact, one of the public methods is extremely useful for any sound you create. This is thecomputeSpectrum() method, which you will use in this chapter’s example to good effect. The only problem with the public methods is that because they are global, they affect every sound that is playing, whether embedded, dynamically loaded, or part of a video sound track.
The public properties of the SoundMixer class are specifically directed at embedded sound, and you probably won’t use them often. In contrast, the SoundMixer class’s public methods are generic and useful. Table 8-5 describes the public methods of the SoundMixer class.
Table 8-5. SoundMixer class public methods
|
Method |
Type |
Description |
|
areSoundsInaccessible() |
Boolean |
Determines whether any sounds are not accessible due to security restrictions. |
|
computeSpectrum(outputArray, FFTMode,stretchFactor) |
void |
Takes a snapshot of the current sound wave and places it into the specified ByteArray object. outputArray is a ByteArray, FFTMode is a Boolean (false by default), and stretchFactor is an int (0 by default). |
|
stopAll() |
void |
Stops all sounds currently playing. |
Getting ID3 Data with the ID3Info Class
The ID3Info class (flash.media.ID3Info) contains properties that reflect ID3 metadata. Essentially, it translates native ID3 tags into something more legible. For example, it allows you to access the TPE1 tag, which contains the artist name, by allowing you to reference it asID3Info.artist. This translation is not strictly necessary, but it makes things a little easier on the eyes and the brain. You can get additional metadata for MP3 files by accessing the id3 property of the Sound class; for example, mySound.id3.TIME. For more information, see theSound.id3 entry in Table 8-1 and the ID3 tag definitions at http://www.id3.org. Table 8-6 briefly summarizes the public properties of the ID3Info class.
Table 8-6. ID3Info class public properties
|
Property |
Type |
Description |
|
album |
String |
The name of the album; corresponds to the ID3 2.0 tag TALB |
|
artist |
String |
The name of the artist; corresponds to the ID3 2.0 tag TPE1 |
|
comment |
String |
A comment about the recording; corresponds to the ID3 2.0 tag COMM |
|
genre |
String |
The genre of the song; corresponds to the ID3 2.0 tag TCON |
|
songName |
String |
The name of the song; corresponds to the ID3 2.0 tag TIT2 |
|
track |
String |
The track number; corresponds to the ID3 2.0 tag TRCK |
|
year |
String |
The year of the recording; corresponds to the ID3 2.0 tag TYER |
Using a Microphone with the Microphone Class
The Microphone class (flash.media.Microphone) is primarily for use with a server, such as the Flash Media Server (FMS) or the Flex server. However, you can also use the Microphone class in a limited fashion without a server—for example, to transmit sound from the microphone through the speakers on the local computer. You attach a Microphone object to a NetStream object to stream audio from a microphone. Table 8-7 briefly summarizes the public properties of the Microphone class.
Table 8-7. Microphone class public properties
|
Property |
Type |
Description |
|
activityLevel |
Number |
The amount of sound the microphone is detecting |
|
gain |
Number |
The microphone gain; that is, the amount by which the microphone should multiply the signal before transmitting it |
|
index |
int |
The index of the microphone, as reflected in the array returned by Microphone.names |
|
muted |
Boolean |
Specifies whether the user has denied access to the microphone (true) or allowed access (false) |
|
name |
String |
The name of the current sound-capture device, as returned by the sound-capture hardware |
|
names |
Array |
The names of all available sound-capture devices |
|
rate |
int |
The rate at which the microphone is capturing sound, in kilohertz |
|
silenceLevel |
Number |
The amount of sound required to activate the microphone and dispatch the activity event |
|
silenceTimeout |
int |
The number of milliseconds between the time the microphone stops detecting sound and the time the activity event is dispatched |
|
soundTransform |
SoundTransform |
Controls the sound of this Microphone object when it is in loopback mode |
|
useEchoSuppression |
Boolean |
Returns true if echo suppression is enabled; false otherwise |
Understanding the Basics of a Sound Player Application
Wow, you survived! I know that was all pretty dry stuff, but it was essential for understanding the nuts and bolts of how sound is manipulated in Flash. Remember that demo? Let’s tidy it up and take another look at the basics of a sound player. The first thing you want to do is define and load an external audio source (an MP3 file). Let’s break down the most basic list of definitions and commands:
//Define the audio source
var audioLocation:String;
//Define a URL request object
var URLReq:URLRequest;
//Define a new Sound object
var snd:Sound;
//Instantiate audio location string
audioLocation = "song1.mp3";
//Instantiate URLrequest to call audio source
URLReq = new URLRequest(audioLocation);
//Instantiate Sound instance
snd = new Sound();
//Call the Sound object's load function to load audio source, using the
//URLrequest
snd.load(URLReq);
//Finally play the audio source. Phew!
snd.play();
//You should hear the MP3 playing now.
Some download manager software can cause Flash Player to fail to load the MP3 file you are calling because it will intercept the response and bypass Flash. There is a way around this. As with video files, the Flash Player reads the file header, not the file suffix, to assess the file type. This means you can give your audio file any suffix type you like. So, for example, you might rename a file called sound.mp3 to sound.fsf, and it would load and play just fine.
Preloading a Buffer
The previous code is a basic implementation, from defining the audio source to playing it. It doesn’t take into consideration the use of a buffer to partially preload the sound file both before and as it plays, which on the whole, is usually essential. As with video, sound can be of low or high quality, and these days, for the sake of an exceptional experience, we err toward much better quality. This is why you need to consider and test buffer size. For seamless playback, you want to allow enough of the sound file to download before beginning to play it, to prevent the playhead from catching up with the progressive download head. To create a buffer that you can pass to the Sound class’s load() function, you must use the SoundLoaderContext class.
Using the Sound.load() function can allow you to truly preload the entire audio source before commanding it to play(). Add an event listener on the Sound object to listen for the Event.COMPLETE event before playing. Although this offers little in the way of runtime buffering, if your site/application has enough time because of its design, consider preloading as many of your sound files as possible this way.
Here’s the basic code with the buffer preloader added:
//Define the audio source
var audioLocation:String;
//Define a URL request object
var URLReq:URLRequest;
//Define new Sound object
var snd:Sound;
//Define a buffer
var buffer:SoundLoaderContext;
//Instantiate audio location string
audioLocation = "song1.mp3";
//Instantiate URLrequest to call audio source
URLReq = new URLRequest(audioLocation);
//Instantiate Sound instance
snd = new Sound();
//Create audio buffer size (in seconds)
buffer = new SoundLoaderContext(5000);
//Call the Sound object's load function to load audio source,
//using the URLrequest and setting a buffer
snd.load(URLReq, buffer);
//Finally play the audio source. Phew!
snd.play();
This version strictly separates the declarations, definitions, and commands from one another. But like the first example, these classes could be defined, instantiated, and passed the information they need all in one go, condensing ten lines of code into four. Now that’s what I call optimization to the extreme.
//Define new Sound object
var snd:Sound;
//Pass the length of the buffer in milliseconds to the new instance of
//the SoundLoaderContext object as it is instantiated.
var buffer:SoundLoaderContext = new SoundLoaderContext(5000);
//Call the Sound object's load function implicitly at instantiation by
//loading the audio source in the URLrequest object instantiation
//and set the buffer
snd = new Sound(new URLRequest(song.mp3), buffer);
//Play (offset, number of loops)
snd.play(30000, 2);
However, for the sake of practicality, good convention, and easy maintenance, I don’t recommend condensing the process quite this much, and you will see that I have taken the middle ground in the code for this chapter’s example.
So you’ve seen how to define a sound source, load it, and play it, but you’ll probably want to be able to stop it, pause it, rewind, and fast-forward it not to mention control the volume and panning of the audio. And believe it or not, you can even display its sound spectrum. Well, relax—these things are not as scary as they might sound; you have seen that playing sound is not rocket science. The rest is just layers on top of what you have already learned.
Pausing Sound
Pausing is one of a few areas of sound usage in ActionScript 3.0 that shows that Adobe needs to address this functionality a little more seriously. There is no actual pause functionality in the Sound class or in any other sound-related classes. You therefore need to use a simple hack. Because you will need to stop the sound playing to make it appear that it is paused, you will need to use the play() command to start it again. But you want to play from the point where the user clicked the pause button the first time, right? And simply playing it again will just start the sound file from the beginning. Luckily, the SoundChannel class has a property called position, which you can use to get the position of the playhead when the pause button is clicked the first time. You store the position before calling the SoundChannel.stop() method, use that as an offset when the pause button is clicked again, and restart playing from this offset.
So let’s consider the variables you need for the pause functionality to work. You need to set a Boolean variable to store the status of the pause button and a Number variable to store the position of the playhead:
var pauseStatus:Boolean;
var playHeadPosition:Number;
Now you need the code to use these when the pause button is toggled:
if (pauseStatus) {
//Play offset , number of loops
soundChannelVar = snd.play(playHeadPosition, 1);
pauseStatus = false;
} else {
playHeadPosition = soundChannelVar.position;
soundChannelVar.stop();
pauseStatus = true;
}
You check to see whether the status of pause is true. If it’s not, then you store the playhead position, stop() the SoundChannel, and set the pause status to true. If it is true, you play the sound file from the offset position stored in the playHeadPosition variable and then set the pause status to false. So, even though you have no built-in, native pause functionality, you can emulate it relatively easily and reliably.
Stopping Sound
Stopping a sound file playing is very straightforward. Let’s assume you have a Sound instance called snd. You can stop it as follows:
var snd:Sound;
. . .
snd.close();
However, you should consider that you cannot use the Sound.close() method once the sound file has finished loading. If you try, you will get the following error:
Error: Error #2029: This URLStream object does not have a stream opened
This is because it is designed to close the sound file download stream, and this will execute without error only if the sound file is still in the process of downloading. Once it has finished downloading, issuing the Sound.close() command will have no effect on the playing sound file. Also, in order to restart a sound file downloading once the Sound.close() method has been successfully executed on it, you must reissue the load() command first. Whatever amount of the sound file that had downloaded at the point where you issued the Sound.close() command will remain in memory and can be played as normal.
The simple, reliable, and generally best choice is to use the SoundChannel.stop() function, as described in the previous section. It will still keep the channel open and the sound file loading into memory, but loading another sound file will replace it.
If you want to be thorough, you can have the stop button execute Sound.close() if the file is still downloading and SoundChannel.stop() if it has finished downloading.
As your code becomes more advanced, it will be important for you to learn about the try...catch method of error handling for checking whether a file is still downloading. I suggest you look into this in more detail when you finish this book. You might check out Adobe’s excellent MXNA blog aggregator (http://weblogs.macromedia.com/mxna/) to start learning more about topics such as error handling. This aggregator provides links to the blog sites of some of the most talented developers in the world.
Fast-Forwarding and Rewinding Sound
To enable yourself to use fast-forward (FF) and rewind (RW) functionality, you need to define timers, so they can run continuously while the user is pressing the FF or RW button. You will notice that you don’t start these timers right away.
timerFF = new Timer(100, 0)
timerFF.addEventListener(TimerEvent.TIMER, this.runFF);
timerRW = new Timer(100, 0)
timerRW.addEventListener(TimerEvent.TIMER, this.runRW);
When the FF or RW button is pressed or released, it will start or stop the timer. So, for example, when the user presses the RW button, you will start the timer:
timerRW.start();
When the user releases the RW button, you stop the timer:
timerRW.stop();
The important thing is what the timer handler code does:
On FF press:
playHeadPosition = soundChannelVar.position;
soundChannelVar.stop();
timerFF.start();
First, you store the present playhead position. Then you stop the track playing (otherwise, you’ll hear multiple versions of the track playing when you release the FF button and it starts playing the track again). Finally, start the FF timer. The FF Timer event handler will simply carry out the calculation of the increment of the playhead position by whatever increment you choose (in milliseconds) and move the playhead bar to represent the present position:
var increment:int = 1000;
playHeadPosition += increment;
movScrubber.movHead.width = ![]()
((Math.floor (playHeadPosition) / trueChronoLength) * 100) * 4;
Once the FF button is released, the timer is stopped, and the SoundChannel plays the sound from the offset position defined by the new playHeadPosition variable.
timerFF.stop();
soundChannelVar = snd.play(playHeadPosition, 1);
//(Play offset, number of loops)
The rewind code is exactly the same, except that the Timer event handler decrements the playhead position:
playHeadPosition -= increment;
Obviously, these are the bare bones of the functionality. In a real-world application, you need to address the fast-forwarding and rewinding not extending beyond the beginning or end of the actual play time. Also, you need to take care of all the little details such as preventing the FF and RW buttons from being engaged if the sound is not already playing, and making sure that the modified volume and pan values are stored and reapplied once the sound is restarted. Don’t panic; I will cover these by the end of the chapter.
Controlling Volume
Now let’s take a look at how you control the volume of your rock song because I know some of you will like to turn it way up loud. For this, you will need to create some form of graphical volume control, be it a simple input text field or a volume dial with meter display.
The important things here are the SoundTransform and the SoundChannel classes. The SoundTransform class allows you to set the volume and pan settings for the SoundChannel instance to which it is assigned. Remember that, in turn, the SoundChannel instance will already be assigned to a Sound class instance. Confused? Let’s look at an example:
//Import required classes
import flash.media.SoundChannel;
import flash.media.SoundTransform;
. . .
//Declare SoundTransform variable
var soundChannelVar:SoundChannel;
var stVolume:SoundTransform;
. . .
//Instantiate SoundTransform object
stVolume = new SoundTransform();
. . .
//Set up SoundChannel
//Play offset, number of loops
soundChannelVar = snd.play(0, 1);
soundChannelVar.soundTransform = stVolume;
You will fire off the volume adjustment event by whatever means are appropriate, based on the type of volume-control interface you have implemented. For example, if you used volume-up and volume-down buttons, you simply assign an event listener to those buttons that listens for aMouseEvent.MOUSE_DOWN event. The code would look something like this:
volUpButton.addEventListener(MouseEvent.MOUSE_DOWN, onVolUp);
volDownButton.addEventListener(MouseEvent.MOUSE_DOWN, onVolDown);
function onVolUp(event:MouseEvent):void {
stVolume.volume = soundVariable + increment;
soundChannelVar.soundTransform = stVolume;
}
function onVolDown(event:MouseEvent):void {
stVolume.volume = soundVariable - increment;
soundChannelVar.soundTransform = stVolume;
}
Notice that this takes soundVariable plus or minus the increment variable, which are both numbers. The result can be a number you feed in directly, or it will be factored on the scale of your volume slide, depending on how you have developed your volume control. Once you have set it, you must reapply the SoundTransform to the SoundChannel class’s own SoundTransform property, which expects a value in the range 0.0 to 1.0. In this chapter’s example, you will see what this process looks like using a slider to set the volume.
And that’s it. That’s how easy controlling the volume is. Next, we’ll look at controlling the sound panning.
Controlling Panning
To control the panning of a sound that is playing is almost exactly the same as controlling the volume. You use the same classes (SoundChannel and SoundTransform) and instantiate them as shown in the preceding section. You actually use the same SoundTransform instance to control both the volume and panning on its assigned SoundChannel object. The only difference is that you need another event handler because a different control is being used. And inside the event handler, the only difference is that you set the pan and not the volume.
stVolume.pan = soundVariable;
soundChannelVar.soundTransform = stVolume;
Remember that the pan has a range of -1.0 to 1.0 (with 0 as the default central setting), unlike the volume range. You should take this into account when deciding what values to send to the event handler for the pan functionality.
Displaying the Sound Spectrum
So would you like to visualize the sound? I’m sure you’ve dreamed of being able to make graphic equalizers to represent the sound file you were playing, or of being able to interpret the sound file waveform frequencies into beautiful aesthetic patterns. I know I have. I even faked a graphic equalizer in one of my early portfolio sites. Well, I’m not much of a back-end coder, so I couldn’t mash one up properly. It looked OK, but it didn’t do anything magical because it couldn’t read the sound frequency data. Well, you’ll be pleased to know that’s all changed with the advent of ActionScript 3.0 and the introduction of the SoundMixer.computeSpectrum() function. “Yay!”
Now I won’t lie; the SoundMixer class doesn’t do all the work. In fact, to be fair, it really just produces all the frequency information and populates the ByteArray it must be passed, with 512 floating-point values representing either the high to low sound frequencies of both the left and right channels or a fast Fourier transform (FFT) algorithm of the sound signal. The first 256 floating-point values represent the left channel, and the second 256 values represent the right channel.
If you want to understand more about the FFT algorithm, I suggest you dust off your advanced mathematics degree and Google it. Or you can just accept that we can use this algorithm.
Adobe’s choice of 512 floating-point values was probably driven by optimization because FFT algorithms can be represented by a range of return values above and below 512. Additionally, you should be aware that it samples all the sounds playing globally as one sound sample, and not any one specific sound file you have loaded. All the sexy stuff is done by the ByteArray, BitmapData, or whatever display vehicle class you decide to use.
A tip for improving the performance of the spectrum computation is to just use the first or last 256 floating-point values (left or right side only), duplicating the data. The audio data will often be very similar, and you skip 256 iterations per timed interval.
You will need to import these classes:
import flash.media.SoundMixer;
import flash.display.BitmapData;
import flash.utils.ByteArray;
Declare the ByteArray variable:
var baSpectrum:ByteArray;
Then instantiate the ByteArray class to pass to the SoundMixer.computeSpectrum() function:
baSpectrum = new ByteArray();
This ByteArray will be populated with the 512 values, representing the frequencies from the snapshot the computeSpectrum() function has taken. Each one of these frequency entries has a value range of -1.0 through 1.0. You need this to happen repeatedly for as long as the sound file is playing, and as you will want to update the visual representation of the playing sound wave constantly, you will need to put this on a Timer event.
timerSpectrum = new Timer(100, 0);
timerSpectrum.addEventListener(TimerEvent.TIMER, onSpectrum);
Notice you haven’t started the timer yet, because you don’t want to run the computeSpectrum() function when the sound isn’t playing and there is consequently no spectrum to compute. This would lead to unnecessary processor overhead. So you’ll need to start the timer every time the sound file is played, and stop it every time it is paused, fast-forwarded, rewound, or stopped. (You’ll see the code permutations for the various play statuses in this chapter’s example.) You need to add the following code where appropriate in the command control function:
timerSpectrum.start();
. . .
timerSpectrum.stop();
So now let’s look at the onSpectrum Timer event handler function code because this is where the action is. You will pass the ByteArray instance to the computeSpectrum() function every time you loop through. As I mentioned earlier, this will be populated with the 512 frequencies that the spectrum snapshot has taken at that moment:
SoundMixer.computeSpectrum(outputArray, FFTMode, stretchFactor);
This function accepts the following parameters:
· outputArray: A ByteArray object that holds the values associated with the sound. If any sounds are not available because of security restrictions (areSoundsInaccessible == true), the outputArray object is left unchanged. If all sounds are stopped, the outputArray object is filled with zeros. This parameter is mandatory.
· FFTMode: A Boolean value indicating whether an FFT is performed on the sound data first. The default is false. Setting this parameter to true causes the method to return a frequency spectrum instead of the raw sound wave. In the frequency spectrum, low frequencies are represented on the left and high frequencies are on the right.
· stretchFactor: An int value indicating the resolution of the sound samples. With the default value of 0, data is sampled at 44.1 KHz; with a value of 1, data is sampled at 22.05 KHz; with a value of 2, data is sampled at 11.025 KHz; and so on.
This takes care of constant sound wave frequency data gathering. Now it’s time to look at the other side of the coin: displaying this data aesthetically. There are innumerable ways to display such a large amount of frequency data, and indeed this is one of the features that makes thecomputeSpectrum() function so powerful.
Let’s consider a couple of the simpler display implementations: an equalizer bar chart and a sound wave display. For the purposes of this example, assume you have created a new Sprite instance called grFrequency. So let’s look at the Timer event handler function code:
//------------------COMPUTE SPECTRUM ------------------------
function onSpectrum(evt:Event):void {
SoundMixer.computeSpectrum(baSpectrum, false);
grFrequency.graphics.clear();
grFrequency.graphics.beginFill(0x00FF00);
grFrequency.graphics.moveTo(0, 0);
for (var i:int = 0; I < 512; I += 1) {
grFrequency.graphics.drawRect(i, 0, 1, (baSpectrum.readFloat() * 150));
}
}
The first line of the function deals with actually computing the spectrum and passing it into the baSpectrum ByteArray. I have set the false value on the FFTMode simply as a reminder that this is the type of display I want (as noted earlier, by default, the FFTMode is alreadyfalse). As a simplification, if the FFTMode is set to false, you will produce a sound wave visualization; if it is set to true, you will produce a bar chart visualization.
The next three lines are all initializing the graphics to display the sound wave or bar chart. You clear the graphic, set the color, and move to the start position, before beginning the drawing cycle.
Following this, you simply loop through the 512 ByteArray values by calling the ByteArray.readFloat() method to get the value, and then display it using the graphics.drawRect method, which takes the x and y coordinates and the width and height as parameter values:
function drawRect(x:Number, y:Number, width:Number, height:Number):void
You calculate the bar height as a factor of the -1.0 through 1.0 value that the readFloat() function returns. This needs to take into account the size of the display area you have available and be adjusted accordingly.
Handling ID3 Tags
Even though the recommended standard for ID3 metadata is not always fully implemented, what we do have from most MP3 files is still very useful. You can get data such as the artist name, the track name, the album title, year of production, and so on. Table 8-8 lists commonly available ID3 tags, which ActionScript allows for access to through the ID3Info class.
Table 8-8. Common ID3 tags
|
ID3 2.0 tag |
Corresponding ActionScript property |
|
COMM |
Sound.id3.comment |
|
TALB |
Sound.id3.album |
|
TCON |
Sound.id3.genre |
|
TIT2 |
Sound.id3.songName |
|
TPE1 |
Sound.id3.artist |
|
TRCK |
Sound.id3.track |
|
TYER |
Sound.id3.year |
Table 8-9 lists ID3 tags that are supported but do not have predefined properties in the ID3Info class (you could extend the ID3Info class in order to add them). You can access these directly by calling Sound.id3.TFLT, Sound.id3.TIME, for example.
Table 8-9. Supported ID3 tags without predefined properties
|
ID3 2.0 tag |
Description |
|
TFLT |
File type |
|
TIME |
Time |
|
TIT1 |
Content group description |
|
TIT2 |
Title/song name/content description |
|
TIT3 |
Subtitle/description refinement |
|
TKEY |
Initial key |
|
TLAN |
Languages |
|
TLEN |
Length |
|
TMED |
Media type |
|
TOAL |
Original album/movie/show title |
|
TOFN |
Original file name |
|
TOLY |
Original lyricists/text writers |
|
TOPE |
Original artists/performers |
|
TORY |
Original release year |
|
TOWN |
File owner/licensee |
|
TPE1 |
Lead performers/soloists |
|
TPE2 |
Band/orchestra/accompaniment |
|
TPE3 |
Conductor/performer refinement |
|
TPE4 |
Interpreted, remixed, or otherwise modified by |
|
TPOS |
Part of a set |
|
TPUB |
Publisher |
|
TRCK |
Track number/position in set |
|
TRDA |
Recording dates |
|
TRSN |
Internet radio station name |
|
TRSO |
Internet radio station owner |
|
TSIZ |
Size |
|
TSRC |
International Standard Recording Code (ISRC) |
|
TSSE |
Software/hardware and settings used for encoding |
|
TYER |
Year |
|
WXXX |
URL link frame |
Now that you know the kind of information the ID3 metadata tags can contain, let’s look at how you go about getting that information out of the tags.
First, make sure you have imported the Sound, Event, and ID3Info:
import flash.media.Sound;
import flash.event.Event;
import flash.media.ID3Info;
Next, set up your ID3 event listener:
var snd:Sound = new Sound();
snd.addEventListener(Event.ID3, id3Handler)
Finally, add the ID3 event-handling code. I have written this with two possibilities in mind: you might simply want to loop through all the fields in the ID3 metadata just to see what’s in there, and you might want to represent a few of the more common (and indeed, essential) pieces of information in onscreen text fields (in this example, the artist and song name):
function id3Handler(event:Event):void {
var song:Sound = Sound(event.target);
var songInfo:ID3Info = ID3Info(song.id3);
for (var xx in songInfo) {
trace("ID3 - " + xx + " is " + songInfo[xx]);
}
txtArtist.text = songInfo.artist;
txtTitle.text = songInfo.songName;
}
You will use these techniques in the sound player you’ll build next, to see what is in the ID3 metadata and to display the artist name and track title while an MP3 file is playing.
Building a Sound Player
Now that you’ve been introduced to the basics of manipulating sound in ActionScript 3.0, including the relevant classes and common functionality, let’s put this all together to create an MP3 player. The MP3 player will look like Figure 8-5. As you can see, it has all the typical features you would expect in an MP3 player.
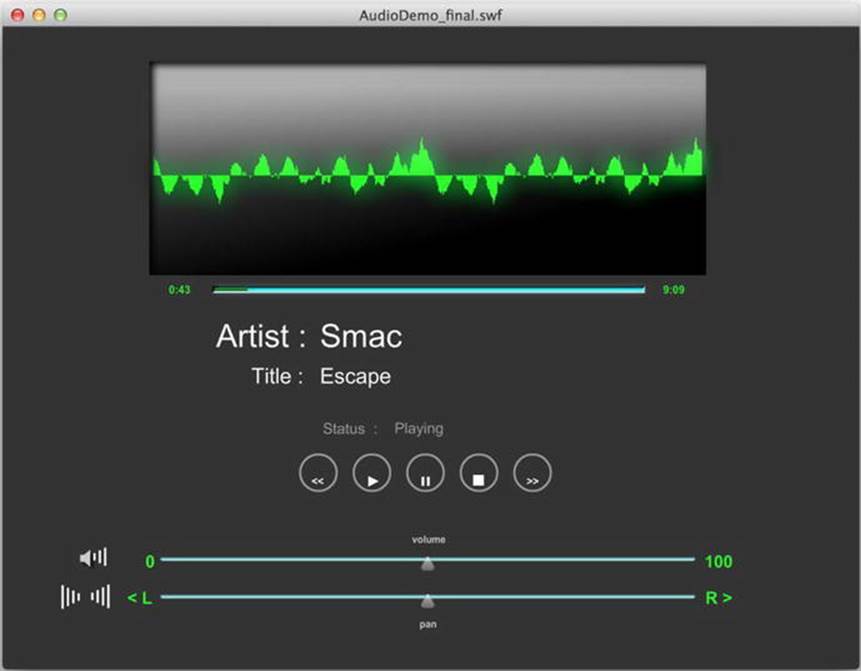
Figure 8-5. The finished MP3 player
You’ll use the following files for the sound player:
· AudioDemo_final.fla
· Main.as
· Sounds.as
· ButtonManager.as
· MediaControlEvent.as
Setting up the Project
As with the video player, I have created the physical assets and initial FLA file (AudioDemo_final.fla) to save you some time on this example. To begin, locate the AudioDemo_final.fla in the code you downloaded for this book and open it.
Now you need to do a quick check. Make sure that the document class is Main.as, and make sure that it is selected. In the Flash IDE, select File ![]() Publish Settings. In the window that appears, click the Settings button to open the ActionScript 3.0 Settings screen, as shown in Figure 8-6.
Publish Settings. In the window that appears, click the Settings button to open the ActionScript 3.0 Settings screen, as shown in Figure 8-6.
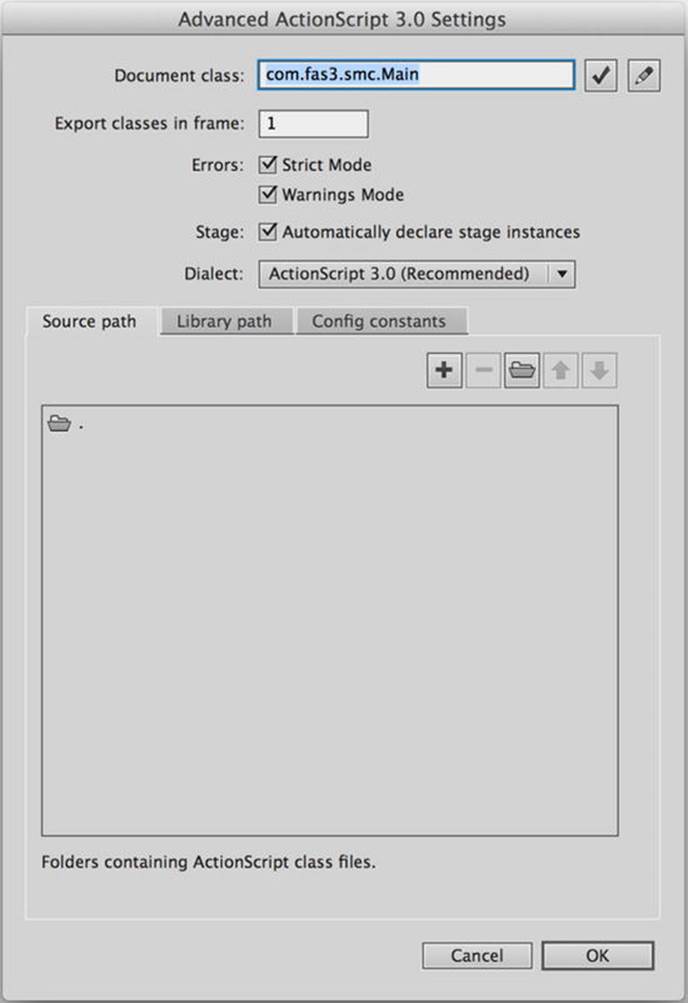
Figure 8-6. Flash ActionScript 3.0 Settings screen
In the Document class text field, enter Main if it’s not already there. This will load the Main.as file as the document class. Remember that the document class is like a root class, so it can control all assets on the root of the timeline.
Next, click the target button to the right of the Classpath: heading and navigate to the directory location where you have stored your class files. When you select it, it should appear very much as mine does in Figure 8-6.
Creating the Main.as File
In the Main.as file, you will create the instances of the Sounds class and button controls. You will also need to create address and display buttons, an audio spectrum, and text fields. Therefore, you will need to import all the Flash classes for these objects.
It is common practice to keep your class and resource files in a deeper directory structure or in packages that reflect the domain under which they are stored and served. For example, if this book’s files were on a domain called www.fas3.com, the classes on this domain would be stored in a directory structure that most competent object-oriented developers would expect to be com.fas3.classes (or similar). Indeed, this is almost the exact package structure I have used. This is to avoid class namespace clashes. A package declaration for the domain would look like this:
package com.fas3.smc
{
class. . .
}
This is an approach you would be well advised to start using regularly.
First, let’s create a new .as file for the Main.as file and add the following code to it:
package com.fas3.smc
{
import flash.display.MovieClip;
import com.fas3.smc.Sounds;
import com.fas3.smc.ButtonManager;
import flash.text.TextField;
import flash.display.SimpleButton;
public class Main extends MovieClip
{
}
}
Save this file as Main.as in your work directory.
Now it’s time to declare the Sound and ButtonManager classes and create the Main constructor, as follows. Sound was already covered, and the ButtonManager will look after any button-based events. You will be creating the ButtonManager later on in this chapter, so update your code with the following highlighted code:
package com.fas3.smc
{
import flash.display.MovieClip;
import com.fas3.smc.Sounds;
import com.fas3.smc.ButtonManager;
import flash.text.TextField;
import flash.display.SimpleButton;
public class Main extends MovieClip {
private var soundManager:Sounds;
private var buts:ButtonManager;
public function Main()
{
}
}
}
This completes the base Main.as FLA document class. This won’t do much at present, but you’ll add the calls for the Sounds and ButtonManager classes after you create them.
Creating the Sounds.as File
You will be creating the Sounds.as class to handle all the sound requirements for your application. So create this file and save it in the same project folder.
Now, let’s add the import and variable declaration statements. As with the video player example in the previous chapter, you’re creating them all in advance, so you don’t need to repeatedly return to the top of the class file and import a class or define a variable. The naming convention should give you some clues about the code you will be creating. Add the following to your Sounds.as class:
package com.fas3.smc
{
import flash.media.Sound;
import flash.media.SoundChannel;
import flash.media.SoundLoaderContext;
import flash.media.SoundTransform;
import flash.media.ID3Info;
import flash.events.Event;
import flash.display.MovieClip;
import flash.net.URLRequest;
import flash.text.TextField;
import flash.utils.Timer;
import flash.events.TimerEvent;
import fl.controls.Slider;
import fl.events.SliderEvent;
public class Sounds extends MovieClip
{
private var snd:Sound;
private var soundChannelVar:SoundChannel;
private var buffer:SoundLoaderContext;
private var timerLoading:Timer;
private var timerPlayHead:Timer;
private var timerFF:Timer;
private var timerRW:Timer;
private var barWid:int = 200;
private var barHi:int = 5;
private var bytLoaded:int;
private var bytTotal:int;
private var pctLoaded:int;
private var trueChronoLength:Number;
private var txtStatus:TextField;
private var txtTrackLength:TextField;
private var txtHeadPosition:TextField;
private var txtArtist:TextField;
private var txtTitle:TextField;
private var movScrubber:MovieClip;
private var multiplier:Number;
private var nsMinutes:Number;
private var nsSeconds:Number;
private var pauseStatus:Boolean;
private var playHeadPosition:Number;
private var volumeSlider:Slider;
private var panSlider:Slider;
private var stVolume:SoundTransform;
private var tempVol:Number = 0.5;
private var tempPan:Number = 0;
private var trackEnd:Boolean;
private var trackStart:Boolean;
}
}
There’s quite a lot there, especially in the variable definitions. The sound manager needs to define text fields, components, temporary minders, multiple integers, and numbers for calculations, timers, and so on. It’s a busy bunny. But don’t let this put you off. Everything will become clear as you step through each part of the process of creating an MP3 player.
Let’s continue with the constructor for your Sound.as class file. This class needs to be passed references to the physical movie clips and text fields on the stage, which I have created for your convenience. Add the constructor function at the bottom of the file:
public function Sounds(movScrubber:MovieClip, txtStatus:![]()
TextField, txtHeadPosition:TextField, txtTrackLength:TextField,![]()
txtArtist:TextField, txtTitle:TextField, volumeSlider:Slider,![]()
panSlider:Slider) {
//Set movies and text fields to local references and to start
//positions and contents
this.movScrubber = movScrubber;
this.txtStatus = txtStatus;
this.txtHeadPosition = txtHeadPosition;
this.txtTrackLength = txtTrackLength;
this.txtArtist = txtArtist;
this.txtTitle = txtTitle;
this.volumeSlider = volumeSlider;
this.panSlider = panSlider;
}
As you can see, you’re already starting to use your defined variables. In this case, you’re using them to store a local reference to the movie clip, text field, and component references that were passed into the constructor.
Now you need to define a function to play the sound file you pass to it and listen for any events. Add the following to the bottom of the file:
public function loadSong(song:String):void {
snd = new Sound(new URLRequest(song));
snd.addEventListener(Event.ID3, id3Handler)
}
In this example, you will listen only for the ID3 events because you will be displaying some important ID3 metadata a bit later. The first line of this function is a compound load statement. It declares a new Sound instance, using a URLRequest instance that it creates on the fly, to load the song you have passed in as a parameter.
Loading the Sound File
I have provided a sample sound file to use with this application called song1.mp3 (not very original, I know). Check out your downloaded code for this file and see the Creative Commons license with which it is issued in a text file in the same download pack. You can, of course, use your own sound file instead.
Now let’s return to the Main.as file and add the instantiation of the Sound.as class file and subsequently call its loadSong() function passing in the song1.mp3 file. Add the following code to the bottom of the file:
soundManager = new Sounds(movScrubber, txtStatus, txtHeadPosition,![]()
txtTrackLength, txtArtist,
txtTitle, volumeSlider, panSlider);
soundManager.loadSong("song1.mp3");
addChild(soundManager);
As you can see, when you instantiate the Sounds class, you pass in all the references to the objects on the stage that this class will need to work with. Then you pass the song1.mp3 reference to its loadSong() function. This loads the sound file but doesn’t play it. Finally, you add the soundManager instance to the display list.
Buffering Sound
When you load the sound file, you need to define a buffer for the sound to load into before playing. So first instantiate the buffer variable in the Sound.as class file constructor:
//Song buffer size in milliseconds
buffer = new SoundLoaderContext(5000);
In the example, 5 seconds of the song need to load into the buffer before it will commence playing. You need to pass this information to the loader, and you do this during the load command. In the Sound.as file, modify the first line of the loadSong() function accordingly:
snd = new Sound(new URLRequest(song), buffer);
This will start the song1.mp3 file loading.
Adding Display Items
The sound player will display a loading progress bar, playhead bar, sound spectrum, and sound track information. So let’s start by adding the loading progress bar.
Creating the Loading Progress Bar
The loading bar will display the progress of the sound file load process. This should complement the playhead bar, and indeed it will operate within the scrubber movie clip. I have already created the physical asset as a white bar.
You will need to loop the check at regular intervals until the load is complete. So you’ll instantiate a timer, add a listener, and start the timer running.
Add this code to your Sounds.as constructor:
timerLoading = new Timer(100, 0);
timerLoading.addEventListener(TimerEvent.TIMER, onLoading);
timerLoading.start();
The first line instantiates the new Timer instance with the parameters of interval and number of loops. You have set the timer to a 100-millisecond interval and told it to loop indefinitely. You will stop the timer when it has finished its job.
Now that you have defined an event listener and started the timer, let’s add the event handler code for the timer event. Add the following function to the bottom of the Sounds.as class file:
private function onLoading(event:TimerEvent):void {
bytLoaded = snd.bytesLoaded;
bytTotal = snd.bytesTotal;
if ((bytTotal >=bytLoaded) && (bytLoaded>0)) {
if (txtStatus.text != "Playing") {
txtStatus.text = "Loading";
}
movScrubber.movLoaderBar.width = ((bytLoaded / bytTotal) * 100) * 4;
if (bytLoaded == bytTotal) {
if (txtStatus.text ==" Loading") {
txtStatus.text = "Load Complete";
}
timerLoading.stop();
}
}
}
This is all fairly self-explanatory. The first few lines work out the amount loaded and the total size of the sound in bytes from the Sound object you created earlier. You check that the file hasn’t completed loading and that it has actually started loading before you try representing the information and issuing status notifications to the status text field. Provided that this is all in order, you then set the width of the loading bar to represent the percentage loaded times 4 (because the movie clip is 400 pixels wide). Finally, you perform another check to see whether the total bytes loaded are equal to the total number of bytes in the sound file. If it is, then the sound file has finished downloading, and you need to stop the associated timer and alert the user through the status text field.
Now if you publish your FLA file, you will see the loading progress bar fill as the sound loads.
The sound file loading will seem instantaneous if the file is being loaded locally. To see this in action, you really need to load a sound file from a remote Internet server.
Creating the Playhead Bar
The playhead bar will show where the song1.mp3 playhead is when playing. Once again, I have already created the graphical object on the stage, within the scrubber movie clip, and you already have the necessary variables defined in the Sounds.as file.
So let’s go ahead and create a Timer instance for this function in the Sounds.as class constructor. Add this to the bottom of the file:
timerPlayHead = new Timer(500, 0);
timerPlayHead.addEventListener(TimerEvent.TIMER, this.headPosition);
The first line instantiates the new Timer instance with the required parameters of interval and number of loops. You have set it to a 500-millisecond interval and told it to loop indefinitely.
Now that you have defined an event listener, you need to think about the event handler code. This is not as simple as working with a video file. The basic principle of displaying an accurate graphical representation of the playhead position is that you take the total length of the sound or video track in a chronological format and compare it against the track’s playhead position chronological information. The goal is to create a relative and accurately scaled playhead graphic, and possibly display the total track length and playhead position in minutes and seconds in appropriate text fields.
For video, you get the track’s chronological head position from the NetStream.Time property. The SoundChannel.position property gives the same information about a sound file, so that’s all good.
Next, you need to get the total track length, so that you can use it to work out how far the track playhead has advanced relative to the total track length. This is where the problem lies. You get video track length from the duration information in the metadata, which is encoded into the FLV file. However, Sound class–loaded MP3s often do not have that information. You can interrogate the track’s ID3 metadata for the TLEN property, which is set aside for the declaration of the track’s length; however, this is far too rarely used to be of reliable value.
The other option is to get the chronological track length by interrogating the length property of the Sound class into which the sound file was loaded. Unfortunately, the Sound.length property is a chronological representation of only the amount of the sound file (in milliseconds) that has been downloaded at the time the property is interrogated, so it will never be accurate until the sound file has completely finished downloading. As you can imagine, that will change the playhead position ratio during the load process, and possibly quite dramatically. It might even look like the track playhead were going backward as the ratio of percent loaded to playhead position changed. So you would seem to have no reliable way of getting the track length.
There is, however, a cunning way around this, which is certainly accurate enough to represent the playhead position acceptably. You can use the information you have about the track load status to extrapolate the track length information. “How?” I hear you ask. “You’re a madman!” I hear you say. Well, it’s simple, if not perfect. Because you have the total number of bytes in the sound file and can compare that with the bytes loaded, you can get an accurate representation of the percentage of the file that has been loaded. Because this is exactly the information theSound.length property uses, you can use that percentage as a multiplier on that property. This will give you an accurate representation of the true chronological track length. Of course, you will need to do a little tweaking and formatting to get it in seconds and initially, while the factors are at their highest, the calculations could be a little off.
The following code gets the playhead to display the count in minutes and seconds, the total track length to display in minutes and seconds, and the graphical representation of the playhead position, using the work-around for the total track length time. These three distinct requirements are separated into the three commented sections within the function. Add this function at the bottom of your Sounds.as file:
private function headPosition(event:TimerEvent):void {
//Set playhead position graphic
multiplier = (1 / (snd.bytesLoaded / snd.bytesTotal));
trueChronoLength = snd.length * multiplier;
if (txtStatus.text == "Playing") {
if (trueChronoLength>0) {
movScrubber.movHead.width = ((Math.floor(soundChannelVar.position)![]()
/ trueChronoLength) * 100) * 4;
//Set head position display text field
nsMinutes = Math.floor((soundChannelVar.position / 1000) / 60);
nsSeconds = Math.floor((soundChannelVar.position / 1000) %6 0);
if (nsSeconds < 10) {
this.txtHeadPosition.text = nsMinutes.toString() + ":0" + nsSeconds.toString();
} else {
this.txtHeadPosition.text = nsMinutes.toString() + ":" + nsSeconds.toString();
}
}
//Set track length display text field
var tlMinutes:int = Math.floor((trueChronoLength / 1000) / 60);
if (tlMinutes < 1){
tlMinutes = 0;
}
var tlSeconds:int = Math.floor((trueChronoLength / 1000) % 60);
if (tlSeconds < 10) {
txtTrackLength.text = tlMinutes.toString() + ":0" + tlSeconds.
toString();
} else {
txtTrackLength.text = tlMinutes.toString() + ":" + tlSeconds.
toString();
}
}
}
The first section takes care of displaying the correct position of the playhead, as the function comment suggests. However, it will skip the display process if you do not yet have the full chronological length of the track worked out when this function fires. The playhead numerical position display text field will format and display it in the appropriate text field after you have the information. The same is true of the total track length text field, and a great amount of code is devoted to formatting the display in this function.
Adding the Sound Spectrum
Now let’s add the code to compute the spectrum. This goes in the Sounds.as file, in which you have already imported the SoundMixer, ByteArray, BitmapFilterQuality, and GlowFilter classes. You have also declared the Timer for the spectrum calculation, theByteArray to hold the returned 512 frequency variables, and the Sprite that will be used to display the frequency information in its final state. Additionally, you have declared a width uint and a spread Number for the display sizes, and a GlowFilter to polish the display a little.
Add these variable declarations to your Sounds.as class file:
private var timerSpectrum:Timer;
private var baSpectrum:ByteArray;
private var grFrequency:Sprite;
private var w:uint = 1;
private var spread:Number;
private var glow:GlowFilter;
Next, you need to instantiate these variables. Add the following code to the bottom of your Sounds.as class constructor:
baSpectrum = new ByteArray();
grFrequency = new Sprite();
grFrequency.x = 0;
grFrequency.y = 200;
movScreen.movSpectrum.addChild(grFrequency);
glow = new GlowFilter()
Here, you have instantiated the ByteArray GlowFilter and the Sprite. You have also set the Sprite’s x and y position and added it to the movScreen.movSpectrum display list because this is the movie clip set up in the FLA file to display it.
Finally, initialize and add an event listener to the spectrum timer. You won’t start it because it should run only when the sound file is playing. You’ll be adding it to the button event handler later in the code. For now, just add the following to the Sounds.as constructor:
timerSpectrum = new Timer(100, 0);
timerSpectrum.addEventListener(TimerEvent.TIMER, onSpectrum);
It seems natural to add the Timer event handler function onSpectrum() now. Add this function into your Sounds.as file:
//------------------COMPUTE SPECTRUM ------------------------
private function onSpectrum(evt:Event):void {
SoundMixer.computeSpectrum(baSpectrum, false);
grFrequency.graphics.clear();
grFrequency.graphics.beginFill(0x00FF00);
grFrequency.graphics.moveTo(0, 0);
for (var i:int = 0; i < 512; i += w) {
spread = (baSpectrum.readFloat() * 150);
grFrequency.graphics.drawRect(i, 0, w, -spread);
}
}
The first line within the function does the important work of computing the sound spectrum and passing it to the baSpectrum ByteArray you defined earlier. You then set up the graphic to display the sound frequencies by setting its color and start position. Once this is done, you loop through the 512 frequency values in the ByteArray by using the readFloat() method, applying a factoring number of 150 to allow for the display size, and then drawing the rectangle that represents these calculations and settings.
After the basic drawing to screen is done, you need to add a little polish. The setting of the color is bright green. This is a color traditionally used by manufacturers to display graphic equalizer information, where it is so bright against the usually black background that it seems to glow. So you’re going to add a simple glow filter. You have already imported the GlowFilter class and instantiated it. Add the following code to the bottom of the onSpectrum function, after the for-next loop:
//Apply the glow filter to the grFrequency graphic.
glow.color = 0x009922;
glow.alpha = 1;
glow.blurX = 25;
glow.blurY = 25;
glow.quality = BitmapFilterQuality.MEDIUM;
grFrequency.filters = [glow];
The last line adds the newly configured glow filter to the Sprite’s filters array.
Displaying ID3 Track Metadata
You need to be able to display track information about the artist’s name and the name of the track, at the very least. As explained earlier in the chapter, you can interrogate for more ID3 information, but for now you’ll stick with these two reasonably reliable and simple fields in this example.
Add the following event listener to the loadSong() function in the Sounds.as file:
snd.addEventListener(Event.ID3, id3Handler);
Now you can add the event handler code to the Sounds.as file, like so:
//----------------- ID3 information event handler -----------------
function id3Handler(event:Event):void {
var song:Sound = Sound(event.target);
var songInfo:ID3Info = ID3Info(song.id3);
trace("ID3 loaded");
We now loop over the song’s metadata so you can see how much there is; we’ll just trace it:
for (var xx in songInfo){
trace("ID3 - " + xx + " is " + songInfo[xx]);
}
txtArtist.text=songInfo.artist;
txtTitle.text=songInfo.songName;
}
You extract the sound file target from the returned object and store it in a Sound variable, so that you can interrogate its ID3 information. You’ll notice that you’re feeding even the song’s ID3 information into another class: the ID3Info class. As noted earlier in the chapter, essentially this class takes the fairly nondescript ID3 tags and translates them into something legible to call. For example, the ID3 tag TPE1 becomes the ID3Info property artist. You don’t have to use the ID3Info class; indeed, you loop through the ID3 metadata in this function to give you some idea of what data you can find in any MP3 files you choose to use.
You assign the artist and songName properties of the ID3Info instance to the appropriate text fields that, once again, I have already put on the stage for you. As you can see, getting ID3 information is pretty simple.
Controlling the Audio as it Plays
The ButtonManager class will deal with all the button-based events. Create that class file now and save it as ButtonManager.as.
Add the following code to the ButtonManager.as file. This covers all the classes you need to import and the variable definitions you will need later on.
package com.fas3.smc {
import flash.net.*;
import flash.display.Sprite;
import flash.display.SimpleButton;
import flash.events.MouseEvent;
import flash.events.EventDispatcher;
import flash.events.Event;
import com.fas3.smc.MediaControlEvent;
public class ButtonManager extends Sprite {
private var butRW:SimpleButton;
private var butPlay:SimpleButton;
private var butPause:SimpleButton;
private var butStop:SimpleButton;
private var butFF:SimpleButton;
private var eventDispatcherButton:EventDispatcher;
private var pauseOn:Boolean = false;
//Simply instantiate your button manager class by passing it the
//names of your Rewind, Play, Pause, Stop and Fast Forward
//button instances
public function ButtonManager(butRW:SimpleButton, butPlay :![]()
SimpleButton, butPause:SimpleButton, butStop:SimpleButton,![]()
butFF:SimpleButton){
this.butRW = butRW;
this.butPlay = butPlay;
this.butPause = butPause;
this.butStop = butStop;
this.butFF = butFF;
}
}
}
Because I have deliberately not added extra code to create the buttons, and instead opted to create them graphically on the stage, you have passed references to them into the class file constructor. You also immediately pass these references to the local variables so you can access them in the scope of the class.
In order to instantiate the ButtonManager class and pass in the button instance references, return to the Main.as file and add the following line after the line that adds the Sounds.as class instance to the display list:
Buts = new ButtonManager(butRW, butPlay, butPause, butStop, butFF);
Now let’s add the button functionality.
Adding Button Functionality
You will start by adding event listeners to the ButtonManager.as class file constructor for each button to listen for MOUSE_DOWN events as soon as a button is pressed. As with the video player, you do not want to wait until the button is released to be notified, particularly for the fast-forward and rewind functions, which rely on the user pressing and holding down the button to execute them. The FF and RW buttons use a Timer class instance to continue to run while the button is pressed, and they have a release event handler that allows you to stop them executing their timer when the user releases the mouse.
Add the following code to your ButtonManager.as class file constructor:
//Add button listeners
butRW.addEventListener(MouseEvent.MOUSE_DOWN, doRewind);
butRW.addEventListener(MouseEvent.CLICK, stopRewind);
butPlay.addEventListener(MouseEvent.MOUSE_DOWN, doPlay);
butFF.addEventListener(MouseEvent.MOUSE_DOWN, doFastForward);
butFF.addEventListener(MouseEvent.CLICK, stopFastForward);
butRW.enabled = false;
butFF.enabled = false;
butPause.enabled = false;
butStop.enabled = false;
You have disabled all the buttons except for the play button. The other buttons will be enabled and disabled as logic dictates throughout the application’s use. Also notice that the pause and stop buttons don’t have event listeners added to them at this stage. Because these buttons don’t need an event listener added to them until after the sound is playing, you have left it to the Play event handler to take care of it.
Now let’s add the button event handlers to ButtonManager.as:
private function doRewind(evnt:MouseEvent):void {
dispatchEvent(new MediaControlEvent("RW"));
}
private function stopRewind(evnt:MouseEvent):void {
dispatchEvent(new MediaControlEvent("RWEND"));
}
private function doPlay(event:MouseEvent):void {
butPause.addEventListener(MouseEvent.MOUSE_DOWN, doPause);
butPause.enabled = true;
butStop.addEventListener(MouseEvent.MOUSE_DOWN, doStop);
butStop.enabled = true;
butFF.enabled = true;
butRW.enabled = true;
dispatchEvent(new MediaControlEvent("PLAY"));
}
private function doPause(event:MouseEvent):void{
if (pauseOn) {
butRW.enabled = true;
butFF.enabled = true;
butPlay.enabled = true;
butStop.enabled = true;
pauseOn = false;
} else {
butRW.enabled = false;
butFF.enabled = false;
butPlay.enabled = false;
butStop.enabled = false;
pauseOn = true;
}
dispatchEvent(new MediaControlEvent("PAUSE"));
}
private function doStop(event:MouseEvent):void {
butPause.removeEventListener(MouseEvent.MOUSE_DOWN, doPause);
butPause.enabled = false;
dispatchEvent(new MediaControlEvent("STOP"));
}
private function doFastForward(event:MouseEvent):void {
dispatchEvent(new MediaControlEvent("FF"));
}
private function stopFastForward(event:MouseEvent):void {
dispatchEvent(new MediaControlEvent("FFEND"));
}
The Play event handler has some extra code. It adds the event listeners for the pause and stop buttons, and it enables all the other control buttons, now that their use is valid. The Stop event handler also has a little extra code. It removes the Pause event listener and disables the pause button.
You’ll also notice that these functions are dispatching their own event: MediaControlEvent. This is the same class you used for the video player example in the previous chapter, and the reasoning for extending the Event class to create this class is the same as explained in that chapter: to allow for simple, modular, extendable event handling and registration for any classes that need to use the media control buttons. And as in the video player example, you’re adding it to the ButtonManager class before it is created. Add the following function into theButtonManager.as file:
//This function adds any external objects to the listener list
//for the mediaControl event
public function addMediaControlListener(funcObj:Function):void {
addEventListener(MediaControlEvent.CONTROL_TYPE, funcObj);
}
It will register an external handler for any MediaControlEvent.CONTROL_TYPE events.
Now let’s add a call to this function from the Main.as file. Add the following line to the end of the Main.as constructor:
buts.addMediaControlListener(soundManager.onControlCommand);
You have defined the Sound.as class function onControlCommand to handle the MediaControlEvent.CONTROL_TYPE events, which you’ll add to the Sounds.as file next.
Save and close both the Main.as and ButtonManager.as files now. They are complete. The Main.as file should look like this:
package com.fas3.smc{
import flash.display.MovieClip;
import com.fas3.smc.Sounds;
import com.fas3.smc.ButtonManager;
import flash.text.TextField;
import flash.display.SimpleButton;
public class Main extends MovieClip {
private var soundManager:Sounds;
private var buts:ButtonManager;
public function Main(){
soundManager = new Sounds(movScrubber, txtStatus,![]()
txtHeadPosition, txtTrackLength, txtArtist, txtTitle, volumeSlider, panSlider);
soundManager.loadSong("song1.mp3");
addChild(soundManager);
buts = new ButtonManager(butRW, butPlay, butPause, butStop,
butFF);
buts.addMediaControlListener(soundManager.onControlCommand);
}
}
}
The ButtonManager.as file should look like this:
package com.fas3.smc {
import flash.net.*;
import flash.display.Sprite;
import flash.display.SimpleButton;
import flash.events.MouseEvent;
import flash.events.EventDispatcher;
import flash.events.Event;
import com.fas3.smc.MediaControlEvent;
public class ButtonManager extends Sprite {
private var butRW:SimpleButton;
private var butPlay:SimpleButton;
private var butPause:SimpleButton;
private var butStop:SimpleButton;
private var butFF:SimpleButton;
private var eventDispatcherButton:EventDispatcher;
private var pauseOn:Boolean = false;
//Simply instantiate your button manager class by passing it the
//names of your Rewind, Play, Pause, Stop and Fast Forward
//button instances
public function ButtonManager(butRW:SimpleButton, butPlay:![]()
SimpleButton, butPause:SimpleButton, butStop:SimpleButton,
butFF:SimpleButton) {
this.butRW = butRW;
this.butPlay = butPlay;
this.butPause = butPause;
this.butStop = butStop;
this.butFF = butFF;
//Add button listeners
butRW.addEventListener(MouseEvent.MOUSE_DOWN, doRewind);
butRW.addEventListener(MouseEvent.CLICK, stopRewind);
butPlay.addEventListener(MouseEvent.MOUSE_DOWN, doPlay);
butFF.addEventListener(MouseEvent.MOUSE_DOWN, doFastForward);
butFF.addEventListener(MouseEvent.CLICK, stopFastForward);
butRW.enabled = false;
butFF.enabled = false;
butPause.enabled = false;
butStop.enabled = false;
}
//This function adds any external objects to the listener list
//for the mediaControl event
public function addMediaControlListener(funcObj:Function):void {
addEventListener(MediaControlEvent.CONTROL_TYPE, funcObj);
}
private function doRewind(evnt:MouseEvent):void {
dispatchEvent(new MediaControlEvent("RW"));
}
private function stopRewind(evnt:MouseEvent):void {
dispatchEvent(new MediaControlEvent("RWEND"));
}
private function doPlay(event:MouseEvent):void {
butPause.addEventListener(MouseEvent.MOUSE_DOWN, doPause);
butPause.enabled = true;
butStop.addEventListener(MouseEvent.MOUSE_DOWN, doStop);
butStop.enabled = true;
butFF.enabled = true;
butRW.enabled = true;
dispatchEvent(new MediaControlEvent("PLAY"));
}
private function doPause(event:MouseEvent):void {
if (pauseOn) {
butRW.enabled = true;
butFF.enabled = true;
butPlay.enabled = true;
butStop.enabled = true;
pauseOn = false;
} else {
butRW.enabled = false;
butFF.enabled = false;
butPlay.enabled = false;
butStop.enabled = false;
pauseOn = true;
}
dispatchEvent(new MediaControlEvent("PAUSE"));
}
private function doStop(event:MouseEvent):void {
butPause.removeEventListener(MouseEvent.MOUSE_DOWN, doPause);
butPause.enabled = false;
dispatchEvent(new MediaControlEvent("STOP"));
}
private function doFastForward(event:MouseEvent):void {
dispatchEvent(new MediaControlEvent("FF"));
}
private function stopFastForward(event:MouseEvent):void {
dispatchEvent(new MediaControlEvent("FFEND"));
}
}
}
The Sounds.as file still has some work to be done on it, which you’ll handle next.
Handling Button Events
The ButtonManager MediaControlEvent.CONTROL_TYPE events are dispatched when any control button is pressed. Now you will add the event handlers to take action when they are notified of a button press. These event handlers go in the Sound.as file.
Open the Sounds.as class file and add the following function to it, to handle the MediaControlEvent.CONTROL_TYPE events:
//----------------- CONTROL BUTTONS ---------------------------
public function onControlCommand(evt:MediaControlEvent):void {
switch(evt.command) {
//---- PAUSE ----
case "PAUSE":
if (pauseStatus) {
soundChannelVar = snd.play(playHeadPosition, 1);
restoreVolPan();
timerSpectrum.start();
pauseStatus = false;
} else {
timerSpectrum.stop();
grFrequency.graphics.clear();
storeVolPan();
soundChannelVar.stop();
pauseStatus = true;
}
txtStatus.text = (txtStatus.text == "Playing")?"Paused" : "Playing";
break;
//---- PLAY ----
case "PLAY":
if (txtStatus.text != "Playing") {
soundChannelVar = snd.play(0,1);
timerPlayHead.start ();
restoreVolPan();
timerSpectrum.start();
txtStatus.text = "Playing";
trackEnd = false;
}
break;
//---- STOP ----
case "STOP":
timerPlayHead.stop();
txtStatus.text = "Stopped";
timerSpectrum.stop();
grFrequency.graphics.clear();
storeVolPan();
soundChannelVar.stop();
movScrubber.movHead.width = 1;
txtHeadPosition.text = "0:00";
break;
//---- RW ----
case "RW":
timerSpectrum.stop();
grFrequency.graphics.clear();
storeVolPan();
soundChannelVar.stop();
timerRW.start();
txtStatus.text = "Rewind";
break;
//---- RW END ----
case "RWEND":
timerRW.stop();
if (!trackStart){
soundChannelVar = snd.play(playHeadPosition, 1);
txtStatus.text = "Playing";
restoreVolPan();
timerSpectrum.start();
}
break;
//---- FF ----
case "FF":
timerSpectrum.stop();
grFrequency.graphics.clear();
storeVolPan();
soundChannelVar.stop();
timerFF.start();
txtStatus.text = "Fast Forward";
break
//---- FF END ----
case "FFEND":
timerFF.stop();
if (!trackEnd){
soundChannelVar = snd.play(playHeadPosition,1);
txtStatus.text = "Playing";
restoreVolPan();
timerSpectrum.start();
}
break;
default:
trace("BUTTON COMMAND ERROR");
break;
}
}
There are a number of conditional code segments in here, nearly all of which are based on the premise that you need to take note of the playhead position, the volume, and the pan settings before you stop the sound playing and execute fast-forward, rewind, pause, and so on, so that you can restart the sound playing with its previous settings still intact. For this, you use two functions: storeVolPan() and restoreVolPan(). Also, you will notice that the playhead timer is started and stopped on the start and stop buttons.
Add the following code to your Sounds.as file:
//Store volume and pan settings for reapplication
private function storeVolPan():void {
playHeadPosition = soundChannelVar.position;
tempVol = stVolume.volume;
tempPan = stVolume.pan;
}
//Restore pan and volume settings
private function restoreVolPan():void {
stVolume.pan = tempPan;
stVolume.volume = tempVol;
soundChannelVar.soundTransform = stVolume;
}
You have used a single switch/case statement to deal with every button press event or delegate it as appropriate. Dispatching your own event allows you to send extra parameters in the dispatched object, and you’ll be interrogating it for a variable called command. This is a Stringthat contains the type of command that a particular button fired off (such as STOP, RW, FF, or FFEND). Once a case has been made, it will set the status text field to reflect this change in status; record the volume, pan, and playhead positions; and execute the appropriate function(s) to carry out the command’s native request.
The Pause switch case statement toggles between play and pause by using a pauseStatus Boolean variable because the Sound class does not have an actual pause function. If you wanted to, you could extend the Sound class to include such a thing, almost exactly as you have done here.
The Play event restarts the sound file playing from the beginning, but restores the volume and pan settings in case they have been changed. It also starts the spectrum timer running to take the sound spectrum snapshot.
The Stop event stores the present user-defined volume and pan settings. It then stops the SoundChannel to which the Sound instance is assigned. Next, it does a little housekeeping by moving the playhead back to the beginning and making sure the numerical representation of the playhead is returned to zero. It also stops the sound spectrum timer and clears the sound spectrum sprite.
The FF/FFEND and RW/RWEND events also require special consideration. When the FF and RW buttons are pressed, they are required to fire off a Timer event to accommodate the need for the playhead increment or decrement for as long as the buttons are held down. They also have the job of stopping the sound spectrum timer and clear the sound spectrum sprite.
Let’s add the Timer declarations to the Sounds.as class file constructor now:
timerFF = new Timer(100, 0)
timerFF.addEventListener(TimerEvent.TIMER, this.runFF);
timerRW = new Timer(100, 0)
timerRW.addEventListener(TimerEvent.TIMER, this.runRW);
Now you need to write the functions they call. These Timer event handlers, which normally just increment or decrement the playhead, will also check for the exception that the playhead is equal to 0 (the beginning of the track) or to the total track length (the end of the track), and set thetrackStart or trackEnd Boolean values to true to reflect whichever status has been achieved in such an event. They then do some housekeeping by resetting the numerical representation of the playhead, resetting the width of the scrub head movie clip, and setting the status text to notify the user that one of these exceptions has been reached. The users are at liberty to press the play button at this point in order to start playing the sound file again. Add the following code for these two functions to your Sounds.as file:
//Fast Forward
private function runFF(event:TimerEvent):void {
if (playHeadPosition < trueChronoLength) {
playHeadPosition += 1000;
movScrubber.movHead.width = ((Math.floor(playHeadPosition)![]()
/trueChronoLength) * 100) * 4;
} else {
trackEnd = true;
txtHeadPosition.text = txtTrackLength.text;
txtStatus.text = "End of track";
movScrubber.movHead.width = 400;
}
}
//Rewind
private function runRW(event:TimerEvent):void {
if (playHeadPosition > 1) {
playHeadPosition -= 1000;
movScrubber.movHead.width = ((Math.floor(playHeadPosition)![]()
/trueChronoLength)*100)*4;
} else {
trackStart = true;
txtHeadPosition.text = "0:00";
txtStatus.text="Start of track";
movScrubber.movHead.width = 1;
}
}
Upon releasing the FF or RW button , the associated timer is stopped, and a check is done to see whether the trackEnd or trackStart Boolean were set to true. If not, the track is allowed to play from its newly incremented or decremented position, and the last-known volume and pan settings are applied.
Controlling the Sound Volume and Panning
Now let’s look at controlling the sound file’s volume and panning. There is one important consideration before you start coding: if users have played the sound once and paused, stopped, or otherwise interacted with its timeline, they may well have set and reset the volume and pan settings. These settings need to be stored, recalled, and reapplied to the sound file when it is restarted or replayed. To the users, these are global settings, affecting any sound that they load and play, and they will not expect the volume or pan to change once they have been set. This will extend our basic button control functionality.
Now you need to control how loud the sound file plays back and the balance of volume from each speaker channel. You’ll be using the SoundTransform class for this, as explained earlier in the chapter. You’ll see that you have already imported the class and defined an instance of it (called stVolume). Add the following line of code to the Sounds.as class file constructor:
stVolume = new SoundTransform();
You also need some form of graphical volume and pan control mechanisms. For this example, you’re using the Slider component (see Figure 8-7).
Figure 8-7. The Slider component
I have already added two of these components to the demo FLA file: one for volume and one for panning, as shown in Figure 8-8.

Figure 8-8. The sliders in the final application
The parameters for the Slider components have been set, as shown in Figure 8-9.
Figure 8-9. Slider component parameter settings
As you can see, I have set the scale from a minimum of 0 to maximum of 100, to give the user a percentage setting for the volume, and defaulted it to start at 50, so it will be in the middle range initially. The pan settings are only slightly different in that the SoundTransform.panrange is –1.0 to 1.0, so the minimum and maximum values are –100 and 100, respectively. The default value is 0 to start with the sound balanced.
I have called these instances volumeSlider and panSlider. In order to use them, you just need to add event listeners to them.
Add the following lines to your Sounds.as class file constructor:
//Set volume controls
volumeSlider.addEventListener(SliderEvent.CHANGE,![]()
onVolSliderChange);
panSlider.addEventListener(SliderEvent.CHANGE, onPanSliderChange);
Add these functions to your Sounds.as class file also to set the pan and volume defaults:
//Set volume
private function onVolSliderChange(evt:SliderEvent):void {
stVolume.volume = (evt.value / 100);
soundChannelVar.soundTransform = stVolume;
}
//Set pan
private function onPanSliderChange(evt:SliderEvent):void{
stVolume.pan = (evt.value / 100);
soundChannelVar.soundTransform = stVolume;
}
The event object that is returned to the event handler contains a value Number variable. This reflects the relative position in either the volume or pan range that you assigned, based on where the slider was set. This value needs to be converted into the SoundTransform class’s native pan or volume range (1.0 through 1.0, or 0.0 through 1.0, respectively), so that it can be applied to the SoundTransform and that, in turn, can be applied to the SoundChannel.
So now your Sounds.as class file is complete and should look like this:
package com.fas3.smc {
import flash.media.Sound;
import flash.media.SoundChannel;
import flash.media.SoundLoaderContext;
import flash.media.SoundTransform;
import flash.media.SoundMixer;
import flash.media.ID3Info;
import flash.events.Event;
import flash.utils.ByteArray;
import flash.display.MovieClip;
import flash.display.Sprite;
import flash.net.URLRequest;
import flash.text.TextField;
import flash.utils.Timer;
import flash.events.TimerEvent;
import fl.controls.Slider;
import fl.events.SliderEvent;
import flash.filters.BitmapFilterQuality;
import flash.filters.GlowFilter;
public class Sounds extends MovieClip {
private var snd:Sound;
private var soundChannelVar :SoundChannel;
private var buffer:SoundLoaderContext;
private var timerLoading:Timer;
private var timerPlayHead:Timer;
private var timerFF:Timer;
private var timerRW:Timer;
private var timerSpectrum:Timer;
private var barWid:int = 200;
private var barHi:int = 5;
private var bytLoaded:int;
private var bytTotal:int;
private var pctLoaded:int;
private var trueChronoLength:Number;
private var txtStatus:TextField;
private var txtTrackLength:TextField;
private var txtHeadPosition:TextField;
private var txtArtist:TextField;
private var txtTitle:TextField;
private var movScreen:MovieClip;
private var movScrubber:MovieClip;
private var multiplier:Number;
private var nsMinutes:Number;
private var nsSeconds:Number;
private var pauseStatus:Boolean;
private var playHeadPosition:Number;
private var volumeSlider:Slider;
private var panSlider:Slider;
private var stVolume:SoundTransform;
private var tempVol:Number = 0.5;
private var tempPan:Number = 0;
private var trackEnd:Boolean;
private var trackStart:Boolean;
private var baSpectrum:ByteArray;
private var grFrequency:Sprite;
private var w:uint = 1;
private var spread:Number;
private var glow:GlowFilter;
//CONSTRUCTOR
public function Sounds(movScreen:MovieClip, movScrubber:![]()
MovieClip, txtStatus:TextField, txtHeadPosition:TextField,![]()
txtTrackLength:TextField, txtArtist:TextField, txtTitle:TextField,![]()
volumeSlider:Slider, panSlider:Slider) {
//Set movies and text fields to local references and
// to start positions and contents
this.movScreen = movScreen;
this.movScrubber = movScrubber;
this.txtStatus = txtStatus;
this.txtHeadPosition = txtHeadPosition;
this.txtTrackLength = txtTrackLength;
this.txtArtist = txtArtist;
this.txtTitle = txtTitle;
this.volumeSlider = volumeSlider;
this.panSlider = panSlider;
movScrubber.movLoaderBar.width = 1;
txtStatus.text = "AWAITING LOCATION";
buffer = new SoundLoaderContext(5000);//buffer size in ms
stVolume = new SoundTransform();
baSpectrum = new ByteArray();
grFrequency = new Sprite();
grFrequency.x = 0;
grFrequency.y = 200;
movScreen.movSpectrum.addChild(grFrequency);
glow = new GlowFilter()
//Set volume controls
volumeSlider.addEventListener(SliderEvent.CHANGE, onVolSliderChange);
panSlider.addEventListener(SliderEvent.CHANGE, onPanSliderChange);
//Add Timers
timerLoading = new Timer(100, 0);
timerLoading.addEventListener(TimerEvent.TIMER, onLoading);
timerLoading.start();
timerPlayHead = new Timer(500, 0);
timerPlayHead.addEventListener(TimerEvent.TIMER, this.headPosition);
timerFF = new Timer(100, 0)
timerFF.addEventListener(TimerEvent.TIMER, this.runFF);
timerRW = new Timer(100, 0)
timerRW.addEventListener(TimerEvent.TIMER, this.runRW);
timerSpectrum = new Timer(100, 0);
timerSpectrum.addEventListener(TimerEvent.TIMER, onSpectrum);
//NB don't forget to stop the Timer when finished
}
//---------------- Load song into Sound instance ----------------
public function loadSong(song:String):void {
snd = new Sound(new URLRequest(song), buffer);
//Add event listeners for completion of loading and for ID3
//information
snd.addEventListener(Event.ID3, id3Handler)
}
//----------------- Loader Timer handler -----------------------
private function onLoading(event:TimerEvent):void {
bytLoaded = snd.bytesLoaded;
bytTotal = snd.bytesTotal;
if ((bytTotal >=bytLoaded) && (bytLoaded > 0 )) {
if (txtStatus.text != "Playing") {
txtStatus.text = "Loading";
}
movScrubber.movLoaderBar.width = ((bytLoaded / bytTotal) * 100) * 4;
if (bytLoaded == bytTotal) {
if (txtStatus.text == "Loading") {
txtStatus.text = "Load Complete";
}
timerLoading.stop();
}
}
}
//------------------ HEAD POSITION & COUNT --------------------
private function headPosition(event:TimerEvent):void {
multiplier = (1 / (snd.bytesLoaded / snd.bytesTotal));
trueChronoLength = snd.length*multiplier;
if (txtStatus.text == "Playing") {
if (trueChronoLength > 0) {
movScrubber.movHead.width = ((Math.floor![]()
(soundChannelVar.position)/trueChronoLength)*100)*4;
}
//Set timer display text field
nsMinutes = Math.floor((soundChannelVar.position / 1000)/ 60);
nsSeconds = Math.floor((soundChannelVar.position / 1000)% 60);
if (nsSeconds < 10) {
this.txtHeadPosition.text = nsMinutes.toString() + ":0" + nsSeconds.toString();
} else {
this.txtHeadPosition.text = nsMinutes.toString() + ":" + nsSeconds.toString();
}
}
//Set track total length display text field
var tlMinutes:int = Math.floor((trueChronoLength / 1000)![]()
/ 60);
if (tlMinutes < 1){
tlMinutes = 0
}
var tlSeconds:int = Math.floor((trueChronoLength / 1000)![]()
% 60);
if (tlSeconds < 10) {
txtTrackLength.text = tlMinutes.toString() + ":0" +![]()
tlSeconds.toString();
} else {
txtTrackLength.text = tlMinutes.toString() + ":" +![]()
tlSeconds.toString();
}
}
//----------------- ID3 information event handler -----------------
function id3Handler(event:Event):void {
var song:Sound = Sound(event.target);
//The ID3Info class translates the ID3 tags into more
//legible calls for the information - e.g., TPE1 becomes
//artist
var songInfo:ID3Info = ID3Info(song.id3);
for (var xx in songInfo) {
trace("ID3 - " + xx + " is " + songInfo[xx]);
}
txtArtist.text = songInfo.artist;
txtTitle.text = songInfo.songName;
}
//------------------COMPUTE SPECTRUM ------------------------
private function onSpectrum(evt:Event):void {
SoundMixer.computeSpectrum(baSpectrum, true);
//SoundMixer.computeSpectrum(baSpectrum, false);
grFrequency.graphics.clear();
grFrequency.graphics.beginFill(0x00FF00);
grFrequency.graphics.moveTo(0, 0);
for (var i:int = 0; i < 512; i += w) {
spread = (baSpectrum.readFloat() * 150);
grFrequency.graphics.drawRect(i, 0, w, -spread);
}
// Apply the glow filter to the gr graphic.
glow.color = 0x009922;
glow.alpha = 1;
glow.blurX = 25;
glow.blurY = 25;
glow.quality = BitmapFilterQuality.MEDIUM;
grFrequency.filters = [glow];
}
//----------------- CONTROL BUTTONS ---------------------------
public function onControlCommand(evt:MediaControlEvent):void {
switch(evt.command) {
//---- PAUSE ----
case "PAUSE":
if (pauseStatus) {
//Play offset, number of loops:
soundChannelVar = snd.play(playHeadPosition, 1);
restoreVolPan();
timerSpectrum.start();
pauseStatus = false;
} else {
timerSpectrum.stop();
grFrequency.graphics.clear();
storeVolPan();
soundChannelVar.stop();
pauseStatus = true;
}
txtStatus.text = (txtStatus.text == "Playing") ?![]()
"Paused" : "Playing";
break;
//---- PLAY ----
case "PLAY":
if (txtStatus.text != "Playing") {
soundChannelVar = snd.play(0, 1);//Play offset, number of loops
timerPlayHead.start();
restoreVolPan();
timerSpectrum.start();
txtStatus.text = "Playing";
trackEnd = false;
}
break;
//---- STOP ----
case "STOP":
timerPlayHead.stop();
txtStatus.text = "Stopped";
timerSpectrum.stop();
grFrequency.graphics.clear();
storeVolPan();
soundChannelVar.stop();
movScrubber.movHead.width = 1;
txtHeadPosition.text = "0:00";
break;
//---- RW ----
case "RW":
timerSpectrum.stop();
grFrequency.graphics.clear();
storeVolPan();
soundChannelVar.stop();
timerRW.start();
txtStatus.text = "Rewind";
break;
//---- RW END ----
case "RWEND":
timerRW.stop();
if (!trackStart) {
//Play offset, number of loops:
soundChannelVar = snd.play(playHeadPosition, 1);
txtStatus.text = "Playing";
restoreVolPan();
timerSpectrum.start();
}
break;
//---- FF ----
case "FF":
timerSpectrum.stop();
grFrequency.graphics.clear();
storeVolPan();
sc.stop();
timerFF.start();
txtStatus.text = "Fast Forward";
break;
//---- FF END ----
case "FFEND":
timerFF.stop();
if (!trackEnd) {
//Play offset , number of loops:
soundChannelVar = snd.play(playHeadPosition,1);
txtStatus.text = "Playing";
restoreVolPan();
timerSpectrum.start();
}
break;
default:
trace("BUTTON COMMAND ERROR");
break;
}
}
//Fast Forward
private function runFF(event:TimerEvent):void {
if (playHeadPosition < trueChronoLength) {
playHeadPosition += 1000;
movScrubber.movHead.width = ((Math.floor(playHeadPosition)![]()
/ trueChronoLength) * 100) * 4;
} else {
trackEnd = true;
txtHeadPosition.text = txtTrackLength.text;
txtStatus.text = "End of track";
movScrubber.movHead.width = 400;
}
}
//Rewind
private function runRW(event:TimerEvent):void {
if (playHeadPosition > 1 ) {
playHeadPosition -= 1000;
movScrubber.movHead.width = ((Math.floor(playHeadPosition) /![]()
trueChronoLength) * 100) * 4;
} else {
trackStart = true;
txtHeadPosition.text = "0:00";
txtStatus.text="Start of track";
movScrubber.movHead.width = 1;
}
}
//Store volume and pan settings for reapplication
private function storeVolPan():void {
playHeadPosition = soundChannelVar.position;
tempVol = stVolume.volume;
tempPan = stVolume.pan;
}
//Reapply pan and volume settings
private function restoreVolPan():void {
stVolume.pan = tempPan;
stVolume.volume = tempVol;
soundChannelVar.soundTransform = stVolume;
}
//Set volume
private function onVolSliderChange(evt:SliderEvent):void {
stVolume.volume = (evt.value / 100);
soundChannelVar.soundTransform = stVolume;
}
//Set pan
private function onPanSliderChange(evt:SliderEvent):void {
stVolume.pan = (evt.value / 100);
soundChannelVar.soundTransform = stVolume;
}
}
}
Creating the Custom Event Class
Now it’s time to create the custom MediaControlEvent.as class. You will use this to fire off button interaction events. This is the same event class you used for the video player example in the previous chapter, so if you’ve already written it, just open the file again and save it to your audio project directory. If not, open a new ActionScript file and save it as MediaControlEvent.as, and put the following code in it:
package com.fas3.smc {
import flash.events.Event;
public class MediaControlEvent extends flash.events.Event {
public static const CONTROL_TYPE:String = "headControl";
public var command:String;
public function MediaControlEvent(command:String):void {
super(CONTROL_TYPE);
this.command = command;
}
}
}
This class simply extends the Event class, and works as described in the previous chapter.
And that completes this example. Save all your classes and publish your FLA file. You’ll have a working MP3 player.
Summary
This chapter covered the basics of working with audio. You have learned how to do the following:
· Load an MP3 file or access the microphone
· Monitor and report on MP3 load and play status
· Read and display ID3 metadata
· Represent the sound data graphically using the sound spectrum
· Control MP3 loading and playback
You can experiment with the MP3 player you built in this chapter and see what else you can do with it. For example, you might add more aesthetically pleasing effects to the sound spectrum display. You could add a file list so you could browse the MP3 files and choose one to load. You could experiment with voice interaction and control. And you could create a multichannel sound mixer. The generic reference information presented in this chapter will be useful for pretty much any MP3–based ActionScript 3.0 project you want to try.
The next chapter covers the components that are available in ActionScript 3.0 and how they can help you quickly create standardized functional objects.
All materials on the site are licensed Creative Commons Attribution-Sharealike 3.0 Unported CC BY-SA 3.0 & GNU Free Documentation License (GFDL)
If you are the copyright holder of any material contained on our site and intend to remove it, please contact our site administrator for approval.
© 2016-2026 All site design rights belong to S.Y.A.