Sams Teach Yourself Arduino Programming in 24 Hours (2015)
Part II: The C Programming Language
Hour 9. Implementing Data Structures
What You’ll Learn in This Hour:
![]() What data structures are
What data structures are
![]() How to create a data structure in C
How to create a data structure in C
![]() How to use data structures in your Arduino sketches
How to use data structures in your Arduino sketches
![]() Using data unions in your sketches
Using data unions in your sketches
Data is the core of every Arduino sketch. Whether you’re monitoring values from analog or digital sensors, or sending data out a network interface, data management can be one of the biggest chores of writing sketches. The Arduino programming language provides some level of data management features that help you organize the data that you use in your sketches. In this hour, we explore two different data management features: structures and unions.
What’s a Data Structure?
In Hour 5, “Learning the Basics of C,” you learned how to use variables to store data in your Arduino sketches. Each variable stores one data value, of a specific data type, in a predefined location in memory. Although variables are useful, sometimes working with individual variables can get a bit complicated with large amounts of data.
Suppose, for example, that you want to track the data from both an indoor and outdoor temperature sensors at various times in the day. Using variables, you’d have to create a separate variable for each temperature value at each time of the day you want to use:
int morningIndoorTemp;
int morningOutdoorTemp;
int noonIndoorTemp;
int noonOutdoorTemp;
int eveningIndoorTemp;
int eveningOutdoorTemp;
The more time samples you want to store, the more data variables you have to create. You can see that it won’t take long before the number of variables your sketch has to work with starts getting out of hand.
In Hour 7, “Programming Loops,” you learned how to create array variables. That helps some, because you can at least use the same variable name to store multiple data values. With array variables, you can store the related temperature samples in the same array:
int morningTemps[2];
int noonTemps[2];
int eveningTemps[2];
That helps cut down on the number of variables you have to work with from six to three, but now you have to keep track of which array index represents which temperature sensor.
Data structures allow us to define custom data types that group related data elements together into a single object. Using a data structure, you can group the multiple sensor values together into a single data object that your program can handle as a single entity. Instead of referencing the individual data elements using an index, you can use variable names to make it obvious which values are which. This proves when storing and retrieving data in databases, files, or just in memory.
The Arduino handles data structures as a single block in memory. When you create a data structure, the Arduino reserves space in memory based on all the data elements contained in the data structure. Creating, storing, and reading data structures is a simple operation that takes minimal coding effort. The next section demonstrates how to start working with data structures.
Creating Data Structures
Before you can use a data structure in your sketch, you need to define it. To define a data structure in the Arduino, you use the struct statement. The generic format for the struct statement is as follows:
struct name {
variable list
};
The name defines a unique name used to reference the data structure in your sketch. The variable list is a set of variable declarations to define the variables contained within the data structure.
Because the data structure definition is part of the variable declarations, you must place it at the top of your Arduino sketch, either before you define the setup function or inside the setup function. Here’s an example of a simple data structure definition:
struct sensorinfo {
char date[9];
int indoortemp;
int outdoortemp;
};
This data structure definition declares three variables as part of the structure:
![]() A character array variable to store a date value
A character array variable to store a date value
![]() An integer variable to store the indoor temperature from the sensors
An integer variable to store the indoor temperature from the sensors
![]() A second integer variable to store the outdoor temperature from the sensor
A second integer variable to store the outdoor temperature from the sensor
Notice that you can mix and match the data types stored in a data structure. You don’t have to use all the same data types in the structure.
This struct statement just defines the data structure format; it doesn’t actually create an instance of the data structure for storing data. To do that, you need to declare individual variables using the data structure data type:
struct name variable;
This statement declares a variable that uses the data structure assigned to the name structure that you defined earlier. For example:
struct sensorinfo morningTemps;
struct sensorinfo noonTemps;
struct sensorinfo eveningtemps;
These three statements declare three separate instances of the sensorinfo data structure: morningTemps, noonTemps, and eveningTemps. All the variables contain all the data elements defined for the sensorinfo data structure and store separate values for those elements.
You can use a shortcut format to declare your sketches in one statement:
struct sensorinfo {
char date[9];
int indoortemp;
int outdoortemp;
} morningTemps, noonTemps, eveningTemps;
This defines the structure and assigns it to variables all at one time.
By The Way: Unnamed Data Structures
You can also define a data structure and declare variables that use the data structure without assigning a name to the data structure:
struct {
char date[9];
int indoortemp;
int outdoortemp;
} morningTemps, noonTemps, eveningTemps;
However, if you do that, because there isn’t a data structure name associated with the structure, you can’t declare any other variables in the sketch with that data structure.
After you declare the data structure variables, you’ll want to assign values to them and use them in your sketch. The next section covers how to do just that.
Using Data Structures
You can assign values to the individual data elements in a data structure in a couple of different ways. One way is to set the initial values of the data elements when you declare the structure variable:
struct sensorinfo morningTemps = {"01/01/14", 68, 25};
With this format, you just define the data elements values inside an array, using braces to create the array. When you define the array, it’s important that you list the data values in the same order that you defined the data elements in the struct declaration.
After assigning values to the data structure, you can reference the individual data elements using this format:
structname.dataname
where structname is the data structure variable that you instantiated, and dataname is the name of the specific data element defined in the structure. For example, to retrieve the outdoor temperature from the morning, you use the following:
morningTemps.outdoortemp
You can use this format to both assign data values to the data elements or to retrieve the data currently stored in the data element. For example, to retrieve the data element values stored in the data structure, you use code like this:
Serial.print("The indoor temperature on ");
Serial.print(morningTemps.date);
Serial.print(" is ");
Serial.println(morningTemps.indoortemp);
The other way to assign values to data elements in a data structure is to use separate assignment statements for each data element:
struct sensorinfo morningTemps;
strcpy(morningTemps.date, "01/01/14");
morningTemps.indoortemp = 68;
morningTemps.outdoortemp = 25;
This example uses the strcpy function to copy a text value into the character array, showing that you can use the data structure element anywhere you’d use a variable.
Let’s run through a quick example of using simple data structures in an Arduino sketch.
![]() Try It Yourself: Using Data Structures
Try It Yourself: Using Data Structures
In this example, you create a data structure to store multiple values to simulate a sensor reading, and then display the data structure values in your sketch output. To run the example, just follow these steps:
1. Open the Arduino IDE, and then enter this code in the editor window:
struct sensorinfo {
char date[9];
int indoortemp;
int outdoortemp;
} morningTemps;
void setup() {
Serial.begin(9600);
strcpy(morningTemps.date, "01/01/14");
morningTemps.indoortemp = 72;
morningTemps.outdoortemp = 25;
Serial.print("Today's date is ");
Serial.println(morningTemps.date);
Serial.print("The morning indoor temperature is ");
Serial.println(morningTemps.indoortemp);
Serial.print("The morning outdoor temperature is ");
Serial.println(morningTemps.outdoortemp);
}
void loop() {
}
2. Save the sketch as sketch0901.
3. Click the Upload icon to verify, compile, and upload the sketch to your Arduino unit.
4. Open the serial monitor window to view the output from the sketch.
The sketch0901 sketch creates a simple data structure, instantiates it in the morningTemps variable, and then assigns values to each element in the data structure. It then outputs the values of the data structure elements using the standard Serial.print and Serial.printlnfunctions. Figure 9.1 shows the output you should see in the serial monitor window.
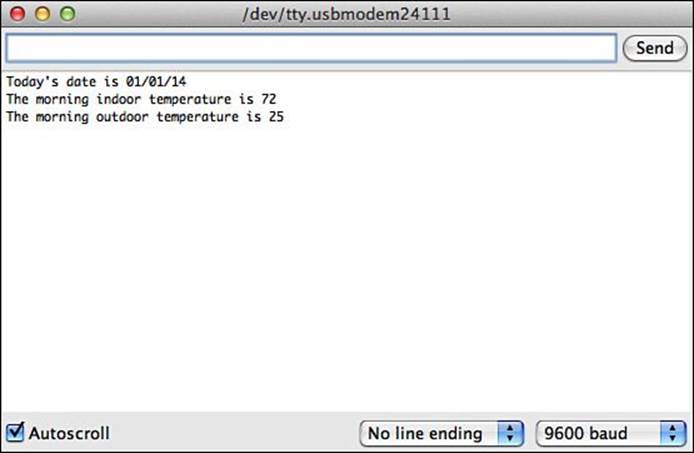
FIGURE 9.1 Output from running the sketch0901 sketch.
Manipulating Data Structures
The great thing about storing data in data structures is that now you can handle the data structure as a single object in your sketch code. For example, if you need to copy the data values from one sensorinfo object to another, instead of having to copy the individual data elements, you can copy the structure as a whole:
noonTemps = morningTemps;
The Arduino knows to copy the entire data structure from the morningTemps variable memory location into the noonTemps variable memory location. Here’s an example that shows this in action.
![]() Try It Yourself: Copying Data Structures
Try It Yourself: Copying Data Structures
In this example, you create a data structure, instantiate two occurrences of the data structure, and then copy one occurrence to the other. Here are the steps to do that:
1. Open the Arduino IDE, and then enter this code into the editor window:
struct sensorinfo {
char date[9];
int indoortemp;
int outdoortemp;
} morningTemps, noonTemps;
void setup() {
Serial.begin(9600);
strcpy(morningTemps.date, "01/01/14");
morningTemps.indoortemp = 72;
morningTemps.outdoortemp = 25;
noonTemps = morningTemps;
Serial.print("For date ");
Serial.println(noonTemps.date);
Serial.print("The indoor temperature is ");
Serial.println(noonTemps.indoortemp);
Serial.print("The outdoor temperature is ");
Serial.println(noonTemps.outdoortemp);
}
void loop() {
}
2. Save the file as sketch0902.
3. Click the Upload icon to verify, compile, and upload the sketch to your Arduino unit.
4. Open the serial monitor to run the sketch and view the output.
The data values assigned to the noonTemps data structure should be the same that you assigned to the morningTemps data structure. That shows the assignment statement copied the full data structure. Figure 9.2 shows the output you should see in the serial monitor.
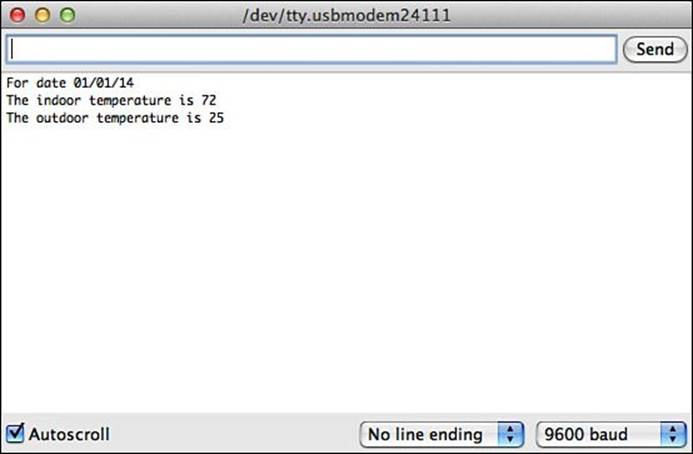
FIGURE 9.2 Output from running the sketch0902 sketch.
Arrays of Structures
You’re not limited to creating a single variable data structure; you can also create arrays of a data structure:
struct sensorinfo temps[10];
This creates an array of 10 instances of the sensorinfo data structure. You can then reference each individual instance of the data structure using the standard array index format:
temps[0].date = "01/01/14";
temps[0].indoortemp = 72;
temps[0].outdoortemp = 25;
temps[1].date = "02/01/14";
temps[1].indoortemp = 72;
temps[1].outdoortemp = 34;
Now you can easily create a loop to iterate through all the instances of your data structure, just changing the index value for each instance. With this technique, you can group as many data structure instances as you need to work with in your sketch. Let’s go through an example that demonstrates that.
![]() Try It Yourself: Using Data Structure Arrays
Try It Yourself: Using Data Structure Arrays
In this example, you build a sketch that stores simulated sensor data into an array of data structure variables. Here are the steps to follow:
1. Open the Arduino IDE, and then enter this code into the editor window:
int counter;
struct sensorinfo {
String date;
int outdoortemp;
int indoortemp;
};
void setup() {
Serial.begin(9600);
struct sensorinfo temps[11];
Serial.println("Loading sensor data...");
// creating sensor data and storing in data structure
for (counter = 1; counter <= 10; counter++) {
temps[counter].date = "01/" + String(counter) + "/14";
temps[counter].indoortemp = 65 + random(15);
temps[counter].outdoortemp = 20 + random(10);
}
Serial.println("Retrieving sensor data...");
for(counter = 1; counter <= 10; counter++) {
Serial.print("For date: ");
Serial.print(temps[counter].date);
Serial.print(" the indoor temp was: ");
Serial.print(temps[counter].indoortemp);
Serial.print(" and the outdoor temp was: ");
Serial.println(temps[counter].outdoortemp);
}
}
void loop() {
}
2. Save the file as sketch0903.
3. Click the Upload icon to verify, compile, and upload the sketch to your Arduino unit.
4. Open the serial monitor to run the sketch and view the output.
Figure 9.3 shows the output that you should see in your serial monitor.
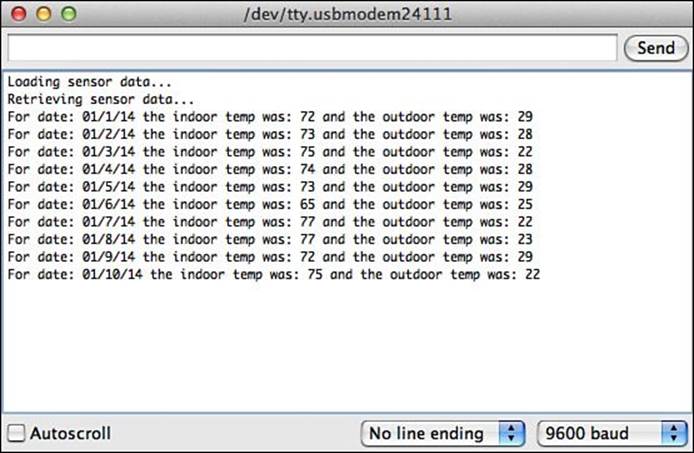
FIGURE 9.3 Output from the sketch0903 code.
Take some time to go over the code in the sketch0904 file; there are a few things to look at in this example. First, the example demonstrated how to use structure arrays, and it also used a String object as part of the data structure:
struct sensorinfo {
String date;
int outdoortemp;
int indoortemp;
};
Then, I used a little bit of trickery to generate a date for each sample:
temps[counter].date = "01/" + String(counter) + "/14";
Because I stored the date value as a String object in the data structure, the value assigned to it could be a String structure. I took advantage of the String method to automatically convert the counter variable integer value into a string value. Making it easy to incorporate thecounter value into the sample date.
Data structures take some time to get used to, but they’re well worth the effort because they can save you quite a bit of typing if you’re trying to work with lots of data in your sketches.
Working with Unions
Thanks to the C programming language, you can use one more data trick in your Arduino programs. Unions allow you to specify a variable that you can use to store a single value, but as more than one data type. This might sound confusing, and it can be somewhat odd trying to figure out just what’s going on with using unions in your sketches.
First, let’s take a look at how to create a union:
union {
// variable list
} unionname;
The variable list used in the union differs from the variable list you use in a defining a data structure. Instead of defining multiple values, it represents the different data types the union can use to store a single value. The Arduino creates only a single memory location for the union, reserving only enough memory to store the largest data type specified.
The union variable only stores one data value, using the data type of the variable you specify. Let’s take a look at an example of using a union. In this example, we’ll assume we have a project with two input sensors. One sensor is a digital input that returns integer values. The other sensor is an analog input that returns floating-point values.
To define the union, you use this format:
union {
int digitalInput;
float analogInput;
} sensorInput;
In this example, we don’t have to worry about storing both sensor values at the same time; only one sensor will return a value at a time.
You can store the either the digital or analog input value using the sensorInput union variable. However, whatever one you store, you have to keep track to make sure that you retrieve the value from the union using the same data type. For example:
sensorInput.digitalInput = 72;
int intValue = sensorInput.digitalInput;
Serial.print("The digital input reading is ");
Serial.println(sensorInput.digitalInput);
If you store the value using the digitalInput union data element, you must retrieve it using the digitalInput data element. If you try to retrieve the value using the analogInput variable, you’ll get a value, but it won’t be the correct format.
The trick is that the union variable doesn’t contain two separate values; it just points to one memory location that’s large enough to hold the largest of the defined data types. If you store the value as an integer and try to retrieve it as a float data type, you won’t get the correct result.
Let’s go through an example to help reinforce this.
![]() Try It Yourself: Experimenting with Unions
Try It Yourself: Experimenting with Unions
In this exercise, you store a value into a union that supports two data types and then try to retrieve the value using both data types. Here are the steps to follow for the experiment:
1. Open the Arduino IDE, and then enter this code into the editor window:
union {
int digitalInput;
float analogInput;
} sensorInput;
void setup() {
Serial.begin(9600);
Serial.println("Saving a digital value...");
sensorInput.digitalInput = 72;
Serial.print("The correct digital input value is: ");
Serial.println(sensorInput.digitalInput);
Serial.print("The incorrect analog input value is: ");
Serial.println(sensorInput.analogInput);
Serial.println("Saving an analog value...");
sensorInput.analogInput = 5.25;
Serial.print("The incorrect digital input value is: ");
Serial.println(sensorInput.digitalInput);
Serial.print("The correct analog input value is: ");
Serial.println(sensorInput.analogInput);
}
void loop() {
}
2. Save the file as sketch0904.
3. Click the Upload icon to verify, compile, and upload the sketch to your Arduino unit.
4. Open the serial monitor tool to run the sketch and view the output.
Figure 9.4 shows the output you should see from running the sketch0904 code.
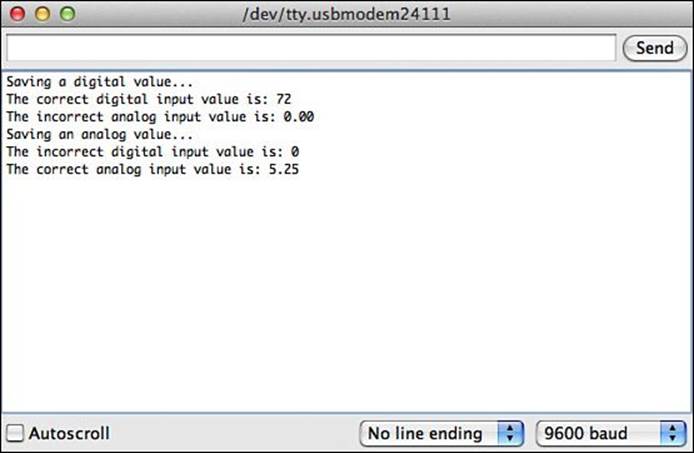
FIGURE 9.4 Output from the sketch0904 code.
When you store an integer value into the union, the digitalInput variable contains the correct value. However, you can still retrieve the analogInput variable value, but it contains an incorrect value. Likewise, when you store a float value in the union, the analogInput variable contains the correct value, and the digitalInput variable contains an incorrect value.
Unions can come in handy, but you have to be very careful when using them in your Arduino sketches.
Summary
This hour covered some of the more complex data handling topics in the Arduino programming language. Data structures allow us to group multiple variables together into a single object that we can handle in our sketches. You can copy structures as a single object, easily copying multiple data elements in one statement. You can also create an array of data structures, which allows you to iterate through all the instantiated values. This hour also discussed using unions in your Arduino sketches. A union allows you to store multiple data types in a single memory location, as long as you retrieve the data using the same data type as you store it.
The next hour covers how to create your own functions for your Arduino sketches. By creating functions, you can place code that you commonly use in your sketches in one place to help cut down on typing.
Workshop
Quiz
1. If you have a set of data values that you want to handle together, what’s the best way to store them and access them in your sketch?
A. Use a union
B. Use an array
C. Use a data structure
D. Use multiple variables
2. If you store a value in a union using one data type and try to retrieve it using another data type, you’ll get an error message. True or false?
3. How do you define an array of structures?
Answers
1. C. A data structure is designed to allow you to handle a group of variable values as a single object in your sketches. That makes it easier to manage the data that you have to work with.
2. False. The Arduino will retrieve the value stored in memory and try to interpret the value using the other data type, which won’t give a meaningful answer. Be careful when using unions; it’s easy to make a mistake.
3. When you instantiate a new structure variable, you place the size of the array in square brackets after the array variable:
struct sensorinfo temps[20];
Q&A
Q. Is there a limit to how many data elements I can place in a data structure?
A. Not in theory. You can store as many data elements in a structure as necessary. Just remember that they each take up space in memory, and there is a limit to how much memory is in the Arduino.
Q. Can I use a union to convert a value from one data type to another?
A. No. The Arduino doesn’t convert the data type stored in the memory location to the type you request. It assumes that the data stored in the memory location is in the proper format as the request and interprets it as such. If the data type is not correct, the resulting value will be incorrect.
All materials on the site are licensed Creative Commons Attribution-Sharealike 3.0 Unported CC BY-SA 3.0 & GNU Free Documentation License (GFDL)
If you are the copyright holder of any material contained on our site and intend to remove it, please contact our site administrator for approval.
© 2016-2026 All site design rights belong to S.Y.A.