Sams Teach Yourself Arduino Programming in 24 Hours (2015)
Part II: The C Programming Language
Hour 10. Creating Functions
What You’ll Learn in This Hour:
![]() How to create your own functions
How to create your own functions
![]() Retrieving data from functions
Retrieving data from functions
![]() Passing data to functions
Passing data to functions
![]() Using functions in your Arduino sketches
Using functions in your Arduino sketches
While writing Arduino sketches, you’ll often find yourself using the same code in multiple locations. With just a small code snippet, it’s usually not that big of a deal. However, rewriting large chunks of code multiple times in your Arduino sketches can get tiring. Fortunately, Arduino provides a way to help you out by supporting user-defined functions. You can encapsulate your C code into a function and then use it as many times as you want, anywhere in your sketch. This hour discusses the process of creating your own Arduino functions, and demonstrates how to use them in other Arduino sketch applications.
Basic Function Use
As you start writing more complex Arduino sketches, you’ll find yourself reusing parts of code that perform specific tasks. Sometimes it’s something simple, such as retrieving a value from a sensor. Other times, it’s a complicated calculation used multiple times in your sketch as part of a larger process.
In each of these situations, it can get tiresome writing the same blocks of code over and over again in your sketch. It would be nice to just write the block of code once and then be able to refer to that block of code anywhere in your sketch without having to rewrite it.
Arduino provides a feature that enables you to do just that. Functions are blocks of code that you assign a name to and then reuse anywhere in your code. Anytime you need to use that block of code in your sketch, you simply use the function name you assigned to it (referred to as calling the function). This section describes how to create and use functions in your Arduino sketches.
Defining the Function
The format that you use to create a function in Arduino doesn’t use a keyword as some other programming languages. Instead, you declare the data type that the function returns, along with the function name with parentheses:
datatype funcname() {
// code statements
}
The funcname defines the name of the function that you use to reference it in your Arduino sketch. Function names follow the same rules as variable names, although often developers like to start functions with capital letters to help differentiate them from variables. The datatype defines the data type of the value the function returns (more on that later).
You must surround the code statements that you include in the function with opening and closing braces. This defines the boundaries of the code that the Arduino runs for the function.
Watch Out: Placing the Function Definition
Make sure that you define the function outside of the setup and loop functions in your Arduino sketch code. If you define the function inside another function, the inner function becomes a local function, and you can’t use it outside of the outer function.
To create a function that doesn’t return any data values to the calling program, you use the void data type for the function definition:
void MyFunction() {
Serial.println("This is my first function");
}
After you define the function in your Arduino sketch, you’re ready to use it.
Using the Function
To use a function that you defined in your sketch, just reference it by the function name you assigned, followed by parentheses:
void setup() {
Serial.begin(9600);
MyFunction();
Serial.println("Now we're back to the main program");
}
When the Arduino runs the sketch and gets to the function line, it jumps to the function code, runs it, and then returns back to the next line in main program to continue processing. Let’s take a look at an example that demonstrates how this works.
![]() Try It Yourself: Using Functions
Try It Yourself: Using Functions
For this example, you create a function in your Arduino sketch, and then use it in the setup function code for the sketch. To create the example, follow these steps:
1. Open the Arduino IDE, and enter this code into the editor window:
void setup() {
Serial.begin(9600);
Serial.println("This is the start of the main program");
MyFunction();
Serial.println("Now we're back to the main program");
MyFunction();
Serial.println("This is the end of the test");
}
void loop() {
}
void MyFunction() {
Serial.println("This is the code from the function");
}
2. Save the sketch code as sketch1001.
3. Click the Upload icon to verify, compile, and upload the sketch to your Arduino unit.
4. Start the serial monitor to run and view the output from your sketch.
The example creates a simple function called MyFunction that outputs a line of text to the serial monitor. The setup function displays some text so that you know that it’s starting, calls the function, and then displays some more text out so that you know the sketch returned back to the main program. If all goes well, you should see the output shown in Figure 10.1.
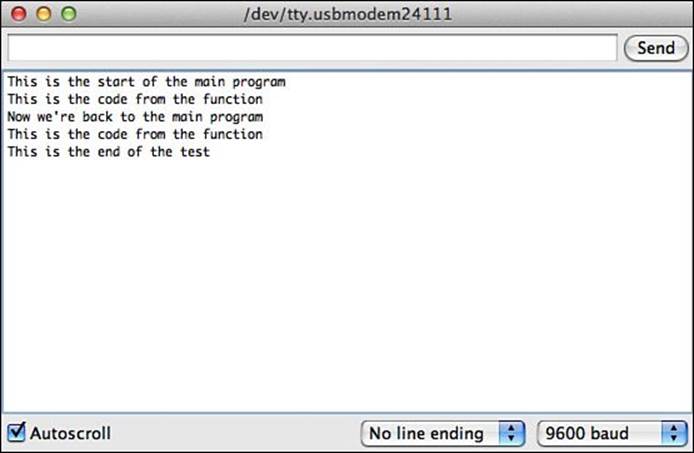
FIGURE 10.1 The output from the sketch1001 code.
Congratulations, you’ve just created a function. If you have to repeat a long message in your sketch, such as help information, you can create a function to do that, and just call the sketch every time you need the output.
Returning a Value
You can do a lot more in functions than just output text. Functions can process any statements that the main program can. This allows you to create functions to process repetitive data calculations, and return a result from the calculations.
To return a value from the function back to the main program, you end the function with a return statement:
return value;
The value can be either a constant numeric or string value, or a variable that contains a numeric or string value. However, in either case, the data type of the returned value must match the data type that you use to define the function:
int MyFunction2() {
return 10 * 20;
}
If you use a variable to hold the returned value, you must declare the variable data type as the same data type used to declare the function:
float MyFunction3() {
float result;
result = 10.0 / 2.0;
return result;
}
To retrieve the value returned from a function, you must assign the output of the function to a variable in an assignment statement:
value = MyFunction3();
Whatever data value the function returns is assigned to the value variable in your sketch.
Let’s take a look at an example of using a return value from a function in an Arduino program.
![]() Try It Yourself: Returning a Value from a Function
Try It Yourself: Returning a Value from a Function
In this example, you create a function to perform a mathematical operation, and then return the value back to the main program. Here are the steps to do that:
1. Open the Arduino IDE and enter this code into the editor window:
void setup() {
int value;
Serial.begin(9600);
value = calc();
Serial.print("The result from the function is ");
Serial.println(value);
}
void loop() {
}
int calc() {
int result;
result = 2 * 2 + 10;
return result;
}
2. Save the sketch as sketch1002.
3. Click the Upload icon to verify, compile, and upload the sketch to your Arduino unit.
4. Open the serial monitor tool to view the output from the sketch.
This example sketch creates a simple function called calc, which performs a mathematical calculation and then returns the value back to the program as an integer data type. The main sketch code in the setup function calls the calc function and assigns the returned value to the value variable. When you run this sketch, you should get the output shown in Figure 10.2.
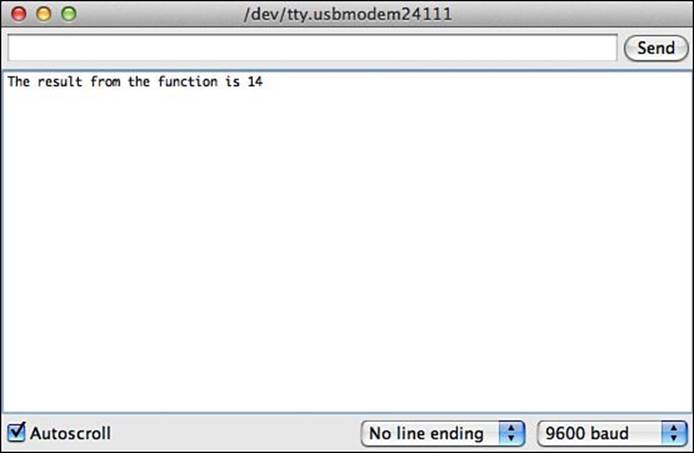
FIGURE 10.2 The output from running the sketch1002 code.
Returning a value from a function is handy, but you’ll usually want to be able to perform some type of operation in the function to allow values to also be passed into the function. The next section shows how to do that.
Passing Values to Functions
There’s just one more piece to making the most use out of functions in your Arduino sketches. Besides returning a value from a function, you’ll most likely want to be able to pass one or more values into the function for processing.
In the main program code, you specify the values passed to a function in what are called arguments, specified inside the function parentheses:
value = area(10, 20);
The 10 and 20 value arguments are listed separated by a comma. If you just have one argument to pass, you don’t use the comma.
To retrieve the arguments passed to a function, the function definition must declare what are called parameters. You do that in the main function declaration line:
int area(int width, int height) {
The parameter definitions define both the data type of the parameter, and a variable name. The argument data values are assigned to the parameter variable names in the same order that they’re listed in the function declaration. In this example, therefore, the width variable is assigned the value 10 and the height variable is assigned the value 20 inside the function code.
You can use the parameter variables inside the function just as you would any other variable:
int area(int width, int height) {
int result = width * height;
return result;
}
After you define the function with parameters, you can use the function as often as you need in your sketch code, passing different argument values to the function to retrieve different results. Let’s take a look at an example of doing just that.
![]() Try It Yourself: Passing Arguments to Functions
Try It Yourself: Passing Arguments to Functions
In this example, you create a function that you can use multiple times in your Arduino sketch, passing different argument values and retrieving different results. To try out this example, follow these steps:
1. Open the Arduino IDE and enter this code into the editor window:
void setup() {
int returnValue;
Serial.begin(9600);
Serial.print("The area of a 10 x 20 size room is ");
returnValue = area(10, 20);
Serial.println(returnValue);
Serial.print("The area of a 25 x 15 size room is ");
returnValue = area(25, 15);
Serial.println(returnValue);
}
void loop() {
}
int area(int width, int height) {
int result = width * height;
return result;
}
2. Save the sketch as sketch1003.
3. Click the Upload icon to verify, compile, and upload the sketch to your Arduino unit.
4. Open the serial monitor to view the output from the sketch.
The area function retrieves the two parameters passed to the function, multiplies them, and then assigns the result to the result variable. The area function then uses the return statement to return the result back to the calling code. The setup function code uses the area function twice, with two different sets of values. Figure 10.3 shows the result you should see in your serial monitor after running the sketch.
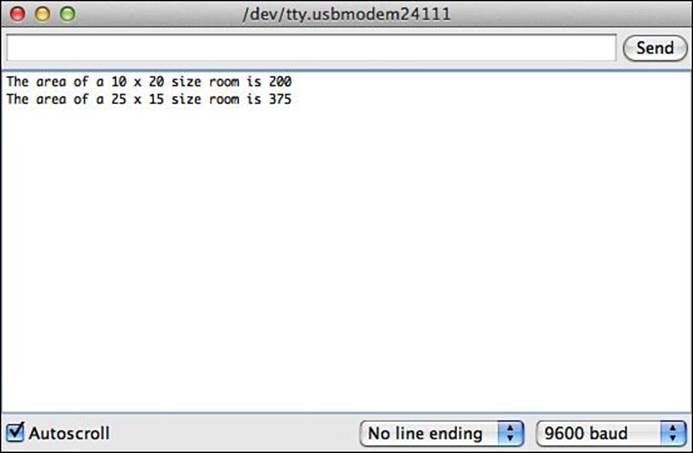
FIGURE 10.3 The serial monitor output from running the sketch1003 code.
Now you have all the tools you need to create and run your own functions in your Arduino sketches. You’ll want to know about just a couple of other items to help make your life a little easier when working with functions. One of those is how to declare variables in your sketch, which the next section discusses.
Handling Variables in Functions
One thing that causes problems for beginning sketch writers is the scope of a variable. The scope is where the variable can be referenced within the sketch. Variables defined in functions can have a different scope than regular variables. That is, they can be hidden from the rest of the sketch.
Functions use two types of variables:
![]() Global variables
Global variables
![]() Local variables
Local variables
The following sections describe how to use both types of variables in your functions.
Defining Global Variables
Global variables are variables that are valid anywhere within the sketch code. If you define a global variable in the main section of your sketch, outside of the functions, you can retrieve its value inside any function in the sketch.
Let’s take a look at a simple example of defining a global variable:
const float pi = 3.14;
void setup() {
Serial.begin(9600);
float area;
Serial.print("The area of a circle with radius of 5 is ");
area = circleArea(5);
Serial.println(area);
Serial.print("The value of pi used for this calculation was ");
Serial.println(pi);
}
void loop() {
}
float circleArea(int radius) {
float result = pi * radius * radius;
return result;
}
Notice in the sketch, the pi variable is defined before any of the functions are defined. That makes it a global variable, and you can use it anywhere in the sketch code, including the setup and loop functions.
This can be a dangerous practice, however, especially if you intend to use your function in different sketches. The function code assumes the global variable exists, and will fail if it doesn’t.
Another danger of using global variables is if you use a global variable inside a function for a different purpose than what you use it outside of the function. If the function changes the global variable value and other functions don’t expect that, it might cause problems in your sketch. Here’s an example of this problem:
int temp, value;
void setup() {
int result;
Serial.begin(9600);
temp = 4;
value = 6;
result = func1();
Serial.print("The result is ");
Serial.println(result);
Serial.print("The value of temp is ");
Serial.println(temp);
}
void loop() {
}
int func1() {
temp = value + 5;
return temp * 2;
}
In this example, the temp and value variables are defined as global variables, and can be used in any function in the sketch. The temp variable was used in both the setup and func1 function, but for different purposes.
In the setup function, the temp variable is set to a static value of 4; however, it’s also used in the func1 function as a temporary variable, changing the value for a calculation. When the sketch cod returns back to the setup function, the value stored in the temp variable is now different. If you run this example in the serial monitor, you’ll get the following output:
The result is 22
The value of temp is 11
The change made to the temp variable in the func1 function affected the value in the entire sketch, not just in the func1 function. If you were expecting the temp variable to still be set to 4, you’d run into a problem with your code.
If you do need to use temporary variables inside a function, there’s a better way to do that than using global variables, as shown in the next section.
Declaring Local Variables
Instead of using global variables in functions, which run the risk of conflicting with other functions, you can use a local variable. You declare a local variable inside the function code itself, separate from the rest of the sketch code:
int func1() {
int calc;
calc = value + 5;
return calc * 2;
}
Once you declare the calc variable as a local variable inside the function, you can use it only inside the function where you declare it. If you try using it in another function, you’ll get an error:
sketch10test.ino: In function 'void setup()':
sketch10test:12: error: 'calc' was not declared in this scope
Another interesting feature of local variables is that you can override a global variable with a local variable:
int temp, value;
void setup() {
int result;
Serial.begin(9600);
temp = 4;
value = 6;
result = func1();
Serial.print("The result is ");
Serial.println(result);
Serial.print("The value of temp is ");
Serial.println(temp);
}
void loop() {
}
int func1() {
int temp;
temp = value + 5;
return temp * 2;
}
In this example, the temp variable is declared a second time in the func1 function as a local variable. That makes it separate from the temp variable that is declared as a global variable. Now if you run this sketch, you’ll get the following output:
The result is 22
The value of temp is 4
So, the original value assigned to the temp global variable remained intact after the function.
Watch Out: Overriding Global Variables
You can override a global variable with a local variable, but it’s not a good practice. When you use the same variable name for both a global and local variable, it can make trying to follow the sketch extremely difficult.
Calling Functions Recursively
One feature that local function variables provide is self-containment. A self-contained function doesn’t use any resources outside of the function other than whatever variables the sketch passes to it as arguments.
This feature enables the function to be called recursively, which means that the function calls itself to reach an answer. Usually, a recursive function has a base value that it eventually iterates down to. Many advanced mathematical algorithms use recursion to reduce a complex equation down one level repeatedly until they get to the level defined by the base value.
Let’s walk through an example that uses a recursive function to calculate the factorial of a number.
![]() Try It Yourself: Creating a Factorial Function
Try It Yourself: Creating a Factorial Function
A factorial of a number is the value of the preceding numbers multiplied with the number. So, to find the factorial of 5, you perform the following equation:
5! = 1 * 2 * 3 * 4 * 5 = 120
Using recursion, the equation is reduced down to the following format:
x! = x * (x – 1)!
Or in English: The factorial of x is equal to x times the factorial of x – 1. By definition, the factorial of 1 is 1, so that’s the base value the recursion will stop at. This can be expressed in a simple recursive function:
int factorial(int x) {
int result;
if (x == 1)
return 1;
else {
result = x * factorial(x – 1);
return result;
}
}
Now just follow these steps to use that function in a sketch:
1. Open the Arduino IDE and enter this code into the editor window:
void setup() {
Serial.begin(9600);
int fact, value;
fact = factorial(5);
Serial.print("The factorial of 5 is ");
Serial.println(fact);
fact = factorial(7);
Serial.print("The factorial of 7 is ");
Serial.println(fact);
}
void loop() {
}
int factorial(int x) {
int result;
if (x == 1)
return 1;
else {
result = x * factorial(x - 1);
return result;
}
}
2. Save the sketch code as sketch1004.
3. Click the Upload icon to verify, compile, and upload the sketch into your Arduino unit.
4. Open the serial monitor to view the output of the sketch.
Figure 10.4 shows the output that you should see in the serial monitor.
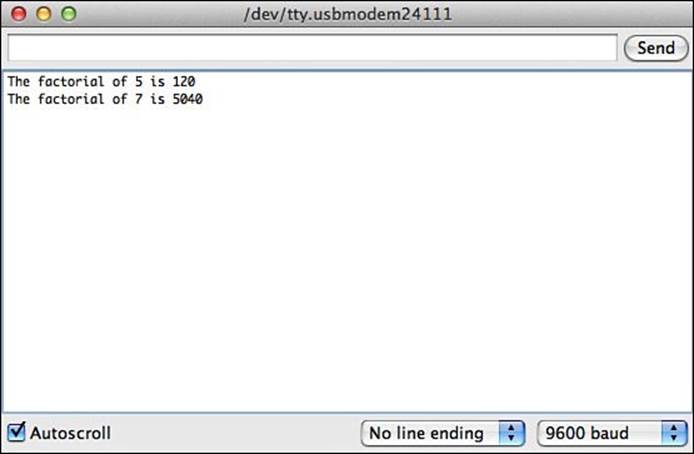
FIGURE 10.4 Output from running the sketch1004 code.
The factorial recursive function iterates through the function until it gets to the base value for the factorial and then returns the final result back to the main calling program. Because the function is completely self-contained, you can use the factorial function in any sketch that requires a factorial calculation.
Summary
This hour showed how to create and use functions in your Arduino sketches. You can define functions to help reduce the amount of coding you have to repeat in your sketch. You can define a function to return value back to the main program, or it can just return back with no return value. You can also pass one or more argument values to a function to be used inside the function code.
The next hour covers one of the more complex features of C programming that you can also use in your Arduino programs. C pointers can get confusing, but once you get the hang of them, they can come in handy in your sketches.
Workshop
Quiz
1. Which format is correct for defining a function in an Arduino sketch?
A. def MyFunction()
B. function myFunction()
C. MyFunction()
D. void MyFunction()
2. You can use a variable name as both a global variable and a local variable and the values will be stored in the same location. True or false?
3. What feature of functions can you use to reduce a complex formula down to multiple iterations of decreasing complexity to return an answer?
Answers
1. D. In the Arduino programming language, you must define the data type the function returns when you declare the function. The void data type indicates the function doesn’t return a value.
2. False. The Arduino will reserve a separate memory location for the local variable from the global variable, and will treat the two variables as separate objects.
3. Recursion allows a function to call itself with a subset of the equation, reducing the problem down to a base result. Once the recursion reaches the base result, the function returns the answers back through the iterations to return the answer.
Q&A
Q. Can a function call other functions inside the function code?
A. Yes, you can call other functions from inside a function.
Q. Is there a limit to how many times a recursive function can call itself?
A. No, in the next hour, ion can continue on as many times as necessary. Of course, this can lead to an endless loop of recursion, so be careful to make sure that your recursive functions have a base value to end on.
Q. Can you write a library to store common functions and then reference that library in any sketch?
A. Yes, this is called a function library. You’ll learn how to create and use a function library later on in Hour 13, “Using Libraries.”
All materials on the site are licensed Creative Commons Attribution-Sharealike 3.0 Unported CC BY-SA 3.0 & GNU Free Documentation License (GFDL)
If you are the copyright holder of any material contained on our site and intend to remove it, please contact our site administrator for approval.
© 2016-2026 All site design rights belong to S.Y.A.