Sams Teach Yourself Arduino Programming in 24 Hours (2015)
Part II: The C Programming Language
Hour 7. Programming Loops
What You’ll Learn in This Hour:
![]() Why we need loops
Why we need loops
![]() Exploring the while loop
Exploring the while loop
![]() The do-while loop
The do-while loop
![]() Using the for loop
Using the for loop
![]() Controlling loops
Controlling loops
In Hour 6, “Structured Commands,” you saw how to manipulate the flow of an Arduino sketch by checking the values of variables using if and switch statements. In this hour, we look at some more structured commands that control the flow of your Arduino sketches. You’ll learn how to loop through a set of commands until an indicated condition has been met. This hour discusses and demonstrates the while, do-while, and for Arduino looping statements.
Understanding Loops
You’ve already seen one type of loop used by the Arduino. By default, the Arduino program uses the loop function to repeat a block of code statements indefinitely. That allows you to write an application that continues to repeat itself as long as the power to the Arduino is on.
Sometimes, though, in your Arduino sketches you’ll find yourself needing to repeat other operations, either until a specific condition has been met, or just repeating a set number of times. An example of this is setting a group of digital ports for input or output mode.
You could just write out all of the pinMode function lines individually, but that could get cumbersome:
void setup() {
pinMode(0, INPUT);
pinMode(1, INPUT);
pinMode(2, INPUT);
pinMode(3, INPUT);
pinMode(4, INPUT);
pinMode(5, INPUT);
pinMode(6, INPUT);
pinMode(7, INPUT);
pinMode(8, INPUT);
pinMode(9, INPUT);
pinMode(10, INPUT);
pinMode(11, INPUT);
pinMode(12, INPUT);
pinMode(13, INPUT);
}
This code would certainly accomplish the task of setting all the digital ports for input, but it sure takes a lot of code to write!
Instead of having to type out each pinMode line individually, the Arduino programming language provides a way for you to use a single pinMode statement and then run it multiple times for all the lines you want to initialize.
The Arduino programming language provides three types of loop statements to help us simplify repetitive tasks like that:
![]() The while statement
The while statement
![]() The do-while statement
The do-while statement
![]() The for statement
The for statement
This hour covers each of these statements, plus a couple of other features that come in handy when using loops. First, let’s take a look at how to use the while statement.
Using while Loops
The most basic type of loop is the while statement. The while statement iterates through a block of code, as long as a specified condition evaluates to a Boolean true value. The format of the while statement is as follows:
while (condition) {
code statements
}
The condition in the while statement uses the exact same comparison operators that the if-then statement uses (see Hour 6). The idea is to check the value of a variable that is changed inside the while code block. That way your code controls exactly when the loop stops.
Let’s run a quick example that demonstrates how the while statement works in an Arduino program.
![]() Try It Yourself: Experimenting with the while Statement
Try It Yourself: Experimenting with the while Statement
In this example, you create a simple while loop to display an output line 10 times. Just follow these steps:
1. Open the Arduino IDE, and then enter this code in the editor window:
void setup() {
Serial.begin(9600);
int counter = 1;
while(counter < 11) {
Serial.print("The counter value is ");
Serial.println(counter);
counter = counter + 1;
}
Serial.println("The loop has ended");
}
void loop() {
}
2. Save the sketch as sketch0701.
3. Click the Upload icon on the toolbar to verify, compile, and upload the sketch to your Arduino.
4. Open the serial monitor to view the output of your sketch.
If all goes well, you should see the output shown in Figure 7.1.
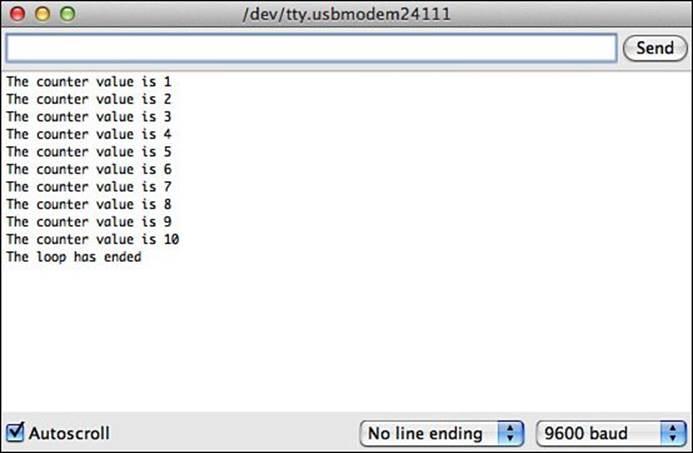
FIGURE 7.1 The output from the sketch0701 sketch.
The loop for the while statement continues as long as the counter variable value is less than 11. Once the counter value is 11, the while statement condition becomes false, so the while loop stops.
Watch Out: Endless Loops
Notice that the counter variable value is changed inside the loop. This is a crucial element to using the while statement. If the variable used in the condition doesn’t change, your code will get stuck in an endless loop and never exit!
Using do-while Loops
The while statement always checks the condition first, before entering into the loop code block statements. There may be times when you’d like to run the code block statements first, before checking the condition. This is where the do-while loop statement comes in handy.
The format of the do-while statement is as follows:
do {
code statements
} while (condition);
When the Arduino runs the do-while statement, it always runs the statements inside the code block first, before evaluating the condition comparison. That means the code is guaranteed to run at least one time, even if the condition is initially false. Let’s look at an example of using a do-while statement.
![]() Try It Yourself: Using the do-while Loop
Try It Yourself: Using the do-while Loop
In this example, you create an Arduino program that uses a do-while statement to loop through a series of statements a set number of times.
1. Open the Arduino IDE, and then enter this code in the editor window:
void setup() {v Serial.begin(9600);
int counter = 1;
do {
Serial.print("The value of the counter is ");
Serial.println(counter);
counter = counter + 1;
} while (counter < 1);
}
void loop() {
}
2. Save the sketch as sketch0702.
3. Click the Upload icon on the toolbar to verify, compile, and upload the sketch to your Arduino.
4. Open the serial monitor to view the output of your sketch.
If all goes well, you should see the output shown in Figure 7.2.
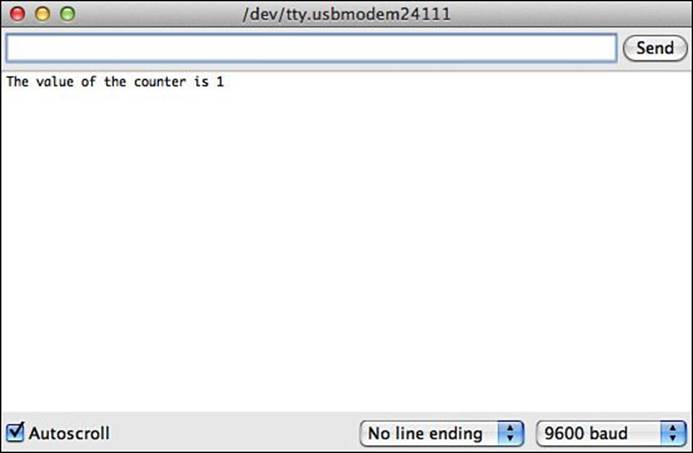
FIGURE 7.2 The output from the sketch0702 sketch.
The condition specified for the do-while statement checks to see whether the counter variable value is less than 1. Because the assignment statement sets the initial value of the counter variable to 1, the very first time the condition is checked, it returns a false value. However, thedo-while loop has already run the statements within the code block before the check, so you’ll see output in the serial monitor.
Using for Loops
The while and do-while statements are great ways to iterate through a bunch of data, but they can be a bit cumbersome to use. In both of those statements, you have to make sure that you change a variable value inside the code block so that the loop condition stops when needed.
The Arduino programming language supports an all-in-one type of looping statement called the for statement. The for statement keeps track of the loop iterations for us automatically.
Here’s the basic format of the for statement:
for(statement1; condition; statement2) {
code statements
}
The first parameter, statement1, is a C language statement that’s run before the loop starts. Normally this statement sets the initial value of a counter used in the loop.
The second parameter, condition, is the comparison that’s evaluated at the start of each loop. As long as the condition evaluates to a true value, the for loop processes the code statements inside the code block. When the condition evaluates to a false value, the Arduino drops out of the loop and continues on in the program code.
The last parameter, statement2, is a C language statement that’s run at the end of each loop. This is normally set to change the value of a counter used in the comparison condition.
A simple example of a for statement would look like this:
for(i = 0; i < 14; i++) {
pinMode(i, INPUT);
}
These three lines of code just replaced the functionality of having to write out all 14 lines of pinMode() statements to set all the digital input lines for input. Now that’s handy!
Here’s another example of using a for statement in an Arduino program.
![]() Try It Yourself: Using the for Statement
Try It Yourself: Using the for Statement
Let’s use a for statement to help simplify setting multiple digital ports for input mode. Just follow these steps:
1. Open the Arduino IDE, and then enter this code in the editor window:
void setup() {
Serial.begin(9600);
int counter;
for(counter = 0; counter < 14; counter++) {
Serial.print("The counter value is ");
Serial.println(counter);
}
Serial.println("This is the end of the loop");
}
void loop () {
}
2. Save the sketch as sketch0703.
3. Click the Upload icon to verify, compile, and upload the sketch to your Arduino unit.
4. Open the serial monitor tool to view the sketch output.
You should see the output shown in Figure 7.3.
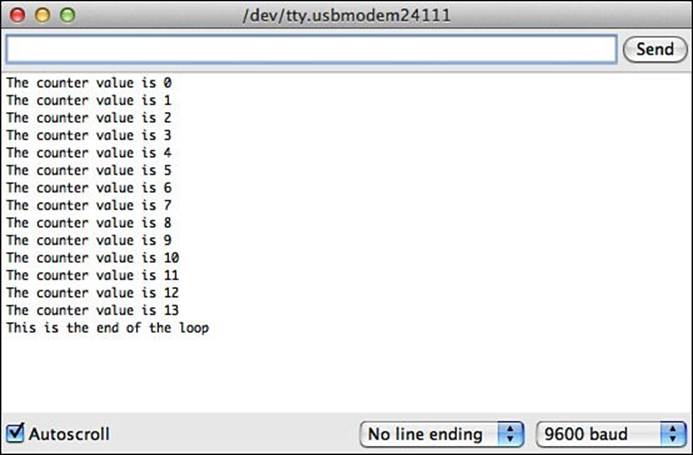
FIGURE 7.3 Output from running the sketch0703 sketch.
Now things are starting to get fancy. You no longer have to keep track of a separate counter variable inside the code block; the for statement does all that for you.
Using Arrays in Your Loops
As you can tell, one thing that loops are great at is processing a series of multiple values. However, it won’t do you any good to loop through multiple values if all the data is stored in different variables.
Fortunately, the C programming language provides a way to reference multiple values using a single variable name, thus enabling you to easily iterate through the different values in a loop.
This section discusses how to use array variables in your loops to help simplify handling large amounts of data.
Creating Arrays
An array stores multiple data values of the same data type in a block of memory, allowing you to reference the variables using the same variable name. The way it does that is with an index value. The index value points to a specific data value stored in the array.
The format to declare an array variable is as follows:
datatype variablename[size];
The datatype keyword is a standard data type used to declare the variable, such as int or float. The size is a numeric value that indicates how many data values of the specified data type the array will hold. Here’s an example of declaring an array of integer values:
int myarray[10];
The statement declares an array variable called myarray that can store up to 10 integer data values in memory. By default, the array data values are empty.
You can reference each data value location by specifying the index with the array variable using square brackets:
myarray[0] = 20;
myarray[1] = 30;
myarray[2] = 40;
myarray[3] = 50;
myarray[4] = 100;
These statements assign values to the first five data value locations in the myarray array variable.
Watch Out: Array Indexes
Note that the first data value location in an array is assigned the index value 0.
As with a normal variable, you can declare an array variable and assign it values in a single statement, like this:
int myarray[10] = {20, 30, 40, 50, 100};
This statement declares the myarray array variable to hold up to 10 integer values, and assigns values to the first 5 data value locations (index values 0 through 4). The braces are required to indicate the values all belong to the same array.
Similarly, to retrieve a specific data value stored in the array variable, you just reference the appropriate index location value:
area = width * myarray[0];
The Arduino retrieves the data value stored in the specified index location and uses it in the equation for the assignment statement.
Using Loops with Arrays
Besides just using numbers for the array index, you can also use a variable that stores an integer value for the index value in an array:
index = 4;
area = width * myarray[index];
Now the Arduino first retrieves the value assigned to the index variable, and then it uses that value as the index location for the myarray array variable. It retrieves the value stored at that data value location for the equation in the assignment statement.
Now that you’re using a variable as the index, the next step in the process is to change the index value in a loop so that you can iterate through all the data values stored in an array, as shown in this code snippet:
int values[5] = {10, 20, 30, 40, 50};
for(int counter = 0; counter < 5; counter++) {
Serial.print("One value in the array is ");
Serial.println(values[counter]);
}
Note that the for loop counter must start with the value 0, since the array index starts at 0. The condition check in the for loop must also stop before you get to the end of the array; otherwise, the program will return odd values, because it will continue reading memory locations thinking they’re part of the array.
Determining the Size of an Array
You may run into situations where you don’t know exactly how many data values are in an array variable but you still need to iterate through all of them. This is where the C language sizeof function comes in handy.
The Arduino language sizeof function returns the number of bytes used to store an object. You can use it to determine how many bytes an array variable takes in memory, and then with a little math, you can determine just how many data values are currently stored in the array:
size = sizeof(myarray) / sizeof(int);
The sizeof(int) returns the number of bytes the system uses to store an integer data type. By dividing the total size of the array by the size of a single integer value, you can determine just how many data elements are in the array. For example, in the previous for loop example, you could use the following:
for(counter = 0; counter < (sizeof(value)/sizeof(int)); counter++) {
The Arduino will only iterate through the number of data elements defined for the array. This is a common practice in the C programming world, and can save you lots of calculations in your Arduino code.
Using Multiple Variables
Another trick often used in for statements is the ability to track multiple counters in a single statement. Instead of initializing just a single counter variable in the for statement, you can initialize multiple variables, separated with a comma. Likewise, you can change the values of all those variables at the end of the loop. The format to do that looks like this:
int a,b;
for (a = 0, b = 0; a < 10; a++, b++) {
Serial.print("One value is ");
Serial.print(a);
Serial.print(" and the other value is ");
Serial.println(b);
}
This for statement uses two counters: the a variable and the b variable. At the end of each iteration, the program increments both variables, but the condition only checks the value of the a variable to determine when to stop the loop.
Nesting Loops
Another popular use of loops is called nesting. Nesting loops is when you place one loop inside another loop, each one controlled by a separate variable.
The trick to using inner loops is that you must complete the inner loop before you complete the outer loop. The closing bracket for the inner loop must be contained within the outer loop code:
int a,b;
for(a = 0; a < 10; a++) {
for(b = 0; b < 10; b++) {
Serial.print("One value is ");
Serial.print(a);
Serial.print(" and the other value is ");
Serial.println(b);
} // closing brace for the 'b' loop
} // closing brace for the 'a' loop
If you forget to close out the inner loop, you won’t get the results that you planned.
Controlling Loops
Once you start a loop, it will usually continue until the specified condition check becomes false. You can change that behavior using two different types of statements:
![]() The break statement
The break statement
![]() The continue statement
The continue statement
Let’s take a look at how each of these statements works.
The break Statement
You use the break statement when you need to break out of a loop before the condition would normally stop the loop. Let’s take a look at an example of how this works.
![]() Try It Yourself: Using the break Statement
Try It Yourself: Using the break Statement
The break statement allows you to “jump out” of a loop before it would normally terminate. To test that, run through this demo:
1. Open the Arduino IDE, and then enter this code in the editor window:
void setup() {
Serial.begin(9600);
int i;
for(i = 0; i <= 20; i++) {
if (i == 15)
break;
Serial.print("Currently on iteration: ");
Serial.println(i);
}
Serial.println("This is the end of the test");
}
void loop() {
}
2. Save the sketch as sketch0704.
3. Click the Upload icon to verify, compile, and upload the sketch to your Arduino unit.
4. Open the serial monitor tool to view the sketch output.
You should see the output shown in Figure 7.4.
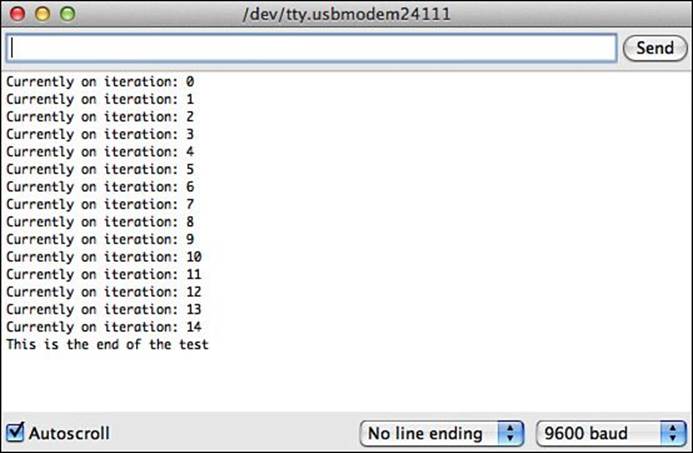
FIGURE 7.4 Output from running the sktech0704 sketch.
The break statement terminates the for loop in iteration 15, before the defined condition for the loop was met.
The continue Statement
The continue statement may be a little odd to follow. Instead of telling the Arduino to jump out of a loop, it tells the Arduino to stop processing code inside the loop, but still jumps back to the start of the loop. That might sound somewhat confusing, as you’d think to stop processing inside the loop you’d exit the loop (like the break statement does).
Perhaps the easiest way to follow how the continue statement works is to watch it in action:
![]() Try It Yourself: Using the continue Statement
Try It Yourself: Using the continue Statement
In this example, you test to see how the continue statement changes the behavior inside a standard for loop. Just follow these steps to run the experiment:
1. Open the Arduino IDE, and then enter this code in the editor window:
void setup() {
Serial.begin(9600);
int i;
for(i = 0; i < 20; i++) {
if ((i > 5) && (i < 10)) {
continue;
}
Serial.print("The value of the counter is ");
Serial.println(i);
}
Serial.println("This is the end of the test");
}
void loop() {
}
2. Save the sketch as sketch0705.
3. Click the Upload icon to verify, compile, and upload the sketch to your Arduino unit.
4. Open the serial monitor tool to view the sketch output.
You should see the output shown in Figure 7.5.
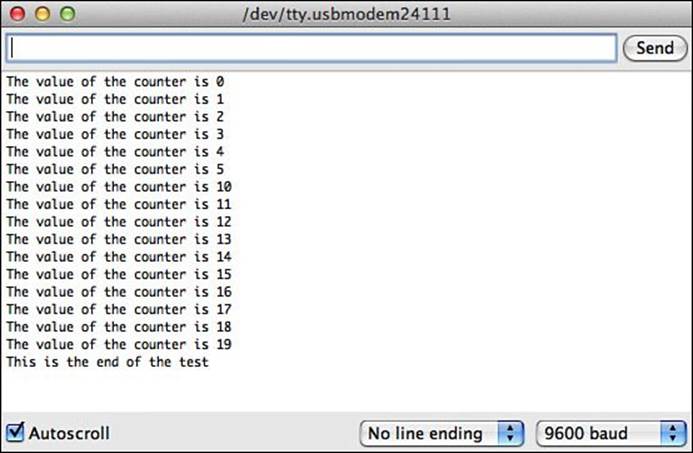
FIGURE 7.5 Output from running the sketch0705 sketch.
The continue statement causes the Arduino to stop processing the code inside the loop if the i variable value is between 5 and 10, but it returns back to the start of the loop and continues on with the loop iterations. The output in Figure 7.5 shows that the for loop continues, even when thecontinue statement processes.
Summary
This hour covered how to iterate through blocks of code multiple times. It’s common to run into situations where you need to repeat one or more statements multiple times with different values. By using loop statements, you can reduce the number of statements you have to write. The whileloop enables you to check a condition that determines when the loop stops. With the while loop, it’s your responsibility to make sure that the condition value changes inside the loop. The do-while loop works similarly to the while loop, but it checks the condition at the end of the loop iteration rather than at the start. The for loop helps simplify things for us by providing the counter, condition check, and the statement that modifies the counter all in one code statement.
This hour also introduced you to the idea of array variables, which allow you to store multiple data values referenced by the same variable name but with different indexes. These come in handy when working with loops.
In the next hour, you learn how to work with text in your Arduino programs, which will prove handy if you’re using any type of human interface for your sketches.
Workshop
Quiz
1. Which loop type will always run at least one iteration of the loop code block no matter if the condition is met?
A. The for loop
B. The while loop
C. The do-while loop
D. The if-then loop
2. With array variables, you can store multiple data values in the array and then iterate through them using a loop. True or false?
3. How could you write a loop to iterate through values 0 through 20, skipping over values 5 through 8 and 10 through 13?
Answers
1. The do-while loop runs the loop code block first, before checking the condition, so it will always run at least one iteration of the loop code block.
2. True. The array stores multiple data values in a common location in memory, and then allows you to use a numeric index value to reference each individual stored value. You can use a loop to iterate through the index values.
3. You can use the continue statement to skip over the value ranges:
int counter;
for(counter = 0; counter <= 20; counter++) {
if ((counter >= 5) && (counter <= 8))
continue;
if ((counter >= 10) && (counter <= 13))
continue;
Serial.print("The value if the counter is ");
Serial.println(counter);
}
Q&A
Q. What happens if I make a mistake and define a condition for a loop that is never met?
A. Because the condition will never evaluate to a true value, the loop will never end. This is called an infinite loop and will cause your Arduino to get stuck in the loop forever.
Q. Is it considered bad form to use break statements in loops?
A. Some programmers believe that you should never use break statements in loops and that you should try to write your loops to avoid using the break statement. However, the break statement is there for a reason, and you may run into situations where it makes perfectly good sense to use it.
Q. Is there a limit to how deep I can nest loops in the Arduino code?
A. No, you can have as many nested loops as you need; however, things do start to get somewhat confusing after a couple of layers of loops, so be careful if you go deeper than that.
All materials on the site are licensed Creative Commons Attribution-Sharealike 3.0 Unported CC BY-SA 3.0 & GNU Free Documentation License (GFDL)
If you are the copyright holder of any material contained on our site and intend to remove it, please contact our site administrator for approval.
© 2016-2026 All site design rights belong to S.Y.A.