Sams Teach Yourself Arduino Programming in 24 Hours (2015)
Part II: The C Programming Language
Hour 6. Structured Commands
What You’ll Learn in This Hour:
![]() Using if-then statements
Using if-then statements
![]() Adding else sections
Adding else sections
![]() Stringing if-else statements together
Stringing if-else statements together
![]() Testing conditions
Testing conditions
![]() Using the switch statement
Using the switch statement
In the Arduino sketches we’ve discussed so far, the Arduino processes each individual statement in the sketch in the order that it appears. This works out fine for sequential operations, where you want all the operations to process in the proper order. However, this isn’t how all sketches operate.
Many sketches require some sort of logic flow control between the statements in the sketch. This means that the Arduino executes certain statements given one set of circumstances, but has the ability to execute other statements given a different set of circumstances. There is a whole class of statements that allow the Arduino to skip over or loop through statements based on conditions of variables or values. These statements are generally referred to as structured commands.
Quite a few structured commands are available in the Arduino programming language, so we’ll look at them individually. In this chapter, we’ll look at the if and switch structured commands.
Working with the if Statement
The most basic type of structured command is the if statement. The if statement in C has the following basic format:
if (condition)
statement
You’ll often hear of this type of statement referred to as an if-then statement. As you can see, though, there’s not actually a “then” keyword in the C language version of the statement.
C uses the line orientation to act as the “then” keyword. The Arduino evaluates the condition in the parentheses, and then either executes the statement on the next line if the condition returns a true logic value or skips the statement on the next line if the condition returns a false logic value.
Here are a few examples to show this in action:
int x = 50;
if (x == 50)
Serial.println("The value is 50");
if (x < 100)
Serial.println("The value is less than 100");
if (x > 100)
Serial.println("The value is more than 100");
In the first example, the condition checks to see whether the variable x is equal to 50. (We talk about the double equal sign in the “Understanding Comparison Conditions” section later in this hour.) Because it is, the compiler executes the Serial.println() statement on the next line and prints the string.
Likewise, the second example checks to see whether the value stored in the x variable is less than 100. It is, and so the compiler executes the second Serial.println() statement to display the string.
However, in the third example, the value stored in the x variable is not greater than 100, so the condition returns a false logic value, causing the compiler to skip the last Serial.println() statement.
Grouping Multiple Statements
The basic if statement format allows for you to process one statement based on the outcome of the condition. More often than not, though, you’ll want to group multiple statements together, based on the outcome of the condition.
To group a bunch of statements together, you must enclose them within an opening and closing brace, as follows:
int x = 50;
if (x == 50) {
Serial.println("The x variable has been set");
Serial.println("and the value is 50");
}
In this example, the output from both print lines will appear in the serial monitor output. All the statements between the braces are considered part of the “then” section of the statement and are controlled by the condition.
One thing about if statements is that it can get tricky trying to pick out the code contained with the braces that’s controlled by the if condition. One way to help that is to indent the code inside the braces, as shown in the example.
You can either manually format your sketch to look like that, or you can let the Arduino IDE help out with that. Just left-align all the code in the sketch, and then choose Tools > Auto Format from the menu bar. The Arduino IDE will automatically determine which code should be indented.
![]() Try It Yourself: Working with if Statements
Try It Yourself: Working with if Statements
To experiment with if statements in your Arduino sketches, follow these steps:
1. Open the Arduino IDE, and then enter this code into the editor window:
void setup() {
int x = 50;
Serial.begin(9600);
if (x > 25) {
Serial.print("The value if x is:");
Serial.println(x);
Serial.println("This value is greater than 25");
}
Serial.println("This statement executes no matter what the value is");
}
void loop() {
}
2. Choose Tools > Auto Format from the menu bar. This will format the code to indent the statements inside the if code block.
3. Save the sketch as sketch0601.
4. To verify, compile, and upload the sketch to the Arduino, click the upload icon on the toolbar, or choose File > Upload from the menu bar.
5. Open the serial monitor by clicking the serial monitor icon on the toolbar, or choose Tools > Serial Monitor from the menu bar. This opens the serial monitor application and restarts the Arduino. You should see the following output:
The value of x is 50
This value is greater than 25
This statement executes no matter what the value is
6. Change the code to set the value of x to 25 in the assignment statement, and then recompile and upload the sketch to the Arduino.
7. Open the serial monitor. You should now see the following output only:
This statement executes no matter what the value is
Because the new value of x causes the condition to evaluate to a false value, the Arduino skips the statements inside the “then” code section, but picks up with the next Serial.println() statement that’s outside of the braces.
Tip: Restarting a Sketch
Because this sketch just runs once in the setup() function then stops, you can rerun the sketch by pressing the Reset button on the Arduino. For the Arduino Uno R3, that button is at the upper-left corner of the circuit board.
Using else Statements
In the if statement, you have only one option of whether to run (or not) statements. If the condition returns a false logic value, the compiler just moves on to the next statement in the sketch. It would be nice to be able to execute an alternative set of statements when the condition isfalse. That’s exactly what the else statement allows us to do.
The else statement provides another group of commands in the if statement:
int x = 25;
if (x == 50)
Serial.println("The value is 50");
else
Serial.println("The value is not 50");
The statement after the else keyword only processes when the if condition is false.
Just like with the if statement code block, you can use braces to combine multiple statements in the else code block:
void setup() {
int x = 25;
Serial.begin(9600);
if (x == 50) {
Serial.println("The x variable has been set");
Serial.println("and the value is 50");
} else {
Serial.println("The x variable has been set");
Serial.println("and the value is not 50");
}
Serial.println("This ends the test");
}
void loop() {
}
You can control the output by adjusting the value you assign to the x variable. When you run the sketch as is, you’ll get this output:
The x variable has been set
And the value is not 50
This ends the test
If you change the value of x to 50, you’ll get this output:
The x variable has been set
And the value is 50
This ends the test
You can also use the Auto Format feature in the Arduino integrated development environment (IDE) to format the else code block statements and the if code block statements.
Using else if Statements
So far, you’ve seen how to control a block of statements using either the if statement or the if and else statements combination. That gives you quite a bit of flexibility in controlling how your scripts work. However, there’s more!
You’ll sometimes need to compare a value against multiple ranges of conditions. One way to solve that is to string multiple if statements back to back:
int x = 45;
if (x > 100)
Serial.println("The value of x is very large");
if (x > 50)
Serial.println("The value of x is medium");
if (x > 25)
Serial.println("The value of x is small");
if (x <= 25)
Serial.println("The value of x is very small");
With this format, only one of the System.println() statements will execute, based on the value stored in the x variable:
The value of x is small
That works, but it is somewhat of an ugly way to solve the problem. Fortunately, there’s an easier solution for us.
The C language allows you to chain if-else statements together using the else if statement, with a catchall else statement at the end. The basic format of the else if statement looks like this:
if (condition1)
statement1;
else if (condition2)
statement2;
else
statement3;
When the Arduino runs this code, it first checks the condition1 result. If that returns a true value, the Arduino runs statement1, and then exits the if-else if-else statements.
If condition1 evaluates to a false value, the Arduino then checks the condition2 result. If that returns a true value, it runs statement2, and then exits the if-else if-else statement.
If condition2 evaluates to a false value, it runs statement3, and then exits the if-else if-else statement.
Listing 6.1 shows the sketch0602 code, which is an example of how to use the else if statement in a program.
LISTING 6.1 The sketch0602 Code Example
void setup() {
int x = 45;
Serial.begin(9600);
if (x > 100)
Serial.println("The value of x is very large");
else if (x > 50)
Serial.println("The value of x is medium");
else if (x > 25)
Serial.println("The value of x is small");
else
Serial.println("The value of x is very small");
Serial.println("This is the end of the test");
}
void loop() {
}
When you run the sketch0602 code, only one Serial.println() statement will execute, based on the value you set the x variable to. By default, you’ll see this output in the serial monitor:
The value of x is small
This is the end of the test
This gives you complete control over just what code statements the Arduino runs in the sketch.
Understanding Comparison Conditions
The operation of the if statement revolves around the comparisons that you make. The Arduino programming language provides quite a variety of comparison operators that enable you to check all types of data. This section covers the different types of comparisons you have available in your Arduino sketches.
Numeric Comparisons
The most common type of comparisons has to do with comparing numeric values. The Arduino programming language provides a set of operators for performing numeric comparisons in your if statement conditions. Table 6.1 shows the numeric comparison operators that the Arduino programming language supports.
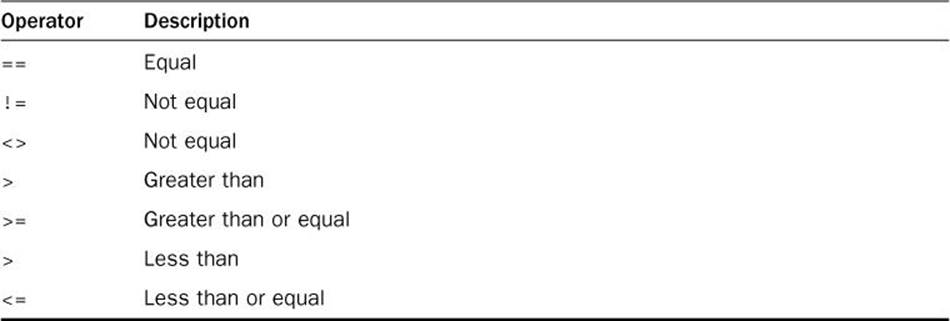
TABLE 6.1 Numeric Comparison Operators
The comparison operators return a logical true value if the comparison succeeds or a logical false value if the comparison fails. For example, the statement
if (x >= y)
Serial.println("x is larger than y");
will execute the Serial.println() statement only if the value of the x variable is greater than or equal to the value of the y variable.
Caution: The Equality Comparison Operator
Be careful with the equal comparison. If you accidentally use a single equal sign, that becomes an assignment statement and not a comparison. The Arduino will process the assignment and then exit with a true value every time. Most likely that’s not what you wanted to do.
Tip: String Comparisons
Because of the odd way the Arduino programming language stores string values, you can’t use a standard comparison operator to compare them. Hour 8, “Working with Strings,” takes an in-depth look at how to use some Arduino functions to compare string values in your sketches.
Boolean Comparisons
Because the Arduino evaluates the if statement condition for a logic value, testing Boolean values is pretty easy:
Serial.begin(9600);
boolean x = true;
if (x)
Serial.println("The value is true");
x = false;
if (x)
Serial.println("The value is false");
Setting a variable value directly to a logical true or false value is pretty straightforward. However, you can also use Boolean comparisons to test other features of a variable.
If you set a variable to a value, the Arduino will also make a Boolean comparison:
int a = 10;
if (a)
Serial.println("The a variable has been set");
However, if a variable contains a value of 0, it will evaluate to a false Boolean condition:
int testing = 0;
if (testing)
Serial.println("The testing variable has been set");
The comparison for the testing variable here will fail because the Arduino equates the 0 assigned to the testing variable as a false Boolean value. So, be careful when evaluating variables for Boolean values.
Tip: Evaluating Function Results
A related feature to Boolean comparisons is the Arduino’s ability to test the result of functions. When you run a function in C, the function returns what’s called a return code. You can test the return code using the if statement to determine whether the function succeeded or failed.
Creating Compound Conditions
In all the examples so far, we’ve just used one comparison check within the condition. With the Arduino programming language, you can group multiple comparisons together in a single if statement, called a compound condition. This section show some tricks you can use to combine more than one condition check into a single if statement.
The Arduino programming language allows you to use the logic operators (see Hour 5, “Learning the Basics of C”) to group comparisons together. Because each individual condition check produces a Boolean result value, the Arduino just applies the logic operation to the condition results. The result of the logic operation determines the result of the if statement:
int a = 1;
int b = 2;
if ((a == 1) && (b == 2))
Serial.println("Both conditions passed when b=2");
if ((a == 1) && (b == 1))
Serial.println("Both conditions passed when b=1");
When you use the and logic operator, both of the conditions must return a true value for the “then” statement to process. If either one fails, the Arduino will skip the “then” code block.
You can also use the or logical operator to compound condition checks:
if ((a == 1) || (b == 1))
Serial.println("At least one condition passed");
In this situation, if either condition passes, the Arduino will process the “then” statement.
Negating a Condition Check
There’s one final if statement trick that C programmers like to use. Sometimes when you’re writing if-else statements, it comes in handy to reverse the order of the “then” and else code blocks.
This can be because one of the code blocks is longer than the other, so you want to list the shorter one first, or it may be because the script logic makes more sense to check for a negative condition.
You can negate the result of a condition check by using the logic not operator (see Hour 5):
int a = 1;
if (!(a == 1))
Serial.println("The 'a' variable is not equal to 1");
if (!(a == 2))
Serial.println("The 'a' variable is not equal to 2");
The not operator reverses the normal result from the equality comparison, so the opposite action occurs from what would have happened without the not operator.
Tip: Negating Conditions
You may have noticed that you can negate a condition result by either using the not operand or by using the opposite numeric operand (such as a != rather than ==). Both methods will produce the same result in your Arduino sketch.
Expanding with the switch Statement
Often you’ll find yourself in a situation where you need to compare a variable against several different possible values. One solution is to write a series of else if statements to determine what the variable value is:
int test = 2;
if (test == 1)
Serial.println("The first option was selected");
else if (test == 2)
Serial.println("The second option was selected");
else if (test == 3)
Serial.println("The third option was selected");
else
Serial.println("None of the correct options was selected");
The more options there are, the longer this code gets! Instead of writing a long series of else if statements, you can use the switch statement:
int test=3;
switch (test) {
case 1:
Serial.println("The first option was selected");
break;
case 2:
Serial.println("The second option was selected");
break;
case 3:
Serial.println("The third option was selected");
break;
default:
Serial.println("None of the correct options was selected");
}
The switch statement uses a standard if-then style condition to evaluate for a result. You then use one or more case statements to define possible results from the switch condition. The Arduino jumps to the matching case statement in the code, skipping over the other case statements.
However, the Arduino continues to process any code that appears after the case statement, including other case statements. To avoid this, you can add the break statement to the end of the case statement code block. That causes the Arduino to jump out of the enter switch statement code block.
You can add a default statement at the end of the switch statement code block. The Arduino jumps to the default statement when none of the case statements match the result.
The switch statement provides a cleaner way of testing a variable for multiple values, without all the overhead of the if-then-else statements.
Summary
This hour covered the basics of using the if structured command. The if statement allows you to set up one or more condition checks on the data you use in your Arduino sketches. You’ll find this handy when you need to program any type of logical comparisons in your sketches. The ifstatement by itself allows you to execute one or more statements based on the result of a comparison test. You can add the else statement to provide an alternative group of statements to execute if the comparison fails.
You can expand the comparisons by using one or more else if statements in the if statement. Just continue stringing else if statements together to continue comparing additional values.
Finally, you can use the switch statement with multiple case statements in place of the else if statements. That helps make checking multiple values in a variable a bit easier.
The next hour walks through using loops in your Arduino sketches. You can use loops to check multiple sensors using the same code, or you can use them to iterate through data blocks without having to duplicate your code.
Workshop
Quiz
1. What comparison should you use to check if the value stored in the z variable is greater than or equal to 10?
A. z > 10
B. z < 10
C. z >= 10
D. z == 10
2. How would you write the if statement to display a message only if the value stored in the z variable is between 10 and 20 (not including those values)?
3. How would you write if-else statements to give a game player status messages if a guess falls within 5, 10, or 15 of the actual value?
Answers
1. C. Don’t forget to include the equal sign in the comparison operator when you need to check whether the value is equal to or greater than the desired value. It’s easy to forget and just use the greater-than comparator symbol.
2. You could use the following code:
if ((z > 10) && (z < 20))
Serial.println("This is the message")
3. You could use the following code:
if (z == answer)
Serial.println("Correct, you guessed the answer!");
else if ((z > (answer – 5)) || (z < (answer + 5)))
Serial.println("You're within 5 of the answer");
else if ((z > (answer – 10)) || (z < (answer + 10)))
Serial.println("You're within 10 of the answer");
else if ((z > (answer – 15)) || (z < (answer + 15)))
Serial.println("You're within 15 of the answer");
Q&A
Q. Is there a limit on how many statements I can place in an if or else code block?
A. No, you can make the code block as large as needed.
Q. Is there a limit on how many else if statements you can place in an if statement?
A. No, you can string together as many else statements to a single if statement as you need.
Q. Is there a limit to how many case statements you can place in a switch statement?
A. No, you can use as many case statements as you need in a single switch statement.
Q. Do you have to have a default option in a switch statement?
A. No. If there isn’t a default option, and if none of the case statements match, no code will be processed in the switch statement.
All materials on the site are licensed Creative Commons Attribution-Sharealike 3.0 Unported CC BY-SA 3.0 & GNU Free Documentation License (GFDL)
If you are the copyright holder of any material contained on our site and intend to remove it, please contact our site administrator for approval.
© 2016-2026 All site design rights belong to S.Y.A.