LEARN TO PROGRAM WITH SMALL BASIC: An Introduction to Programming with Games, Art, Science, and Math (2016)
9. USING DECISIONS TO MAKE GAMES
Sometimes decisions are complicated. Let’s say a boy and a girl want to see a movie. She wants to see an action movie, but he wants to see a comedy. She’s willing to see a comedy if it has action, if it has good reviews, and if it stars an actress she likes. But the movie has to start before 10 PMand must be within a 10-mile radius of the restaurant where the couple is having dinner. Imagine what the code would look like to make a decision like that!
In this chapter, we’ll continue the topic of decision-making and look at some new statements. We’ll first introduce the If/ElseIf statement and show how it makes writing nested If statements easier. Then, you’ll explore the logical operators And and Or, which let you do even more with your If statements. We’ll also introduce the Shapes object so you get more comfortable working with graphics. And you’ll put all this new information into action by building a game called Guess My Coordinates!
The If/ElseIf Ladder
It’s all over the news! Franko, the alien monster, has escaped from custody. Luckily, you have your laser gun with you when you spot him attacking people in your neighborhood. You aim and shoot. Run the program in Listing 9-1 to see what happens next!
1 ' AlienAttack.sb
2 TextWindow.Write("A salivating alien monster approaches. ")
3 TextWindow.WriteLine("Press any key to shoot...")
4 TextWindow.PauseWithoutMessage()
5
6 damage = Math.GetRandomNumber(5) ' Randomly picks an outcome
7 If (damage = 1) Then
8 TextWindow.Write("Wow! You got him. ")
9 TextWindow.WriteLine("Now you can watch SpongeBob!")
10 ElseIf (damage = 2) Then
11 TextWindow.Write("You injured him. ")
12 TextWindow.WriteLine("He wants a Band-aid.")
13 ElseIf (damage = 3) Then
14 TextWindow.Write("Weak shot. Run for your life! ")
15 TextWindow.WriteLine("Now dance! You'll confuse him.")
16 Else
17 TextWindow.Write("You missed! He got you. ")
18 TextWindow.WriteLine("You should stick to video games.")
19 EndIf
Listing 9-1: Climbing the If/ElseIf ladder
The program picks a random number between 1 and 5 (line 6) and then checks that number to decide the alien’s fate. Lines 7–19 are called the If/ElseIf ladder, which is commonly used to build a chain of If statements. Its general form is illustrated in Figure 9-1.
Starting from the first statement, the program runs through each test condition. As soon as it finds a true condition, it runs the statement(s) associated with that condition and moves down to the statement after the EndIf, skipping the rest of the ladder. If none of the conditions is true, the program runs the statements inside the Else clause at the end of the ladder, and then the program moves to the statement after the EndIf.
That’s why the final Else statement is often called the default case. If you don’t include the final Else statement in the ladder and all the test conditions are false, the If/ElseIf ladder does nothing, and the program continues after the EndIf keyword.
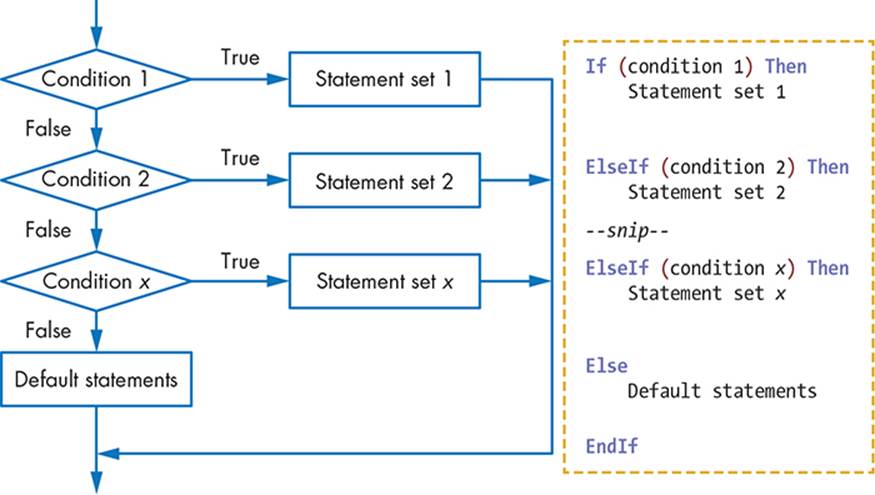
Figure 9-1: The structure of the If/ElseIf ladder
Let’s look at another way to use the If/ElseIf ladder.
Letter Grades
In this example, you’ll create a program that reads a test score between 0 and 100, and displays a letter grade from Table 9-1.
Table 9-1: Letter-Grade Scores
|
Score |
Letter grade |
|
score ≥ 90 |
A |
|
80 ≤ score < 90 |
B |
|
70 ≤ score < 80 |
C |
|
60 ≤ score < 70 |
D |
|
score < 60 |
F |
The complete program is shown in Listing 9-2.
1 ' GradeLetter.sb
2 TextWindow.Write("Enter the score: ")
3 score = TextWindow.ReadNumber()
4 If (score >= 90) Then
5 grade = "A"
6 ElseIf (score >= 80) Then
7 grade = "B"
8 ElseIf (score >= 70) Then
9 grade = "C"
10 ElseIf (score >= 60) Then
11 grade = "D"
12 Else
13 grade = "F"
14 EndIf
15 TextWindow.WriteLine("The grade is " + grade)
Listing 9-2: Grading papers
Try running the program and inputting some numbers to see the results. Here are some output examples:
Enter the score: 90
The grade is A
Enter the score: 72
The grade is C
This program uses an If/ElseIf ladder to run tests on the entered score. Let’s walk through how this program works.
The program tests whether the first condition, score >= 90, is true (line 4). If it is true, grade is set to A and the program jumps to line 15.
If it’s not true, score must be less than 90, so the program checks the next condition, score >= 80, on line 6. If this condition is true (which means that score is greater than or equal to 80 but less than 90), grade is set to B and the program jumps to line 15.
If that’s not true, then score must be less than 80, so the program checks the condition score >= 70 on line 8. If this condition’s true (which means that score is greater than or equal to 70 but less than 80), grade is set to C and the program jumps to line 15.
If that’s not true either, then score must be less than 70. In this case, the program checks the condition score >= 60 on line 10. If this condition is true (which means that score is greater than or equal to 60 but less than 70), grade is set to D and the program jumps to line 15.
Finally, if that last condition is still not true, score must be less than 60. In this case, no conditions are checked, grade is set to F, and the program jumps to line 15.
The Bug on the Ladder
When you’re writing If/ElseIf ladders, the order of the conditional statements is very important. Be very careful with the order when testing your conditions. For example, go back to Listing 9-2 and replace lines 4–7 with the following code:
If (score >= 80) Then
grade = "B"
ElseIf (score >= 90) Then
grade = "A"
This change to the program means that you check the condition score >= 80 first instead of score >= 90. Now, if the user enters 95, the program just tests the first condition, sees that score >= 80 is true, and sets the grade to B. In this code, grade never gets set to A, no matter how high the value of score is. Nobody gets an A! When the program finds a true condition in this If/ElseIf ladder, it skips all the other statements and goes directly to EndIf.
To avoid this problem, make sure the conditions in the If/ElseIf ladder are in the correct order. You’ll probably never want to check a middle value first. Also, be sure to run your program a few times to test the values and catch any problems before your users do.
TRY IT OUT 9-1
In Listing 9-2, you started by checking the condition score >= 90. You can also start by checking the last condition, score < 60, then 60 <= score < 70, then 70 <= score < 80, and so on. Rewrite the program using this reverse order of checking the grade.
Let’s Get Logical
Sometimes you might want to check multiple conditions to see whether to run a statement. For example, you might adopt a dog only if the dog is big, is potty trained, and has three heads. One way to test multiple conditions is to nest If and If/Else statements like you have been doing in previous chapters. Another way is to use logical operators (also called Boolean operators). With logical operators, you can write test conditions that combine two or more logical expressions. Let’s see how.
Do you remember something like 5 < x < 10 when you learned about inequalities in your elementary math class? This expression describes a number, x, that is greater than 5 and less than 10. Figure 9-2 shows you how to write this expression in Small Basic.
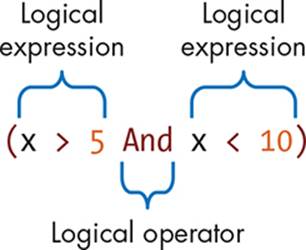
Figure 9-2: A compound condition in Small Basic
This is a compound condition that’s made up of two logical expressions, x > 5 and x < 10, that you combine using the logical operator And. In order for this compound condition to be true, both of the expressions must be true.
Small Basic supports two logical operators: And and Or. Figure 9-3 describes how they work.
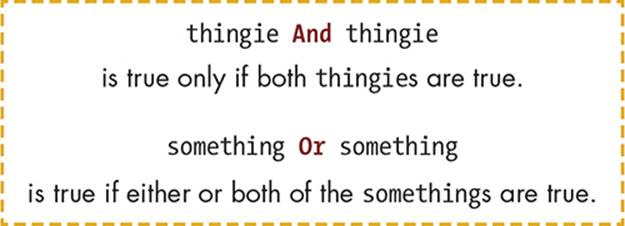
Figure 9-3: Explaining the logical operators And and Or
Next, we’ll explain these operators a bit more.
Logical Operators in the Zoo
Look at Figure 9-4 and answer this question: how would the monkey reach the banana? That’s right: Door 1 And Door 2 And Door 3 must be open. If any one of the three doors is closed, the poor monkey won’t get the banana!
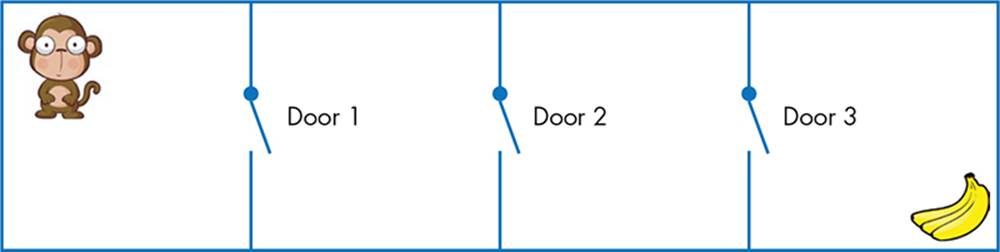
Figure 9-4: Performing logic with the And operator
Now look at Figure 9-5. In this case, the monkey just needs one door to be open: Door 1 Or Door 2 Or Door 3. This monkey likes its chances!
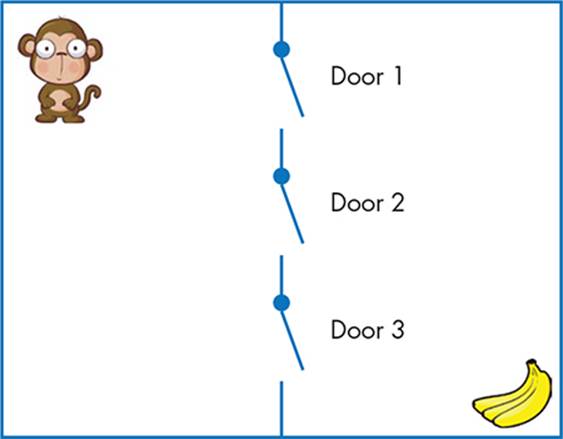
Figure 9-5: Performing logic with the Or operator
In Figure 9-6, the monkey has two options.
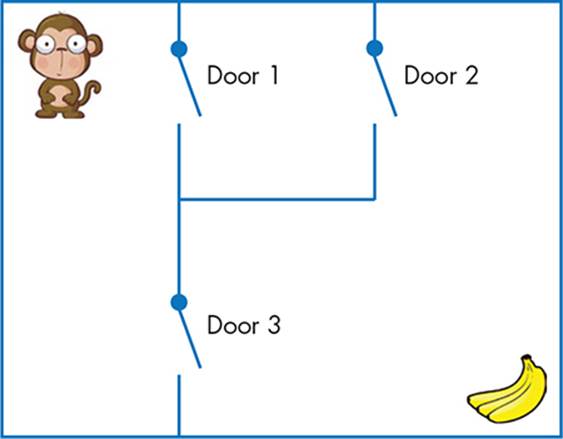
Figure 9-6: Performing logic with And and Or
If it takes the upper path, it needs both doors (Door 1 And Door 2) to be open. If it takes the lower path, it needs just Door 3 to be open. If you were programming this condition, you’d describe it like this:
((Door1 = open) And (Door2 = open)) Or (Door3 = open)
Are you ready to practice using And and Or?
The And Operator
The And operator takes two logical expressions as operands. Operand refers to the term that an operator acts on. Table 9-2 (called a truth table) lists the output of the And operator for all possible combinations of its two operands, X and Y.
Table 9-2: Truth Table for the And Operator
|
If X is |
If Y is |
Then (X And Y) is |
|
"True" |
"True" |
"True" |
|
"True" |
"False" |
"False" |
|
"False" |
"True" |
"False" |
|
"False" |
"False" |
"False" |
If both X and Y are true, then X And Y is true too. But if one of the operands is false, then X And Y is also false.
Listing 9-3 shows two conditions (gameLevel = 1 and score > 100) combined using the And operator. The message You get 200 bonus points! is displayed when both conditions are true.
1 ' AndDemo.sb
2 TextWindow.Write("Game level: ")
3 gameLevel = TextWindow.ReadNumber()
4
5 TextWindow.Write("Score.....: ")
6 score = TextWindow.ReadNumber()
7
8 If ((gameLevel = 1) And (score > 100)) Then
9 TextWindow.WriteLine("You get 200 bonus points!")
10 EndIf
Listing 9-3: The And operator
The statement inside the If block (line 9) is run only if gameLevel equals 1 and score is greater than 100. If either of these two conditions is false, the entire condition is found false and Small Basic won’t run the WriteLine() method on line 9.
You can perform the same check by replacing lines 8–10 with the following nested If statements:
If (gameLevel = 1) Then
If (score > 100) Then
TextWindow.WriteLine("You get 200 bonus points!")
EndIf
EndIf
Do you see how the And operator is a more concise way to test multiple conditions? The nested If statements require five lines of code, but using And, you can do the same thing in only three lines of code!
The Or Operator
How do you like your pizza? You might want to eat pizza only if it has four kinds of meat or if the crust is gooey. When you have multiple conditions but only one condition needs to be true, the Or operator comes into play. Take a look at the truth table for the Or operator in Table 9-3.
Table 9-3: Truth Table for the Or Operator
|
If X is |
If Y is |
Then (X Or Y) is |
|
"True" |
"True" |
"True" |
|
"True" |
"False" |
"True" |
|
"False" |
"True" |
"True" |
|
"False" |
"False" |
"False" |
If either of the two operands is true, or if they’re both true, the combined logical expression is true. The logical expression is false only when both operands are false.
Listing 9-4 shows an example of using the Or operator. The goal is to end the game if there’s no more time to play (timeLeft = 0) or if the player has lost all their energy (energyLevel = 0).
1 ' OrDemo.sb
2 TextWindow.Write("Time left: ")
3 timeLeft = TextWindow.ReadNumber()
4
5 TextWindow.Write("Energy level: ")
6 energyLevel = TextWindow.ReadNumber()
7
8 If ((timeLeft = 0) Or (energyLevel = 0)) Then
9 TextWindow.WriteLine("Game Over!")
10 EndIf
Listing 9-4: The Or operator
If timeLeft is 0 or energyLevel is 0, Small Basic runs the command inside the If block (line 9). Run this program several times using different inputs to make sure you understand how the Or operator works.
You could use nested If statements to do the same thing. For example, you could replace lines 8–10 with the following code:
If (timeLeft = 0) Then
TextWindow.WriteLine("Game Over!")
Else
If (energyLevel = 0) Then
TextWindow.WriteLine("Game Over!")
EndIf
EndIf
However, as you can see, using nested If statements takes up seven lines of code, but using Or took only three! Using the Or operator is a more concise way to test multiple conditions.
The Cosmic Order of Evaluation
Look at the following condition. How does Small Basic evaluate this expression?
If (A = 1 Or B = 1 And C = 1) Then
As it turns out, Small Basic gives And a higher priority than Or. This means it finds B = 1 And C = 1 first, and then the result is used as the right operand for the Or expression. To change the order, you can use parentheses, like this:
If ((A = 1 Or B = 1) And C = 1) Then
This code finds A = 1 Or B = 1 first and uses the result as the left operand for the And expression. We recommend you use parentheses to avoid any confusion!
NOTE
Logical operators like And and Or are evaluated after any arithmetic operators (+, –, *, /) and relational operators (=, <, <=, >, >=, <>) in combined expressions. Among the logical operators, And takes priority over Or; use parentheses to change the order and make your code easier to read.
It’s almost time to apply all the decision-making information you’ve learned and build some exciting applications. But first we need to introduce a new Small Basic object, the Shapes object, which lets you build your applications using rich graphics. Let’s make some pretty pictures!
TRY IT OUT 9-2
Open the file DiceGame_Incomplete.sb from this chapter’s folder, and write the missing code to complete this game. The player enters their bet (from $1 to $10) and then throws a pair of dice. If the sum of the dice is 2 or 12, the player wins three times their bet. If the sum is 4 or 10, the player wins two times their bet. If the sum is 7 or 11, the player loses their bet. Otherwise, the player’s balance doesn’t change, and the player rolls the dice again.
The Shapes Object
In Chapter 3, you learned how to draw all sorts of shapes and images in the graphics window. But those shapes were fixed: once you drew a shape at a location, the only way to move it to a different spot was to clear the entire window and redraw that shape in the new place. If you need to move some shapes around in a program (like moving a character when the player presses a key), it’s best to use the Shapes object.
The Shapes object lets you add, move, and rotate shapes in the graphics window. Run this code to draw a rectangle:
rectID = Shapes.AddRectangle(100, 50)
Program.Delay(1000)
Shapes.Move(rectID, 400, 200)
The program calls AddRectangle() to add a 100×50 rectangle and saves the identifier of the created shape in rectID. The created rectangle appears by default in the upper-left corner of the graphics window. The second statement pauses the program for 1 second so you can see the rectangle’s initial position. The third statement calls Move() to move this rectangle so its upper-left corner is at (400, 200). Note how rectID is passed as the first argument to Move() to let it know the identity of the shape to move.
Think of the Shapes object as a “shape factory”—a factory that manufactures lines, triangles, rectangles, ellipses, and other shapes. When you ask it to create a new shape, it’ll make the shape and return an identifier. Every time you want to do something with the shape you created, you’ll pass this identifier to the Shapes object (as an argument to the method you call).
We won’t cover all the methods of the Shapes object here. Instead, we’ll discuss the ones you’ll use in the next program. You’ll learn the other methods as you progress through this book.
The two methods we’ll use now are AddImage() and Move(). To understand how these methods work, open the file ImageDemo.sb from this chapter’s folder. You’ll see the code shown in Listing 9-5, which moves an image.
1 ' ImageDemo.sb
2 path = Program.Directory + "\Flower.png"
3 imgID = Shapes.AddImage(path)
4 Shapes.Move(imgID, 60, 20)
Listing 9-5: Moving an image using the Shapes object
Click the Run button. The output of this program is illustrated in Figure 9-7 (we added the gridlines and the numbers to show how the code works).

Figure 9-7: Moving the flower image
Let’s assume that this program is saved to C:\Book\Ch09\ImageDemo. The imageDemo folder also contains the Flower.png image file. The Program.Directory property (line 2) points to the directory C:\Book\Ch09\ImageDemo, which contains the executable program (the .exe file). Line 2 uses the + symbol to append two things to the directory: a slash (\) and the image filename (Flower.png). When the program runs line 2, the path variable’s given the full file path (C:\Book\Ch09\ImageDemo\Flower.png).
Line 3 calls the AddImage() method and passes the path variable as an argument. This method loads the image from the file and returns an identifier of the loaded image; this identifier is saved in a variable named imgID. An identifier is like a tag that the Shapes object uses to keep track of the shapes it creates (for example, "Image1", "Rectangle3", "Line100", and so on). The loaded image is displayed in the upper-left corner of the graphics window.
Line 4 calls the Move() method to move the image. The first argument is the shape’s identifier, which the program got from AddImage() and was saved into imgID (line 3). The other two arguments are the upper-left coordinates of the new position. Figure 9-7 shows the flower image with its upper-left corner at (60, 20).
The Flower.png image’s width is 100 pixels, and its height is 140 pixels. If you want to move the image so its center’s at (100, 100), you’d write this:
Shapes.Move(imgID, 100 - 50, 100 - 70)
Because you want the image’s center to be at (100, 100), you need to subtract half the image’s width (50) to center it horizontally and subtract half the image’s height (70) to center it vertically.
This is all the information you need to learn about the Shapes object for you to build the application in the next section. Time to make a guessing game!
TRY IT OUT 9-3
Use code like the following to point to a small image on your computer and display it in the graphics window:
imgID = Shapes.AddImage("C:\Temp\icon.png")
Shapes.Move(imgID, 40, 60)
Update the path with the correct path for your image. Change the second statement to move your image to each of these positions: (100, 40), (10, 10), (27, 78), and then center it in the middle of the graphics window.
Create a Game: Guess My Coordinates
It’s game time! In this section, you’ll develop an interactive game called Guess My Coordinates that tests people’s knowledge of the Cartesian coordinate system, or how well they can read an x, y graph. The game displays a star that represents a point on the Cartesian grid; Figure 9-8 shows what the interface looks like. During each round of the game, the star moves to a random location and asks the player to guess its x- and y-coordinates. The game checks the player’s answers and displays a feedback message. It’s like Battleship but more fun for math geeks!
The game uses the graphics window and the text window at the same time. The graphics window shows the grid and the star, and the text window reads the player’s answers and shows the program’s feedback. Now we’ll walk you through the steps to create this game.
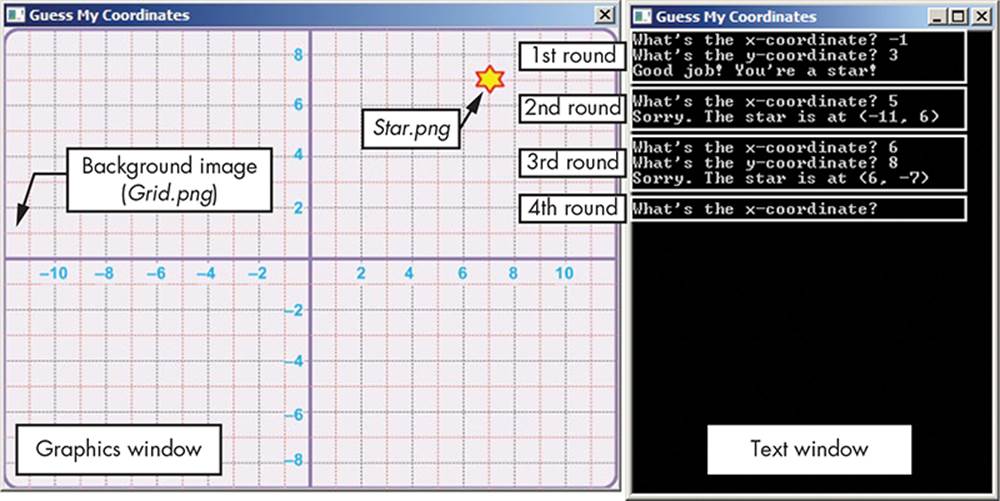
Figure 9-8: The user interface for the Guess My Coordinates game
Step 1: Open the Startup File
Start by opening the GuessMyCoordinate_Incomplete.sb file from this chapter’s folder. This file contains only comments. You’ll add all the code one step at a time.
The chapter’s folder also contains the two images you’ll use (Grid.png and Star.png). Grid.png is a 480×360 image of the Cartesian grid, and Star.png is a 24×24 image of a star.
NOTE
If you run into any problems, check out the finished program (GuessMyCoordinates.sb) included in the chapter folder to see what you did wrong.
Step 2: Set Up the Game
Enter the code in Listing 9-6 to set up the game’s user interface. This goes at the beginning of the file.
1 GraphicsWindow.Title = "Guess My Coordinates"
2 GraphicsWindow.CanResize = "False"
3 GraphicsWindow.Width = 480 ' Same as background image
4 GraphicsWindow.Height = 360 ' Same as background image
5 GraphicsWindow.Top = 200 ' Position on your desktop
6 GraphicsWindow.Left = 50 ' Position on your desktop
7 TextWindow.Title = "Guess My Coordinates"
8 TextWindow.Top = GraphicsWindow.Top
9 TextWindow.Left = GraphicsWindow.Left + GraphicsWindow.Width + 15
10
11 path = Program.Directory ' Program's directory
12 bkgnd = Shapes.AddImage(path + "\Grid.png") ' Bkgnd (480 x 360)
13 star = Shapes.AddImage(path + "\Star.png") ' Star image (24 x 24)
14
15 While ("True") ' Runs forever
16 ' You'll add code from Listings 9-7 and 9-8 here
17 EndWhile
Listing 9-6: Setting up the game
Lines 1–6 set the title, size, and position of the graphics window. The window’s size is set to be equal to the size of the grid image (lines 3–4). Lines 7–9 set the title of the text window and position it to the right of the graphics window (see Figure 9-8). The program then saves the program’s directory (line 11) into path, which you’ll use to make the full path for both images so you can draw them on the screen. Next, the program loads the two images and saves their identifiers (which are returned by the Shapes object) in these two variables: bkgnd and star (lines 12–13).
The While/EndWhile keywords on lines 15 and 17 are explained in detail in Chapter 14. For now, you just need to know that this code creates an infinite loop (a loop that repeats forever, like the Pete and Repeat program, GotoDemo.sb, you wrote in the Chapter 8). You’ll add the remaining code for the application between these While/EndWhile keywords.
Test what you’ve written so far. You should see the two windows side by side, just like in Figure 9-8. The star image appears in the upper-left corner of the graphics window but doesn’t do anything because you didn’t write any code to move it yet.
Now close either the graphics window or the text window so you can add the remaining code.
Step 3: Hide the Star
During each round of the game, you’ll move the star to a random position on the grid and then ask the player to guess its coordinates. Let’s add the code to move the star.
Add the code in Listing 9-7 inside the While loop (line 16 back in Listing 9-6).
1 ' Finds the star's random position (in grid units)
2 X0 = Math.GetRandomNumber(23) - 12 ' Ranges from -11 to 11
3 Y0 = Math.GetRandomNumber(17) - 9 ' Ranges from -8 to 8
4 pt = "(" + X0 + ", " + Y0 + ")" ' Example: (5, -3)
5
6 ' Sets to pixel units and moves the star to the random position
7 xPos = ((X0 + 12) * 20) - 12 ' Sets 12 pixels to the left
8 yPos = ((9 - Y0) * 20) - 12 ' And 12 pixels up
9 Shapes.Move(star, xPos, yPos) ' Moves the star
Listing 9-7: Placing the star
In Figure 9-8, you see that the grid goes from –12 to 12 in the x-direction and from –9 to 9 in the y-direction. If you place the star at any point on the grid’s boundaries, the player sees only part of it; the part of the star outside the grid gets clipped. That’s why you’ll restrict the star’s x-coordinate to the range [–11, 11] and its y-coordinate to the range [–8, 8].
But how do you create a random number between –11 and 11? That’s easy! From –11 to 11 there are 23 integers (–11, –10, ..., 10, 11). If you call GetRandomNumber(23), you’ll get a random integer between 1 and 23. If you subtract 12 from this integer, the result will be an integer between –11 (1 – 12) and 11 (23 – 12), which is what you need. Next, we’ll explain the code.
You use two variables, X0 and Y0, to hold the random coordinates of the star. In line 2, the X0 variable is given a random value between –11 and 11, as explained earlier. In line 3, the Y0 variable is given a random number between –8 and 8. These random values for X0 and Y0 tell you which grid intersection point the star lands on. Next, the program builds a string named pt (short for point) in the form (X0, Y0). This string shows the correct coordinates to the player if they enter the wrong answer.
Now you need to move the star to this new coordinate that you just created, (X0, Y0). Figure 9-9 shows part of the grid and an example of where the star might be set. As you can see in the figure, each unit on the grid maps to 20 pixels in the graphics window; compare this with Figure 9-8 to understand the full scaling of the grid.
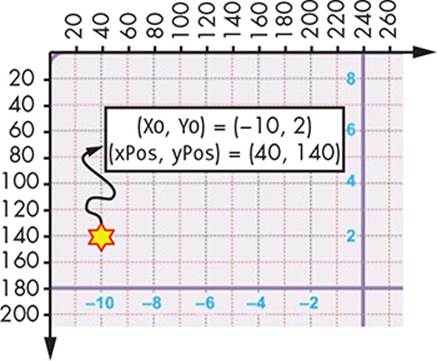
Figure 9-9: Grid coordinates for pixel positions in the graphics window
To move the star to a random position, you’ll first need to translate the (X0, Y0) grid units (what your user sees on the grid image) into (xPos, yPos) pixel units (what Small Basic sees). Let’s do that now.
If the star’s x-coordinate is –11, you need to draw the star at horizontal position 20 in the graphics window. If the star’s x-coordinate is –10, you need to draw it at horizontal position 40, and so on. So you need a formula to map the star’s x-coordinates, X0 = {–11, –10, –9, ..., 0}, to their corresponding horizontal positions, xPos = {20, 40, 60, ..., 240}, in the graphics window. To do this, you add 12 to X0 to get {1, 2, 3, ..., 12} and multiply the result by 20. Test it out! When X0 = –11, (–11 + 12) × 20 = 20. When X0 = –10, (–10 + 12) × 20 = 40, and so on. This is exactly what you want.
Mapping for the y-coordinate works the same way. If 8 is the star’s y-coordinate, you need to draw it at vertical position 20 in the graphics window. If 7 is the star’s y-coordinate, you need to draw it at vertical position 40, and so on. So you need a formula to map the star’s y-coordinates,Y0 = {8, 7, 6, ..., 0}, to their corresponding vertical positions, yPos = {20, 40, 60, ..., 180}, in the graphics window. You do this by subtracting Y0 from 9 and multiplying the result by 20. Let’s test this out! When Y0 = 8, (9 – 8) × 20 = 20. When Y0 = 7, (9 – 7) × 20 = 40, and so on, which is what you need.
You still have one minor detail to consider. Let’s say the star’s (X0, Y0) coordinates are (–10, 2), as shown in Figure 9-9. You map these coordinates to pixels and find that you need to show the star at point (xPos, yPos) = (40, 140) in the graphics window. But you need that star’s center to be at (40, 140). Because the star image is 24×24 pixels, the star’s left position must be 28 (40 – 12), and the star’s top position must be 128 (140 – 12). These are the numbers you need to pass to the Move() method. In other words, to align the star’s center with the intersection of the grid lines, you have to subtract the star’s width (12 pixels) from xPos and the star’s height (12 pixels) from yPos.
In Listing 9-7, line 7 finds the star’s xPos and line 8 finds the star’s yPos in the graphics window. Line 9 then calls the Move() method to place the star at the desired position on the grid.
Step 4: Let the User Guess
Now that the star is displayed on the grid, you need to ask the player to guess its coordinates. Add the code in Listing 9-8 right after the code you added from Listing 9-7, still inside the While loop.
1 TextWindow.Write("What is the x-coordinate? ")
2 xAns = TextWindow.ReadNumber()
3 If (xAns = X0) Then ' Player guessed the correct x-coordinate
4 TextWindow.Write("What is the y-coordinate? ")
5 yAns = TextWindow.ReadNumber()
6 If (yAns = Y0) Then ' Player guessed the correct y-coordinate
7 TextWindow.WriteLine("Good job! You're a star!")
8 Else ' Player entered an incorrect y-coordinate
9 TextWindow.WriteLine("Sorry. The star is at " + pt)
10 EndIf
11 Else ' Player entered an incorrect x-coordinate
12 TextWindow.WriteLine("Sorry. The star is at " + pt)
13 EndIf
14
15 TextWindow.WriteLine("") ' Empties the line before a new round
Listing 9-8: Guessing the coordinates
This code asks the player to enter the x-coordinate of the star, and it waits for an answer (lines 1–2). Then it checks whether the x-coordinate guess is correct (line 3). If the answer is incorrect, the program moves to line 12 to display the correct coordinates of the star (see the box labeled2nd Round in Figure 9-8). But if the x-coordinate guess is correct, the code asks the player to enter the y-coordinate of the star and waits for an answer (lines 4–5). If the player answers correctly (line 7), the program displays Good Job! You're a star!. If not, the program moves to line 9 to display the correct coordinates.
In all these cases, the program ends up at line 15 to display an empty line, and the While loop repeats for another round of the game. The game never ends! (This is exactly how your parents feel when you’re playing video games.)
The game is now complete. Try playing it now!
TRY IT OUT 9-4
Change Listing 9-8 to ask the player to enter the x- and y-coordinates, and then use the And operator to check xAns and yAns in a single If statement.
Programming Challenges
If you get stuck, check out http://nostarch.com/smallbasic/ for the solutions and for more resources and review questions for teachers and students.
1. A love meter gives a number from 1 to 5 that indicates the warmth of your heart (a lower number is warmer). Write a program that asks the user to input their love indicator number and then displays one of these messages:
1: Your heart is lava hot!
2: Your heart is warm.
3: Your heart is neutral.
4: Your heart is cold, like the North Pole!
5: If your heart was a movie, it would be Frozen!
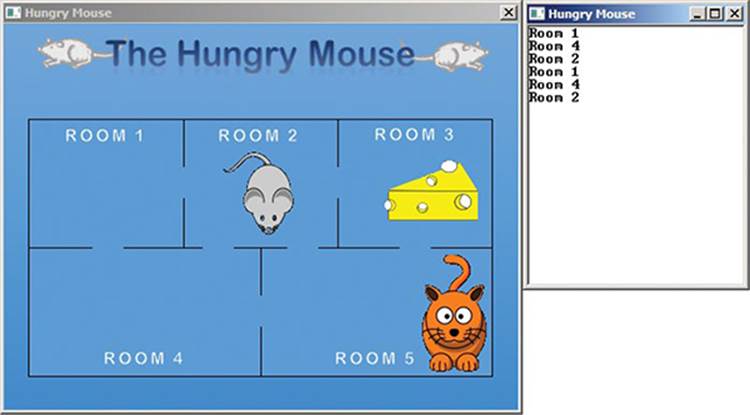
2. Write a program to simulate a mouse’s search for food (see the following figure). The mouse starts at room 1. From there, have the mouse go to either room 2 or room 4 (decide randomly). Pause to display this movement to the user. If the mouse goes to room 4, then for the next step it can move to room 1, room 2, or room 5 (decide randomly and then display the move). Make your simulation end when the mouse goes to room 3 (and finds the cheese) or goes to room 5, where the cat is patiently waiting for its snack. Open the file HungryMouse_Incomplete.sb from this chapter’s folder, and follow the instructions to complete the simulation.
3. Obi-Wan Kenobi needs to know the day of the week. But R2-D2 just beeps at him. Obi-Wan counts the beeps, but he needs your help to translate that number into the day of the week. Write an If/ElseIf ladder that compares the value of the variable dayNum with 1, 2, 3, ..., 7 and sets the value of the variable dayName to "Sunday", "Monday", "Tuesday", ..., "Saturday" (so 1 is Sunday and 7 is Saturday). Help Obi Wan Kenobi. You’re his only hope!
All materials on the site are licensed Creative Commons Attribution-Sharealike 3.0 Unported CC BY-SA 3.0 & GNU Free Documentation License (GFDL)
If you are the copyright holder of any material contained on our site and intend to remove it, please contact our site administrator for approval.
© 2016-2026 All site design rights belong to S.Y.A.