LEARN TO PROGRAM WITH SMALL BASIC: An Introduction to Programming with Games, Art, Science, and Math (2016)
14. CREATING CONDITIONAL WHILE LOOPS
In Chapter 13, we showed you how to use the For loop to repeat code a certain number of times. For loops are ideal to use when you know exactly how many times you want to repeat code. While is another Small Basic keyword that lets you create loops. It’s useful when you don’t know how many times you want to repeat a loop in advance, because While loops keep running code as long as a condition is true.
A While loop condition is similar to how your parents keep telling you to clean your room until it’s spotless or how you keep eating Thanksgiving turkey until you’re stuffed! When the loop’s condition becomes false, the loop ends, and the program moves on.
In this chapter, you’ll learn how to write While loops and use them to verify user input and make games. While loops are a powerful programming concept; once you master them, you’ll be able to make all kinds of cool applications.
When to Use While Loops
Let’s say you want to make a number-guessing game that selects a random number between 1 and 100 and prompts a player to guess it. If the player’s guess is wrong, the game tells them whether their guess was higher or lower than the secret number, and then it asks them to guess again. The game keeps asking the player to guess the number until they get it right.
A For loop isn’t the best choice to use here, because you don’t know how many times it will take a player to guess the secret number. Maybe the player will get it right on the first try, or it might take 100 tries! While loops are perfect in cases like this one.
In the next section, you’ll learn the While loop’s syntax and use it to create your own number-guessing game.
Writing a While Loop
Try out the code in Listing 14-1.
1 ' GuessMyNumber.sb
2 num = Math.GetRandomNumber(100) ' From 1 to 100
3 ans = 0 ' Any value that isn't equal to num
4 While (ans <> num) ' Repeats as long as the guess is wrong
5 TextWindow.Write("Enter your guess [1-100]: ")
6 ans = TextWindow.ReadNumber()
7 If (ans = num) Then ' Player guessed correctly
8 TextWindow.WriteLine("Good job! You get sprinkles!")
9 ElseIf (ans > num) Then
10 TextWindow.WriteLine("Too High. Lower your standards.")
11 Else
12 TextWindow.WriteLine("Too Low. Aim for the stars!")
13 EndIf
14 EndWhile
Listing 14-1: Number-guessing game
The program randomly selects a number from 1 to 100 and assigns it to num (line 2). Then a variable called ans, which will hold the player’s guess, is created and set to 0 (line 3). We set this initial value to 0 because we need it to be different from the correct answer. Let’s take a closer look at the first line of the While loop (line 4):
While (ans <> num)
This piece of code simply says, “As long as ans is not equal to num, run the statement(s) between the While and the EndWhile keywords.”
First, the test condition (ans <> num) is evaluated. If it’s true, the program runs the statements in the loop’s body and keeps repeating until the condition becomes false. When the test condition becomes false, the loop ends, and the program moves to the next statement after the EndWhilekeyword. The flowchart in Figure 14-1 illustrates how the While loop works.
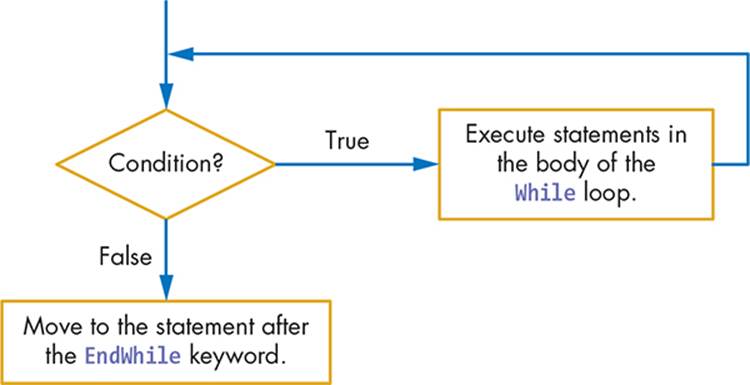
Figure 14-1: Flowchart of the While loop
In the number-guessing game, when the program runs line 4 for the first time, the condition (ans <> num) is true (because we know that num can’t be 0), and the loop runs the statements in its body (lines 5–13). During each iteration of the loop, the player is prompted to enter a guess (line 5), which is saved into the variable ans (line 6). The code then compares the player’s guess with the secret number. If the player guessed correctly (line 7), the code displays Good Job! You get sprinkles! and moves to the statement after EndIf. In this example, it finds EndWhile, which takes your program back to check the condition of the While loop. Because ans is now equal to num, the test condition is false and the While loop terminates, ending the program (because there are no statements after EndWhile).
If the player’s guess was incorrect, the code checks whether the guess was higher than the secret number (line 9). If it’s higher, the program displays Too High. Lower your standards. Then the loop goes for another round. If the player’s guess is lower than the secret number (the Elsestatement on line 11), the program displays Too Low. Aim for the stars! (line 12) and starts another round.
Here is an example of a rather lucky user playing the game:
Enter your guess [1-100]: 50
Too High. Lower your standards.
Enter your guess [1-100]: 25
Too Low. Aim for the stars!
Enter your guess [1-100]: 37
Good Job! You get sprinkles!
Play this game several times to see how it works!
NOTE
Although it’s not required by Small Basic, we’ll make programs easier to read by using parentheses around the While loop’s condition and indenting the body of a While loop.
In the next section, we’ll show you how to use a While loop to check data entered by a user.
TRY IT OUT 14-1
How much wood could a woodchuck chuck if a woodchuck could chuck wood? Open the Woodchuck.sb file from this chapter’s folder, and run it to answer this age-old question. Then figure out some ways to improve the program.
Validating Your Inputs
When you write a program that reads data from a user, you should always check the input data before continuing with your program. This is called validation. In this section, we’ll show you how to use While loops to ensure that your user enters the correct input to your program.
Let’s say you need the user to enter a number between 1 and 5 (including 1 or 5). If they enter a number less than 1 or greater than 5, you need to prompt them to re-enter a number. Listing 14-2 shows you how to use a While loop to achieve this.
1 ' InputValidation.sb
2 num = -1 ' Invalid value (to force a pass through the loop)
3
4 While ((num < 1) Or (num > 5))
5 TextWindow.Write("Enter a number between 1 and 5: ")
6 num = TextWindow.ReadNumber()
7 EndWhile
8 TextWindow.WriteLine("You entered: " + num)
Listing 14-2: Using a While loop to check the input number
Line 2 sets the variable num (which will hold the number entered by the user) to –1. This makes the condition of the While loop (line 4) true, so the loop’s body runs at least once. Although the loop in this example runs fine without the initialization statement on line 2 (because the variablenum will be seen as 0), we recommend that you always initialize your variables and not rely on their default values. This will help you prevent future mistakes.
The program prompts the user for a number and assigns their input to the num variable (lines 5–6). Then the loop runs again. If num is less than 1 or greater than 5 (the user entered an invalid number), the loop’s body runs again, prompting the user to re-enter the number. If num is between 1 and 5 (inclusive), the loop ends, and the program moves to line 8 to display the number.
TIP
Make sure you initialize any variable before you use it in a While loop’s test condition. If you don’t, your program might skip over the loop entirely!
Now you know how to verify user input using a While loop.
TRY IT OUT 14-2
Write a program that asks a user whether they think SpongeBob could become Santa, and then prompt them to enter Y (for yes) or N (for no). They can also enter y or n. Write a While loop that only accepts Y, y, N, or n as valid inputs. Then tell the user what they did wrong each time.
Infinite Loops
If a While loop’s condition doesn’t become false, the loop runs forever, creating an infinite loop. Sometimes this can cause a problem, but sometimes infinite loops are useful, such as when you want to make a game run forever.
But how do you create an infinite loop in Small Basic? There are a few ways to do this, but here is a common shortcut that many Small Basic programmers use:
While ("True")
TextWindow.WriteLine("Loop forever!")
EndWhile
In this code, the loop’s condition is always true; the loop never stops, and it displays Loop forever! forever. To see this in action, you’ll program a simple game that quizzes kids on their addition skills. The complete code is shown in Listing 14-3. Run this program to see how it works.
1 ' AddTutor.sb
2 While ("True")
3 num1 = Math.GetRandomNumber(10) ' Sets num1 between 1 and 10
4 num2 = Math.GetRandomNumber(10) ' Sets num2 between 1 and 10
5 correctAns = num1 + num2 ' Adds both numbers
6 TextWindow.Write("What is " + num1 + " + " + num2 + "? ")
7 ans = TextWindow.ReadNumber() ' User enters an answer
8 If (ans = correctAns) Then ' Checks if the answer is correct
9 TextWindow.WriteLine("This is correct.")
10 Else ' Gives the correct answer
11 TextWindow.WriteLine("Sorry. The answer is " + correctAns)
12 EndIf
13 EndWhile
Listing 14-3: A program that quizzes a user with addition problems
In lines 3 and 4, num1 and num2 are set to random numbers between 1 and 10. Line 5 adds them together to set the correct answer. Line 6 asks the user for the correct answer. Line 7 gets the user’s answer. Line 8 checks whether the answer is true, and if it is, line 9 tells them they’re right. Otherwise, line 11 tells them the correct answer. The game runs forever. When the user wants to quit, they can close the application by clicking the X icon in the upper-right corner of the application’s window.
TIP
You can use a Goto statement inside a While loop to jump to a label outside the loop in order to break out of the loop.
Now it’s time to put what you’ve learned in this chapter to work by designing a complete game. Head to the fridge to get plenty of brain food before reading on!
TRY IT OUT 14-3
Change the AddTutor.sb program so it won’t give the correct answer to the player when they get it wrong. Instead, have the program tell the player that their answer is incorrect and let them try again.
Create a Rock-Paper-Scissors Game
In this section, you’ll create a rock-paper-scissors game in which a user plays against the computer. Figure 14-2 shows the user interface for this game. The three buttons represent rock, paper, and scissors. The player chooses one by clicking it. Then the computer randomly picks an action. The rules that determine the winner are paper beats rock, rock beats scissors, and scissors beats paper.
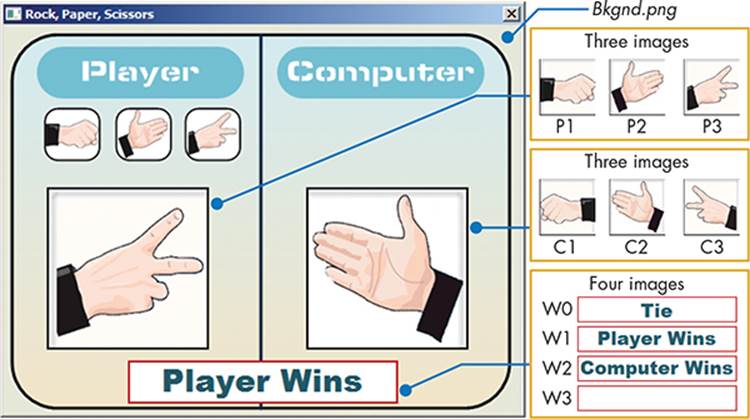
Figure 14-2: The user interface for the rock-paper-scissors game
Images P1, P2, and P3 show the player’s selection, and images C1, C2, and C3 show the computer’s choice. Images W0, W1, W2, and W3 show the result of each round of the game. Everything else you see in Figure 14-2 is part of the background image, including the rock, paper, and scissors images that represent the three buttons.
Step 1: Open the Startup File
Open the file RockPaper_Incomplete.sb from this chapter’s folder and follow along. The folder includes all the images you need for this game. The startup file, shown in Listing 14-4, contains the main part of the game. It also contains empty placeholders for all the subroutines you need to add.
1 ' RockPaper_Incomplete.sb
2 GraphicsWindow.Title = "Rock, Paper, Scissors"
3 GraphicsWindow.CanResize = "False"
4 GraphicsWindow.Width = 480
5 GraphicsWindow.Height = 360
6
7 path = Program.Directory
8 GraphicsWindow.DrawImage(path + "\Bkgnd.png", 0, 0)
9 choice1 = 0 ' 0 = Unknown; 1 = Rock; 2 = Paper; 3 = Scissors
10 GraphicsWindow.MouseDown = OnMouseDown
11
12 While ("True") ' Loops forever
13 If (choice1 <> 0) Then ' If player made a choice
14 blankImg = path + "\W3.png" ' Clears last result
15 GraphicsWindow.DrawImage(blankImg, 115, 310)
16 choice2 = Math.GetRandomNumber(3) ' 1 to 3
17 SwitchImages() ' Shows player and computer choices
18 ShowWinner() ' Shows image for the result
19 choice1 = 0 ' Ready for another round
20 EndIf
21 Program.Delay(10) ' Waits a little, then checks again
22 EndWhile
Listing 14-4: Setting up the window and choice
If you run the program now, all you’ll see is the background image because you haven’t created any of the subroutines yet. You’ll get there, but first let’s check out the setup and main loop of the game. First, the size of the graphics window is set, and the background image is drawn (lines 2–8). The variable choice1 holds the player’s choice: 0 means unknown, 1 means rock, 2 means paper, and 3 means scissors. To start, we set choice1 to 0, because the player hasn’t made a choice yet (line 9). Then we register a handler for the MouseDown event to be able to find out when the player clicks one of the three buttons (line 10). Then the game’s main loop starts (lines 12–22).
The loop continuously checks the value of choice1. As you’ll see in a moment, this variable is changed by the OnMouseDown() subroutine when the player makes a choice. If choice1 is 0, the loop waits for 10 milliseconds (line 21) and checks again. Using a loop makes the program wait forchoice1 to become a value other than 0 (this is called polling; it’s similar to asking “Are we there yet?” during a long trip). When choice1 becomes a value other than 0 (line 13), the body of the If block is executed (lines 14–19). We draw image W3 to show a blank result (lines 14–15). Next, we set the computer’s choice, choice2, to a random value between 1 and 3 (line 16). Then we call SwitchImages() to show the images that correspond to choice1 and choice2 (line 17). Then we call ShowWinner() to show the result of this round of the game (line 18). Finally, we set choice1 back to 0 to tell the OnMouseDown() subroutine that the main loop is ready for another round of the game (line 19).
Next, you’ll add each subroutine one at a time.
Step 2: Add the MouseDown Handler
Now let’s handle the MouseDown event to figure out the player’s choice. Add the OnMouseDown() subroutine in Listing 14-5 to the bottom of the program.
1 Sub OnMouseDown
2 If (choice1 = 0) Then ' Ready for another round
3 y = GraphicsWindow.MouseY ' Vertical click position
4 If ((y > 80) And (y < 120)) Then ' Within range
5 x = GraphicsWindow.MouseX ' Horizontal click
6 If ((x > 40) And (x < 80)) Then ' Rock
7 choice1 = 1
8 ElseIf ((x > 110) And (x < 150)) Then ' Paper
9 choice1 = 2
10 ElseIf ((x > 175) And (x < 215)) Then ' Scissors
11 choice1 = 3
12 EndIf
13 EndIf
14 EndIf
15 EndSub
Listing 14-5: Checking the choice the user clicked
Small Basic calls this subroutine when the player clicks anywhere in the graphics window. First, the subroutine checks the value of choice1 (line 2). If choice1 is 0, the subroutine checks where the player clicked to see whether they clicked one of the three buttons. If choice1 is not 0, that means the main loop is still processing the player’s last choice, so the subroutine just ignores the mouse click. This way your game won’t get confused if the player clicks all over the place.
To see whether the player clicks one of the three image buttons, the subroutine checks the vertical position of the click (line 4). If it’s within the range of the images, the subroutine checks the horizontal position (line 6). The If/ElseIf ladder then compares the horizontal position with the left and right edges of each image and sets choice1 accordingly (lines 6–12).
TIP
If you want to find out the exact positions of the three image buttons, add this code to your program:
GraphicsWindow.MouseMove = OnMouseMove
Sub OnMouseMove
mx = GraphicsWindow.MouseX
my = GraphicsWindow.MouseY
TextWindow.WriteLine(mx + ", " + my)
EndSub
Move the mouse over the background image to see the coordinates displayed in the text window. Don’t forget to delete this code before you share your game with your friends!
Step 3: Switch the Images
When the player makes a choice, you need to show the computer’s pick so they know the computer isn’t cheating. To create some excitement, you’ll animate the images before showing the final choices. Add the SwitchImages() subroutine in Listing 14-6.
1 Sub SwitchImages
2 For M = 1 To 10 ' Flips images 10 times
3 N = 1 + Math.Remainder(M, 3) ' N = 1,2,3,1,2,3...
4 img1 = path + "\P" + N + ".png" ' {\P1, \P2, or \P3}.png
5 img2 = path + "\C" + N + ".png" ' {\C1, \C2, or \C3}.png
6 GraphicsWindow.DrawImage(img1, 40, 150) ' Draws img1
7 GraphicsWindow.DrawImage(img2, 280, 150) ' Draws img2
8 Program.Delay(100) ' Waits a short time
9 EndFor
10
11 ' Shows the actual choices of the player and the computer
12 img1 = path + "\P" + choice1 + ".png"
13 img2 = path + "\C" + choice2 + ".png"
14 GraphicsWindow.DrawImage(img1, 40, 150)
15 GraphicsWindow.DrawImage(img2, 280, 150)
16 EndSub
Listing 14-6: Switching images for a visual effect
SwitchImages() starts by switching the images for the player and the computer 10 times very quickly for a fun visual effect (lines 2–9). Then the code shows the images that correspond to choice1 and choice2 by appending a number to the letters P and C, which represent the names of the images.
Run the code to test it. When you click any of the three image buttons, the player and the computer selections will change 10 times before landing on the images that correspond to the actual choices. (Don’t flip images too quickly, or you’ll get a headache!)
Step 4: Announce the Winner
The last part of the game, the ShowWinner() subroutine, checks the result and displays the winner. Add the ShowWinner() subroutine in Listing 14-7.
1 Sub ShowWinner
2 ' W0: Tie; W1: Player1; W2: Computer
3 If ((choice1 = 1) And (choice2 = 2)) Then ' Paper (2) beats rock (1)
4 img = "\W2.png"
5 ElseIf ((choice1 = 1) And (choice2 = 3)) Then ' Rock (1) beats scissors (3)
6 img = "\W1.png"
7 ElseIf ((choice1 = 2) And (choice2 = 1)) Then ' Paper (2) beats rock (1)
8 img = "\W1.png"
9 ElseIf ((choice1 = 2) And (choice2 = 3)) Then ' Scissors (3) beats paper (2)
10 img = "\W2.png"
11 ElseIf ((choice1 = 3) And (choice2 = 1)) Then ' Rock (1) beats scissors (3)
12 img = "\W2.png"
13 ElseIf ((choice1 = 3) And (choice2 = 2)) Then ' Scissors (3) beats paper (2)
14 img = "\W1.png"
15 Else
16 img = "\W0.png"
17 EndIf
18
19 GraphicsWindow.DrawImage(path + img, 115, 310)
20 EndSub
Listing 14-7: Checking who won to display the right image
This subroutine compares the values of choice1 and choice2 using an If/ElseIf ladder and decides which image (img) to display (lines 3–17). Remember that choice 1 means rock, 2 means paper, and 3 means scissors. Then, line 19 draws the selected image.
TRY IT OUT 14-4
See if you can turn the rock-paper-scissors game into a two-player game!
Programming Challenges
If you get stuck, check out http://nostarch.com/smallbasic/ for the solutions and for more resources and review questions for teachers and students.
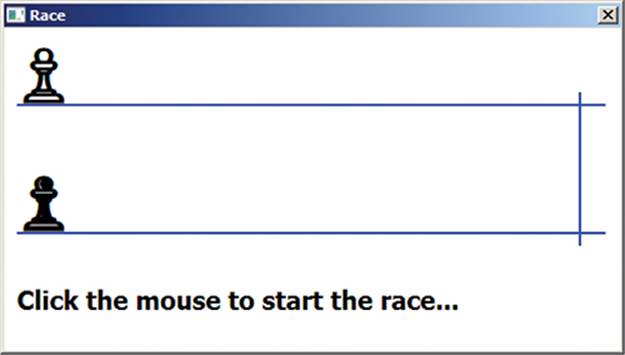
1. Open the file Race_Incomplete.sb from this chapter’s folder. This application simulates a race between two players. When you run the program, you’ll see the following interface. Follow the comments provided in the application’s source code to write the missing code and complete the application.
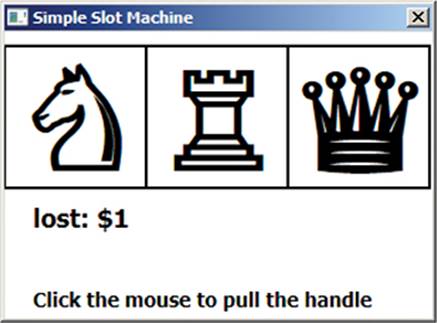
2. Open the file SimpleSlot.sb from this chapter’s folder. This program simulates a simple slot machine, as shown in the following figure. When you click the mouse, the game displays three objects at random. If all three objects are alike, you win $20. If two are alike, you win $5; otherwise, you lose $1. After playing the game, study the code and explain how the program works.
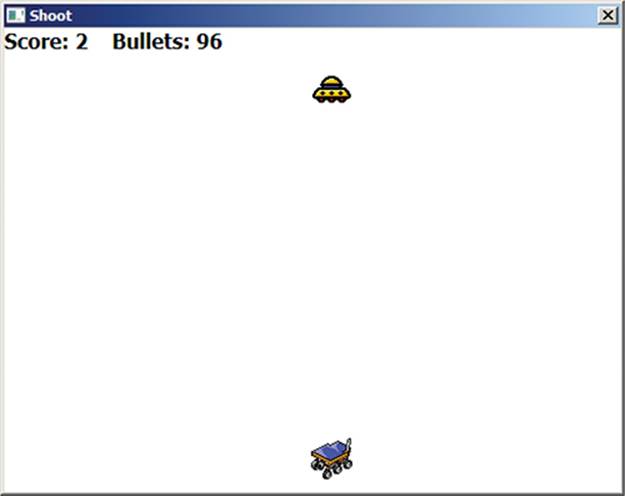
3. Open the file Space.sb from this chapter’s folder. In this game, you shoot at a UFO flying across the top of the screen (see the following figure). Use the left and right arrow keys to move, and press the spacebar to shoot. You have only 100 shots, and the game tracks your score. Think of some ways to improve the game and add them.
All materials on the site are licensed Creative Commons Attribution-Sharealike 3.0 Unported CC BY-SA 3.0 & GNU Free Documentation License (GFDL)
If you are the copyright holder of any material contained on our site and intend to remove it, please contact our site administrator for approval.
© 2016-2026 All site design rights belong to S.Y.A.