LEARN TO PROGRAM WITH SMALL BASIC: An Introduction to Programming with Games, Art, Science, and Math (2016)
13. REPEATING FOR LOOPS
Have you ever noticed that no matter how many times you take out the trash, clean dirty dishes, and do laundry, you always have to do it again? What if you only had to do each task once, and then you created a robot version of yourself to do it every time after that? That would be amazing!
In the Small Basic universe, automating repetitive tasks is a breeze. You only have to write code for a repetitive task once, and then you can use a loop to repeat that task as many times as you need.
Small Basic uses two types of loop statements: For loops and While loops. In this chapter, you’ll learn about For loops, explore nested For loops in depth, and create some programs that take advantage of your computer’s passion for repetition. You’ll learn how to use For loops in a wide range of practical applications. Let’s get loopy!
The For Loop
Let’s say you want to make a program that displays the multiplication table for nine: 1 × 9, 2 × 9, 3 × 9, through 10 × 9. Your first attempt might look like this:
TextWindow.WriteLine(" 1 x 9 = " + (1 * 9))
TextWindow.WriteLine(" 2 x 9 = " + (2 * 9))
TextWindow.WriteLine(" 3 x 9 = " + (3 * 9))
TextWindow.WriteLine(" 4 x 9 = " + (3 * 9))
TextWindow.WriteLine(" 5 x 9 = " + (3 * 9))
TextWindow.WriteLine(" 6 x 9 = " + (3 * 9))
TextWindow.WriteLine(" 7 x 9 = " + (3 * 9))
TextWindow.WriteLine(" 8 x 9 = " + (3 * 9))
TextWindow.WriteLine(" 9 x 9 = " + (3 * 9))
TextWindow.WriteLine("10 x 9 = " + (10 * 9))
Phew! Look at that wall-o-code! Although Small Basic lets you easily copy and paste selected statements, this program repeats a lot of code. What if you want to display the multiplication table up to 100 or 1000? Clearly, this isn’t the best way to write your program. Here’s a version of this program that uses a For loop to get the same result:
For N = 1 To 10
TextWindow.WriteLine(N + " x 9 = " + (N * 9))
EndFor
Run this program and check out what happens. Wasn’t that easier than writing out every line? Now you’ve seen the power of loops!
The loop runs the same statement but with a different value of N each time. First, the code sets the value of N to 1, which is the value we want to start creating the multiplication table from. Next, it runs all the statements between the For and the EndFor keywords. In this case, it runs theWriteLine() method, replacing N with its current value. This is called an iteration of the loop.
Then it sets N to 2. The value of N is compared with the ending value (or terminal value) of the loop, which is 10 in this case. If N is less than 10, the statements in the body of the For loop run again, completing another iteration of the loop. Note that the For loop automatically increases N by 1 during each iteration. This process continues, using N = 3, then N = 4, all the way to N = 10.
After the program runs the tenth iteration, it moves to the statement after the EndFor keyword (if there is one), and the loop is complete.
Now that you’ve seen a basic For loop in action, look at the syntax in Figure 13-1.
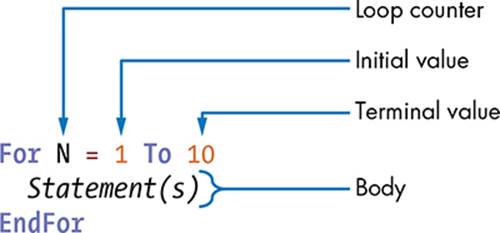
Figure 13-1: Syntax of a basic For loop
Each For loop starts with the keyword For. The statements contained between the For and EndFor keywords are called the body of the For loop. The variable, N, is the loop control variable (or loop counter). It controls the number of times the loop runs, and it’s treated like any other variable in the program. The 1 To 10 part of the statement determines how many times the loop runs.
It’s important to note that the condition to check whether or not the loop runs is tested at the top of the loop. For example, the following code sets N to 1 and then compares it to a terminal value of –10. Because 1 is greater than –10, the code won’t run even once:
For N = 1 To -10
TextWindow.WriteLine(N) ' This won't be executed
EndFor
Let’s look at some fun examples that show you how to use a For loop.
TRY IT OUT 13-1
Think about some other repetitive tasks that you could automate with a loop. Describe a program you’d build with a For loop.
Magical Moving Text
In this example, you’ll create a program that moves a word or sentence across the text window from left to right. Figure 13-2 shows that with each iteration, the word displayed in the last iteration disappears, so the text appears to be animated, moving across the screen to the right.
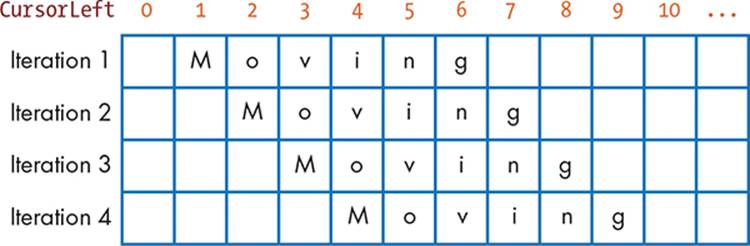
Figure 13-2: Using the Write() method to move a word across the text window
Recall that in Chapter 2 you used the CursorLeft property to display text in different places inside the text window. In this example, you’ll set CursorLeft to 0 and use the Write() method to write the word. After a short delay, you’ll change CursorLeft to 1 and write the word again. You’ll then change CursorLeft to 2, then 3, and so on. Using a For loop, you’ll automate this process to make it look like the word is moving across the text window. Enter the program in Listing 13-1.
1 ' MovingWord.sb
2 For N = 0 To 40
3 TextWindow.CursorLeft = N
4 TextWindow.Write(" Moving") ' Erases the previous line
5 Program.Delay(250) ' Delays so you can read it
6 EndFor
7 TextWindow.WriteLine("")
Listing 13-1: Moving a word across the text window
The program starts a loop that runs from N = 0 To 40 (line 2). During each iteration, it sets the CursorLeft property equal to the loop counter N (line 3) and then uses the Write() method to write the word (line 4). The space before the text Moving helps to erase the previous word. TheProgram.Delay(250) call at line 5 causes the program to wait for 250 milliseconds before it starts the next iteration of the loop. When the loop ends, the program writes an empty line (line 7).
Let’s move on to another example.
TIP
Although it isn’t required, indenting the statements in the body of a For loop makes your code easier to read.
TRY IT OUT 13-2
Change Listing 13-1 to animate your own message to your friends or family members and share it with them. Mine is “I Like Tacos!”
Adding ’em Up
In programming, loops are used in different ways. One important use of loops is called an accumulator loop, which accumulates (or adds up) a value during each iteration of the loop. Accumulator loops are commonly used to keep count of values in programs.
Let’s say you need to find the sum of all integers from 1 to 10: 1 + 2 + 3 + ... + 10. That’s what the program in Listing 13-2 does.
1 ' Sum.sb
2 sum = 0
3 For N = 1 To 10
4 sum = sum + N ' Adds the new value of N to the sum
5 EndFor
6 TextWindow.WriteLine("sum = " + sum)
Listing 13-2: Using a For loop to add numbers
The program uses a variable named sum to hold the running total (this variable is usually called an accumulator). The program starts by initializing sum to 0 (line 2). Then a For loop with a loop counter named N runs from 1 to 10 (line 3). During each iteration, the program adds the value ofN to the accumulator by using the statement at line 4. This statement adds the current value of N to the current value of sum and stores the result back into sum. After the first iteration, sum is 1 (0 + 1); after the second iteration, sum is 3 (1 + 2); after the third iteration, sum is 6 (3 + 3); and so on. When the loop ends, the program displays the value of the sum variable on line 6: sum = 55.
TRY IT OUT 13-3
When the great mathematician Carl Gauss first went to school, his teacher asked the class to find the sum of all the numbers between 1 and 100, that is, 1 + 2 + 3 + 4 + ... + 100. Gauss took one look at the problem and immediately put his answer on the teacher’s desk. The teacher was amazed—Gauss was right! Write a program to find the answer that Gauss worked out in his head. Of course, Gauss didn’t use Small Basic, but he did find a shortcut. Can you figure out his secret method?
Formatting Your Output
The way you display the output of a program is often just as important as the information you display. If the output is difficult to read, people won’t be able to understand what the information means. A well-laid-out display is an essential part of your program design, but getting the formatting right can be tedious. To make it easier, you can use For loops. For example, let’s use a For loop to write a program that outputs the squares of 1 to 5 in a table format (see Figure 13-3).
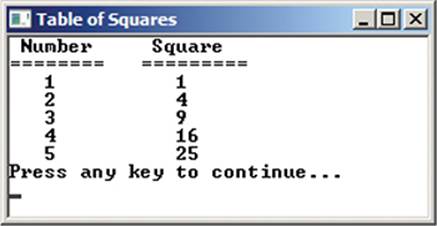
Figure 13-3: The output of SquareTable.sb
Enter and run the program in Listing 13-3.
1 ' SquareTable.sb
2 TextWindow.Title = "Table of Squares"
3 TextWindow.WriteLine(" Number Square")
4 TextWindow.WriteLine("======== =========")
5
6 For N = 1 To 5
7 TextWindow.CursorLeft = 3 ' Moves to middle of col 1
8 TextWindow.Write(N) ' Writes the number
9 TextWindow.CursorLeft = 14 ' Moves to next column
10 TextWindow.WriteLine(N * N) ' Writes its square
11 EndFor
Listing 13-3: Using a For loop to display tabular data
Lines 3–4 write the headers for the two table columns. The loop at line 6 writes the five numbers and their squares. The TextWindow.CursorLeft property sets the desired position under each column (lines 7 and 9). Each time the code loops, it displays the correct value in its proper spot.
TRY IT OUT 13-4
The famous song Twelve Days of Christmas goes like this: “On the first day of Christmas my true love gave to me a partridge in a pear tree. On the second day of Christmas my true love gave to me two turtle doves and a partridge in a pear tree. On the third day of…” and so on for 12 days. On the twelfth day, the singer received 12 + 11 + ... + 2 + 1 gifts. Write a program that shows the total gifts received on each of the 12 days. Include two columns in your output: the day number and the total gifts received on that day.
Drawing All Kinds of Lines
You can use For loops to change all kinds of values, including visual displays. Listing 13-4 draws 10 lines of increasing width in the graphics window.
1 ' Lines.sb
2 GraphicsWindow.Title = "Lines"
3 GraphicsWindow.PenColor = "Blue"
4 For N = 1 To 10
5 GraphicsWindow.PenWidth = N
6 y = N * 15 ' Vertical position of the line
7 GraphicsWindow.DrawLine(0, y, 200, y)
8 EndFor
Listing 13-4: Increasing the line width with each iteration
After setting the window’s title and the pen’s color (lines 2–3), the program starts a For loop with a loop counter named N that runs from 1 to 10 (line 4). In each iteration, the program sets the pen’s width to the current value of N (line 5), sets the vertical position of the line (line 6), and then draws a line that is 200 pixels long (line 7). The output is shown in Figure 13-4.
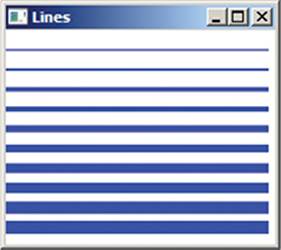
Figure 13-4: The output of Lines.sb
TRY IT OUT 13-5
What does the following program do? Run the program to check your answer.
For N = 1 To 200
GraphicsWindow.PenColor = GraphicsWindow.GetRandomColor()
x2 = Math.GetRandomNumber(300)
y2 = Math.GetRandomNumber(300)
GraphicsWindow.DrawLine(0, 0, x2, y2)
EndFor
Changing the Step Size
The previous section showed you the syntax of the For loop that automatically increases the loop counter by one after each iteration. But For loops have a general form that lets you control the Step size of the loop’s control variable to increase it or decrease it by however much you want. Here’s the general form of the For loop:
For N = A To B Step C
Statement(s)
EndFor
It works like the simplified loop you saw earlier. But instead of incrementing the loop counter N by one, you can decide how much to change N. You do this by setting the amount in the Step size, C, which can be a positive or negative number or any Small Basic expression. Let’s look at some examples that show you how to use this general form of the For loop.
Counting Down by Twos
In this example, the program counts from a starting value (10 in this case) down to 0, subtracting 2 at a time so the program writes the numbers 10, 8, 6, 4, 2, 0 in the text window. Enter and run the program in Listing 13-5.
1 ' CountDown.sb
2 For N = 10 To 0 Step -2 ' Uses a negative step size
3 TextWindow.WriteLine(N)
4 EndFor
Listing 13-5: Counting down with Step
A negative value was used for the Step size (line 2) to reduce the value of the loop counter by 2 after each iteration.
Here’s the output:
10
8
6
4
2
0
Making a Fractional Step
The Step size doesn’t have to be an integer value. You can also use a decimal value, as shown in Listing 13-6.
1 ' DecimalStep.sb
2 GraphicsWindow.FontSize = 10
3 GraphicsWindow.BrushColor = "Black"
4
5 yPos = 0
6 For angle = 0 To (2 * Math.PI) Step 0.3
7 xPos = 100 * (1 + Math.Sin(angle))
8 GraphicsWindow.DrawText(xPos, yPos, "Hello")
9 yPos = yPos + 8
10 EndFor
Listing 13-6: Making a design with text
The loop counter in this example is an angle (in radians) that uses the values from 0 to 2π in increments of 0.3 (line 6). In each iteration, the sine of the angle is computed, and the answer is used to set the horizontal position of the cursor (line 7). The word Hello is then displayed at that position (line 8), and the variable yPos is adjusted to set the vertical position for the next output text (line 9). Experimenting with different Step sizes can create some very cool stuff, like the wavy design shown in Figure 13-5.
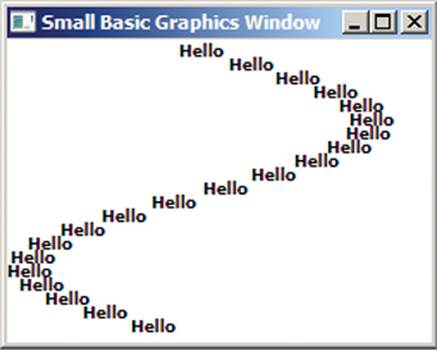
Figure 13-5: The output of DecimalStep.sb
TRY IT OUT 13-6
Write a program that finds the sum of all odd numbers from 5 to 25.
Nested Loops
The statements in the body of a For loop can be any Small Basic statement, including another For loop. Nesting is when you put one For loop inside another For loop (no birds are involved). Using nested loops allows you to create iterations in two or more dimensions. This technique is important, and you can use it to solve a wide range of programming problems.
To understand the idea of nested For loops, you’ll examine a program that causes your computer to “jump” four times and “clap” three times after each jump. Because the program needs to count two actions (jumps and claps), it needs to use two loops, as shown in Listing 13-7. The counter for the outer loop, j, runs from 1 to 4. The counter for the inner loop, c, runs from 1 to 3.
1 ' NestedLoops.sb
2 For j = 1 To 4 ' The jump counter
3 TextWindow.Write("Jump " + j + ": ")
4 For c = 1 To 3 ' The clap counter
5 TextWindow.Write("Clap " + c + " ")
6 EndFor
7 TextWindow.WriteLine("")
8 EndFor
Listing 13-7: Nesting For loops
In the first iteration of the outer loop (where j = 1), the inner loop repeats three times (for the three values of c); each time, it writes the word Clap followed by a space, the current value of c, and another space (line 5). When you nest For loops like this, the inner loop goes through all its iterations for each iteration of the outer loop. So the first iteration of the outer loop makes the program display Jump 1: Clap 1 Clap 2 Clap 3. When the inner loop ends, the program outputs an empty line (line 7) to move the cursor to the beginning of the next line, and the second iteration of the outer loop starts with j = 2. The inner loop runs again for c = 1, 2, and 3. This causes the program to display Jump 2: Clap 1 Clap 2 Clap 3. This continues, so the program displays Jump 3: Clap 1 Clap 2 Clap 3 and then Jump 4: Clap 1 Clap 2 Clap 3. Then the program ends. Perhaps your computer wants to be a cheerleader!
Figure 13-6 helps to explain how the program works. The outer circle represents each time the outer loop runs: for example, at the top of the outer circle, when j = 1 in the outer loop, the inner loop runs three times, where c = 1, c = 2, and c = 3. Follow the outer loop and think through each inner loop. Continue until you get all the way around the outer circle.
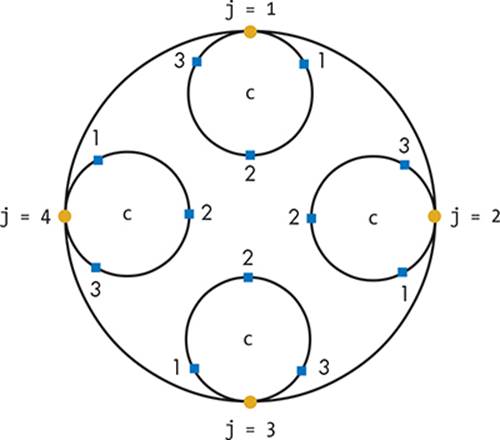
Figure 13-6: How NestedLoops.sb works
The output should look like this:
Jump 1: Clap 1 Clap 2 Clap 3
Jump 2: Clap 1 Clap 2 Clap 3
Jump 3: Clap 1 Clap 2 Clap 3
Jump 4: Clap 1 Clap 2 Clap 3
Now let’s look at other problems where nested For loops come in handy!
Tessellating for Fun
In this example, an application covers the graphics window by stamping a small image over it. The complete program is shown in Listing 13-8.
1 ' Stamp.sb
2 GraphicsWindow.Title = "Stamp"
3
4 path = Program.Directory
5 img = ImageList.LoadImage(path + "\Trophy.ico")
6
7 width = ImageList.GetWidthOfImage(img) ' Width of image
8 height = ImageList.GetHeightOfImage(img) ' Height of image
9
10 GraphicsWindow.Width = 8 * width ' 8 columns
11 GraphicsWindow.Height = 3 * height ' 3 rows
12
13 For row = 0 To 2 ' 3 rows
14 For col = 0 To 7 ' 8 columns
15 GraphicsWindow.DrawImage(img, col * width, row * height)
16 EndFor
17 EndFor
Listing 13-8: Stamping a pattern across the graphics window
Copy the Trophy.ico file from this chapter’s folder to your application’s folder, and then run this program to see the result. Your screen should look like Figure 13-7. Way to go, champ!
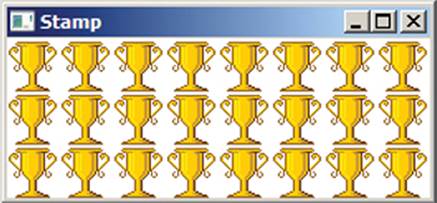
Figure 13-7: The output of Stamp.sb
The program loads an image file (Trophy.ico) from your application’s folder and saves the image’s identifier in a variable named img (line 5). This is done by calling the ImageList object’s LoadImage() method. The program then uses the ImageList object’s methods to tell you the width and height of the loaded image in pixels (lines 7–8). The image’s identifier (the img variable) is passed as an argument to the called methods. In lines 10–11, the program resizes the graphics window to hold eight horizontal and three vertical copies of the image. The program then uses a nested loop to stamp the image at different positions in the graphics window. The outer loop runs for three rows, and the inner loop runs for eight columns, for a total of 24 (3 × 8) iterations (lines 13–14). In each iteration, the x- and y-positions of the image are computed based on the dimensions of the image, and the image is drawn at that location (line 15). Now your trophy collection is bigger than Michael Jordan’s is!
TRY IT OUT 13-7
Update Listing 13-8 to stamp a different image instead of a trophy. Then show your friends and family!
Multiple Nesting Levels
You can have more than two levels of nesting. Listing 13-9 displays all possible combinations of quarters, dimes, and nickels that add up to 50 cents.
1 ' CoinsAdder.sb
2 TextWindow.WriteLine("Quarters Dimes Nickels")
3 TextWindow.WriteLine("-------- ----- -------")
4
5 For Q = 0 To 2 ' Quarters
6 For D = 0 To 5 ' Dimes
7 For N = 0 To 10 ' Nickels
8 If (Q * 25 + D * 10 + N * 5 = 50) Then
9 TextWindow.Write(Q)
10 TextWindow.CursorLeft = 13
11 TextWindow.Write(D)
12 TextWindow.CursorLeft = 24
13 TextWindow.WriteLine(N)
14 EndIf
15 EndFor
16 EndFor
17 EndFor
Listing 13-9: Listing the combinations of coins that add up to 50 cents
The first loop initially keeps track of quarters by setting Q = 0. The second loop runs six times and counts all the dimes: For D = 0 To 5. For each pass of the second loop, the third loop runs 11 times, keeping track of the nickels: For N = 0 To 10. That means the If condition in line 8 is checked 198 times (3 × 6 × 11)! If the coin values total 50, that combination is displayed (lines 9–13). While looping through, the code uses the CursorLeft property to line up the columns and rows properly. Here’s the output:
Quarters Dimes Nickels
-------- ----- -------
0 0 10
0 1 8
0 2 6
0 3 4
0 4 2
0 5 0
1 0 5
1 1 3
1 2 1
2 0 0
TRY IT OUT 13-8
Write a program that finds all the sets of three integers that are less than 20 and can be the sides of a right triangle.
Programming Challenges
If you get stuck, check out http://nostarch.com/smallbasic/ for the solutions and for more resources and review questions for teachers and students.
1. Write a For loop that displays this output:
I had 1 slices of pizza.
I had 2 slices of pizza.
I had 3 slices of pizza.
...
I had 10 slices of pizza.
2. Although the pizza in the previous exercise is very yummy, it’s not grammatically correct, because the program outputs 1 slices of pizza. Fix the program so that its output is grammatically correct (and you won’t embarrass your English teacher). (Hint: use an If statement inside theFor loop.)
3. We built a game for you to quiz Alice on her multiplication so she’ll be ready for the queen’s questions. The program generates 10 random multiplication questions and asks Alice to enter the answer for each question. Alice earns one point for each correct answer. If she enters a wrong answer, show her the correct answer. The program ends by showing her total score. Re-create the program, run it, and explain how it works:
score = 0
For N = 1 To 10 ' Asks 10 questions
n1 = Math.GetRandomNumber(10)
n2 = Math.GetRandomNumber(10)
TextWindow.Write(n1 + " x " + n2 + "? ")
ans = TextWindow.ReadNumber()
If (ans = n1 * n2) Then ' Increases the score
score = score + 1
Else ' Shows the correct answer
TextWindow.WriteLine("Incorrect --> " + (n1 * n2))
EndIf
EndFor
TextWindow.WriteLine("Your score is: " + score + "/10")
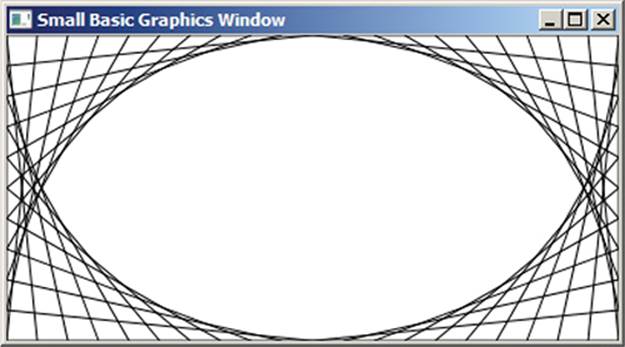
4. Write a program that draws the following image. (Hint: use a For loop to draw the line pattern for each of the four corners.)
All materials on the site are licensed Creative Commons Attribution-Sharealike 3.0 Unported CC BY-SA 3.0 & GNU Free Documentation License (GFDL)
If you are the copyright holder of any material contained on our site and intend to remove it, please contact our site administrator for approval.
© 2016-2026 All site design rights belong to S.Y.A.