LEARN TO PROGRAM WITH SMALL BASIC: An Introduction to Programming with Games, Art, Science, and Math (2016)
19. RECEIVING FILE INPUT AND OUTPUT
The programs you’ve written so far in this book took input from the keyboard and sent output to the screen. But what if you wanted to create a virtual phone book and use thousands of lines of data in the program? Working with that much data could make it difficult to write and maintain your program. You’d have to input every name and phone number each time you ran the program!
Fortunately, a program can also receive input from a file and send its output to a file, and both files can be saved on your computer. So all the phone book information could be neatly tucked away in a file, and you’d only have to input the data once. Today, many programs process data that is stored in files.
In most programming languages, working with files is an advanced topic, but Small Basic makes file handling super simple. In this chapter, you’ll learn about the File object and how it makes working with files a breeze!
The Case for Files
In your programs, you’ve used variables and arrays to store data. But data stored in variables and arrays is temporary: all that data is lost when the program ends or when you turn off your computer. When you run your program again, it won’t remember the input you entered the last time it ran. If you want to permanently store the data created in a program, you need to save that data in a file. Data stored in files is called persistent data because it’s retained even after you turn off your computer. It’s as persistent as a squirrel caching acorns.
Files provide a convenient way to handle large amounts of data. If your program requires lots of data (like the names of your friends), you can’t ask a user to input that data each time they run the program. Most likely, they will get annoyed and stop using the program. If a program can read its input data from a file, a user won’t need to enter data by hand and might want to run the program many times. When programs use files, a user could even customize the application by changing the data file. For example, if you write a spelling game that reads its input from a file, the user can set the game’s difficulty by changing the input file. For example, they could use short words for an easy game and long words for a more difficult game.
Getting data from a file is called reading the file, and the files a program reads are generally called input files. Similarly, sending data to a file is called writing to the file, and the files a program writes to (or creates) are called output files. Storing data to (and reading data from) files on disk is called file access. Working with files is called file I/O, which is short for input/output.
Before we start working with files in programs, let’s look at filenames and how files are saved on your computer.
Naming Files
When you create a new file, you give it a name. You can call it Fred or DontOpenMe if you want, but it’s usually best to name it more specifically, such as myFriends or myLoveStory.
The Windows operating system is case insensitive and doesn’t see any difference between uppercase and lowercase letters in filenames, so myFile, Myfile, and MYFILE would all refer to the same file. Windows also supports filenames with two parts that are separated by a period, such asmyFile.dat. The part following the period (dat in this example) is called the file extension. The file extension usually indicates what kind of file it is (such as a photo or text file). Table 19-1 lists some of the most common file extensions and their meanings. File extensions are usually added automatically by the programs you use. For example, the Small Basic IDE adds an .sb extension to source code files.
Table 19-1: Common File Extensions
|
Extension |
File type |
Used for |
|
.dat |
General data file |
Storing information about a specific application |
|
.exe |
Executable file |
Applications |
|
.gif |
Graphic Interchange Format |
Website images |
|
.html |
Hypertext Markup Language website file |
Web pages |
|
.jpg |
An image encoded with the JPEG standard |
Photos from a digital camera |
|
.mp3 |
Music encoded in MPEG layer 3 audio format |
Audio files |
|
|
Portable Document Format file for reading |
Ebooks |
|
.txt |
General text file |
Notes you might write in Notepad |
You’ll be working with text (.txt) files in this chapter.
File Organization
Imagine dozens of books organized in a cabinet with several shelves. Each shelf has a different label (such as Science, Math, Novels, Dr. Seuss, and so on) and is filled with books in that category. Each shelf serves as a container that groups related books together. Similarly, files on a computer are stored in containers called directories (or folders). A directory can contain files as well as other directories. A directory within a directory is called a subdirectory.
The filesystem is the part of the operating system that is responsible for organizing files and directories on a computer and providing ways to manage them. When you call a file-related method from your Small Basic program (to create, delete, read from, or write to a file), the operating system’s filesystem handles all the low-level details for you, so you don’t have to worry whether the actual files are stored on a hard drive, flash memory, a CD, a DVD, and so on. The Small Basic library talks to the operating system to access files stored on various media, as illustrated inFigure 19-1.

Figure 19-1: How the filesystem lets you access files on different media
The filesystem has a tree structure, like the one shown in Figure 19-2. The top of the tree is called the root directory (the drive letter D: in this figure). The root directory has a number of files and other directories under it. Each of these directories might contain other files and subdirectories.
You can locate any file by following a path from the root directory down the tree until you reach that file. The sequence of directories you follow makes up the pathname for the file. For example, to find the last file in Figure 19-2, you would look in the root directory D:, then in Book, and then in Chapter03 to locate the file. If you write the path using a backslash (\) to separate each directory, the pathname is D:\Book\Chapter03\Ch03.docx. You can locate each file on the system using its pathname.
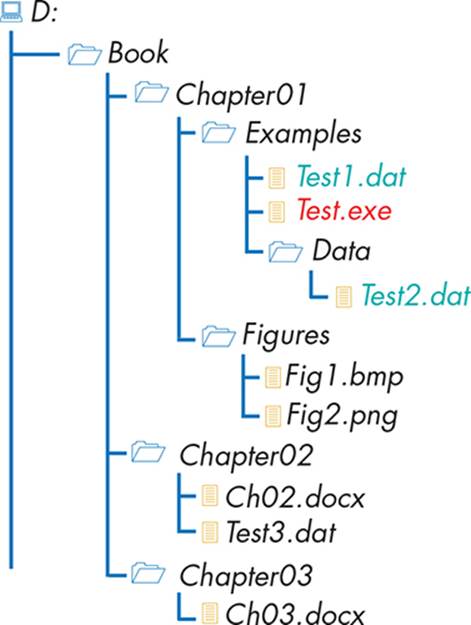
Figure 19-2: The filesystem as a tree
To access a file from a Small Basic program, you need to specify the file’s pathname. To learn how, look at the executable file Test.exe in Figure 19-2. When you run this file, the running program knows its current directory (which is D:\Book\Chapter01\Examples in this case). If you wantTest.exe to access a data file (such as Test1.dat or Test2.dat), you need to specify the pathname—the sequence of folders, starting from the root, that the program needs to navigate to reach the file. This is also called the absolute path. In Figure 19-2, the absolute path for Test1.dat isD:\Book\Chapter01\Examples\Test1.dat, and the absolute path for Test2.dat is D:\Book\Chapter01\Examples\Data\Test2.dat.
If you write a program that only you will use, you can save the data files needed by this program anywhere you like and access these files using absolute paths hardcoded in your program. For example, you can write this:
str = File.ReadContents("D:\Book\Chapter01\Examples\Test1.dat")
But if you give this program to a friend to try, it will fail unless your friend has the same file tree as you. A better solution is to build the desired path(s) in your program at runtime, like this:
path = Program.Directory
str = File.ReadContents(path + "\Test1.dat")
Now the program will add Test1.dat to the end of its current directory, which means it will look for Test1.dat in the same folder that the program is in. Then your friend only needs to place Test.exe and Test1.dat in the same folder; the absolute path will no longer matter. You can just zip your program’s folder (right-click the folder, click Send to, and click Compressed (zipped) folder) and send that ZIP file to your friend. Your friend can save the files contained in the ZIP file under C:\, D:\, C:\Temp, or any other folder of their choice, and your program will work as you designed it.
With an understanding of files and pathnames, you’re ready to learn about the File object and how to use its methods to read data from files, write data to files, and perform other file management operations. Let’s go single file!
The File Object
Small Basic’s File object includes all the methods that handle reading and writing file data, deleting and copying files, and listing directory contents. Because this object supports many methods, this section is divided into two parts. First, we’ll explore the methods related to reading from and writing to files. Second, we’ll look at the methods related to file management.
File I/O Methods
The File object’s most frequently used methods are those used to write data to files and read data from files. Let’s explore these methods in detail.
To start, open Notepad and type some words in the editor so it looks like Figure 19-3. Make sure that you don’t press ENTER after the last line.
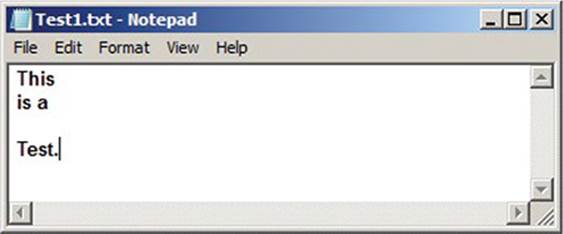
Figure 19-3: An example text file
Save the file as Test1.txt in C:\Temp so its absolute pathname is C:\Temp\Test1.txt. If you don’t want to create the file, you can find it in this chapter’s folder; just copy it to C:\Temp.
Reading from a File
Now let’s try reading the contents of Test1.txt. You can use the File object’s ReadContents() method to read the entire contents of a file at once. This method opens a file, reads it, and returns its entire contents as a string. Enter and run the program in Listing 19-1 to see how this method works.
1 ' ReadContentsDemo.sb
2 path = "C:\Temp\Test1.txt"
3 str = File.ReadContents(path)
4 len = Text.GetLength(str)
5 TextWindow.WriteLine(str)
6 TextWindow.WriteLine("This file has " + len + " characters.")
Listing 19-1: Demonstrating the ReadContents() method
Here is the output of this program:
This
is a
Test.
This file has 19 characters.
Line 2 sets the file’s absolute path. Line 3 reads the entire contents of the file and saves the returned string in a variable named str using the ReadContents() method. ReadContents() takes one argument: the pathname of the file you want to read. Line 4 gets the length of the string and saves it in a variable named len. Lines 5–6 display the str and len variables.
But why does GetLength() output 19 characters for the string’s length when the string "This is a Test." contains only 15? To understand what’s going on, you need to examine the actual characters that make up the str variable. Remember from Chapter 18 that characters are encoded in a format (such as ASCII or Unicode). Add the following code to the end of Listing 19-1, and run the program again:
For N = 1 To len
ch = Text.GetSubText(str, N, 1) ' Gets one character
code = Text.GetCharacterCode(ch) ' Gets the code for this character
TextWindow.WriteLine(code) ' Displays it
EndFor
This code shows that the str variable has 19 characters. Figure 19-4 breaks down what the program is doing.
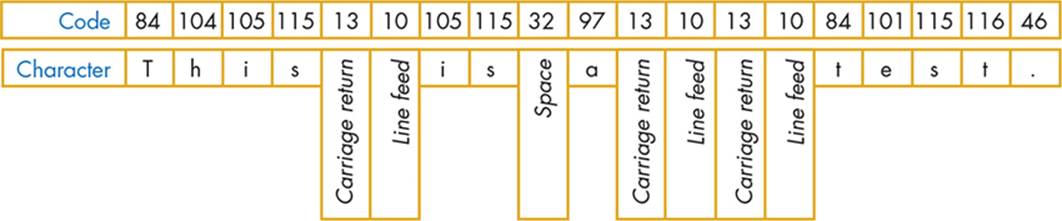
Figure 19-4: The 19 characters of the str variable in Listing 19-1
Notepad inserts two special characters (called carriage return and line feed, whose ASCII codes are 13 and 10) to mark the end of each line. Think of the newline (or end-of-line) marker as a pair of characters produced when you press ENTER on the keyboard. Without these characters, the lines in the file would run together in one long line. The newline characters are control characters; they only control the position of the cursor on the screen or the printer.
The ReadContents() method returns the entire contents of the file as a single string, including newline characters between lines in the file.
Writing to a File
The WriteContents() method lets you save the contents of a string in a program to a file of your choice. If you want to create multiple lines of text, you need to insert the newline characters manually. For example, let’s write a program that reads text input from the keyboard and writes it back to a file. The program is shown in Listing 19-2.
1 ' WriteContentsDemo.sb
2 CR = Text.GetCharacter(13) ' Code for carriage return
3 LF = Text.GetCharacter(10) ' Code for line feed
4 outFile = "C:\Temp\Out.txt" ' Absolute path of output file
5
6 strOut = "" ' Text to be written to file
7 strIn = "" ' One line (read from the user)
8 While(strIn <> "exit") ' Until user enters exit
9 TextWindow.Write("Data (exit to end): ") ' Prompts for text
10 strIn = TextWindow.Read() ' Reads line
11 If (strIn <> "exit") Then ' If user didn't enter exit
12 strOut = strOut + strIn + CR + LF ' Appends text to strOut
13 EndIf
14 EndWhile
15
16 File.WriteContents(outFile, strOut) ' Writes strOut to file
Listing 19-2: Demonstrating the WriteContents() method
Here’s a sample run of this program showing the user input:
Data (exit to end): If Peter Piper picked a peck of pickled peppers,
Data (exit to end): Where's the peck of pickled peppers? I'm hungry.
Data (exit to end): exit
Now open the output file C:\Temp\Out.txt in Notepad and check its contents. The file contains what the user entered in the text window. Pretty cool, huh? You wrote all of that text without using Notepad!
Here’s how the program works. We define the codes for the carriage return and the line feed characters in lines 2–3 and define the output file’s path in line 4. We then start a loop to get the user’s text (line 8–14). In each iteration of the loop, we prompt the user to enter any text they want (line 9) and read the input text into a variable named strIn (line 10). If the user enters any text other than exit (line 11), we append that text followed by a carriage return and line feed to the strOut string (line 12). When the user enters exit, the loop ends, and we call WriteContents() to writestrOut to the output file (line 16). If the file doesn’t exist, WriteContents() automatically creates it. If the file does exist, WriteContents() overwrites its contents with whatever is in the strOut variable.
TRY IT OUT 19-1
Write a program that reads an input text file, converts the text to lowercase, and then saves the result to a new output file.
Checking for Errors
Similar to when you work with user input, you can’t control what the user saves in a file that your program reads. Sometimes the data in a file might be incorrect due to human error. Many things can go wrong (as you’ll see in a moment), and your programs need to be ready to handle these errors.
Fortunately, Small Basic is always prepared! A call to WriteContents() returns "SUCCESS" or "FAILED" automatically based on whether the operation was successful. A well-written program checks the returned string and takes action in case of failure. Let’s update Listing 19-2 to check the return value of WriteContents(). Replace the statement on line 16 with the code in Listing 19-3.
1 result = File.WriteContents(outFile, strOut) ' Writes strOut to file
2 If (result = "SUCCESS") Then
3 TextWindow.WriteLine("Output saved to: " + outFile)
4 Else
5 TextWindow.WriteLine("Failed to write to: " + outFile)
6 TextWindow.WriteLine(File.LastError)
7 EndIf
Listing 19-3: Checking the return value of WriteContents()
First, we save the return of WriteContents() in a variable named result (line 1), and then we check the method’s return value. If the method succeeds (line 2), we inform the user that the output has been saved successfully (line 3). If the operation fails (line 4), we tell the user that the program failed to write to the output file (line 5), and then we display the reason for the failure using the File object’s LastError property (line 6). This property is automatically updated by WriteContents() if writing to a file fails.
After writing the code to handle the failure case, we need to test the code by making it fail on purpose. Here are some things that can cause WriteContents() to fail:
1. The path of the output file doesn’t exist.
2. The output file is already open in another program.
3. There is not enough space to save the file.
Let’s experiment with the first possibility to see what happens.
Path Doesn’t Exist
Run the short program in Listing 19-4.
1 ' BadPath.sb
2 path = "C:\Temp\Folder1\Out.txt"
3 res = File.WriteContents(path, "Hello")
4 TextWindow.WriteLine(res + ": " + File.LastError)
Listing 19-4: Writing to a file when the path doesn’t exist
You should see this output:
FAILED: Could not find a part of the path 'C:\Temp\Folder1\Out.txt'.
The program attempts to write the string "Hello" to an output file (lines 2–3). The directory Temp exists, but the subdirectory Folder1 doesn’t exist, so WriteContents() fails.
Appending to a File
The AppendContents() method opens the specified file and adds data to the end of the file without erasing its original contents. AppendContents() takes two arguments: the pathname of the output file and the string you want to append to the end of the file. If the operation is successful, the method returns "SUCCESS"; otherwise, it returns "FAILED". If the file you pass to AppendContents() doesn’t exist, it’s created for you, and the string is written to it. If the file already exists, the string is appended to its end.
To see the AppendContents() method in use, let’s say you need to maintain a log file that records actions, errors, and other events in your program. To keep the program simple, let’s just record the times when your program is executed. Every time your program runs, you add a record to a log file that includes the date and time. The complete program is shown in Listing 19-5.
1 ' AppendContentsDemo.sb
2 outFile = Program.Directory + "\Log.txt"
3
4 strLog = Clock.WeekDay + ", " + Clock.Date + ", " + Clock.Time
5 result = File.AppendContents(outFile, strLog)
6 If (result = "FAILED") Then
7 TextWindow.WriteLine("Failed to write to: " + outFile)
8 TextWindow.WriteLine(File.LastError)
9 EndIf
10
11 TextWindow.WriteLine("Thank you for using this program. And for using deodorant.")
Listing 19-5: Demonstrating the AppendContents() method
When you run this program, it creates a log string that contains the current day of the week, date, and time (line 4), and it appends this string to the end of a log file named Log.txt that is in the program’s directory (line 5). If writing to the file fails, the program displays an error message explaining the cause of the failure (lines 7–8). Then the program displays a message (line 11) and ends.
Each time you run this program, a new line is appended to the end of the Log.txt file. Here’s the output of Log.txt after running the program three times:
Sunday, 7/19/2015, 12:40:39 PM
Sunday, 7/19/2015, 12:43:21 PM
Sunday, 7/19/2015, 12:47:25 PM
ReadLine(), WriteLine(), and InsertLine()
The ReadContents() and WriteContents() methods let you read and write the entire contents of a file at once. Sometimes this is just what you need. But in other situations, reading or writing one line at a time might be better.
The File object provides the ReadLine() method for reading a single line of text from a file. A line of text consists of a string of characters that ends with a carriage return and line feed pair. ReadLine() reads all the text on that line up to (but not including) the carriage return character. This method takes two arguments: the path of the file and the line number of the text to be read. The first line of a file is line number 1, the second line is 2, and so on. If the file contains the specified line number, the method returns the text at that line. Otherwise, it returns an empty string.
The File object also provides the WriteLine() method for outputting a line of text to a file. This method takes three arguments: the path of the file, the line number to write text to, and the text to write. Keep the following information in mind when you’re using this method:
1. If the file doesn’t exist, WriteLine() creates it.
2. If the file contains the specified line number, WriteLine() overwrites that line.
3. If the specified line number is larger than the number of lines in the file, the specified text is appended to the end of the file. For example, if the file contains three lines and you ask WriteLine() to write new text at line 100, the specified text is written at line 4.
4. WriteLine() automatically writes a carriage return and line feed at the end of the passed text. This means you don’t have to append these characters to your strings manually.
5. If the operation is successful, WriteLine() returns "SUCCESS"; otherwise, it returns "FAILED".
In addition to ReadLine() and WriteLine(), the File object provides the InsertLine() method for you to insert a line of text into a file, at a specified line number. As with the WriteLine() method, this method takes three arguments: the path of the file, the line number where you want the new text to be inserted, and the text you want to insert. InsertLine() won’t overwrite any existing content at the specified line. If the operation is successful, InsertLine() returns "SUCCESS"; otherwise, it returns "FAILED".
As an example, let’s write a simple program that creates login names from the first and last names of users. The program will read an input file that contains the first and last names of users, and it will create an output file that contains the login names for these users. The login name for a user is composed of the first letter of the user’s first name and up to five characters from their last name. For example, if the user’s name is Jack Skellington, his login name is jskell. If the user’s name is Stan Lee (three-letter last name), his login name will be slee. The complete program is shown in Listing 19-6.
1 ' LoginName.sb
2 inFile = Program.Directory + "\Users.txt"
3 outFile = Program.Directory + "\LoginNames.txt"
4
5 N = 1 ' Tracks the line number
6 While (N > 0) ' We'll set N = 0 when we detect end of file
7 strLine = File.ReadLine(inFile, N) ' Reads the Nth line
8 If (strLine = "") Then ' If the string's empty
9 N = 0 ' Exits the While loop
10 Else ' We have an entry
11 idx = Text.GetIndexOf(strLine, " ") ' Finds space in strLine
12 firstChar = Text.GetSubText(strLine, 1, 1)
13 lastName = Text.GetSubText(strLine, idx + 1, 5)
14 loginName = firstChar + lastName
15 loginName = Text.ConvertToLowerCase(loginName)
16 File.WriteLine(outFile, N, loginName) ' Saves to a file
17 N = N + 1 ' Gets ready for the next line
18 EndIf
19 EndWhile
Listing 19-6: Creating login names from first and last names
We start by giving the paths for the input and output files (lines 2–3). We then start a loop to read the contents of the input file, one line at a time (lines 6–19). After reading a line (line 7), we check whether that line is empty, and if it is (line 8), we set N equal to 0 to end the loop (line 9). Otherwise, we process the user’s name that is read from the input file to create the lowercase login name (lines 11–15). First, we find the space between the first name and the last name (line 11). Next, we get the first letter of the first name (line 12) and the first five letters of the last name (line 13), combine them to create the login name (line 14), and convert the login name to lowercase (line 15). Then we write the login name to the output file (line 16) and increment N by 1 to read the next line in the input file (line 17).
To keep the code simple, we didn’t add error-checking code. We also assumed that the input file was properly formatted: each line contained a user’s first and last names separated by a single space. Table 19-2 shows an example input file for this program and the output file.
Table 19-2: Creating Login Names
|
User’s name |
Login name |
|
Tina Fey |
tfey |
|
Jimmy Fallon |
jfallo |
|
David Letterman |
dlette |
|
Jay Leno |
jleno |
|
Amy Poehler |
apoehl |
TRY IT OUT 19-2
Write a program that reads an input file and counts the number of lines, characters, and spaces it contains.
File Management
In addition to the methods that let you perform file I/O, the File object also provides a couple of methods related to file and directory management. Using these methods, you can copy and delete files, create and delete directories, and list files and directories from your program.
Copying and Deleting Files
You can use the CopyFile() method to create a copy of an existing file. This method takes the pathnames of the source file and the destination file as arguments. The source file isn’t affected by this operation. If the operation is successful, the method returns "SUCCESS". Otherwise, it returns"FAILED".
If the destination path points to a location that doesn’t exist, the method attempts to create it automatically. For example, look at the following code:
srcPath = "C:\Temp\Test1.txt" ' Path of the source file
dstPath = "C:\Temp\Temp1\Temp2\Test1.txt" ' Path of the destination file
File.CopyFile(srcPath, dstPath)
If the subfolders Temp, Temp1, and Temp2 don’t exist, CopyFile() attempts to create all the directories in the destination path, beginning with the root. When you run this code, you’ll have two copies of the Test1.txt file: the original source file and the duplicate file underC:\Temp\Temp1\Temp2.
WARNING
If the destination path points to an existing file, that file will be overwritten. So be careful when you use the CopyFile() method, because you might overwrite some of your files!
If you want to delete a file, use the DeleteFile() method. This method takes one argument: the pathname of the file you want to delete. If the operation is successful, the method returns "SUCCESS". Otherwise, it returns "FAILED".
WARNING
The deleted file doesn’t go to the recycle bin; instead, it’s completely deleted from your system. So be extra careful when you use the DeleteFile() method!
Using CopyFile() and DeleteFile(), you can create your own subroutines for moving and renaming files. To move a file to a new location, copy the file to the new location and then delete the original file. To rename a file, make a copy of the file, give the copy a new name, and then delete the original file.
Creating and Deleting Directories
You can easily create or delete a directory. The CreateDirectory() method takes a single argument: the pathname of the directory you want to create. If the directories don’t exist, the method attempts to create all the directories in the path, beginning with the root. If the operation is successful, the method returns "SUCCESS". Otherwise, it returns "FAILED". Here’s an example:
File.CreateDirectory("C:\Temp\Temp1\Temp2")
If the directories C:\Temp, C:\Temp\Temp1, and C:\Temp\Temp1\Temp2 don’t exist, CreateDirectory() creates them. If the directory path already exists, the function does nothing and returns "SUCCESS".
The DeleteDirectory() method also takes a single argument: the pathname of the directory you want to delete. All files and folders under the path are deleted. If the operation is successful, the method returns "SUCCESS". Otherwise, it returns "FAILED". Figure 19-5 shows an example ofDeleteDirectory().
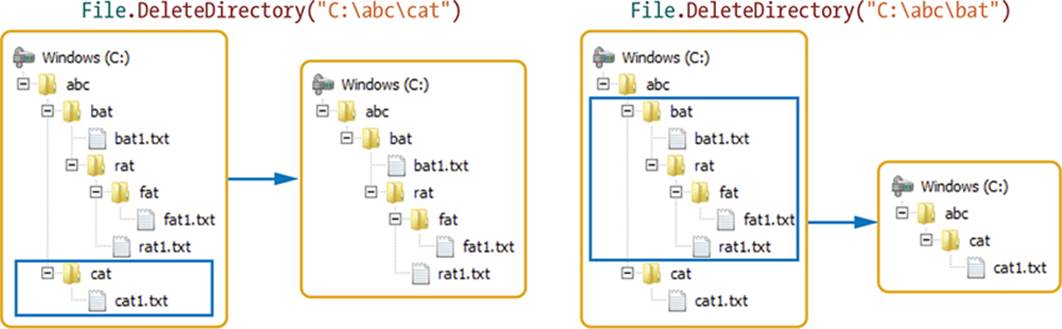
Figure 19-5: Demonstrating the DeleteDirectory() method
WARNING
When you call DeleteDirectory(), all the files and folders under the pathname are deleted. So make sure you don’t have any files tucked away that you don’t want to delete!
List Files and Directories
The File object includes the GetFiles() method, which lets you list all the files in a directory. This method takes the path of the target directory as its argument. The example in Listing 19-7 shows you how to use this method.
1 ' GetFilesDemo.sb
2 path = "D:\Temp"
3 fileArray = File.GetFiles(path)
4 count = Array.GetItemCount(fileArray)
5 TextWindow.WriteLine(path + " contains " + count + " files:")
6 For N = 1 To count
7 TextWindow.WriteLine(" " + fileArray[N])
8 EndFor
Listing 19-7: Demonstrating the GetFiles() method
Here is the output after running this program (change the path variable in line 2 to a directory on your computer):
D:\Temp contains 3 files:
D:\Temp\Fig01.bmp
D:\Temp\keys.txt
D:\Temp\Test.sb
We start by specifying the path of the directory we want to list (line 2). Next, we call GetFiles() with the desired path (line 3). This method creates an array that contains the pathnames of all the files in the directory; we save the identifier of the returned array in fileArray. Then we callGetItemCount() to find out the number of elements in the returned array (line 4) and use a For loop to display its elements (lines 6–8).
NOTE
If GetFiles() fails, then fileArray stores the string "FAILED". In this case, the call to Array.GetItemCount(fileArray) returns 0. So you might not need to perform an extra check on the return of GetFiles().
The GetDirectories() method lets you list all the subdirectories in a given directory. Listing 19-8 shows an example of this method.
1 ' GetDirectoriesDemo.sb
2 path = "D:\Temp"
3 dirArray = File.GetDirectories(path)
4 count = Array.GetItemCount(dirArray)
5 TextWindow.WriteLine(path + " contains " + count + " directories:")
6 For N = 1 To count ' Displays the array's elements
7 TextWindow.WriteLine(" " + dirArray[N])
8 EndFor
Listing 19-8: Demonstrating the GetDirectories() method
Here is the output after running this program:
D:\Temp contains 3 directories:
D:\Temp\Chapter01
D:\Temp\Chapter02
D:\Temp\Chapter03
But your output will probably look different, depending on what your Temp directory looks like. This program is similar to Listing 19-7. We start by storing the path we’re interested in (line 2). Next, we call GetDirectories() with the path (line 3). This method creates an array that contains the pathnames of all the directories in the specified path; we save the identifier of the returned array in dirArray. Then we call GetItemCount() to find out the number of elements in the returned array (line 4) and use a For loop to display its elements (lines 6–8). Try changing line 2 to access a different directory.
At this point, we’ve covered everything you need to know about the File object. Let’s put some of this newfound knowledge to work to create some cool applications!
Practical Programs
We’ll present two programs intended to highlight different aspects of file I/O and give you some ideas and new techniques that you can use in your own creations.
The Poet
In this example, we’ll modify the Poet program we created in Chapter 16 so it reads its input from files instead of hardcoding the word lists into the program. By doing so, your program will be more awesome and concise, and it will be easy to add words to!
The program uses five input files: article.txt, adjective.txt, noun.txt, verb.txt, and preposition.txt. The article.txt file contains a list of articles and qualifiers; the adjective.txt file contains a list of adjectives, and so on. To take advantage of the way Small Basic handles arrays, each of the five files is formatted to make it easy to be read into an array in your program.
Look at this statement:
art = File.ReadContents("article.txt")
We automatically load the contents of the article.txt file into an array named art that contains the five elements shown in Figure 19-6.
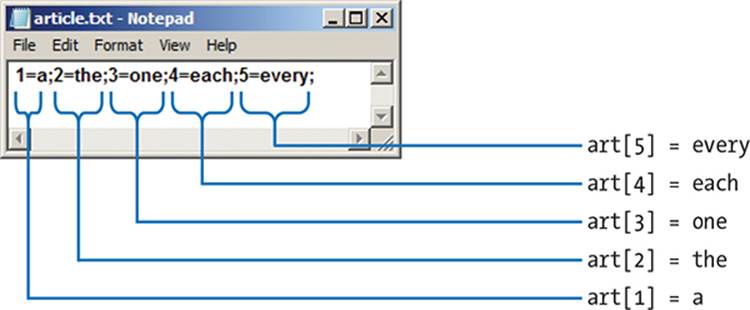
Figure 19-6: Reading the contents of article.txt into an array named art
Open the file Poet_Incomplete.sb from this chapter’s folder, which also contains the background image and the five input files we’ll need. The file has an empty placeholder for the CreateLists() subroutine, which you’ll add now. This subroutine is shown in Listing 19-9.
1 Sub CreateLists
2 article = File.ReadContents(path + "\article.txt")
3 adjective = File.ReadContents(path + "\adjective.txt")
4 noun = File.ReadContents(path + "\noun.txt")
5 verb = File.ReadContents(path + "\verb.txt")
6 prepos = File.ReadContents(path + "\preposition.txt")
7 EndSub
Listing 19-9: The CreateLists() subroutine
Run this program. It should work the same way as before but with an advantage: the user can now change the input files to create their own custom poems.
Math Wizard
In this example, we’ll create a program featuring a wizard who seems to know a lot about math. The wizard isn’t Merlin, Gandalf, or Harry Potter: welcome to the world of the Math Wizard! The wizard starts by asking the user to think of a secret number. He then requests that the user perform some mathematical operations on that number (such as doubling the number, subtracting 2, dividing the answer by 10, and so on). At the end, the wizard uses his magical powers to tell the user the resulting number after performing these operations (although he doesn’t know the user’s secret number)!
The idea of the program is very simple. We’ll save each math puzzle in a text file that has the format shown in Figure 19-7. The first line contains the puzzle’s answer, and the remaining lines contain the instructions that the wizard asks the user to perform. This program includes 11 puzzles saved in Puzzle01.txt, Puzzle02.txt, ..., Puzzle11.txt. You can add more puzzles by creating additional puzzle files (follow the format shown in Figure 19-7).
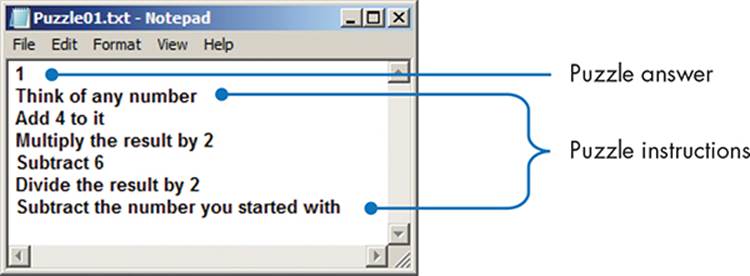
Figure 19-7: The format of a puzzle file
The strategy for developing this program is outlined as follows:
1. When the program starts, we’ll list the files in the program’s directory to get the pathnames of the puzzle files.
2. For each round of the program, we’ll select one of the available puzzles.
3. We read the first line of the selected puzzle’s file and interpret it as the puzzle’s answer. The remaining lines represent the instructions the wizard displays.
4. The wizard displays the puzzle’s instructions one by one until the program reaches an empty line. The wizard asks the user to press ENTER after each instruction.
5. The wizard displays the puzzle’s answer.
Open the Wizard_Incomplete.sb file from this chapter’s folder. This file contains the program’s main code, shown in Listing 19-10, and empty placeholders for the DoPuzzle() subroutine that you’ll add. The folder also contains the text files for the 11 premade puzzles.
1 ' Wizard_Incomplete.sb
2 TextWindow.Title = "MATH WIZARD"
3 TextWindow.WriteLine("========== MATH WIZARD ==========")
4 TextWindow.WriteLine("Press Enter after each instruction")
5 TextWindow.WriteLine("==================================")
6 TextWindow.WriteLine("")
7
8 puzzle = File.GetFiles(Program.Directory) ' Stores filenames into an array
9
10 For P = 1 To Array.GetItemCount(puzzle)
11 path = puzzle[P] ' File in the app's directory
12 If (Text.EndsWith(path, ".txt")= "True") Then
13 DoPuzzle()
14 EndIf
15 EndFor
16 TextWindow.WriteLine("The game was won, the math was fun, and the magic is done!")
17 TextWindow.WriteLine("There is one Math Wizard to rule them all! Bye!")
Listing 19-10: The main code of the Math Wizard program
After displaying the program’s title and its instructions (lines 2–6), we call GetFiles() to get a list of all the files in the program’s directory, and we save the identifier of the returned array in the puzzle variable (line 8). We then start a loop to process the files we found (lines 10–15). In each iteration, we get one pathname from the puzzle array (line 11) and check whether it has a .txt extension (line 12). If the file has a .txt extension (which means it contains a puzzle), we call DoPuzzle() to show that puzzle to the user (line 13). The program ends with a message from the Math Wizard (lines 16–17).
Add the DoPuzzle() subroutine shown in Listing 19-11 to the bottom of the Wizard_Incomplete.sb program.
1 Sub DoPuzzle
2 puzzleAns = File.ReadLine(path, 1) ' Reads answer from first line
3 N = 2 ' Starts from second line
4 line = "?" ' To enter the loop
5 While (line <> "") ' Loops as long as we have instructions
6 line = File.ReadLine(path, N) ' Reads the Nth line
7 If (line <> "") Then ' If we have an instruction
8 TextWindow.Write(line + "... ") ' Writes instruction
9 TextWindow.PauseWithoutMessage() ' Waits for user to press a key
10 TextWindow.WriteLine("")
11 N = N + 1 ' Prepares to read next line
12 EndIf
13 EndWhile
14 TextWindow.WriteLine("You still have: " + puzzleAns)
15 TextWindow.WriteLine("")
16 EndSub
Listing 19-11: The DoPuzzle() subroutine
We read the first line from the file and save it in puzzleAns (line 2). Next, we set N to 2 to read the second line of the file and set the line string to "?" to enter the While loop (lines 3–4). In each iteration of the loop, we read one line from the puzzle’s file (line 6) and check whether the program reached the last instruction. If line is not empty (line 7), we display the instruction the program just read (line 8) and wait for the user to press any key (line 9). When the player presses any key, we increment N to read the next instruction in the file (line 11). When the program reads an empty line, the While loop ends, and the program moves to line 14, where we display the puzzle’s answer followed by an empty line (lines 14–15).
Figure 19-8 shows a sample run of the program.

Figure 19-8: Sample output of the Math Wizard program
TRY IT OUT 19-3
Think of ways to improve the Math Wizard program, and try to implement them. For example, add some colors to make the output look fancier or draw something after each puzzle.
Programming Challenges
If you get stuck, check out http://nostarch.com/smallbasic/ for the solutions and for more resources and review questions for teachers and students.
1. Let’s write a spelling quiz game using homonyms. Homonyms are words that sound the same but have different meanings. Use Notepad to create the following text file:
In your math class;ad/add;add
Halloween queen;which/witch;witch
Eyes do this;sea/see;see
In the church;altar/alter;altar
A rabbit;hair/hare;hare
A good story;tail/tale;tale
Animals have them;clause/claws;claws
Pencils do this;right/write;write
Each line in this file contains three fields separated by semicolons. The first field is the hint you’ll show the player, such as In your math class. The second field is the two possible answers that your player will choose from, such as ad/add. The third field is the correct answer, such as add.
In each round, have the program display the hint and the two possible answers to the player, and then wait for them to enter their answer. Have the program compare the user’s answer with the correct answer, and then let them know whether their answer is correct.
2. Write a science quiz that tests the student’s knowledge of the animal kingdom. First, use Notepad to create the following text file:
1=Invertebrates;2=Fish;3=Amphibians;4=Reptiles;5=Birds;6=Mammals
Bat;6
Clam;1
Dog;6
Frog;3
Lizard;4
Peacock;5
Salamander;3
Salmon;2
Spider;1
Turkey;5
Turtle;4
The first line contains the possible classifications. Each of the remaining lines contains an animal’s name and its correct classification. Display an animal’s name to the player, and then ask them to classify that animal by entering the number of the correct class. Then process the player’s answer and let them know whether their answer is correct; if their answer is incorrect, display the correct classification.
All materials on the site are licensed Creative Commons Attribution-Sharealike 3.0 Unported CC BY-SA 3.0 & GNU Free Documentation License (GFDL)
If you are the copyright holder of any material contained on our site and intend to remove it, please contact our site administrator for approval.
© 2016-2026 All site design rights belong to S.Y.A.