LEARN TO PROGRAM WITH SMALL BASIC: An Introduction to Programming with Games, Art, Science, and Math (2016)
3. DRAWING BASICS
With Small Basic you can become a masterful artist. Instead of a paintbrush, you’ve got the power of code. Let’s jump in so you can start creating your very own masterpiece! We showed you the TextWindow object, but in this chapter, you’ll explore the GraphicsWindow object, which includes methods that draw lines, triangles, rectangles, ellipses, and even fancy text.
The Graphics Coordinate System
Think of the graphics window as a rectangular grid. Every point on this grid is described with two numbers, called coordinates. The x-coordinate tells you a point’s horizontal position, and the y-coordinate tells you a point’s vertical position. You specify the point’s location using parentheses, like this: (x, y).
In the system you use at school, point (0, 0) is in the middle of the graph, but things are a little different in the graphics window. Figure 3-1 shows you that point (0, 0) is in the upper-left corner of the graphics window, which means you can only see the points that have positive x- and y- values.
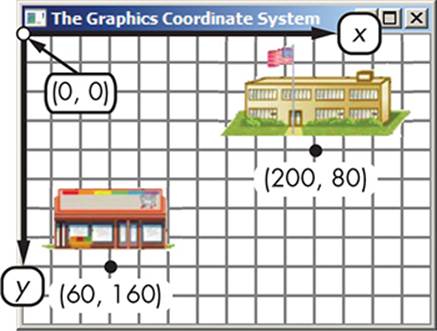
Figure 3-1: The coordinate system of the graphics window
Now that you know how the graphics window’s coordinate system works, let’s play around with it. The next sections take you on a tour of some methods you can use to draw simple pictures. Throughout the chapter, we’ll show you drawings to create with Small Basic, and we’ll include the gridlines to help you visualize the coordinates involved in each shape.
Drawing Lines
To draw a line, you can use the DrawLine() method:
GraphicsWindow.DrawLine(x1, y1, x2, y2)
The arguments x1, y1 and x2, y2 are for the x- and y-coordinates of the two end points of the line. To put this method into action, run the program in Listing 3-1, which draws two parallel lines.
1 ' ParallelLines.sb
2 GraphicsWindow.Title = "Parallel Lines"
3 GraphicsWindow.DrawLine(40, 50, 100, 50) ' Top line
4 GraphicsWindow.DrawLine(40, 70, 100, 70) ' Bottom line
Listing 3-1: Drawing parallel lines
In line 3, Small Basic starts at the upper-left corner and then jumps to the right 40 and down 50. From there, it draws the line to the right, to the (100, 50) end point. Then, in line 4, it hops down to (40, 70) and draws a second line to the right, at the (100, 70) end point. Each pair of end points uses the same x-coordinates; the different y-coordinates draw the second line below the first line.
Great job! But lines by themselves aren’t very exciting (unless they’re short lines at Disneyland). Let’s use several different lines to draw a sailboat like the one in Figure 3-2.
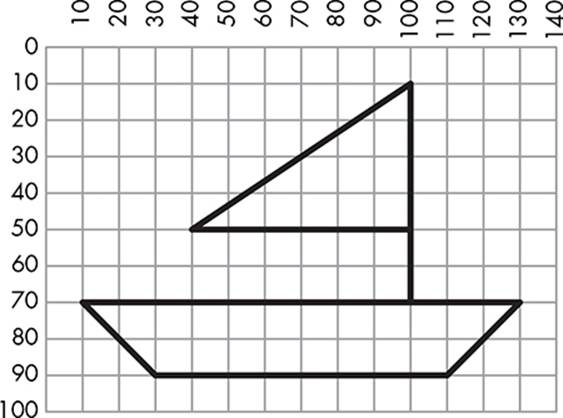
Figure 3-2: A sailboat drawn entirely with line segments
This shape’s made up of seven line segments, and your program includes seven DrawLine() statements. The code for this program is in Listing 3-2, and you can see its output in Figure 3-3.
1 ' SailBoat.sb
2 GraphicsWindow.Title = "SailBoat"
3 GraphicsWindow.DrawLine(10, 70, 130, 70) ' Top of the boat
4 GraphicsWindow.DrawLine(130, 70, 110, 90) ' Right side
5 GraphicsWindow.DrawLine(110, 90, 30, 90) ' Bottom of the boat
6 GraphicsWindow.DrawLine(30, 90, 10, 70) ' Left edge
7 GraphicsWindow.DrawLine(100, 70, 100, 10) ' Mast
8 GraphicsWindow.DrawLine(100, 10, 40, 50) ' Slanted sail edge
9 GraphicsWindow.DrawLine(40, 50, 100, 50) ' Bottom edge of sail
Listing 3-2: Drawing a boat with seven lines
Congratulations, you’ve just drawn your first picture in Small Basic. You’re well on your way to becoming a great artist.
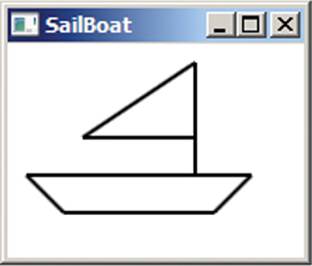
Figure 3-3: The output of SailBoat.sb
Drawing Shapes
You can draw lots of cool pictures using lines, but that can be super slow. You can simplify your code by drawing geometric shapes with built-in methods, which also saves you a lot of time!
Triangles
Use the DrawTriangle() and FillTriangle() methods to draw triangles:
GraphicsWindow.DrawTriangle(x1, y1, x2, y2, x3, y3)
GraphicsWindow.FillTriangle(x1, y1, x2, y2, x3, y3)
These methods take the x- and y-coordinates of the three corners of the triangle.
The DrawTriangle() method draws the triangle’s outline, and the FillTriangle() method fills the inside of the triangle with whatever color you set the BrushColor property to.
TIP
For a complete list of colors you can use in the graphics window, please see http://tiny.cc/hexcolors/.
For example, to fill a triangle with blue, use these two statements:
GraphicsWindow.BrushColor = "Blue"
GraphicsWindow.FillTriangle(100, 10, 40, 50, 100, 50)
If you want to see the border, then add a call to DrawTriangle():
GraphicsWindow.BrushColor = "Blue"
GraphicsWindow.FillTriangle(100, 10, 40, 50, 100, 50)
GraphicsWindow.DrawTriangle(100, 10, 40, 50, 100, 50)
Experiment with these methods to draw all kinds of triangles. Check your understanding with Try It Out 3-1.
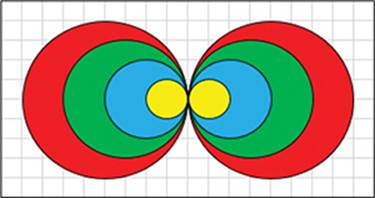
TRY IT OUT 3-1
Write a program that draws the shape in Figure 3-4. (Hint: start by drawing the four blue triangles, and then draw the four yellow triangles.)
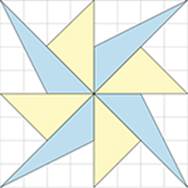
Figure 3-4: A fancy pinwheel
Rectangles and Squares
Using the DrawRectangle() and FillRectangle() methods, you can draw rectangles or squares of different sizes:
GraphicsWindow.DrawRectangle(x, y, width, height)
GraphicsWindow.FillRectangle(x, y, width, height)
In both methods, the first two arguments (x and y) are the coordinates of the upper-left corner of the rectangle. The third argument sets the width, and the fourth argument sets the height. Use the same number for the third and fourth arguments to draw a square.
To try out these methods, let’s write a program that draws the house shown in Figure 3-5.
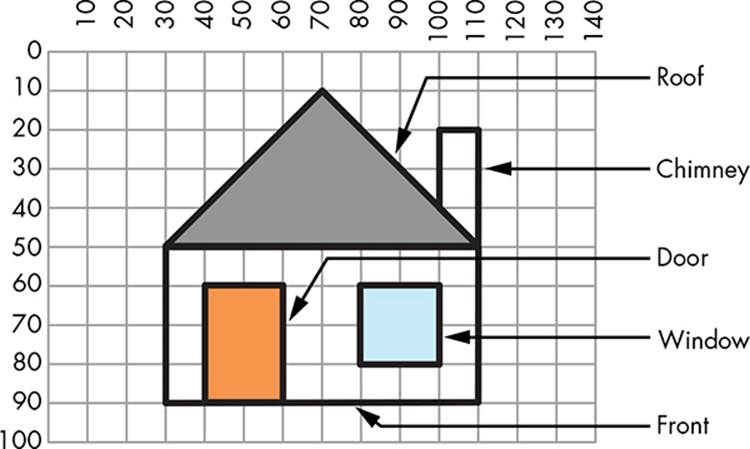
Figure 3-5: Drawing a house
The complete program is shown in Listing 3-3.
1 ' House.sb
2 GraphicsWindow.Title = "House"
3 GraphicsWindow.DrawRectangle(30, 50, 80, 40) ' Front of the house
4
5 GraphicsWindow.BrushColor = "Orange" ' Door is light orange
6 GraphicsWindow.FillRectangle(40, 60, 20, 30) ' Door
7 GraphicsWindow.DrawRectangle(40, 60, 20, 30) ' Door border
8
9 GraphicsWindow.BrushColor = "Lightblue" ' Window is light blue
10 GraphicsWindow.FillRectangle(80, 60, 20, 20) ' Window
11 GraphicsWindow.DrawRectangle(80, 60, 20, 20) ' Window border
12
13 GraphicsWindow.DrawRectangle(100, 20, 10, 30) ' Chimney
14
15 GraphicsWindow.BrushColor = "Gray" ' Roof is gray
16 GraphicsWindow.FillTriangle(30, 50, 70, 10, 110, 50) ' Roof
17 GraphicsWindow.DrawTriangle(30, 50, 70, 10, 110, 50) ' Roof border
Listing 3-3: Building the house of your dreams
Figure 3-6 shows what the output looks like. The front side is a rectangle with its upper-left corner at (30, 50), a width of 80, and a height of 40 (line 3). The door is a filled rectangle with its upper-left corner at (40, 60), a width of 20, and a height of 30 (line 6).
The window is a filled square with its upper-left corner at (80, 60) and a side length of 20 (line 10). The roof is a filled triangle whose three corner points are at (30, 50), (70, 10), and (110, 50).
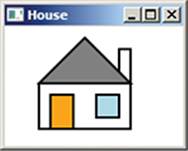
Figure 3-6: The output of House.sb
The chimney is also a rectangle with its upper-left corner at (100, 20). Its width is 10 and height is 30 (line 13). However, part of this rectangle is covered by the roof, so you need to draw the chimney first, and then draw the roof on top of it to cover the bottom of the chimney.
Now you have the house of your dreams!
TRY IT OUT 3-2
Now that you can draw lines, triangles, rectangles, and squares, write a program that draws the fox shown in Figure 3-7. Add some colors.
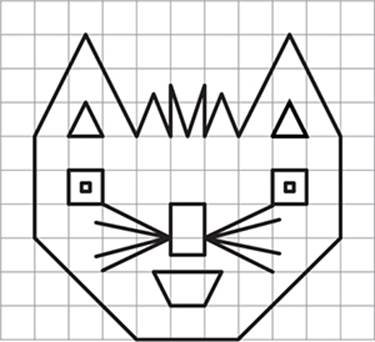
Figure 3-7: Drawing and coloring the fox
Ellipses and Circles
GraphicsWindow also has methods for drawing ellipses (ovals) and circles. Here are two ellipse methods that use four arguments:
GraphicsWindow.DrawEllipse(x, y, width, height)
GraphicsWindow.FillEllipse(x, y, width, height)
Figure 3-8 explains these four arguments. The first two arguments, x and y, set the upper-left coordinate of the ellipse. The third argument, width, sets the width of the ellipse, and the fourth argument, height, sets the height of the ellipse. To draw a circle, just set the width and the height of the ellipse to the same value.
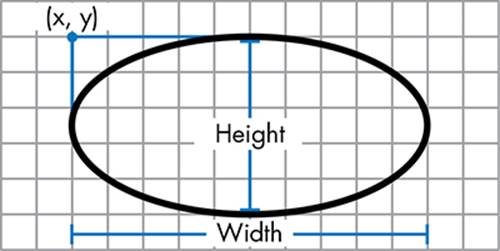
Figure 3-8: The four arguments for the ellipse-drawing methods
To use these drawing methods, let’s write a program that draws the face shown in Figure 3-9.
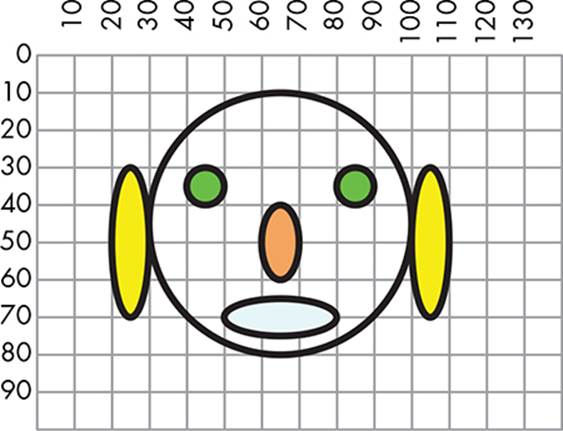
Figure 3-9: Drawing a face
To draw the face, you just have to draw a circle and some different ellipses using the right parameters. The full program is shown in Listing 3-4.
1 ' Face.sb
2 GraphicsWindow.Title = "Face"
3
4 GraphicsWindow.BrushColor = "Yellow" ' Color of the two ears
5 GraphicsWindow.FillEllipse(20, 30, 10, 40) ' Left ear
6 GraphicsWindow.DrawEllipse(20, 30, 10, 40) ' Left ear border
7
8 GraphicsWindow.FillEllipse(100, 30, 10, 40) ' Right ear
9 GraphicsWindow.DrawEllipse(100, 30, 10, 40) ' Right ear border
10
11 GraphicsWindow.BrushColor = "Lime" ' Color of the two eyes
12 GraphicsWindow.FillEllipse(40, 30, 10, 10) ' Left eye
13 GraphicsWindow.DrawEllipse(40, 30, 10, 10) ' Left eye border
14
15 GraphicsWindow.FillEllipse(80, 30, 10, 10) ' Right eye
16 GraphicsWindow.DrawEllipse(80, 30, 10, 10) ' Right eye border
17
18 GraphicsWindow.BrushColor = "SandyBrown" ' Color of the nose
19 GraphicsWindow.FillEllipse(60, 40, 10, 20) ' Nose
20 GraphicsWindow.DrawEllipse(60, 40, 10, 20) ' Nose border
21
22 GraphicsWindow.BrushColor = "LightCyan" ' Color of the mouth
23 GraphicsWindow.FillEllipse(50, 65, 30, 10) ' Mouth
24 GraphicsWindow.DrawEllipse(50, 65, 30, 10) ' Mouth border
25
26 GraphicsWindow.DrawEllipse(30, 10, 70, 70) ' Face border
Listing 3-4: Drawing the most awesome ellipse face ever
The output of this program is shown in Figure 3-10. All of the ellipses in this picture use the same pen size and color, but you can add even more detail to your Small Basic drawings by changing those properties. Let’s see how.
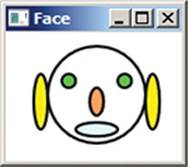
Figure 3-10: The output of Face.sb
Pen Size and Color
To change the pen size and color, you can set the following properties before you draw a line or a shape:
GraphicsWindow.PenWidth = 20 ' Sets line width
GraphicsWindow.PenColor = "Green" ' Sets line color
If you want to mix things up, you can change your pen color every time you run your program by using the GetRandomColor() method of the GraphicsWindow object. Check it out:
GraphicsWindow.PenColor = GraphicsWindow.GetRandomColor()
This method doesn’t have any arguments, which is why there’s nothing in the GetRandomColor() method’s parentheses; it returns a randomly selected color. Go ahead and try it out!
Pen Width and Shape Size
When drawing triangles, rectangles, and ellipses, the width of the pen you use in the drawing affects the size of the shape. Listing 3-5 shows you what we mean.
1 ' PenWidthDemo.sb
2 GraphicsWindow.Title = "Pen Width Demo"
3
4 GraphicsWindow.PenWidth = 20 ' Width of circle
5 GraphicsWindow.PenColor = "Lime" ' Color of circle
6 GraphicsWindow.DrawEllipse(20, 20, 100, 100) ' Circle border
7
8 GraphicsWindow.PenWidth = 1 ' Width of square
9 GraphicsWindow.PenColor = "Black" ' Color of square
10 GraphicsWindow.DrawRectangle(20, 20, 100, 100) ' Square border
Listing 3-5: Using pen width to change the size of the shape
This program uses a pen with a width of 20 to draw the border of the circle. Figure 3-11 shows that the border extends 10 pixels out from the perimeter of the square, even though the circle and the square have the same dimensions. When measured across the outside edges, the diameter of the output circle is 120 pixels instead of the specified value of 100.
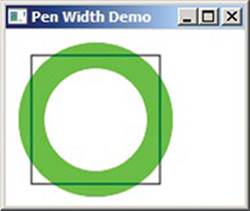
Figure 3-11: The output of PenWidthDemo.sb
TRY IT OUT 3-3
Write a program that draws a bike like the one shown in Figure 3-12. (Hint: use the given grid lines to figure out the coordinates of the different shapes to make them easier to code.)
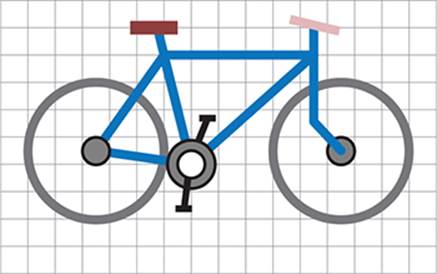
Figure 3-12: Drawing a bike
Drawing Text
A picture might be worth a thousand words, but you can also draw text in the graphics window, like this:
GraphicsWindow.DrawText(x, y, "text")
DrawText() takes three arguments. The first two arguments set the x- and y-coordinates of the upper-left corner of the text, and the third argument takes a string of the text (or numbers) you want to draw. Remember to put the string in quotes.
If you want to change how the text appears, use the GraphicsWindow object properties in Table 3-1.
Table 3-1: GraphicsWindow Properties for the Font Name, Size, Style, and Color
|
Property |
Default |
Description |
|
FontName |
"Tahoma" |
The name of the font |
|
FontSize |
12 |
The size of the font |
|
FontBold |
"True" |
Whether or not the font’s bold |
|
FontItalic |
"False" |
Whether or not the font’s italic |
|
BrushColor |
"SlateBlue" |
The color of the brush that draws the text |
If you don’t change any of these properties, Small Basic uses the default values listed in Table 3-1. The program in Listing 3-6 changes these properties to draw some fancy text.
1 ' Fonts.sb
2 GraphicsWindow.Title = "Fonts"
3 GraphicsWindow.BackgroundColor = "LightYellow"
4 GraphicsWindow.FontName = "Times New Roman"
5 GraphicsWindow.FontSize = 120
6 GraphicsWindow.FontItalic = "True"
7
8 GraphicsWindow.BrushColor = "Silver" ' Text shadow color
9 GraphicsWindow.DrawText(5, 5, "Hello!") ' Shadow position/text
10
11 GraphicsWindow.BrushColor = "RosyBrown" ' Text color
12 GraphicsWindow.DrawText(0, 0, "Hello!") ' Position and text
Listing 3-6: Trying out some fonts
In line 3, the BackgroundColor property changes the background color of the graphics window. Lines 4–6 set the name, size, and italics properties of the font you use in any calls to DrawText(). Line 8 sets the color of the font using the BrushColor property, and line 9 draws the string"Hello!" starting at point (5, 5). This line draws the background shadow you see in Figure 3-13. In line 11, the program changes the BrushColor property, and then line 12 draws the same string in a slightly different position. This creates the appearance of text with a background shadow, as shown in Figure 3-13.
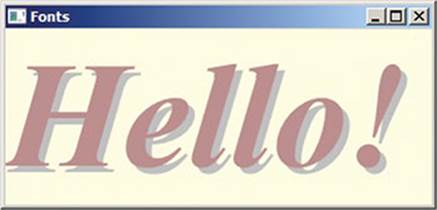
Figure 3-13: The output of Fonts.sb
By layering text on top of other text like this, you can create some cool effects. Try playing with this code to see what you can come up with!
You can also draw text to fit a certain width by using the DrawBoundText() method:
GraphicsWindow.DrawBoundText(x, y, width, "text")
The parameters x, y, and "text" mean the same as they do in the DrawText() method: x and y are where you start to draw, and "text" is the string of text or numbers to draw. The third argument, width, tells Small Basic the maximum available width for the text in the output. If the text doesn’t fit in the given width, then it continues on a new line. Even though the rectangle that the text appears in has a fixed width, the text keeps going, so the rectangle text area stretches vertically for as long as it needs to. But if one word’s too long to fit in your bound rectangle (which happens, especially if the font’s too big), then it gets clipped! The program in Listing 3-7 and its output in Figure 3-14 show you what we mean.
1 ' BoundTextDemo.sb
2 GraphicsWindow.Title = "DrawBoundText Demo"
3
4 ' No clipping
5 GraphicsWindow.FontSize = 15 ' Smaller font
6 GraphicsWindow.DrawBoundText(10, 10, 70, "Today is my birthday")
7
8 ' With clipping
9 GraphicsWindow.FontSize = 18 ' Larger font
10 GraphicsWindow.DrawBoundText(150, 10, 70, "Today is my birthday")
11 GraphicsWindow.DrawRectangle(150, 10, 70, 80)
Listing 3-7: Boundaries that contain the text
The text in the invisible rectangle on the left automatically wraps to make sure it doesn’t go beyond the width you specified. In the bound rectangle on the right, the text gets clipped because it’s too long to fit. Small Basic displays three dots, called an ellipsis, indicating that text has been clipped.
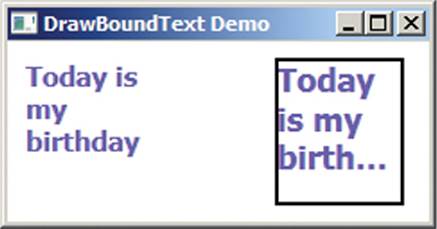
Figure 3-14: The output of BoundTextDemo.sb
Inserting Images
Some images might be too complicated to draw with basic shapes, or they might just take too long to code. Instead, you can draw those images ahead of time with a paint program and then use them in your application. GraphicsWindow provides two methods to insert images. Although these methods start with Draw, they actually insert an existing image in the graphics window:
GraphicsWindow.DrawImage(imageName, x, y)
GraphicsWindow.DrawResizedImage(imageName, x, y, width, height)
Both methods take the image pathname and the x- and y-coordinates to determine the image’s location in the graphics window. DrawResizedImage() takes two additional arguments (width and height) so you can resize the input image.
Listing 3-8 shows the DrawImage() method with an example image.
1 ' ImageDemo.sb
2 GraphicsWindow.Title = "Image Demo"
3 GraphicsWindow.Width = 320 ' Same width as background image
4 GraphicsWindow.Height = 240 ' Same height as image
5 GraphicsWindow.DrawImage("C:\Small Basic\Ch03\BkGnd.bmp", 0, 0)
6
7 GraphicsWindow.BrushColor = "White" ' Text color
8 GraphicsWindow.FontSize = 50
9 GraphicsWindow.DrawText(10, 120, "Hello Moon!")
Listing 3-8: Inserting your first image
The program starts by setting the width and height of GraphicsWindow to 320 and 240 pixels, respectively, to match the size of the image. Line 5 calls DrawImage() and passes in the pathname where the image is saved. In lines 7–9, the program draws the white text Hello Moon! on top of the background image. When you run this program on your computer, make sure you set the path in line 5 to the correct location of the BkGnd.bmp file on your computer. Figure 3-15 shows the output.
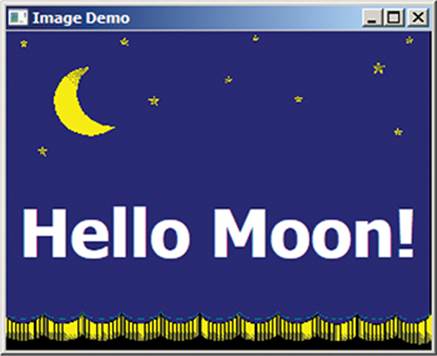
Figure 3-15: The output of ImageDemo.sb
NOTE
Small Basic can also draw images from the Web. Here’s an example:
GraphicsWindow.DrawImage("http://smallbasic.com/bkgnd.jpg", 0, 0)
Programming Challenges
If you get stuck, check out http://nostarch.com/smallbasic/ for the solutions and for more resources and review questions for teachers and students.
1. Write a program that connects the following six points with line segments: (20, 110), (110, 50), (10, 50), (100, 110), (60, 20), (20, 110). What shape do you get?
2. What’s the output of the following program?
GraphicsWindow.DrawLine(50, 18, 61, 37)
GraphicsWindow.DrawLine(61, 37, 83, 43)
GraphicsWindow.DrawLine(83, 43, 69, 60)
GraphicsWindow.DrawLine(69, 60, 71, 82)
GraphicsWindow.DrawLine(71, 82, 50, 73)
GraphicsWindow.DrawLine(50, 73, 29, 82)
GraphicsWindow.DrawLine(29, 82, 31, 60)
GraphicsWindow.DrawLine(31, 60, 17, 43)
GraphicsWindow.DrawLine(17, 43, 39, 37)
GraphicsWindow.DrawLine(39, 37, 50, 18)
3. What’s the output of the following program?
GraphicsWindow.DrawRectangle(10, 10, 90, 50)
GraphicsWindow.DrawRectangle(15, 60, 75, 4)
GraphicsWindow.DrawRectangle(34, 64, 6, 6)
GraphicsWindow.DrawRectangle(74, 64, 6, 6)
GraphicsWindow.DrawRectangle(30, 70, 75, 10)
GraphicsWindow.DrawRectangle(20, 80, 80, 2)
4. What’s the strangest thing in your house? Draw it using the DrawLine() method.
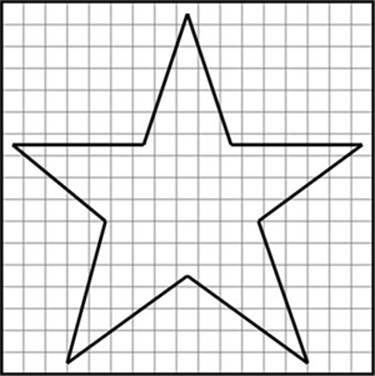
The following problems show a grid to make it easier for you to draw the shapes. You can use any size you like for the grid. We recommend 20 pixels.
5. Write a program that draws this star.
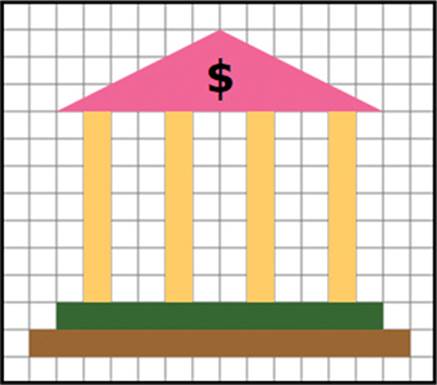
6. Write a program that draws this bank, using any colors you’d like.
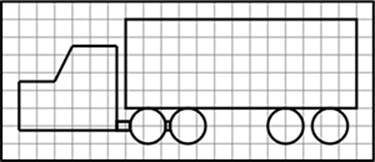
7. Write a program that draws this truck. For extra credit, add front wheels.
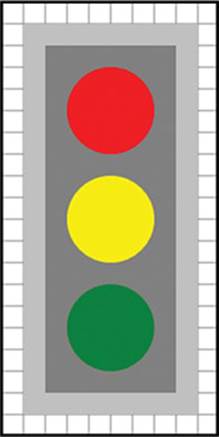
8. Write a program that draws a traffic light like this one.
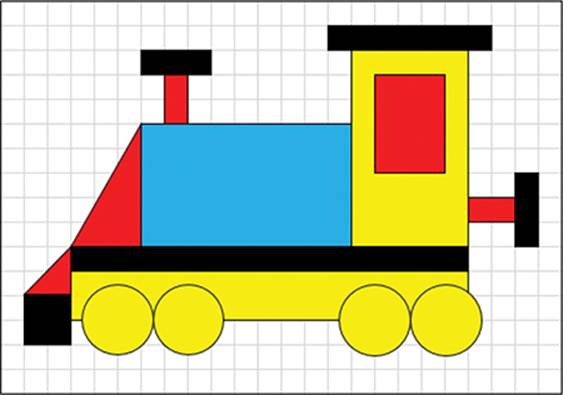
9. Write a program that draws a train like this one.
10.Write a program that draws the following shape.
11.Write a program that draws this person.

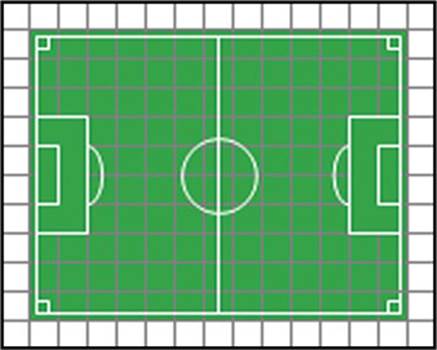
12.Write a program that draws a soccer field similar to this one.
All materials on the site are licensed Creative Commons Attribution-Sharealike 3.0 Unported CC BY-SA 3.0 & GNU Free Documentation License (GFDL)
If you are the copyright holder of any material contained on our site and intend to remove it, please contact our site administrator for approval.
© 2016-2026 All site design rights belong to S.Y.A.