LEARN TO PROGRAM WITH SMALL BASIC: An Introduction to Programming with Games, Art, Science, and Math (2016)
5. DRAWING SHAPES WITH TURTLE GRAPHICS
In Chapter 3 you learned how to draw pictures using code, but in Small Basic you can program a friendly turtle to draw pictures for you! In this chapter, you’ll explore the Turtle object. You’ll also learn how to use a For loop to repeat lines of code a set number of times to draw beautiful designs.
Meet the Turtle
Enter this statement in the Small Basic Editor:
Turtle.Show()
Now click Run. Presto! A turtle should appear in the center of the graphics window (Figure 5-1), waiting for your commands.
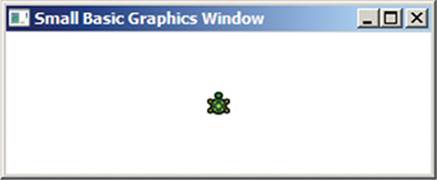
Figure 5-1: Hello, turtle!
You might wonder how useful this slow creature can be, but don’t underestimate its powers. Once upon a time a turtle won a race against the fastest hare on Earth!
Small Basic’s turtle uses the GraphicsWindow object’s pen to draw lines. It always carries this pen (perhaps it’s hidden in its shell next to the turtle wax), and you can decide if the pen is up or down! When the pen is down, the turtle draws as it moves. When the pen is up, the turtle moves without leaving a trace. You can command the turtle to put down or lift up its pen by using the PenDown() and PenUp() methods (see Figure 5-2).

Figure 5-2: Illustrating the PenUp() and PenDown() methods
The default pen state is down, so the turtle’s ready to draw from the day it’s born. Now let’s explore what it can do.
Moving the Turtle
You can enter commands to tell your turtle what to do. Just like Ash Ketchum commands Pikachu, you’ll command your turtle. First, let’s use the Turtle object to tell the turtle to move!
Give it a push by entering these lines in the Editor. Then click Run.
Turtle.Show()
Turtle.Move(100)
Go, turtle, go! The Move() method in this example commands the turtle to move forward 100 pixels.
Now let’s look at the two different ways of moving your turtle: absolute motion and relative motion.
Absolute Motion
With absolute motion, you tell your turtle to go to a point on the graphics window. No matter where the turtle is, it moves to the exact point you choose.
One way to move the turtle to a particular point on the graphics window is to change its X and Y properties. To see how, run the program shown in Listing 5-1.
1 ' SetTurtle.sb
2 Turtle.Show()
3 Program.Delay(1000)
4 Turtle.X = 100
5 Turtle.Y = 140
Listing 5-1: Setting the turtle’s position
The Show() method (line 2) causes the turtle to appear near the center of the graphics window (320, 240). The Delay() method on line 3 makes the program sleep for 1,000 milliseconds (which is 1 second), so you can see the turtle’s initial position. Line 4 sets the turtle’s X position to 100, and line 5 sets the turtle’s Y position to 140. After running lines 4 and 5, the turtle will appear at point (100, 140) on the graphics window, as illustrated in Figure 5-3. Note that the turtle moved to the new location without leaving any trace; it’s like the turtle got picked up and placed at (100, 140).
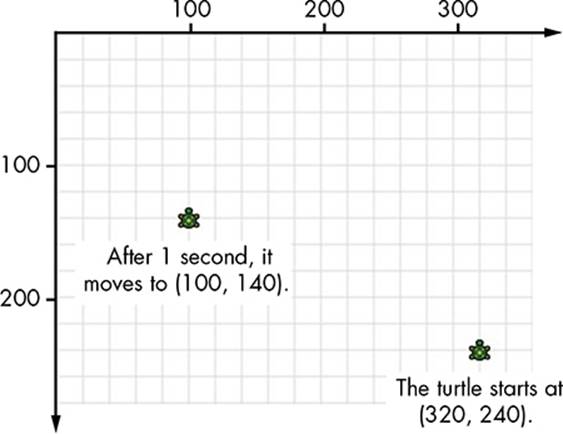
Figure 5-3: Moving the turtle by setting its X and Y properties
Another way to move the turtle to an absolute position on the graphics window is to use the MoveTo() method. This method takes the x- and y-coordinates of the desired position as arguments. Run the program in Listing 5-2 to see what this method does.
1 ' MoveTo.sb
2 Turtle.Show()
3 Program.Delay(1000)
4 Turtle.MoveTo(100, 140)
Listing 5-2: Moving the turtle using absolute motion
You can see the output of this program in Figure 5-4. Again, the turtle starts at (320, 240) pointing north (line 2), and the program sleeps for 1 second so you can watch the turtle in action (line 3). After 1 second, the turtle turns toward (100, 140) before it starts its slow journey toward that point. This time, the turtle draws a line while moving (because the turtle’s pen is down by default). If you add Turtle.PenUp() anywhere before calling MoveTo(), the turtle moves to (100, 140) without leaving any trace.
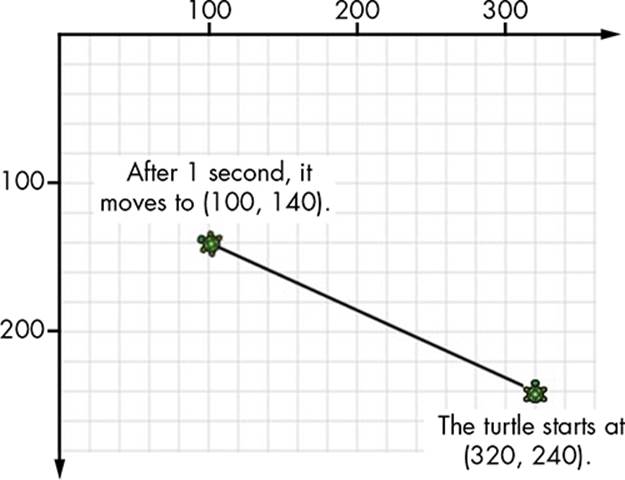
Figure 5-4: Using MoveTo() to set the turtle’s absolute position
Note that when it stops moving, the turtle stays pointed in the direction it turned to. It doesn’t reset to face north again. Compare this figure to Figure 5-3, where the turtle remains pointing north, like it’s been picked up and moved to the new position.
Let’s say you want your turtle to face north after it completes its journey. Add the following statement at the end of Listing 5-2:
Turtle.Angle = 0
When the turtle reaches point (100, 140), it’ll turn in place to point north. Try it out! See Figure 5-5 to understand the relationship between the Angle property and the direction in which the turtle’s facing.
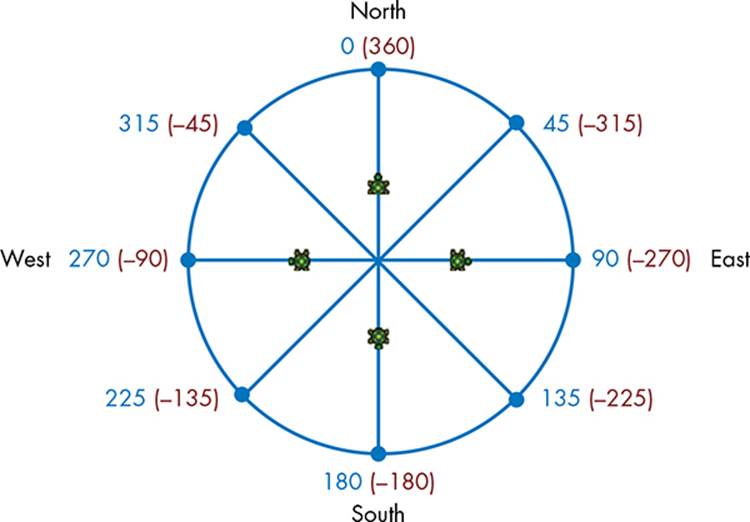
Figure 5-5: For the turtle, 0 is north, 90 is east, 180 is south, and 270 is west.
As you can see in Figure 5-5, when you set your turtle’s Angle to 0 or 360, it faces north. You can set the turtle’s Angle to 45, to make it face northeast; 90, to make it face east; 135 (southeast); 180 (south); 225 (southwest); 270 (west); 315 (northwest); and 360 (back to north again). Of course, you can set the turtle’s Angle to any number you want. Experiment by setting the Angle property of the Turtle object to different numbers to see which directions the turtle will face. Don’t forget to try negative numbers.
Relative Motion
With relative motion you tell the turtle how far to move from its current position; that is, you tell it how far to move relative to its current position.
Let’s practice by making the turtle hit an imaginary target. Listing 5-3 shows one way to program the turtle to hit the target.
1 ' RelativeMotion.sb
2 Turtle.Show()
3 Turtle.Move(150)
4 Turtle.TurnRight()
5 Turtle.Move(100)
Listing 5-3: Moving the turtle using relative motion
The output is illustrated in Figure 5-6. Line 3 moves the turtle up 150 pixels, line 4 turns the turtle to the right, and line 5 moves the turtle forward 100 pixels.
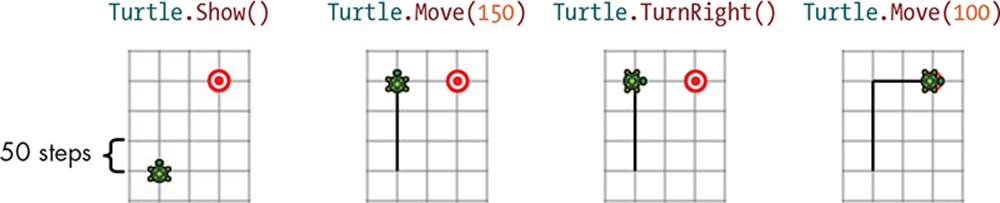
Figure 5-6: Moving the turtle using relative motion commands
Relative motion differs from absolute motion because we told the turtle to move a certain distance instead of telling it to go to a set of coordinates.
When you pass a negative number to Move(), your turtle will move backward. You can also use the Turn() method to command your turtle to turn in place by any angle you desire. Enter the code shown in Listing 5-4 to play around with these options, and run the program to see the results in action.
1 ' Turn.sb
2 Turtle.Show()
3 Turtle.Turn(45)
4 Turtle.Move(100)
5 Turtle.Turn(-90)
6 Turtle.Move(-100)
Listing 5-4: Turning the turtle using relative motion
Line 3 turns the turtle to the right by 45 degrees. Line 4 moves the turtle forward 100 pixels (see the left image in Figure 5-7). The –90 in line 5 turns the turtle to the left by 90 degrees. Line 6 moves the turtle backward 100 pixels (see the right image in Figure 5-7).
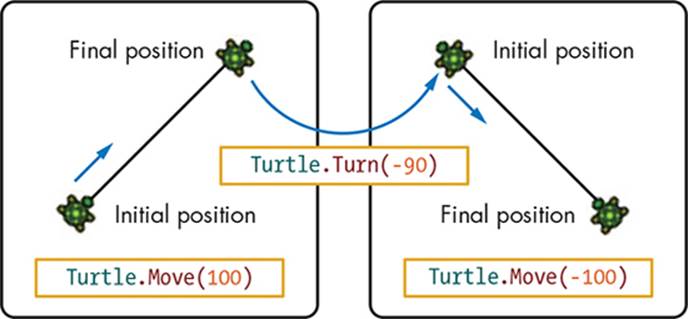
Figure 5-7: Illustrating the turtle’s Move() and Turn() methods
Coloring Your Steps
You can set your turtle’s pen size and color using GraphicsWindow’s PenWidth and PenColor properties. For example, the following code makes your turtle draw with a red pen that’s 5 pixels wide.
GraphicsWindow.PenColor = "Red"
GraphicsWindow.PenWidth = 5
Add this code before commanding your turtle to move, and then observe what happens.
Controlling Your Speed
The Turtle object has one more property that you need to know. The Speed property sets how fast the turtle moves. The possible Speed values are 1 to 10. Follow along with Listing 5-5 to watch your turtle race around your screen.
1 ' TurtleSpeed.sb
2 Turtle.Show()
3 Turtle.Speed = 2 ' Sets the initial speed to 2
4 Turtle.Move(100) ' Moves the turtle forward 100 pixels
5 Turtle.Speed = 5 ' Changes the speed to 5
6 Turtle.TurnRight() ' Turns the turtle to its right
7 Turtle.Move(100)
8 Turtle.Speed = 9 ' Changes the speed to 9
9 Turtle.TurnRight()
10 Turtle.Move(100)
Listing 5-5: Setting the turtle’s speed
Line 3 sets the turtle’s speed to 2. The turtle slowly moves 100 pixels (line 4) and then gets faster in line 5. You can already see the speed increase as the turtle turns right (line 6) and darts forward 100 pixels (line 7). Then you set the turtle to a speed of 9 (line 8). The turtle quickly turns right (line 9) and sprints forward another 100 pixels (line 10). If you don’t want to watch the turtle move slowly while drawing, set the Speed property to 10 at the start of your program. The turtle will move so fast that you’ll barely see it. It’s superturtle!
TRY IT OUT 5-1
Write a program that makes your turtle draw this star (Figure 5-8). The coordinates of each point are included.
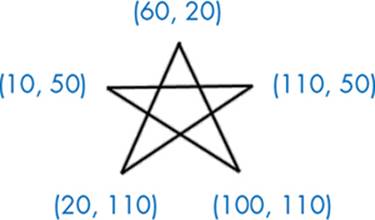
Figure 5-8: A star pattern
Introducing the For Loop
As you start writing longer programs, you’ll need to repeat some statements. For example, let’s make the turtle draw a square: enter the code shown in Listing 5-6.
1 ' Square1.sb
2 Turtle.Move(60) ' Moves 60 pixels
3 Turtle.TurnRight() ' Turns right 90 degrees
4 Turtle.Move(60) ' Moves 60 pixels
5 Turtle.TurnRight() ' Turns right 90 degrees
6 Turtle.Move(60) ' Moves 60 pixels
7 Turtle.TurnRight() ' Turns right 90 degrees
8 Turtle.Move(60) ' Moves 60 pixels
9 Turtle.TurnRight() ' Turns right 90 degrees
Listing 5-6: Making the turtle draw a square
The turtle starts facing upward. This code tells the turtle to move 60 pixels up to draw one side of the square, turn 90 degrees to the right, move 60 pixels to draw another side, turn 90 degrees to face downward, move 60 pixels to draw a third side, turn 90 degrees to face left, and move 60 pixels to complete the square. Finally, the turtle turns 90 degrees one last time so it’s facing upward like it was at the beginning. Check out the result in Figure 5-9. Does your screen look the same?
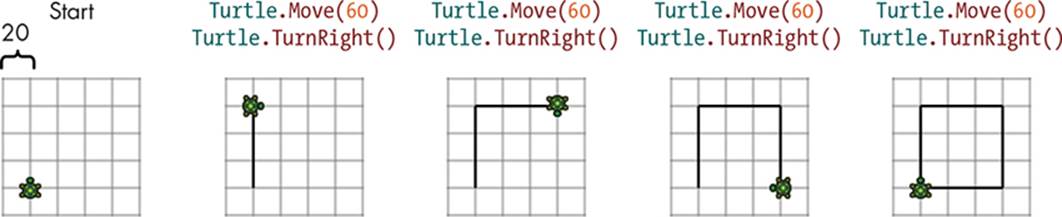
Figure 5-9: Drawing a square using move and turn commands
You repeated the Move(60) and TurnRight() methods four times. The computer doesn’t mind repeating these tasks, but it’s boring for you to type all that code. Wouldn’t it be great if you could make the turtle draw this square using an easier approach?
Well, you can! You can make the turtle draw the same square as in Listing 5-6, just by using a few lines of code. Use a For loop, like the one in Listing 5-7.
1 ' Square2.sb
2 For I = 1 To 4 ' Repeats 4 times
3 Turtle.Move(60) ' Draws one side
4 Turtle.TurnRight() ' Turns right 90 degrees
5 EndFor
Listing 5-7: Making the turtle draw a square using a For loop
The For loop runs Turtle.Move(60) and Turtle.TurnRight() four times. You use a For loop when you know how many times you want to repeat some code (for more on For loops, see Chapter 13). In this example, your program starts the loop, runs the two lines of code, and then goes back to the start of the loop to run it again. It runs four times and then exits the loop. Try it out!
In this short program, you’re using three new Small Basic keywords: For, To, and EndFor.
NOTE
The keywords (For, To, and EndFor) don’t have to be capitalized the way you see them in Listing 5-7, and the statements in the For loop don’t have to be indented, but those are the default formats. The Editor indents the statements inside the For loop as you type to make your code easier to read.
Figure 5-10 shows what’s going on.
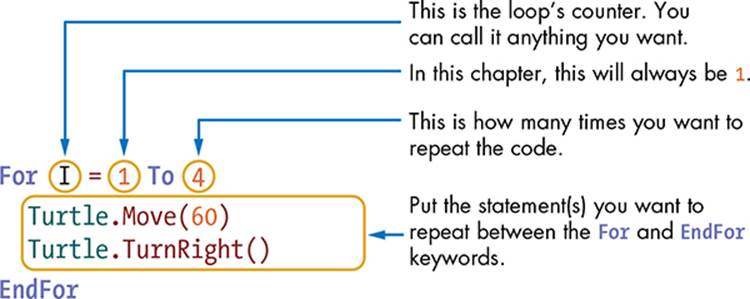
Figure 5-10: The parts of the For loop
To repeat lines of code, you simply put the statement(s) you want to repeat between the For and EndFor keywords. If you want to repeat these statements four times, write this:
For I = 1 To 4
The variable I is the counter. It keeps track of how many times the loop has been run and how many times it has left to go. Each time your program runs the loop, it adds one to the counter.
Remember the For loop the next time you get in trouble at school! If your teacher catches you chewing gum and asks you to write I won’t chew gum in class again 100 times, Small Basic is there to rescue you! Write this instead:
For I = 1 To 100
TextWindow.WriteLine("I won't chew gum in class again.")
EndFor
Try it out. No, not chewing gum in class; try out the program!
NOTE
Programmers usually use one-letter variables to name the loop’s counter (such as I, J, or K), but any other name works too. It doesn’t matter if you use upper- or lowercase letters—Small Basic would treat I and i as the same variable.
TRY IT OUT 5-2
Predict the output of the following program. Then run the program to check your answer.
GraphicsWindow.PenColor = "Red"
GraphicsWindow.PenWidth = 3
For I = 1 To 4
Turtle.Move(30)
Turtle.Turn(-60)
Turtle.Move(30)
Turtle.Turn(120)
Turtle.Move(30)
Turtle.Turn(-60)
Turtle.Move(30)
Turtle.TurnRight()
EndFor
Drawing Regular Polygons
You can easily change the square-drawing program (Listing 5-7) to draw other polygons. (Don’t be so square!) A polygon is just a simple closed figure. For some examples, look at the three polygons in Figure 5-11.
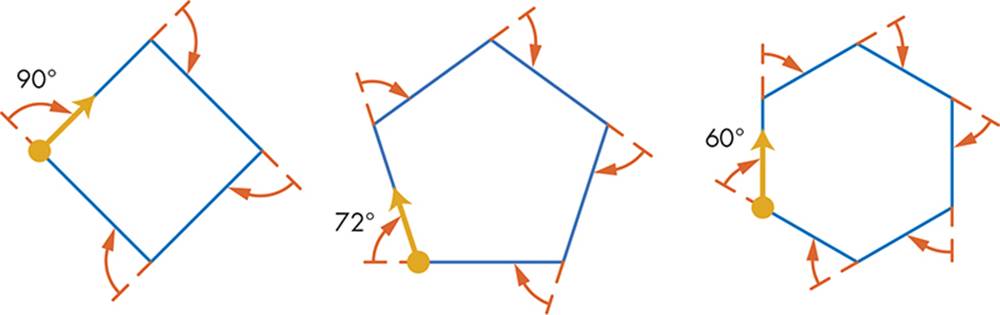
Figure 5-11: The exterior angles of three polygons
You use a general pattern to draw these shapes. To create the square in Figure 5-11, you draw four sides with a 90-degree turn angle after each side (that is, 360 degrees divided by 4). For the pentagon (the middle polygon), you draw five sides with a 72-degree turn angle after each side (360 divided by 5). For the hexagon (the polygon on the right), you draw six sides with a 60-degree turn after each side (360 divided by 6). Do you see the pattern? The angle is 360 degrees divided by the number of sides. With this in mind, you can create the polygon-drawing program inListing 5-8.
1 ' Polygon.sb
2 numSides = 5 ' Set to 3 (triangle), 4 (square), 5 (pentagon)...
3
4 For I = 1 To numSides
5 Turtle.Move(60) ' Polygon's side length
6 Turtle.Turn(360 / numSides)
7 EndFor
Listing 5-8: Drawing a regular polygon
To draw a different polygon, replace the whole number in the numSides variable on line 2 with another number. Figure 5-12 shows eight polygons (all with the same side length) you can draw with this program. Try it out!
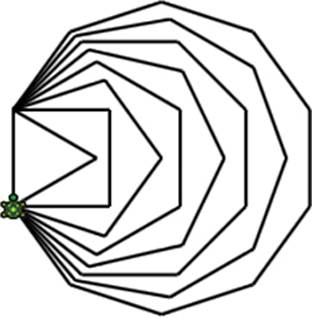
Figure 5-12: The output of Polygon.sb using different values for numSides
What happens when you use a large number for the value of numSides? The polygon begins to look more like a circle! Set numSides to 36, change Move(60) on line 5 to Move(20), and see what happens.
A Star Is Born
With the knowledge you now have about the angles of different shapes, what do you think happens when you turn the turtle by multiples of 72 degrees (which is the angle you used to draw a pentagon), such as 2 × 72 = 144 degrees or 3 × 72 = 216 degrees? Run the program shown in Listing 5-9 to find out.
1 ' PentaStar.sb
2 For I = 1 To 5
3 Turtle.Move(150)
4 Turtle.Turn(144) ' The turn angle is 2 * 72
5 EndFor
Listing 5-9: Drawing a pentagon star
If the turn angle is 144 instead of 72, the output is a star instead of a pentagon. Look at Figure 5-13 to see how this works.
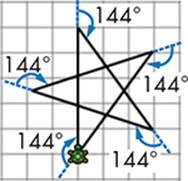
Figure 5-13: Illustrating the output of PentaStar.sb
NOTE
If you’d like to hide the turtle after creating your masterpiece, call Turtle.Hide() at the end of your program.
Try experimenting with different polygons and turn angles to discover the various stars you can create. Figure 5-14 shows three examples to help you get started.
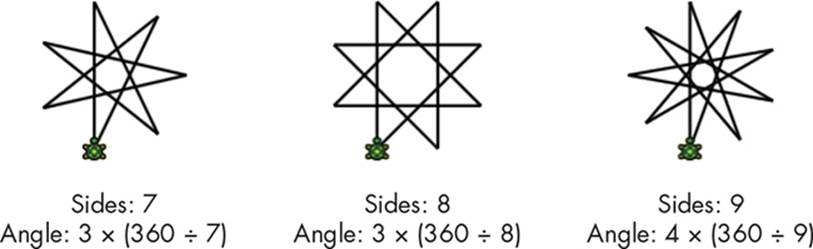
Figure 5-14: Drawing different stars by using Listing 5-9
TRY IT OUT 5-3
Write a program that directs the turtle to draw the pentagon in Figure 5-15. (Hint: use the Angle property to set the turtle’s initial direction.)
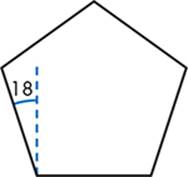
Figure 5-15: A pentagon
Creating Polygon Art Using Nested Loops
You can create beautiful shapes using polygons and stars. In this section, we’ll draw a pattern created by rotating a square 12 times (see Figure 5-16).
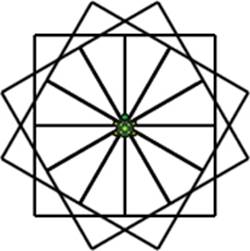
Figure 5-16: The output of RotatedPolygon.sb
To make this art, you’ll use a nested loop, which is when you place one loop inside another loop. Each time the outer loop runs, it also runs the inner loop. Listing 5-10 shows you how to use a nested loop to create the pretty drawing in Figure 5-16.
1 ' RotatedPolygon.sb
2 numSides = 4 ' Set to 3 (triangle), 4 (square)...
3 repeatCount = 12 ' How many times to rotate the polygon
4
5 For I = 1 To repeatCount
6 ' 1) Draw the desired polygon
7 For J = 1 To numSides
8 Turtle.Move(60) ' The polygon's side length
9 Turtle.Turn(360 / numSides)
10 EndFor
11 ' 2) Turn the turtle a little
12 Turtle.Turn(360 / repeatCount)
13 EndFor
Listing 5-10: Drawing a pattern of rotated polygons
This program has two loops, one nested inside the other. The outer loop (line 5) uses a loop counter named I and repeats 12 times to draw 12 squares. During each round of this loop, the program performs two tasks. First, it draws a square using another For loop with a loop counter namedJ (line 7). Then, in line 12, it turns the turtle a little (360° ÷ 12 = 30° in this case) before it repeats the loop on line 5 to draw the next square. So fancy!
When you use nested loops, make sure you use different names for the loop counters. In Listing 5-10, we used the I variable for the outer loop and the J variable for the inner loop.
Change the numSides and repeatCount variables to experiment with different polygons and rotation counts. Figure 5-17 shows some shapes you can create by rotating a hexagon. Try changing the pen color and width to add fancy touches to your creations. The possibilities are endless!

Figure 5-17: Patterns created by rotating a hexagon
TRY IT OUT 5-4
Predict the output of the following program. Try to imagine the result of the code before you run it. Then run the code to check your answer.
repeatCount = 5
For I = 1 To repeatCount
For J = 1 To 4 ' Draws a square
Turtle.Move(60)
Turtle.Turn(90)
EndFor
For J = 1 To 3 ' Draws a triangle
Turtle.Move(60)
Turtle.Turn(120)
EndFor
Turtle.Turn(360 / repeatCount)
EndFor
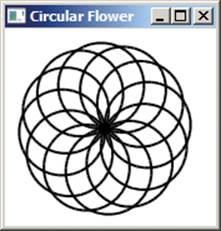
Endless Graphics
In Listing 5-10 you created patterns by rotating a single polygon. You can also create patterns using two or more polygons of different sizes. To keep the code simple, let’s draw two polygons of different sizes and rotate them.
Run the program shown in Listing 5-11 to see what patterns you can make.
1 ' PolygonArt.sb
2 Turtle.Speed = 10
3 numSides = 6 ' Set to 3 (triangle), 4 (square)...
4 repeatCount = 8 ' How many times to rotate
5 sideLen1 = 30 ' Side length of polygon 1
6 sideLen2 = 40 ' Side length of polygon 2
7
8 For I = 1 To repeatCount
9 For J = 1 To numSides ' Draws the first polygon
10 Turtle.Move(sideLen1)
11 Turtle.Turn(360 / numSides)
12 EndFor
13
14 For J = 1 To numSides ' Draws the second polygon
15 Turtle.Move(sideLen2)
16 Turtle.Turn(360 / numSides)
17 EndFor
18
19 ' Turns the turtle to prepare for the next round
20 Turtle.Turn(360 / repeatCount)
21 EndFor
Listing 5-11: Rotating two similar polygons
Figure 5-18 shows the output of this program. This program rotates two hexagons (the first has a side length of 30, and the second has a side length of 40) eight times. The outer loop in line 8 repeats up to the number in repeatCount. Each time the program loops, the code performs three actions:
1. Draw the first polygon using the side length in sideLen1 (lines 9–12).
2. Draw the second polygon using the side length in sideLen2 (lines 14–17).
3. Turn the turtle to get ready for the next round of the loop (line 20).
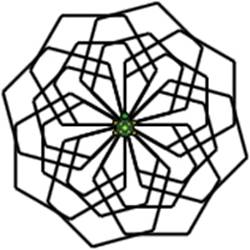
Figure 5-18: The output of PolygonArt.sb
Now try using the repeatCount values in Figure 5-19 to create lots of different patterns. Try setting sideLen1 = 40 and sideLen2 = 60!
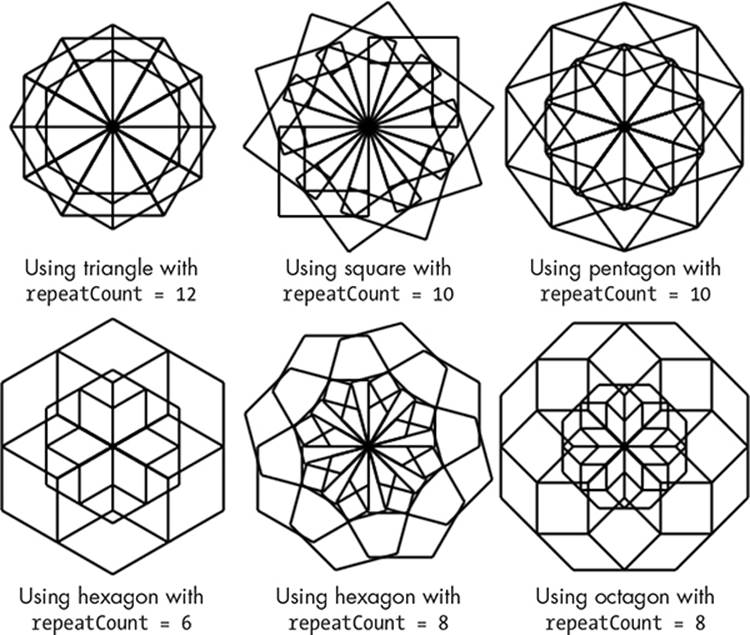
Figure 5-19: Some of the patterns you can create by experimenting with PolygonArt.sb
Experiment with this program to see what other shapes you can discover!
TRY IT OUT 5-5
Change Listing 5-11 to draw three polygons (instead of two) of different sizes, and then rotate them. Save your discoveries for your next art gallery. (Or, if you don’t want to become a millionaire, go to http://tiny.cc/turtlepatterns/ and share them with the world!)
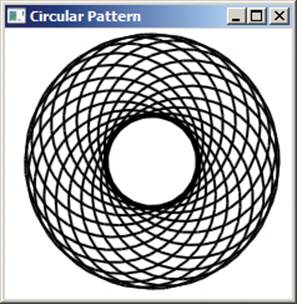
Programming Challenges
If you get stuck, check out http://nostarch.com/smallbasic/ for the solutions and for more resources and review questions for teachers and students.
1. This code draws a circle:
For K = 1 To 36
Turtle.Move(6)
Turtle.Turn(10)
EndFor
Write a program to have the turtle repeat this code 12 times to create the pattern shown here:
2. Write a program to draw a flowerpot like this one:

3. Re-create the following code and experiment with it:
For I = 1 To 20 ' Repeats 20 times
For K = 1 To 36 ' Draws a circle
Turtle.Move(12)
Turtle.Turn(10)
EndFor
Turtle.Turn(18) ' Gets ready for next circle
Turtle.Move(12) ' Moves a little bit before drawing next circle
EndFor
Change the Move() distance after rotating each circle to discover new patterns!
All materials on the site are licensed Creative Commons Attribution-Sharealike 3.0 Unported CC BY-SA 3.0 & GNU Free Documentation License (GFDL)
If you are the copyright holder of any material contained on our site and intend to remove it, please contact our site administrator for approval.
© 2016-2026 All site design rights belong to S.Y.A.