Programming for Musicians and Digital Artists: Creating music with ChucK (2015)
Part 2. Now it gets really interesting!
Chapter 10. Events: signaling between shreds and syncing to the outside world
This chapter covers
· Events: a different way to advance time
· Controlling ChucK in real time from your computer keyboard
· Inter-shred communication using events
· Broadcast events vs. notify events
· Creating your own event classes by subclassing
You’ve explored many topics and gained many skills throughout the book so far, including using logic, arrays, functions, multithreading, classes, and objects. If you’ve never programmed before, you can now look at almost any other language and be able to jump in and start understanding the basics right away.
One last step for you is to learn some new tools for live performance, so that you can take your compositions on stage as well as talk to other systems in the studio. You’re going learn two ways of doing this: using the keyboard and mouse in this chapter and using MIDI controllers and Open Sound Control (OSC) in chapter 11. In the process of learning these new techniques and skills, you first need to learn about a new concept called events, which provide a means for shreds to talk to each other in real time and also a means for you to receive signals and information from the outside world.
10.1. What are events?
So far, we’ve worked with controlling time in ChucK as a mechanism to make everything happen in a strongly timed way. In all of these cases, we specified the precise durations by which to move time forward. For example, ChucKing 100::ms to now advances ChucK time by exactly that duration. This is useful for all kinds of situations, like specifying a rate, establishing a tempo, holding a note, waiting for time to pass, adding voices and instruments and sections sequentially in time, and more. Advancing time is fundamental to making any sound at all with ChucK.
But there are situations where it’s useful to advance time for an indefinite period, until something happens, and you don’t necessarily know in advance when that something is going to happen. You might be waiting to respond to real-time external input from a user pressing a button on a keyboard or joystick, or waiting on a message from the network, or waiting on an action from another concurrent shred.
This is where events come to your aid in ChucK. An event is simply a mechanism to notify a shred when something happens. Events have two sides:
· One or more shreds can wait on an event while time advances.
· An event can be triggered to notify waiting shreds that something has happened.
In the latter case, the event might be triggered by another concurrent process or by ChucK internally, in the case of specialized events such as via MIDI, mouse, or joystick.
Let’s look at a basic code snippet of waiting on an event. Waiting on an event (in this case, myEvent is an Event) isn’t much different than advancing time by some duration. If myEvent is of type Event, you can directly ChucK myEvent to now ![]() . This advances time on the current shred, and you don’t have to specify the precise duration.
. This advances time on the current shred, and you don’t have to specify the precise duration.

The most important thing to remember here is that the current shred advances time at the current line and does not move past this line of code until the event is triggered (from somewhere else in the system). When the event is triggered, this code resumes execution from the next line ![]() .
.
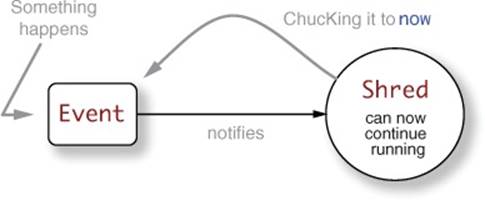
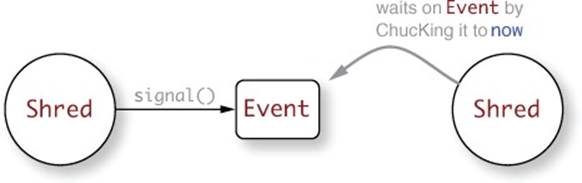
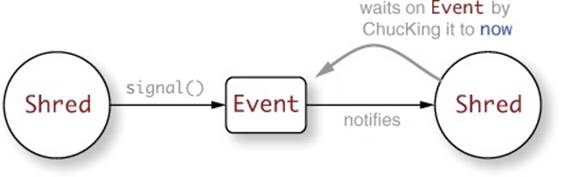
Figure 10.1 shows that by ChucKing an event to now, a shred is associated with that event and won’t run until the ChucK shreduler sees the event, which then notifies the shred that the event has occurred (figure 10.2). Only then can the shred continue executing.
Figure 10.1. Shred ChucKs an event to now and then waits for event to be triggered.
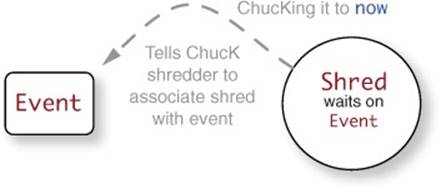
Figure 10.2. Event is triggered. ChucK notifies the shred that it has occurred. Shred can continue running.
Events and event-driven programming aren’t unique to ChucK; they can be found in most programming languages that support some notion of concurrency. But the way you use events in ChucK is rather unique, because like everything else in ChucK, you’re always aware of time and the precision of timing. To make events concrete, let’s look at an example of waiting on a keyboard event.
10.2. Programming with events: keyboard input
As mentioned previously, you can use events to allow you to respond to asynchronous (you can’t predict when it will happen) real-time input from external devices. These may come from a connected MIDI device, a computer keyboard, a mouse, joysticks, or WiiMotes, as well as networked communication such as OSC (we’ll get to this later). In all of these cases, ChucK provides specialized events tailored for those purposes.
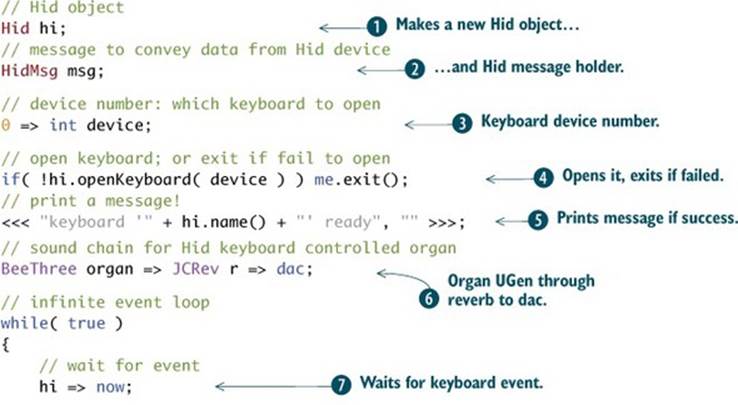
In our first example of listing 10.1, you’ll use an event to wait for and respond to computer keyboard input. To get input from the computer keyboard, you’ll use a special ChucK event object, called Hid (stands for human interface device). Hid is responsible for getting input from computer keyboards, mice, and anything that considers itself a joystick/gamepad. You’re going to create a Hid event and wait on it inside a loop. You’ll then write code to specify what to do once that event is triggered (by ChucK, when the user presses a key). Let’s first take a look at code that sets up the general structure for working with Hid events.
In this simple example, you first instantiate a Hid object ![]() , called myHid, along with a HidMsg object
, called myHid, along with a HidMsg object ![]() , called msg. HidMsg is an object that carries data from Hid whenever new information, such as a button press, arrives at the Hid object. You next hook myHid to your computer keyboard by using the openKeyboard() method
, called msg. HidMsg is an object that carries data from Hid whenever new information, such as a button press, arrives at the Hid object. You next hook myHid to your computer keyboard by using the openKeyboard() method ![]() . You then check to see if this all worked, and if it didn’t, you print an error
. You then check to see if this all worked, and if it didn’t, you print an error ![]() and exit
and exit ![]() . If everything worked out, you print a status message stating the name of the keyboard device
. If everything worked out, you print a status message stating the name of the keyboard device ![]() .
.
Listing 10.1. Standard code to create a Hid event
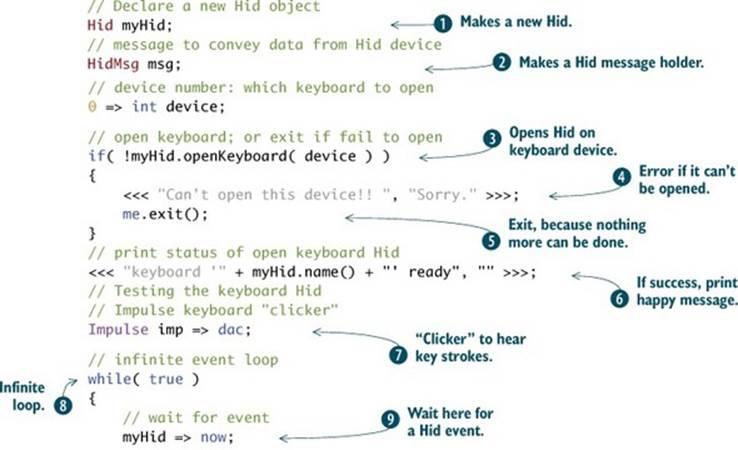
To use and test your new Hid keyboard event, you can make a simple click generator by using an impulse unit generator ![]() . Then you drop into an infinite loop
. Then you drop into an infinite loop ![]() , where you wait on the Hid event by ChucKing myHid to now
, where you wait on the Hid event by ChucKing myHid to now ![]() . This advances time indefinitely until the Hid event is triggered elsewhere in ChucK. Also, code execution suspends at this point in the current shred, which means that nothing beyond this line of code is yet executed.
. This advances time indefinitely until the Hid event is triggered elsewhere in ChucK. Also, code execution suspends at this point in the current shred, which means that nothing beyond this line of code is yet executed.
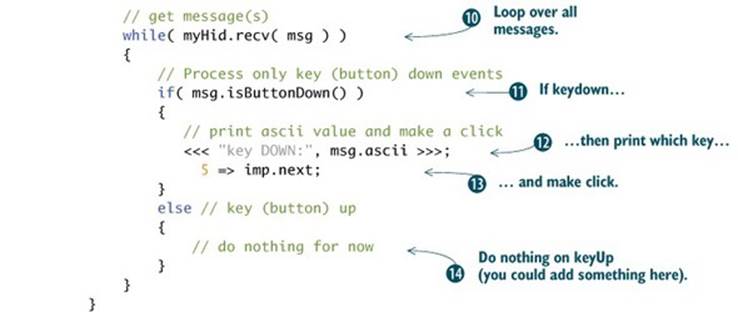
When the user presses any key, ChucK internally receives this information and triggers any associated Hid events. Your shred is waiting on this event ![]() and wakes up, resuming execution. You then enter a while loop
and wakes up, resuming execution. You then enter a while loop ![]() , whose purpose is to receive and act on all available incoming data on theHidMsg object you declared at the beginning of the program. You use a while loop because more than one input data could be available (if the user pressed several keys simultaneously). Inside the loop, you check to see whether it was a key-down
, whose purpose is to receive and act on all available incoming data on theHidMsg object you declared at the beginning of the program. You use a while loop because more than one input data could be available (if the user pressed several keys simultaneously). Inside the loop, you check to see whether it was a key-down ![]() or key-up event and print out a message with the ASCII code associated (a unique integer for each key) with the key that was pressed
or key-up event and print out a message with the ASCII code associated (a unique integer for each key) with the key that was pressed ![]() . You also use your imp Impulse UGen to make a little click
. You also use your imp Impulse UGen to make a little click ![]() . If the event was not a buttonDown message (key released), you don’t do anything
. If the event was not a buttonDown message (key released), you don’t do anything ![]()
Using Keyboard Input with Miniaudicle
Keyboard typing appears in the editor windows of miniAudicle, so you’ll likely notice this happening when you test the programs of listing 10.1. One way to fix this is to move the focus of your computer away from miniAudicle, by clicking on an empty space on your desktop. Then keyboard messages won’t enter text in miniAudicle, but your program will still receive and respond to the keystrokes.
With listing 10.1, we’ve demonstrated the basic form of getting data not only from Hid events but also from MIDI and OSC, which you’ll learn about in chapter 11.
Exercise: figure out a little about ASCII
Look at the console output when you hit different keys, and see if you can determine the pattern of keyboard keys, the alphabet and other symbols, and the integers assigned to them. Can you start to think of writing a program that responds to particular keys only (using if statements)? Or one that responds differently for different keys (like the asdf row versus the qwerty row)?
Next, let’s flesh out your keyboard event input program and add more interesting sound to create a keyboard organ! Note that the basic structure of listing 10.2 is largely the same as the code from listing 10.1. You make a new Hid ![]() and HidMsg
and HidMsg ![]() , open up the device
, open up the device ![]() , and check to see if it’s valid
, and check to see if it’s valid ![]() , and if so, you print out some things about the specific keyboard device that was opened
, and if so, you print out some things about the specific keyboard device that was opened ![]() . You might ask, “How many keyboards could a computer have?” Actually, more than one, because you’re free to plug a USB keyboard into your laptop or plug two or more USB keyboards into any computer. That’s why you have to specify a device number
. You might ask, “How many keyboards could a computer have?” Actually, more than one, because you’re free to plug a USB keyboard into your laptop or plug two or more USB keyboards into any computer. That’s why you have to specify a device number ![]() , because the ChucK Hid class can take input from different ones.
, because the ChucK Hid class can take input from different ones.
Listing 10.2. Keyboard organ controlled by Hid event
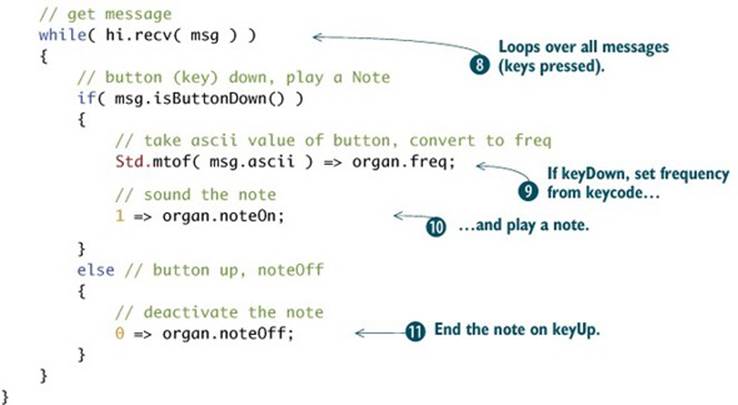
To complete the construction of your first playable ChucK instrument, you add code to set up a nice sound for synthesis, using the STK FM BeeThree organ UGen ![]() . In the main loop, you do the same ChucKing of your Hid event to now
. In the main loop, you do the same ChucKing of your Hid event to now ![]() , and when you receive a key the code drops into the same while loop to service the messages
, and when you receive a key the code drops into the same while loop to service the messages ![]() . You also expand the code to activate/deactivate the sound in response to key-down and key-up events. The keyDown (called buttonDown in the Hid class) message treats the ASCII key codes as MIDI note numbers, using Std.mtof() to set the frequency
. You also expand the code to activate/deactivate the sound in response to key-down and key-up events. The keyDown (called buttonDown in the Hid class) message treats the ASCII key codes as MIDI note numbers, using Std.mtof() to set the frequency ![]() ; then you just send a noteOn to your organ
; then you just send a noteOn to your organ ![]() . For keyUp (buttonUp)
. For keyUp (buttonUp) ![]() , you send noteOff. And that’s it!!
, you send noteOff. And that’s it!!
How awesome is that? ChucK has allowed you to turn your computer into a playable organ with just a few lines of code! You can also do things like this with mice, joysticks, or other devices.
10.3. Inter-shred communication using events
In the previous examples you used Hid, a specialized ChucK event, to get real-time input from the computer keyboard. In this case, you only needed to worry about waiting on the event and responding when the event actually happened. The triggering of the event happened elsewhere in ChucK, behind the scenes.
It’s also possible to create events and programmatically trigger them from your own ChucK programs. This is extremely useful for inter-shred communication, when one or more shreds need to know when something happens on a different shred. For example, one shred might be serving as a master clock or center of operations and wishes to tell related shreds when to perform various tasks. Alternatively, two shreds may simply want a handshake mechanism, where one shred synchronizes to (waits on) the actions of a second shred.
Let’s say you have an event and a shred. As you’ve seen before, the shred can simply ChucK the event to now to wait on it. This is no different than you’ve done in the keyboard examples of listings 10.1 and 10.2. The shred in question is said to be waiting on the event, as shown in figure 10.3. The shred on the right ChucKs the event to now. Any other running shred can signal that event.
Figure 10.3. Event triggered with signal()in shred on left
Next, let’s say you have a second shred (on the left in figure 10.3), which has access to the same event as shown in figure 10.4. This shred can manually trigger the event by calling signal(). After the shred on the left triggers the event, the event in turn notifies and wakes up the shred on the right, resuming its execution. In the next section and in listing 10.3 we show how a shred can use the event .signal() method to synchronize with another shred.
Figure 10.4. Event triggered with signal() in shred on left, thus advancing time in shred on right
10.3.1. Using event.signal() to synchronize one shred to another
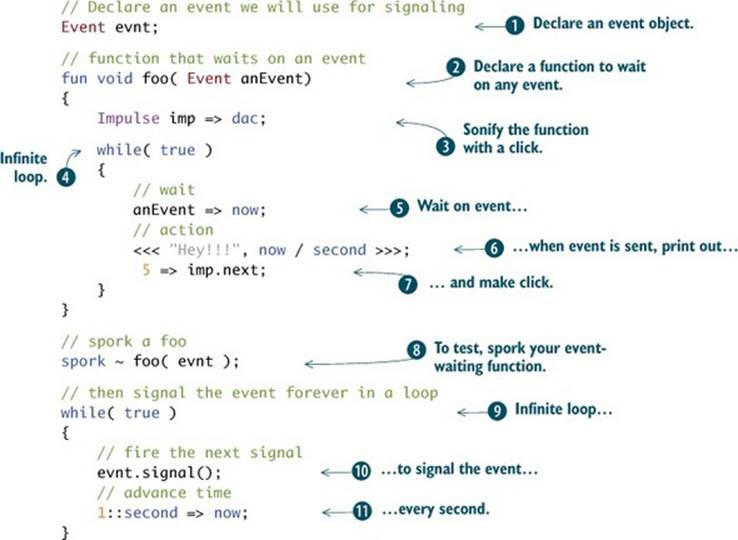
For a simple example of using events, shown in listing 10.3, you begin by declaring a new Event called evnt ![]() . Then you declare a function that takes an event as an argument
. Then you declare a function that takes an event as an argument ![]() . That function is a simple endless loop
. That function is a simple endless loop ![]() that ChucKs the event to now
that ChucKs the event to now ![]() . If the function ever receives a notification to wake up, it prints a message and the current time in seconds
. If the function ever receives a notification to wake up, it prints a message and the current time in seconds ![]() and then repeats the loop, ChucKing the event to now and going back to sleep
and then repeats the loop, ChucKing the event to now and going back to sleep ![]() . To make things interesting, and because it’s ChucK, you include an Impulse connected to the dac
. To make things interesting, and because it’s ChucK, you include an Impulse connected to the dac ![]() , which you sonify on each wakeup/print
, which you sonify on each wakeup/print ![]() . To test your new function, you spork one of them
. To test your new function, you spork one of them ![]() and then enter an endless loop
and then enter an endless loop ![]() , signaling the event
, signaling the event ![]() every second
every second ![]() .
.
Listing 10.3. Simple event signaling
10.3.2. Using signal to synchronize multiple shreds
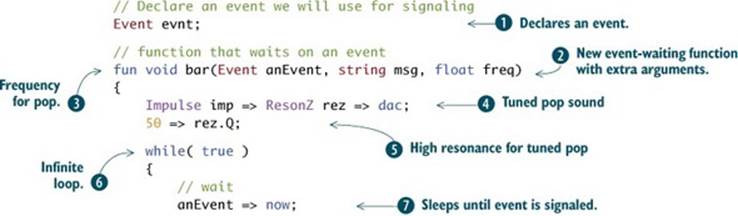
In listing 10.4, you’ll now use this same mechanism to use one shred, which we’ll call the master shred, to signal() multiple slave shreds. They’re called slaves because they can’t do anything without a signal from the master. Still using the same globally declared Event ![]() , you’ll modify thefoo function from the previous listing and rename it bar
, you’ll modify thefoo function from the previous listing and rename it bar ![]() to take three arguments; the first argument is still an event that you’ll use to trigger the actions of the shred. The second argument is a string that will be printed out each time a signal notification is received. The third argument is a frequency for a strongly resonant
to take three arguments; the first argument is still an event that you’ll use to trigger the actions of the shred. The second argument is a string that will be printed out each time a signal notification is received. The third argument is a frequency for a strongly resonant ![]() filter at a particular frequency
filter at a particular frequency ![]() applied to the Impulse
applied to the Impulse ![]() , so you’ll be able to hear the difference between the different shreds.
, so you’ll be able to hear the difference between the different shreds.
The bar() function does the same thing internally as the previous foo() function, dropping into an infinite loop ![]() , waiting for anEvent
, waiting for anEvent ![]() , and then waking up when notified, printing out the string msg, the float freq, and the current time in seconds
, and then waking up when notified, printing out the string msg, the float freq, and the current time in seconds ![]() . You also fire the impulse
. You also fire the impulse ![]() ; then the function goes back to sleep
; then the function goes back to sleep ![]() .
.
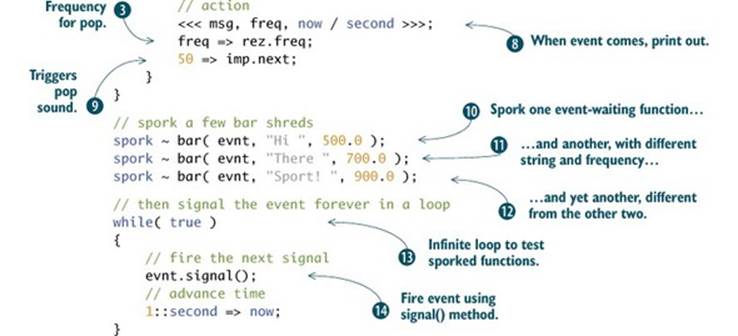
To test, you spork three bar() function shreds, each with a different string message and frequency ![]()
![]()
![]() . You then drop into the same infinite loop
. You then drop into the same infinite loop ![]() , signaling the event every second
, signaling the event every second ![]() .
.
Listing 10.4. Using one shred to signal() multiple other shreds
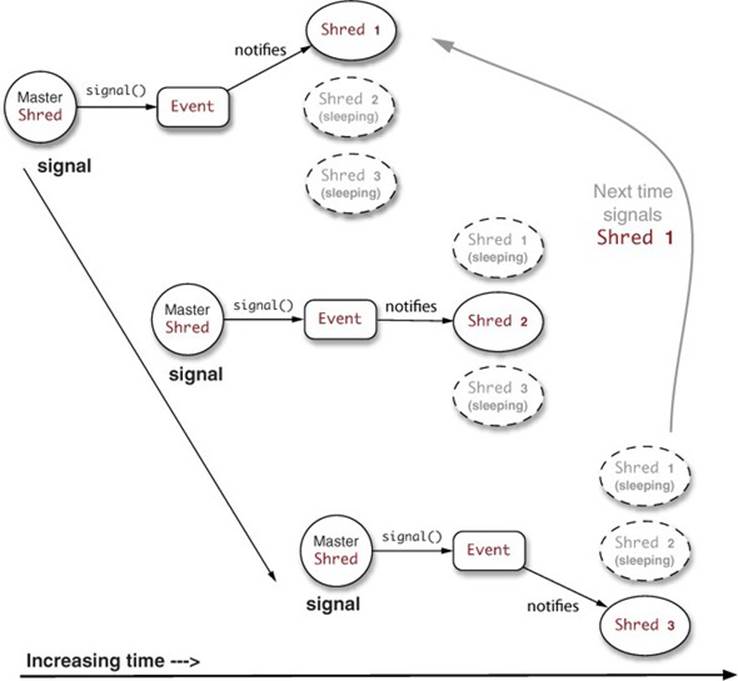
Running this, you’ll notice that each shred runs by itself, sequentially in turn, in response to each single signal() message. This is depicted in figure 10.5, which shows that each signal() triggers only the next shred in line (in the order in which it was sporked). So for the previous example, you’d first trigger the shred that prints “Hi” and sounds 500 Hz. Next you’d trigger “There” with 700 Hz and then “Sport!” with 900 Hz. The next event would trigger the first shred (“Hi” with 500 Hz) again, and so on cyclically forever.
Figure 10.5. Triggering events with signal() within shred on left advances time in shreds on right but only one shred per event() message.
That behavior might be what’s desired, but you might want all three shreds to wake up at once. In the next section you’ll see a couple of ways to do that.
10.3.3. Triggering multiple shreds at the same time using events
One way to make your three shreds all trigger at the same time would be to signal the event three times with no time delay between them.
Exercise: use multiple signal() messages to wake up more than one shred
Copy and paste the following line (![]() from listing 10.4) so that the event signal() message is sent a total of three times, followed by the 1-second delay. So your new program will have that identical line repeated three times:
from listing 10.4) so that the event signal() message is sent a total of three times, followed by the 1-second delay. So your new program will have that identical line repeated three times:
evnt.signal();
evnt.signal();
evnt.signal();
You’ll now see all three messages print together, hearing all three sounds at once.
There is another way to notify and wake up multiple shreds with a single message. Event has a variant of signal(), called broadcast(), which wakes up all shreds currently waiting on the event, as shown in figure 10.6.
Figure 10.6. Event triggered with broadcast() in shred on left advances time in all shreds on right.

By using broadcast(), the master shred can notify all shreds (unlimited) currently waiting on that event. They wake up at the same time and do their respective things. Think of what this might mean for a drum machine or music composition!
Exercise: use a broadcast() message to wake up more than one shred
Go back to listing 10.4 and ![]() and change the signal() message to broadcast().
and change the signal() message to broadcast().
evnt.broadcast();
You’ll now see all three messages print and hear all three sounds at the same time.
10.4. Customized events example: a multi-instrument gamelan
Because Event is a ChucK class, you can extend the functionality by subclassing (remember that from the previous chapter on classes and objects?). You can extend the Event class to make customized events that can contain additional data and behavior. In listing 10.5, you’ll use custom events and polymorphism to synchronize a small orchestra of different StkInstruments. The result will be similar to the gamelans of Java and Bali, with different bells, pots, pans, and the like being struck in precise rhythm to create a rich musical texture of complimentary sounds.
To start, you create a new event type as a subclass of Event, called TheEvent ![]() , which you’ll use to pass MIDI note
, which you’ll use to pass MIDI note ![]() and velocity
and velocity ![]() data between shreds. To use your new TheEvent class, you declare two of them called evnt and evnt2
data between shreds. To use your new TheEvent class, you declare two of them called evnt and evnt2 ![]() . You then declare a global reverberator and connect it to the dac
. You then declare a global reverberator and connect it to the dac ![]() . Your polymorphic event-handling function called poly
. Your polymorphic event-handling function called poly ![]() takes as arguments an StkInstrument (any kind, polymorphism!) and an event upon which to synchronize. The poly function does the usual things; after connecting the StkInstrument to the global reverberator
takes as arguments an StkInstrument (any kind, polymorphism!) and an event upon which to synchronize. The poly function does the usual things; after connecting the StkInstrument to the global reverberator ![]() , you drop into an infinite loop
, you drop into an infinite loop ![]() and ChucK the event to now
and ChucK the event to now ![]() , putting this shred to sleep. When it receives the event, it sets the note number
, putting this shred to sleep. When it receives the event, it sets the note number ![]() and velocity
and velocity ![]() and then sleeps again.
and then sleeps again.
Listing 10.5. Using a custom Event subclass, with polymorphism
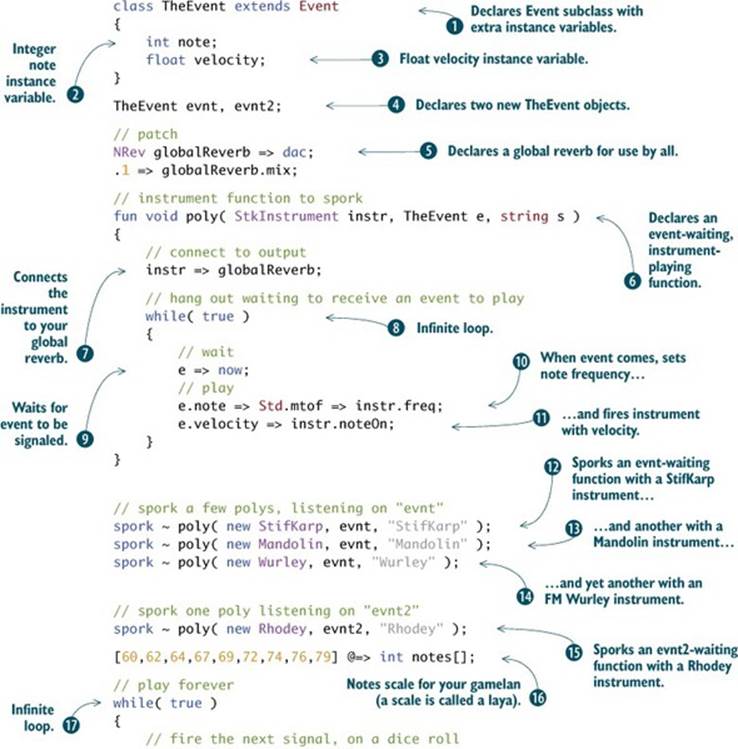
To use your new class, you spork a few shreds on the evnt event, each using a different instrument ![]()
![]()
![]() . You also spork a shred to wait on evnt2, with yet another instrument
. You also spork a shred to wait on evnt2, with yet another instrument ![]() . You next define an array of pitches to use for your composition
. You next define an array of pitches to use for your composition ![]() .
.
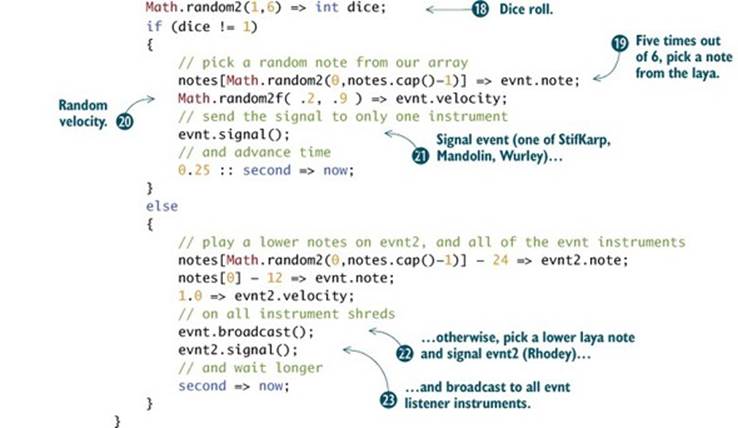
In an infinite loop ![]() , you roll a random die
, you roll a random die ![]() , and depending on the result either you signal the next one of the three evnt-related shred/instruments
, and depending on the result either you signal the next one of the three evnt-related shred/instruments ![]() to play a random note
to play a random note ![]() at a random velocity
at a random velocity ![]() , or much less frequently you opt to play lower notes on all instruments by usingsignal() on evnt2
, or much less frequently you opt to play lower notes on all instruments by usingsignal() on evnt2 ![]() and broadcast() on evnt
and broadcast() on evnt ![]() .
.
So as you can see, events represent an extremely powerful programming construct in ChucK that you can use to synchronize shreds and wait on external real-time input, further adding to your arsenal of ChucK programming tools. As always, experiment and have fun with it!
Exercise: expand your gamelan orchestra
Start with the example of listing 10.5, and add more instruments or change the logic to have them play differently. Change the note numbers in the array to suit your taste. Try adding one or more percussion instruments by using SndBuf.
Note: SndBuf isn’t a subclass of StkInstrument, so you’ll have to write your own event function like poly but to accept a SndBuf as the first argument and a sound file name to load, in addition to an event to trigger it.
Exercise: write a whole event-driven drum machine
Rewrite one of the drum machines from the previous chapter to use events for triggering. This can be pretty hard, so do it slowly, starting with only one instrument, then adding more. You might also want to do it all in one file, especially when trying it out for the first time. Then you can split the instruments out to their own files and create a score.ck file to add everything as you like.
10.5. Summary
In this chapter you learned how to work with time in ChucK using events. You saw how important events can be for working with things like the computer keyboard to capture real-time gestural data from a user and for shreds to talk to each other. You even built your first playable musical instrument, a keyboard organ! Here are some important things to remember:
· Events can be waited on by one or more shreds while time advances.
· Events can be triggered to notify waiting shreds that something has happened.
· Events can be triggered by external events such as Hids; for example, a keyboard.
· Shreds can trigger events by using signal(), which triggers at most one listening shred, or broadcast(), which triggers all listening shreds.
· You can subclass Event to make your own event types, adding data or functions to them.
In our next chapter we’ll expand the types of external devices and signals that can trigger events, looking specifically at MIDI devices and OSC.