Programming for Musicians and Digital Artists: Creating music with ChucK (2015)
Part 2. Now it gets really interesting!
Chapter 11. Integrating with other systems via MIDI, OSC, serial, and more
This chapter covers
· The Musical Instrument Digital Interface
· MIDI messages
· Controlling ChucK with MIDI devices
· MIDI output to other software, synthesizers, robots, and more
· The Open Sound Control protocol for networked systems
· Serial interfaces in ChucK
So far we’ve covered a lot of concepts, all in a creative context, emphasizing composing music and controlling sound in real time. You’ve learned about arrays, logic, functions, multithreading, classes, objects, events, and more. If you were new to programming, you’ll now be able to look at almost any other language and understand the basics right away. The fact that ChucK allows you to control sound and make music so easily and expressively is one of the things that sets it apart from other languages. One last step in your ChucK journey is to learn more tools that you can use for live performance. This will allow you to take your compositions and code-built instruments on stage. In chapter 10, you learned about events and how to start using the keyboard. Now you’ll learn about the Musical Instrument Digital Interface, how to use MIDI controllers with ChucK in real time, and how to use ChucK to control external MIDI synthesizers and devices.
We’ll also briefly introduce the Open Sound Control (OSC) protocol, which allows you to use ChucK in a networked context, and we’ll talk briefly about serial I/O in ChucK.
11.1. Using MIDI: history, basics, and advanced applications
In this section we cover the MIDI standard, including the hardware and connectors, some types of messages, and how you can use it with ChucK. You’ll learn how to connect to things in the outside world such as MIDI-capable musical keyboards and synthesizers and even robots!
As a thought experiment, can you imagine if all of the manufacturers of cell phones, cameras, computers, DVD players, TVs, and other electronic devices adopted a single cable type and data standard so that all devices could talk over the exact same connections? The world would be so much easier to navigate. Well, in the 1980s, almost all of the electronic music manufacturers of the day drafted and adopted the MIDI standard, so that their devices could communicate with each other. If you think about it, it was (and still is) quite a miracle, because MIDI allows you to connect keyboards, synthesizers, computers, lighting controllers, and many other artistically interesting things.
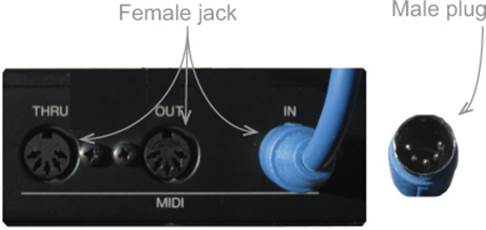
Originally, the heart of MIDI was a specific type of connector called a five-pin DIN, or MIDI connector, and MIDI cable that could be used to plug one device into another. This wire and connector are still somewhat important today, and if you look on the back of a digital keyboard (electronic piano or organ) or synthesizer, you’re still likely to see two or three round, five-pin, female MIDI jacks (figure 11.1). Being able to recognize these connectors will be important to you later, when we talk about how to connect to MIDI musical keyboards and synthesizers.
Figure 11.1. Female MIDI jacks commonly found on the back panel of keyboard synthesizers and other devices. A cable with the male MIDI plug is also shown.
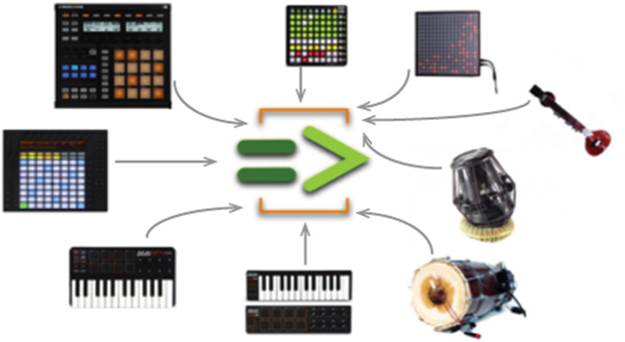
For those of you who make music primarily with your computers, physical MIDI cables and connectors are less important today than they were three decades ago, but they still can be used to connect to the outside world, to control computer programs (like ChucK) with a MIDI keyboard or other controller (figure 11.2). Physical MIDI interfaces, connectors, and cables can also be useful for connecting one computer to another.
Figure 11.2. You can use a MIDI interface and cable to control ChucK from lots of MIDI devices, ranging from music keyboards (clockwise from bottom), to drum/ percussion controllers, to button matrix controllers such as the Monome (top) and Tenori-on by Yamaha, to custom-built controllers like the ESitar and ETabla (right).
To connect your computer in this way using MIDI, you first need a MIDI adapter, which usually plugs into a USB port, FireWire, Thunderbolt, or other device. The MIDI adapter might have female jacks, as shown in figure 11.1, or it might go directly from your computer to male plugs, also shown in figure 11.1, which can connect directly to MIDI devices. Some MIDI keyboard controllers and other devices can connect directly to USB.
MIDI hardware and cables can also be important because you can use ChucK to control outboard synthesizers and many other MIDI devices (figure 11.3).
Figure 11.3. You can also control lots of external synthesizers and other MIDI cable devices from ChucK.

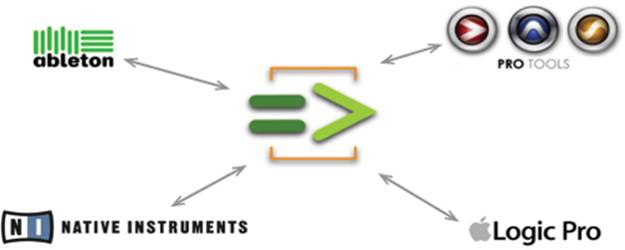
Even without a MIDI interface and cable, you can still use MIDI in ChucK to communicate between programs running at the same time, such as software sound synthesizers, virtual keyboards, DJ software, and digital audio workstations (DAWs), as shown in figure 11.4. Almost every commercial music program includes MIDI connectivity, so if you’re running one of these programs on your computer, ChucK will be able to see it and communicate. You’ll learn how to do this very soon.
Figure 11.4. Via MIDI, ChucK can talk to lots of other MIDI-capable software programs and systems.
Now that you know a little about the physical MIDI connectors and cables, you need to know something about the software specifications for MIDI, specifically, how musical and other parameters are transmitted from one device/program to the other.
11.1.1. MIDI messages
To get started, you should first understand MIDI messages, most of which consist of three integer bytes of 8 bits each, as shown in figure 11.5. Each byte can take on values ranging from 0 to 255, and only the first byte, called the status byte, of any MIDI message can be greater than 127, ranging from 128 to 255. The next two bytes, called the data bytes, have a value less than 128, from 0 to 127. Having the status byte in a different range from the other two is the way MIDI can tell which one is the first byte.
Figure 11.5. Almost all MIDI messages have three integer bytes. The first (status) byte has a value of 128–255, and the remaining (data) bytes have values between 0 and 127.
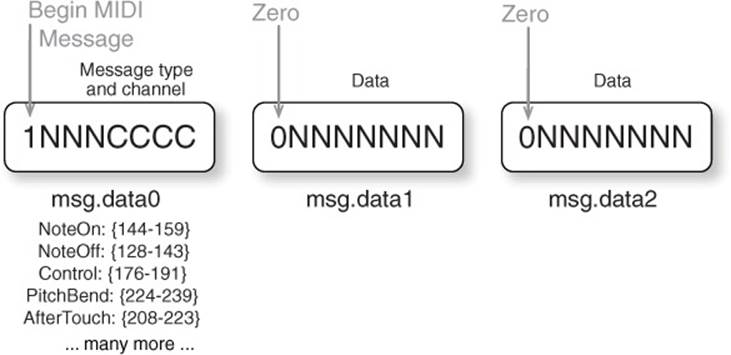
Probably the most common MIDI message is the noteOn message (status byte equal to 144–159), but other messages types include noteOff, Control Change, and others. Control Change messages (status byte equal to 176–191) have many types, as determined by the value of the second byte, including sustain pedal, volume pedal, pitch bend, panning, reverb level, and many more.
To make this clearer, you’ll create a little program to play random notes on an external MIDI synthesizer, as shown in listing 11.1. First, you have to open the MIDI device on which your target interface or synthesizer lives ![]() , and you need a MIDI device to be present so you can open it. So make sure that you have some MIDI-compliant synthesizer to control from ChucK.
, and you need a MIDI device to be present so you can open it. So make sure that you have some MIDI-compliant synthesizer to control from ChucK.
A MIDI synthesizer to play from ChucK
To play a MIDI device from ChucK, you can use a MIDI interface and cable to connect your computer to the MIDI input of an outboard synthesizer. Or you can locate or install and run a virtual MIDI synthesizer on your computer. Mac users can use a variety of such programs, including SimpleSynth (free), General MIDI Player (costs a little), and Logic (costs more). Windows users often find a built-in General MIDI synthesizer already installed on their computer. Windows users can also use VirtualMIDISynth, MidiPiano, Anvil Studio, Cakewalk, and many other programs. Linux users can use LMMS, Qtractor, Schism Tracker, and others.
Once you have a MIDI interface and synthesizer connected, or a software synthesizer loaded and running on your computer, you can use the Device Browser window in the miniAudicle to see your MIDI device(s), using the menu item for MIDI.
Note: You must exit and restart miniAudicle when connecting and disconnecting MIDI devices; otherwise new ones won’t show up.
Now that you have a MIDI device connected/installed and identified, you should be able to inspect it in the miniAudicle, as shown in figure 11.6, by selecting Window > Device Browser and then selecting MIDI from the tool in that window.
Figure 11.6. Selecting the Device Browser in the miniAudicle Window menu brings up that browser window (upper left). Then you can select MIDI and inspect the inputs and outputs (lower right). You then use these port numbers in ChucK to connect to those devices.

Once you have a MIDI device successfully connected and identified, you can play it using the code of listing 11.1. You first make a MidiOut object ![]() and try to open it
and try to open it ![]() on the appropriate MIDI port number
on the appropriate MIDI port number ![]() . Note: You might need to change the number to match the particular synthesizer you’re trying to play. If the device opens correctly, you then make a MidiMsg holder for noteOn/noteOff messages you’re going to send
. Note: You might need to change the number to match the particular synthesizer you’re trying to play. If the device opens correctly, you then make a MidiMsg holder for noteOn/noteOff messages you’re going to send ![]() . You define a MIDInote function
. You define a MIDInote function ![]() for sending either noteOn messages (argument onoff=1
for sending either noteOn messages (argument onoff=1 ![]() ) or noteOff (onoff=0)
) or noteOff (onoff=0) ![]() . That function packs the numbers into the correct message holders (data1, data2, data3) and sends the message.
. That function packs the numbers into the correct message holders (data1, data2, data3) and sends the message.
Listing 11.1. MIDI output note on/off boilerplate
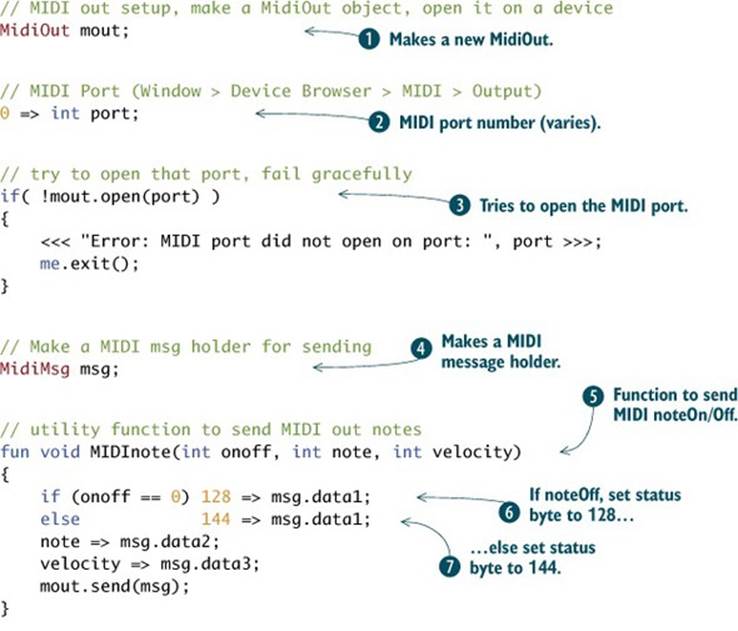

To test everything, you set the MIDI note and velocity to appropriate random numbers and send a noteOn by calling your function ![]() . It’s pretty important to turn off
. It’s pretty important to turn off ![]() every note that you turn on in MIDI; otherwise you get possible stuck notes, which are one of the common criticisms of MIDI systems.
every note that you turn on in MIDI; otherwise you get possible stuck notes, which are one of the common criticisms of MIDI systems.
Exercise: play “Twinkle, Twinkle Little Star” on your MIDI synthesizer
Instead of playing random notes, change the infinite while loop to a for loop, and iterate through the notes and durations for the “Twinkle” song (reproduced here) that we used in chapter 4. Note that you don’t have to do Std.mtof(myNotes[]) here because you can just send the MIDI note number, and your synthesizer will take care of the rest.
// declare and initialize array of MIDI notes
[57,57,64,64,66,66,64,62,62,61,61,59,59,57] @=> int myNotes[];
// quarter note and half note durations
0.3 :: second => dur q;
0.8 :: second => dur h;
[ q, q, q, q, q, q, h, q, q, q, q, q, q, h] @=> dur myDurs[];
// loop for length of array
for (0 => int i; i < myNotes.cap(); i++)
{
MIDInote(1, myNotes[i], 100);
myDurs[i] => now;
MIDInote(0, myNotes[i], 100);
0.2 :: second => now;
}
Try playing a different song, by coding different note and duration values.
When we first introduced noteOn, we noted that the status byte could range from 144 to 159. This is because the status byte for noteOn is the value 144 plus the channel number, which can have any value from 0 to 15, for a total of 16 channels. By exploiting different channel numbers, a MIDI sender can control multiple devices, each of which can listen on a different channel number.
11.1.2. External MIDI controllers for ChucK
Just as you controlled a MIDI synthesizer using ChucK code, you can also use external controllers or software to control things going on inside ChucK code. This can unlock the true potential of ChucK’s real-time synthesis, concurrency, and event-driven design. MidiIn is an object that can be ChucKed to now as an event, and whenever a message comes in over that port, the event is signaled, causing time to pass.
Using a MIDI controller to play and control ChucK code
Just like playing a synthesizer from ChucK, you’ll need a MIDI interface and cable to connect your computer to the MIDI output of an outboard keyboard or other MIDI controller. Or you can locate or install and run a virtual MIDI keyboard. One excellent software MIDI keyboard that’s available for all platforms is Virtual MIDI Piano Keyboard (VMPK). Mac-specific virtual MIDI keyboard programs include MidiKeys and Chirp, as well as virtual keyboards available in other music programs such as Logic, Pro Tools, and many others. Windows users can use FreePiano, MidiPiano, and many others. In addition to VMPK, Linux users can use jack-keyboard and others.
Once you have a MIDI interface and keyboard/controller connected, or a software keyboard/controller loaded and running on your computer, use the Device Browser window in the miniAudicle to see your MIDI device(s), using the MIDI menu item.
Listing 11.2 shows a simple monophonic (one note at a time) piano synthesizer that can be played using MidiIn. After you make a MidiIn object ![]() and open it
and open it ![]() , remembering to set the port number appropriately, and make a MidiMsg holder for incoming messages
, remembering to set the port number appropriately, and make a MidiMsg holder for incoming messages ![]() , you declare and connect aRhodey FM electric piano to use as your synthesizer
, you declare and connect aRhodey FM electric piano to use as your synthesizer ![]() .
.
In an infinite loop ![]() , you ChucK the MidiIn object min to now, as an event, suspending time until a message is received on that port
, you ChucK the MidiIn object min to now, as an event, suspending time until a message is received on that port ![]() . When you press a key on your MIDI keyboard, ChucK time is allowed to advance and the program continues executing.
. When you press a key on your MIDI keyboard, ChucK time is allowed to advance and the program continues executing.
Listing 11.2. Simple piano synthesizer controlled by MIDI input
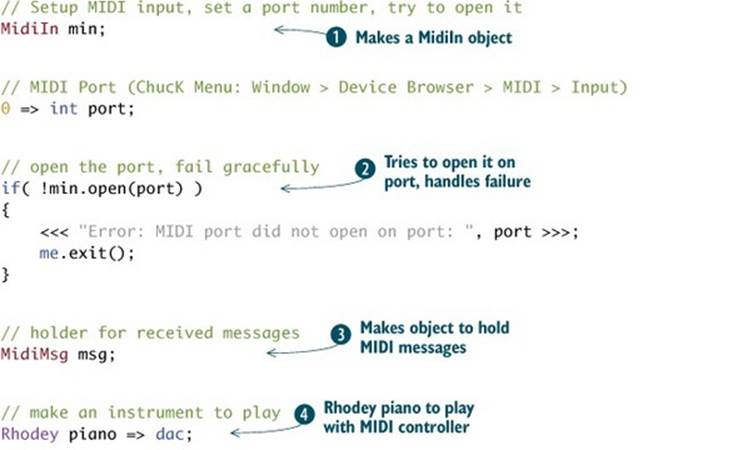

When time advances, you test to see if the incoming message is a noteOn on channel 0 (data1 == 144), and if so, you set your piano frequency and gain and play a note. If the message is a noteOff, you send your piano a noteOff message.
Exercise: make your own software synthesizer using your MIDI controller
Rock out using your MIDI controller and ChucK. Make an array of Rhodey piano UGens, and cycle through it using a counter. Use BeeThree UGens to make an organ or Mandolins to make a mandolin, or whatever you like. ChucK makes it pretty easy to build your own playable instruments by using the StkInstrument UGens available or by making your own instrument classes.
11.1.3. ChucK to ChucK using a virtual MIDI port
One other interesting thing you can do with MIDI is to use it to talk between ChucK shreds, using one process to control another. For that, you need a virtual port. On Mac computers, you can make a virtual port in the Audio Midi Setup application, found in the /Applications/Utilities folder. Basically you have to enable the IAC driver, as shown in figure 11.7 (left), by selecting Window > Show MIDI Window from the top menu, clicking the IAC Driver icon, and then selecting the Device Is Online check box.
Figure 11.7. Audio MIDI Setup (left) on a Mac and loopMIDI (right) on Windows let you set up a virtual MIDI port, which you can then use to connect ChucK to other programs or itself.
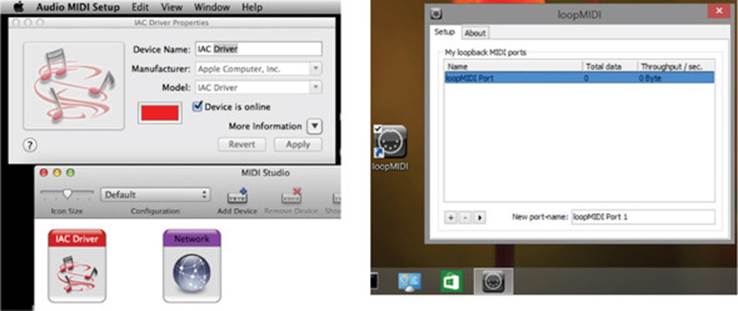
Windows users can use loopMIDI or virtualMIDI from Tobias Erichsen (see figure 11.7, right) or music software programs such as Cakewalk or Pro Tools. To use loopMIDI, you need to download, install, and run it. Click the + button in the lower left of the window that appears. Now when you run the miniAudicle (remember, you have to stop it and restart it so that new devices can show up), that device should appear.
Once you’ve created a virtual MIDI port, you can use the miniAudicle Device Browser to see it in the MIDI Devices window. Using that port number, you should now be able to run the code of listing 11.1 and listing 11.2 and hear your monophonic Rhodey electric piano responding to your random note sender. ChucK to ChucK via MIDI!
11.1.4. Controlling robots via MIDI
One amazing thing to do with MIDI is to control things other than synthesizers. These can include lighting controllers (available from music and theatrical supply stores), special effects like fog machines and pyrotechnics, and robots, as shown in figure 11.8.
Figure 11.8. ChucK can control many physical objects in the real world such as robots (left), including commercially available MIDI player pianos like the Yamaha Disklavier (right).
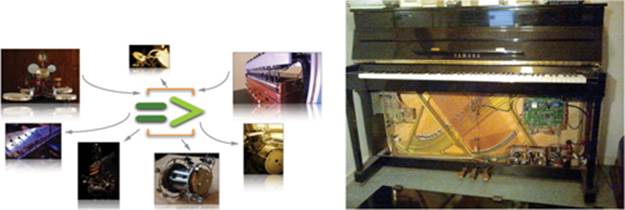
“Wait a minute,” you might say, “I don’t have a robot to control via MIDI.” Actually, one might be closer and more available than you think. A number of manufacturers make MIDI player pianos, such as the Yamaha Disklavier shown in figure 11.8.
MIDI player pianos can often be found in the lobbies of hotels, in department stores, in churches, and in other public spaces. You might be able to call up your local piano store and ask if you can plug into their MIDI player pianos and control them using ChucK! The nice thing about MIDI player pianos is that they respond to noteOn and noteOff just like a synthesizer, so any code you write that works with your synthesizer should work with a MIDI player piano. Some electronic organs (and even some large church organs) respond to MIDI as well, and you can control those from ChucK just as you would any synthesizer.
Wow! You’ve learned that MIDI allows you to use ChucK to control external synthesizers, theatrical effects, and even robots. MIDI also lets you control ChucK synthesis from external devices such as musical keyboards. ChucK shreds can talk to each other using MIDI within a single computer or between computers using MIDI interfaces and cables. MIDI also lets you connect ChucK to other programs. The power and ubiquity of MIDI is one of the reasons that it has stuck around for 30 years and will likely be with us for a long time to come.
Let’s now look at a newer and even more flexible way to communicate between programs and computers, called Open Sound Control.
11.2. Open Sound Control: networking music
Another protocol for passing musical information between programs and devices is OSC, developed and announced in 1997 to address shortcomings of MIDI and to take advantage of the increasing connectedness of computers made possible by local area networks. Today, most musical programs and languages, including commercial systems, allow for the use of OSC, and some controllers can even send and receive OSC. Mobile apps also can send and receive OSC, making it possible to control musical and artistic events and systems in many flexible ways. The birth and proliferation of laptop orchestras, mobile orchestras, interactive art installations, and many other things (see chapter 0) have been enabled and pushed forward by the availability of networks (especially wireless) and OSC.
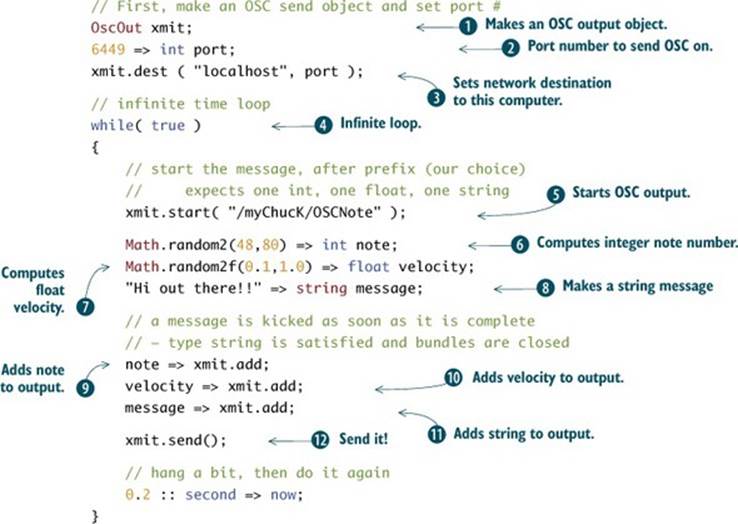
Appendix D gives a more complete introduction to OSC, but to demonstrate the potential, let’s make a simple conductor (sender) and player (receiver, client) that use OSC. First, you’ll build the sender, as implemented in listing 11.3. OscOut ![]() is an object that can send OSC messages on a port number of your choosing
is an object that can send OSC messages on a port number of your choosing ![]() . You use the special name localhost
. You use the special name localhost ![]() to indicate that you want to send and receive on the same computer. This is all that’s required to set up and send OSC! Then you drop into an infinite loop
to indicate that you want to send and receive on the same computer. This is all that’s required to set up and send OSC! Then you drop into an infinite loop ![]() to conduct the receiver that you’re going to create soon.
to conduct the receiver that you’re going to create soon.
At the heart of any OSC message is the specification of how the message starts, the address, a unique string that you make up, and the arguments that come after that ![]() . In this case, we chose /myChucK/OSCNote as our message address and specified that the arguments coming after will be one int, one float, and one string. All of these must be present, in exactly this order, for the message to be complete and sent and to be received at the other end. After you’ve started and specified your message
. In this case, we chose /myChucK/OSCNote as our message address and specified that the arguments coming after will be one int, one float, and one string. All of these must be present, in exactly this order, for the message to be complete and sent and to be received at the other end. After you’ve started and specified your message ![]() , you compute some values
, you compute some values ![]()
![]()
![]() and then add the arguments you want to send with the message
and then add the arguments you want to send with the message ![]()
![]()
![]() . You can add any combination of ints, floats, and strings, but it’s a good idea to use the same combination with every message of a given address so the receiving end knows what to expect. When you’ve finished adding arguments, you tell the OscOut object to send the message
. You can add any combination of ints, floats, and strings, but it’s a good idea to use the same combination with every message of a given address so the receiving end knows what to expect. When you’ve finished adding arguments, you tell the OscOut object to send the message ![]() .
.
Listing 11.3. Simple OSC sender
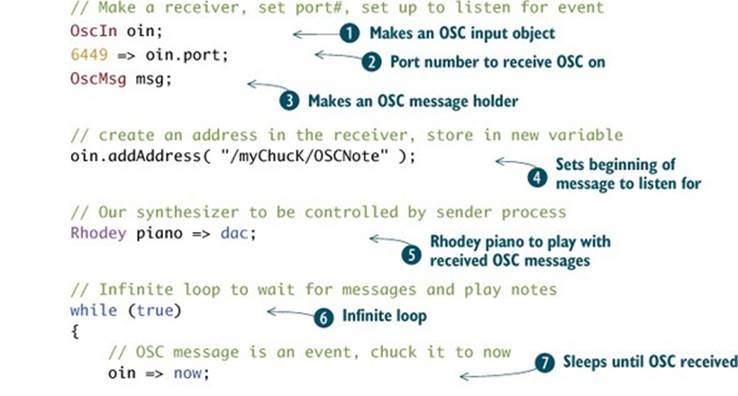
Now that you’ve created your sender, you need a receiver, as shown in listing 11.4. Here you make an OscIn object ![]() and set the same port number
and set the same port number ![]() (very important). You also create an OscMsg object
(very important). You also create an OscMsg object ![]() , which will store each message that you receive. In the next line, you add an address in your receiver that exactly matches the format of the messages that the sender will be transmitting
, which will store each message that you receive. In the next line, you add an address in your receiver that exactly matches the format of the messages that the sender will be transmitting ![]() .
.
After making a new Rhodey object and connecting it to the dac ![]() , you drop into an infinite loop
, you drop into an infinite loop ![]() to wait for your messages to come in. Note that an OscIn object is an event, so it can be ChucKed to now just like any other event
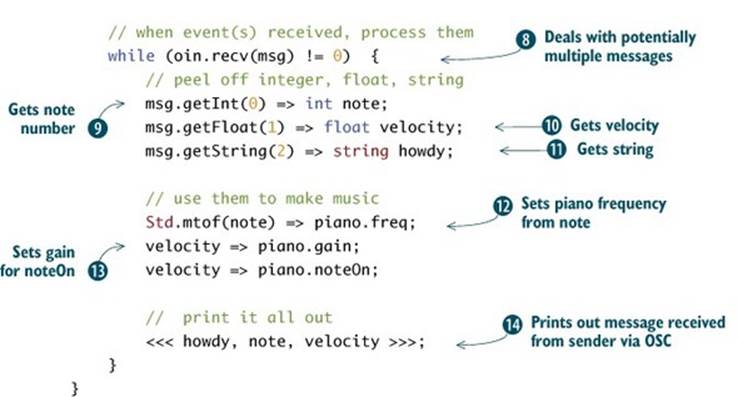
to wait for your messages to come in. Note that an OscIn object is an event, so it can be ChucKed to now just like any other event ![]() , suspending time until a message is received. Once this event fires, you retrieve the message itself
, suspending time until a message is received. Once this event fires, you retrieve the message itself ![]() and then get the arguments using the appropriate functions
and then get the arguments using the appropriate functions ![]()
![]()
![]() , use those to control your notes
, use those to control your notes ![]()
![]() , and print it all out just to verify things arrived okay
, and print it all out just to verify things arrived okay ![]() .
.
Listing 11.4. Simple OSC receiver
This little demonstration should convince you of the power of OSC, letting you control one ChucK shred from another. It would also let you communicate between ChucK and other music software and languages, other graphics programming languages such as Processing, and anything else that uses OSC.
The real power kicks in when you use OSC between different computers over a network. We don’t have the space or time to fully get into that here, but the clue is in the dest() line of the sender program of listing 11.3 ![]() . If you changed localhost to another machine name on your network, such as GeWang.local, or an IP address of the form 192.168.0.2, then you could run the receiver on that machine, and you’d have the beginnings of a multi-machine orchestra!
. If you changed localhost to another machine name on your network, such as GeWang.local, or an IP address of the form 192.168.0.2, then you could run the receiver on that machine, and you’d have the beginnings of a multi-machine orchestra!
Exercise: make your own LOrk (Laptop Orchestra)
Do as we just described, changing localhost to another machine name or IP address on your network. Use your own knowledge of networking, or get a friend who knows networking, and trade them your knowledge of ChucK for their help. Run the sender on one machine and the receiver on the other. Create two senders and two receivers, one for each machine. Perform a networked ChucK duet over your local wireless network.
OSC is super powerful, and we’ve barely cracked the surface here. There’s more in-depth documentation in appendix D and many online resources, such as documentation for specific pieces by the Princeton Laptop Orchestra and Stanford Laptop Orchestra, that talk about how OSC can be used to communicate between computers and programs.
Just as with MIDI, many commercial programs also support OSC, so you could use ChucK to move the virtual volume and effects sliders on a digital audio workstation program such as Reaper, Pro Tools, Logic, or Cakewalk. Connecting ChucK to other such systems via OSC means that you’re no longer limited to things the manufacturer provides, because your ChucK programs become part of those systems!
We’ll now turn briefly to one more outside-world communication method: serial ports and connections.
11.3. Serial input/output to the outside world
Serial communication means that the individual binary digits (bits) of a message or value go over a wire one at a time. MIDI is actually a form of serial communication, because all of those messages are transmitted over a single wire, one bit at a time. So the first (status) byte of a MIDInoteOn (channel 0) would be transmitted as the individual bits:
1 0 0 1 0 0 0 0 (binary for the number 144)
Even though MIDI is a form of serial communication, usually when people talk about serial, they’re talking about a protocol called RS-232 or one related to it. Not long ago, computers talked to each other via modems, over phone lines, using RS-232 serial. Although it’s pretty outdated and most people don’t use it regularly, serial is still good for connecting to many things, like Arduino microcontrollers, older development boards (BasicStamp, DSP boards from Texas Instruments, Analog Devices), and some older interfaces and systems, as shown in figure 11.9. As an example,listing 11.5 shows a simple ChucK program to accept text information as strings via a serial interface ![]() configured to the specific settings for an Arduino board
configured to the specific settings for an Arduino board ![]() . Each time the Arduino sends a new string, the .onLine() event is triggered
. Each time the Arduino sends a new string, the .onLine() event is triggered ![]() , allowing you to getLine() the string
, allowing you to getLine() the string ![]() and print it out
and print it out ![]() . Serial I/O is covered in much more detail in appendix F.
. Serial I/O is covered in much more detail in appendix F.
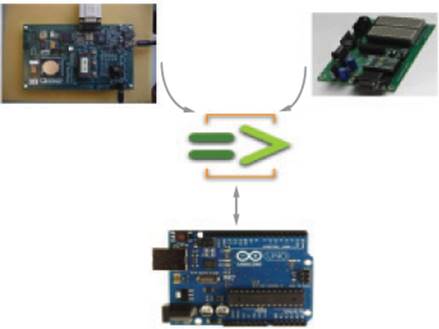
Figure 11.9. You can use serial communication in ChucK to exchange data as well as to control and be controlled by other systems such as Arduino (lower), Analog Devices Shark DSP (upper left), and the Parallax BASIC Stamp (upper right).
Listing 11.5. Receive lines of strings from an Arduino via a SerialIO object

Another way to Print in Chuck
Note that the example of listing 11.5 uses a different method to print to the console from the one you’ve been using (<<< "Print this" >>>;). The chout <= technique is another way of printing that’s more compatible with Java and some other languages.
Many things that you can connect to your computers via USB are actually using, or emulating, the old RS-232 serial protocol.
We’re not going to cover any more specific serial examples here, because it’s a pretty specialized topic and highly dependent on the hardware being used. But serial is, of course, supported in ChucK, and for more examples of how to use it, see appendix F.
11.4. Summary: looking outward and forward
You’ve done a whole lot, but ChucK lets you do so much more. In this chapter you learned how to connect to things in the outside world using MIDI, OSC, and serial. MIDI is a time-honored means for electronic musical devices to talk to and control each other. MIDI can be used to connect a huge number of devices and systems, ranging from musical keyboards, to drum controllers, synthesizers, computers, theatrical lights and effects, and even robots. OSC is a more modern protocol for computer systems to communicate with each other about music and sound. Serial is even older than MIDI, but it’s still around and in use for many do-it-yourself types of systems such as Arduino. ChucK can speak all of these: MIDI, OSC, and serial.
Throughout the book you’ve learned about ChucK’s types, logic and control structures, arrays, objects, classes, events, and more and how to use them for your music making. But there’s more to ChucK than we could ever cover in just one book. Even though you know quite a lot about ChucK’s built-in unit generators, there are more of them that you’ve never used, but they’re all described in appendix C.
And, we didn’t use or talk about all of the functions available in the ChucK Standard, Math, Machine, and other libraries and classes, but they’re documented in appendix B.
ChucK can also open, read, and write computer files such as text files containing scores, lyrics, and whatever. The specifics of dealing with files are covered in appendix E.
Appendix G tells you how to use ChucK in the command line (terminal, shell, DOS box, or other text-only interface), without needing the miniAudicle at all. If this doesn’t make sense to you, don’t worry about it. We include it so that all types of computer users can enjoy and use ChucK.
ChucK isn’t limited to what’s built in. You can do even more, like extending the ChucK language itself, creating your own unit generator classes via three mechanisms:
· Chugens— ChucK code encapsulated in a function that acts like a UGen.
· Chubgraphs— New UGen classes that are composed of existing unit generators connected together.
· ChuGins— External objects written in the C or C++ languages, which are loaded when ChucK runs and show up as native unit generators.
All three of these, with examples, are covered in appendix H.
What’s clear is that if you’ve worked through all of the examples and exercises, you’re now a ChucK programmer and a digital artist who is capable of creating amazing works of art, limited only by your inspiration and imagination. ChucK is a powerful tool, and it’s now in your toolbox. So, as we like to say in the ChucK community,
The time is now;
// Let's make music!!