Programming for Musicians and Digital Artists: Creating music with ChucK (2015)
Part 1. Introduction to programming in ChucK
In chapter 0 we told you why we wrote ChucK, why we love programming in it so much, and some of the things we’ve done in our own art making.
Now, in these first five chapters we will teach you the basics of programming in ChucK. Chapter 1 begins with the basics of ChucK, including variables, types, conditional statements, and looping structures. With these features of ChucK, you will quickly be putting together a program to synthesize the first few notes and bars of a song. Chapter 2 introduces the libraries (tools) built into ChucK. Using those functions, you’ll be able to set and modify pitches, volumes, and durations of the notes in your songs. You’ll also learn how random numbers and mathematical calculations can be used to make much more interesting music automatically, letting the computer do most of the work.
In chapter 3 we introduce arrays, and show how to make, store, and play melodies more easily. We also show how to control other parameters in ChucK. In chapter 4 we show you how to use sound files in ChucK and how you can use them to create soundscapes and even a cool electronic dance piece. Chapter 5 introduces the concept of functions and how they can be used in modularizing and organizing your code.
Chapter 1. Basics: sound, waves, and ChucK programming
This chapter covers
· Introduction to acoustics, sound, and waveforms
· Sine waves and other oscillators
· Variables
· Control structures and logic
So far we’ve talked about why we think ChucK is the best and most powerful language to make all kinds of art and artistic systems. Now it’s time to begin learning how to program in ChucK to make sound and music. We’ll first talk about sound in general, looking at a graphed sound waveform or two. We’ll talk about properties of sounds in terms of loudness, pitch, and noise. You’ll learn that things that oscillate are fundamental to physics, sound, and music, and you’ll make music with ChucK’s built-in oscillators. You’ll learn:
· How data is managed and manipulated in ChucK by the use of variables.
· About the timing mechanisms built into ChucK. The way it handles timing is one of the things that makes it different from all other programming languages, and which makes it so great for programming music, sound, and time-based art.
· About controlling the flow of your programs by using logical variables and tests, and looping.
By the end of the chapter, you’ll have written your first composition in ChucK!
1.1. Sound waves and waveforms
We’ll begin by talking about the physics and nature of sound. Sound consists of high and low pressure fluctuations (waves) of air caused by one or more vibrating objects. Sound waves then propagate through the air, maybe bouncing off walls and other surfaces, finally reaching your ears or a microphone. People who work with sound often graph waveforms (amplitude of air pressure, or voltage from a microphone, as a function of time). Figure 1.1 shows a plot of wave values as a function of time of a man saying the word “see.”
Figure 1.1. Waveform (sound amplitude versus time) of the spoken word “see”
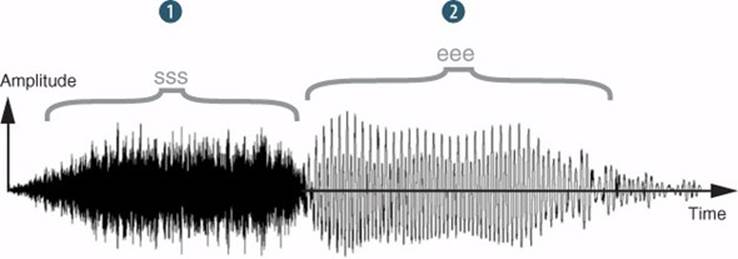
Some things are obvious from this plot. The noisy consonant “sss” ![]() in the first half of the sound changes quickly to a different structure for the “eee” vowel in the second half
in the first half of the sound changes quickly to a different structure for the “eee” vowel in the second half ![]() . If you zoom into the transition area, more things become obvious, as shown in figure 1.2.
. If you zoom into the transition area, more things become obvious, as shown in figure 1.2.
Figure 1.2. Waveform zoomed in to the transition between “sss” and “eee”
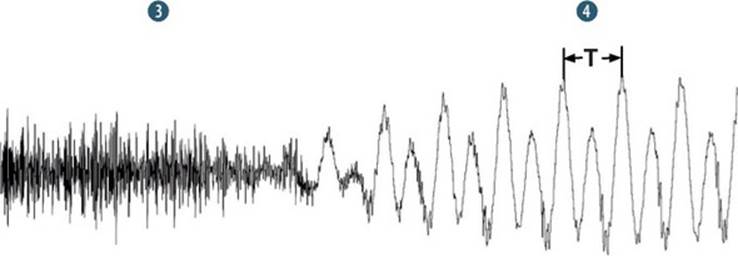
The “sss” ![]() looks about the same, still noisy with lots of wiggles in the waveform, but the “eee” sound quickly enters into what’s called periodic oscillation, with a basic shape repeating over and over
looks about the same, still noisy with lots of wiggles in the waveform, but the “eee” sound quickly enters into what’s called periodic oscillation, with a basic shape repeating over and over ![]() . There might be small deviations due to noise, quavers in the voice itself, or other factors, but the oscillation generally repeats over and over again. This is characteristic of sounds that have pitch. Pitch is your perception of frequency from low to high. It’s what you sing or whistle of a song melody, and it’s what musicians notate and talk about in terms of note names and numbers. The keys of the piano keyboard are oriented from low (left) to high (right) pitches.
. There might be small deviations due to noise, quavers in the voice itself, or other factors, but the oscillation generally repeats over and over again. This is characteristic of sounds that have pitch. Pitch is your perception of frequency from low to high. It’s what you sing or whistle of a song melody, and it’s what musicians notate and talk about in terms of note names and numbers. The keys of the piano keyboard are oriented from low (left) to high (right) pitches.
Most anything that gives you a sense of pitch exhibits periodic oscillation, and anything that oscillates periodically will sound pitchy (within certain frequency ranges). The region marked as T in figure 1.2 is the period of oscillation (usually given in seconds), and 1/T is the frequency of the oscillation in cycles per second. So in the case of the “eee” sound, if the period T is measured as 6.6 milliseconds (a millisecond is one 1000th of a second), then the frequency of oscillation will be 1/0.0066 = 150 cycles per second, or 150 Hz (the unit of frequency named after physicist Heinrich Hertz, pronounced “hurts”).
If you repeat that single period of “eee” over and over, looping at a convenient point like at the main peaks, you could synthesize an “eee” sound of any length you like. If you play that loop slightly faster, the pitch will go up. Play it slower and you get a lower pitch. That synthetic sound would be pretty dull and boring, because by selecting one period and looping that exactly over and over, you’ll have removed all the noise, slight deviations of pitch, and other things that made the original sound natural. This is one reason that synthetic speech sounds so, uh, synthetic.
Much of electronic music history, and of music history in general, and actually much of physics, centers on the notion of oscillation. We’ll use ChucK’s many flavors of built-in oscillators in coming sections, but for now we’ll look at one of the most fundamental forms of oscillation in nature and sound: the sine wave. You’ll use ChucK’s sine wave oscillator soon to write your first program that plays a musical note. So what’s a sine wave? A sine wave rises and falls smoothly and periodically, as shown (a few “periods” worth) in figure 1.3.
Figure 1.3. A sine wave (right) can be generated by rotating the circle (left) counterclockwise and tracing the height of the dot as it changes in time.

The circle on the left shows one way that sine waves can be pictured, explained, and generated. If you rotate the circle counterclockwise at a constant rate, say N rotations per second, then the height of the dot that begins on the right side of the circle (the left side of the graph) traces out a sine curve shown to the right, as time progresses from left to right. One way to picture this is to imagine the dot on the circle edge as a pencil, and if you pull a piece of paper from right to left as the circle turns, it will draw a sine wave. If N were five cycles per second, then the circle and sine wave would complete five cycles in one second.
You might have heard of sine functions if you’ve studied trigonometry, but as we noted before, sine waves can be found all over in nature and mathematics. Things that rotate can be described in terms of sine waves. The electricity coming out of AC wall sockets alternates in a sine wave pattern, because the generators in electrical power plants rotate in circles. But not just rotating things generate sine waves. A pendulum sweeps out a sine wave pattern in displacement as it oscillates back and forth. A simple mechanical system of a mass and spring oscillates in a sine wave pattern. An electrical circuit containing an inductor and a capacitor oscillates in a sine wave pattern. Acoustically, the single resonance of the air inside a pop bottle oscillates in a sine wave pattern. So, as you can see, sine waves are pervasive and important characters in the real world.
Other simple waveforms that are common in nature and in electronic music include triangle, sawtooth, and square waves. Figure 1.4 shows two cycles each of sine, triangle, sawtooth, and square waves.
Figure 1.4. Two cycles each of sine wave, triangle wave, sawtooth wave, and square wave

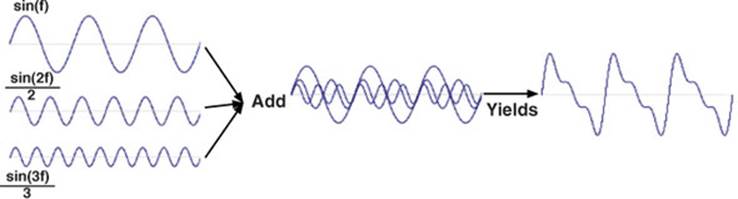
Sine waves are at the heart of the analysis of sound as well as synthesis. More complex periodic waves can be built of sine waves. You can make any sound possible by adding together sine waves of different frequencies, phases (delays), and amplitudes (loudness). Sine waves are the fundamental building blocks of what’s called the spectral view of sound, where instead of looking at the individual wiggles of the waveform, you look at the sine components that make up that waveform. Figure 1.5 shows that a sawtooth wave can be built by adding sine waves at integer multiples (1, 2, 3, ...) of some fundamental frequency. Such components are called harmonic. Triangle and square waves can be made up of odd sine harmonic (1, 3, 5, ...) frequencies at differing amplitudes.
Figure 1.5. Sine waves at integer multiple frequencies (1, 2, 3) can be used to build a sawtooth wave.
The sawtooth also has a nice physical analogy in the musical instrument world, because when a bowed string oscillates, the bow alternately sticks to the string, dragging it along, and then slips, allowing the string to snap back. This creates a sawtooth motion, as observed long ago by Herman von Helmholtz (1821–1894). Helmholtz gave us some of the earliest acoustic theory and experiments with the spectral descriptions of instruments and sounds. A sawtooth wave can be a good start on a violin synthesis, and we’ll do that shortly.
Physically, a clarinet playing its lowest note oscillates very much like a square wave, so you could build a very simple clarinet-sounding synthesis by using a square wave and an envelope generator (more on those soon). But first, let’s program!
1.2. Your first ChucK programs
It’s time to get started learning how to program. At this point, you should have read the instructions in appendix A on how to install miniAudicle and the basic functionality of the programming environment. Once it’s installed, open miniAudicle and we’ll guide you in writing your first programs. Figure 1.6 shows the miniAudicle ready to run ChucK code.
Figure 1.6. Main windows of the miniAudicle ChucK Integrated Development Environment (IDE)
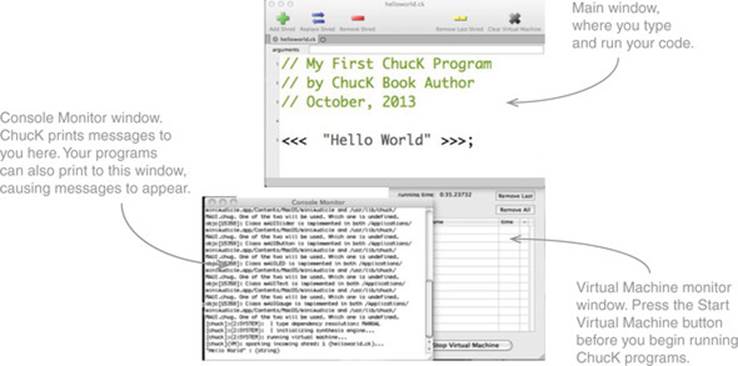
There are three main windows in the miniAudicle. The main window that you see at the top of figure 1.6 is initially called Untitled, and it’s the window in which you write your programs. You can change the name of this window, which you’ll do shortly when you write and save your first program. The lower-right window is the Virtual Machine (VM) monitor, which shows the status of the VM server while your ChucK code runs. Once started, the VM is always there and running, waiting for things to do.
When you click Start Virtual Machine, it creates a window called the Console Monitor (lower left of figure 1.6). This is where you’ll receive messages from the computer to help you with your program. If there are errors in your code, this is where the computer will tell you that there are problems and specifically where (in which lines) they occur. You can also print messages to yourself from your running code in the Console Monitor to help you debug your program or to keep you informed of what’s going on.
1.2.1. Your first program: “Hello World”
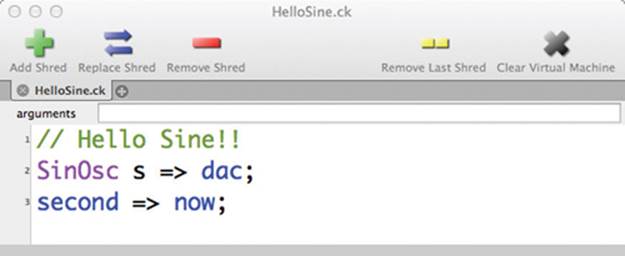
In almost all languages, the first program you learn to write is “Hello World”, so we’ll begin by showing you how to do this in ChucK. Go to the Untitled window, save it as helloworld.ck using the File menu, and then type in this line.
<<< "Hello World" >>>;
Don’t forget the semicolon, which is important for ending every line of code in ChucK.
Next, make sure that your VM is running (you’ll see the running time: value increasing constantly), and then click Add Shred on the main window, which is now labeled helloworld.ck. You’ll instantly see that “Hello World” appears in the Console Monitor. Congratulations, you successfully executed your first ChucK program! Clicking the Add Shred button told ChucK to run the “Hello World” code that you typed into the main window. You’ll click this button each time you want to run a ChucK program.
Even though you’ll always be typing and running code from the main window, from now on we’ll show code as text, with labels and comments. We won’t show you the whole main window with control buttons, but we’ll show parts of figure 1.6 in the future to point out some of those controls. All of the windows can be moved around on your desktop as you like, as with many of the programs you’re used to working with on your computer.
As discussed previously, it’s useful to you as a programmer to print to the Console Monitor for debugging purposes and as a composer to tell you what section of your song you’re currently running. From this first example you know that putting items between <<< >>> allows you to print. Putting anything in quotes between the triple <<< >>> print characters prints that directly. We’ll give you more advanced techniques on printing other things as you continue through this chapter.
1.2.2. Your first sound program: “Hello Sine!”
Because ChucK is a language focused on sound, and our goal is to teach you to program through writing compositions, you need to go a lot further in our programs than printing text to your Console Monitor window. You need to learn how to make sound. Thus, you’ll name your second program “Hello Sine!” Because a sine wave is periodic, it produces a sound that you hear as a pitch. So think of this first sine wave sound that you make as the beginning note of your first song, “Twinkle, Twinkle, Little Star.”
When you enter the code of listing 1.1, make sure you save it as a new file called HelloSine.ck. You should get used to the idea of saving your programs with meaningful names. When you change your programs in major ways, it’s often good to save them as a new file, giving them a related name such as HelloSine2.ck.
Also note that as you type the program of listing 1.1 into the miniAudicle editor window, some of the words magically change colors. This is the miniAudicle recognizing those reserved words and coloring them by type. You’ll learn more about that later.
Listing 1.1. Hello Sine!
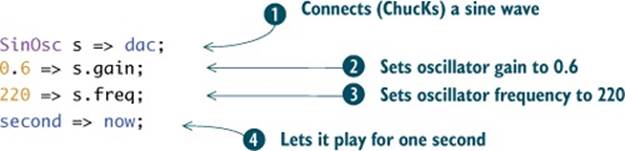
Let’s dissect this program line by line. In line ![]() , you make your first sound signal chain, also called a patch, which we’ll talk about shortly. SinOsc is called a unit generator (UGen), an object that will generate the sound of a sine wave. The name you give your oscillator is s, which is called a variable name in programming because its value can change. It’s also a variable in that you could have chosen any name such as t or mywave. You as the programmer pick how you name the things you make. For simplicity, we’ve chosen s.
, you make your first sound signal chain, also called a patch, which we’ll talk about shortly. SinOsc is called a unit generator (UGen), an object that will generate the sound of a sine wave. The name you give your oscillator is s, which is called a variable name in programming because its value can change. It’s also a variable in that you could have chosen any name such as t or mywave. You as the programmer pick how you name the things you make. For simplicity, we’ve chosen s.
The next important thing is the => symbol. Notice that it looks like an arrow. This is the ChucK operator, and ChucK is the name for the entire language. It’s designed to look like a signal flowing from one side of the arrow to the next. When you use it, you say you’re ChucKing whatever is on the left side of the arrow to whatever is on the right side. So right now, you have a SinOsc that you’ve named s and you want to send that sound out to your speakers or headphones. For that you use a special object called a digital-to-analog converter (DAC), which is connected inside your computer to the output of your sound card (speakers, headphones, and the like).
So, by ChucKing a SinOsc named s to the dac, you’ve made a sine wave that you’ll be able to hear from your speakers. Another term for connecting your sine oscillator unit generator to the dac is making a patch, which comes from the old days of analog synthesizers where sound-making and -processing components were connected using patch cords, or physical wires with plugs that made the connections.
Now that you’ve created a sound-making signal chain, you should know that there are three main aspects of this program in creating a sound: how loud, which frequency (or pitch), and how long. In line ![]() , you work with how loud. All sound-generating and -processing objects in ChucK have a .gain method, which you can use to control the volume level of sound. Gain can be set to any number, but it usually ranges between 0.0 and 1.0. Note in this code that you set the volume to .6 by ChucKing it to s.gain.
, you work with how loud. All sound-generating and -processing objects in ChucK have a .gain method, which you can use to control the volume level of sound. Gain can be set to any number, but it usually ranges between 0.0 and 1.0. Note in this code that you set the volume to .6 by ChucKing it to s.gain.
In line ![]() , you work with frequency. This is how you’re able to compose and determine which pitch (specific frequency) you want your SinOsc to make. The .freq method of your SinOsc accepts a number in Hertz from 0 to 20,000, which covers, and goes well below, the range of frequencies of human hearing. Note that in this example you set the frequency by ChucKing 220 to s.freq. This is the pitch of the first note of your “Twinkle” song. We’ll talk more in the next chapter about how to determine frequencies for particular musical pitches.
, you work with frequency. This is how you’re able to compose and determine which pitch (specific frequency) you want your SinOsc to make. The .freq method of your SinOsc accepts a number in Hertz from 0 to 20,000, which covers, and goes well below, the range of frequencies of human hearing. Note that in this example you set the frequency by ChucKing 220 to s.freq. This is the pitch of the first note of your “Twinkle” song. We’ll talk more in the next chapter about how to determine frequencies for particular musical pitches.
In line ![]() , you determine how long your synthesis will run, or the duration of your first note. For now you want your sound to play for 1 second, which you accomplish by ChucKing a duration of 1 second to an object called now. ChucKing second to now tells ChucK that you want to wait 1 second while sound is synthesized. If you didn’t have this line that manipulates time, you’d hear no sound, because the program would end right there.
, you determine how long your synthesis will run, or the duration of your first note. For now you want your sound to play for 1 second, which you accomplish by ChucKing a duration of 1 second to an object called now. ChucKing second to now tells ChucK that you want to wait 1 second while sound is synthesized. If you didn’t have this line that manipulates time, you’d hear no sound, because the program would end right there.
Units of time and duration in ChucK
You could have played your sine wave for any amount of time by ChucKing a different duration to now. For example, if you change line ![]() in listing 1.1 to
in listing 1.1 to
2.0::second => now;
then the sound will play for 2 seconds. The double colon tells ChucK that you want to talk about units of time (duration in seconds), so 2::second is 2 seconds, 0.1::second is 1/10 of a second, and so on. Also note that there can be spaces (or not) around the double colon. We’ll talk about other units of ChucK time/duration shortly.
One of the most powerful aspects of ChucK is that as the programmer you have absolute control of time. But you’re also obligated to control time to make sounds. We’ll discuss time and the now object in more detail in section 1.4.
1.2.3. Now let’s make music
Playing a single sine wave is a big deal, but now let’s expand your program to play four notes. The next step in building your song is creating a score of pitches and durations that you’d like your SinOsc to make. First, add a comment at the beginning of the program, to help document it ![]() . Then, extend your previous program as follows.
. Then, extend your previous program as follows.
Listing 1.2. Sine wave music

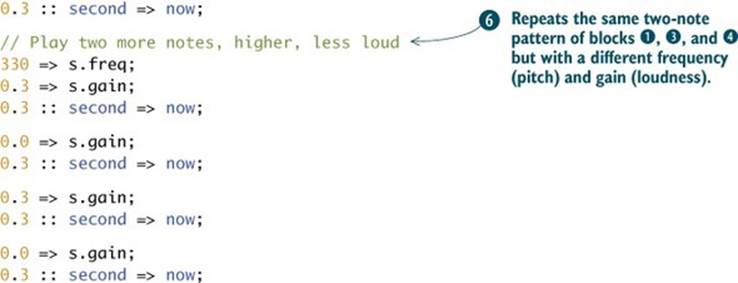
Note that you’re creating the first individual note by setting the gain of the dac- connected sine oscillator ![]() to 1.0
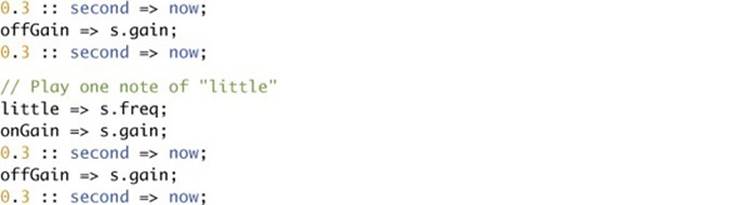
to 1.0 ![]() and then zero
and then zero ![]() , letting your sound patch run for a little while each time by ChucKing a duration of .3 seconds to now. You repeat the same note in
, letting your sound patch run for a little while each time by ChucKing a duration of .3 seconds to now. You repeat the same note in ![]() . You have to make that silence between the notes (by setting .gain to 0.0) or else those first two repeated notes would sound like one long note. In
. You have to make that silence between the notes (by setting .gain to 0.0) or else those first two repeated notes would sound like one long note. In ![]() , you repeat the whole two-note sequence but with a higher pitch (the second “twinkle” in your song) and at a quieter volume (the gain of an oscillator correlates to volume; larger gain equals higher volume). You can probably imagine creating an entire composition, stringing commands like this together. But that’s a lot of work, and by the end of this chapter we’ll show you many techniques to create notes like this in a much more concise and powerful way.
, you repeat the whole two-note sequence but with a higher pitch (the second “twinkle” in your song) and at a quieter volume (the gain of an oscillator correlates to volume; larger gain equals higher volume). You can probably imagine creating an entire composition, stringing commands like this together. But that’s a lot of work, and by the end of this chapter we’ll show you many techniques to create notes like this in a much more concise and powerful way.
ChucK is a real programming language
To those of you who have worked with music software, like GarageBand for Mac or FruityLoops for PC or many other such programs, this might seem like quite a bit of typing to make only a few sine tones. Remember when we mentioned in the introduction (“What is ChucK? How is it different?”) that because ChucK is text-based, typing is part of the bargain? But copy-paste is possible and encouraged, and in actuality the amount of typing required in ChucK is much less than in almost any other text-based language, even ones that were designed for music.
For now, to give you a glimpse of the power of ChucK, you can type in (or copy/paste) and run this short program. Don’t worry if there are things that you don’t understand; just be careful to type it in exactly as you see it here:
Impulse imp => ResonZ filt => NRev rev => dac;
0.04 => rev.mix;
100.0 => filt.Q => filt.gain;
while (1) {
Std.mtof(Math.random2(60,84)) => filt.freq;
1.0 => imp.next;
100::ms => now;
}
Once you’ve typed in the code, save it as WowExample.ck (or whatever name you like), and click the Add Shred button (figure 1.6, top left). You’ll hear a steady stream of tuned pops with random pitches. Lots of sound can come from very little code, once you know the powerful features of the language. You can click Add Shred again and hear even more notes. In fact, you can click Add Shred lots of times and hear even more.
When you’re through and want to stop the sound, click the Clear Virtual Machine button at the top right of the miniAudicle window (figure 1.6).
Over the next examples and couple of chapters, you’ll be building up your basic knowledge of ChucK, enabling you to make more and more powerful programs. If it sometimes feels like you’re not getting much for your lines of typed code, bear with us, because by the end of this chapter you’ll learn new things in ChucK that will allow you to make much more, even hours of music, for comparatively little typing.
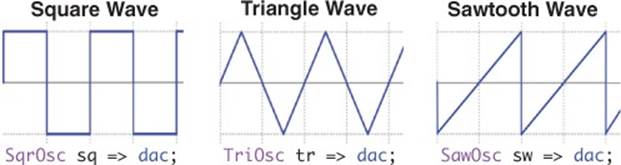
1.2.4. Trying new waveforms
Because you’re now ready to start composing using an oscillator, we want to enable you to use more than only the SinOsc object to make music. As discussed in section 1.1, it’s possible to make sound using many different types of waveforms. Try out the three waveforms shown in figure 1.7 in the program in listing 1.2 by changing the SinOsc in code block ![]() to one of the following: a square wave (SqrOsc), a triangle wave (TriOsc), or a sawtooth wave (SawOsc).
to one of the following: a square wave (SqrOsc), a triangle wave (TriOsc), or a sawtooth wave (SawOsc).
Figure 1.7. ChucK has built-in oscillator types for square, triangle, and sawtooth waveforms.
Testing and debugging
Each time you make a change in your program, you’ll click the Add Shred button to tell ChucK to run that new code. If there’s an error in your typing, ChucK will print it into the Console Monitor window, usually with the line number where it found the error. That line number will also be marked in red in the miniAudicle main window where you typed your code. Go back and fix the error, and rerun the code by clicking Add Shred until things work. If things still don’t work or make sense, retype the code from scratch. That’s how all programmers do it!
Also, at any time you can use the Save As menu item to save a new ChucK code file under a new filename. This will be important later as you write more and more programs.
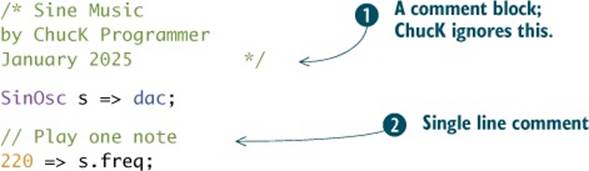
Some of the most important elements in programming are the comments the author makes while creating the code. As shown in the first few lines of listing 1.2 and shown again here, comments are made in two ways: ![]() a set of slashes and asterisks, /* and */, or
a set of slashes and asterisks, /* and */, or ![]() two forward slashes,//. In method 2, anything on the line past the // isn’t registered by ChucK as computer code. Method 1 is for multiple lines where all lines in between the two sets of characters are to be ignored by the compiler.
two forward slashes,//. In method 2, anything on the line past the // isn’t registered by ChucK as computer code. Method 1 is for multiple lines where all lines in between the two sets of characters are to be ignored by the compiler.
Good coding practices
At first, you should make a habit of commenting every line (or most lines, or at least every block) of code to make notes to yourself and future collaborators. Also, you should always put your name and date at the top of each program you write. As you become a more advanced programmer and also look at the programs of others, you’ll learn how to comment most effectively, where comments are necessary, and what to say in them.
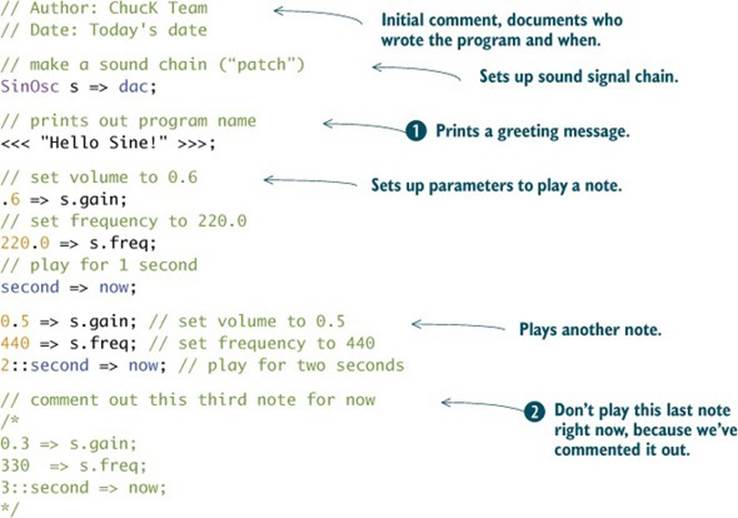
The example of listing 1.3 brings together all the concepts discussed in section 1.2. The code is well documented (commented), and you print something to the Console output ![]() at the beginning and then play two notes of music.
at the beginning and then play two notes of music.
In the last block ![]() , we show how you can use the multiline /*...*/ form of comments to cause some code to not be executed, because ChucK assumes that this text is a comment and not code. This can be extremely helpful for debugging your code or skipping across some of your composition so you can work with later parts.
, we show how you can use the multiline /*...*/ form of comments to cause some code to not be executed, because ChucK assumes that this text is a comment and not code. This can be extremely helpful for debugging your code or skipping across some of your composition so you can work with later parts.
Listing 1.3. Using comments to document code and control execution
You now know how to make sound with oscillators, how to change pitch using .freq and volume using .gain, and how to control the durations of your notes using now. But there are other things you need to know to make better music.
1.3. Data types and variables
The programs you’ve seen so far make sound, but it would be really hard to think about making a whole song using this type of literal coding of each gain, frequency, and time. The next concept to learn is how to make your program easy to change, given decisions you might make as a composer or even decisions the program itself might make.
One key to doing this is to use variables. In ChucK and many other programming languages, each variable has to have a particular data type, meaning that it can hold only one specific type of value or collection of values. Just like our examples in listing 1.2, where a variable s contained ourSinOsc, you can declare variables to hold a number, a time, or even words. But each one can hold only one type of data.
A very important ChucK data type is designed to hold integer (int) numbers. An integer is a special type of number that doesn’t have a fractional part; thus it needs no decimal point. In ChucK, an integer variable can store any number in the range of −2,147,483,648 to +2,147,483,647. You can declare and initialize (give a value to) an integer variable as shown in listing 1.4. Declaring a new variable creates space in the computer to store that variable and registers the newly declared name and type for that variable, so you can refer to it by name later. Initializing a variable gives it a value. In listing 1.4, right after you declare the new myPitch variable, you store the value of 220 into it by ChucKing.
Good coding practices: variable names
Because you’re the programmer, you can pick any name you like for your variables, but it’s almost always better to pick names that are meaningful. Names like myPitch, myVolume, and fastTempo are much more meaningful than x, j, and z. People reading your code can see those names and have an idea of their purpose. Later you’ll see that some variables are temporary, used quickly in code just after they’re created, and never used again. For these types of variables, i, temp, x, and the like are fine. But for most variables, a good name (not too long but definitely not too short) is important.
Listing 1.4. Defining and using an integer variable
// declare an integer
int myPitch;
// store a value in it
220 => myPitch;
// print it out
<<< myPitch >>>;
You can also initialize integers at the time they’re declared. For example, you can simultaneously declare an int named myPitch and set its value to 220, as shown in the following listing.
Listing 1.5. Initializing an integer as it’s declared
// another way to initialize integers
// store 220 in newly declared myPitch, all at once
220 => int myPitch;
<<< myPitch >>>;
Many times you want to change the value of a variable—that’s one reason they’re called variables. And there are times when you want to use the value of a variable to initialize a new variable. You might set the value of one variable as related to another to use them as frequencies for a musical chord or scale. Also, deriving new variables from others can make your programs more readable and easier to modify. You’ll first learn how to use math to change variable values and derive new variables from others in listings 1.6 and 1.7; then you’ll use those tools to play music inlisting 1.8. Because integers are numbers, you can do all sorts of arithmetic with them, as shown in the following listing. This will become more important later on when you want to play more and more notes.
Listing 1.6. Doing math with integers
// arithmetic with integers
220 => int myPitch;
// add or subtract
myPitch + myPitch - 110 => int anotherPitch;
// multiply
2 * myPitch => int higherPitch;
// divide
myPitch / 2 => int lowerPitch;
// print them all out
<<< myPitch, anotherPitch, higherPitch, lowerPitch >>>;
The code prints the following in the Console Monitor window:
220 330 440 110
Exercise
Walk through the variable math operations of listing 1.6 using pencil and paper. See if you come up with the same numbers. Type this code into ChucK to check your answers. Which was easier? You can use ChucK as a calculator!
The next listing shows a few shorthand methods to do arithmetic on variables to change their values in place. By adding a math operator to the beginning of the ChucK => operator, that math is performed on the variable and stored back into the variable.
Listing 1.7. Shorthand math: multiply, subtract, and ChucK in one step!
// longhand math with integers // shorthand math with integers
int myPitch; 220 => int myPitch;
220 => myPitch;
// multiply by 2 // multiply by 2, in-place
2 * myPitch => myPitch; 2 *=> myPitch; // "times ChucK"
// subtraction // in-place subtraction
myPitch - 110 => myPitch; 110 -=> myPitch; // "minus ChucK"
<<< myPitch >>>; <<< myPitch >>>;
Both of these print the following in the Console Monitor window:
330 :(int)
Let’s use your newfound knowledge about integer variables to play a couple of notes, as shown in the next listing. Here you store your pitch in an integer variable, and you create two integers called onGain and offGain to store the values of 1 and 0 so you can turn the sound of your oscillator on and off.
Listing 1.8. Playing notes with integer variables
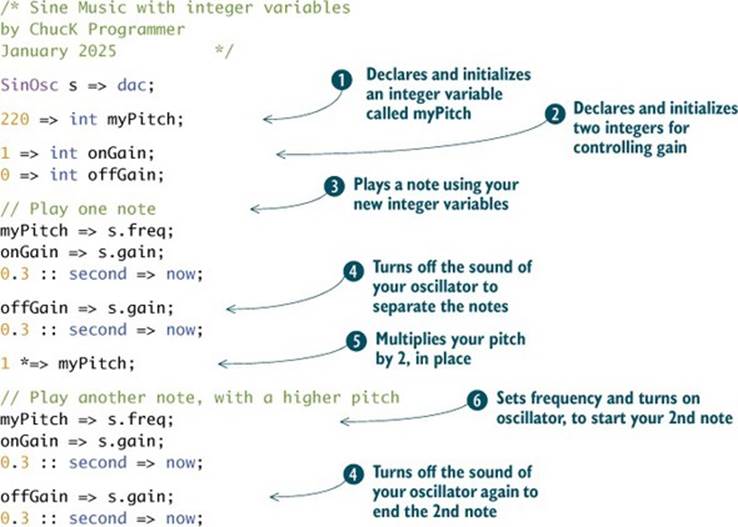
By creating integer variables in ![]() and
and ![]() , you can use those instead of numbers to set your sine wave parameters
, you can use those instead of numbers to set your sine wave parameters ![]() ,
, ![]() ,
, ![]() . Because they’re variables, you can change their value at any time, so the beauty lies in
. Because they’re variables, you can change their value at any time, so the beauty lies in ![]() , where you multiply your pitch by 2. Setting the sine wave frequency to this new value makes the pitch higher.
, where you multiply your pitch by 2. Setting the sine wave frequency to this new value makes the pitch higher.
This amount of frequency change (doubling) is called a musical interval of one octave up, for somewhat obscure reasons. An octave is a doubling (upward) or halving (downward) of frequency. For those familiar with keyboard instruments, an octave is the space between any two C notes (middle C to the octave above, for instance), A notes, G notes, and the like. If you play an open string on a guitar or other stringed instrument and then put your finger on the 12th fret and play that same string, you’ll hear a difference of an octave (doubling of frequency, and not coincidentally you’re cutting the string length in half).
You can play some notes using integer variables, but what if you wanted to play a different interval, as is the case in the “Twinkle” song, where you want to play two notes at 220 Hz and then two notes at 330 Hz? You might note that you could multiply 220 by 1.5 to yield 330.0, but ChucK won’t allow you to do that because you can’t use fractions or decimal points when dealing with integers. And what about the next two notes (“little”) in the song? These notes need to have a frequency of 369.994 (which you could maybe round to 370), but what if you wanted to get creative and fiddle with the melody even more? You might want to play the word “little” on F# and G#, with frequencies of 369.994 and 415.305 Hz. We’ll talk more about pitch and frequency in the next chapter, but you know that integer variables can store only numbers with no fractional part (no decimal points allowed).
Fortunately, there’s another ChucK data type called float. Floating-point numbers are numbers that have a decimal point (fractional part) and can thus be more precise. But as you can imagine, these numbers are stored and operated upon differently inside the computer; thus there’s a separate data type for these. You can declare and initialize float variables just as you’ve done with integers. All of the arithmetic and shorthand operators also apply to floats. Listing 1.9 shows how you can declare and initialize a float to hold your first “twinkle” frequency. You can use math on that, multiplying it by 1.5 to store it in a newly declared variable called twinkle2. Similarly, you can derive your pitches for “little” by multiplying twinkle or twinkle2 by the correct floating-point numbers.
Listing 1.9. Using and manipulating float variables
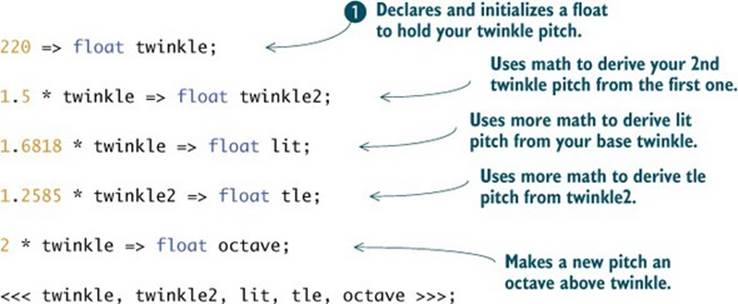
The code produces the following console output:
220.000000 330.000000 369.996000 415.305000 440.000000
The beauty of this code is that just by changing the initialization of your first twinkle, all of the other pitches change as well. Because variables are used to set pitches, if you changed ![]() to
to
110 => float twinkle;
then all of the pitches would go down by an octave. Setting the initial twinkle to 261.616 Hz would play “Twinkle” in the key of C. Changing a whole melody or song into a different key is called transposition. You could initialize that initial twinkle variable to any reasonable number, and all others would change proportionally. So the “Twinkle” song would still be intact but in a different musical key. The power of programming!
Note that you already used floats when you set the gain of your SinOsc UGen in listing 1.2 (first to 1.0 and then to 0.3 to make it quieter). We’ll look at one more example in the following listing to reinforce the use of floats. The ability to turn volume and frequency into variables will become an important element in making expressive compositions, as you’ll soon see.
Listing 1.10. Twinkle with floats
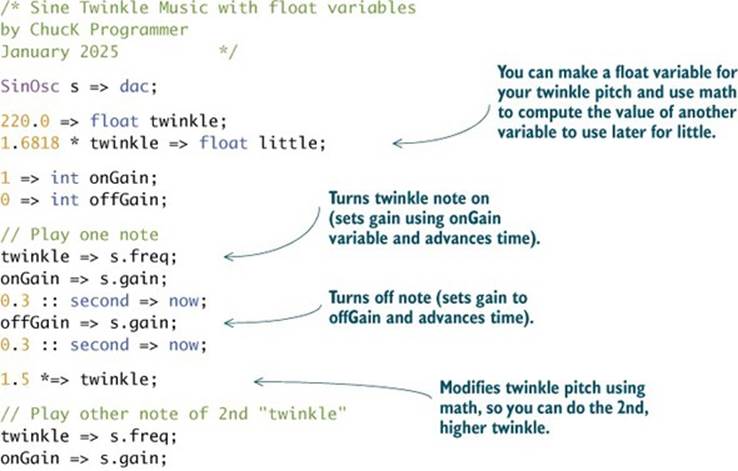
You’ve now used variables (both int and float) to make your code more flexible and readable. But can you do something about all of those lines with numbers controlling time? You could make a float variable and initialize it to 0.3 and then use it something like this:
0.3 => float myDur;
myDur :: second => now;
But there’s a better way! You’ll now learn about two more data types that are built into ChucK, specifically to control times and durations.
1.4. Time in ChucK: It’s about now
So far you’ve been making sound by hooking a sine or other oscillator to the dac, setting its frequency and gain, and ChucKing some duration, such as 0.3::second, to a magical keyword called now. Now we’re going to dig into the timing mechanisms of ChucK, introducing two new data types (like float and int) to deal with time and durations.
What’s a Keyword?
Keywords are special reserved words in computer languages and systems. We’ve used lots of keywords already, such as dac, SinOsc, and second. You can tell a keyword when you type or see it in the mini-Audicle, because it changes color automatically. The one thing you must remember as a programmer is that you can’t choose those keywords for your variable names. ChucK won’t allow that, because those words already have been defined (by the authors of ChucK) for special uses. Rule of thumb: if the miniAudicle colorizes a word, you can’t use it as a variable name (except for comments which are automatically colored green).
1.4.1. Variables of type dur
You’ve already ChucKed durations of time to the ChucK keyword now to control time in all of the previous examples, but you can improve the “Twinkle” song further by using variables of a new data type called dur, for duration.
Listing 1.11. Twinkle with dur variables
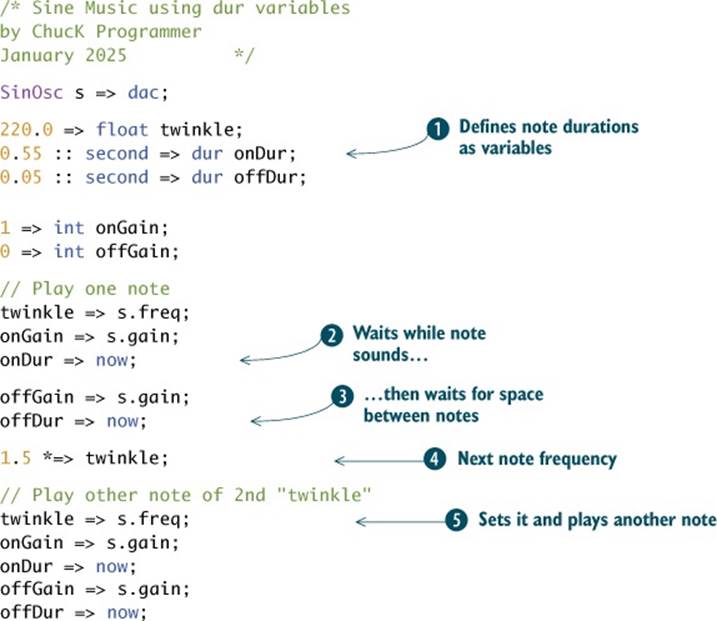
In ![]() , you make two variables of type dur, which you initialize to different values. One controls the amount of time the sine wave is making sound
, you make two variables of type dur, which you initialize to different values. One controls the amount of time the sine wave is making sound ![]() , and the other controls the sound off time
, and the other controls the sound off time ![]() ; this silent time is often called a rest by musicians. In
; this silent time is often called a rest by musicians. In ![]() , you use in-place variable arithmetic to change the frequency of twinkle so you can use it for the second pair of twinkle2 notes; for musicians and physicists, this musical interval of 3/2 is called a perfect fifth. In
, you use in-place variable arithmetic to change the frequency of twinkle so you can use it for the second pair of twinkle2 notes; for musicians and physicists, this musical interval of 3/2 is called a perfect fifth. In ![]() you turn the oscillator on and off again, advancing time using your dur variables, to play the next note.
you turn the oscillator on and off again, advancing time using your dur variables, to play the next note.
Understanding time and duration (and floats and ints) is essential for ChucK programmers. By default, ChucK provides the special duration keywords shown in table 1.1. You likely know second, minute, hour, day, and week, but the values in the table that you might not be familiar with arems and samp. One 1000th of a second is called a millisecond, abbreviated ms. So 1000 :: ms is equal to 1 :: second.
Table 1.1. Special ChucK duration keywords and their corresponding durations
|
Keyword |
Duration |
|
samp |
1 digital sample in ChucK time (usually 1/44100 of a second) |
|
ms |
1 millisecond |
|
second |
1 second |
|
minute |
1 minute |
|
hour |
1 hour |
|
day |
1 day |
|
week |
1 week |
The samp duration depends on the sample rate at which your sound hardware is running, but it’s always the fundamental unit of time in any digital audio system. A samp is usually 1/44100 of a second (because there are 44100 audio samples used to capture a second of audio). For reasons that are both technical (syncing audio to the most common video formats) and perceptual (a sample rate that’s high enough to capture the audible range of human hearing), 44100 is the sample rate most commonly used in CDs, MP3s, and other storage devices.
Thought Problem
Why didn’t the ChucK designers define a “year” or “month” keyword? Answer: month and year don’t have a specific duration. Months can range from 28 to 31 days, and years can be either 365 or 366 days long. ChucK is very precise about time, so month and year were not included.
1.4.2. The importance of time
Now that you’ve used time and dur a little, let’s talk a bit more deeply about why time is so important in ChucK and why it’s so important for you as a programmer to understand how time is dealt with in ChucK. Sound is a time-based medium. Sound, and by extension, music, happens over time. Without the passage of time, there’d be no sound. This fundamental relationship between time and sound is at the core of the ChucK language, and it allows you to govern how time flows in order to make sound happen—and to control sound precisely over time.
There are a few things in ChucK that work together to make this possible:
· time and dur are native data types, just like int and float.
· The now keyword holds the current ChucK time, which starts at zero when you click the Start Virtual Machine button in the miniAudicle.
· By manipulating now (ChucKing a duration to it), and only by manipulating now, you can cause the passage of time in a ChucK program to generate sound.
In ChucK, time (time) and duration (dur) are basic data types that you can work with much like integers and floating-point numbers. They represent values of a particular type. You can declare variables of those types and set their values and perform arithmetic on them.
1.4.3. Variables of type time
The time type holds a point in time (referenced from zero when the ChucK VM is started). The dur type holds a duration, which is a length of time, the space between two times. Just as you might arrange to meet someone at a particular time—“I’ll meet you at 1:00 p.m.”—or specify something as a duration—“I’ll be back in an hour”—this is the nature of time and dur in ChucK. A time specifies a point in time (the duration since ChucK was started), and dur specifies a length of time. For example, 2::second in ChucK is a value of type dur. You can add durations together to form new durations, (for example, 2::second + 1::minute) and store durations into newly declared variables, for example,
0.8::second => dur quarter; // quarter note duration
The duration of a quarter note in music depends on the tempo, often expressed in how many quarter-note durations happen per second, also called BPM (beats per minute). Here we’ve defined a quarter note to be 0.8 seconds, meaning that our tempo is 75 BPM (60 seconds per minute / 0.8 seconds per beat = 75 beats per minute).
Variables can be reused to create new variables, for example,
4::quarter => dur whole;
Once you’ve set your quarter note duration (thus tempo), you can define a whole note from that, made up of four quarter notes. You could similarly define eighth notes (quarter / 2) and half notes (2 * quarter or whole / 2), like this:
4::quarter => dur whole;
4 * quarter => dur whole;
whole / 2 => dur half;
quarter / 2 => dur eighth;
The special keyword now is at the heart of working with time in ChucK, and it is of type time. The word now has two special functions. First, when read, now holds the current logical ChucK time. Essentially now is ChucK’s master clock. Second, even though now is a variable, you can’t change its value directly, at least not in the normal way. When you try to change the value of now, for example, by ChucKing a particular duration to now, it has the important side effect of letting time pass (and letting sound generate) for precisely that duration. In effect, ChucK is advancing time until nowbecomes the value you want it to be!
Figure 1.8 shows this for the two-note “Twinkle” example of listing 1.11, illustrating how time advances between blocks of code being executed.
Figure 1.8. Chuck code executes until a duration is ChucKed to now. At that point, time keeps advancing and sound is synthesized until the duration has passed. The cycle continues, with code being executed until now is advanced by some duration and sound is synthesized for that duration. When all code has run and time has advanced as far as the last point, the program stops and sound stops as well.
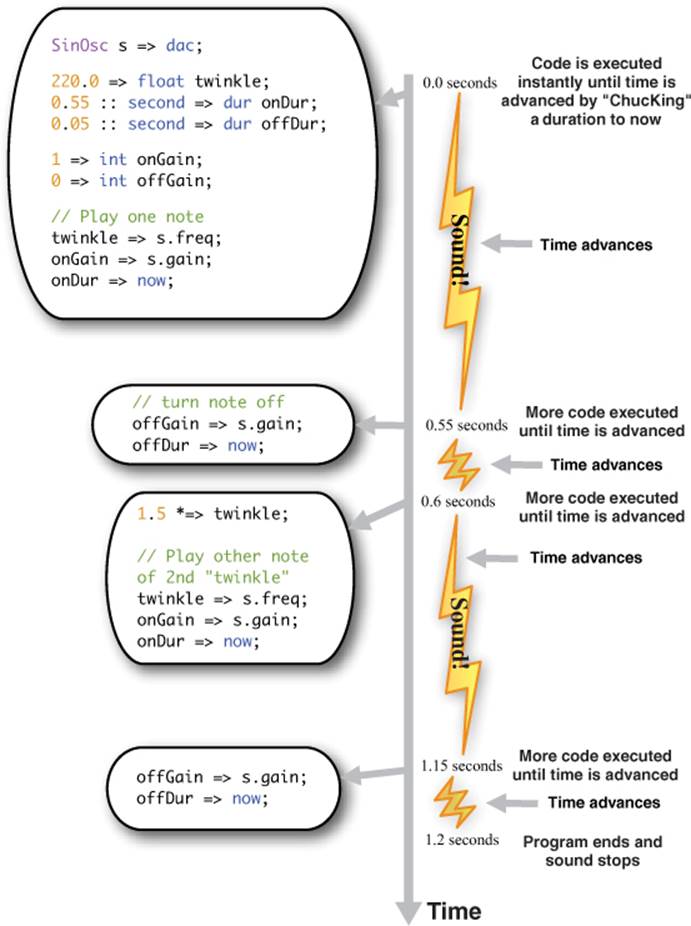
Another way to look at time in ChucK is that your code stops executing for any duration you ChucK to now, but all the synthesis stuff you’ve connected (SinOsc => dac, for example) keeps running and making sound. When that particular duration that you ChucKed to now has passed, the next line of code executes.
1.4.4. Working with now
Working with now is simple and fun and yet is absolutely essential to programming in ChucK—you must use it to make sound, period. Because the way that ChucK deals with time is so important and is what makes it so different from every other language, we need to reinforce points abouttime, dur, and dealing with now. Here are some important things to keep in mind when working with now.
· ChucKing a duration to now advances ChucK time precisely by that amount: while time is advancing, your code is automatically and temporarily suspended (the next line is not executed) and sound is generated by the system. How it does this depends on how you’ve set up the sound synthesis.
· now will never move forward unless or until you manipulate it. So until you explicitly advance time, you’re actually working within a single instant in time.
· Another way to think about all this is that ChucK code execution waits until now becomes the time you want to reach. For this reason, you should never ChucK a negative duration to now, for example, -1::second => now. ChucK can’t (yet) go backward in time, so trying to do this will halt your program.
· There are no restrictions on how much time is advanced, as long as it’s by a non-negative amount! So it’s possible to advance time, say, by a microsecond, a samp, 2 hours, or 51 weeks with the same mechanism—it’s all up to you; the system will behave accordingly and predictably.
There are other ways to advance time; for example, by chucking an Event to now (such as clicking the computer mouse, pressing the fire button on a joystick, or playing a note on a musical MIDI keyboard connected to your computer) for when you don’t know beforehand how much time to advance. We’ll leave that for a later discussion. For now, you’ve just learned one of the most important aspects of ChucK: controlling time using durations.
Now that you know about the int, float, time, and dur data types, we should mention that ChucK has a couple of other built-in (called primitive) data types, including string (a string of text characters like “hello world”) and void (a type with no type, in case you need a variable but don’t need a type). We know this notion of a void datatype might be confusing, but you’ll need this later in the book. Table 1.2 summarizes all of ChucK’s built-in data types.
Table 1.2. ChucK data types
|
Data Type |
Description |
Example |
Comment |
|
int |
Integer |
3, 3541 |
No decimal point |
|
float |
Floating point |
2.23, 3.14159, 22.0 |
Decimal point |
|
string |
Description |
"hello","data/a.wav" |
Comment or text |
|
dur |
Distance between times |
1:: second, ms, 3*day |
Duration |
|
time |
ChucKianTime |
22050.0 |
Time in samples |
|
void |
No type |
You’ve learned a lot about variables and data and using those to control your sound parameters and advancing through time. But you’re still typing many lines of ChucK code to make each note. There must be a better way, and there is. Read on.
1.5. Logic and control structures for your compositions
To motivate the ideas of this next section, let’s look at a different, non-“Twinkle” example that plays around with modifying pitch and duration (by advancing time) in a new and flexible way. The very few lines of code in the next listing can make really interesting sounds, forever, by repeatedly moving through time with now. Type in this program and run it. The magic that you’re hearing is ChucK playing a constant stream of notes, randomly changing the frequency and duration of each.
Listing 1.12. Random triangle wave music
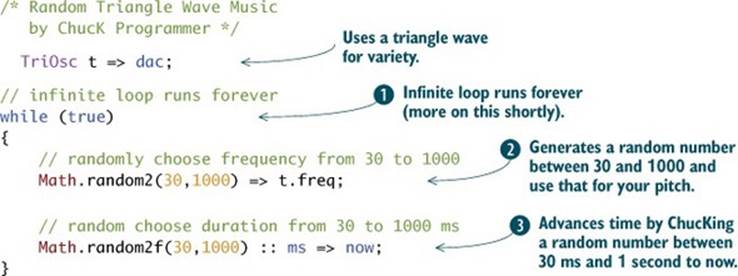
Now play with the numbers (30, 1000) ![]() . Each time you make a change, click the Replace Shred button on the miniAudicle, and the code that was running will be magically replaced with the new code. If you made significant changes, you’ll instantly hear the difference! This is another extremely powerful aspect of ChucK—the ability to modify your code on the fly while sound is still being synthesized.
. Each time you make a change, click the Replace Shred button on the miniAudicle, and the code that was running will be magically replaced with the new code. If you made significant changes, you’ll instantly hear the difference! This is another extremely powerful aspect of ChucK—the ability to modify your code on the fly while sound is still being synthesized.
Try this
Don’t click Replace Shred each time you make a change to the code of listing 1.12. Instead, click Add Shred. Now you hear more magic of ChucK, which is that it can run multiple programs, called shreds, at the same time! You can add more running random sine programs, almost as many as you like, and hear that ChucK is happily generating many sounds at the same time. You’ll use this power of ChucK and learn a lot more about it later, but for now, isn’t it amazing how much sound/music you can make with just a little bit of code? We promised that your ratio of sound to typing would increase.
Once you’re tired of hearing this and ready to move on, click the Clear Virtual Machine button (marked with a big X in the upper-right corner of your main window, as shown in figure 1.9), and that will stop the sound.
Figure 1.9. Clear Virtual Machine button in the miniAudicle main editor window
Wow! With only the four lines of actual ChucK code of listing 1.12 you’ve made more notes than you ever could by typing them in one at a time. You’re going to learn some of how that’s possible next, and you’ll learn the rest in chapter 2.
The program of listing 1.12 randomly changes the frequency of a triangle wave ![]() . Each new frequency is random, and the time it lasts until the next one is played is also random. The while (true) line
. Each new frequency is random, and the time it lasts until the next one is played is also random. The while (true) line ![]() begins what programmers call an infinite loop, essentially meaning “do everything within the curly braces forever.” We’ll talk about more ways to loop shortly. In the last line
begins what programmers call an infinite loop, essentially meaning “do everything within the curly braces forever.” We’ll talk about more ways to loop shortly. In the last line ![]() of the while loop’s body, you’re advancing now by a random amount, at which point ChucK knows to automatically suspend the code, let time pass for that time, and meanwhile generate sound. Precisely after that time has passed, ChucK resumes executing your code. Clicking the Clear Virtual Machine button ends the infinite while loop and stops sound.
of the while loop’s body, you’re advancing now by a random amount, at which point ChucK knows to automatically suspend the code, let time pass for that time, and meanwhile generate sound. Precisely after that time has passed, ChucK resumes executing your code. Clicking the Clear Virtual Machine button ends the infinite while loop and stops sound.
You’ve now written your first loop using the while keyword. The while keyword, combined with the brackets, is called a control structure. So next let’s look at exactly how that loop and other loops work. You’ll learn about logic and control structures, which are essential to making expressive and interesting compositions from your ChucK code.
1.5.1. Programming power through logic statements: the if statement
Logic statements are either true or false, as in “seven is not equal to two” or “-3 is a negative number, and negative numbers are less than zero, therefore -3 is less than zero.” Control structures use logic to determine how your computer code runs and what the effects of it will be. ChucK employs many standard control structures found in programming languages, including if, else, for, and while.
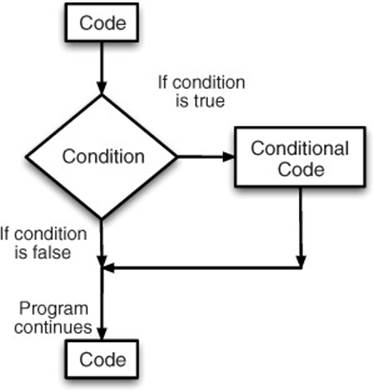
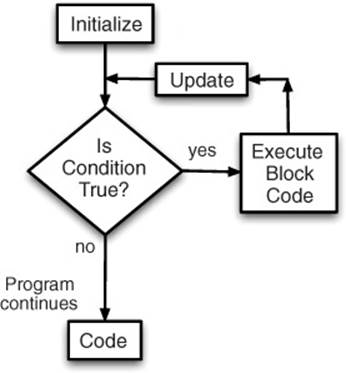
We’ll start by looking closely at the if statement. We all use if statements in everyday life, such as “If I get hungry enough, I’ll stop and get food.” if statements in ChucK can be used to make decisions in code, based on the conditions of variables or other things that hold values. Figure 1.10shows a diagram of what happens with an if condition, walking procedurally (line by line) through the code (shown in listing 1.13).
Figure 1.10. Flow chart of an if conditional. If the condition is true, then some ChucK code is executed. If the condition is false, then the code is skipped, and the next code in the program executes.
Listing 1.13. If statement example
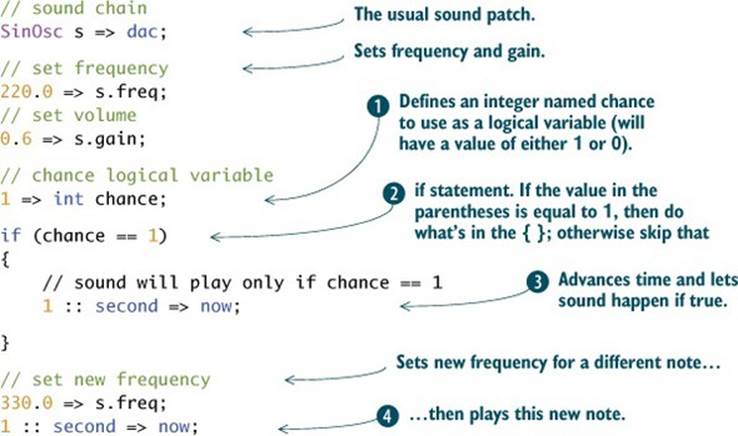
Translating the diagram in figure 1.10 into code, you see in the listing a simple program that uses a new integer variable chance ![]() that’s initialized to 1. If chance is equal to 1 (chance == 1)
that’s initialized to 1. If chance is equal to 1 (chance == 1) ![]() , then something will happen.
, then something will happen.
With the control structures you’re learning in this section, you’re using the characters { and }. You can consider these to be like paragraphs, but programmers call them blocks. In this case, if the condition is true, then you enter and execute the code ![]() in the block. If the condition is not true, then you move on. Also notice that two equal signs are used to express the conditional test. That’s the convention in ChucK and many other programming languages, to use the == symbol to indicate you’re doing a logical test for equality, in this case “is the variable named chance equal to 1?”
in the block. If the condition is not true, then you move on. Also notice that two equal signs are used to express the conditional test. That’s the convention in ChucK and many other programming languages, to use the == symbol to indicate you’re doing a logical test for equality, in this case “is the variable named chance equal to 1?”
There are logical conditions in addition to equals, such as less than, greater than, and not equal to. For that, ChucK provides other symbols (called relational operators) to test values, as summarized in table 1.3.
Table 1.3. Logical conditionals
|
Symbol |
Meaning in words |
Example use |
|
== |
is equal to |
if (x == 0) |
|
!= |
is not equal to |
if (x != 0) |
|
< |
is less than |
if (x < y) |
|
> |
is greater than |
if (x > y) |
|
>= |
is greater than or equal to |
if (x >= y) |
|
<= |
is less than or equal to |
if (x <= y) |
In the random triangle frequency program from listing 1.12, you use a ChucK reserved word, true, which always has the value of 1. In ChucK, the value 1 is used to represent true, and the value 0 represents false. If you type and run this line of ChucK code
<<< true, false >>>;
you’ll see that ChucK prints
1 0
Note that you can print two items by placing a comma between them in your <<< >>> print statement. Similarly, you can type and run this
<<< -3 < 0, true==1, true==false, 1 > 10 >>>;
yielding
1 1 0 0
meaning that -3 is less than 0, and true does equal 1, but true does not equal false, and 1 is not greater than 10. Cool, huh?
Continuing the example from listing 1.13, because chance==1, the test is true, so the program continues into the block and executes line ![]() , advances time by 1 second, and plays sound for 1 second.
, advances time by 1 second, and plays sound for 1 second.
Now, go and change line ![]() , setting chance to 0, and rerun the newly edited code. This in essence changes line
, setting chance to 0, and rerun the newly edited code. This in essence changes line ![]() to be false and thus line
to be false and thus line ![]() will never be executed, so no time will pass and no sound will be made in that conditional code. The program goes on to play the second note
will never be executed, so no time will pass and no sound will be made in that conditional code. The program goes on to play the second note ![]() , which is why you hear only that higher note. So when chance==1, you hear two notes, and when chance != 1 you hear only one note.
, which is why you hear only that higher note. So when chance==1, you hear two notes, and when chance != 1 you hear only one note.
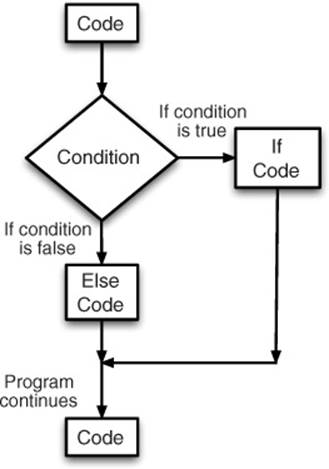
The else statement goes hand and hand with the if statement. As you can see from figure 1.11, the if/else structure forms a fork in the road: if the condition is true, then go right; if the condition is false, then go left. As you can see from listing 1.14, the else statement ![]() has its own block of code, following the if statement’s block
has its own block of code, following the if statement’s block ![]() . In this case the test
. In this case the test ![]() will equate to false, so the code will jump down and execute
will equate to false, so the code will jump down and execute ![]() , changing the frequency to 330 Hz, advancing time, and playing the sound for 3 seconds.
, changing the frequency to 330 Hz, advancing time, and playing the sound for 3 seconds.
Figure 1.11. Flow chart of an if/ else conditional. If the condition is true, then some ChucK code is executed. If the condition is false, then different code is executed.
If you change the initialization of chance to 1 rather than 3 in ![]() , then the if condition
, then the if condition ![]() will be true and the first block of code
will be true and the first block of code ![]() will execute, playing a sine wave of frequency 220 Hz for 1 second.
will execute, playing a sine wave of frequency 220 Hz for 1 second.
Listing 1.14. if/else code example

Run the code in listing 1.14, changing chance to different values. You’ll hear the low twinkle note followed by the much higher note only when chance==1, and for any other value you’ll hear the twinkle2 note followed by the high one.
1.5.2. Logical operators and conditions
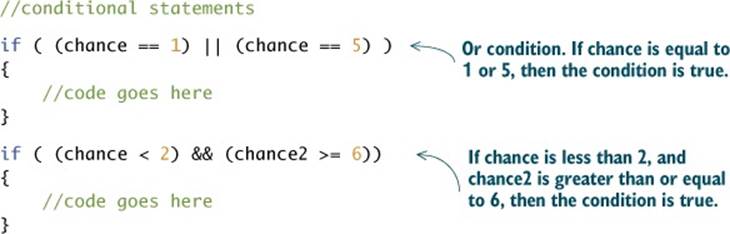
Just as you can have logical statements that combine or require multiple conditions (“My gas gauge is below half a tank, and gas is pretty cheap right now, so I’ll buy gas”), it’s also possible to have multiple conditions in an if statement. The && (known as and) operator means that all conditions must be true for the overall condition to be true. The || (known as or) condition means that only one of the conditions needs to be true to execute that block of code. An example of or might be “If my tank is really empty or gas is really cheap, then I’ll fill up.” ChucK code examples of these are shown in listing 1.15.
if/else/and/or statements will become increasingly useful as you learn more about ChucK and music programming.
Listing 1.15. More complex logical conditions
1.5.3. The for loop control structure
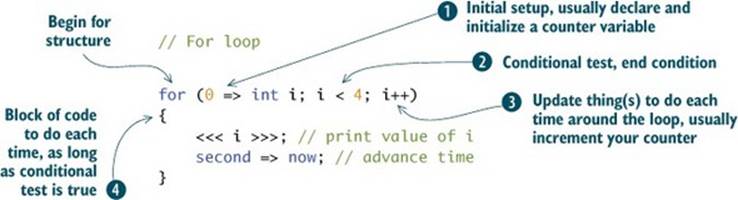
You can make even more interesting music using the next control structure, called a for loop. As the loop name implies, this control structure is used to make loops and cyclical behaviors. In listing 1.16 and illustrated in figure 1.12, a for loop begins by setting an initial state with a variable ![]() . It contains a condition
. It contains a condition ![]() that it checks to see if it’s true (like an if statement). If it’s true, it then executes a block (paragraph) of code
that it checks to see if it’s true (like an if statement). If it’s true, it then executes a block (paragraph) of code ![]() , and at the end it executes an update command
, and at the end it executes an update command ![]() . Here the initial variable is updated to a new value, and then the condition is checked again. This process continues until the condition is false and the loop is over.
. Here the initial variable is updated to a new value, and then the condition is checked again. This process continues until the condition is false and the loop is over.
Figure 1.12. Flow chart of a for loop. Variable i is initialized to 0 and then counted up (++) until it reaches the value of 4. The code in the block is executed each time.
There are many musical cases where you might want to use a for loop, such as playing up the notes of a scale (next chapter) or sweeping gradually from one frequency to another by hitting all the frequencies in between. Here you’re counting up and printing integers.
Listing 1.16. The for loop
In the example of the previous listing, the integer variable i is initialized to 0 ![]() . The conditional test
. The conditional test ![]() is of course true (0 is less than 4), so the block of code
is of course true (0 is less than 4), so the block of code ![]() is executed (print i, wait 1 second); then i is incremented
is executed (print i, wait 1 second); then i is incremented ![]() (i++ is the same as 1 +=> i, which is the same as i + 1 => i) and the for loop is run again with i equal to 1. The conditional test is still true (1 is less than 4), so the block is executed, i is incremented, and the for loop runs again. This continues until i is equal to 4, and the conditional test is now false, so the loop ends.
(i++ is the same as 1 +=> i, which is the same as i + 1 => i) and the for loop is run again with i equal to 1. The conditional test is still true (1 is less than 4), so the block is executed, i is incremented, and the for loop runs again. This continues until i is equal to 4, and the conditional test is now false, so the loop ends.
Let’s add sound to this concept so you can start to hear what a for loop can do for you musically. In music programming, for loops can be used to play scales, repeat patterns such as bass lines or melodies, smoothly change gains, sweep frequencies up or down, and many other super-musical things.
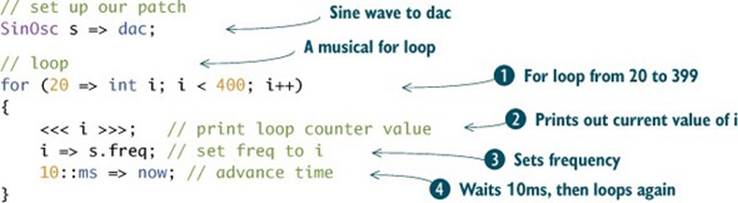
In listing 1.17, you use a for loop ![]() to set frequencies of your SinOsc
to set frequencies of your SinOsc ![]() from values 20 Hz to 400 Hz (and print them out
from values 20 Hz to 400 Hz (and print them out ![]() ) every 10 milliseconds
) every 10 milliseconds ![]() . Imagine having to write all these lines of code out one by one as you did in section 1.2! Looping allows you to make much more complicated sounds and compositions right away and saves you many lines of code. Already, as a composer, you’re able to write music that you would have never been able to write without learning how to program.
. Imagine having to write all these lines of code out one by one as you did in section 1.2! Looping allows you to make much more complicated sounds and compositions right away and saves you many lines of code. Already, as a composer, you’re able to write music that you would have never been able to write without learning how to program.
Listing 1.17. Musical use of a for loop
1.5.4. The while loop control structure
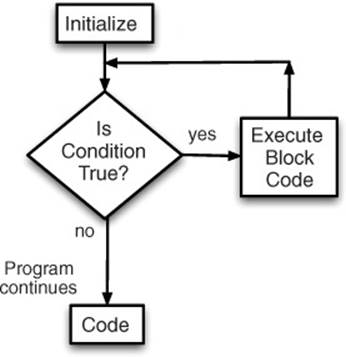
The last control structure you’re going to learn in this chapter is the while loop (figure 1.13), which you’ve already used to make an infinite loop. while is similar to a for loop but is written differently. You can rewrite the same for-loop program but using a while statement, as shown in listing 1.18.
Figure 1.13. Flow chart of a while loop. Integer variable i is first initialized to 0; then the block loops, incrementing i by 1 each time, until the condition is false (i reaches 400).
Listing 1.18. Musical while loop
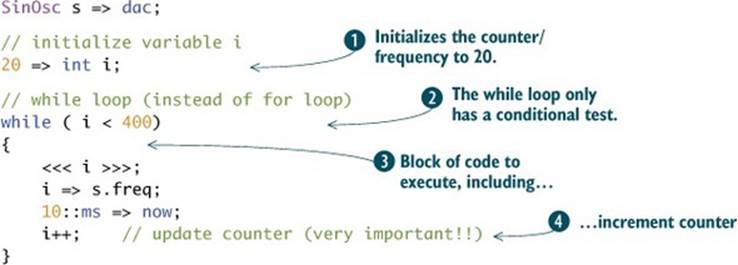
After setting up your usual sine wave, you initialize integer i to be 20 ![]() . Then you set up your while condition
. Then you set up your while condition ![]() (while i is less than 400). The name suggests that it’s a condition, which can make it a little more obvious and easy to remember than the for loop. The while loop then continues inside its block
(while i is less than 400). The name suggests that it’s a condition, which can make it a little more obvious and easy to remember than the for loop. The while loop then continues inside its block ![]() . Notice that you then add an update command
. Notice that you then add an update command ![]() similar to the for loop update. Running this code, you’ll see that it makes the same sound as the for loop code of listing 1.15. It’s important to learn both for and while loops because you’ll use them in different ways throughout your ChucK learning journey.
similar to the for loop update. Running this code, you’ll see that it makes the same sound as the for loop code of listing 1.15. It’s important to learn both for and while loops because you’ll use them in different ways throughout your ChucK learning journey.
Note that if you forgot to add the increment line ![]() in the block of code of listing 1.18 the program would run forever, with the value of i and the sine frequency always equal to 20. In most programming languages, the notion of an infinite loop (a conditional loop that never reaches a termination condition) is to be avoided at all costs. But this is less so in ChucK, and you’ve already intentionally used an infinite loop, while (true) in listing 1.12, to make really interesting music. The buttons at the top of the miniAudicle to add, replace, and remove shreds and clear the VM allow you to create and use infinite loops without fear. One attractive power of ChucK is that it can keep running while you add, modify, replace, and layer code to make really interesting sounds and music.
in the block of code of listing 1.18 the program would run forever, with the value of i and the sine frequency always equal to 20. In most programming languages, the notion of an infinite loop (a conditional loop that never reaches a termination condition) is to be avoided at all costs. But this is less so in ChucK, and you’ve already intentionally used an infinite loop, while (true) in listing 1.12, to make really interesting music. The buttons at the top of the miniAudicle to add, replace, and remove shreds and clear the VM allow you to create and use infinite loops without fear. One attractive power of ChucK is that it can keep running while you add, modify, replace, and layer code to make really interesting sounds and music.
1.6. Using multiple oscillators in your music
So far in your programs you’ve played single notes and melodies using one oscillator. Because music involves more than melody and rhythm, you may wonder, how do you control and play multiple oscillators at the same time? This is easy in ChucK, as shown in the next listing.
Listing 1.19. Using more than one oscillator
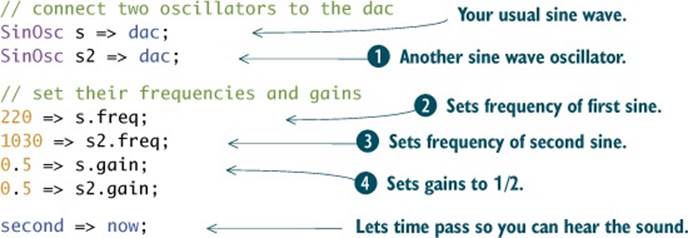
One nice aspect of ChucK is that when you connect more than one sound source to something, such as the dac, the sounds are automatically added together. Sound engineers call this mixing. In this example, when you connect the second SinOsc, s2, to the dac ![]() , it will automatically be mixed with the other SinOsc, and you’ll hear the sound of both oscillators. You set their frequencies to be different
, it will automatically be mixed with the other SinOsc, and you’ll hear the sound of both oscillators. You set their frequencies to be different ![]() ,
, ![]() , so you can hear that there are two oscillators. If you set their frequencies to be exactly the same, you’d hear one sound louder, because mixing two identical signals yields a louder version of those signals. In
, so you can hear that there are two oscillators. If you set their frequencies to be exactly the same, you’d hear one sound louder, because mixing two identical signals yields a louder version of those signals. In ![]() , you set their gains to be 0.5, because you want to avoid overloading the audio output. A good rule of thumb when mixing together a number of sources is to scale their gains so that they all add up to about 1.0. If you added yet another SinOsc, s3, to this mix, you’d want to set all their gains to 0.3, or maybe one to 0.5 and the other two to 0.25.
, you set their gains to be 0.5, because you want to avoid overloading the audio output. A good rule of thumb when mixing together a number of sources is to scale their gains so that they all add up to about 1.0. If you added yet another SinOsc, s3, to this mix, you’d want to set all their gains to 0.3, or maybe one to 0.5 and the other two to 0.25.
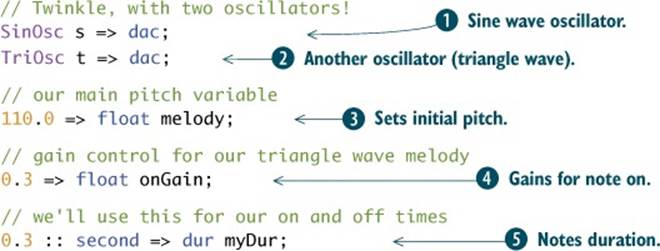
1.7. A final example: “Twinkle” with oscillators, variables, logic, an- nd control structures
Now it’s time to bring everything together to make a composition using all the tools you’ve learned in this chapter. The example program in listing 1.20 shows you how to do just that, enhancing our “Twinkle” example to make some harmonies and do some really interesting things with loops. First, you’ll declare two oscillators, one sine ![]() and one triangle
and one triangle ![]() . Then you’ll declare variables to hold pitch
. Then you’ll declare variables to hold pitch ![]() (melody) and your note on volume
(melody) and your note on volume ![]() . Finally in your initial setup, you’ll define a duration variable to hold your note length
. Finally in your initial setup, you’ll define a duration variable to hold your note length ![]() .
.
Listing 1.20a. Putting “Twinkle” all together, with two waves!
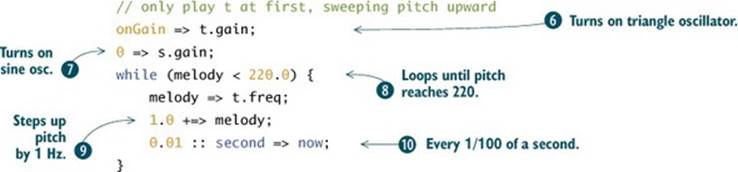
Continuing with the two-oscillator “Twinkle” example (listing 1.20b), you first play only the triangle oscillator ![]() , setting the sine oscillator gain to 0.0
, setting the sine oscillator gain to 0.0 ![]() . You begin the song by sweeping the triangle wave pitch upward from 110.0 to 220.0 using a while loop
. You begin the song by sweeping the triangle wave pitch upward from 110.0 to 220.0 using a while loop ![]() . You then move the frequency up by 1 Hz each time around the loop
. You then move the frequency up by 1 Hz each time around the loop ![]() and do it very quickly, updating every 1/100 of a second
and do it very quickly, updating every 1/100 of a second ![]() .
.
Listing 1.20b. Putting “Twinkle” all together (part B, Sweeping Upward)
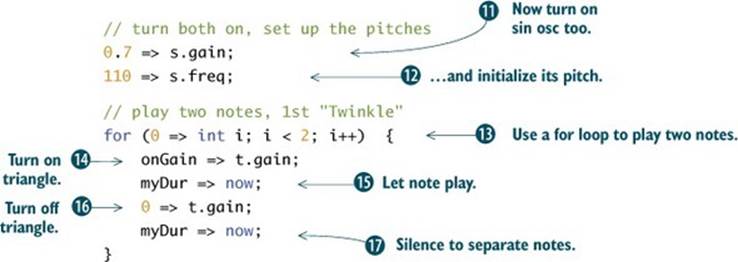
Once you’ve swept the pitch upward, you begin playing your melody and harmony (listing 1.20c) by turning on the sine oscillator ![]() , setting the frequency to 110.0
, setting the frequency to 110.0 ![]() , and playing two notes on the triangle oscillator using a for loop
, and playing two notes on the triangle oscillator using a for loop ![]() . To play these notes, you turn on the triangle oscillator (set gain to a non-zero value)
. To play these notes, you turn on the triangle oscillator (set gain to a non-zero value) ![]() , wait for a time
, wait for a time ![]() , and then turn it off
, and then turn it off ![]() and wait again
and wait again ![]() . This plays the first “Twinkle” of the song.
. This plays the first “Twinkle” of the song.
Listing 1.20c. Putting “Twinkle” all together, first “Twinkle”
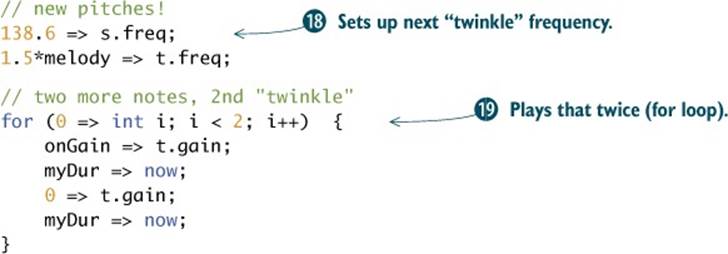
For the second “twinkle,” you set new pitches ![]() and play two more notes
and play two more notes ![]() the same way, as shown next.
the same way, as shown next.
Listing 1.20d. Putting “Twinkle” all together, the second “twinkle”
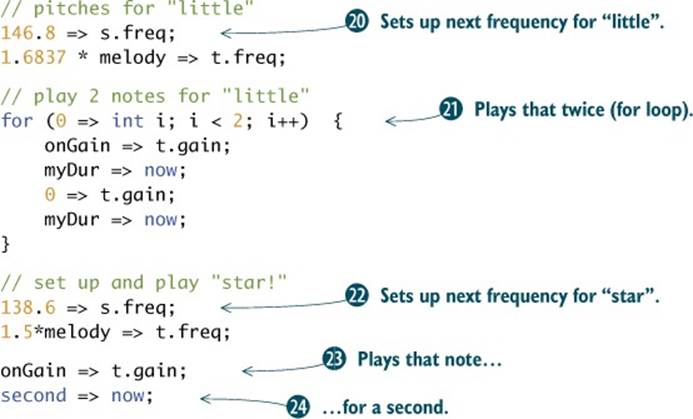
As shown in the next listing, to play “little,” you set more new pitches ![]() and play two more notes
and play two more notes ![]() , again the same way. For “star,” you need to play it only once, so you set the pitches
, again the same way. For “star,” you need to play it only once, so you set the pitches ![]() and play the notes
and play the notes ![]() , this time for 1 second
, this time for 1 second ![]() .
.
Listing 1.20e. Putting “Twinkle” all together, playing “little” and “star”
To conclude your song, shown next, you use a for loop ![]() to sweep the frequencies of both oscillators all the way down to zero. Again, you update the oscillator frequencies by just a little (down 1 Hz every time around the loop) but very often (every 1/10 of a second
to sweep the frequencies of both oscillators all the way down to zero. Again, you update the oscillator frequencies by just a little (down 1 Hz every time around the loop) but very often (every 1/10 of a second ![]() ).
).
Listing 1.20f. Putting “Twinkle” all together

Note that in this one example, you’ve used almost all of what you’ve learned in this chapter. You used sine and triangle waves, int and float variables, for and while loops, conditional tests, math, and the now keyword with durations to control time. We introduced one new aspect of the for loop here: you can count downward (from a higher number to a lower number) in a for loop. In this case, you sweep your oscillators downward by initializing your integer variable i and then count down to zero by using the decrement operator (i--, which is the same as 1 -=> i, which is the same as i – 1 => i).
Exercise
Try changing the number of times the notes are played by changing the conditions of the for loops (try i < 3 or 4, or more). Try changing the increment ![]() (listing 1.20b) and decrement
(listing 1.20b) and decrement ![]() amounts (listing 1.20f) for your pitch-sweeping loops. Experiment!
amounts (listing 1.20f) for your pitch-sweeping loops. Experiment!
1.8. Summary
Whew! We’ve covered a lot up to this point:
· You learned a little about sound waves in general, which are fluctuations traveling through the air.
· We discussed sine waves and oscillators and the built-in ChucK oscillator types (SinOsc, SqrOsc, SawOsc, and TriOsc).
· You learned about variables and data types: int(eger), float(ing point), dur(ation), and time.
· We showed you how to manipulate time in ChucK. No sound is made unless you, as the programmer, advance time (by ChucKing durations to now).
· You studied logical conditions and reserved words such as if, else, &&&, true, and false.
· You experimented with looping structures, for and while, which allow you to control your programs and sound/music without having to type out every event literally.
Congratulate yourself, because you’re now a programmer and a digital artist! But ChucK offers you so much more power and invites you to learn more about programming as well as sound, acoustics, human-computer interaction, and more. For example, how in the world did we come up with those numbers for the pitches we used in this chapter? ChucK can help with that! And you’ll learn that right away in the next chapter.
So continue on to learn more about ChucK’s built-in libraries (useful functions you can use) and arrays (ways to organize and manipulate your musical/artistic data).
All materials on the site are licensed Creative Commons Attribution-Sharealike 3.0 Unported CC BY-SA 3.0 & GNU Free Documentation License (GFDL)
If you are the copyright holder of any material contained on our site and intend to remove it, please contact our site administrator for approval.
© 2016-2026 All site design rights belong to S.Y.A.