Programming for Musicians and Digital Artists: Creating music with ChucK (2015)
Part 1. Introduction to programming in ChucK
Chapter 2. Libraries: ChucK's built-in tools
This chapter covers
· Library functions (methods)
· The ChucK Standard library, conversion of units
· Standard library type conversion
· The ChucK Math library
· Math library random number generation and sine function
· Using library functions to make your music more expressive
Now that you have your feet wet and have learned the basics of how to use ChucK, and you’ve created your first set of compositions, it’s time to learn how to make even more expressive music and sound. You’ll also be learning how to make your programming easier as well as your programs more readable. In this chapter we introduce libraries, which are sets of tools built into ChucK that will help you accomplish these goals.
In almost all programming languages there are general sets of utility functions that come in the form of libraries. These libraries handle basic functions that programmers have to use at one point or another. You can look at these functions as tools, and those tools are kept in toolboxes (each library) according to their type.
The individual tools are sometimes called methods or functions, which you’ll learn more about in chapter 4.
We’ll look at two libraries, or collections of functions: the ChucK Standard library (called Std) and the ChucK Math library. By learning about the Standard library functions that convert numbers and units, you’ll be able to control pitch and loudness much more easily. You’ll also learn ways to convert between data types, from strings to numbers and back, for example. In the Math library, you’ll learn more about generating and using random numbers and how to round floating-point numbers to integers. You’ll also use some cool math procedures, like computing values of a sine function explicitly using the built-in sin() function of the Math library, to control synthesis parameters in musically interesting ways. Specifically, in section 2.3 you’ll use a sin() function to smoothly pan a signal left and right in the stereo sound field.
2.1. The Standard library: tools for pitch, loudness, and more
Initially, we’re going to focus on the Standard library’s methods that allow you to do unit conversion (such as from Fahrenheit to Centigrade temperatures, or numbers representing the notes on a musical keyboard into frequencies for our oscillators), and show how these can help you in your compositions.
Remember from chapter 1, in order to play our “Twinkle” song you had to type in lots of numbers for pitches? Some of those, like 220 and 330, were easy. But how did we come up with those? Others, like 415.305 Hz, might have caused you to ask, “Where in the world did that come from?” Well, one of the most useful Standard library functions allows you to quickly figure out the frequency of any musical note. And the Standard library has loads of other useful functions, such as one that helps you compute a gain that’s related to your perception of loudness, and other functions to convert between different data types. Armed with a couple of Standard library functions, you’ll be able to play our “Twinkle” song much more easily, and your code will be more friendly and readable. So let’s dig in and look at some of the functions in the Standard library!
The Musical Instrument Digital Interface
The Musical Instrument Digital Interface (MIDI) was adopted in the 1980s by nearly all makers of electronic keyboard synthesizers, organs, and digital pianos and then by computer makers and others. MIDI lets electronic musical instruments, controllers, computers, computer music notation programs, and more communicate musical things to each other, using the same set of agreed-upon codes and numbers. For example, a computer can instruct a synthesizer to play a note by sending a NoteOn message or bend the pitch by sending a PitchBend message.
2.1.1. Deriving musical frequencies from MIDI note numbers
The first method you’re going to learn about is the MIDI note-to-frequency converter, known in ChucK as Std.mtof() (mtof stands for MIDI to frequency). As with variable names, you’ll find that library functions almost always have meaningful, if somewhat cryptic at first, names. All Standard library functions are invoked by using the Std prefix (called a namespace), followed by a dot and the name of the method (function).
To convert from MIDI note numbers to frequencies, you first have to know how MIDI note numbers work. MIDI note numbers are integers that correspond to the individual keys of the musical keyboard, as shown in figure 2.1. The MIDI notes (keyboard keys) are designated by integer numbers ranging from 0 to 127 (which is the standard range for most MIDI parameters). The MIDI note numbers are arranged so that middle C (also called C4) is number 60, near the middle of the MIDI note range.
Figure 2.1. MIDI numbers labeled on a standard musical keyboard
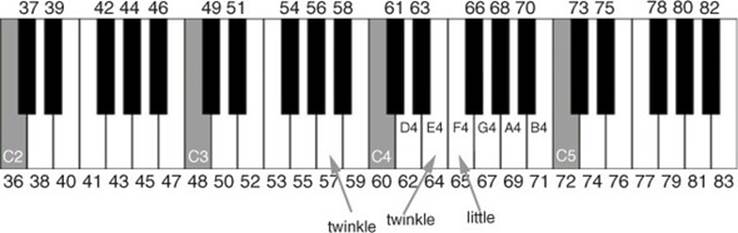
The standard piano-style musical keyboard
This type of black-and-white arranged keyboard is often called the piano keyboard or musical keyboard. This is helpful to differentiate it from other keyboards, like the QWERTY computer keyboard that you type on.
Some manufacturers decided that middle C should be C3, thus MIDI #48, so you might encounter octave differences between various devices and software programs. We’re going to go with the music-theory-correct middle C = C4 = 60.
MIDI note numbers, combined with the Std.mtof() function, make it easier to create melodies, play scales, and do other musical tasks. To try it out, type in and run this code:
<<< Std.mtof(57) >>>;
And you should see printed in the Console Monitor window
220.000000 :(float)
which is the frequency of your first “Twinkle” note!
Functions: Arguments and Return Values
The number in the parentheses (57 in this case) is called the argument to the function. Using a function is referred to as invoking or calling the function. The value that results from using the function is called the return value.
Now try typing in
<<< Std.mtof(60), Std.mtof(62), Std.mtof(64), Std.mtof(65), Std.mtof(67) >>>;
which should yield in the Console window
261.625565 293.664768 329.627557 349.228231 391.995436
These are the frequencies of the first five notes of a musical C scale: C, D, E, F, G. Looking back at the keyboard of figure 2.1, you can see that if you count every key (both white and black), starting with 60 at C4, the white keys of the C scale are associated with the numbers 60, 62, 64, 65, and 67.
ChucK coding note
Just as with much of computer programming, there are multiple ways to achieve the same result. So ChucK functions can be used in two different ways: by calling with parentheses and an argument (in this case 64) such as
<<< Std.mtof(64) >>>;
or by ChucKing the argument to the function
<<< 64 => Std.mtof >>>;
These will do the same thing and yield the same result (return value).
Now, let’s use a for loop to play lots of notes using the Std.mtof function. The code in listing 2.1 shows a program in which you play the entire chromatic scale (every note on the musical keyboard, both white and black) using a Triangle Wave oscillator (TriOsc). You do this by creating a forloop that goes from 0 to 127 (covering every MIDI note), which gets stored in variable i. Notice that variable i gets used as the input (sometimes called the argument to the function) into Std.mtof() ![]() . So on the first time through the for loop, MIDI note 0 is converted to 8.175799 Hz., which is a C note that’s too low to hear, five octaves below middle C (also called C-1).
. So on the first time through the for loop, MIDI note 0 is converted to 8.175799 Hz., which is a C note that’s too low to hear, five octaves below middle C (also called C-1).
Listing 2.1. Playing a chromatic scale using Std.mtof()
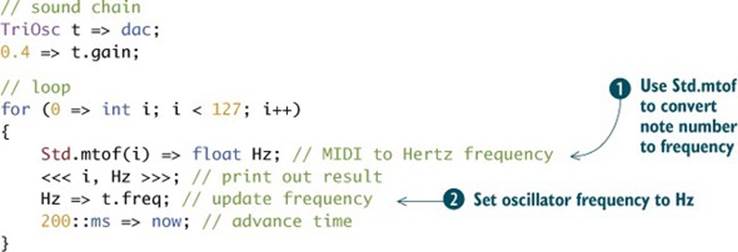
On the second iteration, MIDI note 1 is converted to 8.661957 Hz. Each time around the loop, the program prints the corresponding MIDI note value and converted frequency value in Hertz. The frequency value is ChucKed to the oscillator t.freq ![]() on each iteration so you can hear the scale. On the third iteration, MIDI note 2 becomes 9.177024 Hz. You won’t be able to hear the first many low notes, because they’re too low in frequency for your speakers to reproduce. Even when you begin to hear or feel the sound, your ears won’t perceive the very low frequencies as having pitch.
on each iteration so you can hear the scale. On the third iteration, MIDI note 2 becomes 9.177024 Hz. You won’t be able to hear the first many low notes, because they’re too low in frequency for your speakers to reproduce. Even when you begin to hear or feel the sound, your ears won’t perceive the very low frequencies as having pitch.
Try This
Run the code in listing 2.1 a number of times, and try to determine the lowest frequency that you can hear. Try it both with speakers and with headphones. At what frequency do you really start to hear pitches versus just feeling that there’s sound? The human ear is more sensitive to some frequency ranges than others. Which frequency sounds the loudest to you?
Try This
Rewrite the for loop to play the chromatic scale, using a while loop instead. Remember to increment that counter inside the loop!
As you can imagine, the Std.mtof() method is going to play a large role in creating melodies from now on. It’s also possible to go the other direction and use the Std.ftom() method to convert frequency to MIDI notes. This could be useful if you have some particular frequency and want to know the musical note closest to that, or if you’re using an external synthesizer or other software or hardware that accepts MIDI notes. You’ll learn more about how to send MIDI notes to synthesizers and other things connected to your computer in chapter 11.
Note for Musicians
Std.mtof() can also take in floating-point values to help you with microtonal scales and pitches, so Std.mtof(60.5) gives you a quarter tone between C and C#.
The Standard library also has functions (also called methods) to convert between units of gain, level, volume, loudness, and power—all terms that relate to levels, some perceptual and some physical, mathematical, or engineering in nature. These are covered in detail in appendix B, “Library functions: Std, Math, other.”
2.1.2. Converting between data types: float to int
The next Standard library method will help you convert from floating-point numbers to integers. When you first realized you needed floating-point numbers to accurately express frequencies and gains, you might have typed in something that yielded an error because of trying to store a floatinto an int. The simplest example of that is
220.0 => int myFreq;
which yields an error printed to the Console Monitor window:
line(1): cannot resolve operator '=>' on types 'float' and 'int'...
This is just ChucK protecting you in a way, telling you that something might be lost in the conversion from floating point to integer. An example of that would be
220.5 => int myInt;
where the .5 part would be thrown away and you might not realize it. Thus, ChucK refuses to do it and prints an error. ChucK as a language is strongly typed, meaning that the data types are held relatively pure, and converting from one to the other can require a little work on your part. Interestingly, storing an int into a float requires no work, because no data could be lost in the process. So
220 => int myFreq; myFreq => float myFloatFreq;
works just fine, because 220 gets changed into 220.0, no data is lost, and precision is actually gained, for use later.
But going the other way, from float to int, requires what’s called a conversion or type cast, which means taking data of one type and casting it in the best way possible to another data type. The most common one you’ll need as a ChucK programmer is going from float to int, which is accomplished using Std.ftoi (float to integer), in this way:
220.5 => Std.ftoi => int myFreq; (or Std.ftoi(220.5) => int myFreq; )
Note that in this case, the fractional part is truncated (thrown away), yielding 220. Even if you specified
Std.ftoi(220.999999999) => myFreq;
you’d still get 220, because any fractional part is thrown away.
2.1.3. Obtaining an int from a number expressed as text
Another example of data type conversion might be if you had a string variable that held the string “128.7” but you wanted to use it as a float to set a frequency or something else. Many programs accept user input in the form of information typed into the computer, and ChucK can also read data from files on your computer, some of which might contain text. Fortunately, there are also Std library methods for converting strings (known sometimes as ASCII, that’s where the a in atoi comes from) to and from integers and floating points. So you can do this using Std.atoi("128.7");, as shown in table 2.1.
Table 2.1. ChucK Std library functions to convert string, float, and int data types
|
Method |
Output |
Description |
|
Std.atoi(string value) |
int |
Converts ASCII (string) to integer |
|
Std.atof(string value) |
float |
Converts ASCII (string) to float |
|
Std.itoa(int value) |
string |
Converts integer to ASCII (string) |
|
Std.ftoa(float value) |
string |
Converts float to ASCII (string) |
There are more useful functions in the Std library, all of which are listed and described in appendix B, including ones to take the absolute value of numbers (absolute value turns negative numbers into positive ones, leaving positive numbers alone) and return the sign, negative or positive, of numbers.
Standard isn’t the only library available in ChucK, so let’s leave it for now and turn to another super-useful library, called Math.
2.2. The ChucK Math library
Remember how cool it was when you used Math.random() to set the frequencies and durations of notes in an infinite loop? In the next few subsections, we’ll be diving into another library, known as Math, which has a large number of utility functions that will allow you to make your programs much more powerful and expressive.
2.2.1. Math library random functions
The first set of Math library methods is used for generating random numbers. You used these in chapter 1 to play an infinite stream of notes of random frequencies and durations, so here we’ll look into exactly how those functions work. Random numbers are very useful in making digital art. It’s quite tedious for a programmer to set every single parameter value over time when exploring a sound with many parameters, for example. But using random functions allows you to hand such tasks over to the computer, while you listen for the parts you like, just as you did with the random notes in chapter 1.
Although ChucK isn’t really a gaming language (but many people have written games in it), let’s say you want to simulate the rolling of a single die. You’d need some way of randomly generating a number that can be 1, 2, 3, 4, 5, or 6. In the example in listing 2.2, you use the Math library to generate random integers between 1 and 6 using the Math.random2() method. This program runs forever (the while (true) condition is always true) and generates a random number every half second. The 2 on random2 means you’re going to specify two numbers, a minimum and a maximum, between which the function will generate random numbers. The specified numbers are also allowed, so in this case 1 and 6 will appear with equal probability for all integers 1 through 6.
Listing 2.2. Random integer generation using the Math library
// random integer number generation
// simulates the roll of a die
while (true)
{
<<< "Dice Roll =", Math.random2(1,6) >>>;
second / 2 => now;
}
The Math library has four ways of creating random numbers, as shown in table 2.2. Integers are made with the Math.random2() and Math.random() methods.
Table 2.2. Chuck Math library functions to create random numbers
|
Method |
Output |
Description |
|
Math.random() |
int |
Generates random integer between 0 and Math.RANDOM_MAX |
|
Math.random2(int min, int max) |
int |
Generates random integer in the range [min, max] |
|
Math.randomf() |
float |
Generates random floating point number in the range [0, 1] |
|
Math.random2f(float min, float max) |
float |
Generates random floating point number in the range [min, max] |
Floating-point random numbers are created using Math.randomf(), which gives a number in the range 0.0 to 1.0, and Math.random2f(), which generates random floats in a range. Again, you as the programmer get to specify the minimum and maximum values.
Note
Math.random() isn’t used very often, but it’s built into ChucK to be more compatible with other programming languages.
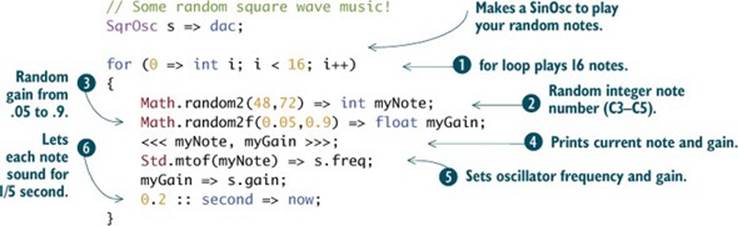
The program in listing 2.3 demonstrates how random numbers can be used in the composition process. As you can see, you set up a for loop to play a total of 16 notes ![]() . In each step of the loop, a random integer between 48 and 72 is created and stored in integer variable myNote
. In each step of the loop, a random integer between 48 and 72 is created and stored in integer variable myNote ![]() , and a random floating-point number between 0.05 and 0.9 is generated and stored in the float variable myGain
, and a random floating-point number between 0.05 and 0.9 is generated and stored in the float variable myGain ![]() . After printing both out to the console, myNote is used to set the frequency of oscillator s via your old friend Std.mtof(), and myGain is used to set the volume.
. After printing both out to the console, myNote is used to set the frequency of oscillator s via your old friend Std.mtof(), and myGain is used to set the volume. ![]() Thus, a new MIDI note (frequency)
Thus, a new MIDI note (frequency) ![]() and volume are generated every fifth of a second
and volume are generated every fifth of a second ![]() , making a composition that randomly generates notes. Although this generates no known melody, we think you’ll agree that it sounds somewhat musical, because of the note-by-note changes in volume (called accents by musicians and composers) and the ever-changing frequencies. Run it a few times, and you’ll hear that the notes and volumes generated are different each time. The only thing that’s guaranteed is that there will be exactly 16 notes.
, making a composition that randomly generates notes. Although this generates no known melody, we think you’ll agree that it sounds somewhat musical, because of the note-by-note changes in volume (called accents by musicians and composers) and the ever-changing frequencies. Run it a few times, and you’ll hear that the notes and volumes generated are different each time. The only thing that’s guaranteed is that there will be exactly 16 notes.
Listing 2.3. Random music using the Math Library
Random number generators allow you to write musical programs that never sound exactly the same, but you can do so in a fairly controllable way, which can be an exciting technique as a modern composer. There’s a way to make sure that a sequence of random numbers is always the same but different from all other such sequences. Say you don’t want to write out what the notes are specifically, and you want them to be randomly generated, but you want the composition to be the same every time you play it. How do you accomplish this?
The key to controlling random number generation, along with specifying the range, is generating a seed, which the random number generator uses to start the sequence of random numbers it will generate from then on. The seed usually is created using something that’s constantly changing, like your computer’s system clock. Thus, every time you run the program of listing 2.3, a different seed is generated and the program generates a completely new set of notes and volumes. But starting with the same seed would ensure that the sequence of random numbers would be exactly the same across different executions of the same program. So how can you set the seed yourself? Type in the following new line of code and insert it into listing 2.3, right before the for loop at ![]() :
:
Math.srandom(134); // set seed
The number 134 in this example was chosen arbitrarily. Try playing around with the seed value. Change it to 133 and see what happens. Contrary to what you might think, changing the seed just a little bit doesn’t change the sequence just a little bit. Each seed value generates a completely new sequence, basically unrelated to all others.
Try This
Change the seed value in Math.srandom to a few different numbers, and notice what it does to your composition. You should hear a particular pattern for any single seed value but a different pattern for each seed. Also change the numbers in the specified range where you set the note number (![]() in listing 2.3). For example, increase the higher number, and note that you begin to hear occasional higher notes than before.
in listing 2.3). For example, increase the higher number, and note that you begin to hear occasional higher notes than before.
2.2.2. Rounding numbers: being more fair about float-to-int conversion
Now you’ve begun to see the power of the Math library, and there are many more useful tools in it. Remember when you cast your floats to integers, and the fractional parts were lost due to truncation? Remember that 220.9999 got truncated to 220, which doesn’t seem fair. The solution is to round, meaning that any fractional part greater than or equal to 0.5 gets rounded up, and any less than that gets rounded down (truncated). Math provides a function called round, which takes care of that. Try it with this line:
<<< Math.round(220.501), Math.round(220.49) >>>;
There are other Math functions, including logs, exponents, and trigonometry (sine, cosine, and tangent). If you’re familiar with such functions, you should find the list of them in appendix B familiar. You’ll be using some of them in later chapters as you get to more advanced programming and signal-processing techniques.
2.3. Stereo and panning
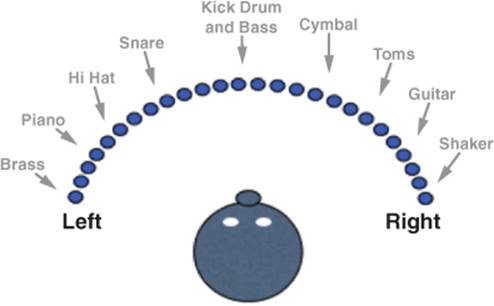
Let’s take a break from math (but a very brief one, because you’re going to use a Math function pretty soon) to look at a fun audio technique known as panning. Panning comes from the word panorama, meaning a “view of a region surrounding an observer.” In audio, panning is a way audio mixers place sound in the stereo sound field between the left and right speakers. In modern music/ sound production, many of the sound sources are recorded on different channels and often at different times and locations. The mixer (both the device called a mixer and the person operating that device, also called a mixer) has to blend things to artificially create a sense of space. As shown in figure 2.2, when mixing a song, audio engineers often place certain instruments in discrete regions (for example, horns to the left and guitar more to the right).
Figure 2.2. Panning is used to position the instruments in a stereo sound field.
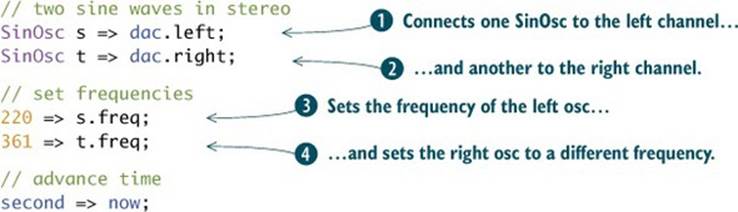
We’re going to introduce three methods (shown in listings 2.4, 2.5, and 2.6) you can use to achieve panning in ChucK, which will give you more parameters to compose with. The first example shows two oscillators, one being hard panned to the left speaker and the other to the right speaker (or left and right ear headphone elements) using dac.left ![]() and dac.right
and dac.right ![]() . Yep! dac has some extra functions hidden inside, including hooking to different audio channels. When you play this example, you’ll hear two sine tones that are different in pitch
. Yep! dac has some extra functions hidden inside, including hooking to different audio channels. When you play this example, you’ll hear two sine tones that are different in pitch ![]() ,
, ![]() on either side of your stereo field (one sine left and one right).
on either side of your stereo field (one sine left and one right).
Listing 2.4. Using dac.left and dac.right to connect to left and right speakers
The second technique for panning is similar, but it can be used to do multichannel audio (like the 5.1 surround sound in movie theaters and in many home theater/ game systems). If you have a setup in your studio with more than two speakers, and you have a multichannel sound card or external interface that supports more than two channels, then you can use the dac.chan() method to set what you want to play in each speaker. The next listing shows the multichannel connection of four oscillators.
Listing 2.5. Using dac.chan() to connect to multiple speakers
SinOsc s0 => dac.chan(0);
SinOsc s1 => dac.chan(1);
SinOsc s2 => dac.chan(2);
SinOsc s3 => dac.chan(3);
The third panning method is the one we like the most, because it allows us to use our programming skills and the power of ChucK to do things we generally can’t do in commercial audio programs.
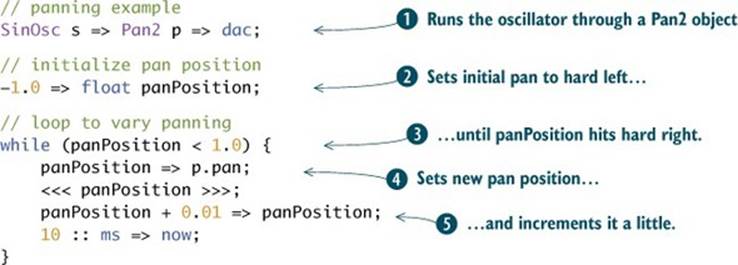
There’s a cool UGen object called Pan2, which you can insert into the audio signal chain (between your SinOsc source and the dac), as shown in listing 2.6. We’ve named this object p, and you connect it to the dac (audio output) ![]() . The nice thing about connecting Pan2 to dac is that ChucK knows that they’re stereo, so the two outputs of Pan2 automatically get connected to dac.left and dac.right. Panning for the Pan2 object is controlled with a floating-point number from -1.0 (left) to 1.0 (right), using the .pan method. As you can see in the following listing, you set variablepanPosition to -1.0 (leftmost)
. The nice thing about connecting Pan2 to dac is that ChucK knows that they’re stereo, so the two outputs of Pan2 automatically get connected to dac.left and dac.right. Panning for the Pan2 object is controlled with a floating-point number from -1.0 (left) to 1.0 (right), using the .pan method. As you can see in the following listing, you set variablepanPosition to -1.0 (leftmost) ![]() . The panning position is set by updating p.pan with the panPosition current value.
. The panning position is set by updating p.pan with the panPosition current value. ![]() You slowly increase that variable (rightward) by .01
You slowly increase that variable (rightward) by .01 ![]() until it gets to 1.0
until it gets to 1.0 ![]() . You can hear this example well with headphones.
. You can hear this example well with headphones.
Listing 2.6. Using a Pan2 object to connect a SinOsc to stereo dac output
To make panning even more interesting, we’re going to return to the Math library and look at another example using the Pan2 object with a new sound-producing object called Noise. The Noise object generates white noise (random values at every point in time and equal energy at every frequency), which is really close to the “sss” sound from “see” of figure 1.1.
So you connect the Noise source n to the Pan2 panning object to the dac. In an infinite while loop, you use another new method called Math.sin(). This method uses a sine function to create parameters for the panning object. Notice how this sounds. The white noise moves between left and right, back and forth, in the pattern of a sine wave, forever. This can be a powerful tool for making expressive compositions.
Listing 2.7. Automatic panning using Pan2 and the Math.sin() function
//sound chain: white noise to pan2 to dac
Noise n => Pan2 p => dac;
//noise can sound quite loud
0.2 => n.gain;
// infinite loop
while (true)
{
//oscillate pan between 1.0 and -1.0
Math.sin(now/second) => p.pan;
//do it pretty often, to make it smooth
ms => now;
}
There are many other trigonometry-based mathematical functions in the Math library, which are listed along with all other Std and Math library functions in appendix B. What’s the difference between Math.sin() and the SinOsc object? The SinOsc object is a sound-producing UGen type of object. As such, SinOsc automatically produces a sine waveform when connected to the dac, but Math.sin() requires you to call it with an argument, and then it returns a specific point within a sine wave. Math library functions are for computing math and also for parameters, like controlling .pan or.gain methods. Compositional uses of Math functions can include adding vibrato or even generating pitches.
Now that you’ve acquired a lot of new tools, the functions of the Std. and Math libraries, you should use them to make some music. So let’s do just that
2.4. Example: random music with two voices and panning
To wrap up this chapter, you’ll make a random music generator using a lot of the cool library methods we’ve talked about. For this example, you’ll have one solo voice, an oscillator playing up and down the MIDI keyboard randomly, and you’ll have an accompaniment voice randomly stick on notes that the solo voice plays but an octave lower. And you’ll pan your melody randomly, using the Math library. So let’s get to it!
As shown in listing 2.8, you first declare and add panning to your melody oscillator using the Pan2 object ![]() . Next, you make another oscillator for harmony and connect it to the dac
. Next, you make another oscillator for harmony and connect it to the dac ![]() . Of course, the dac takes care of mixing these sources together automatically.
. Of course, the dac takes care of mixing these sources together automatically.
Then you make gain variables to use for turning your notes on and off ![]() . As a last setup step, you declare a MIDI note number for your melody to start on
. As a last setup step, you declare a MIDI note number for your melody to start on ![]() .
.
Listing 2.8. Two-part random walk music with panning
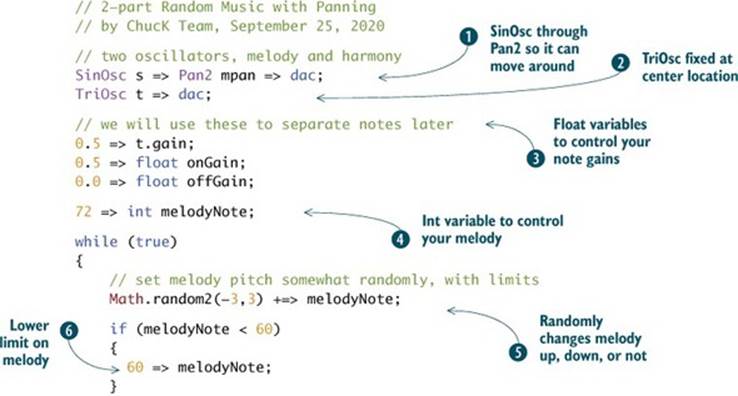
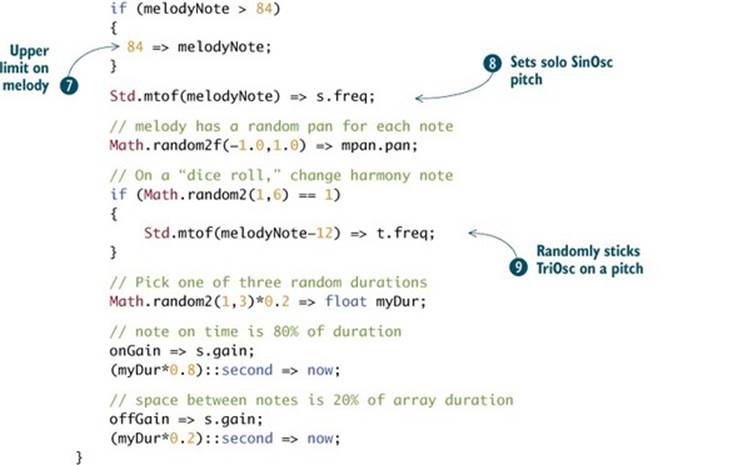
In the infinite while loop block, you randomly increase or decrease your MIDI melody note by between -3 and +3 notes (keys on the MIDI keyboard) ![]() . This is called a random walk, where rather than setting the note itself to a random number, you randomly walk up or down the keyboard (or stay still if the random number is 0). To make sure you don’t walk too far left or right, thus playing notes that are too low or too high in pitch, you test the new MIDI note to make sure it’s between middle C
. This is called a random walk, where rather than setting the note itself to a random number, you randomly walk up or down the keyboard (or stay still if the random number is 0). To make sure you don’t walk too far left or right, thus playing notes that are too low or too high in pitch, you test the new MIDI note to make sure it’s between middle C ![]() and two octaves above that
and two octaves above that ![]() . Once you’ve set your new note, you useStd.mtof to turn that into a pitch for your SinOsc
. Once you’ve set your new note, you useStd.mtof to turn that into a pitch for your SinOsc ![]() . You also set a random panning for your melody (via Pan2) between left (-1.0) and right (1.0).
. You also set a random panning for your melody (via Pan2) between left (-1.0) and right (1.0).
Next, on a dice roll (number between 1 and 6 inclusive), you decide whether to change the pitch of your harmony TriOsc ![]() . So there’s a one-in-six chance of it changing. If it does change, it’s given the same pitch as your melody oscillator but one octave lower (+/-12 in MIDI notes is up or down one octave).
. So there’s a one-in-six chance of it changing. If it does change, it’s given the same pitch as your melody oscillator but one octave lower (+/-12 in MIDI notes is up or down one octave).
Finally, you compute a random duration of either 0.2, 0.4, or 0.6 seconds (1, 2, or 3 times 0.2) for your melody note to last before the loop runs again. You turn on your melody for 80% of that time and turn it off for 20%. Then the loop executes again, forever, until you click Remove Shred or Remove All Shreds.
Try This
Add a call to Math.srandom() to seed the random number generator before the main while loop. Change the seed value a few times, noting that each number generates a different song but the same each time you run it with the same seed. Find a seed that generates your new, original, favorite song.
2.5. Summary
Wow, huh? You just made a pretty musical-sounding composition, but you chose to leave most of the actual decisions about the notes and durations and the synchronization of the melody and harmony completely up to the computer. You were able to accomplish this by using almost all of the things you’ve learned so far:
· Using Standard library functions like Std.mtof
· Converting between ints and floats (and back) and rounding
· Using Math library functions like Math.random
· Panning using the Pan2 UGen
· Making random music and controlling the randomness (range and seed)
You’ll do a lot more with library functions in the future, and you’ll learn how to write your own functions from scratch (chapter 5).
The next chapter will dive into arrays, which are collections of data that you can use to organize your notes, pitches, durations, parameters, even strings of text, or whatever. Once you know how to make and use those, you’ll be able to code whole songs much more easily, with much less typing, and also make your programs even more readable for you and others.
All materials on the site are licensed Creative Commons Attribution-Sharealike 3.0 Unported CC BY-SA 3.0 & GNU Free Documentation License (GFDL)
If you are the copyright holder of any material contained on our site and intend to remove it, please contact our site administrator for approval.
© 2016-2026 All site design rights belong to S.Y.A.