Lightning Fast Animation in Element 3D (2014)
Chapter 9. Some Other Techniques
We're almost there. By now, you have enough functional knowledge about Element 3D and how to work with it such that you can do just about anything. But there are some techniques (that we're about to cover) that can save you time and decrease your learning time.
In this chapter, we'll cover 3D text and flying logos, interacting with live action footage, and playing around a bit with some other features of Element 3D.
Flying text/logos
Unlike Zax or other 3D plugins for AEX, Element uses existing layers to extrude text and logos. Let's check out the techniques (starting with text).
Sure, everyone wants to make the next great character animation feature film when they start animating. But what a lot of animators don't realize when they're starting is that extruded text and flying logos are the foundation of any animator's reel. After all... even the first commercial animation of Rhythm & Hues (Life of Pi, Babe, Dr. Doolittle, and so on) was the logo for United Artists. 3D plugins for doing logos and text in After Effects have been around for quite a while. A version of Zaxwerks was even included with After Effects 5.5 (not CS5.5... just Version 5.5 back in 2003). With Zax you could import Illustrator vector art (even some very basic 3D models) to create some pretty cool logos and text.
3D text extrusions
By now, you have a firm grasp of creating a project and how we lay out our layers. So, set up a new Element project with composition. Name the project 3Dtext.
1. Create a layer of text (use your last name). Use any font you like and type it out. I used Bank Gothic for mine.
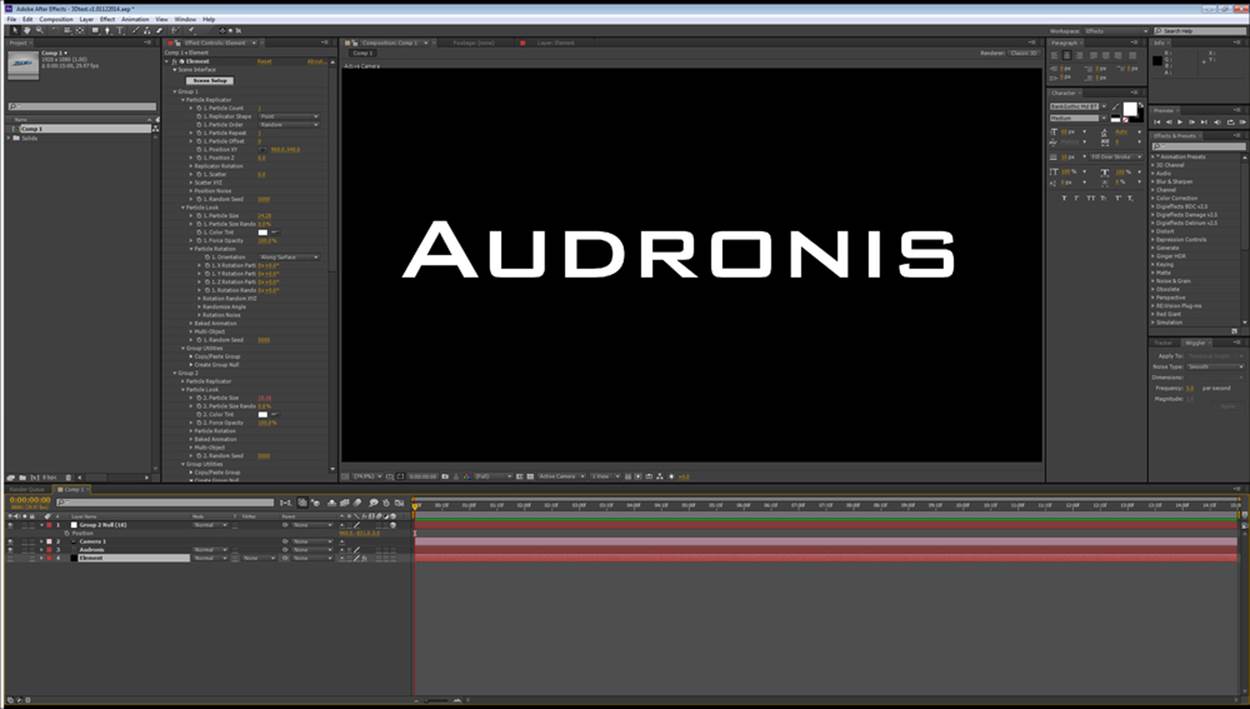
2. Turn off the text layer (clicking on the eye) and turn on the Element layer.
3. Add the text layer to the custom layers section of the Element plugin (the same way we did when we used the AEX layer for texturing).
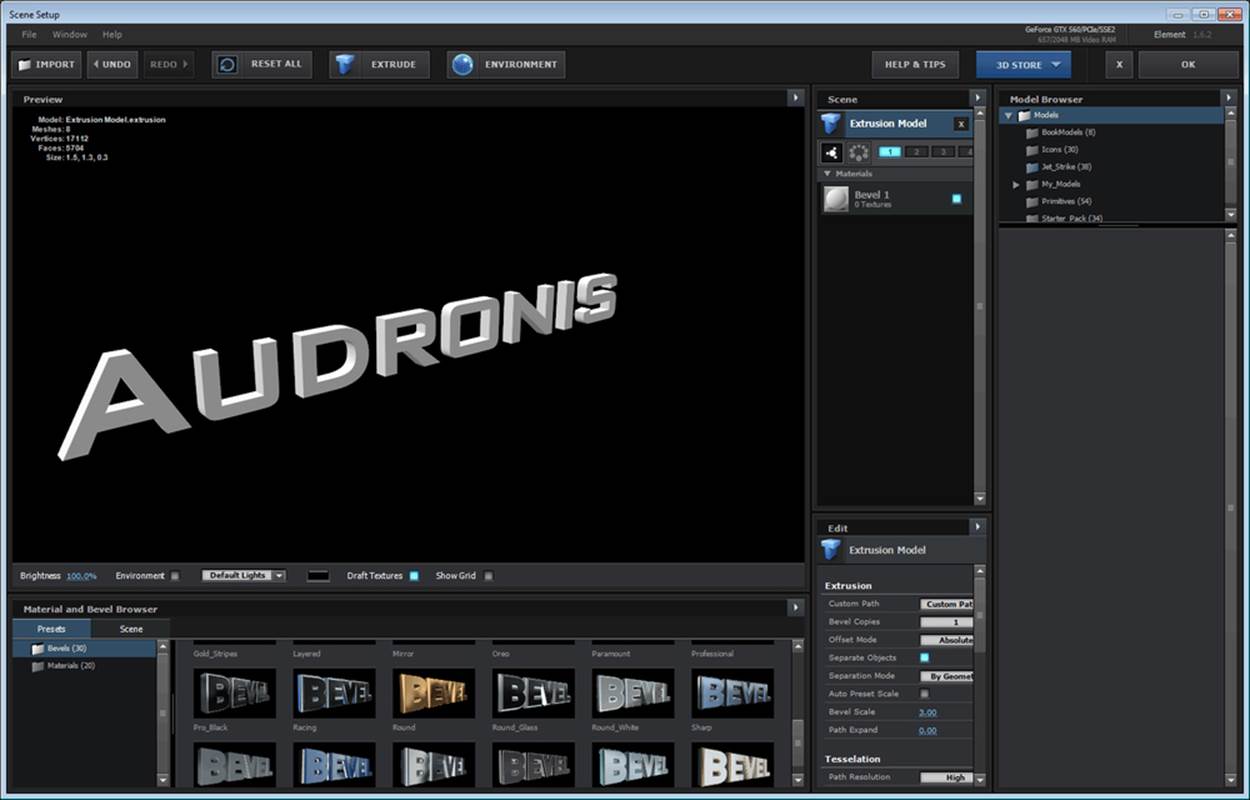
4. Now, back in the Scene Setup window for the Element plugin, just click on EXTRUDE at the top of the interface, as shown in the following screenshot:
Let's quickly go over the following functions that the bevel controls perform, from top to bottom, in the Extrusion section of the Edit window:
· Custom Path: This is used to select which of the custom layers this extrusion uses.
· Bevel Copies: This indicates how many bevels this extrusion has (you can make a stair-stepped bevel using this feature).
· Offset Mode: This has an effect only if you have more than one bevel copy, irrespective of whether the next extrusion is from the face or from the back of the previous extrusion.
· Separate Objects: This is used to determine whether or not to separate objects in your extrusion.
· Separation Mode: This is used to determine whether or not to separate the objects by the geometry or bounding box.
· Auto Preset Scale: This sets the size of the extrusion and bevel(s) automatically. It is kind of buggy.
· Bevel Scale: This is used to adjust the extrusion size.
· Path Expand: This is used to determine whether or not the bevel goes out from, or contracts from, the original graphic.
Let's get back to making this happen by performing the following steps:
1. Go ahead and make your Bevel Copies option 3. We're going to create a pipe bevel here.
2. Make sure your Offset Mode is Relative, your Bevel Scale is 2.85, and your Path Expand is 0.
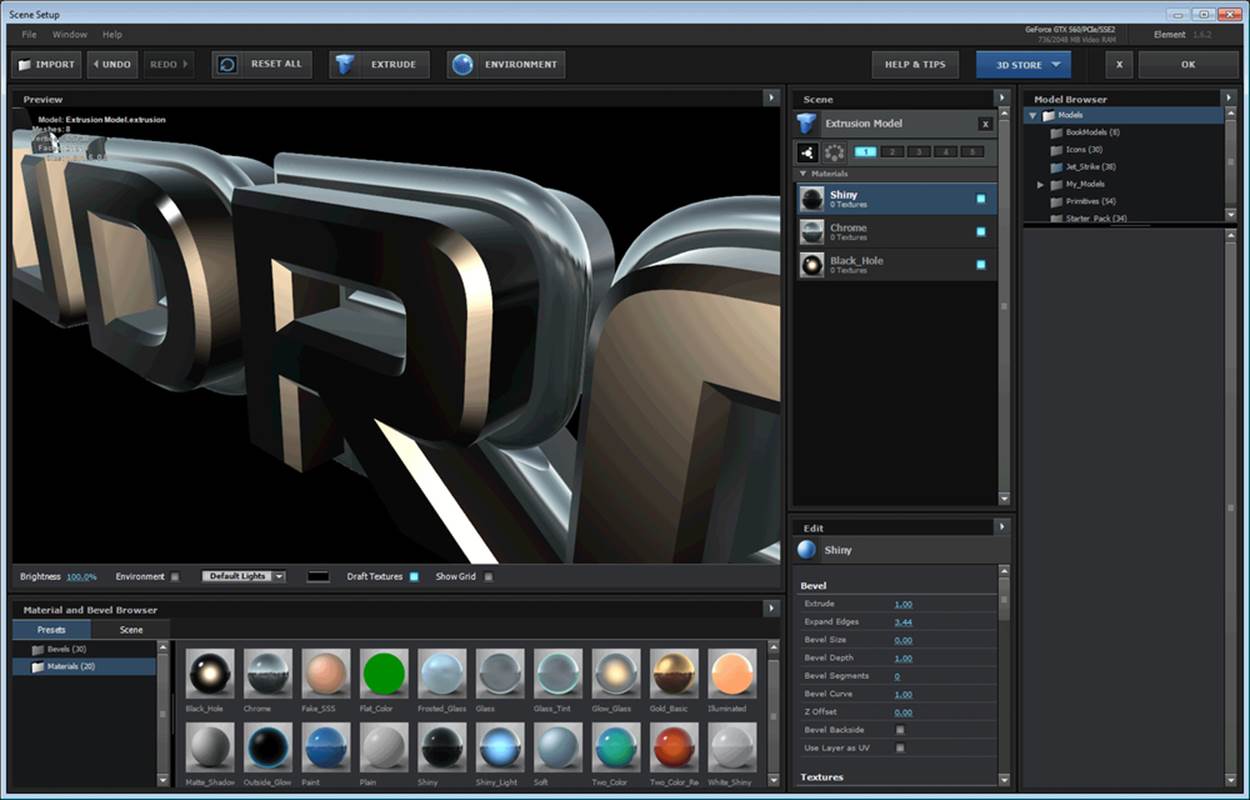
Now, there are similar controls on each level of bevel. You'll notice that you now have three surfaces attached to your object. We could just use one of our bevel presets, but this is a book on how to use Element, so let's learn something here. Assign some materials to each of the bevel surfaces. Now we can see some separation. But let's make the pipe-like bevel now.
3. The order of the surfaces (top to bottom) corresponds with the order from the back of the object to front. Let's start at the front (bottom layer). Set up this extrusion with the following settings:
· Extrude: 1.00
· Expand Edges: 0.00
· Bevel Size: 2.12
· Bevel Depth: 1.00
· Bevel Segments: 0
· Bevel Curve: 1.00
· Z-offset: 0.00
· Leave backfaces and UV off
What we did was create a bevel edge on the extrusion. The edge is sharp because we lowered the segments to 0. The bevel size was the key here. It actually lets us see this edge. The sharp edge will look good on specular highlights as well. Now, let's create a rounded pipe for the next bevel:
4. On the middle layer, set it up with the following settings:
· Extrude: 0
· Expand Edges: 3.11
· Bevel Size: 3.82
· Bevel Depth: 1.00
· Bevel Segments: 15
· Bevel Curve: 1.00
· Z-offset: 0.00
· Turn backfaces on, but leave UV off
Now what we did was eliminate any flat extrusion (with the extrude of 0), and we expanded the edges (making the pipe pop out from the edge). We also created a large size bevel so that we can see the pipes and increased the bevel segments. This adds geometry to the bevel and makes the curve smoother. Turning on the backfaces puts a bevel at the back of this segment making it a full pipe.
5. Finally, the last segment should be as simple as possible (after all, it's the back), so we'll use the following settings:
· Extrude: 1.00
· Expand Edges: 3.44
· Bevel Size: 0
· Bevel Depth: 1.00
· Bevel Segments: 0
· Bevel Curve: 1.00
· Z-Offset: 0.00
· Leave backfaces and UV off
All we did really was create a simple extrusion with no bevel on this section. The results of all this should look something like the following screenshot:
Tip
This use of a layer as the source for extrusion can lead to all kinds of interesting things. You can animate the text, use animation presets for animating in/out the text; you can even warp it! The possibilities are rather limitless. The only limitation is the need to use vector art and not bitmapped graphics for this feature.
Flying logos
As you probably know, flying logos are the main staple of any motion graphics artist. Just look at the beginning of any film. I mean really! How many flying logos does one film need?! I've toyed with the idea of making a film made of nothing but flying logos to tell a story.
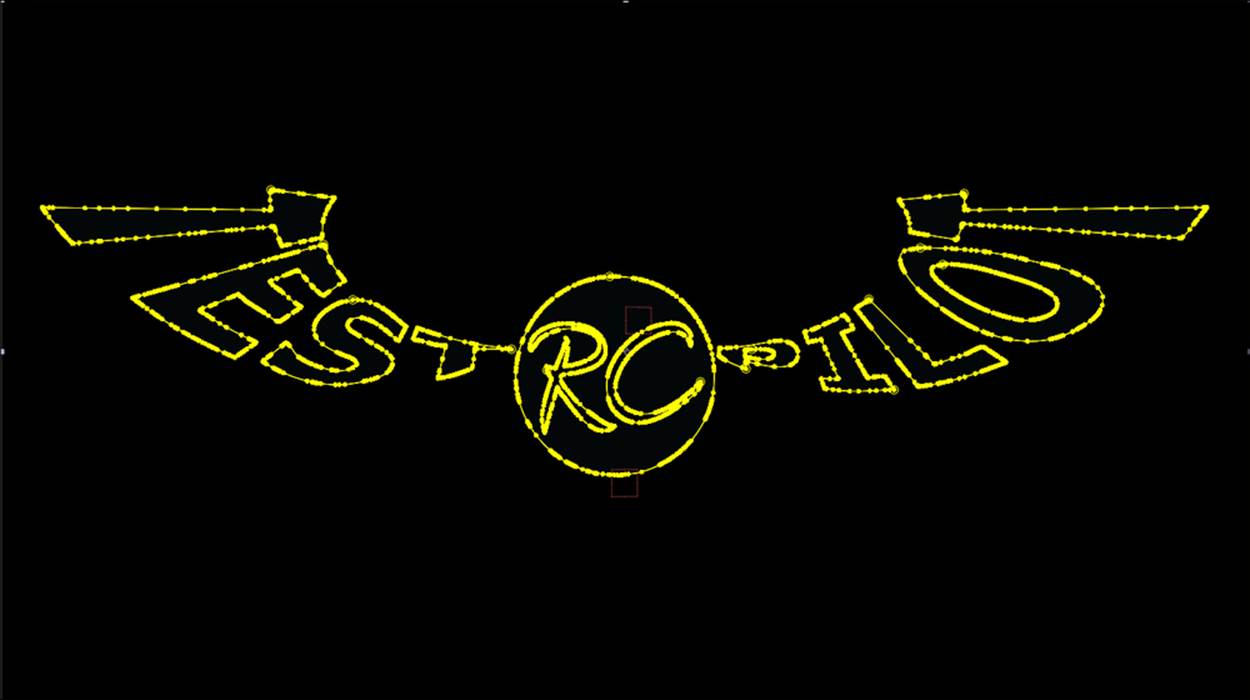
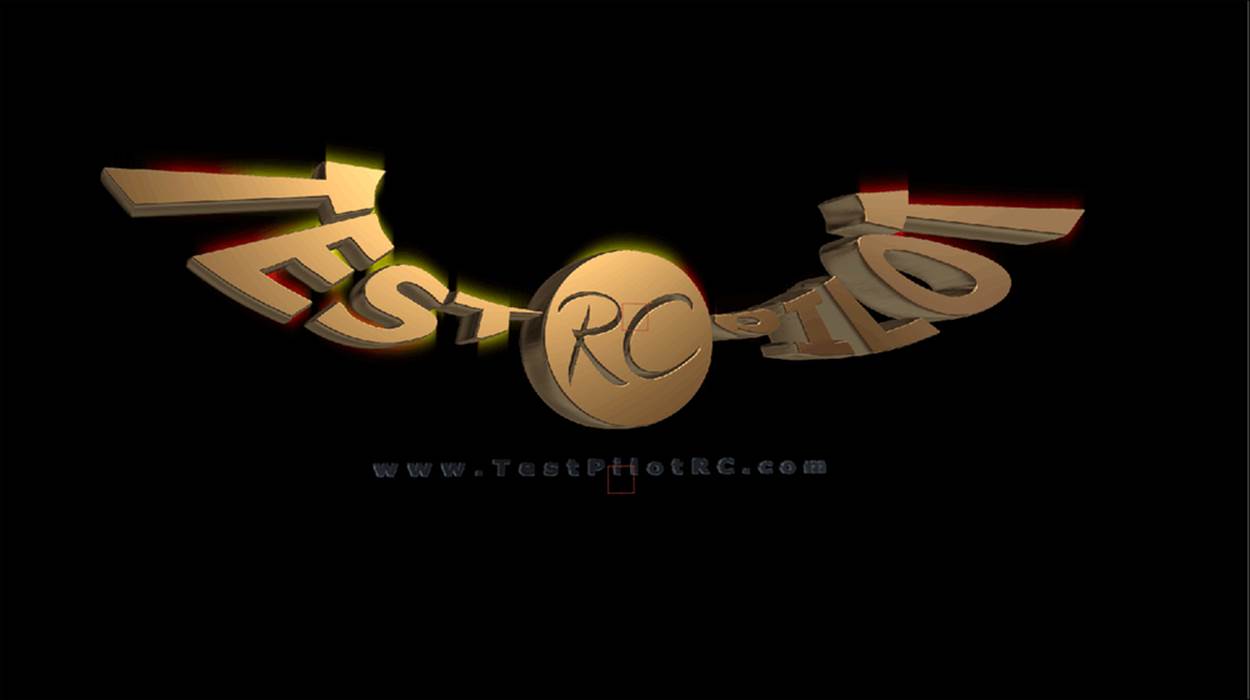
The principle is the same. We just use a logo layer rather than a text layer. The first thing you will need to do is put the logo on a transparent background in Photoshop. If the entire logo is in one color, then it's cool! Put it on one layer. But if the logo needs several textures, break it into separate layers in Photoshop. We're using the Test Pilot RC logo (with the generous permission of the website, of course). I've broken the main logo and the website address into separate layers. Then, I import the layers separately into After Effects and place them in the timeline.
As we're using a bitmap graphic, we make it large; very large (so that we can have smooth curves). Once we put it on the timeline, we scale it down to fit the window and create a mask path out of it. We do this by selecting Layer | Auto-trace. The result is a masked image (Element uses mask paths to create objects) that looks like the following screenshot:
We do the same for our other Photoshop layer. From here on, it's the same as the text. Assign each of the Photoshop layers to a custom mask layer in the Element plugin. Then, in the Scene Setup interface, create two extrudes and assign the custom path to each one respectively. After all is textured and done, your scene should look like the following screenshot:
Tip
Adding additional effects to an adjustment layer can make your logos look even cooler (this one has a vertical glow). Also, you can animate the shape of your logo by animating the mask over time! The possibilities are limitless.
The possibilities of live footage, world position mattes, and compositing
Let's face it. 3D isn't just animation and flying logos. It also comes in handy for VFX and telling your story. Everybody loves disaster movies, so let's make Air Force One crash! If you want to follow along these lines and do the scene, you'll need Trapcode Particular, Tiffen's DFX v3, Video Copilot's Optical Flares, and the Jet Strike and Flight Kit packs for Element. If you don't have these, don't worry. The principles here are what's important, not the knob turning. This is mostly to show the possibilities with Element. This will go very quickly (as it's principle-driven and not a book on how to use these plugins).
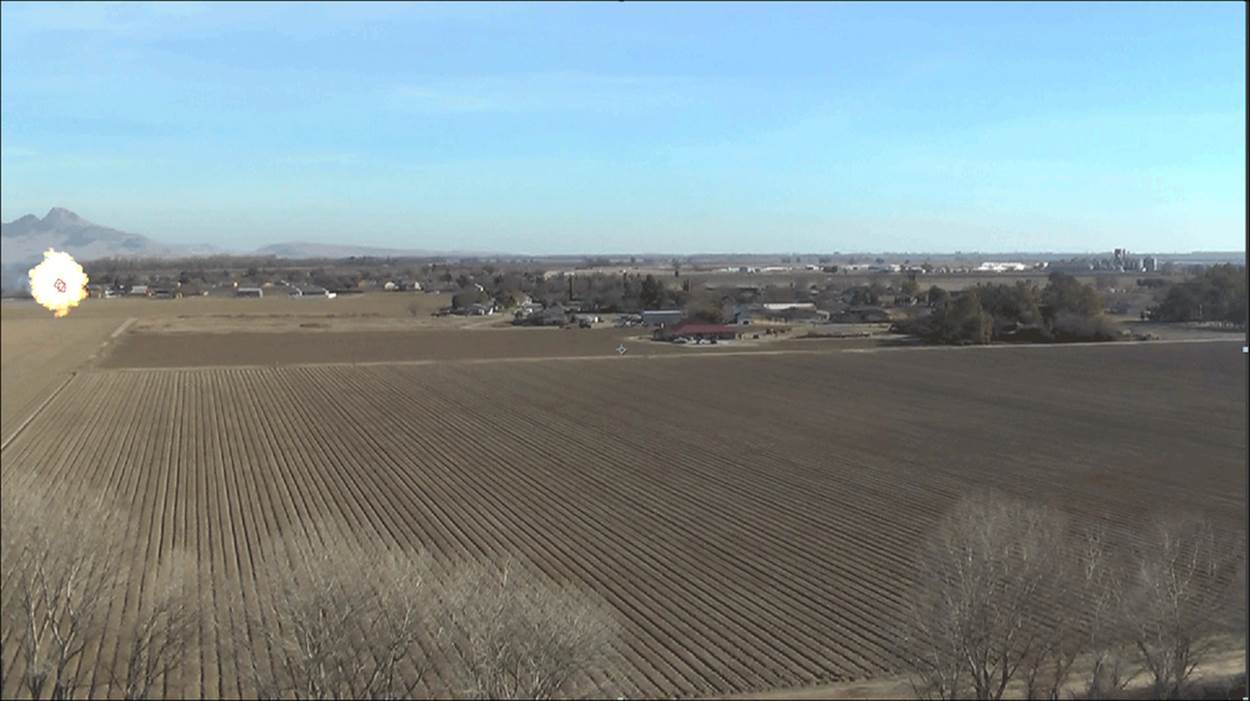
1. We start off with some footage taken from my hexacopter (hovering about 50 m off the ground). We'll throw away all the takeoff and landing of the drone, and use from about 4:49:10 to about 5:13:29. By the way, all of this is available on the downloadable content for this book. We even have a fire burning in the background, so we have set up a great crash site already!
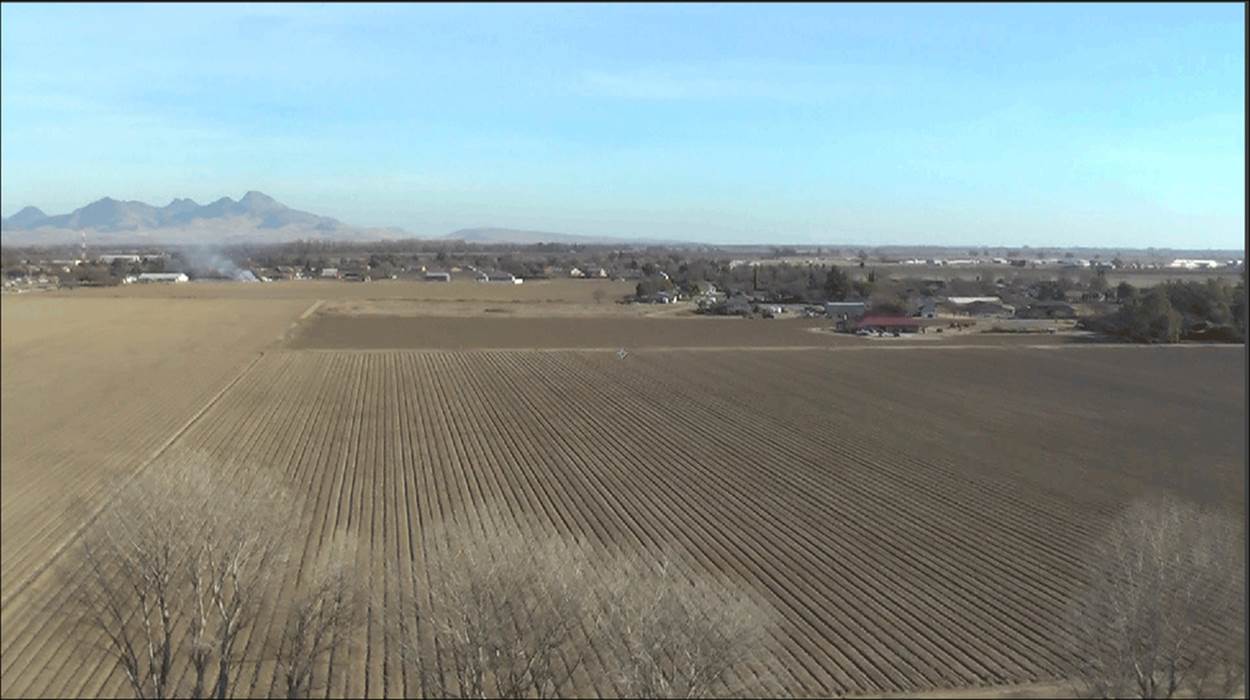
2. Don't create a camera yet. The only thing in your timeline should be this footage. Now, use the 3D Camera Tracker effect on this footage. This will track hundreds of points in the footage, figure out what lens you are using, and track the movement of your camera for you!
3. Once it's done solving this task for the camera (should take a couple of minutes), click on the Create Camera button in the effect (shown in the following screenshot).
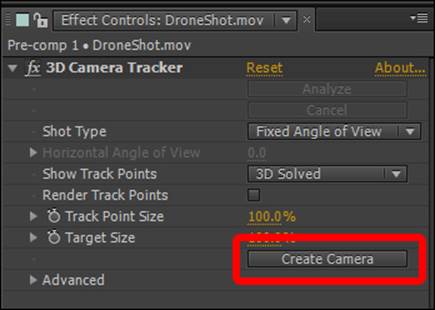
Great! Now we have a camera that moves just like our hexacopter did!
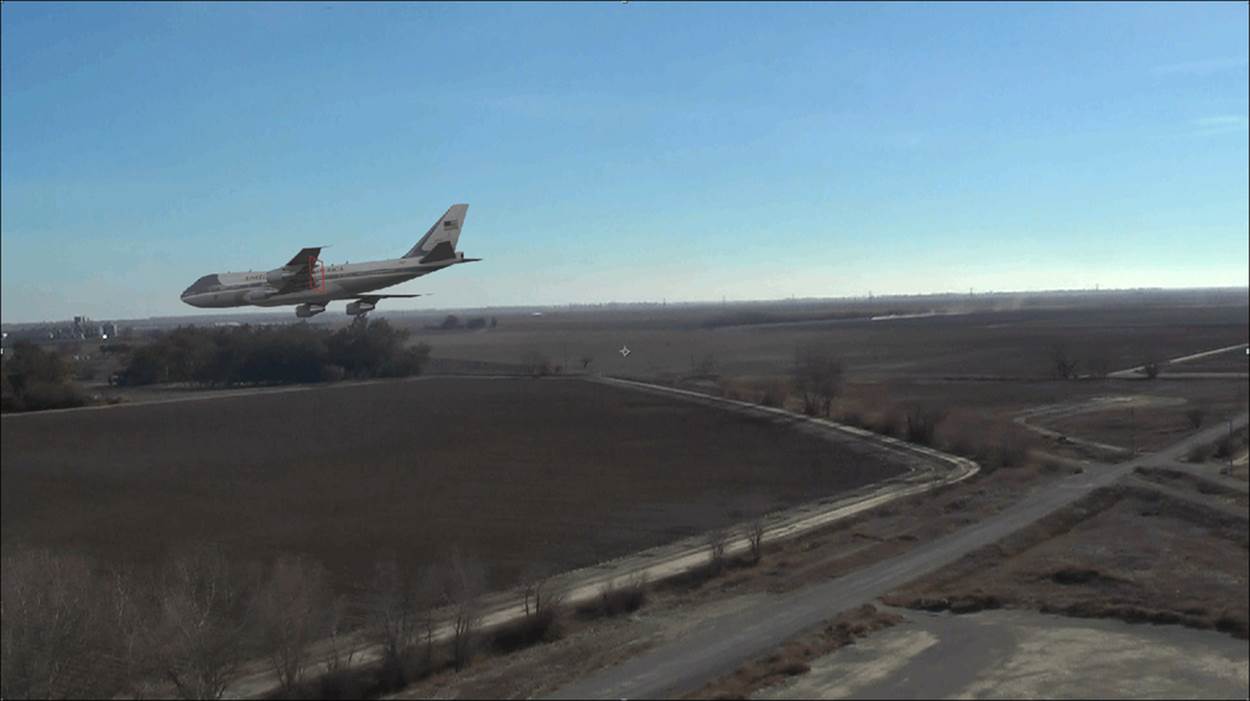
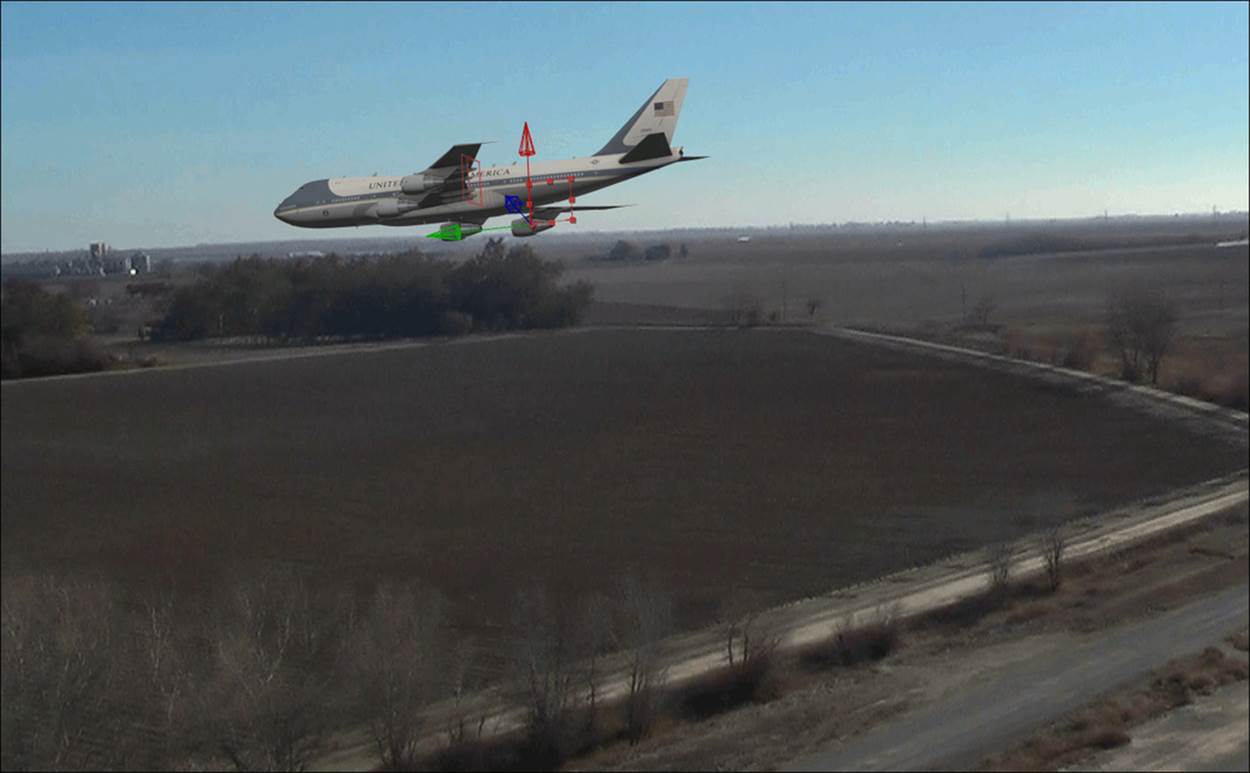
4. Next, we add an Element layer, and slap in Air Force One (from the Jet Strike pack). It should be visible on the first frame, and you'll notice that the airplane hovers in the air and maintains a great position even as the camera moves.
5. Create a group Null for the plane.
6. Then, create a second null (that the first null is attached to). This is to prevent us from having gimbal lock. Gimbal lock is where you rotate the object, and at some point, two rotational axes actually effect the plane in the same way. Having two nulls lets us bypass this obstacle.
7. Use your first null to animate the movement of the plane and the second to rotate it. Now, move the plane out of frame to the right (at beginning of the clip) and animate it to smash into the smoke the very moment that the smoke comes into view (else, it might look weird when the plane smashes into something that is already on fire).
8. Add some rocking effect to the plane (rolling left/right) to make it look out of control (but remember, it's a big plane, so the movements are slow). Also, don't forget to separate your position dimensions and use continuous Bezier keyframes to make everything realistic.
Tip
It's ok if the plane goes out of frame at times. Remember, we're trying to mimic a real-camera movement, and amateurs can't keep something moving fast in frames. The important thing is to make the plane look real. So keep its movement smooth.
9. Add some color correction to your element layer to make it blend better with the background. The preceding screenshot used both the Curves effect and the Hue/Saturation effect.
10. Now, we add a point light that mimics the Sun (slightly orangey-yellow) and an ambient light that is of the same color. Adjust their position and intensity to match the environment as closely as possible.
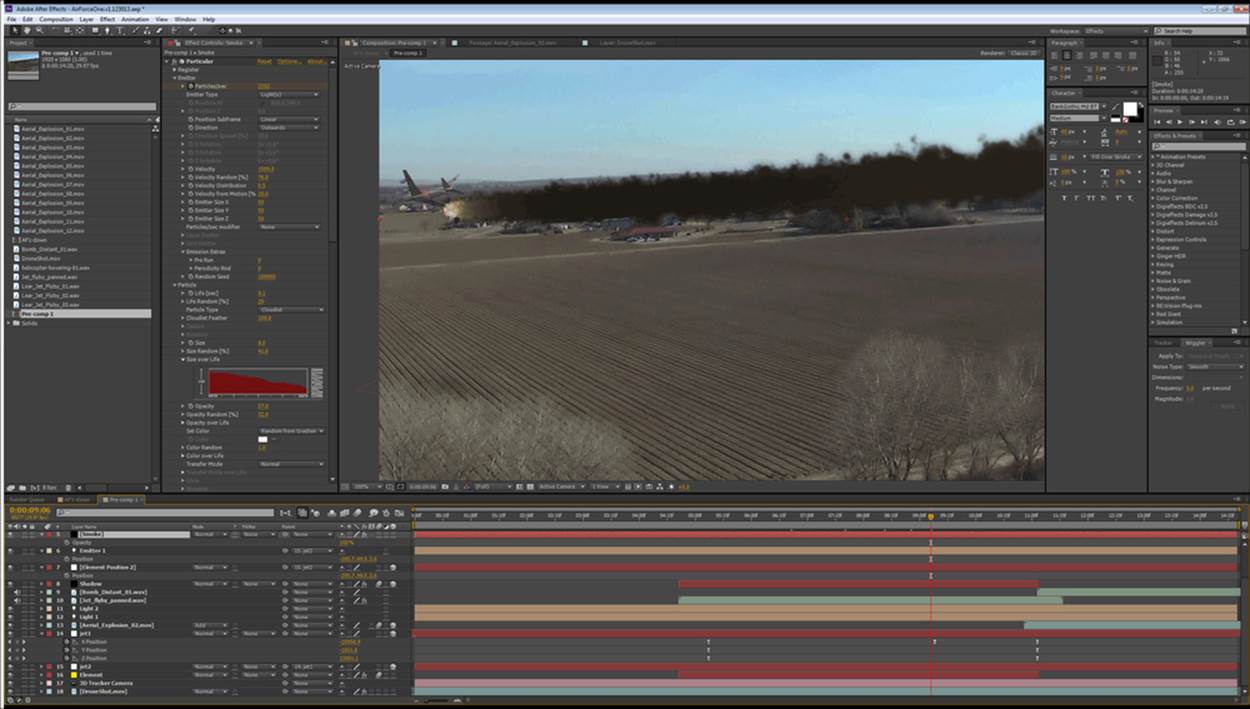
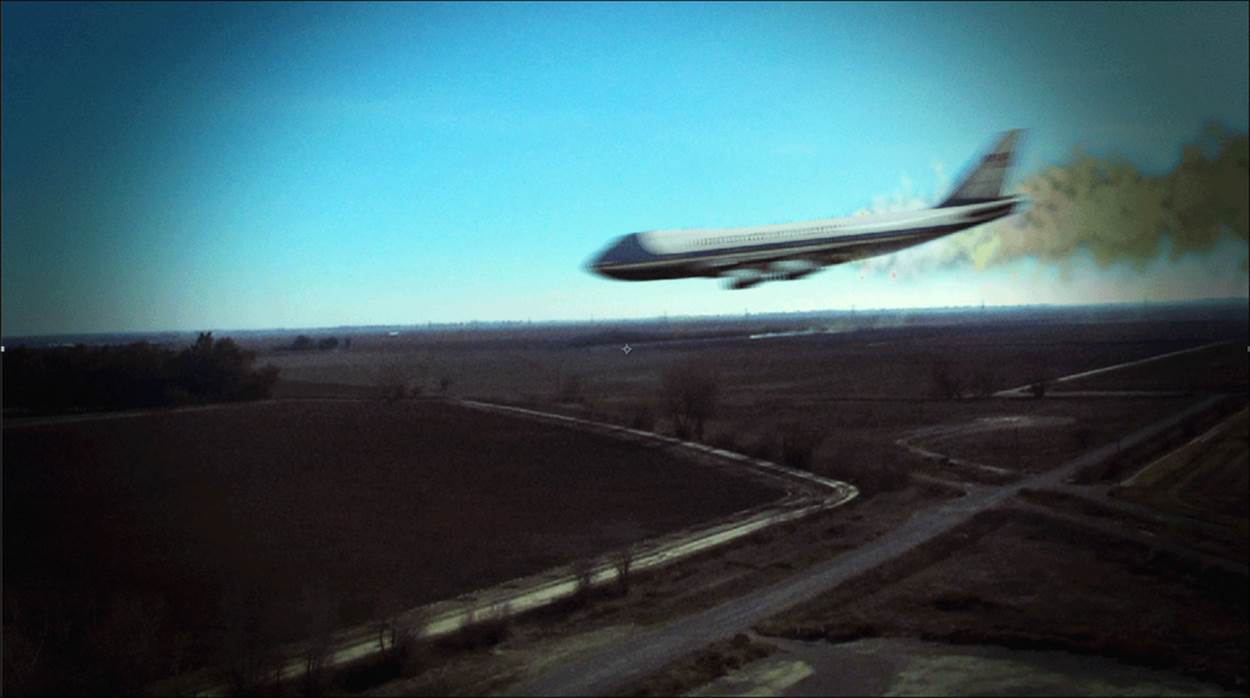
11. The Flight Kit has a lot of footage of aerial explosions. We're going to use Aerial_Explosion_02.mov and have that explosion happen when the plane hits its target. Remember that the explosion doesn't happen after the plane crashes but while it crashes. Therefore, have some overlap, and as soon as the explosion is big enough, cut your Element layer (so the plane is no longer in your scene). Also, use the transfer mode Add for the explosion. The result should look similar to what is shown in the following screenshot:
12. Now, create a solid black 3D layer.
13. Cut out the shape of a plane (from the top view), and copy the plane's null's X and Z keyframes, and paste them on the black layer.
14. Rotate it so it's flat. This is going to be our shadow.
15. Put a pretty severe blur on it, and bring its opacity down to around 20.
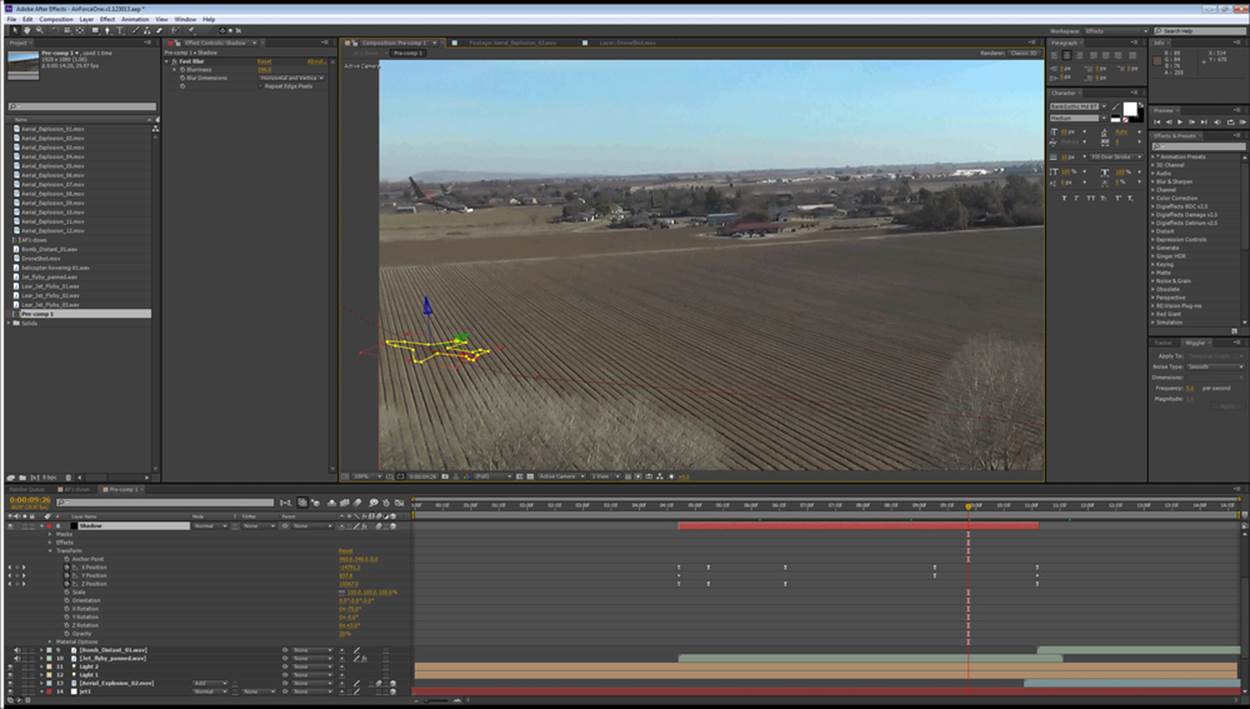
16. Now, with your timeline marker over one of the position keyframes, select all the keyframes for the mask, and position it under the plane.
17. Make sure it moves properly with the plane and meets up with it at the crash site. This is how the audience can tell if the plane is falling. You may have to keyframe the Y position of the shadow to make it realistic. Your result should look similar to the following screenshot:
Now, the real fun begins. We already have something worthy of Xena or Babylon 5, but let's make it better! We need to have a reason for the plane to crash, so let's add fire and smoke to the engine! We need a position though. So, let's open our Element plugin and select a frame where the plane is big and in clear view.
1. Under Utilities in your Element plugin, you'll find Generate 3D Position. Open this.
2. Next to Select 2D Position, you'll see a crosshairs button. Click on this, and then click on the outermost engine on the right wing. You'll see a little crosshair pop up on it.
3. Now, just under the Generate 3D Position option, you'll see Create 3D Null. Open this and click on the button that says Generate. Wait! You're not done.
4. Now, parent the new null layer that has been created to the second null of your jet (the rotation one, which should be parented to the position one). Now, this null object will stick to the engine and follow the plane's movement.
5. The Particular plugin can emit particles from a light. So now, let's create a point light, position it on the engine null, and parent it to that null. The easiest way to do this is to copy the unparented coordinates of the null to it.
6. Name this light Emitter 1, and create a solid layer with the Particular plugin applied to it to create some smoke. This is a whole chapter in itself, so to keep from going on a tangent, just search how to create smoke with particular on Google. Then, for the emitter type, use light.
The result should look similar to what is shown in the following screenshot:
Pretty cool right? We've got a big problem though. Earlier in the timeline (where our jet has the engine hidden by the cabin), the smoke is on top! We can fix this with a world position matte.
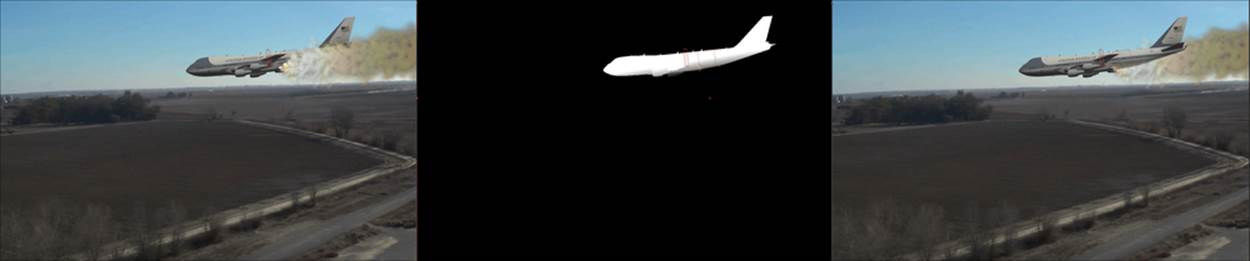
World position mattes
The world position map lets us create a matte based on the coordinates of the object. So, once we set it up, we can make the far wing appear black, and the cabin and the foreground wing appear white. Apply this to the smoke layer, and it will accurately mask it over time to make the smoke only appears where appropriate for our perspective! These mattes are quite versatile and very handy.
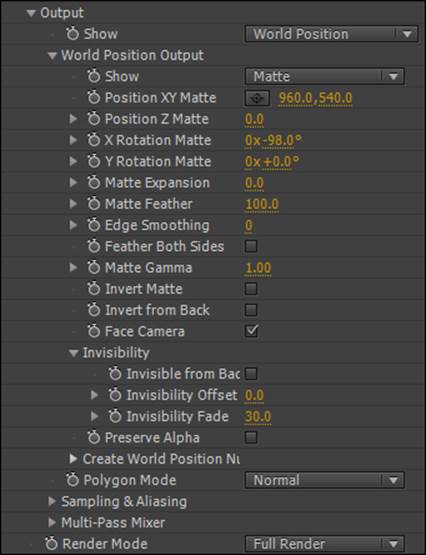
1. First, duplicate your Element layer and move it directly above the smoke layer.
2. On this second Element layer, open the Output twirly on the Element plugin. Play with these settings and experiment! For this scene, the settings should look like the following screenshot:
3. Set the track matte for your smoke layer to Luma Matte Inverted: Element 2.
Your smoke is even better! Now, time for the light attached to the engine to mimic fire.
4. Apply Optical Flares to a new layer (make the flare small and orange). It shouldn't be prominent. Remember, the best effects are the ones you don't notice!
5. Duplicate your world position matte Element layer and apply the duplicate as another Luma Matte Inverted to your flare layer. Now your smoke (and flares) appears at appropriate times.
6. We're almost done. Now to blend everything together a bit better, precomp everything.
7. Create an adjustment layer.
8. Add an Add Grain effect and apply the Tiffen DFX Film Stocks plugin. Choose your favorite film stock. To create the following screenshot, we used a Kodak Ektachrome look:
Tip
Adding color correction and grain on top of everything is an important step in compositing. Adding grain helps create consistent imperfections across your whole picture. A final pass of color correction can hide any slight imperfections, both of which help suspend disbelief.
Granted, this Ektachrome look is a bit severe. But hey, we like severe sometimes, so there we are! Finally, use your precomp layer to add a bit of camera shake when the impact happens and you have a pretty spiffy special effect in only a couple of hours!
The fully rendered animation (and project) is available as part of the downloadable content.
Summary
We learned some of the more advanced techniques (and some basic ones too) of Element 3D. Flying logos, extruded text, and match motioning live footage are all extremely useful tools in your toolbox. You're ready. Now, get out there, fiddle with Element, and get your "3Deity" on!
In the next chapter, we'll explore some closing thoughts and tips.