Lightning Fast Animation in Element 3D (2014)
Chapter 2. Welcome to Element 3D
In this chapter, we're going to dive right into 3D. However, before we do that, let's make sure that we're all on the same page. Animating in 3D isn't just a matter of picking up a mouse and ripping out great stuff; you need to make sure that your machine, operating system, and software are all up to snuff. Luckily, Element 3D doesn't have nearly the requirements of the other software packages.
The machine specifications
Professional production is nothing short of a race. If you can get your product out in a way that it looks better and if you get it done faster than your competition, you're going to stay in business. So, the faster and better machine you have, the better it is for your animation experience. Unfortunately, not all of us have the budget of Pixar. The machine specifications listed below will get you going pretty well. Element 3D is compatible with both Mac and PC. However, Element 3D will run on far slower machines than those outlined in the coming section, and will run better on a much faster machine. The following are the specifications that I am using:
The PC configurations
The following are the specifications of the PC that is used for this book:
· Intel i7-2600 @ 3.4 GHz
· 12.0 GB RAM
· Windows 7 (64 bit)
· Wacom Intuos 4 tablet
· 10 TB RAID-5 eSATA array
· BlackMagic Decklink HDMI
· NVIDIA GeForce GTX 560
Complete GPU specifications for Element 3D are available at https://www.videocopilot.net/assets/public/misc/GPUs.pdf.
Software
Element 3D is a plugin for Adobe After Effects. We'll use CS6 under the Creative Cloud license for the purposes of this book. Additionally, you will need a 3D modeling program. There are plenty of paid ones (such as Maya, 3D Studio Max, Lightwave, and Cinema 4D). However, if budget is a concern, you can use a free 3D program called Blender, which is used by many professionals.
We'll also be using the Jet Strike and Flight Kit for Element 3D later in this book. These kits are among many that are available for Element 3D; they include many models and compositing elements to help you with your 3D animations. If you don't have these expansion packs, don't worry; the principals are important, not the specifics.
Introduction to the interface
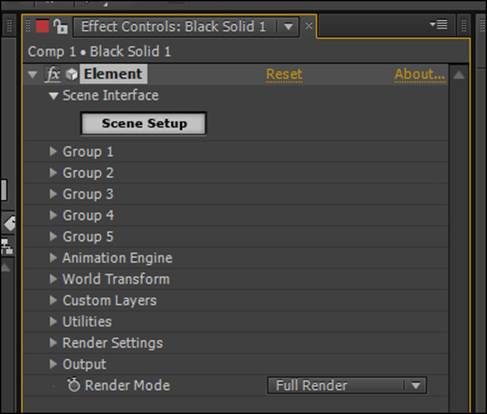
So, let's dive in! Start up After Effects and create a new HD 1080p30 (29.97) composition (it only needs to be a couple of seconds long). Then add a black solid layer and apply the Element plugin to that layer (Effect | Video Copilot | Element). Now you'll want to open your effect controls and hit the Scene Setup button. This will open the Element 3D interface. The following screenshot shows you the location of the Scene Setup button within the AEX interface:
Tip
Downloading the example project files and colored images
You can download the example project files and colored images for this book you have purchased from your account at http://www.packtpub.com. If you purchased this book elsewhere, you can visit http://www.packtpub.com/support and register to have the files e-mailed directly to you.
You're now presented with the Element 3D interface. To give you a tour of the interface, let's load an object into it. On the right side, toward the top, you'll see a window labeled Model Browser. Click on the Primitives heading within that window and you'll see a bunch of objects appear in the lower-right window. Click on the capsule image. Congratulations! You've just loaded your first Element 3D object, and your window should look like the following screenshot:
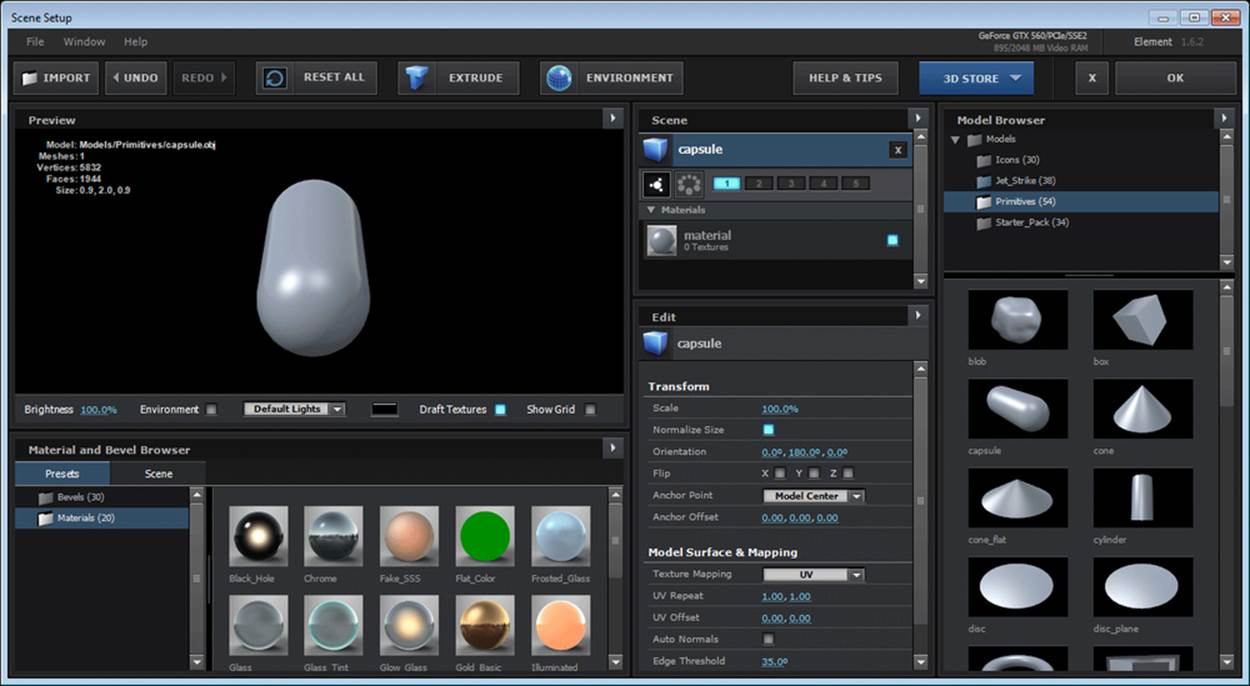
The Element 3D interface
Tour of the interface
Since you already know where the Model Browser window is, let's start there and move clockwise around the interface.
The Model Browser window
The Model Browser window is where you'll locate your existing Element 3D models to be used in your scene. They are contained in folders (such as Primitives). Stock folders are grey, and add-on packs are blue (for example, in the preceding screenshot, you'll notice that the Jet_Strike folder is blue, therefore, an expansion pack set). This is important for portability. If you're rendering on a render farm, it's important to let them know that you are not only using Element 3D, but also using add-on assets.
Directly below the hierarchy view (the tree of folders) is the model list. Each model is represented by a preview image in the perspective view with the model name directly below it.
The Edit window
This window can be likened to the Effect Controls window in AEX. This is where all of the parameters can be edited for your object or any of its components (shaders, orientation, and so on). In the screenshot that shows you the Element 3D screen, you can clearly see the Transform and Surface attributes for the capsule model that we have loaded into the interface.
The Material and Bevel Browser window
The Material and Bevel Browser window allows you to not only see all of the preset materials and bevels that are available as a starting point, but it also gives you a focused view of the materials and bevels within your scene (by clicking on the Scene tab at the top of this window). Similar to the Model Browser window, there is both a hierarchical view (using folders along the left-hand side) and a Preview window (using folders along the right-hand side). In the screenshot that shows you the Element 3D interface, we can look at all of the presets available for the materials.
The Preview window
The Preview window is filled with a plethora of information. Obviously, there is a perspective view of your current model. You can rotate the object by left-clicking on your mouse, move it by clicking on the middle button, zoom in/out using the mouse wheel, and rotate the environment/lights by right-clicking on your mouse.
The statistics of your scene are in the upper-left section of the window. These include the relative path of your model, number of models, number of vertices (points), faces (polygons), and size of your object. The vertex and face statistics will be important in terms of rendering. More of these means slower rendering times, fewer means less quality. (We'll dive more into this in Chapter 8, Optimizing Performance.)
Along the bottom of the Preview window are controls. With these controls (from left to right), you can change the brightness of the preview, show the environment map, change the lighting scheme, edit the background color, change the quality of your textures, and show a grid. The Element 3D interface's screenshot shows these options as set by default.
The Scene window
The Scene window allows the selection of objects and some property adjustments (such as assigning objects to groups). Element 3D animates from within After Effects (AEX), and group assignments will be important when we actually move on to animate our scenes. Whatever is selected from within the Scene window will then alter the Edit window to show you that object/material's properties for editing. Our capsule is currently selected in the Element 3D interface's screenshot and assigned to group 1.
Toolbar (top)
The toolbar covers most of the major operations of Element 3D. The IMPORT button is how you'll bring objects in from your 3D modeling software. UNDO and REDO are self-explanatory, while RESET ALL resets all your edits to their default values. EXTRUDE is used mostly for bringing in logos and text to be animated in 3D (you'll extrude and bevel these, and we'll be covering this functionality later in this book). ENVIRONMENT changes the panoramic image assigned to your texturing maps and reflections. Your standardHELP button is also there.
Clicking on the 3D STORE button will open a web browser to the Video Copilot add-on store for Element 3D (where you can buy more packages, such as Jet Strike).
Clicking on the X button will make you lose all the changes that were made in the interface. This is a cancel button. On the other hand, clicking on OK commits all changes and pipes them into AEX.
Modeling versus animating
Let's start by changing how you think about 3D animation. It's not like motion graphics, and it's not like cell animation (2D). If you were to draw an analogy between 3D animation and any other style, it's more like claymation or stop-motion animation than anything else. This is because before you actually animate anything, you have to make it. You literally have to make a 3D model of it.
To be perfectly clear, Element 3D is an animation package and not a modeling package. Before you can jump in and animate an object, that object must exist. Therefore, you'll either need to make the objects yourself, have someone else make them, or buy them. We'll show you how to make your own basic objects in this book using other software packages and prepare them for import into Element 3D.
Setting up your first project in Element 3D
Now that we know what Element 3D is (and isn't)—and I'm sure you have a ton of ideas of how you're going to use it—let's cover our final step of groundwork before we turn you into a 3D pro! It's extremely important to set up your projects from the ground level.
Staying organized
As any professional knows, you never have enough time to make everything perfect. This is precisely why it's important to take the time at the beginning of a project to set up everything in an ultra-organized manner. This will make it much easier for you to distribute your renders across multiple machines, take your work to another machine, or ship everything out to a render farm.
Directory structure
If you've ever had to pick up a project from another artist, you know well what a nightmare a poor directory structure can be. An extremely organized directory structure is the key. Projects (especially when you start using 3D) can get very complex very fast. You canquickly set up a template directory structure of your own using the following three principals:
· K.I.S.S. (Keep it simple, stupid): Sorry for the last word, but that's what it really stands for. Make your directories are simple so that someone with absolutely no idea about what he/she is looking at can figure it out. This way, if you have to come back to a project months from creation, you don't have to relearn everything.
· Everything within one root directory: I know you can get into a hurry and use an image that you downloaded to your downloads directory. Don't ever do that! Take the extra second to copy that image to your project directory. You won't ever regret it. With that in mind, at the end of the day, back up that root directory to another drive. You won't regret this either.
· Descriptive naming: Come up with a naming convention so you not only know what you're working on, but also know what the version (and maybe even the date) is. For instance, if I'm modeling a human head, I start with HumanHead.v1.010113.obj. This means that it's a human head, Version one, and started on January 1, 2013.
The following screenshot displays an extremely organized directory structure:
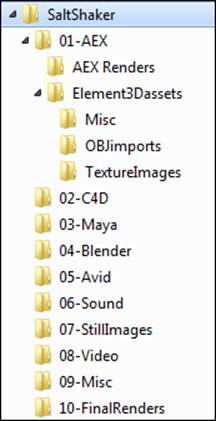
Directory structure
In the preceding screenshot, you can see how I have set up my directory's structure. At a glance, you can tell where assets are to go and later, where to find them. A good directory structure is the foundation of a project that can meet deadlines. For the upcoming project, set up your directory's structure mimicking the structure from the preceding screenshot. You can exchange Avid for whatever editing software you use.
Summary
You now know where all of the buttons are located in Element 3D as well as a rudimentary understanding of what they do. You've set up your directory's structure and understood the importance of organizing your assets. Now, are you ready to get down to the nuts and bolts? Continue to Chapter 3, Your First Objects, and learn the basics of 3D modeling and how to prepare objects for Element 3D.