Creating Apps in Kivy (2014)
Chapter 5. Kivy Graphics
Kivy provides sophisticated graphics capabilities using OpenGL and SDL instructions. These can be useful if you’re creating an interactive game rather than an application with widgets.
In this chapter, you’ll learn the basics of the Kivy canvas and graphics primitives. You’ll be creating a set of icons (some animated!) to render on your current conditions screen. These aren’t going to be phenomenal works of art, unless you choose to modify them to be a lot nicer than mine.
If you’re keeping your work in version control, you might want to make a separate branch for this chapter. If not, copy the entire project to a separate directory so you have a backup.
This chapter is a huge amount of fun (at least, it was fun to write!), but you’ll be reverting a lot of these explorations at the end of it. It’ll be easier if you make a copy now.
A Conditions Widget
Start by adding an UnknownConditions widget to the KV file using a dynamic class, as shown in Example 5-1.
Example 5-1. A simple conditions widget
<UnknownConditions@BoxLayout>:
conditions: ""
canvas:
Color:
rgb: [0.2, 0.2, 0.2]
Ellipse:
pos: self.pos
size: self.size
Label:
text: root.conditions
There are a few things to notice about this short snippet. The first is that there is a Label widget, just like you’ve seen in previous examples. I point this out because it is not immediately obvious that you can simultaneously have graphics instructions and child widgets. It is probably more common to do this with layouts that give more control over widget position than BoxLayout. For example, you might use a widget as a positioned sprite that moves in front of a background for a mobile game.
Second, notice the canvas property. If you want to interact with graphics primitives, you need to create instructions on a canvas. Here, you construct two instruction objects, a Color instruction and an Ellipse instruction. These have attributes such as the RGB (red green blue) Colorvalue and the size and position of the Ellipse.
Unlike normal widgets, which are considered independent objects rendered on the screen, instructions should be thought of in aggregate. They can affect each other sequentially. Thus, the Color instruction, which says “do things in gray,” affects the next instruction, which says “draw an ellipse.” Together, they say “draw a gray ellipse.”
Thus, even though a similar syntax is used to lay out objects and properties on a widget, it is better to think of instructions as verbs—that is, actions—while widgets are better thought of as nouns.
Finally, observe how the Ellipse instruction is able to reference properties on the self object. In a canvas, self refers to the object on which the canvas is being rendered. Thus, canvas is a property of self, not a new child widget. The ellipse is being drawn to take up the entire area of the self object, with the same position and size as the parent widget.
Now render this conditions object in the CurrentWeather KV definition by replacing the Label that currently renders conditions as a string with Example 5-2. (I don’t know what “proximity shower rain” means, even if I look out my Palo Alto window.)
Example 5-2. Rendering the conditions widget
BoxLayout:
id: conditions
UnknownConditions:
conditions: root.conditions
The encompassing BoxLayout is given an id so that later you can easily change the child widget to something different depending on the current weather conditions.
If you render the weather now, it will look like Figure 5-1.
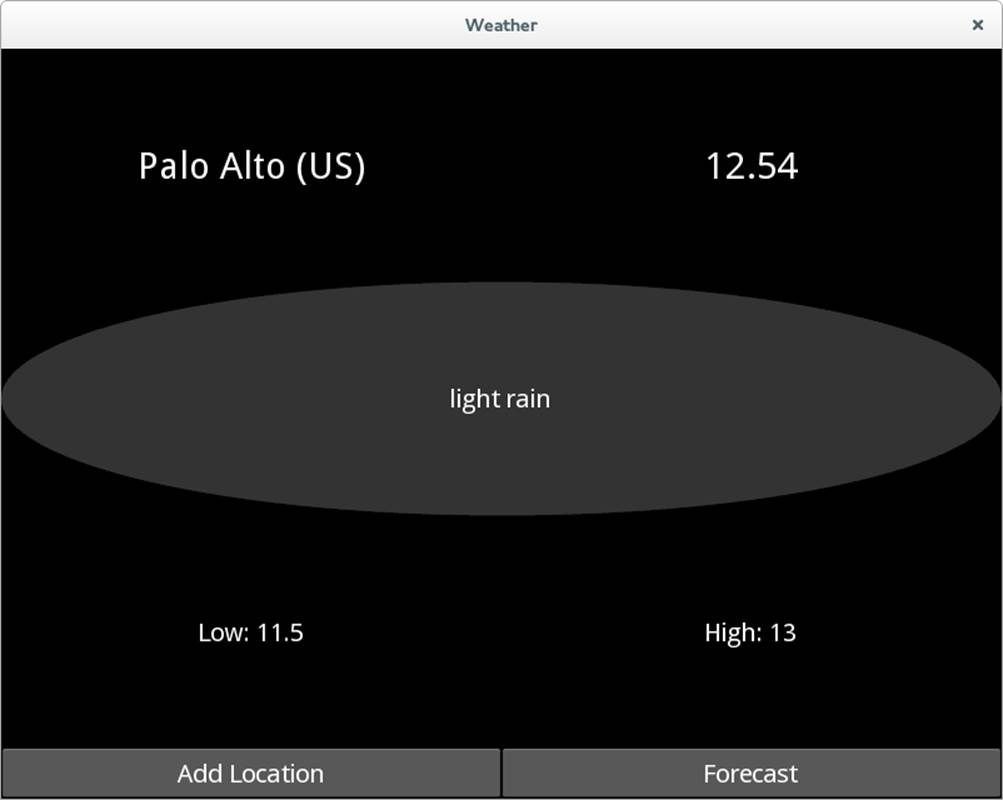
Figure 5-1. Your first graphics instruction
Dynamic Conditions
While it might be reasonable to render unknown weather as a gray ellipse, you really want things to be more dynamic. One option is to make the conditions property into a widget instead of a string and then render whatever the chosen widget is from the Python code.
See if you can work out how to do this as an exercise; you’ve done something just like it in a previous chapter. Create a new method called render_conditions on the CurrentWeather class that uses Factory to construct an UnknownConditions object. If you have trouble, refer to the KV file in Example 5-3 and the Python code in Example 5-4.
Example 5-3. Referring to widget by id
<CurrentWeather>:
orientation: "vertical"
conditions: conditions ![]()
BoxLayout:
Label:
text: "{} ({})".format(root.location[0], root.location[1])
font_size: "30dp"
Label:
text: "{}".format(root.temp)
font_size: "30dp"
BoxLayout:
id: conditions ![]()
![]()
The id is still specified here, but you are no longer constructing a default UnknownConditions.
![]()
Set the value of the property to the widget with the id so it can be referenced in Python code.
Example 5-4. Setting a widget dynamically
classCurrentWeather(BoxLayout):
location = ListProperty(['New York', 'US'])
conditions = ObjectProperty() ![]()
temp = NumericProperty()
temp_min = NumericProperty()
temp_max = NumericProperty()
def update_weather(self):
weather_template = "http://api.openweathermap.org/data/2.5/" +
"weather?q={},{}&units=metric"
weather_url = weather_template.format(*self.location)
request = UrlRequest(weather_url, self.weather_retrieved)
def weather_retrieved(self, request, data):
data = json.loads(data.decode()) ifnotisinstance(data, dict) else data
self.render_conditions(data['weather'][0]['description']) ![]()
self.temp = data['main']['temp']
self.temp_min = data['main']['temp_min']
self.temp_max = data['main']['temp_max']
def render_conditions(self, conditions_description):
conditions_widget = Factory.UnknownConditions() ![]()
conditions_widget.conditions = conditions_description
self.conditions.clear_widgets()
self.conditions.add_widget(conditions_widget) ![]()
![]()
Change conditions to be an ObjectProperty rather than a StringProperty.
![]()
Call the new render_conditions function with the conditions string, rather than setting the value of the string.
![]()
Remember to add from kivy.factory import Factory at the top of the file.
![]()
Add the widget dynamically using Python instead of having it hardcoded in the KV file.
With this refactor, the program will still look like Figure 5-1, but now you can easily create a new widget for clear skies, as shown in Example 5-5.
Example 5-5. Drawing a little sunshine
<ClearConditions@BoxLayout>:
conditions: ""
canvas:
Color:
rgb: [0.8, 0.7, 0.3]
Line:
cap: "round"
width: 3
points:
[self.center_x - (self.height / 2),
self.center_y,
self.center_x + (self.height / 2),
self.center_y]
Line:
cap: "round"
width: 3
points:
[self.center_x,
self.center_y - (self.height / 2),
self.center_x,
self.center_y + (self.height / 2)]
Line:
cap: "round"
width: 3
points:
[self.center_x - (self.height * .35355),
self.center_y - (self.height * .35355),
self.center_x + (self.height * .35355),
self.center_y + (self.height * .35355)]
Line:
cap: "round"
width: 3
points:
[self.center_x - (self.height * .35355),
self.center_y + (self.height * .35355),
self.center_x + (self.height * .35355),
self.center_y - (self.height * .35355)]
Color:
rgb: [0.6, 0.5, 0.0]
Ellipse:
pos: self.center_x - ((self.height - 40) / 2), self.pos[1] + 20
size: [self.height - 40, self.height - 40]
Label:
text: root.conditions
It’ll be easier to understand the math if you first look at the effect in Figure 5-2 (your app won’t look like this until you hook up the main.py code in a couple minutes).
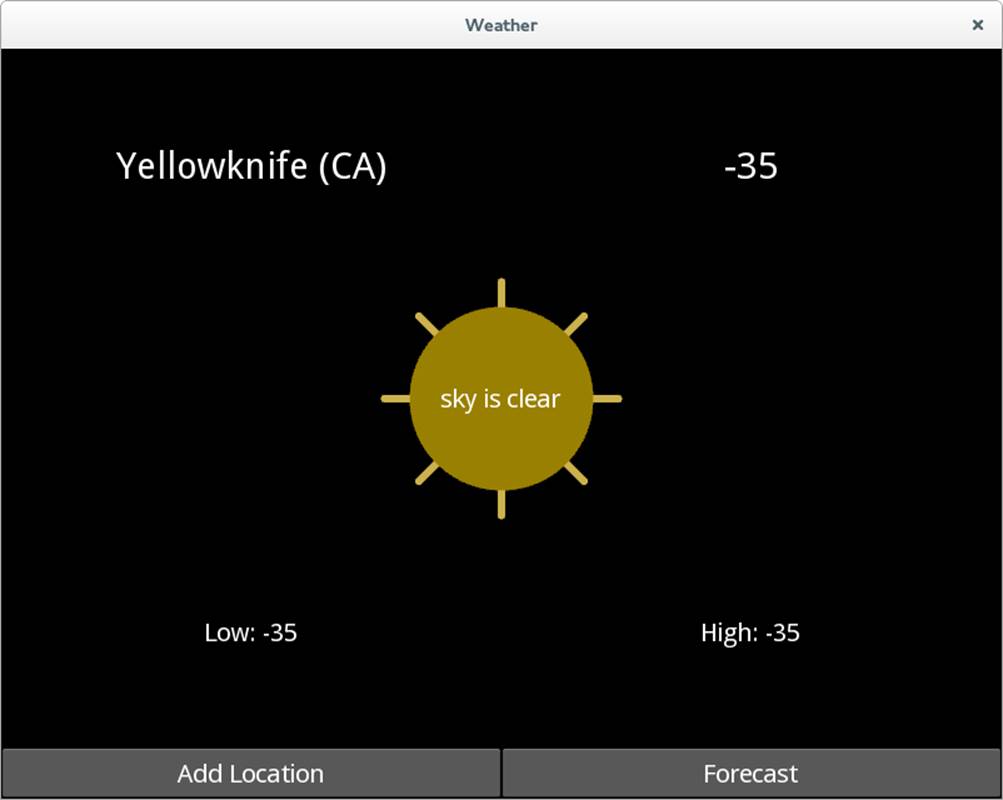
Figure 5-2. Rendering of clear, cold skies
This simple sunshine graphic is composed of some relatively simple instructions and some not completely simple mathematics. I’ll describe each instruction in turn.
First, a Color instruction sets a nice yellow-orange color in RGB format. It has 80% red, 70% green, and 30% blue, since Kivy RGB settings range from 0 to 1 in floating point.
This is followed by four Line instructions. These all have the same structure, composed of cap, width, and points properties. The width is obviously the width of the line. The cap can be set to a few different values; "round" gives the ends of the line a nice radiused feeling. Thepoints property is a list of values for the line. Alternating values are x and y coordinates in the coordinate space of the window. This means that 0, 0 is the lower-left corner of the window. Therefore, it is typically wise to adjust the points relative to the pos or center of the widget holding the canvas to which you are issuing instructions.
Each line has four values in the points list. These values are used to draw a single line between two points. Each of the lines is the length of the height of the widget, and is centered on the widget. The first line has the same y coordinate (the middle of the window) for both points, so it represents a horizontal line. The second similarly represents a vertical line.
The latter two lines represent a cross at a 45-degree angle to the other lines. You can safely think of the value 0.35355 as “magic” unless you know basic trigonometry, in which case it is an approximation of √2 / 4, which combines the sine of 45° with a division by 2 on the height.
Finally, the color is made a bit darker, just for fun, and an ellipse with equal height and width (a circle) is drawn in front of the lines. This circle is smaller than the length of the lines, so they poke out behind it like a radix. Note my minor attempt at style: by making the color quite dark, I’ve made the white label readable in front of it.
Admittedly, that was not a lot of fun. It took me several minutes of fiddling to get the image to look the way I wanted it to. It isn’t normal to tweak graphics primitives by hand in the KV language, though it can be useful. Mathematically derived graphics are more often created in Python code, while artistic effects should be applied as textures to an image rather than being encoded in primitives.
If you’ve created this widget in weather.kv, you might be wondering how to turn it on in main.py. You can do this with a simple conditional in the render_conditions function, as you can see in Example 5-6.
Example 5-6. Rendering different widgets depending on conditions
def render_conditions(self, conditions_description):
if "clear" inconditions_description.lower():
conditions_widget = Factory.ClearConditions()
else:
conditions_widget = Factory.UnknownConditions()
conditions_widget.conditions = conditions_description
self.conditions.clear_widgets()
self.conditions.add_widget(conditions_widget)
Abstracting Common Widgets
I’ve mentioned in previous chapters how much you should hate duplicate code. Hopefully you were annoyed at the way the conditions label had to be applied in both ClearConditions and UnknownConditions. Inheritance can help abstract away this duplicate code.
Note that sometimes such a refactor is not a good idea. This label adds only three lines of code per widget, and right now there are only two widgets. In this case, I probably wouldn’t normally go to the trouble of refactoring, since I’d actually be adding more lines of code to maintain, and a heavy layer of abstraction.
However, as more conditions widgets are added, the duplicate code will expand. What if you later want to change the label to have a different font? Changing it in a dozen widgets would be rather irritating. Further, I want to explain this for pedagogical reasons; your own widget hierarchies are sure to be more complex than a single label.
Start by making a new class in main.py that extends BoxLayout. Don’t forget to explicitly create the conditions property that was created dynamically in the KV classes. This property is now maintained in only one place (this class), rather than separately in the two widgets. SeeExample 5-7.
Example 5-7. A simple conditions widget
classConditions(BoxLayout):
conditions = StringProperty()
The styling for this widget in the KV language file can have the Label that was previously included in both the conditions widgets. The rule is described in Example 5-8.
Example 5-8. Basic conditions styling
<Conditions>:
Label:
text: root.conditions
You’ll also need to modify both the widgets as described in Example 5-9. Remember to do the same thing in the more complicated ClearConditions class.
Example 5-9. The simplified UnknownConditions dynamic class
<UnknownConditions@Conditions>: ![]()
canvas.before: ![]()
Color:
rgb: [0.2, 0.2, 0.2]
Ellipse:
pos: self.pos
size: self.size
![]()
![]()
Extend Conditions instead of BoxLayout.
![]()
Change canvas to canvas.before.
![]()
Remove the conditions property and the old Label.
If you did not change canvas to canvas.before, your label would not be visible. It would render when the parent class was painted, but then the canvas would paint its graphics on top of the label. The canvas.before property is a (kind of hackish, in my opinion) way to tell Kivy to draw graphics instructions before rendering widgets. There is a similar canvas.after property if you want to delay rendering until later in the pipeline. After this refactor, your code will run exactly the same as previously, but now it’s much more readable.
Basic Animation
Animation in Kivy can be trivially easy. I’ll illustrate this with a snow widget. I’ll define this widget entirely in Python rather than trying to build it in the KV language, since defining individual flakes in KV would be troublesome.
So as not to bore you, I’m not going to show you the entire process of experimentation I went through to come up with this example. However, I don’t want you to get the impression that I just rattled this off the first time. Programming, especially programming involving visual design, requires a lot of trial and error. This example took about an hour to compose. I actually had a more complicated animation going, but I simplified it so the example didn’t take too many pages. You can, of course, tweak it as much as you like if animation interests you.
You’ll need to import a few modules that I’ll explain in a moment. Add the imports from Example 5-10 to the top of your main.py file.
Example 5-10. Imports for snow animation
importrandom
fromkivy.graphicsimport Color, Ellipse
fromkivy.clockimport Clock
You may as well also update render_conditions to render the to-be-defined widget if the conditions warrant it. See Example 5-11.
Example 5-11. Rendering the snow widget for snowy weather
elif "snow" inconditions_description.lower():
conditions_widget = SnowConditions()
And now, my entire animated SnowConditions class is displayed in Example 5-12.
Example 5-12. The animated SnowConditions class
classSnowConditions(Conditions):
FLAKE_SIZE = 5 ![]()
NUM_FLAKES = 60
FLAKE_AREA = FLAKE_SIZE * NUM_FLAKES
FLAKE_INTERVAL = 1.0 / 30.0
def __init__(self, **kwargs):
super(SnowConditions, self).__init__(**kwargs)
self.flakes = [[x * self.FLAKE_SIZE, 0]
for x inrange(self.NUM_FLAKES)] ![]()
Clock.schedule_interval(self.update_flakes, self.FLAKE_INTERVAL) ![]()
def update_flakes(self, time):
for f inself.flakes: ![]()
f[0] += random.choice([-1, 1])
f[1] -= random.randint(0, self.FLAKE_SIZE)
if f[1] <= 0:
f[1] = random.randint(0, int(self.height))
self.canvas.before.clear()
with self.canvas.before: ![]()
widget_x = self.center_x - self. FLAKE_AREA / 2 ![]()
widget_y = self.pos[1]
for x_flake, y_flake inself.flakes:
x = widget_x + x_flake ![]()
y = widget_y + y_flake
Color(0.9, 0.9, 1.0) ![]()
Ellipse(pos=(x, y), size=(self.FLAKE_SIZE, self.FLAKE_SIZE))
![]()
I defined some constants on the class to make it a little clearer what is happening in later code. These are pretty easy to understand from their names, except possibly FLAKE_INTERVAL, which says that snowflake positions will update about 30 times per second.
![]()
This list comprehension may seem rather odd. It creates a list of 60 tuples of (x, y) coordinates representing the position of each flake. This position is relative to a sort of internal reference system with (0, 0) at the bottom of a rectangular area that is self.height units high andFLAKE_AREA units wide. This square will be positioned in the center of the widget, but these (x, y) coordinates don’t know that yet. Each flake starts equally spaced 5 units apart in the x axis at position 0 (the bottom) in the y axis. Why the bottom? I’ll explain in a second.
![]()
The Clock object is a very useful tool for animations. This call tells Kivy to call self.update_flakes 30 times per second.
![]()
This loop does the complete job of animation. It loops over every flake’s position and alters its coordinates. It moves each flake 1 unit either to the left or to the right to give it a bit of a “drifty” effect. It also moves each flake a random number of units down, causing the occasional “hang” effect. Finally, if the flake is at the bottom of the box, it is randomly popped up at some other position inside the box. This also repositions all the flakes after they’ve started at position 0.
![]()
In Python, canvas instructions can be wrapped in a context manager for easier readability. In this case, I used canvas.before so the conditions Label in the parent class is still visible.
![]()
The position of each flake is adjusted to be relative to the position of the widget. These coordinates represent the position in the window where the (0, 0) of the individual flakes should be positioned: centered on the widget.
![]()
Add the flake position relative to the coordinate system relative to the window to get the absolute position of the flake.
![]()
Graphics instructions are constructed as objects, similar to in the KV language but with more verbosity.
The picture obviously isn’t animated, but my screen looks something like Figure 5-3. One of the hardest things to do in this chapter was find cities that had the weather conditions I wanted to test graphics for!
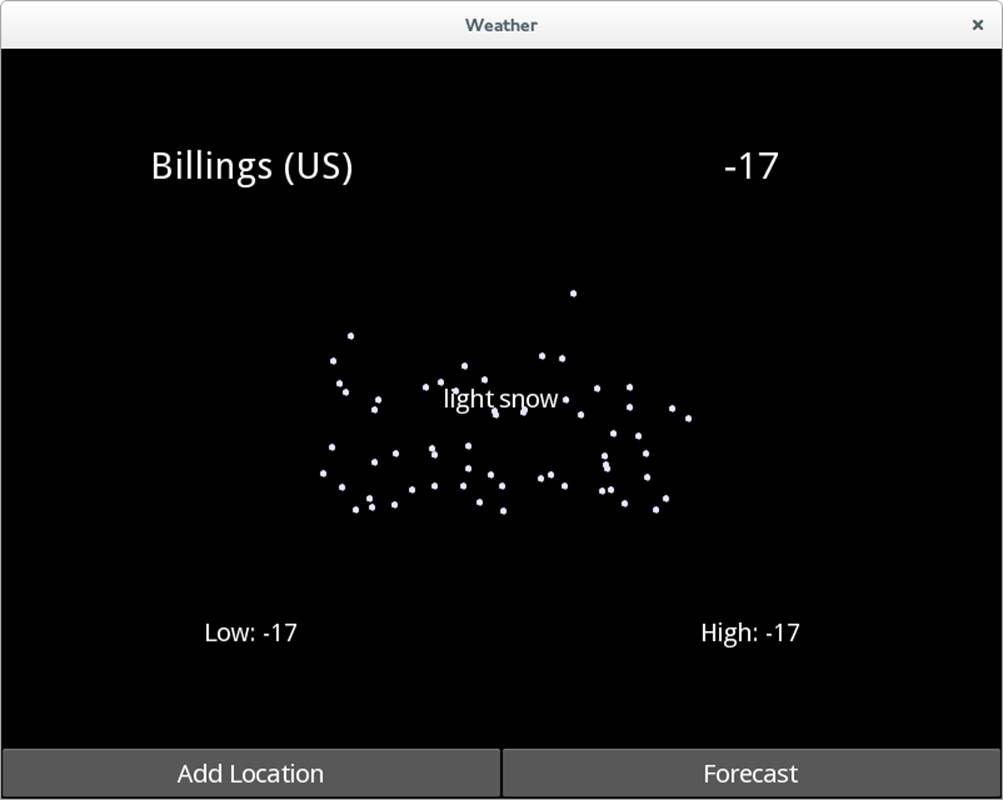
Figure 5-3. Still screenshot of the snow animation
SUPER IN PYTHON 2 AND PYTHON 3
The super keyword has been revamped in Python 3 so that the default case is easier to write. The default case is to call “the parent class of the object that is being instantiated,” and we can invoke it by passing no arguments into the super method.
In Python 2, you have to explicitly pass two arguments into super:, the current class and the self object. Thus, the super call in Example 5-12 would have to read super(SnowConditions, self).__init__(**kwargs) in Python 2.
Luckily, the Python 2 syntax is still supported in Python 3, so if you are looking to support both languages, you can use the more verbose syntax and it will run on either interpreter.
Using Icons Instead
While it’s fun to draw primitive graphics, doing so for all the possible weather conditions would soon become monotonous. To be honest, if I hadn’t wanted to introduce you to the Kivy canvas, I would never have gone down this route at all. Instead, I would have used the weather icons supplied by Open Weather Map.
In fact, that’s what I’ll be doing in future chapters. You’re free to keep the graphics code if you prefer, but if you want to follow along closely, you might want to revert to the state of things before you started this chapter.
Now prepare to be shocked at how easy it is to load an icon from the Internet in Kivy. See the changes to CurrentWeather in Example 5-13 and weather_retrieved in Example 5-14. Also remember to add a conditions_image StringProperty to the class.
Example 5-13. Using AsyncImage to load an image from the network
BoxLayout:
orientation: "horizontal"
Label:
text: root.conditions
AsyncImage:
source: root.conditions_image
Example 5-14. Setting the conditions icon
self.conditions_image = "http://openweathermap.org/img/w/{}.png".format(
data['weather'][0]['icon'])
The AsyncImage widget is an example of Kivy’s modern approach to things. While most GUI toolkits would force you to download and render the image in separate steps, Kivy is aware that most applications are connected to the Web and gives us a convenient widget to grab icons from the network.
If you run this and search for Seattle, you’ll almost certainly get the “light rain” icon (see Figure 5-4). It’s always rainy in Seattle (this is not technically true; Seattle residents perpetuate this myth to keep the beautiful days to themselves). You don’t need to write an app to know that.
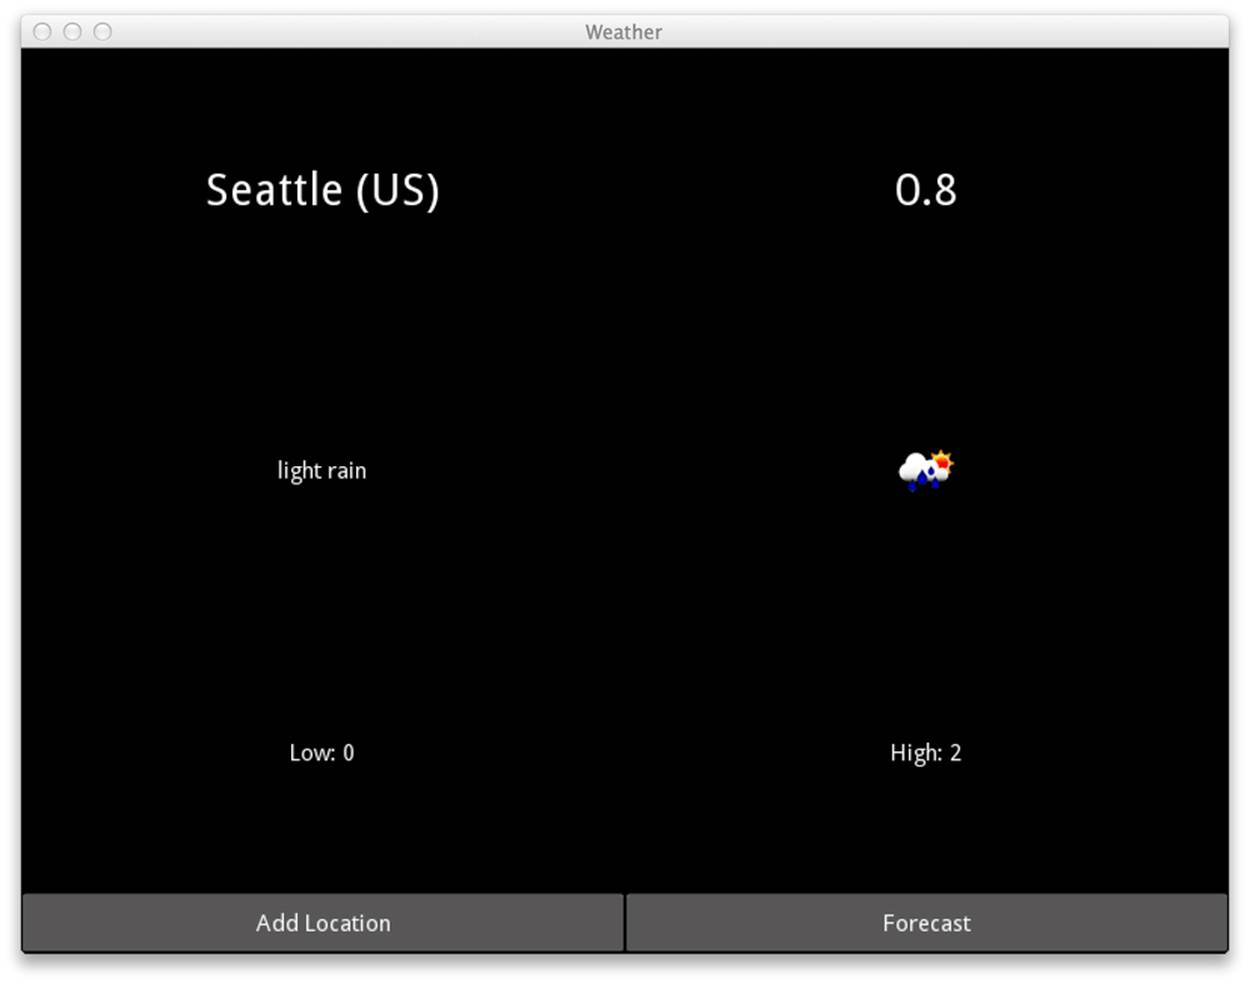
Figure 5-4. Rainy in Seattle
File It All Away
I apologize for the anticlimax of going from coding your own animation to using a stock icon. However, you’re now in good shape to think about persistent storage in the next chapter! Here are a few additional paths you may want to explore:
§ Add an animated rain widget inspired by the snow widget. I’d use short lines instead of circles for drops, but you could also do ellipses with little triangle hats.
§ Make the snow movement more realistic. An algorithm that is a bit less random about when to hesitate or drift in a specific direction would be suitable.
§ You can also experiment with randomly sized snowflakes. I did this and it looked pretty neat.
§ Experiment with some of the other instructions in the Kivy API. These include Bézier curves, triangles, and meshes, as well as transform instructions such as scale and rotate.
§ Read up on using textures and shaders in Kivy if you’re looking to do more advanced graphics in animated games.
§ Experiment with using the Clock object to automatically update the weather every hour.