The Mikado Method (2014)
Part 2. Principles and patterns for improving software
In this second part of the book, we’ll start with a larger example that will show you how to break up a monolith by first adding tests and then restructuring the monolith into several packages. Following that, you’ll get advice on how to let your class and package design emerge, and learn some common patterns for improving code and using the method. When you’ve finished reading this part, you’ll have a better idea of where to take your code and how to take it there.
Chapter 5. Breaking up a monolith
This chapter covers
· Getting to modularized code
· Unexplored nodes, decision nodes, and true leaves
· Tests that guide change
The most common questions we hear when we introduce the Mikado Method are, “What if I don’t have any tests and want to refactor safely? Will the Mikado Method solve my problem?” We believe that these questions are somewhat misguided. The real question you should be asking yourself is, “At what point do I need to know if my changes broke anything?”
If the answer is, “immediately,” then you need something (like automated tests) to validate that quickly. If you intend to wait and let your customers alert you to any problems, the answer is, “pretty late on.” If you have a huge QA department, your answer might be, “during the test phase.” If you asked us, we’d say, “as soon as possible.” We believe in fast feedback, and the faster it is, the better it is. One way to get fast feedback is from tests. We want the majority of our tests to be automated and preferably to be very fast. This opens up the possibility for instant feedback, and that lays the groundwork for flexibility.
If you don’t have any tests, you have two options: leave it that way and keep changing code without tests. This basically means that someone else, like a coworker or an end user, will figure out if the code works. Or you add tests as you go and try to cover as much of your code with tests as you can, and then modify the code. We like the latter approach and always try to cover our code with tests and then modify it.
You’ve had a first taste of the Mikado Method, and now we’ll explore it further. We’ll again use a code example to explain concepts, introduce terminology, and show how the method can be applied to move the code in the direction we see fit. This time we’ll do it a bit differently, though. In the second example in chapter 2, we leaned on the compiler only; now we’ll add tests, let them guide us a bit, and see how that changes our approach. When you’ve finished this chapter, you’ll know how to split and partition code without causing an even bigger mess. The “cover (with tests) then modify” approach we’ll discuss in this chapter is a truly nondestructive path to modular code.
5.1. The code of an online loan institute
The code we’ll visit in this chapter is part of a big, back-office system used by a loan institute. Once again, we’re facing software that needs to change, but this time the change was initiated by the market and the customers instead of by the developers.
To date, customers have had to apply for a loan at the bank with the assistance of the staff. The idea that has gained some traction lately is that customers could enter information about themselves and their desired loans in web forms and post them. Then staff could process the applications, make risk assessments, and approve and pay out the money if everything seemed to be in order.
The back-end web service already supports most of this, but the “approve” functionality is bundled together with the rest of the application logic. In order to make this workflow safe for customers and the bank, the approve logic needs to be separated so that customers can’t approve their own loans, which would be bad for business. The idea is to set up two separate servers: one to handle applications, and the other to handle approvals. The loan application server is made accessible from the internet, and a web form is built for customers. The approval server is kept safe behind a firewall on the bank intranet. This makes it a lot harder for customers to approve their own applications, and bank officials can process the applications using a web form.
Before we start restructuring this piece of code, we’ll show you how the system works and also peek quickly at the design. We always start by looking around in the code we’re about to change, and we recommend you do that too, unless you’re already very familiar with the code you’ll be working with. This needn’t take a long time—5 to 15 minutes is usually enough. Let’s do that now, looking first at the API, then at the architecture, and finally at the actual code.
5.1.1. The existing functionality
At the moment, there’s only one entry point to the server, from which all the calls are then dispatched using an action parameter. There are three actions that can be performed:
· Apply
· Fetch
· Approve
Each of these actions needs one or more parameters to function.
Apply
The apply action needs two additional parameters: amount and contact. The first is the desired loan amount, and the second is an email address that can be used to contact the borrower. Here’s an example of a loan application sent via an HTTP request:
http://localhost:8080/?action=apply&amount=10000&
contact=donald@ducks.burg
All HTTP requests sent to the server return a JSON (JavaScript Object Notation) string, and so does apply. If an application is successful, a ticket with an identifier is returned, which is used to retrieve information about the application. The JSON response to the previous apply call above would look like the following if it was the second loan application and it was successful (note the id):
{
"id":2
}
JSON
JSON (JavaScript Object Notation) is a lightweight data interchange format commonly used with web apps. Computers can parse and generate JSON with ease, but it’s also easy for humans to read and write.
Fetch
After an application request has been made, or if a bank official needs to retrieve information about an application, fetch is used. When fetch is used, the id parameter from the apply call is used as an identifier to retrieve information. Here’s an example that fetches a previously made application via an HTTP request:
http://localhost:8080/?action=fetch&id=2
When fetch is called, it retrieves the application and returns all of the information that’s available about it. The JSON response looks like this:
{
"applicationNo":2,
"amount":10000,
"approved":false,
"contact":"donald@ducks.burg"
}
Approve
After an application request has been made, and if everything seems to be in order, a bank official can approve the loan. This is done via the approve action, and once again the id from the apply response is used:
http://localhost:8080/?action=approve&id=2
The approve action returns the ticket id, just like apply does; in this case:
{id='2'}
In order to see the application’s actual state, fetch must be used. If the application was approved, it’ll look like this:
{
"applicationNo":2,
"amount":10000,
"approved":true,
"contact":"donald@ducks.burg"
}
5.1.2. The architecture and the code
The code of this server (the apply, fetch, and approve services) is organized in six classes: LoanServer, LoanHandler, LoanApplication, LoanRepository, Ticket, and ApplicationException. The latter is used whenever an error occurs and isn’t included in the architecture diagram in figure 5.1.
Figure 5.1. The LoanServer creates a LoanHandler, which creates a LoanApplication, which is passed to the LoanRepository, which returns a Ticket for the loan application.

The LoanServer class is the entry point of the server. It contains the server setup and launches the service at port 8080. When start is called, all incoming requests are handled by one dispatching class: the LoanHandler. The call to join just makes the main thread wait for the server thread to finish:
public class LoanServer {
public static void main(String[] args) throws Exception {
Server server = new Server(8080);
server.setHandler(new LoanHandler());
server.start();
server.join();
}
}
In the example, we use parts of the Java Servlet API. If you don’t know about that, you should be able to follow along nicely anyway. What you need to watch for is how we structure, move, and change the code rather than how we use the Servlet API. If you’re more used to dynamically typed languages, then appendix C is for you.
The LoanServer uses a LoanRepository to store and fetch LoanApplications. Whenever an application is made, a new LoanApplication object is created and stored so it can be retrieved later. If an application is successfully stored, a Ticket is returned. The id of the ticket can be used to fetch information about loan applications.
Listing 5.1. The handle method in LoanHandler.java
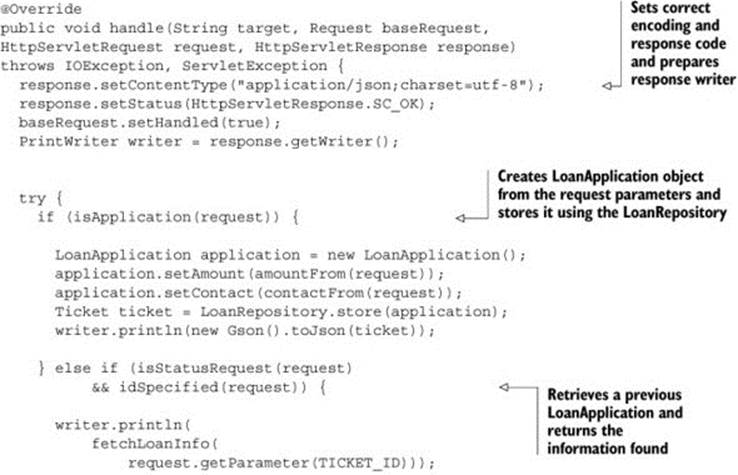

In addition to the handle method, LoanHandler.java contains several helper methods, most of them one-liners that are self-explanatory. Some of them use a LoanRepository to store loan applications, and some use information from the request. The most complicated method isgetNextId(), whose job is to come up with the next ticket and application ID.
Listing 5.2. Helper methods in LoanHandler.java
private String contactFrom(HttpServletRequest request) {
return request.getParameter("contact");
}
private long amountFrom(HttpServletRequest request) {
return Long.parseLong(request.getParameter("amount"));
}
private String approveLoan(String parameter) {
return new Gson().toJson(LoanRepository.approve(parameter));
}
private boolean isApproval(HttpServletRequest request) {
return APPROVE.equals(request.getParameter("action"));
}
private boolean idSpecified(HttpServletRequest request) {
return request.getParameter(TICKET_ID) != null &&
validId(request) >= 0;
}
private long validId(HttpServletRequest request) {
String ticketId = request.getParameter(TICKET_ID);
try {
return Long.parseLong(ticketId);
} catch (NumberFormatException e) {
return -1L;
}
}
private boolean isStatusRequest(HttpServletRequest request) {
return FETCH.equals(request.getParameter("action"));
}
private boolean isApplication(HttpServletRequest request) {
return APPLICATION.equals(request.getParameter("action"));
}
private String fetchLoanInfo(String ticketId) {
LoanApplication formerApplication = LoanRepository.fetch(ticketId);
return new Gson().toJson(formerApplication);
}
public long getNextId() {
File file = new File(LoanRepository.REPOSITORY_ROOT);
File[] files = file.listFiles(new FileFilter() {
@Override
public boolean accept(File pathname) {
return pathname.getName().
endsWith(LoanRepository.FILE_EXTENSION);
}
});
return files == null ? 0 : files.length + 1;
}
Our goal was to learn a bit more about the system—how it works and what the architecture looks like—and then to look at the code. We’ve done that and we won’t linger any longer. The time has come to start changing code again.
5.2. Beheading the beast
Let’s behead this code beast and separate the approve logic from the apply logic and put them into separate classes. If you’re also thinking, “Let’s get a fresh piece of paper and write down the goal,” that’s good, because that’s exactly what we’re going to do.
5.2.1. Set a goal
When we use the Mikado Method, we always start with the end in mind—the goal. Let’s write that down now (see figure 5.2).
Figure 5.2. This is the Mikado Goal. When we’ve achieved this, we’re done.

Now we have the goal written down and we’re familiar with the code, so it’s time to start work. This time, however, we won’t try to achieve our goal directly. Instead, we’ll start by adding some tests. After our initial poking around in the code, we came to the conclusion that the best place we can safely start our testing is in the LoanHandler. If we start there, we won’t need to change anything before we cover the code with tests. We can just instantiate a LoanHandler and call the handle method. Sometimes we aren’t this lucky and need to modify code before we can test it. Testing can be sort of a catch-22; to safely change something, you want verifying tests, but to be able to add tests you need to change code. This time, however, we can add tests without modifying anything.
Adding tests will, however, be a fair amount of work, because the handle method takes no less than four arguments: a String, a Request, an HttpServletRequest, and an HttpServletResponse. There are several ways of controlling the input to this method, and we’ve decided to take the approach that we believe involves the least amount of work. We’ll pass null and three stubbed classes.
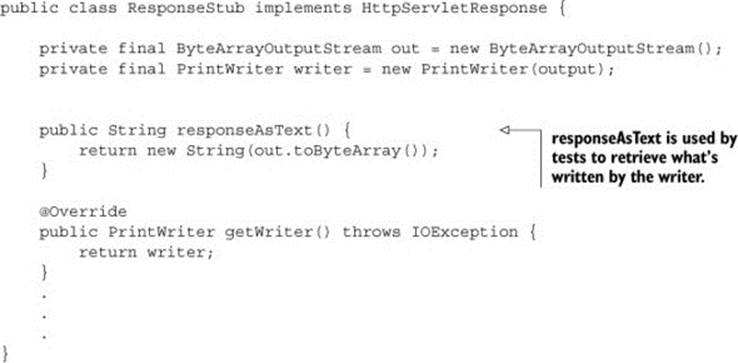
The StubbedResponse implements the HttpServletResponse, mostly with empty methods. To make things easier to test, we’ll also add a method to retrieve the response that’s written to the writer.
Listing 5.3. The stubbed response
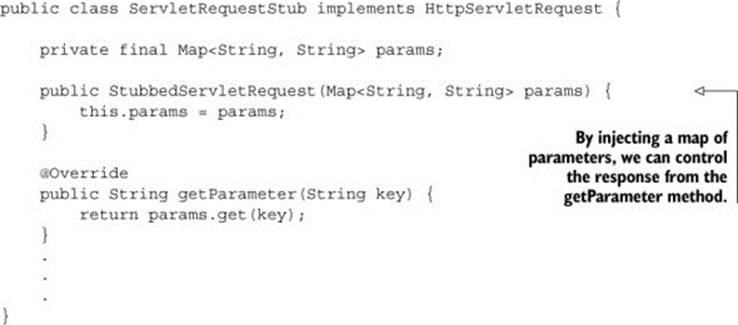
To be able to control how the StubbedHttpServletRequest behaves, we create a constructor that uses a Map of parameters’ responses. What’s injected in the constructor is later used by the getParameter method.
Listing 5.4. The stubbed HttpServletRequest
The RequestStub that we create extends Request, so we can override methods if we need to.
Listing 5.5. The stubbed Request
public class RequestStub extends Request {
}
Listing 5.6. The tests
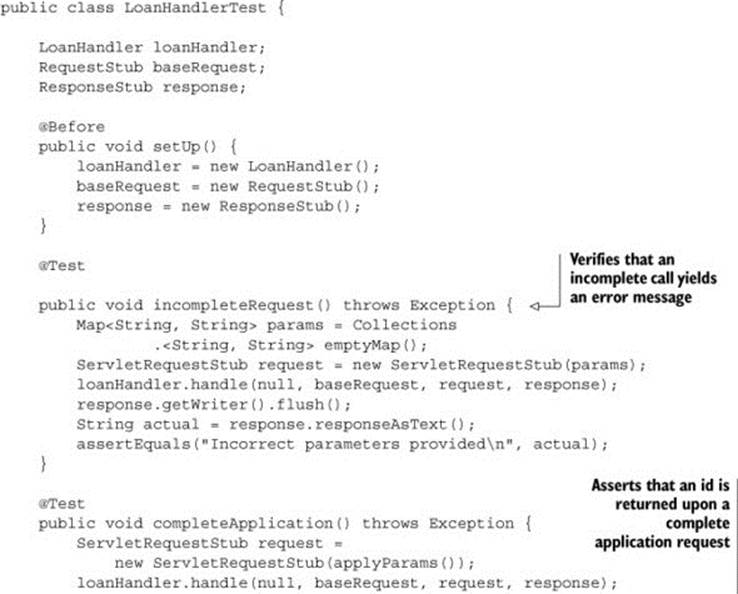
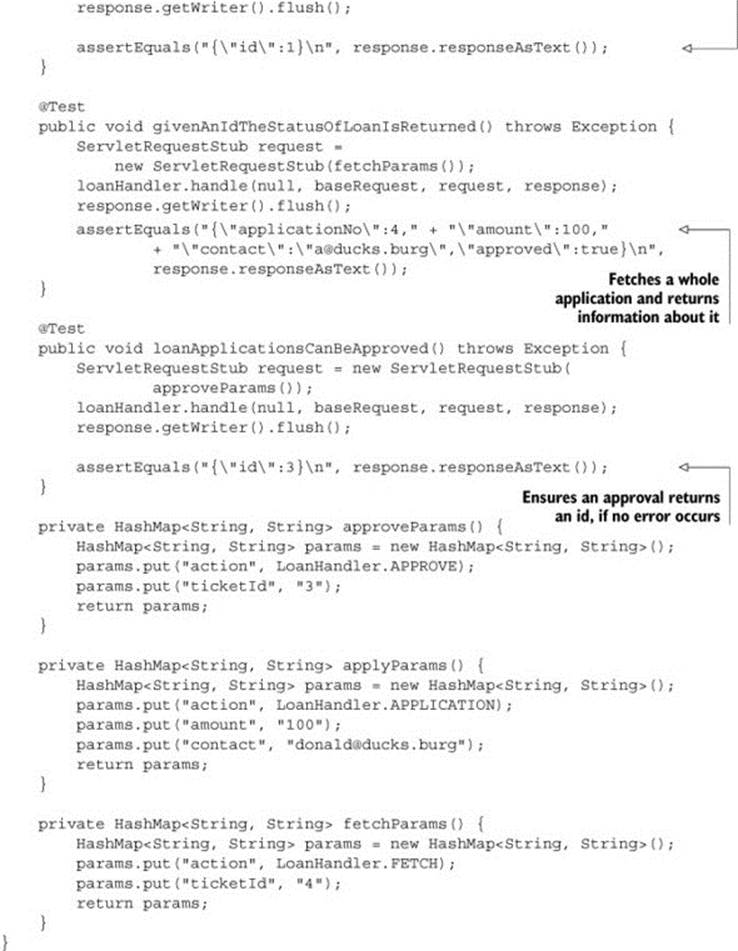
We covered this code with tests, but we realize as they run that the code is depending on the filesystem. The LoanRepository persists applications to a certain path, and we don’t have full control over that process. This makes it harder to test the Loan-Handler. Just like the example inchapter 2, this situation suggests that we need to take control of the repository before we continue splitting approvals and applications into separate servers.
5.2.2. Create an abstraction
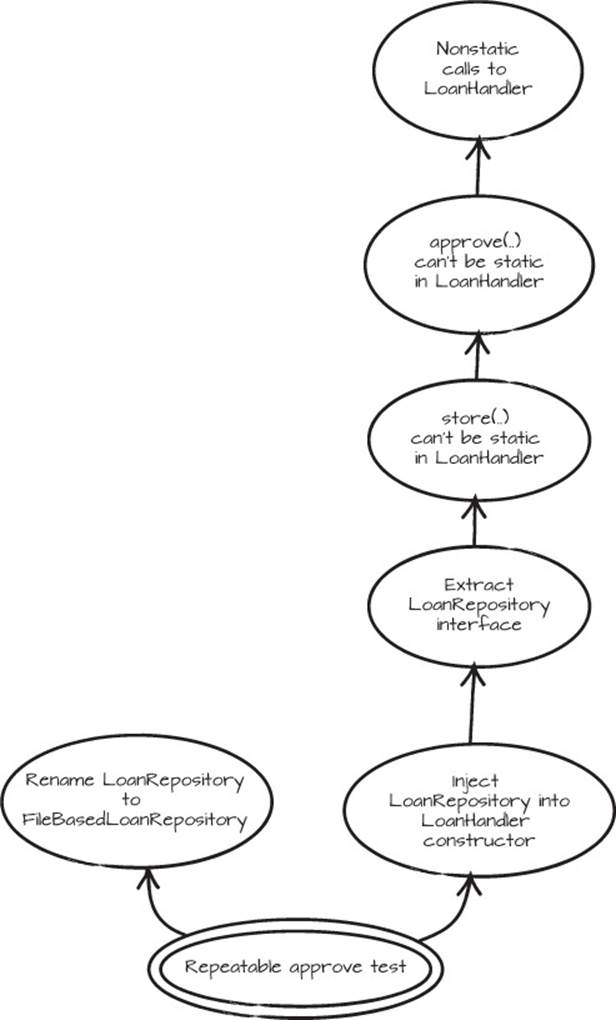
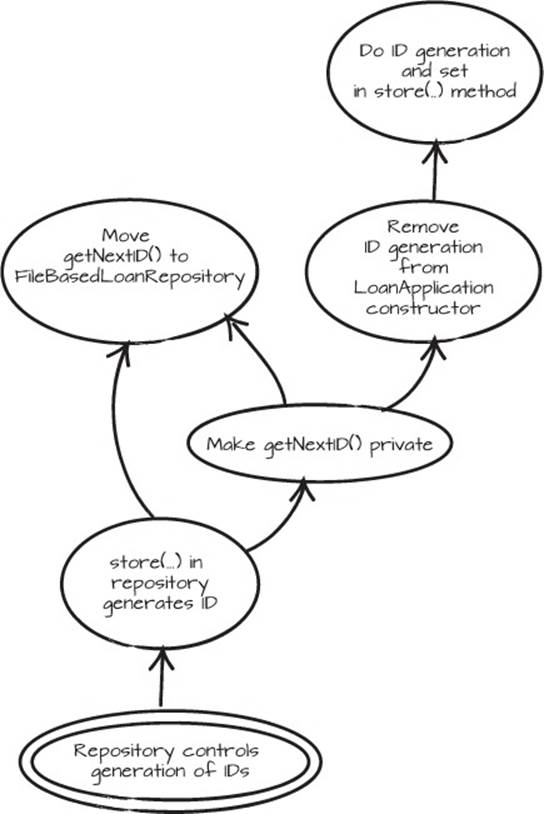
Our first decision is that the LoanRepository really should be named FileBasedLoan-Repository and that we should extract an interface named LoanRepository. We won’t dive into the details around that redesign; instead, we’ll just show you the graph of that change and the result. See figure 5.3.
Figure 5.3. Graph representing the first steps for encapsulating the LoanRepository
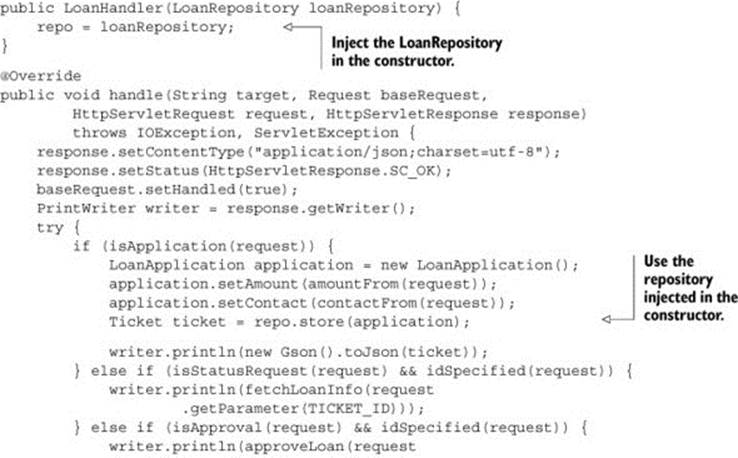
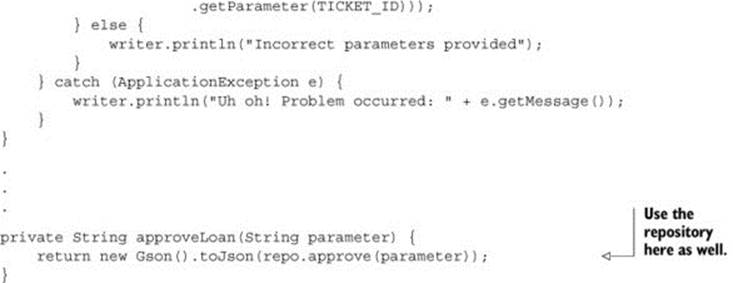
To be able to control the LoanRepository, we inject a LoanRepository into the LoanHandler constructor and assign it to the variable repo. That variable is used later in the handle method.
Listing 5.7. The slightly changed LoanHandler.java
With the LoanRepository abstraction in place, we can start taking advantage of that in our tests.
Listing 5.8. The slightly changed setUp() in LoanHandlerTest.java

5.2.3. More LoanRepository duties
Despite our efforts to encapsulate the LoanRepository responsibilities, we failed to notice that we aren’t quite done. Only after running the tests do we find that we don’t have full control over the generation of new applications. They get an ID based on the number of applications already on the filesystem. The ID comes from the LoanHandler:

We can’t allow IDs that are generated outside of the LoanRepository implementation, so before we go any further, we’ll change that. Once again, we present the graph (figure 5.4) and the resulting code, but not the whole process of getting there.
Figure 5.4. Graph representing the final steps to encapsulate the LoanRepository
5.2.4. Back to the business goal
After that slight detour, we’re now in a position to lean on the compiler, and we also have a safety net in the form of lightning-fast unit tests. This makes our task a lot easier, because fast feedback like that is a great foundation for quick and controlled experiments.
The major advantage of tests and the Naive Approach, compared to analyzing the code, is the comparatively shallow learning curve. By trying things, you learn more about the code and what the actual change is going to look like, instead of learning unnecessary details about your code. You also don’t need to worry about the cost of starting at the wrong end, or even worse—changing the wrong things.
With this in mind, we’ll simply try to create a new server. Here’s the ApproveServer with the new ApproveHandler:
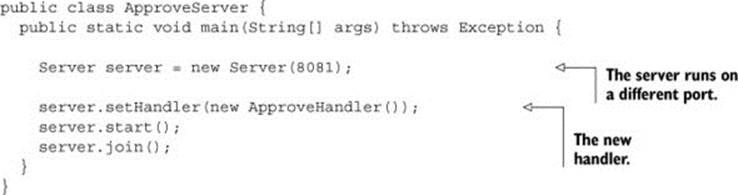
With the new server code in place, we discover that we need an ApproveHandler to handle the approvals (obviously). This is what we’re talking about: the Naive Approach in action. Just do it, and see where it leads.
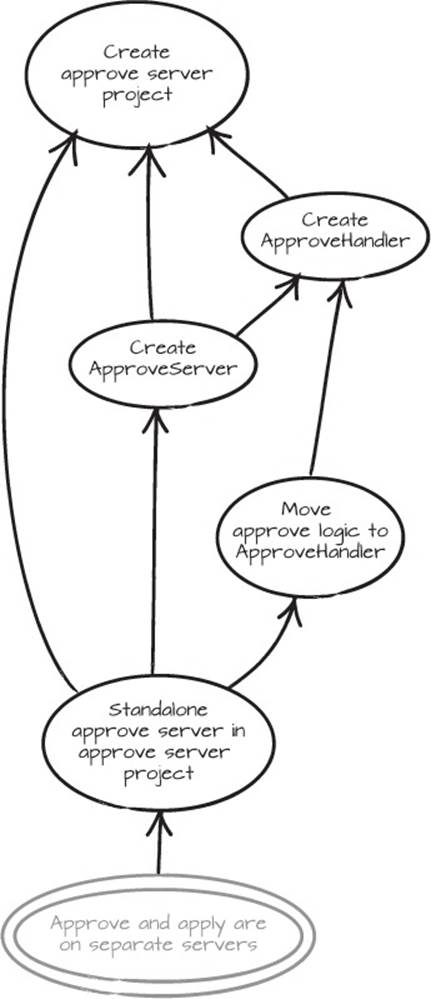
Because we want the approve code to be on a separate server, we decide to put it in a separate project as well. In Java land, putting things in a separate project usually means a separate .jar, .ear, or .war file; in .NET land it means a separate assembly. This new project has no dependencies on the existing project, and the existing project doesn’t depend on this new project. This is useful information that we want to hold on to.
5.2.5. Update the graph
Keeping information for later means updating the graph, rather than trying to remember it, so before we write any more code, we’ll add a circle to the Mikado Graph to record what we’ll do, in case we need to revert and start over.
We’re pretty confident that the Mikado Method is a bit more familiar to you now, so we’ll move along slightly slower than during the encapsulation of the LoanRepository but a bit faster than in Chapter 2. We’ll take notes without explaining every step in detail and generally focus on improving the code. You’ll also notice that as the code becomes more complex, so will the route to our goal.
In the graph in figure 5.5, we’ve added several new circles to remind us of the things we need to take care of.
Figure 5.5. To finish separating the different responsibilities, we need an approve server.
Now we can look at the graph to see what we need to do. ApproveHandler is an empty class at the moment, and the first real step toward separating the code is moving the approval logic from LoanHandler to ApproveHandler. The first code to be moved is the actual approval and the conditional surrounding it. We’ll assume that all third-party libraries are added to the new projects, such as Request, HttpServletRequest/Response, and so on.
Here’s the new ApproveHandler with compiler errors in bold:
public void handle(String target, Request baseRequest,
HttpServletRequest request, HttpServletResponse response)
throws IOException, ServletException {
if (isApproval(request) && idSpecified(request)) {
response.getWriter().println(
approveLoan(request.getParameter(TICKET_ID)));
}
}
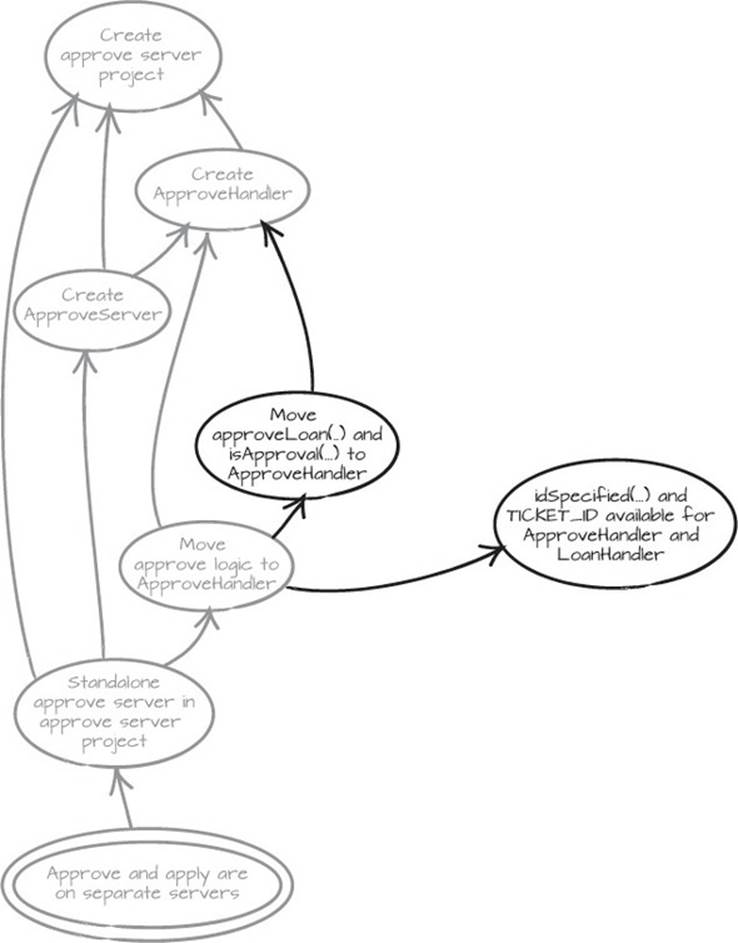
Adding the preceding code produces an ApproveHandler that contains compiler errors, because none of the methods isApproval, idSpecified, and approveLoan, nor the constant TICKET_ID exist in our new class. When we try to remedy the error by moving them toApproveHandler, we get compiler errors in LoanHandler instead. We find that we need to move isApproval and approveLoan to Approve-Handler, and make idSpecified and TICKET_ID available for both LoanHandler and ApproveHandler.
Remember, compiler warnings and other errors are exactly what we want. They contain lots of useful information. We note that isApproval, idSpecified, approve-Loan, and TICKET_ID need to be moved, and then we revert again. This gives us a clean slate to work with and a diagram that looks like figure 5.6.
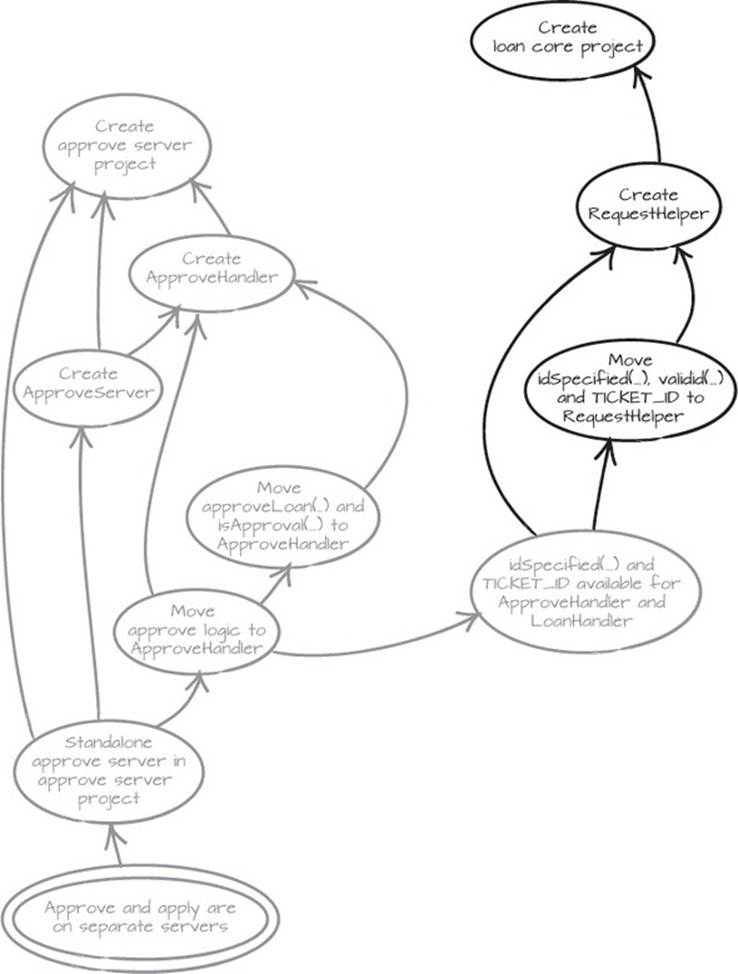
Figure 5.6. We need to move isApproval and approveLoan to ApproveHandler, and make idSpecified and TICKET_ID available for both LoanHandler and ApproveHandler.
5.2.6. Revert and restart from a clean slate
Reverting and working with compiling code, and successful tests if you have any, is one of the hallmarks of the Mikado Method. You should always try to start from a known state.
In this case, we have one new leaf in the graph: “idSpecified and TICKET_ID available for ApproveHandler and LoanHandler.” That node is a decision node—a node that doesn’t say how to do something, but only what you need to accomplish. This is a great tactic when you’re not quite sure how to solve the problem, and you want to defer that commitment. Decision nodes will you help keep your mind and your options open.
Decision nodes
Special nodes (like goals, decision nodes, and any other node that has a special meaning) could possibly have a special notation. The only node we’ve given a special notation is the goal. Whether or not the others need a special notation is up to you to decide.
In this case, we have a method and a constant that we want to use in two different projects, so placing them in a helper class seems appropriate. Because this is code we want to share, the new class, the RequestHelper class, should live in a shared project in order to be available for both handler projects. We decide to create the new class in a new project, the loan core project. Then we move idSpecified and TICKET_ID to RequestHelper, but this causes compiler errors—the validId method also needs to move to RequestHelper. As usual, we jot down what we’ve learned in the Mikado Graph before we revert (the new nodes are the darker ones). See figure 5.7.
Figure 5.7. idSpecified and TICKET_ID are shared, so we put them in a new RequestHelper class in the new loan core project. idValid also has to move to the new class.
The RequestHelper now looks like the following listing.
Listing 5.9. Contents of the RequestHelper class
public static final String TICKET_ID = "ticketId";
static boolean idSpecified(HttpServletRequest request) {
return request.getParameter(RequestHelper.TICKET_ID) != null
&& RequestHelper.validId(request) >= 0;
}
static long validId(HttpServletRequest request) {
String ticketId = request.getParameter(RequestHelper.TICKET_ID);
try {
return Long.parseLong(ticketId);
} catch (NumberFormatException e) {
return -1L;
}
}
We’ve just moved idSpecified and validId to the new RequestHelper, and the code looks fine. Because we reverted earlier, we need to recreate the approve project and the ApproveHandler before we can get to “Move approveLoan and isApproval to ApproveHandler,” which is the next unexplored node. You might think it’s unnecessary work to re-create these things, and you’re partially right. Sometimes you can get away with stashing away your changes as a patch in your versioning system, and later reapplying them. Sometimes it’s easier to just redo the changes, because the code your stashed code relies on might have changed.
Stashing, shelving, creating a patch
Many VCSs have a function that allows an edited state to be saved, giving you the option to later reapply the change to the code. This functionality goes by different names, such as stashing, shelving, or creating a patch. In the Mikado Method, you can create such a saved state with the changes that broke the system, and then when the prerequisites are in place you can reapply the change. Sometimes this works, but sometimes the codebase has changed enough that the base of the saved state doesn’t exist anymore, and the patch fails.
When we move approveLoan, we get another error (yay!). The error hints that we also need to move the LoanRepository to the new loan core project. We do a quick revert, move isApproval, and get a new error that tells us we also need to move the APPROVE constant to the newApproveHandler. Time to add some more nodes to the graph and revert again (see figure 5.8).
Figure 5.8. When we move approveLoan, we see that LoanRepository needs to be in the loan core project. When isApproval is moved, we see that we need to move the APPROVE constant.
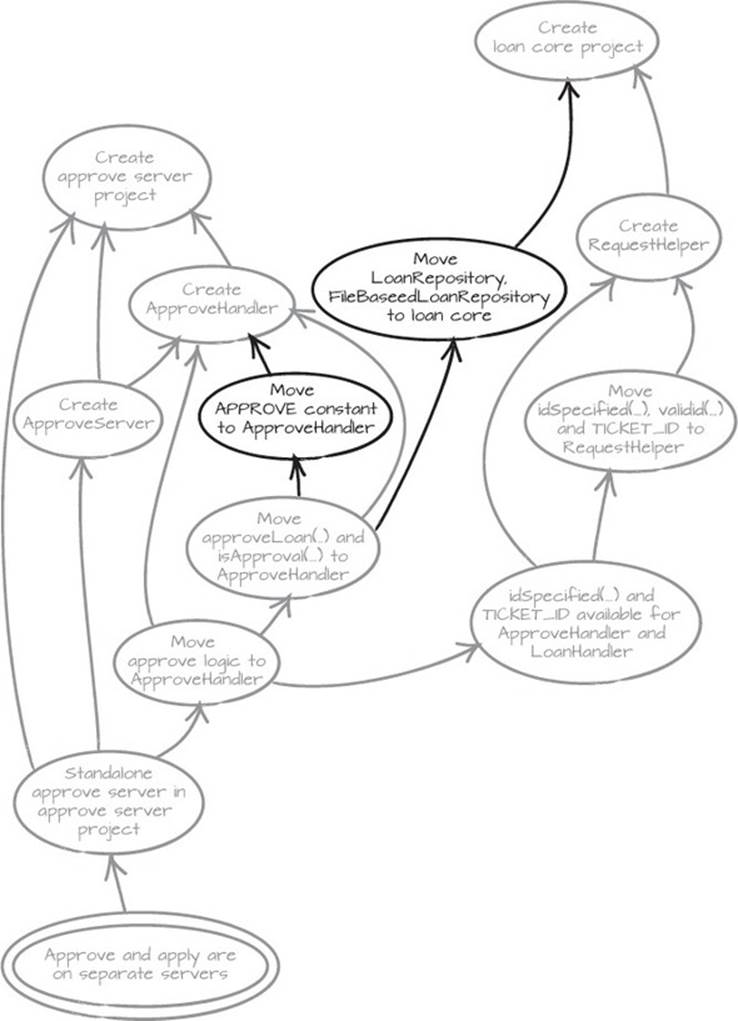
After our revert, we have a clean slate again. Does that mean we’re back where we started? No. We know a lot more about the system and the changes we need to make. Looking at the graph, we can see that the unexplored node is “Move LoanRepository to loan core,” but first we need to re-create the loan core project. We’re working with a clean slate, remember?
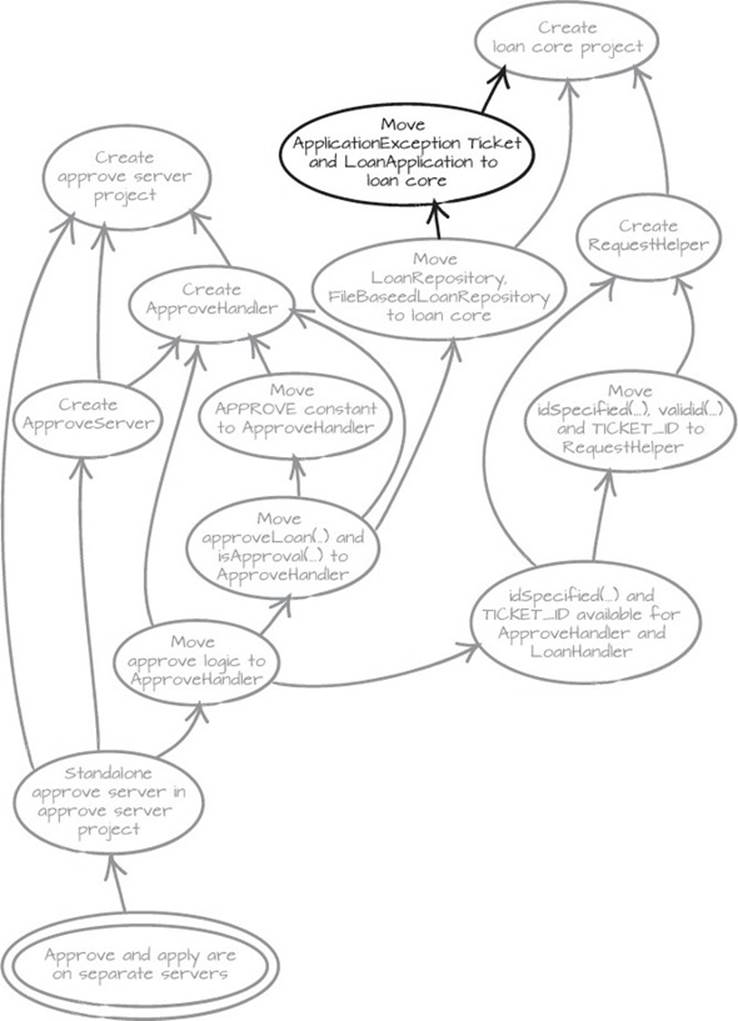
When we try to move LoanRepository, all hell breaks loose and nothing seems to compile anymore. Apparently that wasn’t a leaf either. More likely, all hell breaking loose is a sign that we’ve come across a central concept. After a quick look around, it seems like the repository is coupled to LoanApplication, Ticket, and ApplicationException. Once again, we make use of the VCS and revert. When we see the code compile, we start by moving Ticket, LoanApplication, and ApplicationException, and then Loan-Repository, to the loan core project. This is also noted in our graph, shown in figure 5.9.
Figure 5.9. The LoanRepository and its companions Ticket, LoanApplication, and ApplicationException need to be in the loan core project.
This restructuring is starting to feel almost too safe, on the verge of boring. This is exactly the point of the Mikado Method. It takes code changes that might range from “tricky” to “nightmare” and turns them into a rather dull sequence of making a change, finding the problems, appending solutions to the graph, and reverting.
But are we ever going to get to a point where we can actually do something? Of course.
5.3. Getting to the true leaves of the graph
In every Mikado restructuring journey, there comes a time when things fall into place, and you can actually implement changes instead of just updating the graph and reverting. The transition isn’t always easy to spot; you rarely know when it happens until after the fact.
When you reach the peak and travel over the hump, the nature of the work shifts from exploration to repetition. When this happens, you may wish you’d stored the changes somehow, so you don’t have to redo them. We’ve felt this as well and we’ve experimented some with different version-control techniques, but so far it’s been easier to stick to the “revert and redo later” technique. We’re sure, however, that someone will eventually come up with a clever trick for an existing VCS or will invent something that makes it easier to apply old changes.
In our example, we’re just about to make this transition and switch from exploration to repetition. In other words, we won’t be doing much more to the graph but adding check marks.
5.3.1. The first steps on the way back
We glance at our graph and see that once we’ve created the loan core project, a new leaf is revealed. We go after our new leaf: “Move LoanApplication, Ticket, and ApplicationException” and try to move the code. To our great satisfaction, it works! The next no-brainer is to moveLoanRepository, and that also works.
We take another look at the graph and spot our next step, “Create RequestHelper.” It looks like a leaf, so we declare that the next natural step. It works, and so does moving idSpecified, idValid, and TICKET_ID from LoanHandler to RequestHelper. That means we’ve also fulfilled the decision node to make those available to both ApproveHandler and LoanHandler. From the look of the graph, we’re humming along nicely (see figure 5.10), and our loan core project has formed and taken shape. We’re not facing any resistance from the code as we make our changes.
Figure 5.10. Partially checked-off graph
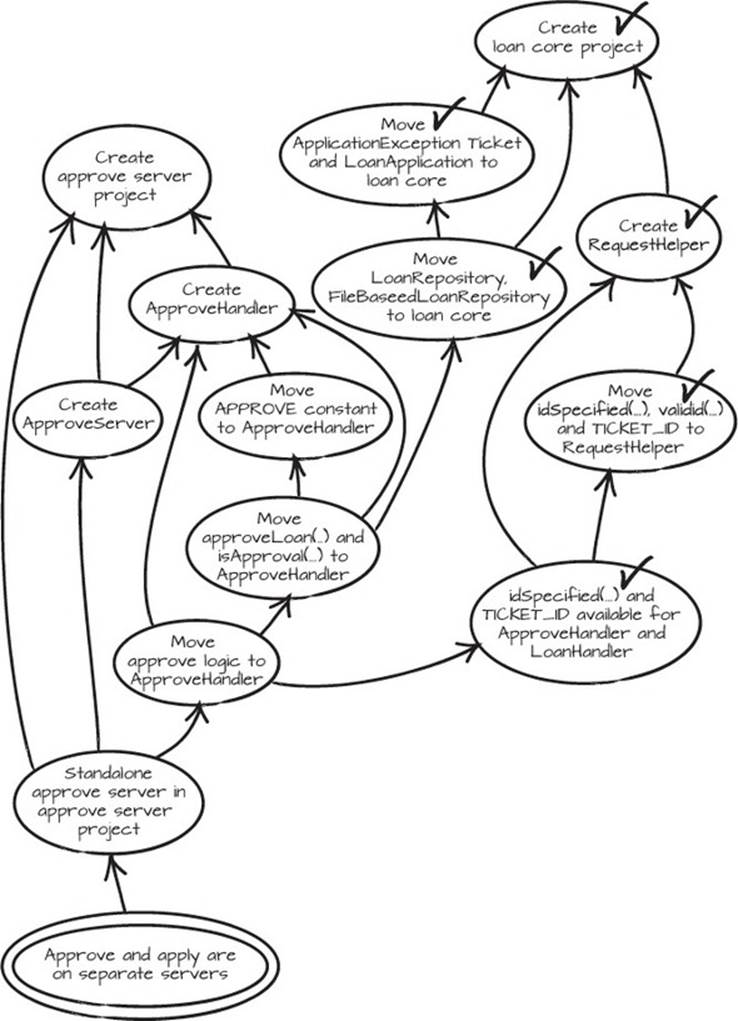
Now that we have the loan core project in place, it’s time to move the approval code to the approve project. We start by creating the new approve project, creating the empty ApproveHandler in that project, and then creating the ApproveServer. We make this project depend on the loan core project, to get the shared code in there. Then we move the APPROVE constant and the approveLoan and isApproval methods to the new ApproveHandler. As we move the approve logic to the new handler, the ApproveServer is indeed implemented. Figure 5.11 proves it—we’re done!
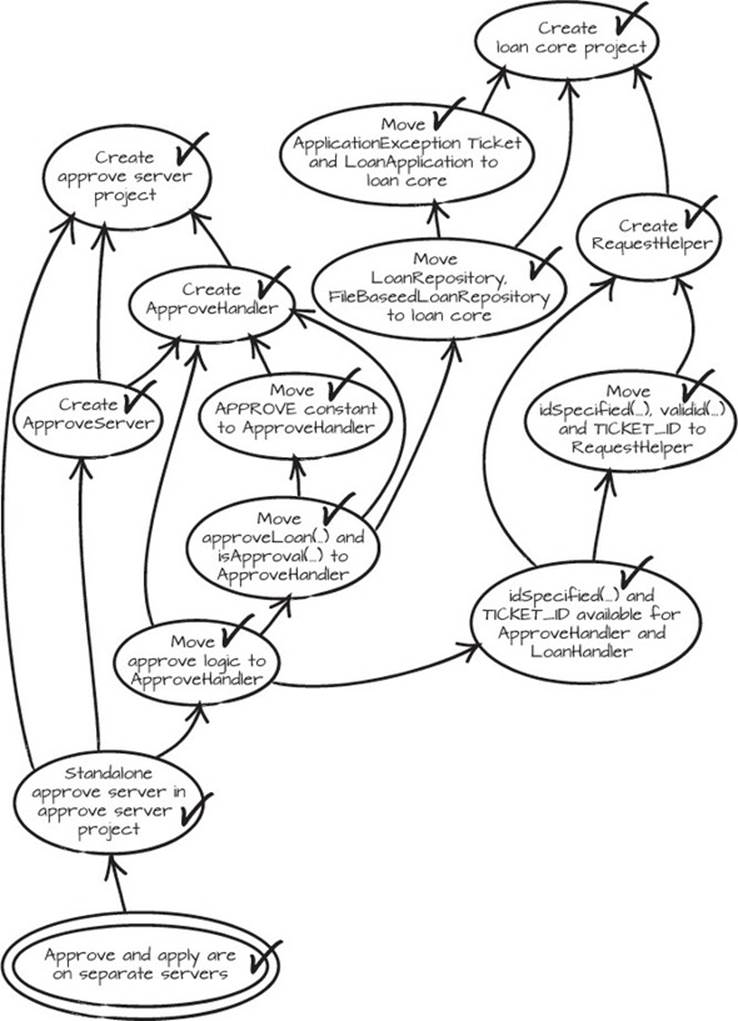
Figure 5.11. All nodes checked!
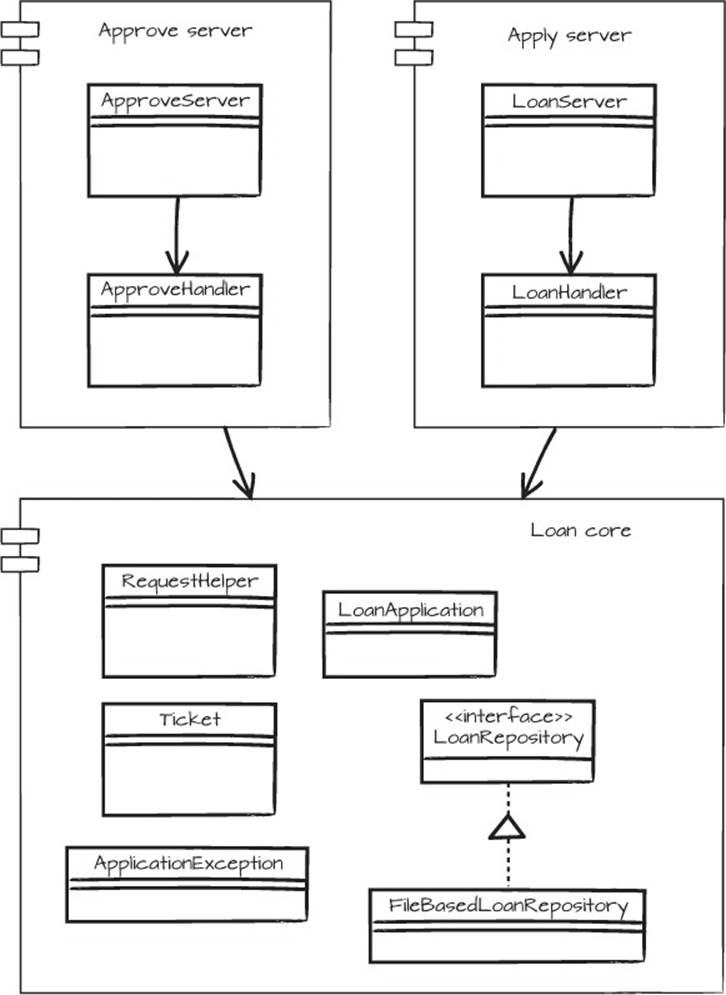
The resulting UML diagram is shown in figure 5.12.
Figure 5.12. The result of restructuring the code. At the top are the server parts, and at the bottom is the shared loan core project.
If you’re observant, you’re probably now asking, “What about the tests?” Yes, that’s right, the code doesn’t really work. We need to move the stubs and MemoryRepository to the loan core project as well. After that, the test that verifies the approve functionality,loanApplicationsCanBeApproved(), should be extracted from LoanHandlerTest and inserted in ApproveHandlerTest in the approval project. Only then are we truly finished.
The final version of the more interesting classes can be found in listings 5.10, 5.11, 5.12, and 5.13.
Listing 5.10. Contents of the ApproveHandler class
package org.mikadomethod.approveserver;
import ...
...
public class ApproveHandler extends AbstractHandler {
public static final String APPROVE = "approve";
private final LoanRepository repo;
public ApproveHandler(LoanRepository loanRepository) {
this.repo = loanRepository;
}
@Override
public void handle(String target, Request baseRequest,
HttpServletRequest request, HttpServletResponse response)
throws IOException, ServletException {
response.setContentType("application/json;charset=utf-8");
response.setStatus(HttpServletResponse.SC_OK);
baseRequest.setHandled(true);
PrintWriter writer = response.getWriter();
if (isApproval(request) &&
RequestHelper.idSpecified(request)) {
writer.println(approveLoan(
request.getParameter(RequestHelper.TICKET_ID)));
} else {
writer.println("Incorrect parameters provided");
}
}
private String approveLoan(String parameter) {
return new Gson().toJson(repo.approve(parameter));
}
private boolean isApproval(HttpServletRequest request) {
return APPROVE.equals(request.getParameter("action"));
}
}
Listing 5.11. Contents of the LoanHandler class
package org.mikadomethod.loanserver;
import ...
...
public class LoanHandler extends AbstractHandler {
public static final String APPLICATION = "apply";
public static final String FETCH = "fetch";
private final LoanRepository repo;
public LoanHandler(LoanRepository loanRepository) {
repo = loanRepository;
}
@Override
public void handle(String target, Request baseRequest,
HttpServletRequest request, HttpServletResponse response)
throws IOException, ServletException {
response.setContentType("application/json;charset=utf-8");
response.setStatus(HttpServletResponse.SC_OK);
baseRequest.setHandled(true);
PrintWriter writer = response.getWriter();
try {
if (isApplication(request)) {
LoanApplication application = new LoanApplication();
application.setAmount(amountFrom(request));
application.setContact(contactFrom(request));
Ticket ticket = repo.store(application);
writer.println(new Gson().toJson(ticket));
} else if (isStatusRequest(request) &&
RequestHelper.idSpecified(request)) {
writer.println(fetchLoanInfo(
request.getParameter(RequestHelper.TICKET_ID)));
} else {
writer.println("Incorrect parameters provided");
}
} catch (ApplicationException e) {
writer.println("Uh oh! Problem occurred: "+e.getMessage());
}
}
private String contactFrom(HttpServletRequest request) {
return request.getParameter("contact");
}
private long amountFrom(HttpServletRequest request) {
return Long.parseLong(request.getParameter("amount"));
}
private boolean isStatusRequest(HttpServletRequest request) {
return FETCH.equals(request.getParameter("action"));
}
private boolean isApplication(HttpServletRequest request) {
return APPLICATION.equals(request.getParameter("action"));
}
private String fetchLoanInfo(String ticketId) {
LoanApplication formerApplication = repo.fetch(ticketId);
return new Gson().toJson(formerApplication);
}
}
Listing 5.12. Contents of the LoanRepository interface
package org.mikadomethod.loanserver;
public interface LoanRepository {
LoanApplication fetch(String ticketId);
Ticket store(LoanApplication application);
Ticket approve(String ticketId);
}
Listing 5.13. Contents of the ApproveHandlerTest class
package org.mikadomethod.approveserver;
import ...
...
public class ApproveHandlerTest {
ApproveHandler approveHandler;
RequestStub baseRequest;
ResponseStub response;
private MemoryLoanRepository loanRepository;
@Before
public void setUp() {
loanRepository = new MemoryLoanRepository();
approveHandler = new ApproveHandler(loanRepository);
baseRequest = new RequestStub();
response = new ResponseStub();
}
@Test
public void loanApplicationsCanBeApproved() throws Exception {
LoanApplication loanApplication = new LoanApplication();
loanApplication.setAmount(100);
loanRepository.store(loanApplication);
ServletRequestStub request = new ServletRequestStub(
approveParams());
approveHandler.handle(null, baseRequest, request, response);
response.getWriter().flush();
assertEquals("{\"id\":1}\n", response.responseAsText());
}
private HashMap<String, String> approveParams() {
HashMap<String, String> params =
new HashMap<String, String>();
params.put("action", ApproveHandler.APPROVE);
params.put("ticketId", "1");
return params;
}
}
5.3.2. Side effect–free programming
You just saw us spend a lot of energy figuring out how to navigate the dependencies of an application in order to make a change. When you use the Mikado Method, dealing with dependencies is mainly what you’ll do, and you’ll start to see them everywhere. After a while you’ll start to think, “Isn’t there a way to avoid all these dependencies?”
No, you can’t avoid dependencies, and there will always be a need to restructure code. You can’t disregard the importance of how you structure your code, but you can structure it differently.
We’ve found that code with few or no side effects is much easier to restructure and move around. Mutable state creates dependencies that aren’t directly seen in a dependency graph, but that are temporal and depend on the order of execution at runtime. In a multithreaded environment, this gets even more complicated, and even the best test suite might not be able to alert you about errors caused when you change code. This complicates the exploratory nature of the Naive Approach because finding errors can be much more difficult than locating functional errors or compilation problems.
When you stumble across code that has mutable state, you need to change your strategy and try to make the methods pure and the data objects immutable. This can feel wasteful and will probably mean you need to take the restructuring on a small detour. But when you think it’s a detour, remember this: it’s well worth the effort.
Keeping functions pure and having immutable objects make code easier to move around, which reduces the pain substantially when you refactor and restructure it. Hence, the more side effect–free code you have, the smoother your current and future refactorings will be.
5.4. Summary
In this chapter, you saw that a restructuring done the Mikado way is a long sequence of making an edit, finding problems, updating the graph with desired solutions, and then reverting. This goes on until you can actually implement something, and then the scene changes. From then on, it’s a rather straightforward chore of implementing leaf after leaf until you reach the goal. Sometimes the two phases are more interleaved and mixed, but the general idea is the same.
You’ve also seen that you can approach a change a bit differently by covering your code with tests before changing it. Adding tests is sometimes necessary in order to give you the extra courage it takes to tackle extra-difficult code. This can feel like a detour, but it saves you time in the long run.
We’ve looked at a lot of code, so now let’s become a bit more general and look at how we can abstract what we’ve learned so far. In the next chapter, we’ll look at how design principles can help us while we change difficult code.
Try this
· Try to restructure your code with automated refactorings only.
· Look for a place to add tests without changing the code. Reflect over how that’s different from being allowed to change code to add tests.
· Try changing a piece of code in different ways, with the same goal in mind. What happens to your graph when you do that?