The Mikado Method (2014)
Part 2. Principles and patterns for improving software
Chapter 6. Emergent design
This chapter covers
· Emergent design that’s robust in the face of change
· Redesigning classes
· Morphing the code to a good package structure
· How to let the Mikado Method guide you in a redesign
We deliberately started describing and explaining the Mikado Method from the practical end of things, letting you get your hands dirty and actually change code. We did this because we know how easy it is to get stuck analyzing things and going nowhere.
The Mikado Method is all about changing code, but you don’t want to change the same code over and over again. The trick is to pull the code toward a state where changes don’t create ripple effects, forcing other changes. If you think back, you can probably identify several situations where you’ve tried a lot of things and felt like you were going in circles, or when you reached the goal but didn’t feel that you improved the system very much. If so, you know that just trying random things to reach your goal isn’t enough. You also need a direction.
In previous chapters, we showed you how to get on top of a restructuring by starting with a clear goal and then systematically trying to change code and reverting. What we didn’t tell you was that we also applied several design principles. These design principles are always on our minds when we use the Mikado Method. They give us guidance and direction regarding how and why we move things around, pull things apart, or merge things. The design principles we’ll talk about have been created by different people in software development, but they’re very well and holistically described in the book Agile Software Development, Principles, Patterns, and Practices by Robert C. Martin (Prentice Hall, 2002).
We’ll take a look at these principles from the perspective of the Mikado Method, at the problems that arise when developing, and at the decisions you need to make as you change your code. By the end of the chapter, you’ll be able to let your new and better design emerge as you restructure your application with the Mikado Method.
6.1. Designing classes
When we use the Mikado Method, we use design principles to guide us regarding what methods to put in what classes, what abstractions to create, and what dependencies between classes we should pursue. Instead of just rambling on about the principles in this section, we’ll discuss them in the context of problems that often arise when we use the Mikado Method, and we’ll look at how design principles can help solve those problems.
6.1.1. Code that does too many things
Problem
When you design a software program from scratch, you can control reasonably well what goes into a class or a function. But if you’re not careful, changes upon changes combined with bad judgment can add up and make the code bloated, with each method or class doing too many things. It’s very common to come across code like this when restructuring with the Mikado Method. Usually, there’s a piece of functionality in the bloated part that you want to reuse, and you need to move it to a method or a class where reuse is possible.
Take a look at the Login class in the following listing, where the login method is handling too many responsibilities.
Listing 6.1. A piece of code that does too much
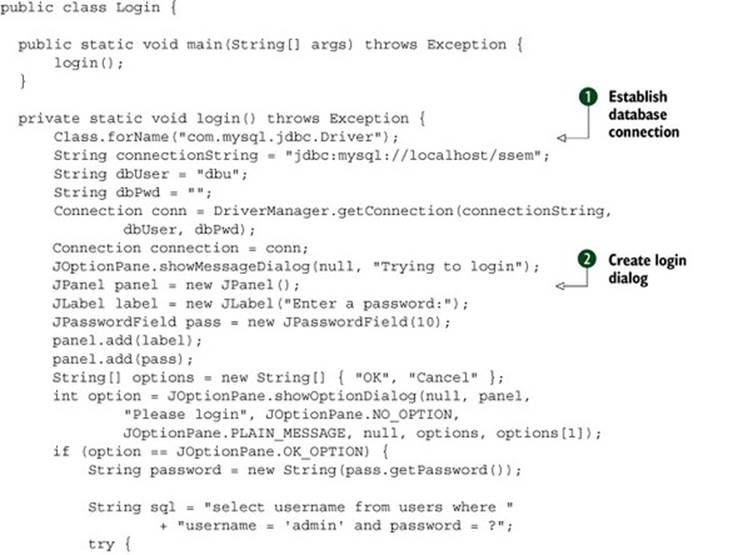
This code does a handful of things. It establishes a database connection ![]() , creates a login dialog
, creates a login dialog ![]() , verifies user credentials
, verifies user credentials ![]() , creates an application
, creates an application ![]() , and does some error handling
, and does some error handling ![]() . When you see a long method or a big class, it’s often an indication that the method has several responsibilities.
. When you see a long method or a big class, it’s often an indication that the method has several responsibilities.
Solution
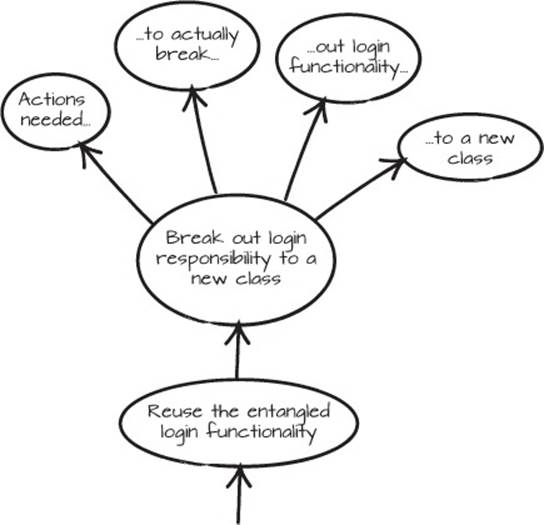
Possible ways to refactor this code include putting the database behind an interface, placing the GUI code in a separate package, moving the error handling to a more general solution, or just using the login functionality in more places. If you wanted to separate the login from the other logic, you’d create a graph that looks something like figure 6.1.
Figure 6.1. A typical Mikado graph for extracting a responsibility
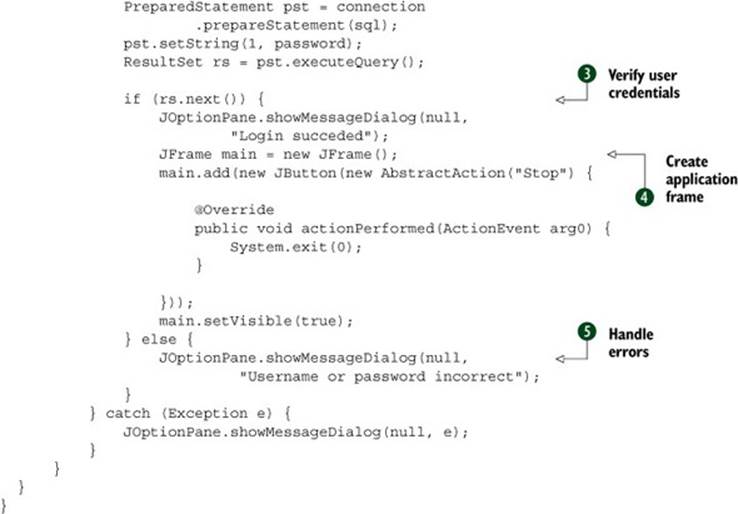
Depending on the time you have, you can either extract just the functionality you need or move out all the different responsibilities to new classes. A solution where all incidental responsibilities are moved to separate classes could look like the next listing.
Listing 6.2. Responsibilities distributed
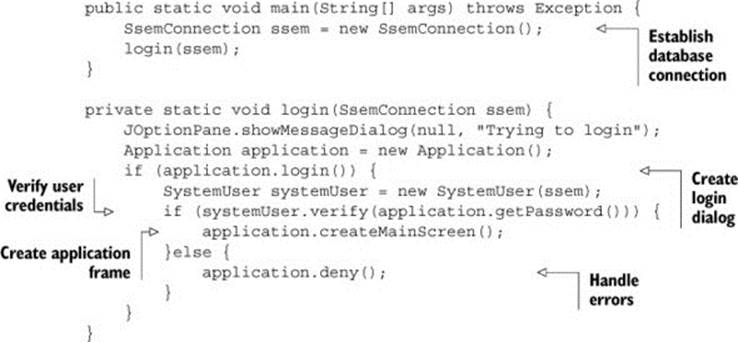
The restructured example in listing 6.2 does the same things as listing 6.1, with the main difference being that the responsibilities have been distributed in smaller classes with expressive names. Why is this a good idea?
Creating Seams in a Codebase
In Working Effectively With Legacy Code, Michael Feathers defines a seam as a place where you can alter a program’s behavior without editing in that place. Typically, a seam is a method call or function call where the callee can be changed without changing the caller. If your code lacks a seam where you need one, the usual solution is to extract a method containing the code you want to alter. Then you can either extend the class and override the method, or move the method to a separate class or interface, and provide the caller with the class or interface. Depending on your programming language, there might be other options such as passing a function or changing the extracted method at runtime.
The Single Responsibility Principle
In the previous example, we moved the different responsibilities to separate classes. The guiding principle in this case is the Single Responsibility Principle (SRP): “A class should have one, and only one, reason to change.” Separating responsibilities in your code has the following advantages:
· Makes it easier to read the code.
· Makes it easier to move code around.
· Code that isn’t changed is unlikely to suddenly break.
· Decreases the risk of creating unnecessary dependencies between the implementation details in the different responsibilities.
· Makes reuse more likely due to both the singled-out responsibility and the lower probability of implementation dependencies between responsibilities (see the previous point).
Determining just what a responsibility is can sometimes be a bit difficult. For example, should a User class validate the user name, or should that be extracted to a UserName class? If the user concept changes for other reasons than the user name concept, the answer is yes. But initially in an application, the User may have only a user name, and then at some point the user concept might be extended to mean more than just the user name, or the user name concept might be extended to include responsibilities that go beyond those of the user. Determining when that line is crossed in a complex codebase is the tricky part. As a rule of thumb, you can start by splitting out the code representing the responsibilities you are absolutely sure don’t belong where they currently reside. Later, when you find more evidence for code representing misplaced responsibilities, that code can be extracted as well.
What do Problems with SRP Look Like?
Problems with SRP are pretty easy to find. Just look for long methods—methods with more than 25 lines. Some would even say more than 10 lines. Whenever you find them, extract additional methods, and after a while you’ll have a class with several extracted methods. Maybe the new methods belong in a new class, or maybe they need to go into an existing one. If you pay attention and try to come up with descriptive names for the methods, the code will start talking to you and tell you where it needs to go.
6.1.2. Code that isn’t stable in the face of change
Problem
When you do the work of changing code with the Mikado Method, you don’t want to change the same code over and over again if you can avoid it at an affordable cost. Bearing that in mind, have a look at the following simplified card game application, and see if you can spot the problem.
Listing 6.3. What will happen if you add another game?
. . .
public static final int FIVE_CARD_POKER = 0;
public static final int INDIAN_POKER = 1;
. . .
public class CardGameEngine {
. . .
public void deal(Game game, User user, Dealer dealer) {
if(game.getType() == FIVE_CARD_POKER) {
user.setCards(dealer.deal(5));
} else if(game.getType() == INDIAN_POKER) {
user.setCards(dealer.deal(1));
} else {
// else what?
}
}
}
In the deal method, the two constants and the if-else statements are good indicators that something is wrong. For every new game that’s added, a new constant and a new conditional have to be added, in every part of the code where a variation of the behavior is needed. This type of codeisn’t stable in the face of change. Even worse, if other variations are needed, there will be a conditional mess that needs to be updated every time something changes. This type of programming is a common problem in legacy code. Granted, in procedural languages this how you do it, but in most languages there are other constructs that are much more appropriate.
Solution
The solution is to create structures and abstractions in the code that support adding new features without changing the existing code. A Mikado Graph for adding a whist game to the previous code would typically look like figure 6.2.
Figure 6.2. Adding the game of whist to the CardGameEngine
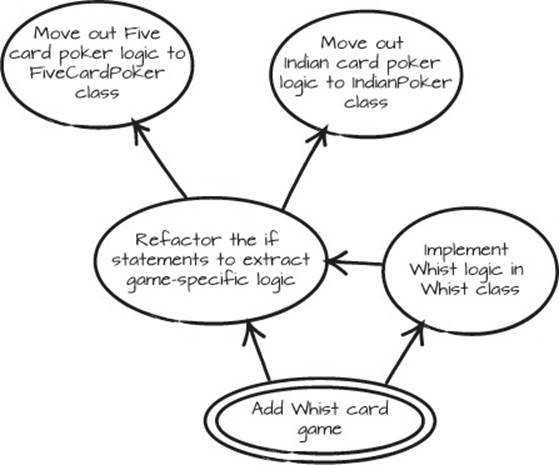
Whist
Whist is a classic, English, trick-taking card game that was played widely in the eighteenth and nineteenth centuries.
The refactored code before adding the whist game would look something like the following.
Listing 6.4. Refactored code
interface Game {
void deal(User user, Dealer dealer);
}
public class FiveCardPoker implements Game {
. . .
public void deal(User user, Dealer dealer) {
return user.setCards(dealer.nextCards(5));
}
}
public class IndianPoker implements Game {
. . .
public void deal(User user, Dealer dealer) {
return user.setCards(dealer.nextCards(1));
}
}
. . .
public class CardGameEngine {
. . .
public void deal(Game game, User user, Dealer dealer) {
game.deal(user, dealer);
}
. . .
}
The logic of these games is encapsulated behind the Game interface, in the different implementations of the interface. The CardGameEngine only knows how to connect the Game, the User, and the Dealer. It knows nothing about the specific games. Adding the Whist game would only involve creating a new implementation of the Game interface. The deal logic wouldn’t have to change in any of the existing classes. The code is stable in the face of (the anticipated) change.
Refactor before adding new functionality
Let’s say you wanted to add a new game, whist, to the first version of the code in listing 6.3. You could alter all the if statements across the codebase, but a better way is to first make the CardGameEngine stable in the face of change, and then add the new game. In our experience, the former approach is error-prone and time-consuming, and it makes the situation even worse because of the increased complexity of more conditionals. We find that first stabilizing the code and then adding the new game is less error-prone, and it yields faster results in general. This is a refactoring-in-advance step, where you first refactor the code and then implement the new logic.
With this approach, you’re not tempted to leave the code immediately after you’ve added the new if statements and skip the refactoring step entirely. It’s very important to complete the refactoring step to avoid building up complexity, and doing it first is good insurance.
At times when you can’t see any good abstraction or generalization of behavior in advance, you might have to wait until after the new functionality (a game, in this case) is implemented. These are usually cases where there isn’t too much complexity built up anyway, and another if statement won’t make the transformation significantly harder.
The code in listing 6.3 was improved by using a common refactoring called “Replace conditional with polymorphism” (a.k.a. “Replace conditional with strategy”), as described in Martin Fowler’s book Refactoring. In order to stabilize the code in listing 6.3, you need to extract the code in the blocks in the if statements into new methods, move those methods into classes that implement the Game interface, and then call them on the provided game, instead of having the conditional statement.
The Open-Closed Principle
The guiding principle when going from the code in listing 6.3 to the code in listing 6.4 is the Open-Closed Principle (OCP): “A class’s behavior should be extendable without having to modify it.” In its purest form, the OCP says that when you add a feature to a codebase, you shouldn’t have to alter any existing code; you should be able to just add new code.
As you can see in listing 6.4, by moving specific game behavior to the different implementations, the generic Game engine can be kept stable in the face of change. As a byproduct, it also becomes a whole lot cleaner.
In general, it’s hard to make all code OCP-compliant because it’s hard to know what changes the future will require. But you do want your code to allow you to add new features of the same type that you already have without modifying the existing code very much.
Avoid conditionals
The OCP effectively rules out programming variations using conditionals, such as if statements, because adding a new conditional is modifying existing code. Conditional-free code requires some effort and thinking, but it’s often worth it. Misused if statements are usually a big hurdle when it comes to improving large and unwieldy codebases, because they make the code harder to understand and follow. When you make changes to large codebases, strive to remove variations coded with conditionals if the code is on the critical path of your current change. The goal should be to push all conditionals to the edges of your applications.
6.1.3. Code that violates its contract
Problem
Another common scenario when restructuring code is that you find a class that implements the contract of an abstraction or a base class, but when you make assumptions based on this, you get runtime or compiler errors. This is likely because the contract of the abstraction is broken in some way.
There are several ways to break a contract, and a common example is the Square-Rectangle problem. For example, here’s a Rectangle class:
public class Rectangle {
public Rectangle(int height, int width) { . . . }
public void setHeight(int height) { . . . }
public int getHeight() { . . . }
public void setWidth(int width) { . . . }
public int getWidth() { . . . }
}
Then you find a use for a Square object, and want to add that. A square is a special case of a rectangle, so subclassing Rectangle might seem like a good idea. Here’s a Square that extends the Rectangle:
public class Square extends Rectangle {
public Square(int side) {
super(side, side);
}
public void setHeight(int height) {
super.setHeight(height);
super.setWidth(height);
}
public void setWidth(int width) {
super.setWidth(width);
super.setHeight(width);
}
}
The problem here is that the contract of the Rectangle says you can change the sides independently. If a method takes a Rectangle and then changes its height, it would expect the width to be unaltered—that’s part of the contract of the Rectangle. In the case of the square, the derived class is not substitutable for the base class because it breaks the contract of the base class.
Solution
Consider the difference between the inheritance approach of the previous Square class (where the Square is a Rectangle) with the following approach.
Listing 6.5. Composition approach for Square with a new interface
public interface TwoDimensionalObject {
int getWidth();
int getHeight();
}
public class Square implements TwoDimensionalObject {
private Rectangle internalRect;
public Square(int side) {
internalRect = new Rectangle(side, side);
}
public void setHeight(int height) {
internalRect.setHeight(height);
internalRect.setWidth(height);
}
public void setWidth(int width) {
internalRect.setWidth(width);
internalRect.setHeight(width);
}
public int getWidth() {
return internalRect.getWidth();
}
public int getHeight() {
return internalRect.getHeight();
}
}
In listing 6.6, you can see the Rectangle class that implements the TwoDimensionalObject interface. (Note that the interface only specifies the getter methods.) You already know that the Square and the Rectangle can’t have their dimensions altered in the same way, so the interface can’t have any dimension setter methods.
Listing 6.6. Rectangle should also implement the new interface
public class Rectangle implements TwoDimensionalObject {
public Rectangle(int height, int width) { . . . }
public void setHeight(int height) { . . . }
public int getHeight() { . . . }
public void setWidth(int width) { . . . }
public int getWidth() { . . . }
}
The code in these two examples is similar, but there’s one important difference: the inheritance. The APIs of the Square and the Rectangle are still the same, but in the first case the Square is a Rectangle, and in the latter case it uses a Rectangle. The new TwoDimensionalObjectinterface creates a new contract that doesn’t say anything about the relation between width and height, and this interface can be used across the application.
When you find such a problem, the related part of the Mikado Graph often has a node with something like “Square does not extend Rectangle,” or if you figured out how to implement it, “Square implements TwoDimensionalObject instead of Rectangle.” By just removingextends Rectangle from the code, the compiler, should you have one, will identify a lot of the places that you need to fix. For any runtime tricks, such as casting an object to another object, you’ll need an automated test suite or manual testing. Often you can’t just remove the existing inheritance, and instead you’ll need to replace it with interfaces and new base classes that are better suited to the way you use the abstraction, as in the Square-Rectangle case.
A refactoring trick
In cases where the inheritance is extensive and intertwined, a good trick is to first use the “Push down methods to subclass” refactoring. This refactoring duplicates the superclass’s methods in all its subclasses, creating their own implementations of all the methods needed. After this, it’s easier to remove the inheritance and replace it with an interface or a new base class. Sometimes inserting an empty class in the inheritance hierarchy can help you move methods to the right classes.
This problem isn’t always limited to the functionality inside the classes, but often extends to the consumers of the poor abstraction. A common telltale of bad abstractions is code like the following, where the type is checked at runtime, and different paths are taken based on the implementing type:
public class GraphicsManager {
...
public void handleObject(Rectangle rectangle) {
if(rectangle instanceof Square) {
Square square = (Square)rectangle;
...
} else {
...
}
}
...
}
There are several ways of breaking the contract:
· Using the wrong abstraction or extending an unsuitable class, which was the case with the Rectangle-Square example.
· Overriding a subclass method in a way that’s inconsistent with the protocol of the abstraction. This often happens in complex inheritance hierarchies.
· Having a method take a superclass as an argument, and then perform completely different actions depending on the implementing subclass, as in the preceding GraphicsManager.
The Liskov Substitution Principle
In the solutions in listings 6.7 and 6.6, you change the contract to better accommodate the properties you’re interested in. The guiding principle is the Liskov Substitution Principle (LSP): “Derived classes must be substitutable for their base classes.” In other words, it should be possible to use a subclass to an abstraction anywhere the abstraction is used. Adhering to the LSP makes programs easier to read, reason about, and change.
Inheritance and LSP go hand in hand, and whenever there’s a problem with an inheritance hierarchy, like in the Square-Rectangle case, you should stop and ask yourself a simple but very relevant question: “Is this Square class a Rectangle, or should we just use a Rectangle in theSquare class?”
When in doubt, use composition over inheritance, just like we did when we made Square use a Rectangle. Our simple advice is to start with composition and then consider inheritance if that makes more sense. It’s a lot easier to move to stronger dependencies, like inheritance, than to move the other way.
6.1.4. Bulky interfaces
Problem
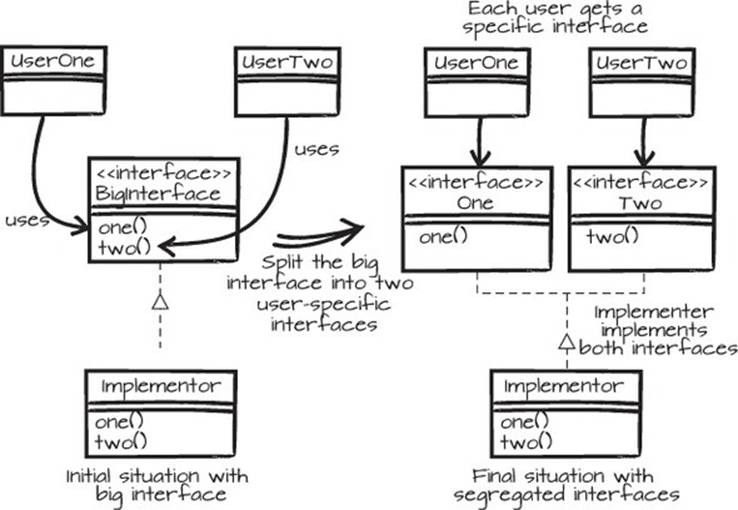
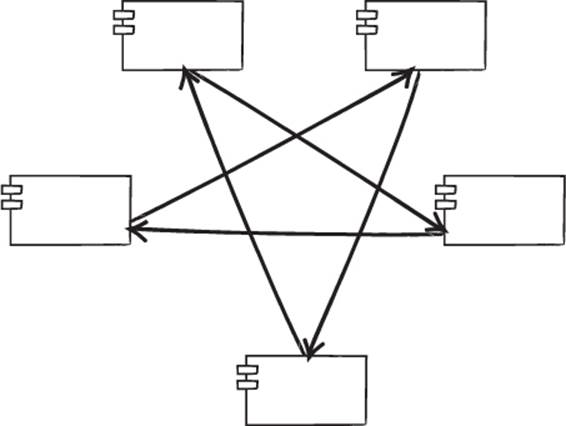
Often, interfaces are used in code to separate the contract from the implementation. If the interface is large, the chances are that it accidentally serves several purposes, or several consumers. When you want to move certain functionality to a new place, such as for a specific consumer, you can’t just do that. For example, in the left part of figure 6.3, you can’t just move one of the users and the parts of the interface it uses to a new project or solution, should you need to. As you probably know by now, moving code is a common consequence of using the Mikado Method on nontrivial code, and bulky interfaces are common obstacles when moving code.
Figure 6.3. Create a codebase that’s easier to change by creating user-specific interfaces.
Solution
Problems with too extensive interfaces are often discovered when you try to split functionality, such as when moving parts to separate packages. By extracting smaller client-specific interfaces, like in figure 6.3, the application gets a better structure, and the users and their interfaces can be put in different packages.
Depending on the size of the interface, it can be split and combined in many ways. The division in figure 6.4 is the simplest case. A variation could have one of the users using both methods, and in that case the division would look a bit different.
Figure 6.4. Process for creating segregated interfaces: 1) Initial situation with a big interface. 2) Create empty user-specific interfaces. 3) Pull up one method at a time to the new interfaces. 4) When the new interfaces are defined, change the users’ references to the new interfaces.
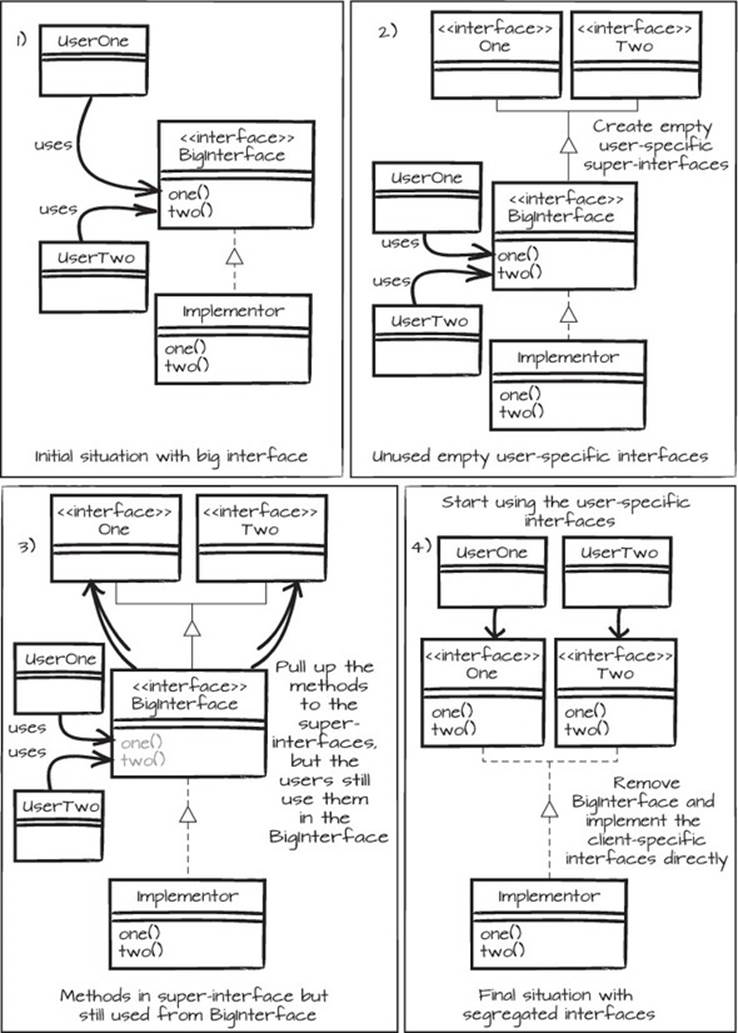
With more methods and users, it gets more complicated. In a compiling language, to find the methods to be extracted to a specific user interface, you can use the Naive Approach. If you just remove or comment out one method at a time from BigInterface, you can see where the different methods are missed in the code, and thereby build your knowledge about what methods go where. You can also start using empty interfaces where you would like to, see where the code breaks, and then grow the graph with what methods you must pull up based on the feedback you get from the broken code. If your IDE can find method usages, you can use that to find candidates for methods to move into the new interfaces, or you can find them by doing relevant regular expression searches. Keep on extracting different user-specific super-interfaces until you can do what you set out to do, possibly until the original BigInterface is empty and can be removed.
IDE support
The automated refactorings of some IDEs, like Eclipse and IntelliJ, can help extract new super-interfaces from an existing interface, and pull up or push down methods in the interface hierarchy. You have to decide how to divide the methods among the interfaces, but you can get significant help with the boilerplate coding from an IDE. To avoid unnecessary manual labor, get to know the capabilities of your IDE before you do these types of refactorings.
The Interface Segregation Principle
When splitting the preceding interfaces, we used the Interface Segregation Principle (ISP) as our guiding principle: “Interfaces should be fine-grained and client-specific.” Breaking the ISP creates implicit dependencies between the unused members of the interface class and its users, which adds to the complexity of the codebase and decreases stability.
You don’t want to expose more functionality than necessary to a client. All clients should be on a need-to-know basis, and when you have several clients with different needs, you should create one interface for each type of client. If a client needs more information at some later point in time, you can extend the interface at that time. Try to find seams in the code where the connecting interfaces can be kept to a minimum. This minimizes the risk of having inappropriate relations between the parts of the system.
6.1.5. Code with rigid call-dependency chains
Problem
The core problem when changing code is the troublesome dependencies in the code. These are what the Mikado Method is there to help you find, but if you don’t do anything about them, not much improvement will happen. To illustrate this, let’s look at the following very simple piece of code, which looks quite ordinary:
public class Door {
private final CylinderLock lock;
public Door(CylinderLock lock) {
this.lock = lock;
}
public void open() {
lock.unlock();
...
}
}
public class CylinderLock {
public void lock() {
...
}
public void unlock() {
...
}
}
In this code, the Door uses an injected CylinderLock, which introduces a problematic dependency. The door is depending on an implementation detail—what type of lock is used.
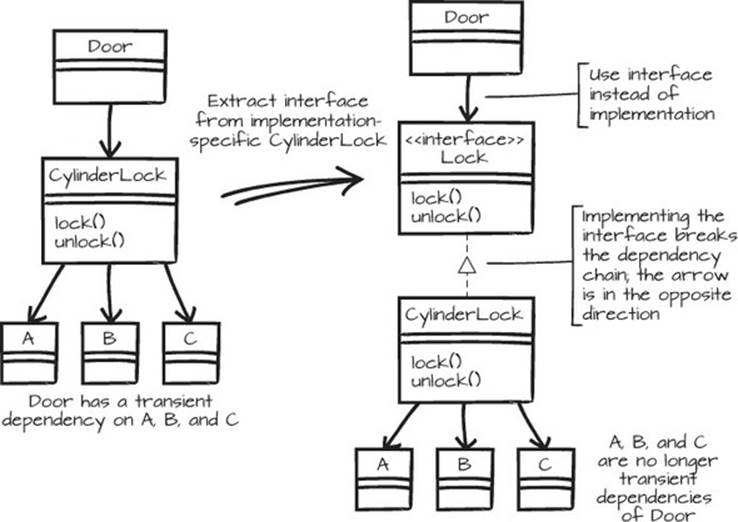
Granted, if this is the only code you’ll ever need, it’s probably fine. But it’s rarely this simple. The CylinderLock depends on a lot of code that’s specific to the CylinderLock, and the Door transiently depends on that code as well, as the left part of figure 6.5 shows. Now, if you want to move the Door to a new package, you’ll have to make sure that the entire tail of dependencies from CylinderLock is also reachable. This could be OK, but it’s often a problem when restructuring code.
Figure 6.5. By extracting an interface between a client and a provider, a troublesome dependency chain can be broken.
Solution
If you extract an interface from CylinderLock, a Lock interface, with the conceptual functionality that Door needs, the chain is broken. This is what’s illustrated in figure 6.5. Note that the implements arrow points to the interface, as does the using arrow. This is a dependency barrier, where all dependency arrows point toward an object, and none point out. The code with the barrier, where the Door knows nothing about the type of lock, looks like this:
public interface Lock {
public void lock();
public void unlock();
}
public class Door {
private final Lock lock;
public Door(Lock lock) {
this.lock = lock;
}
public void open() {
lock.unlock();
...
}
}
public class CylinderLock implements Lock {
public void lock() {
...
}
public void unlock() {
...
}
}
This code is much less fragile with regard to changes in the lock implementations because the Door doesn’t implicitly depend on any of the code that the CylinderLock uses. You could now move the Door class and the Lock interfaces to a separate package, and as long as any lock implements the protocol of Lock, all is fine. Another benefit is that adding another lock is just a matter of implementing the Lock interface.
Abstractions, like interfaces or abstract/virtual classes, are usually the more stable points in a codebase. That’s partly because they contain less or no code and therefore have fewer dependencies and change less than concrete implementations, and partly because they usually represent concepts one level above the implementation—concepts that don’t change as much as the implementation details. The Lock interface in the preceding code won’t change as much as the Lock implementations. In addition, the abstractions can be used to break dependency chains, like we did with theLock previously. This provides even more stability to your codebase by isolating the users of an interface from changes in the implementers of the interface.
Dependency injection
Troublesome dependencies in object-oriented programming are often related to the instantiation of objects, because that ties the instantiating class to the instantiated class by a call to its constructor. This is a rather strong dependency, which makes it difficult or impossible to use another class in a flexible manner. By depending on abstractions that are provided to a class, the decision of what implementation to use is deferred to the calling class. This often increases the flexibility of an application, but it has to be balanced against the increased complexity.
The Dependency Inversion Principle
In the preceding examples, we strove to depend on interfaces and classes higher up in the inheritance hierarchy, guided by the Dependency Inversion Principle (DIP): “Depend on abstractions, not on concretions.” Doing so, and at the same time adhering to the other class design principles, makes the code more robust in the face of further changes.
The principles guide you on a fairly granular level, and they remind you of how you should design classes to increase the chances of ending up with code that’s easy to maintain. But there’s a little more to maintainable code than just class design. You also need something to tell you how you should organize your classes in packages.
6.2. Designing packages
Even seemingly simple Mikado goals can require you to move classes between packages, create new packages, or even reorganize the overall packaging structure. The Mikado Method will often have you move code around, and you need to know what to put where. Just as there are principles for class design, there are principles for designing packages to make your codebase more robust in the face of change.
In the following sections, we’ll look at some of the packaging problems that can occur when evolving an application with the Mikado Method, and also at some common solutions to those problems and the principles they’re based on. We’ll look at how a package structure could evolve in an application like chapter 5’s loan application. We’ll leave out a lot of details to keep our focus on structuring the packages.
What’s a package?
The term package is a bit ambiguous and overloaded in software development, so let’s define what we mean.
A package in this chapter refers to a UML component. A UML component is a deployable or executable component, which can be anything from a single class to an arbitrary amount of code packaged for deployment. This usually equates to a project in your IDE.
Note that the term package in UML and Java corresponds to the package declaration, which in Java also means a folder in the filesystem where the class files and other resources reside. To complicate matters, in other environments such as .NET or Ruby, the equivalent of a Java or UML package is the namespace.
The packaging principles we’ll describe in this chapter are much more important when dealing with UML components, or projects, than with UML packages. They’re still relevant to UML packages, though, because we sometimes break out a package that becomes a new component.
6.2.1. What to put in a package
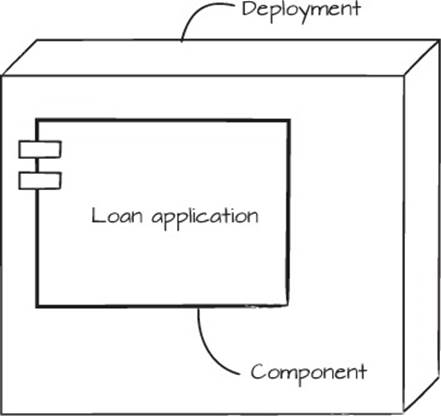
An application often starts with one single package, for one single deployment. This is the simple life, as shown in figure 6.6.
Figure 6.6. The simple life: a single loan application package deployed on a server
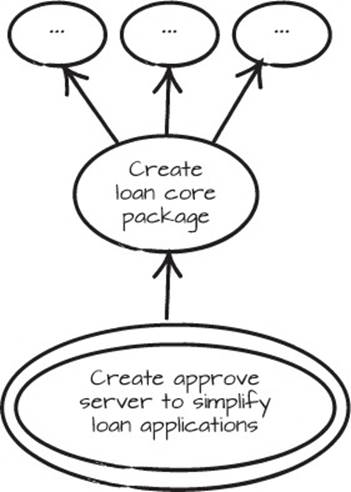
Then you realize you want to have two different versions of the application, such as the public application and back-office approval versions from the loan application in Chapter 5. You start a new Mikado Graph with “Create approve server to simplify loan applications” and realize that there’s some common code that you need in both applications, so you add a prerequisite, “Create loan core package,” as in figure 6.7. You create the loan core package and start moving the common code there. As usual, you can see what you need to change by using the compiler or tests, or by analyzing the moved code.
Figure 6.7. When you want to create the new approve server, you realize that there’s some loan core code you want to use in both places.
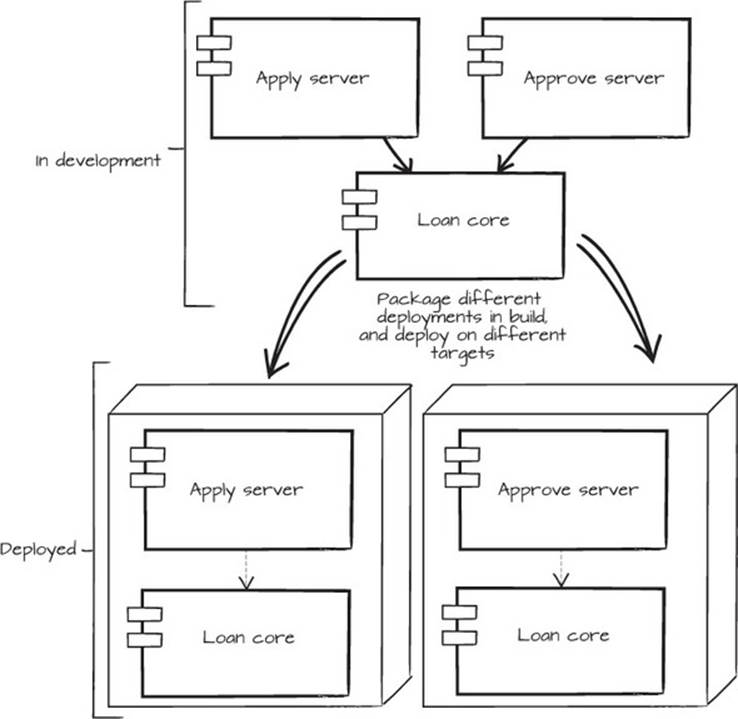
By releasing the shared code in a separate package, you can start reusing it in an orderly way. This is an example of the Reuse-Release Equivalence Principle (REP): “The granule of release is the granule of reuse.” Regardless of your intentions, you have to consider all accessible code in the package as reused. In figure 6.8 you can see the two deployments with a shared code package.
Figure 6.8. In development, you have the apply package, the approve package, and the loan core package. In the deployment step, they’re bundled in two deployables and each is placed on one server.
One reason to split up code into packages is that it communicates that the code within a given package should be used together. This is the Common Reuse Principle (CRP): “Classes that are used together are packaged together.”
Back in the development of loan application, you realize that you have to change a detail regarding the rate ticker in the common package, but this change ripples up into both apps, and it’s a mess. The loan core package is obviously not yet properly partitioned; there were some pieces missing in the shared code package. This could mean that you have a problem with the Common Closure Principle (CCP): “Classes that change together are packaged together.” In this case, you had to change the code in all packages to complete a single change. You can’t mitigate all possible types of changes in advance, but you should be able to do so for anticipated changes. If you make a change and get a problem, that’s an anticipated change from then on.
The cohesion principles
The Reuse-Release Equivalence Principle, the Common Reuse Principle, and the Common Closure Principle are often called cohesion principles because they strive for packages that are as highly cohesive as possible. This means that when you create a package of code, the code in it should be used together and changed together.
6.2.2. Dependencies between packages
In the previous section, we failed to contain a change in the common package. Let’s revert the failing changes and add a node to the existing, or possibly new, Mikado Graph: “Make loan core package self-contained and cohesive,” as in figure 6.9.
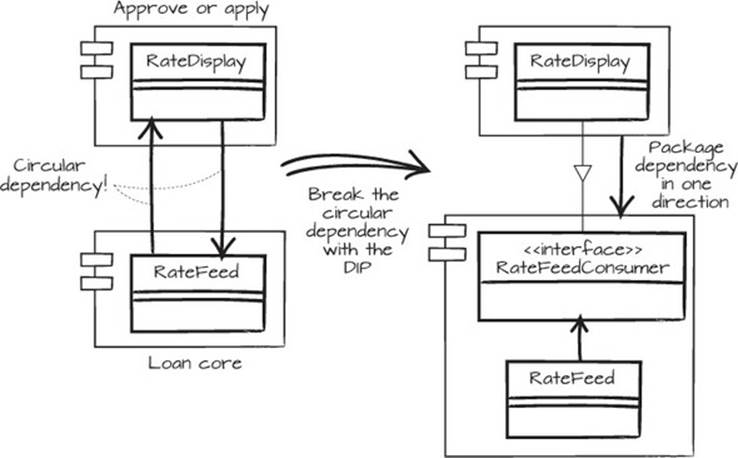
Figure 6.9. When moving the RateFeed class to the loan core package, the circular dependency must first be broken.
When you go to move the code to the right place, there’s a messy RateFeed class that should be moved to the loan core package, but when you move it there, the loan core package has a dependency back to the presentation code in the application packages. This is a violation of the Acyclic Dependencies Principle (ADP): “The dependency graph of packages must have no cycles.” This isn’t an acceptable solution, and in many environments it won’t even compile. We’ve tried to illustrate that in figure 6.10.
Figure 6.10. Cyclic dependencies are evil
Luckily, you learned about the Dependency Inversion Principle earlier (see section 6.1.5), and you can use this here. Let’s revert the code again and add “Break circular dependency by creating RateFeedConsumer interface” to the Mikado Graph. The new interface and the rate feed functionality go into the loan core package, and by implementing the interface in the applications, the applications can create rate tickers that are automatically updated, as described in figure 6.11. Now you can move the last pieces of code to make the loan core package more robust in the face of change, following the cohesion principles.
Figure 6.11. Moving the RateFeed class to the loan core package creates a circular dependency because of the interaction with the RateDisplay class. By breaking the circular dependency with an interface, the packages can comply with the Acyclic Dependencies Principle.
Cyclic dependencies in the wild
Cyclic dependencies are easier to avoid between packages than within them. In fact, they can’t exist between projects in IDEs like Eclipse, IntelliJ, or Visual Studio. So as long as you structure and build your applications in a standard manner, this shouldn’t pose a problem.
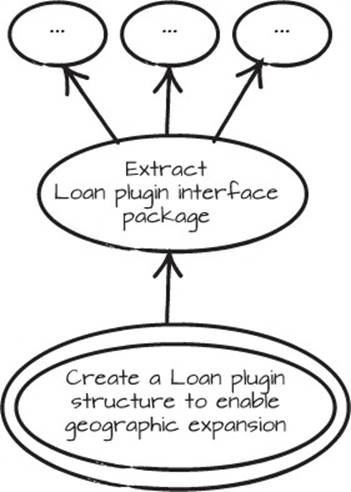
The development of the application moves on, and after a while you realize that if you could plug in different types of loans for different countries, your business could grow a lot. A common way to create a plugin architecture is to create a plugin interface package, and then plug in packages that implement that interface package. Start a fresh Mikado Graph with the goal, “Create a Loan plugin structure to enable geographic expansion” like in figure 6.12. One of the first prerequisites will be “Extract Loan plugin interface package.”
By building the application with different plugin implementations, different behaviors can be achieved. More behaviors can be added subsequently, still without changing a single line of code in the existing packages. The package structure is illustrated in figure 6.13.
Figure 6.12. The initial Mikado Graph for creating a plugin structure

The stability of the solution can be attributed to two principles. First, you used the Stable Abstractions Principle (SAP): “Abstractness increases with stability.” The plugin interface package contains mostly abstractions such as interfaces, making it more stable due to fewer moving parts in the shape of implementation details, and hence fewer outgoing dependencies. Then, there’s the Stable Dependencies Principle (SDP): “Depend in the direction of stability.” This one can be seen in figure 6.13, where both the dependency arrow and the extension arrow point toward the abstract interface package. In reality, packages don’t implement other packages, but the classes in the implementing package implement the interfaces and abstractions in the interface package.
Figure 6.13. The loan core accepts loan plugins that implement the contents of the loan interface package.

The coupling principles
The Acyclic Dependencies Principle, Stable Abstractions Principle, and Stable Dependencies Principle are often referred to as coupling principles. They tell you what dependencies to create between packages. In general, you should strive for low coupling and high cohesion, and the couplings you make should be toward stable, abstract packages.
A system has to change somewhere in order to evolve, so not all packages can be stable. The key is to move the more stable interfaces and abstract classes to their own packages. After that, you put their volatile implementers in implementation packages that depend on the interface packages.
Just-in-time extraction
Creating a new package and defining a release process (and then sticking to it) is tedious work. In addition, crossing package boundaries when you’re restructuring code can be problematic due to the constraints of the interpackage dependencies. When you need to extract a new package, as we described in this chapter, do it just in time, when you need it, and not just in case you might need it in the future. Use the Mikado Method to make sure you have all the structure in place and all the dependencies right so that the extraction can be made without errors.
As the application is developed further, more candidates for package extraction will be discovered. In time, you’ll probably also have to merge packages, or merge and restructure along another axis. By using the principles for both package and class design, your application design will emerge from what you have, and from what you want to do next.
6.3. Summary
Keep your methods and classes focused, keep the system extensible without editing existing code, follow the contracts of the code, keep interfaces sufficiently small, and avoid long dependency chains.
Here are the same points expressed as class design principles, often referred to as the SOLID principles based on their initial letters:
· Single Responsibility Principle
· Open-Closed Principle
· Liskov Substitution Principle
· Interface Segregation Principle
· Dependency Inversion Principle
When you create a package of code, the code in it should be used together and changed together. And here are the same points listed as cohesion package design principles:
· The Reuse-Release Equivalence Principle
· The Common Reuse Principle
· The Common Closure Principle
In addition to high cohesion, your packages should also strive for low coupling. The couplings you make should be toward stable, abstract packages. These are the coupling package design principles:
· The Acyclic Dependencies Principle
· The Stable Abstractions Principle
· The Stable Dependencies Principle
These names are really just mnemonic devices. It’s much more important to know what they stand for than to know what their names are.
Changes are an intrinsic part of the Mikado Method. In this chapter, we looked at how you can make classes and packages more robust in the face of change. By practicing and applying the same kind of thinking in your own development, you can let your designs emerge from what you already have, and from what you want to do. By moving your designs in increments instead of big bangs, you can continuously improve, extend, and deliver your software.
Try this
· See if you can find any part of your codebase that could be improved after the lessons of this chapter. Try to improve it.
· Try to find code that looks good given what you just learned. Was it easier or more difficult than finding code that looks bad? Could you write more of the good-looking stuff?