OpenGL ES 3.0: Programming Guide, Second Edition (2014)
Chapter 4. Shaders and Programs
Chapter 2, “Hello, Triangle: An OpenGL ES 3.0 Example,” introduced you to a simple program that draws a single triangle. In that example, we created two shader objects (one for the vertex shader and one for the fragment shader) and a single program object to render the triangle. Shader objects and program objects are fundamental concepts when working with shaders in OpenGL ES 3.0. In this chapter, we provide the full details on how to create shaders, compile them, and link them together into a program object. The details of writing vertex and fragment shaders come later in this book. For now, we focus on the following topics:
• Shader and program object overview
• Creating and compiling a shader
• Creating and linking a program
• Getting and setting uniforms
• Getting and setting attributes
• Shader compiler and program binaries
Shaders and Programs
There are two fundamental object types you need to create to render with shaders: shader objects and program objects. The best way to think of a shader object and a program object is by comparison to a C compiler and linker. A C compiler generates object code (e.g., .obj or .o files) for a piece of source code. After the object files have been created, the C linker then links the object files into a final program.
A similar paradigm is used in OpenGL ES for representing shaders. The shader object is an object that contains a single shader. The source code is given to the shader object, and then the shader object is compiled into object form (like an .obj file). After compilation, the shader object can then be attached to a program object. A program object gets multiple shader objects attached to it. In OpenGL ES, each program object will need to have one vertex shader object and one fragment shader object attached to it (no more and no less), unlike in desktop OpenGL. The program object is linked into a final “executable,” which can then be used to render.
The general process to get a linked shader object involves six steps:
1. Create a vertex shader object and a fragment shader object.
2. Attach source code to each of the shader objects.
3. Compile the shader objects.
4. Create a program object.
5. Attach the compiled shader objects to the program object.
6. Link the program object.
If there are no errors, you can then tell the GL to use this program for drawing any time you like. The next sections detail the API calls you use to execute this process.
Creating and Compiling a Shader
The first step in working with a shader object is to create it. This is done using glCreateShader.

Calling glCreateShader causes a new vertex or fragment shader to be created, depending on the type passed in. The return value is a handle to the new shader object. When you are finished with a shader object, you can delete it using glDeleteShader.

Note that if a shader is attached to a program object (more on this later), calling glDeleteShader will not immediately delete the shader. Rather, the shader will be marked for deletion and its memory will be freed once the shader is no longer attached to any program objects.
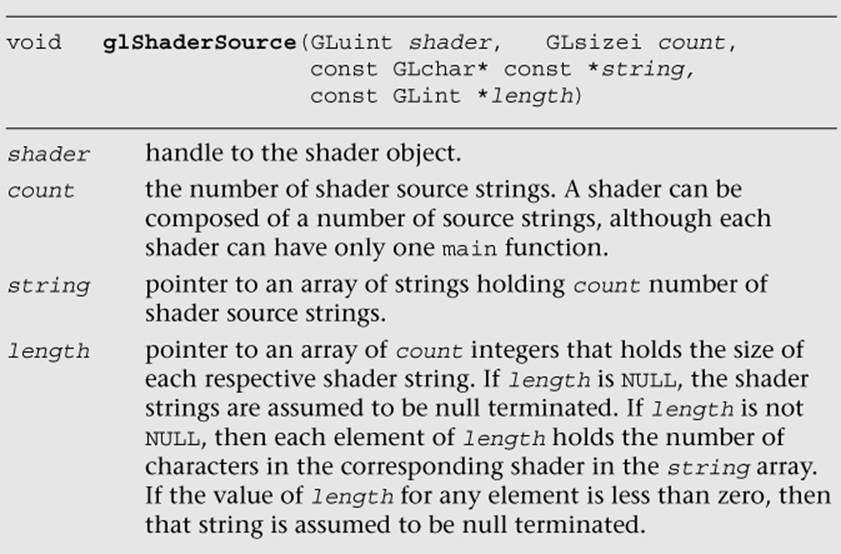
Once you have a shader object created, typically the next thing you will do is provide the shader source code using glShaderSource.
Once the shader source has been specified, the next step is to compile the shader using glCompileShader.

Calling glCompileShader will cause the shader source code that has been stored in the shader object to be compiled. As with any normal language compiler, the first thing you want to know after compiling is whether there were any errors. You can use glGetShaderiv to query for this information, along with other information about the shader object.
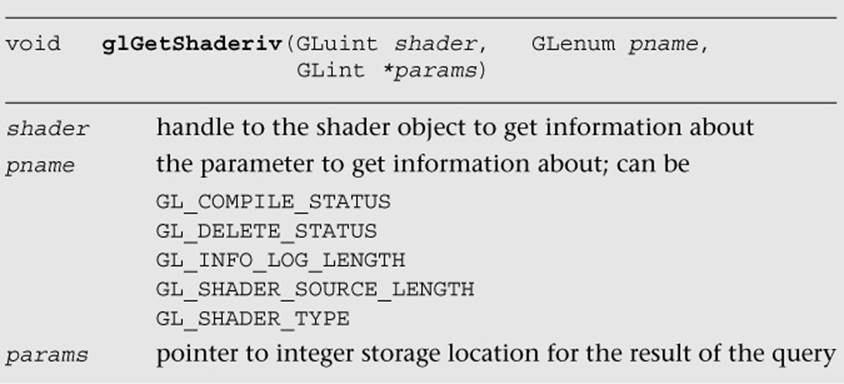
To check whether a shader has compiled successfully, you can call glGetShaderiv on the shader object with the GL_COMPILE_STATUS argument for pname. If the shader compiled successfully, the result will be GL_TRUE. If the shader failed to compile, the result will be GL_FALSE. If the shader does fail to compile, the compile errors will be written into the info log. The info log is a log written by the compiler that contains any error messages or warnings. It can be written with information even if the compile operation is successful. To check the info log, its length can be queried using GL_INFO_LOG_LENGTH. The info log itself can be retrieved using glGetShaderInfoLog (described next). Querying for GL_SHADER_TYPE will return whether the shader is a GL_VERTEX_SHADER or GL_FRAGMENT_SHADER. Querying forGL_SHADER_SOURCE_LENGTH returns the length of the shader source code, including the null terminator. Finally, querying for GL_DELETE_STATUS returns whether the shader has been marked for deletion using glDeleteShader.
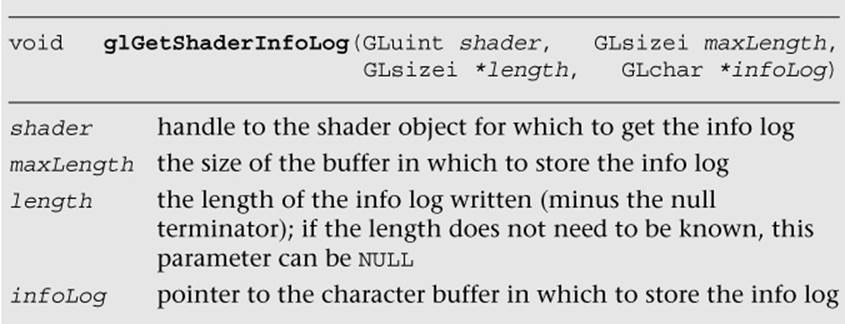
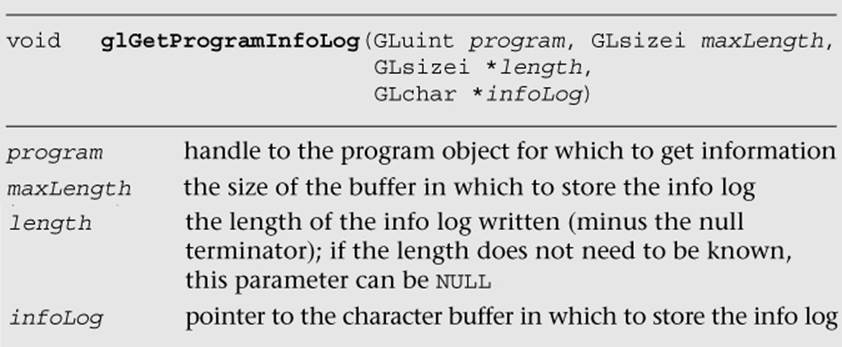
After compiling the shader and checking the info log length, you might want to retrieve the info log (especially if compilation failed, to find out why). To do so, you first need to query for the GL_INFO_LOG_LENGTH and allocate a string with sufficient storage to store the info log. The info log can then be retrieved using glGetShaderInfoLog.
The info log does not have any mandated format or required information. Nevertheless, most OpenGL ES 3.0 implementations will return error messages that contain the line number of the source code on which the compiler was working when it detected the error. Some implementations will also provide warnings or additional information in the log. For example, the following error message is produced by the compiler when the shader source code contains an undeclared variable:
ERROR: 0:10: 'i_position' : undeclared identifier
ERROR: 0:10: 'assign' : cannot convert from '4X4 matrix of float'
to 'vertex out/varying 4-component vector of float'
ERROR: 2 compilation errors. No code generated.
At this point, we have shown you all of the functions you need to create a shader, compile it, find out the compile status, and query the info log. For review, Example 4-1 shows the code from Chapter 2, “Hello Triangle: An OpenGL ES 3.0 Example,” to load a shader that uses the functions just described.
Example 4-1 Loading a Shader
GLuint LoadShader ( GLenum type, const char *shaderSrc )
{
GLuint shader;
GLint compiled;
// Create the shader object
shader = glCreateShader ( type );
if ( shader == 0 )
{
return 0;
}
// Load the shader source
glShaderSource ( shader, 1, &shaderSrc, NULL );
// Compile the shader
glCompileShader ( shader );
// Check the compile status
glGetShaderiv ( shader, GL_COMPILE_STATUS, &compiled );
if ( !compiled )
{
// Retrieve the compiler messages when compilation fails
GLint infoLen = 0;
glGetShaderiv ( shader, GL_INFO_LOG_LENGTH, &infoLen );
if ( infoLen > 1 )
{
char* infoLog = malloc ( sizeof ( char ) * infoLen );
glGetShaderInfoLog ( shader, infoLen, NULL, infoLog );
esLogMessage("Error compiling shader:\n%s\n", infoLog);
free ( infoLog );
}
glDeleteShader ( shader );
return 0;
}
return shader;
}
Creating and Linking a Program
Now that we have shown you how to create shader objects, the next step is to create a program object. As previously described, a program object is a container object to which you attach shaders and link a final executable program. The function calls to manipulate program objects are similar to shader objects. You create a program object by using glCreateProgram.

You might notice that glCreateProgram does not take any arguments; it simply returns a handle to a new program object. You delete a program object by using glDeleteProgram.

Once you have a program object created, the next step is to attach shaders to it. In OpenGL ES 3.0, each program object needs to have one vertex shader and one fragment shader object attached to it. To attach shaders to a program, you use glAttachShader.

This function attaches the shader to the given program. Note that a shader can be attached at any point—it does not necessarily need to be compiled or even have source code before being attached to a program. The only requirement is that every program object must have one and only one vertex shader and fragment shader object attached to it. In addition to attaching shaders, you can detach shaders using glDetachShader.

Once the shaders have been attached (and the shaders have been successfully compiled), we are finally ready to link the shaders together. Linking a program object is accomplished using glLinkProgram.

The link operation is responsible for generating the final executable program. The linker will check for a number of things to ensure successful linkage. We mention some of these conditions now, but until we describe vertex and fragment shaders in detail, these conditions might be a bit confusing to you. The linker will make sure that any vertex shader output variables that are consumed by the fragment shader are written by the vertex shader (and declared with the same type). The linker will also make sure that any uniforms and uniform buffers declared in both the vertex and fragment shaders have matching types. In addition, the linker will make sure that the final program fits within the limits of the implementation (e.g., the number of attributes, uniforms, or input and output shader variables). Typically, the link phase is the time at which the final hardware instructions are generated to run on the hardware.
After linking a program, you need to check whether the link succeeded. To check the link status, you use glGetProgramiv.
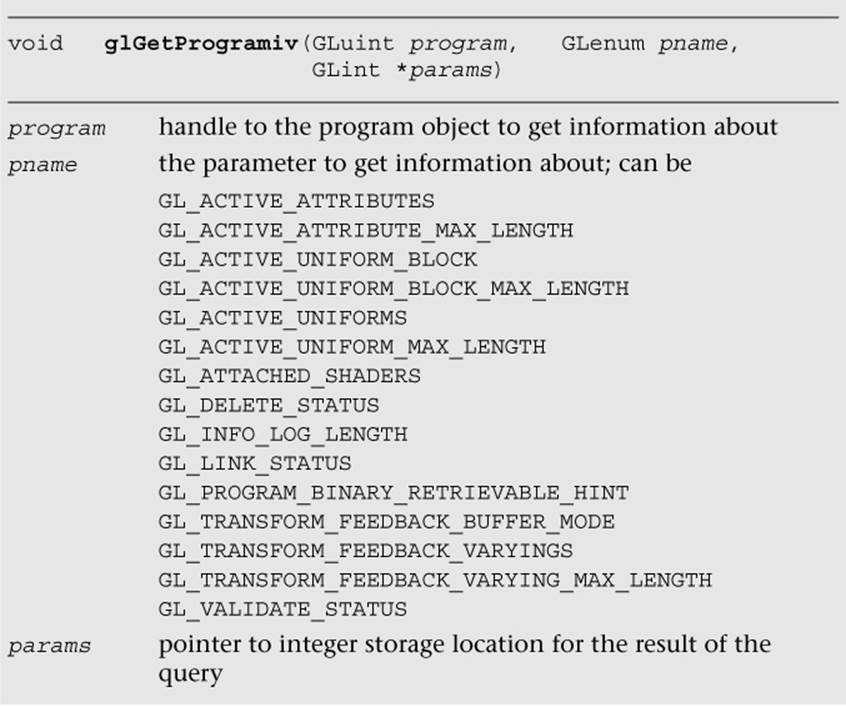
To check whether a link was successful, you can query for GL_LINK_STATUS. A large number of other queries can also be executed on program objects. Querying for GL_ACTIVE_ATTRIBUTES returns a count of the number of active attributes in the vertex shader. Querying forGL_ACTIVE_ATTRIBUTE_MAX_LENGTH returns the maximum length (in characters) of the largest attribute name; this information can be used to determine how much memory to allocate to store attribute name strings. Likewise, GL_ACTIVE_UNIFORMS andGL_ACTIVE_UNIFORM_MAX_LENGTH return the number of active uniforms and the maximum length of the largest uniform name, respectively. The number of shaders attached to the program object can be queried using GL_ATTACHED_SHADERS. The GL_DELETE_STATUS query returns whether a program object has been marked for deletion. As with shader objects, program objects store an info log, the length of which can be queried for using GL_INFO_LOG_LENGTH. Querying for GL_TRANSFORM_FEEDBACK_BUFFER_MODE returns eitherGL_SEPARATE_ATTRIBS or GL_INTERLEAVED_ATTRIBS, which is the buffer mode when transform feedback is active. Queries for GL_TRANSFORM_FEEDBACK_VARYINGS and GL_TRANSFORM_FEEDBACK_VARYING_MAX_LENGTH return the number of output variables to capture in transform feedback mode for the program and the maximum length of the output variable names, respectively. The transform feedback is described in Chapter 8, “Vertex Shaders.” The number of uniform blocks for programs containing active uniforms and the maximum length of the uniform block names can be queried using GL_ACTIVE_UNIFORM_BLOCKS and GL_ACTIVE_UNIFORM_BLOCK_MAX_LENGTH, respectively. Uniform blocks are described in a later section. Querying for GL_PROGRAM_BINARY_RETRIEVABLE_HINT returns a value indicating whether the binary retrieval hint is currently enabled for program. Finally, the status of the last validation operation can be queried for using GL_VALIDATE_STATUS. The validation of program objects is described later in this section.
After linking the program, we next want to get information from the program info log (particularly if a link failure occurred). Doing so is similar to getting the info log for shader objects.
Once we have linked the program successfully, we are almost ready to render with it. Before doing so, however, we might want to check whether the program validates. That is, there are certain aspects of execution that a successful link cannot guarantee. For example, perhaps the application never binds valid texture units to samplers. This behavior will not be known at link time, but instead will become apparent at draw time. To check that your program will execute with the current state, you can call glValidateProgram.

The result of the validation can be checked using GL_VALIDATE_STATUS described earlier. The info log will also be updated.
Note
You really want to use glValidateProgram only for debugging purposes. It is a slow operation and certainly not something you want to check before every render. In fact, you can get away with never using it if your application is successfully rendering. We want to make you aware that this function does exist, though.
So far, we have shown you the functions needed for creating a program object, attaching shaders to it, linking, and getting the info log. There is one more thing you need to do with a program object before rendering, and that is to set it as the active program using glUseProgram.

Now that we have our program active, we are set to render. Once again, Example 4-2 shows the code from our sample in Chapter 2, “Hello Triangle: An OpenGL ES 3.0 Example,” that uses these functions.
Example 4-2 Create, Attach Shaders to, and Link a Program
// Create the program object
programObject = glCreateProgram ( );
if ( programObject == 0 )
{
return 0;
}
glAttachShader ( programObject, vertexShader );
glAttachShader ( programObject, fragmentShader );
// Link the program
glLinkProgram ( programObject );
// Check the link status
glGetProgramiv ( programObject, GL_LINK_STATUS, &linked );
if ( !linked )
{
// Retrieve compiler error messages when linking fails
GLint infoLen = 0;
glGetProgramiv( programObject, GL_INFO_LOG_LENGTH, &infoLen);
if ( infoLen > 1 )
{
char* infoLog = malloc ( sizeof ( char ) * infoLen );
glGetProgramInfoLog ( programObject, infoLen, NULL,
infoLog );
esLogMessage ( "Error linking program:\n%s\n", infoLog );
free ( infoLog );
}
glDeleteProgram ( programObject );
return FALSE;
}
// ...
// Use the program object
glUseProgram ( programObject );
Uniforms and Attributes
Once you have a linked program object, there are number of queries that you might want to do on it. First, you will likely need to find out about the active uniforms in your program. Uniforms—as we detail more in the next chapter on the shading language—are variables that store read-only constant values that are passed in by the application through the OpenGL ES 3.0 API to the shader.
Sets of uniforms are grouped into two categories of uniform blocks. The first category is the named uniform block, where the uniform’s value is backed by a buffer object called a uniform buffer object (more on that next). The named uniform block is assigned a uniform block index. The following example declares a named uniform block with the name TransformBlock containing three uniforms (matViewProj, matNormal, and matTexGen):
uniform TransformBlock
{
mat4 matViewProj;
mat3 matNormal;
mat3 matTexGen;
};
The second category is the default uniform block for uniforms that are declared outside of a named uniform block. Unlike with the named uniform block, there is no name or uniform block index for default uniform blocks. The following example declares the same three uniforms outside of a named uniform block:
uniform mat4 matViewProj;
uniform mat3 matNormal;
uniform mat3 matTexGen;
We describe uniform blocks in more detail in the section Uniform Blocks in Chapter 5.
If a uniform is declared in both a vertex shader and a fragment shader, it must have the same type, and its value will be the same in both shaders. During the link phase, the linker will assign uniform locations to each of the active uniforms associated with the default uniform block in the program. These locations are the identifiers the application will use to load the uniform with a value. The linker will also assign offsets and strides (for array and matrix type uniforms) for active uniforms associated with the named uniform blocks.
Getting and Setting Uniforms
To query for the list of active uniforms in a program, you first call glGetProgramiv with the GL_ACTIVE_UNIFORMS parameter (as described in the previous section). This will tell you the number of active uniforms in the program. The list includes uniforms in named uniform blocks, default block uniforms declared in shader code, and built-in uniforms used in shader code. A uniform is considered “active” if it was used by the program. In other words, if you declare a uniform in one of your shaders but never use it, the linker will likely optimize that away and not return it in the active uniform list. You can also find out the number of characters (including the null terminator) that the largest uniform name has in the program; this can be done by calling glGetProgramiv with the GL_ACTIVE_UNIFORM_MAX_LENGTH parameter.
Once we know the number of active uniforms and the number of characters needed to store the uniform names, we can find out the details on each uniform using glGetActiveUniform and glGetActiveUniformsiv.
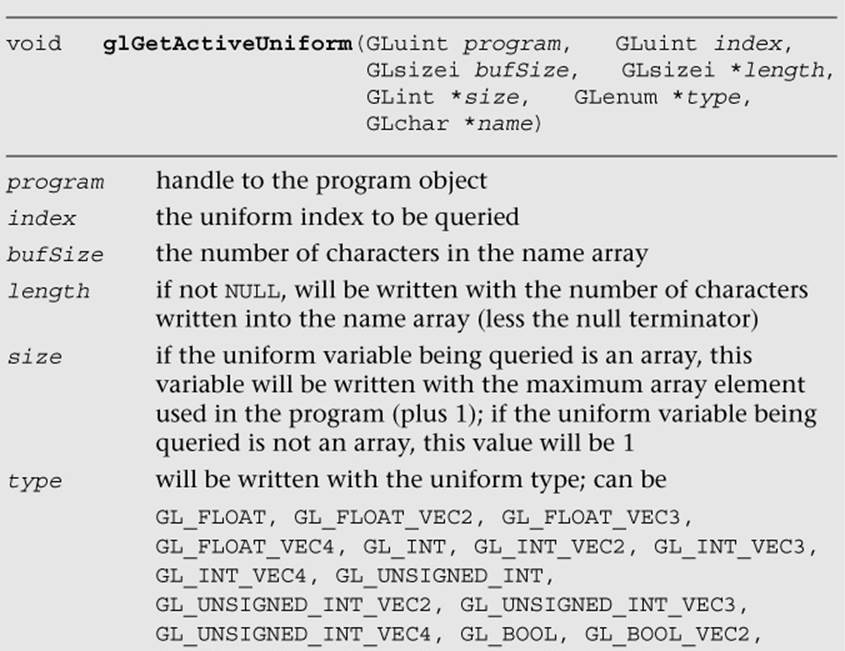
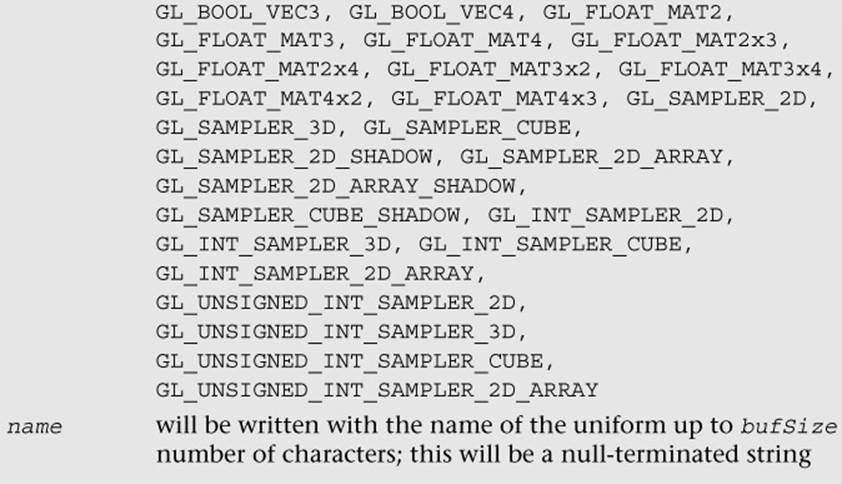
Using glGetActiveUniform, you can determine nearly all of the properties of the uniform. You can determine the name of the uniform variable along with its type. In addition, you can find out if the variable is an array, and if so what the maximum element used in the array was. The name of the uniform is necessary to find the uniform’s location, and the type and size are needed to figure out how to load it with data. Once we have the name of the uniform, we can find its location using glGetUniformLocation. The uniform location is an integer value used to identify the location of the uniform in the program (note that uniforms in the named uniform blocks are not assigned a location). That location value is used by subsequent calls for loading uniforms with values (e.g., glUniformlf).
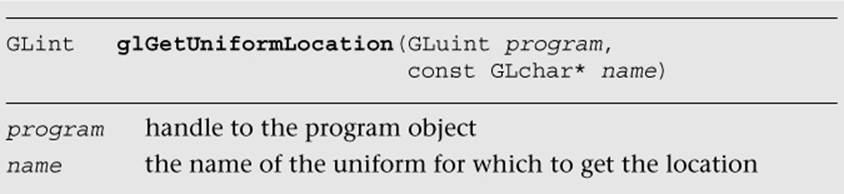
This function will return the location of the uniform given by name. If the uniform is not an active uniform in the program, then the return value will be –1. Once we have the uniform location along with its type and array size, we can then load the uniform with values. A number of different functions for loading uniforms are available, with different functions for each uniform type.
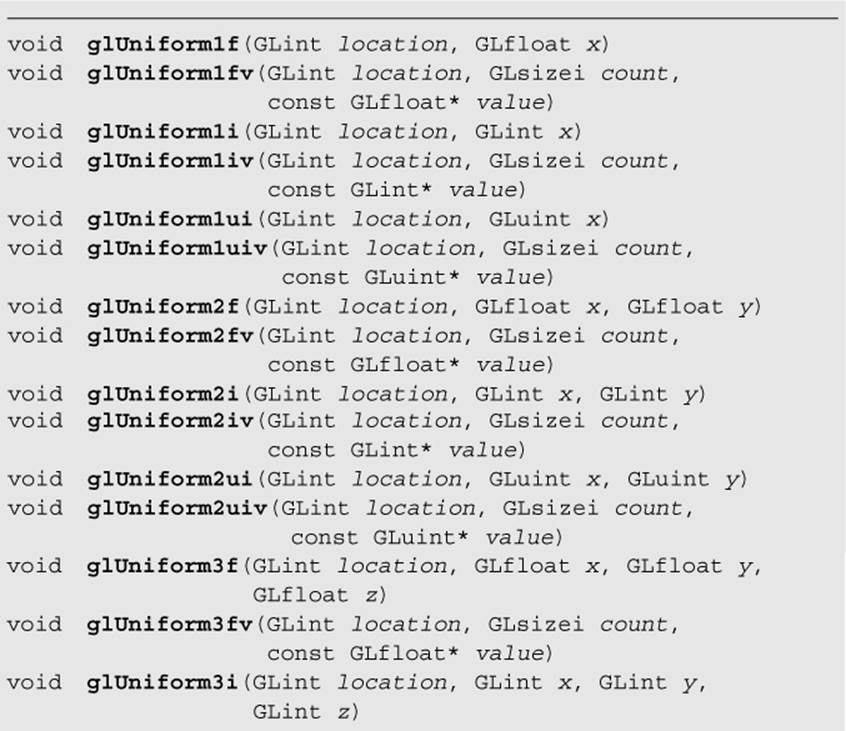
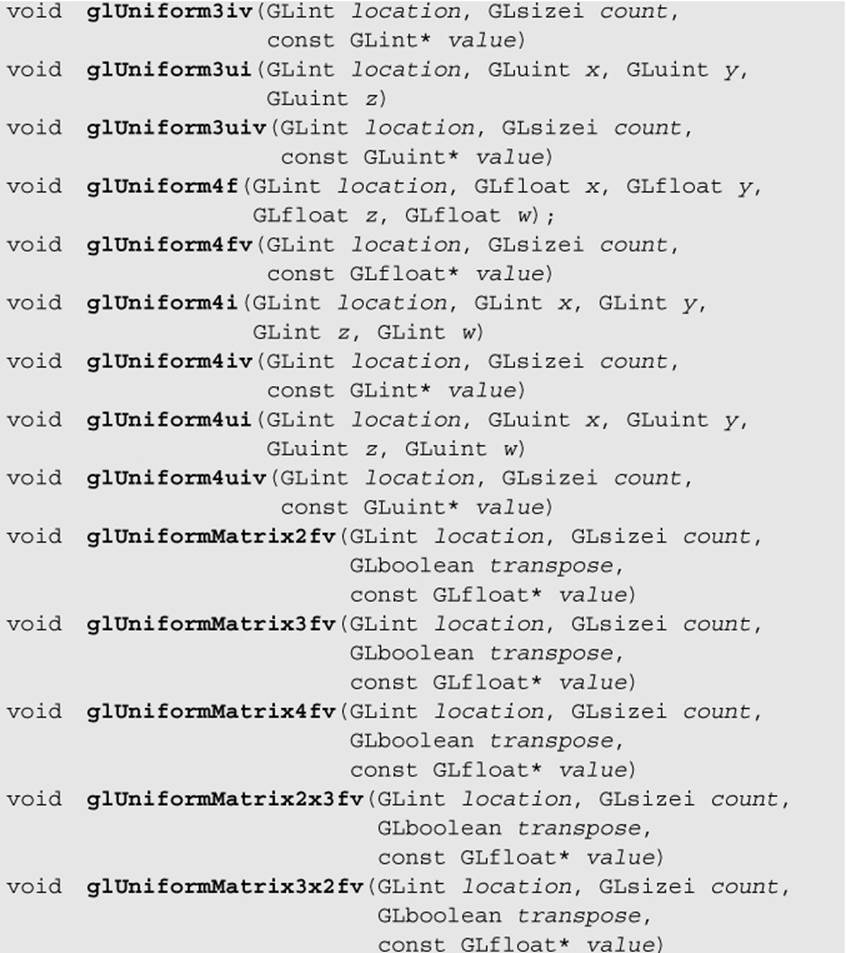
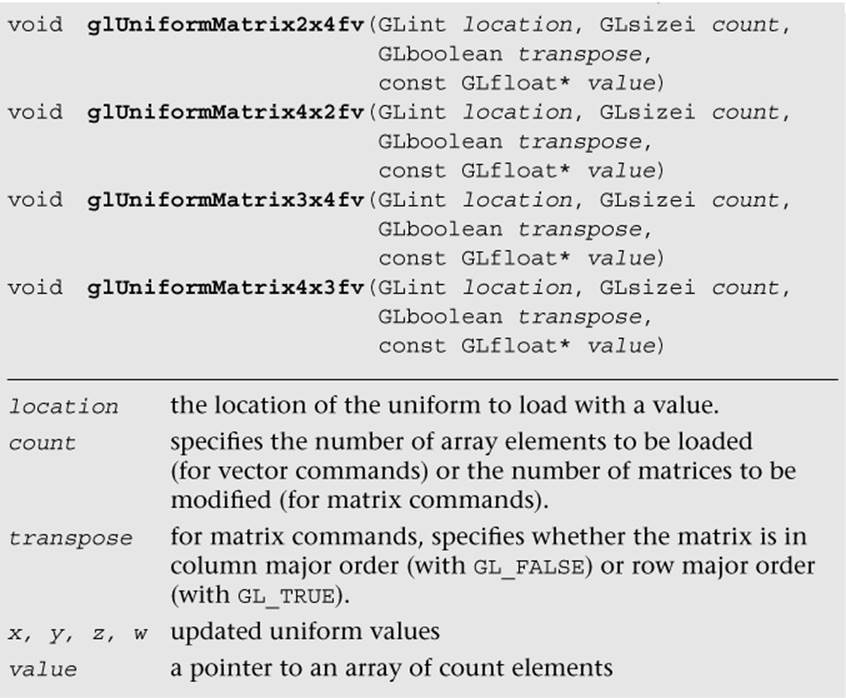
The functions for loading uniforms are mostly self-explanatory. The determination of which function you need to use for loading the uniform is based on the type returned by the glGetActiveUniform function. For example, if the type is GL_FLOAT_VEC4, then either glUniform4for glUniform4fv can be used. If the size returned by glGetActiveUniform is greater than 1, then glUniform4fv would be used to load the entire array in one call. If the uniform is not an array, then either glUniform4f or glUniform4fv could be used.
One point worth noting here is that the glUniform* calls do not take a program object handle as a parameter. The reason is that the glUniform* calls always act on the current program that is bound with glUseProgram. The uniform values themselves are kept with the program object. That is, once you set a uniform to a value in a program object, that value will remain with it even if you make another program active. In that sense, we can say that uniform values are local to a program object.
The block of code in Example 4-3 demonstrates how you would go about querying for uniform information on a program object using the functions we have described.
Example 4-3 Querying for Active Uniforms
GLint maxUniformLen;
GLint numUniforms;
char *uniformName;
GLint index;
glGetProgramiv ( progObj, GL_ACTIVE_UNIFORMS, &numUniforms );
glGetProgramiv ( progObj, GL_ACTIVE_UNIFORM_MAX_LENGTH,
&maxUniformLen );
uniformName = malloc ( sizeof ( char ) * maxUniformLen );
for ( index = 0; index < numUniforms; index++ )
{
GLint size;
GLenum type;
GLint location;
// Get the uniform info
glGetActiveUniform ( progObj, index, maxUniformLen, NULL,
&size, &type, uniformName );
// Get the uniform location
location = glGetUniformLocation ( progObj, uniformName );
switch ( type )
{
case GL_FLOAT:
//
break;
case GL_FLOAT_VEC2:
//
break;
case GL_FLOAT_VEC3:
//
break;
case GL_FLOAT_VEC4:
//
break;
case GL_INT:
//
break;
// ... Check for all the types ...
default:
// Unknown type
break;
}
}
Uniform Buffer Objects
You can share uniforms between shaders in a program or even between programs by using a buffer object to store uniform data. Such buffer objects are called uniform buffer objects. Using uniform buffer objects, you can potentially reduce the API overhead when updating large blocks of uniforms. In addition, this approach increases the potential storage available for uniforms because you are not limited by the default uniform block size.
To update the uniform data in a uniform buffer object, you can modify the contents of the buffer object using commands such as glBufferData, glBufferSubData, glMapBufferRange, and glUnmapBuffer (these commands are described in Chapter 6, “Vertex Attributes, Vertex Arrays, and Buffer Objects”) rather than using the glUniform* commands described in the previous section.
In the uniform buffer objects, uniforms are represented in memory as follows:
• Members of type bool, int, uint, and float are stored in memory at the specified offset as single uint-typed, int-typed, uint-typed, and float-typed components, respectively.
• Vectors with basic data types of bool, int, uint, or float are stored in consecutive memory locations beginning at the specified offset, with the first component at the lowest offset.
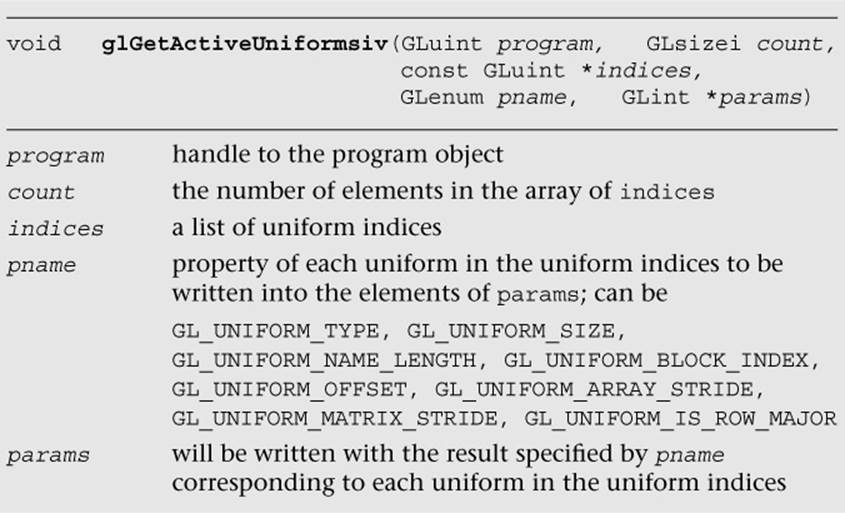
• Column-major matrices with C columns and R rows are treated as an array of C floating-point column vectors, each consisting of R components. Similarly, row-major matrices with R rows and C columns are treated as an array of R floating-point row vectors, each consisting of C components. While the column or row vectors are stored consecutively, they may be stored with gaps by the implementation. The offset between two vectors in the matrix is referred to as the column or row stride (GL_UNIFORM_MATRIX_STRIDE) and can be queried in a linked program using glGetActiveUniformsiv.
• Arrays of scalars, vectors, and matrices are stored in memory by element order, with array member zero placed at the lowest offset. The offset between each pair of elements in the array is constant and referred to as the array stride (GL_UNIFORM_ARRAY_STRIDE) and can be queried in a linked program using glGetActiveUniformsiv.
Unless you use the std140 uniform block layout (the default), you will need to query the program object for the byte offsets and strides to set uniform data in the uniform buffer object. The std140 layout guarantees a specific packing behavior with an explicit layout specification defined by the OpenGL ES 3.0 specification. Thus using std140 layout allows you to share the uniform block between different OpenGL ES 3.0 implementations. Other packing formats (see Table 5-4) may allow some OpenGL ES 3.0 implementations to pack the data more tightly together than thestd140 layout.
The following is an example of a named uniform block LightBlock using the std140 layout:
layout (std140) uniform LightBlock
{
vec3 lightDirection;
vec4 lightPosition;
};
The std140 layout is specified as follows (adapted from the OpenGL ES 3.0 specification). When the uniform block contains the following member:
1. A scalar variable—The base alignment is the size of the scalar. For example, sizeof(GLint).
2. A two-component vector—The base alignment is twice the size of the underlying component type size.
3. A three-component or four-component vector—The base alignment is four times the size of the underlying component type size.
4. An array of scalars or vectors—The base alignment and array stride are set to match the base alignment of a single element array. The entire array is padded to a multiple of the size of a vec4.
5. A column-major matrix with C columns and R rows—Stored as an array of C vectors with R components according to rule 4.
6. An array of M column-major matrices with C columns and R rows—Stored as M × C vectors with R components according to rule 4.
7. A row-major matrix with C columns and R rows—Stored as an array of R vectors with C components according to rule 4.
8. An array of M row-major matrices with C columns and R rows—Stored as M × R vectors with C components according to rule 4.
9. A single structure—The offset and size are calculated according to the preceding rules. The structure’s size will be padded to a multiple of the size of a vec4.
10. An array of S structures—The base alignment is calculated according to the alignment of the element of the array. The element of the array is calculated according to rule 9.
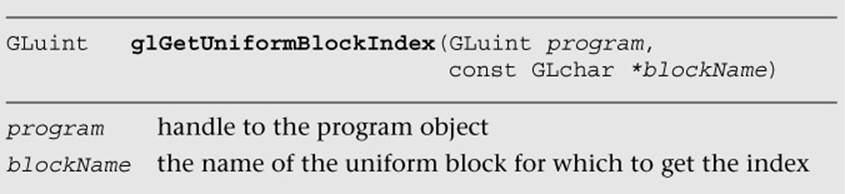
Similar to how a uniform location value is used to refer to a uniform, a uniform block index is used to refer to a uniform block. You can retrieve the uniform block index using glGetUniformBlockIndex.
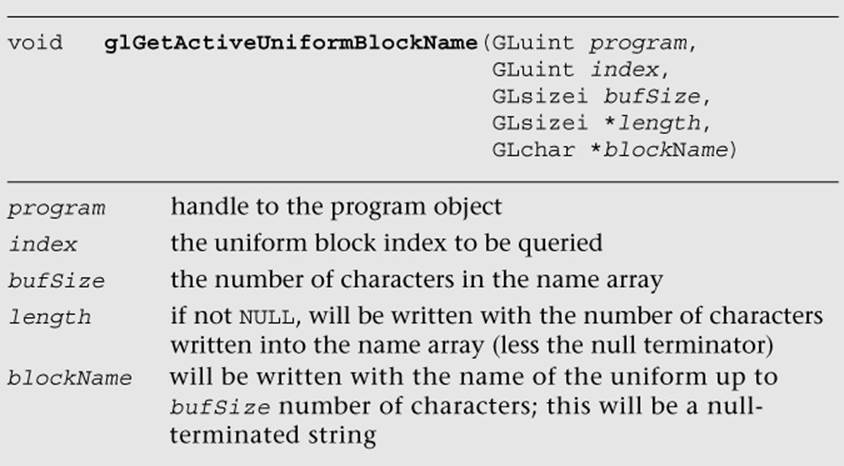
From the uniform block index, you can determine the details of the active uniform block using glGetActiveUniformBlockName (to get the block name) and glGetActiveUniformBlockiv (to get many properties of the uniform block).
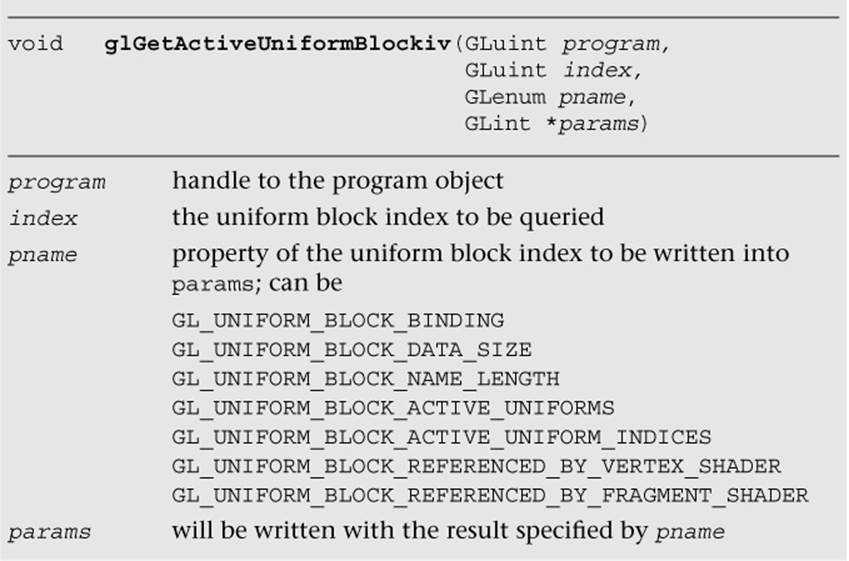
Querying for GL_UNIFORM_BLOCK_BINDING returns the last buffer binding point for the uniform block (zero, if this block does not exist). The GL_UNIFORM_BLOCK_DATA_SIZE argument returns the minimum total buffer object size to hold all the uniforms for the uniform block, while querying for GL_UNIFORM_BLOCK_NAME_LENGTH returns the total length (including the null terminator) of the name of the uniform block. The number of active uniforms in the uniform block can be queried using GL_UNIFORM_BLOCK_ACTIVE_UNIFORMS. TheGL_UNIFORM_BLOCK_ACTIVE_NUMBER_INDICES query returns a list of the active uniform indices in the uniform block. Finally, querying for GL_UNIFORM_BLOCK_REFERENCED_BY_VERTEX_SHADER and GL_UNIFORM_BLOCK_REFERENCED_BY_FRAGMENT_SHADERreturns a boolean value, whether the uniform block is referenced by the vertex or fragment shader in the program, respectively.
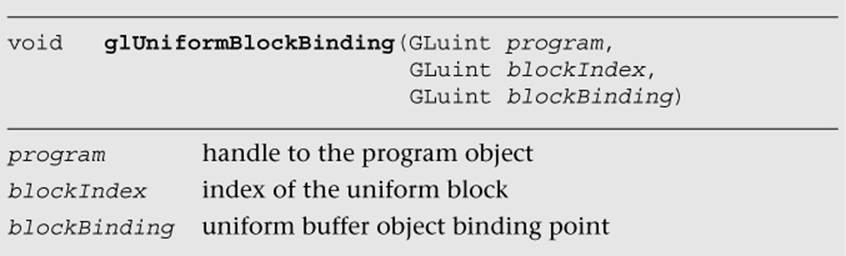
Once you have the uniform block index, you can associate the index with a uniform block binding point in the program by calling glUniformBlockBinding.
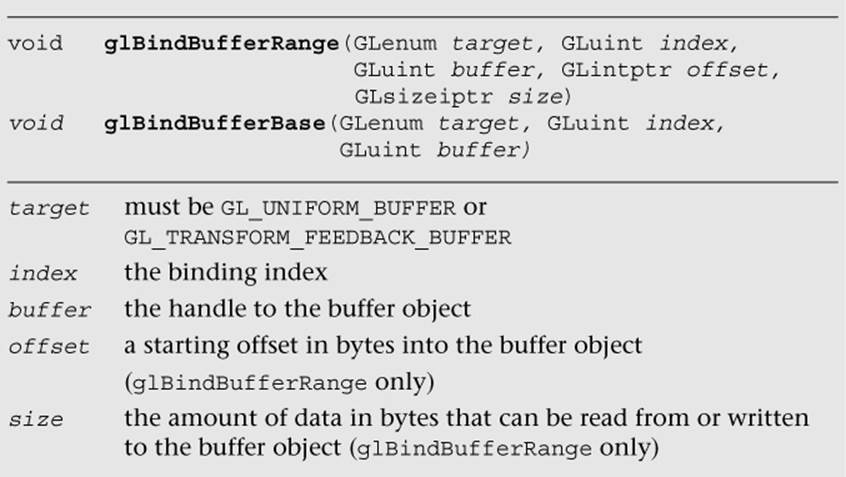
Finally, you can bind the uniform buffer object to the GL_UNIFORM_BUFFER target and a uniform block binding point in the program using glBindBufferRange or glBindBufferBase.
When programming the uniform blocks, you should pay attention to the following limitations:
• The maximum number of active uniform blocks used by a vertex or fragment shader can be queried using glGetIntegerv with GL_MAX_VERTEX_UNIFORM_BLOCKS or GL_MAX_FRAGMENT_UNIFORM_BLOCKS, respectively. The minimum supported number for any implementation is 12.
• The maximum number of combined active uniform blocks used by all shaders in a program can be queried using glGetIntegerv with GL_MAX_COMBINED_UNIFORM_BLOCKS. The minimum supported number for any implementation is 24.
• The maximum available storage per uniform buffer can be queried using glGetInteger64v with GL_MAX_UNIFORM_BLOCK_SIZE, which returns the size in bytes. The minimum supported number for any implementation is 16 KB.
If you violate any of these limits, the program will fail to link.
The following example shows how to set up a uniform buffer object with the named uniform block LightTransform described earlier:
GLuint blockId, bufferId;
GLint blockSize;
GLuint bindingPoint = 1;
GLfloat lightData[] =
{
// lightDirection (padded to vec4 based on std140 rule)
1.0f, 0.0f, 0.0f, 0.0f,
// lightPosition
0.0f, 0.0f, 0.0f, 1.0f
};
// Retrieve the uniform block index
blockId = glGetUniformBlockIndex ( program, "LightBlock" );
// Associate the uniform block index with a binding point
glUniformBlockBinding ( program, blockId, bindingPoint );
// Get the size of lightData; alternatively,
// we can calculate it using sizeof(lightData) in this example
glGetActiveUniformBlockiv ( program, blockId,
GL_UNIFORM_BLOCK_DATA_SIZE,
&blockSize );
// Create and fill a buffer object
glGenBuffers ( 1, &bufferId );
glBindBuffer ( GL_UNIFORM_BUFFER, bufferId );
glBufferData ( GL_UNIFORM_BUFFER, blockSize, lightData,
GL_DYNAMIC_DRAW);
// Bind the buffer object to the uniform block binding point
glBindBufferBase ( GL_UNIFORM_BUFFER, bindingPoint, buffer );
Getting and Setting Attributes
In addition to querying for uniform information on the program object, you will need to use the program object to set up vertex attributes. The queries for vertex attributes are very similar to the uniform queries. You can find the list of active attributes using the GL_ACTIVE_ATTRIBUTESquery. You can find the properties of an attribute using glGetActiveAttrib. A set of routines are then available for setting up vertex arrays to load the vertex attributes with values.
However, setting up vertex attributes really requires a bit more understanding of primitives and the vertex shader than we are ready to delve into right now. Instead, we dedicate an entire chapter (Chapter 6, “Vertex Attributes, Vertex Arrays, and Buffer Objects”) to vertex attributes and vertex arrays. If you want to find out how to query for vertex attribute info, jump to Chapter 6 and the section Declaring Vertex Attribute Variables in a Vertex Shader.
Shader Compiler
When you ask OpenGL ES to compile and link a shader, take a minute to think about what the implementation has to do. The shader code is typically parsed into some sort of intermediate representation, as most compiled languages are (e.g., an Abstract Syntax Tree). A compiler must then convert the abstract representation into machine instructions for the hardware. Ideally, this compiler should also do a great deal of optimization, such as dead-code removal, constant propagation, and more. Performing all this work comes at a price—and this price is primarily CPU time and memory.
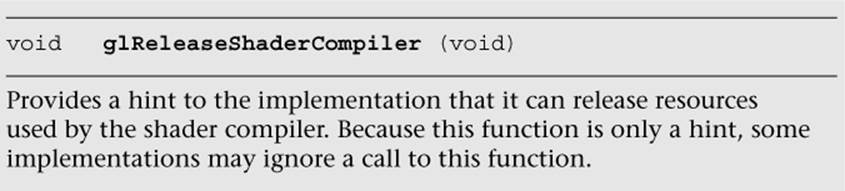
OpenGL ES 3.0 implementations must support online shader compilation (the value of GL_SHADER_COMPILER retrieved using glGetBooleanv must be GL_TRUE). You can specify your shaders using glShaderSource, as we have done so far in our examples. You can also try to mitigate the resource impact of shader compilation. That is, once you have finished compiling any shaders for your application, you can call glReleaseShaderCompiler. This function provides a hint to the implementation that you are done with the shader compiler, so it can free its resources. Note that this function is only a hint; if you decide to compile more shaders using glCompileShader, the implementation will need to reallocate its resources for the compiler.
Program Binaries
Program binaries are the binary representation of a complete compiled and linked program. They are useful because they can be saved to the file system to be reused later, thereby avoiding the cost of online compilation. You may also use program binaries so that you do not have to distribute the shader source codes in your implementation.
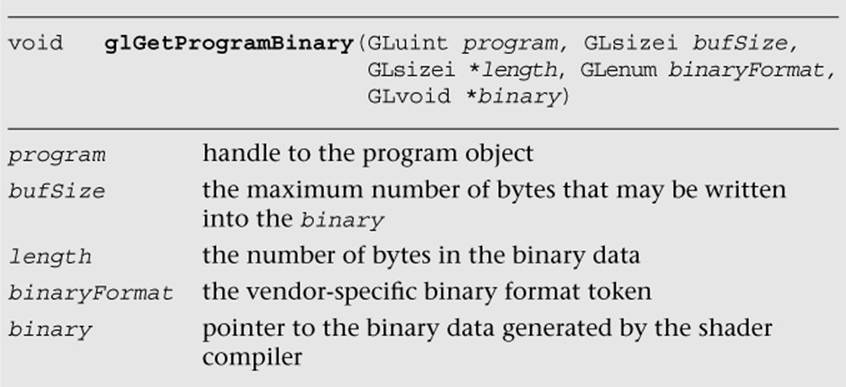
You can retrieve the program binary using glGetProgramBinary after you have compiled and linked the program successfully.
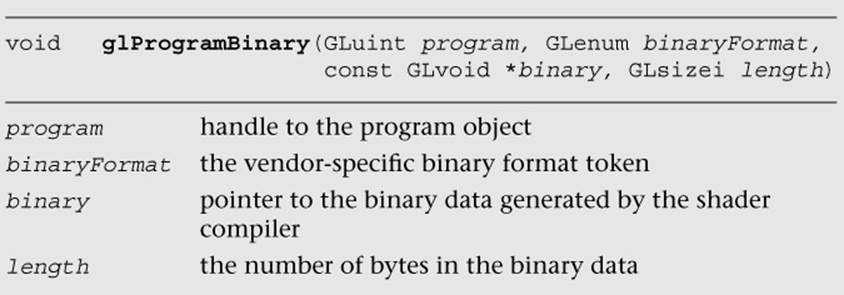
After you have retrieved the program binary, you can save it to the file system or load the program binary back into the implementation using glProgramBinary.
The OpenGL ES specification does not mandate any particular binary format; instead, the binary format is left completely up to the vendor. This obviously means that programs have less portability, but it also means the vendor can create a less burdensome implementation of OpenGL ES 3.0. In fact, the binary format may change from one driver version to another implemented by the same vendor. To ensure that the stored program binary is still compatible, after calling glProgramBinary, you can query the GL_LINK_STATUS through glGetProgramiv. If it is no longer compatible, then you will need to recompile the shader source code.
Summary
In this chapter, you learned how to create, compile, and link shaders into a program. Shader objects and program objects form the most fundamental objects in OpenGL ES 3.0. We discussed how to query the program object for information and how to load uniforms. In addition, you learned how source shaders and program binaries differ and how to use each. Next, you will learn how to write a shader using the OpenGL ES Shading Language.
All materials on the site are licensed Creative Commons Attribution-Sharealike 3.0 Unported CC BY-SA 3.0 & GNU Free Documentation License (GFDL)
If you are the copyright holder of any material contained on our site and intend to remove it, please contact our site administrator for approval.
© 2016-2026 All site design rights belong to S.Y.A.