Learn Ruby on Rails For Web Development (2015)
Chapter 3. ADDING BOOTSTRAP
So our app is starting to come together. We've got a couple of pages, and the beginning of a header navigation system. It's time to start styling our app to make it look a little more professional.
To do that, we're going to use something called "Bootstrap", which is a CSS framework that was created by a couple of guys at Twitter. It used to be called Twitter Bootstrap, but the guys have since left Twitter and taken Bootstrap with them, and now maintain it full-time on their own.
Bootstrap is one of the most popular CSS frameworks out there because it is incredibly easy to use and you don't need any front-end design experience to use it.
Take a minute to go check it out at: GetBootstrap.com
Click on the "Components" link at the top of the page and just sort of scroll through all the stuff on that page. You'll see a lot of the different things you can add to your website listed there.
Below each item you'll see a little snippet of code. Adding the item to your page is as easy as copying and pasting that code onto your site (in most cases).
INSTALLING BOOTSTRAP
To use Bootstrap in our App we need to add the Bootstrap Gem. The name of the Gem is "bootstrap-sass ", so let's head over to RubyGems.org and check it out (you always want to get into the habit of going to RubyGems.org and checking out a Gem before blindly installing it.
At RubyGems.org search for bootstrap-sass and it should be the first one listed:
bootstrap-sass 3.3.1.0
Twitter's Bootstrap, converted to Sass and ready to drop into Rails or Compass
**Note: the version number 3.3.1.0 might be different by the time this book is published, it's no big deal - they're always updating Gems.
Go ahead and click on it and you should see this standard page:

(RubyGems.org bootstrap-sass page)
There on the right-hand side of the screen you should see a little box labelled "GEMFILE:" with a little clipboard icon under it. Click the clipboard icon to copy the Gem reference and version number; it should look like this:
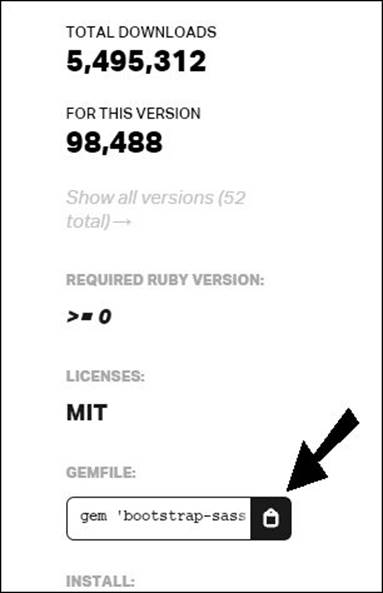
(gem 'bootstrap-sass', '~> 3.3.1.0')
Under that you should also see a link to the Gem's Documentation. That's where you would normally get instructions for installing and using the Gem. Take a minute to check it out and read through it.
So let's go ahead and add Bootstrap to our app. We need to add the reference to the bootstrap-sass Gem to our Gemfile:
/Gemfile
1 source 'https://rubygems.org'
2 gem 'rails', '4.1.6'
3 gem 'sass-rails', '~> 4.0.3'
4 gem 'uglifier', '>= 1.3.0'
5 gem 'coffee-rails', '~> 4.0.0'
6 gem 'jquery-rails'
7 gem 'turbolinks'
8 gem 'jbuilder', '~> 2.0'
9 gem 'sdoc', '~> 0.4.0', group: :doc
10 gem 'spring', group: :development
11 gem 'bootstrap-sass', '~> 3.3.1.0'
12
13 group :development, :test do
14 gem 'sqlite3'
15 end
16
17 group :production do
18 gem 'pg', '0.17.1'
19 gem 'rails_12factor', '0.0.2'
20 end
21
Notice line 11 is what we added. Save the file and close it, now we need to run the bundle install command like always when adding a new Gem.
1 $ bundle install
2
Sometimes those two steps are enough to install a Gem, but not this time. We need to do a few more things (as per the instructions in the Documentation at RubyGems.org).
Bootstrap is a CSS framework, so we need to add a CSS file to our app. You can name it just about anything, so I'm going to name it bootstraply.css.scss and it goes here: /app/assets/stylesheets/bootstraply.css.scss
We haven't really talked about the /app/assets/ folders yet, but if you just glance at it you'll see that it contains three directories (images, javascripts, and stylesheets). We won't get into it now, but you can guess that this is where your images, javascripts and stylesheets go...
For now, just right-click on the stylesheets directory and select "New File" (like we've done in the past) and name the new file bootstraply.css.scss
Next, open that newly created bootstraply.css.scss file and add these two lines of code:
1
2 @import "bootstrap-sprockets";
3 @import "bootstrap";
4
Actually, leave a couple of spaces above those two lines because we'll be adding more stuff to the top of that file later on.
We're almost finished, now we just need to add a reference to some javascript stuff that Bootstrap uses. Add these lines to our Javascript reference file:
/app/assets/javascripts/application.js
1 //= require jquery
2 .
3 .
4 //= require bootstrap-sprockets
5 //= require bootstrap
6 //= require_tree .
7
There will already be a bunch of stuff in that file, just put the two lines in bold above the //=require_tree . line and you should be good to go.
That should do it! It's a good idea to stop and restart your server whenever you add a new Gem, so let's do that now. Next head back to your website and reload the page: https://pinterested-codemy.c9.io (or whatever your URL is)
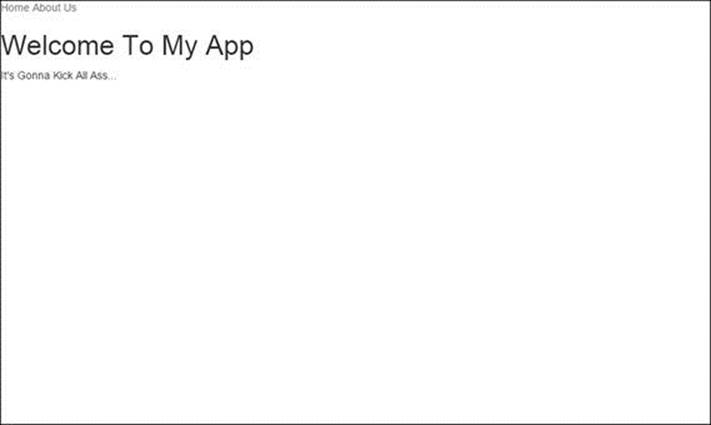
(https://pinterested-codemy.c9.io with Bootstrap Installed)
Notice anything different? Your page should look slightly different. The link colors should be different and the font should look a little different. That's Bootstrap at work.
You'll also notice that all the text is crunched up against the very side of the screen. Let's fix that real quick. All we need to do is open our application.html.erb file and wrap the <%= yield %> tag in a container div:
/app/views/layouts/application.html.erb
1 <!DOCTYPE html>
2 <html>
3 <head>
4 <title>Workspace</title>
5 <%= stylesheet_link_tag 'application', media: 'all', 'data-turbolinks-track' => true %>
6 <%= javascript_include_tag 'application', 'data-turbolinks-track' => true %>
7 <%= csrf_meta_tags %>
8 </head>
9 <body>
10 <%= render 'home/header' %>
11
12 <div class="container">
13 <%= yield %>
14 </div>
15
16 </body>
17 </html>
15
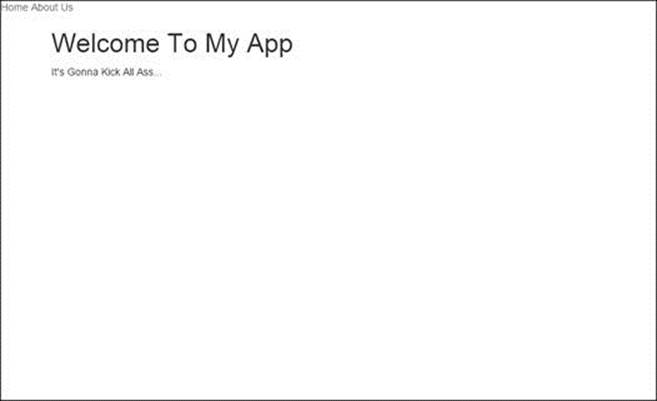
(https://pinterested-codemy.c9.io With Container Class Gutter)
That should add a gutter on the left and right side of the screen. I tend to do this with all my websites because it looks good and it's a standard layout thing to do.
PLAYING WITH BOOTSTRAP
So let's play around with Bootstrap a little bit. Let's start out by adding a Jumbotron to our Index page. Head over to GetBootStrap.com and click the "Components" tab at the top of the screen. Next, scroll down the list of links on the right hand side of the screen till you see the "Jumbotron" link, click it.
You'll see a Jumbotron with a bit of code below it:
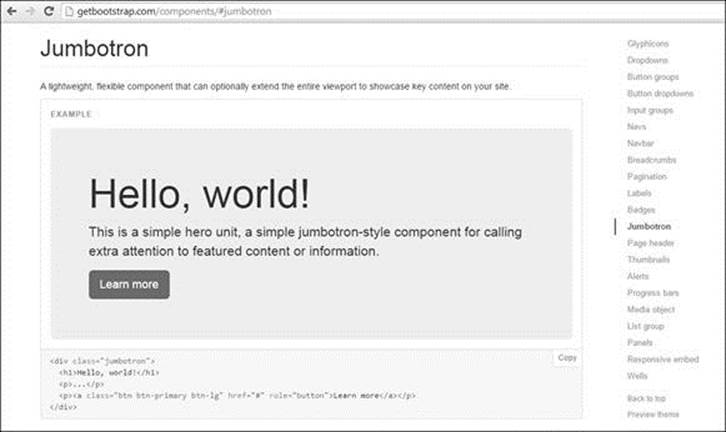
(GetBootstrap.com Jumbotron Component)
Take a look at the code below it. You'll notice that to add a Jumbotron to our site, we just need to wrap whatever we want the Jumbotron to include with this tag:
1 <div class="jumbotron">
2 .
3 .
4 </div>
So let's do that right now to our Index page:
/app/views/home/index.html.erb
1 <div class="jumbotron">
2 <h1>Welcome To My App</h1>
3 <p>It's Gonna Kick All Ass...</p>
4 </div>
5
Save it, then take a look at the page in your web browser. Pretty neat!
Now let's see how to make some buttons with Bootstrap. Let's add two buttons to our Jumbotron. Buttons are not listed on the "Components" page at GetBootstrap.com, but rather on the "CSS" page, so click the "CSS" link at the top of the page. Then, click the "Buttons" link on the right hand menu. Scroll down till you see the "Options" section for the buttons.
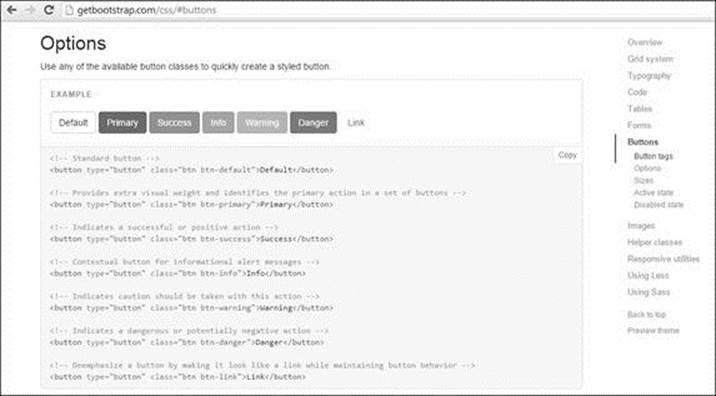
(http://getbootstrap.com/css/#buttons)
You see we have six different color options (white, blue, green, light blue, orange, and red). The corresponding code for each button can be found below the button images:
1 <button type="button" class="btn btn-default">Default</button>
2
Notice the Class= part. That's where you designate the color type. Default is white, Primary is blue, Success is green, Info is light blue, Warning is orange, and Danger is red.
Normally we only need to copy and paste the code from GetBootstrap.com into our app (like we did with the Jumbotron), but buttons are a little different because they are links, and we learned earlier that Rails does links a little differently (remember we used embedded Ruby to generate our page links).
We'll need to use the same embedded Ruby, but with a little twist. I'll show you how by adding two buttons to our Index page inside the jumbotron:
/app/views/home/index.html.erb
1 <div class="jumbotron">
2 <h1>Welcome To My App</h1>
3 <p>It's Gonna Kick All Ass...</p>
4 <%= link_to 'About Us', home_about_path, class: 'btn btn-default' %>
5 <%= link_to 'Home', root_path, class: 'btn btn-primary' %>
6 </div>
7
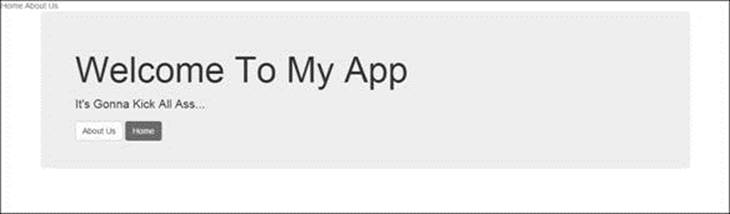
(https://pinterested-codemy.c9.io with Jumbotron and Buttons)
The link_to tag is exactly the same as we've used before, except we added a comma at the end and the class: 'btn btn-default' bit at the end. That tells Rails that this isn't just a link, but it's a button link. And I got that class stuff directly from the code beneath the buttons there at GetBootstrap.com
You'll notice I added two different colored buttons, a white one and a blue one just to mix things up. You can also change the size as well (see size listings in the button section at Getbootstrap.com).
For instance, if we had wanted to make one of the buttons large, it would look like this:
1 <%= link_to 'About Us', home_about_path, class: 'btn btn-default btn-lg' %>
2
**Note: I should point out that I use single quotes (') in the link_to tag above, but you can also use regular double quotes (") if you prefer. Rails accepts either.
ADDING A NAVBAR
So we've played around with Bootstrap a bit; adding a Jumbotron and some buttons, but now it's time to pull out the big guns and add a Navbar.

(http://getbootstrap.com/components/#navbar Bootstrap Navbar)
Navbars are located on the "Components" page at GetBootstrap.com, so go check them out. We'll use the first one they have listed, but I don't want a search bar or links right by the "Brand" logo, so I'll simply erase those lines from the code listed below the Navbar example.
We'll also replace the default links with the links to our exact pages. Where should we put all this code? Surely not at the top of every page of our site! Nope, we'll put it just once in our _header.html.erb partial file that gets called and outputted on every page automatically. In fact, we can erase what's in that file now and put our Navbar code:
/app/views/home/_header.html.erb
1 <nav class="navbar navbar-default" role="navigation">
2 <div class="container">
3 <!-- Brand and toggle get grouped for better mobile display -->
4 <div class="navbar-header">
5 <button type="button" class="navbar-toggle collapsed" data-
6 toggle="collapse" data-target="#bs-example-navbar-collapse-1">
7 <span class="sr-only">Toggle navigation</span>
8 <span class="icon-bar"></span>
9 <span class="icon-bar"></span>
10 <span class="icon-bar"></span>
11 </button>
12 <a class="navbar-brand" href="#">Brand</a>
13 </div>
14
15 <!-- Collect the nav links, forms, and other content for toggling -->
16 <div class="collapse navbar-collapse" id="bs-example-navbar-collapse-1">
17 <ul class="nav navbar-nav navbar-right">
18 <li><%= link_to 'Home', root_path %></li>
19 <li><%= link_to 'About Me', home_about_path %></li>
20 </ul>
21 </div><!-- /.navbar-collapse -->
22 </div><!-- /.container-fluid -->
23 </nav>
24
There's only a few differences between the code above and the code snippet listed at GetBootstrap.com
First, notice on line 2: <div class="container">, the default listed at GetBootstrap is <div class="container-fluid"> but I took out the fluid tag because I don't want it to be fluid.
Next, notice line 18 and 19, that's where our links go. The only difference between those two links and our old two links is that these two are wrapped in <li> and </li> tags, which is necessary for the Navbar.
Finally, I took out the reference to the search form and the default dropdown links that come with it because I don't want dropdown links.
So go ahead and save that file and hit reload at your site and your page should now look like this:
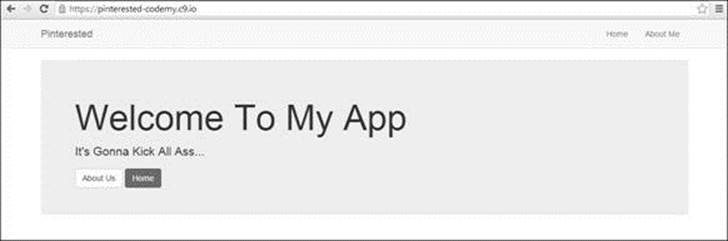
(https://pinterested-codemy.c9.io/ With Navbar and Jumbotron and Buttons)
You can also change line 12 above to say "Pinterested" instead of brand. In fact, let's change that line and make it an embedded Ruby link instead of a normal HTML link. Notice the HTML link has a class of "navbar-brand", we'll have to slap that onto the end of our Ruby link just like we did for the buttons.
1 <%= link_to 'Pinterested', root_path, class: 'navbar-brand' %>
2
Now our Navbar will say Pinterested instead of Brand and have a working link.
Throughout the rest of this book we'll do more stuff with Bootstrap, but I think you can probably already see how easy it is to work with and how quickly you can throw up some really professional looking front-end design stuff to make your site look really good.
Take some time to play around with Bootstrap on your own. Look through the different thing it offers and try some of them out. Have some fun with it and we'll get back into the serious stuff in the next chapter.
CUSTOMIZING BOOTSTRAP
Right out of the box, Bootstrap gives you a lot of flexibility, but you can actually customize Bootstrap to make it look exactly how you want it to look, and it's fairly easy. Don't like the color of the Navbar? We can change that. Don't like the color of the Jumbotron or buttons? We can change that too.
Bootstrap is built on something called LESS which is a dynamic stylesheet language that allows you to define variable and do different things.
HOWEVER, our version of Bootstrap doesn't use LESS, it uses SASS (remember when we installed the Bootstrap Gem, it was called bootstrap-sass?
SASS stands for "Syntactically Awesome StyleSheets" and is a scripting language similar to LESS.
Don't worry, you don't need to know much about SASS or LESS, all you need to know is one thing...LESS uses @ signs and SASS uses $ signs. We won't get much deeper than that!
So what?
SASS allows us to customize Bootstrap down to the nth level and get it to look exactly how we want it to look. To see how, head back to GetBootstrap.com and click the "Customize" link at the top of the screen. Next click the "Less Variables" link on the right-hand side of the screen.
You should see a big list of things, all of which can be customized.
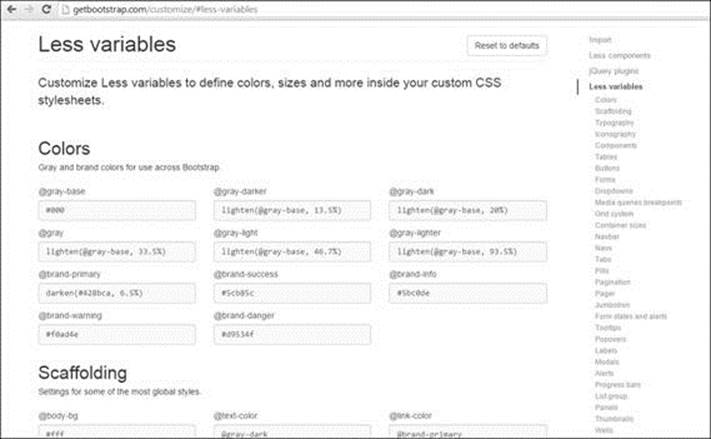
(http://getbootstrap.com/customize/#less-variables - Available Variables To Customize)
Browse through the list and pick something out. Let's look at the Jumbotron variables since we've got a Jumbotron on our Index page.
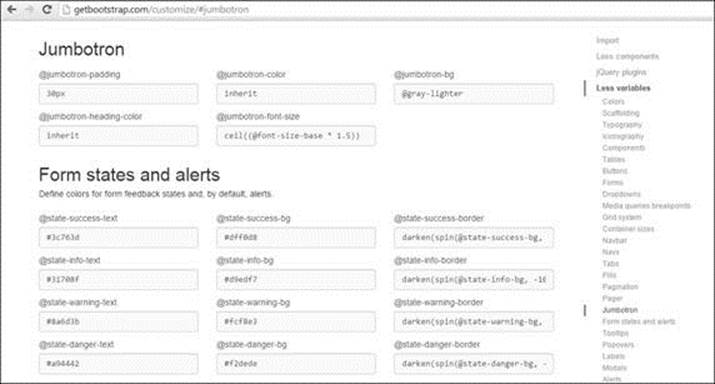
(http://getbootstrap.com/customize/#jumbotron)
All of the things listed here are things we can customize for our app. For instance, let's take this one:
1 @jumbotron-bg
2
Notice the @ sign? That's because it's Less. But like I said, we aren't using Less, we're using Sass so we need to change the @ to a $ when we use these things.
And how do we use them? We simply add them to our bootstraply.css.scss file that we created earlier when we installed the Bootstrap Gem.
/app/assets/stylesheets/bootstraply.css.scss
1 $jumbotron-bg: blue;
2 .
3 .
4 @import "bootstrap-sprockets";
5 @import "bootstrap";
6
7
Remember earlier when I told you to add some space above those two @import lines we added when we first created this file? That's because any time you add a Sass variable to this file, it needs to be ABOVE those two lines.
So what did we do here? We told our Bootstrap to make the background of our Jumbotron blue. Notice the format; $variable: output;
You have your Sass variable (that we took from the "Customize" page at GetBootstrap.com) with a dollar sign $ in front of it and a colon behind it, then a space, then whatever output you want (in our case blue) followed by a semi-colon.
I typed blue, just to make a clear example, but normally you would use a color hex code like: #0041a0; which is a shade of blue. So that line would look like this:
1 $jumbotron-bg: #0041a0;
2
You get the idea. So go ahead and save that and then go check it out by reloading your website at: https://pinterested-codemy.c9.io (or whatever your URL is)
The Jumbotron should be blue now. Neat!
And you can do that for any variable in the Less Variables list there on the "Customize" page at GetBootstrap.com
For instance, if you wanted to make the background color of the Navbar green, and the body of the entire site Pink, you would do this:
/app/assets/stylesheets/bootstraply.css.scss
1 $jumbotron-bg: blue;
2 $ navbar-default-bg: #014421;
3 $body-bg: #fa9fb9;
4 .
5 .
6 @import "bootstrap-sprockets";
7 @import "bootstrap";
8
In fact, try that out and see how it looks! The important thing is that you can customize almost everything, from sizes, to colors, and more.
Spend some time going through that list and looking at all the different things you can customize in Bootstrap. And it's all as easy as adding a single line of code to your bootstrap.css.scss file.
All materials on the site are licensed Creative Commons Attribution-Sharealike 3.0 Unported CC BY-SA 3.0 & GNU Free Documentation License (GFDL)
If you are the copyright holder of any material contained on our site and intend to remove it, please contact our site administrator for approval.
© 2016-2026 All site design rights belong to S.Y.A.