Learn Ruby on Rails For Web Development (2015)
Chapter 4. ADDING USERS WITH DEVISE
Our app is starting to come together! Now that we've introduced Bootstrap, we can begin to shape the look and feel of the app. But when you get right down to it...our app still doesn't really do anything.
It's time to change that.
One of the key components of our app is the ability for people to sign up for a user account, log in, log out, and update their user profile.
We don't want just anyone to be able to post Pinterest-style 'pins' to our site, we want them to sign up and sign in first.
Back in the old days, to write the code needed to handle all of that would be a huge pain in the ass and take a long time. There would have been lots of database work to deal with, and I hate database work!
Luckily, this is Ruby on Rails, and there's a Gem that will handle all of that nasty stuff for us...it's called "Devise".
Devise is a user authentication Gem that will easily handle signing in new users, allowing them to log in, log out, and update their own user profiles. It will also generate all the fill-out forms needed to accomplish this task, and handle all the nasty database stuff too.
All we have to do is install it and configure it, and we're off and running.
Head over to RubyGems.org and search for Devise. As of the writing of this book, Devise has been downloaded and installed nearly ten million times...so yeah, it's a popular Gem (and why not - try to think of any website in the world that doesn't need to sign up, in, and out users!).
As of the writing of this book, devise is on version 3.4.1 so that's what I'll add to our Gemfile:
/Gemfile
1 source 'https://rubygems.org'
2
3 gem 'rails', '4.1.6'
4 gem 'sqlite3'
5 gem 'sass-rails', '~> 4.0.3'
6 gem 'uglifier', '>= 1.3.0'
7 gem 'coffee-rails', '~> 4.0.0'
8 gem 'jquery-rails'
9 gem 'turbolinks'
10 gem 'jbuilder', '~> 2.0'
11 gem 'sdoc', '~> 0.4.0', group: :doc
12 gem 'spring', group: :development
13 gem 'bootstrap-sass', '~> 3.3.1.0'
14 gem 'devise', '~> 3.4.1'
15
16 group :development, :test do
17 gem 'sqlite3'
18 end
19
20 group :production do
21 gem 'pg', '0.17.1'
22 gem 'rails_12factor', '0.0.2'
23 end
24
As always, when we add a new Gem to our Gemfile, we need to run bundle install:
1 $ bundle install
2
Of course, Devise does a heck of a lot, and so it shouldn't surprise us that there are more steps to install and configure it than other Gems. You can read those steps in the Devise Documentation found at RubyGems.org but I'm going to walk you through them right now.
First we need to run the generator:
1 $ rails generate devise:install
2
That will generate a bunch of text to the terminal screen, and if you take a look at that text, you'll notice that it contains instructions for 5 more steps that you need to complete in order to install devise. Don't worry, they aren't too bad and we're going to walk through them right now.
Here are the instructions, straight from Devise's terminal output:
1. Ensure you have defined default url options in your environments files. Here is an example of default_url_options appropriate for a development environment in config/environments/development.rb:
config.action_mailer.default_url_options = { host: 'localhost', port: 3000 }
In production, :host should be set to the actual host of your application.
2. Ensure you have defined root_url to *something* in your config/routes.rb. For example: root to: "home#index"
3. Ensure you have flash messages in app/views/layouts/application.html.erb. For example:
<p class="notice"><%= notice %></p>
<p class="alert"><%= alert %></p>
4. If you are deploying on Heroku with Rails 3.2 only, you may want to set:
config.assets.initialize_on_precompile = false
5. You can copy Devise views (for customization) to your app by running:
rails g devise:views
So let's take a look at these. Right off the bat, we can ignore number four because we aren't using Rails 3.2 - in fact, we're using Rails 4.1.6 or higher.
We can also ignore number two because we've already defined our app's root index page earlier.
So that leaves us with 1, 3, and 5. Let's walk through those now.
STEP ONE
Let's look at step one. Basically we need to add a line of code to two files.
/config/environments/development.rb:
1 .
2 .
3 config.action_mailer.default_url_options = { host: 'localhost', port: 3000 }
4 end
5
Just paste line three at the bottom of that file (above the final 'end' that's already listed there).
Next we need to make a similar change to this file:
/config/environments/production.rb:
1 .
2 .
3 config.action_mailer.default_url_options = { host: ' pinterested99.herokuapp.com' }
4 end
5
Check out line three of this one. It's basically the same as line three from the last file, but instead of host: 'localhost', port: 3000 we put the URL of out actual live app on Heroku. You should put the URL of whatever you named your app at Heroku.
What's going on here? Well these two files correspond with our development environment and our production environment settings. We're basically just telling our app to use the Webrick server for our local development environment and use Heroku for our production environment.
STEP THREE
Now let's look at Step Three.
Step three wants us to add a bit of code to handle flash messages. Flash messages are basically little automatic prompts that appear on the web site whenever a user does something.
For instance, when a user signs in, they'll get a flash message at the top of the screen that says something like "You have successfully signed in". When they sign out, they'll get one that says "You have successfully signed out", etc.
Devise handles all of these messages automatically, but we need to add a bit of code to our app to show Devise where on the page we want those messages to appear.
Devise has given us some suggested code to post on our site:
1 <p class="notice"><%= notice %></p>
2 <p class="alert"><%= alert %></p>
3
But we want to change that a bit so that we can use Bootstrap to alter the look and feel of those flash messages. In fact, if you head back to GetBootStrap.com and click the "Components" link, you can scroll through the list and click the "Alerts" link.
A flash message is basically an alert, so we'll be using Bootstrap's alert class. You'll notice Bootstrap offers four colors for alerts; green (success), blue (info), yellow (warning), red (danger). We'll use blue.
So where should we post the code to handle the Devise flash messages? We want those messages to be able to flash on any page of our website, so the logical place to put the code would be our /app/views/layouts/application.html.erb file, right above the <%= yield %> tag and below our container div, so let's do that:
/app/views/layouts/application.html.erb
1 .
2 .
3 <div class="container">
4 <% flash.each do |name, msg| %>
5 <%= content_tag(:div, msg, class: "alert alert-info") %>
6 <% end %>
7 <%= yield %>
8 </div>
9 .
10
So let's look through this code since it's a little different than what Devise recommended to us.
This is a basic Ruby loop. It's basically saying: "for each flash message, do something", in our case the 'something' is to output the message in a CSS div with class "alert alert-info".
Where did I get class "alert alert-info"? I copied it from the code snippet over at GetBootstrap under the alert for a blue box. So our alerts will be blue.
You'll also notice that the first line Ruby tag doesn't have an equal sign as it's opening tag! <% flash.each do |name, msg| %> (the second line does but not the first).
What gives? Up until now, all of our embedded Ruby has started with a <%= tag. The equal sign means "output this to the screen", and we don't want to output anything when running our loop. We only want to output if the loop becomes true, hence the second line DOES have a <%= tag...because we want to output that stuff.
STEP FIVE
The only thing left to do is add the command from step five into the terminal, so let's go ahead and do that now:
1 $ rails g devise:views
2
This runs the generator for the devise views. Notice in the past we've always written out generate commands, like this:
1 $ rails generate devise:views
2
Just typing "g" instead of generate is shorthand and completely acceptable.
After you run this command, check out your /app/views/ directory. You should see a new folder named "devise". That folder contains a bunch of folders and all the new pages that Devise has automatically created to handle stuff like logging in, logging out, editing user profiles, resetting passwords, and stuff like that. Check it out!
The terminal should have displayed a bunch of text too...that's a breakdown of what Devise just added. So you can eyeball it. See all those pages? For instance, let's look at /app/views/devise/registrations/new.html.erb
I'm guessing that's the page that allows people to register for your site (create a 'new' registration). Open it in the text editor and you'll see a "Sign Up" tag right at the top of the file.
How about: app/views/devise/sessions/new.html.erb? That's the page that allows people to log in. When someone logs into your web site they are essentially creating a session. Logging in is the act of creating a new session.
Similarly, logging out is the act of deleting a session.
Devise has created a BUNCH of stuff, and to tell you the truth, we aren't even going to use most of it. So don't get overwhelmed.
We're not quite done installing Devise, there's still one more step. We've got devise set up, and we've created our views but we haven't connected Devise with our database so that we can keep track of all those users. Luckily it's not hard, we just need to issue two commands:
1 $ rails generate devise user
2 $ rake db:migrate
3
WORKING WITH DATABASES IN RAILS
We haven't really talked about databases much, but we need to now. Rails makes working with databases super easy, but you need to understand what's going on.
Whenever you want to do something with databases in Rails, you create a database migration, and then push that migration into the database. Think of a migration as a manifest...a list of stuff you want. Create your list, then stick it in the database.
Just now, when we issued the command: $ rails generate devise user we were creating a migration, and adding 'users' to it. In fact, you can even see the migration file. Migration files are located in the /db/ folder: /db/migrate/
Running that rails generate devise user command created this migration for me: 20141224175632_devise_create_users.rb located here:
/db/migrate/20141224175632_devise_create_users.rb
1 class DeviseCreateUsers < ActiveRecord::Migration
2 def change
3 create_table(:users) do |t|
4 ## Database authenticatable
5 t.string :email, null: false, default: ""
6 t.string :encrypted_password, null: false, default: ""
7
8 ## Recoverable
9 t.string :reset_password_token
10 t.datetime :reset_password_sent_at
11
12 ## Rememberable
13 t.datetime :remember_created_at
14
15 ## Trackable
16 t.integer :sign_in_count, default: 0, null: false
17 t.datetime :current_sign_in_at
18 t.datetime :last_sign_in_at
19 t.string :current_sign_in_ip
20 t.string :last_sign_in_ip
21
22 ## Confirmable
23 # t.string :confirmation_token
24 # t.datetime :confirmed_at
25 # t.datetime :confirmation_sent_at
26 # t.string :unconfirmed_email # Only if using reconfirmable
27
28 ## Lockable
29 # t.integer :failed_attempts, default: 0, null: false # Only if lock strategy is :failed_attempts
30 # t.string :unlock_token # Only if unlock strategy is :email or :both
31 # t.datetime :locked_at
32
33
34 t.timestamps
35 end
36
37 add_index :users, :email, unique: true
38 add_index :users, :reset_password_token, unique: true
39 # add_index :users, :confirmation_token, unique: true
40 # add_index :users, :unlock_token, unique: true
41 end
42 end
43
So there's a lot of stuff here, and you don't really need to know what any of it means, but take a look through it and see if anything jumps out at you.
We can see there's a reference to emails and passwords (because our users will log in with emails and passwords), there's some time stuff so we can keep track of when someone is logged in, and there's password reset stuff.
Like I said though, we don't really need to know what any of that stuff means at this point, or really ever. Just know that we've created a migration.
To push that migration into our database, we issued the $ rake db:migrate command.
DEVELOPMENT DATABASE VS. PRODUCTION DATABASE
Before we go any further, we need to talk databases a bit (Since we're using them now). I mentioned this earlier when we set up Heroku for the first time but I wanted to touch on it again.
In our development environment, we're using a database called: sqlite3. It's a very light-weight database that comes installed with Rails. In fact, if you look at your Gemfile, you'll see a reference to it.
Like I mentioned earlier, sqlite3 isn't really an appropriate database to use for our finished production level website. We needed to designate another database for that.
We're going to use the Postgres database. Why? Heroku likes Postgres, and it's super easy to use. The only thing we really need to do is add the Postgres Gem to our Gemfile (which we did earlier). You'll remember it was a little more complicated than adding a regular Gem, simply because we need to tell our app to use sqlite3 for development and postgres for production...but still pretty simple.
So here's what we did:
/Gemfile
1 source 'https://rubygems.org'
2
3 gem 'rails', '4.1.6'
4 gem 'sass-rails', '~> 4.0.3'
5 gem 'uglifier', '>= 1.3.0'
6 gem 'coffee-rails', '~> 4.0.0'
7 gem 'jquery-rails'
8 gem 'turbolinks'
9 gem 'jbuilder', '~> 2.0'
10 gem 'sdoc', '~> 0.4.0', group: :doc
11 gem 'spring', group: :development
12 gem 'bootstrap-sass', '~> 3.3.1.0'
13 gem 'devise', '~> 3.4.1'
14
15 group :development, :test do
16 gem 'sqlite3'
17 end
18
19 group :production do
20 gem 'pg', '0.17.1'
21 gem 'rails_12factor', '0.0.2'
22 end
23
So we've done two things here. First, we REMOVED the original reference to the gem 'sqlite3' that was in there from when we started our project. We still want to reference it, but we do that by adding it to the group reference on line 15.
That 'group' reference is basically telling our app to use sqlite3 in our development and test environment (remember, we won't be doing any test environment stuff in this book).
Second, we added the postgres database (pg) and rails_12factor (which you need to add with it for Heroku), and designated those to be used in our production environment.
Whenever we add Gems to our Gemfile we need to run bundle install, but this time it needed to be a little different. We needed to run bundle install without production. If you think about that; it makes sense, because we don't want to install the postgres database in our development environment. Here's the command:
1 $ bundle install --without production
2
Note: that 'without' has two dashes in front of it --
We only need to run that special bundle install command once; Rails will remember from now on not to install production stuff.
Why am I talking about all of this again? Because I want to make sure that you understand that we are using two separate databases. It's important to keep that in mind.
Why? Because whenever we run a migration, we're only pushing that migration into our local database, not our production database. We also need to push it into the production database (postgres in this case) up on Heroku.
PUSHING MIGRATIONS TO POSTGRES AT HEROKU
Stick with me here... when we ran the $ rails generate devise user command we created a migration for our users. Then, when we ran the $ rake db:migrate command we pushed that migration into our database...that is, into our sqlite3 database.
We haven't pushed it into our Postgres database sitting up at Heroku; and we need to do that. Every time you push a new migration to the local development environment database (sqlite3), you ALSO need to push the migration to your production environment database (postgres). You do that with this command:
1 $ heroku run rake db:migrate
2
That looks an awful lot like the "rake db:migrate" command we use locally, it just slaps a "heroku run" to the front of it. Just remember that if you don't run this command, your database won't work on Heroku.
CHECK OUT OUR NEW DEVISE WEB PAGES
Alright! We've now completed the Devise installation, we've run our Users migration so Devise can keep track of all the users in both our development and production environments, and we've generated the Views that create the pages that allow people to log in and out and all that good stuff.
So let's take a look at those pages!
First, be sure to stop your web server and restart it.
Next, to find out where those pages are, we need to find the routes that Devise has generated for each of them. So let's run our trusty rake routes command:
1 $ rake routes
2
Remember the last time we ran this command, we only had two pages in our app (index and about). Now there's a whole bunch of stuff listed there!
1 $ rake routes
2 Prefix Verb URI Pattern Controller#Action
3 new_user_session GET /users/sign_in(.:format) devise/sessions#new
4 user_session POST /users/sign_in(.:format) devise/sessions#create
5 .
6 .
7
Just like earlier, the first column is the route. The second is whether it's a web page (GET), a form submission (POST), or a logout (DELETE). The third column is the URL pattern, and we'll use that to navigate to the page in our web browser. The fourth column is the Controller Action.
I didn't print the whole list here, just the first couple of listings, but you can run the rake routes command yourself and see the full list.
Remember, the ones listed as GET generally tend to be web pages. So let's pick one of them and punch it into our web browser and see what it looks like!
https://pinterested-codemy.c9.io/users/sign_up (or whatever your url is)
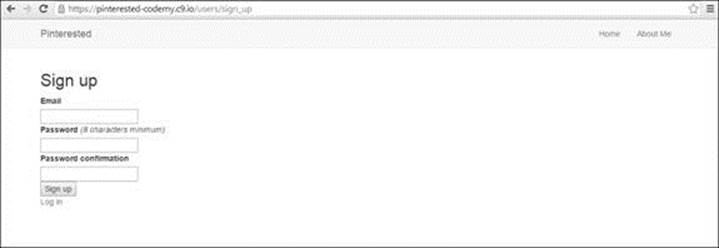
(https://pinterested-codemy.c9.io/users/sign_up - Devise User Sign Up Page)
Check out the Login page (/users/sign_in):
https://pinterested-codemy.c9.io/users/sign_in (or whatever your url is)
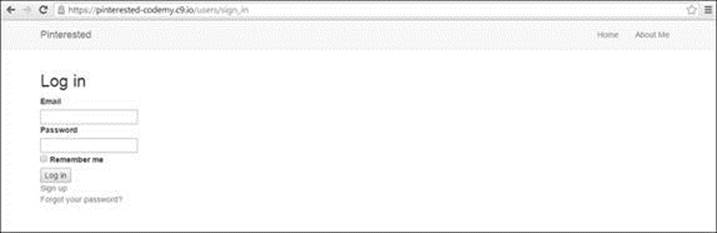
(https://pinterested-codemy.c9.io/users/sign_in - Devise Users Sign In Page)
There's a link on that page for people who have forgotten their password and need it sent to them, you can check that out as well.
These pages and the forms on them are fully functional. You can now sign up for an account, sign in etc. Sure, the pages look a little lame, but the functionality works and we'll spruce up how they look next.
STYLING DEVISE VIEWS
So let's dive in and make these pages look a little better. It's fairly easy to do. All of the files that we need to edit are located in your /app/views/devise/ folder. Let's start by editing the page that allows people to sign up for an account:
/app/views/devise/registrations/new.html.erb
1 <h2>Sign up</h2>
2
3 <%= form_for(resource, as: resource_name, url: registration_path(resource_name)) do |f| %>
4 <%= devise_error_messages! %>
5
6 <div class="field">
7 <%= f.label :email %><br />
8 <%= f.email_field :email, autofocus: true %>
9 </div>
10
11 <div class="field">
12 <%= f.label :password %>
13 <% if @validatable %>
14 <em>(<%= @minimum_password_length %> characters minimum)</em>
15 <% end %><br />
16 <%= f.password_field :password, autocomplete: "off" %>
17 </div>
18
19 <div class="field">
20 <%= f.label :password_confirmation %><br />
21 <%= f.password_field :password_confirmation, autocomplete: "off" %>
22 </div>
23
24 <div class="actions">
25 <%= f.submit "Sign up" %>
26 </div>
27 <% end %>
28
29 <%= render "devise/shared/links" %>
30
This may be the most complicated looking file we've seen so far, but it's not that bad. To edit these Devise views, we're going to use Bootstrap (of course!).
Head over to GetBootstrap.com and click the CSS tab at the top of the screen; then click the "Forms" link on the right-hand side of the screen. There are a couple of things we need to do. We won't be copying and pasting all the code below the example form at GetBootstrap.com, instead we'll just pick out two pieces.
First, Bootstrap wants us to wrap each input field and label in a form-group div:
1 <div class="form-group">
2 .
3 .
4 </div>
5
Our new.html.erb file already wraps those things in a div, but it names the div class as "field". You can see this on line 6, 11, and 19 above.
No problem, just replace "field" with "form-group on lines 6, 11, and 19 above.
Second, Bootstrap wants us to add a "form-control" class to each input field. (the input field is the box that you type stuff in on the web form). In our new.html.erb file above, those are located on line 8, 16, and 21:
7
8 <%= f.email_field :email, autofocus: true, class: 'form-control' %>
9
15
16 <%= f.password_field :password, autocomplete: "off", class: 'form-control' %>
17
20
21 <%= f.password_field :password_confirmation, autocomplete: "off", class: 'form-control' %>
22
Third, notice how our form makes people type in a password, and then type in that password again to confirm it? I don't really think we need people to double type their password for our simple app, so I'm going to remove that. All we have to do is erase lines 19 thru 22.
Fourth, what about the 'Submit' button? It looks a little bland...we can use a Bootstrap button like we've used on our Index page. Let's do that:
24
25 <%= f.submit "Sign up", class: 'btn btn-primary' %>
26
So here's what our updated file should look like now:
/app/views/devise/registrations/new.html.erb
1 <h2>Sign up</h2>
2
3 <%= form_for(resource, as: resource_name, url: registration_path(resource_name)) do |f| %>
4 <%= devise_error_messages! %>
5
6 <div class="form-group">
7 <%= f.label :email %><br />
8 <%= f.email_field :email, autofocus: true, class: 'form-control' %>
9 </div>
10
11 <div class="form-group">
12 <%= f.label :password %>
13 <% if @validatable %>
14 <em>(<%= @minimum_password_length %> characters minimum)</em>
15 <% end %><br />
16 <%= f.password_field :password, autocomplete: "off", class: 'form-control' %>
17 </div>
18
19
20 <div class="actions">
21 <%= f.submit "Sign up", class: 'btn btn-primary' %>
22 </div>
23 <% end %>
24
25 <%= render "devise/shared/links" %>
26
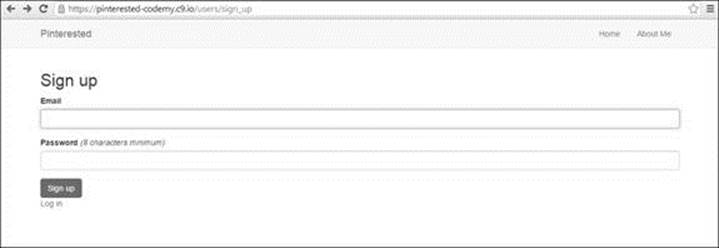
(https://pinterested-codemy.c9.io/users/sign_up - Devise User Sign Up Page)
So this definitely looks better, but we can do even better by adding panels. Head back to GetBootstrap.com, click the "Components" link, and then click the "Panels" link on the right-hand side of the screen.
We want to add a "Panel with heading", and we'll also put a "Panel with footing" at the bottom where our "login" link is. Here's how:
/app/views/devise/registrations/new.html.erb
1 <div class="panel panel-default">
2 <div class="panel-heading"><h2>Sign up</h2></div>
3 <div class="panel-body">
4
5 <%= form_for(resource, as: resource_name, url: registration_path(resource_name)) do |f| %>
6 <%= devise_error_messages! %>
7
8 <div class="form-group">
9 <%= f.label :email %><br />
10 <%= f.email_field :email, autofocus: true, class: 'form-control' %>
11 </div>
12
13 <div class="form-group">
14 <%= f.label :password %>
15 <% if @validatable %>
16 <em>(<%= @minimum_password_length %> characters minimum)</em>
17 <% end %><br />
18 <%= f.password_field :password, autocomplete: "off", class: 'form-control' %>
19 </div>
20
21
22 <div class="actions">
23 <%= f.submit "Sign up", class: 'btn btn-primary' %>
24 </div>
25 <% end %>
26 </div>
27 <div class="panel-footer"><%= render "devise/shared/links" %></div>
28 </div>
29
You can see the changes in bold. Basically we wrapped the whole page in a div with class="panel panel-default", wrapped the page header in a div with class="panel-heading", wrapped the main meat and potatoes of the page in a div with class="panel-body", and then wrapped the links at the body of the page in a div with class="panel-footer".
The result should look like this:
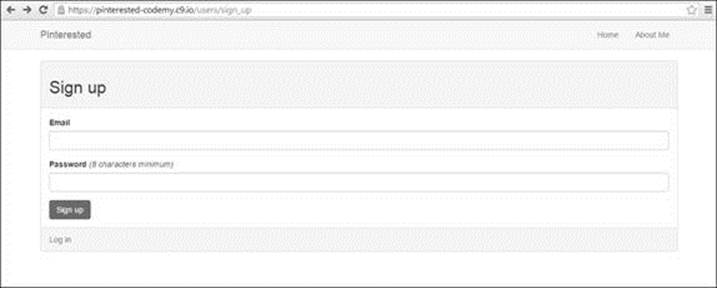
(https://pinterested-codemy.c9.io/users/sign_up - Devise User Sign Up Page Finished Layout)
You can go through yourself and make these exact same changes to the other Devise views that have forms:
/app/views/devise/registrations/edit.html.erb (lets users edit their profile)
/app/views/devise/sessions/new.html.erb (lets users log in)
/app/views/devise/passwords/new.html.erb (forgotten password page)
You'll notice that those pages all look similar, so you should be able to duplicate the changes we just made to our /app/views/devise/registrations/new.html.erb to each of them.
ADDING LINKS TO DEVISE PAGES
So now we've got our Devise pages looking pretty good, now we need to add links to those pages into our Navbar at the top of each page. We'll add those links using the Ruby link_to tag like we've done in the past, but this time we'll add a little twist.
We aren't going to want to show links to all of the devise pages to all of the people who visit our site. For instance, we don't want to show a link to the "Edit User" page on our Navbar if the person viewing the site has not logged in yet (or isn't even a user!).
Similarly, we don't need to show a link to the login page after a person has already logged in.
And finally, we need to add a link to log out, and that link looks a little different than other links we've created in the past.
DETERMINING WHETHER A USER IS LOGGED IN OR NOT
So first things first, how can we determine whether a user is already logged in or not? Luckily it's pretty easy in rails, we'll just use a bit of Ruby code and a simple "If" statement.
It will basically say "If a user is logged in, show these links, if not - show these other links". Here's the code:
1 <% if user_signed_in? %>
2 .
3 .
4 <% else %>
5 .
6 .
7 <% end %>
8
The links that we want to appear only when a user is signed in (edit profile, logout) are listed right after line one and before the "else" statement. The links that we'd like to appear when a user is not signed in (login, sign up) go after the "else" statement and before the "end" statement.
To get the paths to the different pages we'd like to add (edit profile, logout, login, sign up) we can run our trusty rake routes command:
1 $ rake routes
2
And pay special attention to the ones listed as "GET" (remember to slap a _path to the end for our link_to Ruby code:
Log In: new_user_session_path
Edit Profile: edit_user_registration_path
Sign Up: new_user_registration_path
Log Out: destroy_user_session_path
Let's look at the last one, the Log Out path. When you run the rake routes command, you'll see it listed as DELETE, not GET. This makes a certain amount of sense because logging out is basically "deleting a session".
But creating a link to a DELETE event is a little different than a regular link. It looks like this:
1 <%= link_to 'Logout', destroy_user_session_path, method: :delete %>
2
You'll notice the link is the same, except we slapped a "method: :delete" bit to the end. Pretty simple.
UPDATING THE NAVBAR
So now we've got our If statement lined up, and we've got the paths to the new Devise pages that we'd like to add. Let's update our Navbar:
/app/views/home/_header.html.erb
1 <nav class="navbar navbar-default" role="navigation">
2 <div class="container">
3 <!-- Brand and toggle get grouped for better mobile display -->
4 <div class="navbar-header">
5 <button type="button" class="navbar-toggle collapsed" data-
6 toggle="collapse" data-target="#bs-example-navbar-collapse-1">
7 <span class="sr-only">Toggle navigation</span>
8 <span class="icon-bar"></span>
9 <span class="icon-bar"></span>
10 <span class="icon-bar"></span>
11 </button>
12 <%= link_to 'Pinterested', root_path, class: 'navbar-brand' %>
13 </div>
14
15 <!-- Collect the nav links, forms, and other content for toggling -->
16 <div class="collapse navbar-collapse" id="bs-example-navbar-collapse-1">
17 <ul class="nav navbar-nav navbar-right">
18 <li><%= link_to 'Home', root_path %></li>
19 <li><%= link_to 'About Me', home_about_path %></li>
20
21 <% if user_signed_in? %>
22 <li><%= link_to 'Edit Profile', edit_user_registration_path %></li>
23 <li><%= link_to 'Logout', destroy_user_session_path, method: :delete %></li>
24 <% else %>
25 <li><%= link_to "Login", new_user_session_path %></li>
26 <li><%= link_to "Join", new_user_registration_path %></li>
27 <% end %>
28 </ul>
29 </div><!-- /.navbar-collapse -->
30 </div><!-- /.container-fluid -->
31 </nav>
32
So the changes are lines 21 through 27. Notice we put the IF statement that checks whether a user is signed in or not AFTER the first two links (Home and About) because we want those two links to show up if a user is signed in or not signed in.
We're moving right along. We can add new users, log in, log out, update user profiles, and our Navbar now shows links dynamically based on whether a user is logged in or out.
Now it's time to start adding real functionality to our site and allow people to start uploading pinterest style "pins", and that's what we'll do in the next chapter.
All materials on the site are licensed Creative Commons Attribution-Sharealike 3.0 Unported CC BY-SA 3.0 & GNU Free Documentation License (GFDL)
If you are the copyright holder of any material contained on our site and intend to remove it, please contact our site administrator for approval.
© 2016-2026 All site design rights belong to S.Y.A.