Learn Ruby on Rails For Web Development (2015)
Chapter 8. STYLING WITH JQUERY MASONRY AND ADDING PAGINATION
We're nearing the end of our project! All we need to do is tinker with the look and feel of things, make some minor changes, and we'll be done.
Let's dive right in and get started!
First things first, our pins index page doesn't look like pinterest in any way shape or form. We need to change that pronto.
What we want is for each pin to be square/rectangular in form with the image on top, followed by the description below it. This sounds like a job for Bootstrap panels to me! But first we need to do some other stuff...
Right now our pins index page is dominated by that ugly table. Let's get rid of all traces of that table now, and we can get rid of the <h1> Listing pins</h1> tag too:
/app/views/pins/index.html.erb
1 <% @pins.each do |pin| %>
2 <%= image_tag pin.image.url(:medium) %>
3 <%= pin.description %>
4 <%= link_to 'Show', pin %>
5 <% if pin.user == current_user %>
6 <%= link_to 'Edit', edit_pin_path(pin) %>
7 <%= link_to 'Destroy', pin, method: :delete, data: { confirm: 'Are you
8 sure?' } %>
9 <% end %>
9 <% end %>
10 <br/>
11 <%= link_to 'New Pin', new_pin_path %>
12
I took out all traces of the table stuff. All the <td> and their corresponding </td> tags, all the <tr> tags...everything table related. It didn't leave us with much left!
Now let's add some line breaks to get things looking a little better:
/app/views/pins/index.html.erb
1 <% @pins.each do |pin| %>
3 <%= image_tag pin.image.url(:medium) %><br/>
5 <%= pin.description %><br/>
7
9 <%= link_to 'Show', pin %><br/>
10 <% if pin.user == current_user %>
11 <%= link_to 'Edit', edit_pin_path(pin) %><br/>
12 <%= link_to 'Destroy', pin, method: :delete, data: { confirm: 'Are you
13 sure?' } %><br/>
14 <% end %>
17 <% end %>
18 <br/>
19 <%= link_to 'New Pin', new_pin_path %>
20
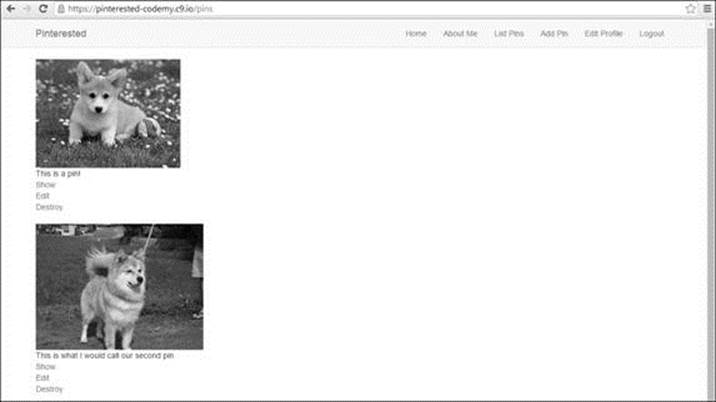
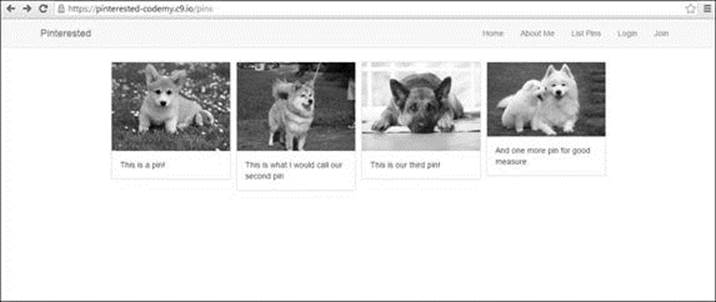
(Pins Index Page Without Formatting)
And while we're at it, let's get rid of the "Show" link. Instead, let's make the image itself clickable. All we have to do is modify line 3 above (the image tag).
1 <%= link_to image_tag(pin.image.url(:medium)), pin %>
2
So now our pins index page looks like this:
/app/views/pins/index.html.erb
1 <% @pins.each do |pin| %>
2 <%= link_to image_tag(pin.image.url(:medium)), pin %><br/>
3 <%= pin.description %><br/>
4
5 <% if pin.user == current_user %>
6 <%= link_to 'Edit', edit_pin_path(pin) %><br/>
7 <%= link_to 'Destroy', pin, method: :delete, data: { confirm: 'Are you
8 sure?' } %><br/>
9 <% end %>
10 <br/>
11 <% end %>
12 <%= link_to 'New Pin', new_pin_path %>
13
So far so good; the pins look a little better, the only problem is that they scroll vertically down the page instead of horizontally across the page.
And when you resize the page, we want the pins to move around in a sort of animated way, just to add some cool effects to the site.
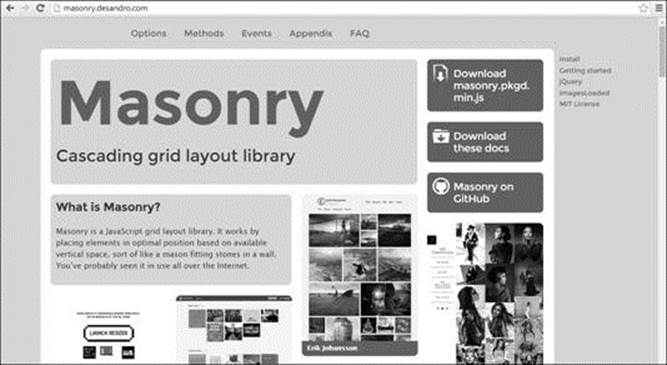
To do that, we're going to use something called jQuery Masonry. You can take a look at it at: http://masonry.desandro.com/
As like most things in Rails, Masonry comes as a Gem, so head over to RubyGems.org and search for masonry-rails and as of this book, the version number is 0.2.4, so go ahead and copy the reference and add it to your Gemfile. We'll also add jquery-turbolinks while we're at it.
Gemfile
1 .
2 .
3 gem 'jquery-turbolinks'
4 gem 'masonry-rails', '~> 0.2.4'
5
And as always, run bundle install to install it:
1 $ bundle install
2
While you're at RubyGems.org, click the "Documentation" link for Masonry and look through it, there's a few more steps to install this thing and they're precise.
Scroll down until you see the CSS Usage section:
/app/assets/stylesheets/application.css
1 .
2 .
3 *= require 'masonry/basic'
4 *= require 'masonry/centered'
5 *= require 'masonry/fluid'
6 *= require 'masonry/gutters'
7 *= require 'masonry/infinitescroll'
8 *= require 'masonry/right-to-left'
9 *= require 'masonry/transitions'
10 *= require_self
11 *= require_tree .
12 */
13
These app/assets/ files look a little different than other files we've played with so far. Take a look at line 10 and line 11 above. Basically line 11 tells our app to add all the files in this directory to our project, and line 10 tells our app to add this file to the project. So when we add things to that file, I like to put them above those two lines.
Let's look at all the things we just added (lines 3-9). Those are all the different things that Masonry will do. Notice the infinitescroll thing? You've probably seen that on websites before...
But actually, we don't need all of those things, we only need the transitions one. So let's update the file:
/app/assets/stylesheets/application.css
1 .
2 .
3 *= require 'masonry/transitions'
4 *= require_self
5 *= require_tree .
6 */
7
Looking through the Masonry documentation, we'll see that we also need to add a couple of lines to our Javascript manifest file as well:
/app/assets/javascripts/application.js
1 .
2 .
3 //= require jquery
4 //= require jquery.turbolinks
5 //= require jquery_ujs
6 //= require turbolinks
7 //= require bootstrap-sprockets
8 //= require bootstrap
9 //= require masonry/jquery.masonry
10 //= require_tree .
It's important to add the jquery.turbolinks reference directly below the jquery reference, otherwise things can get wonky and might not work.
Finally, we need to add a bit of CoffeeScript to our pins.js.coffee file:
/app/assets/javascripts/pins.js.coffee
1 # Place all the behaviors and hooks related to the matching controller here.
2 # All this logic will automatically be available in application.js.
3 # You can use CoffeeScript in this file: http://coffeescript.org/
4 $ ->
5 $('#pins').imagesLoaded ->
6 $('#pins').masonry
7 itemSelector: '.box'
8 isFitWidth: true
9
Finally, we've got to add a little bit of custom CSS to our CSS file:
/app/assets/stylesheets/pins.css.scss
1 // Place all the styles related to the pins controller here.
2 // They will automatically be included in application.css.
3 // You can use Sass (SCSS) here: http://sass-lang.com/
4
5 #pins {
6 margin: 0 auto;
7 }
8
9 .box {
10 margin: 5px;
11 width: 214px;
12 }
13
14 .box img {
15 width: 100%;
16 }
17
Strictly speaking, we could probably add that bit of CSS to our bootstraply.css.scss file, but since this code is going to style our pins, I put it in our pins.css.scss file.
That should take care of the setup for this thing, but now we need to configure our pins index page to actually use Masonry, and if you scroll down through the Masonry documentation, you'll see a section on 'Setup' that shows you how to call the divs and classes on your web page.
/app/views/pins/index.html.erb
1 <div id="pins" class="transitions-enabled">
2 <% @pins.each do |pin| %>
3 <div class="box">
4 <div class="panel panel-default">
5 <%= link_to image_tag(pin.image.url(:medium)), pin %><br/>
6 <div class="panel-body">
7 <%= pin.description %>
8 </div>
9
10 <div class="panel-footer">
11 <% if pin.user == current_user %>
12 <%= link_to 'Edit', edit_pin_path(pin) %>
13 <%= link_to 'Destroy', pin, method: :delete, data: { confirm: 'Are you
14 sure?' } %>
15 <% end %>
16 </div>
17 <% end %>
18
19 <%= link_to 'New Pin', new_pin_path %>
20 </div>
21 </div>
22 </div>
23
Basically all we're doing is (line 1) wrapping the entire page in a div with ID="pins" (which corresponds with the css we just added to our pins.css.scss file and as well as our pins.js.coffee file) and class=" transitions-enabled" (which tells masonry to do its transitions thing).
We're also (line 3) wrapping each individual pin in a div with class="boxy" which also corresponds with the css we just added to our pins.css.scss file as well as our pins.js.coffee file.
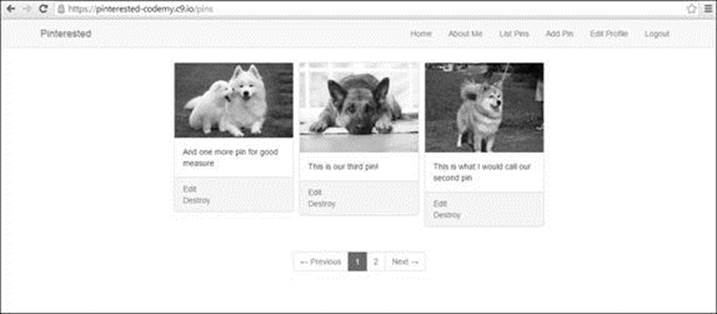
So if we restart our server and check out our website, our pins index page should scroll horizontally. And if we resize the screen, the pins should move about and resize with a cool animated transition effect.
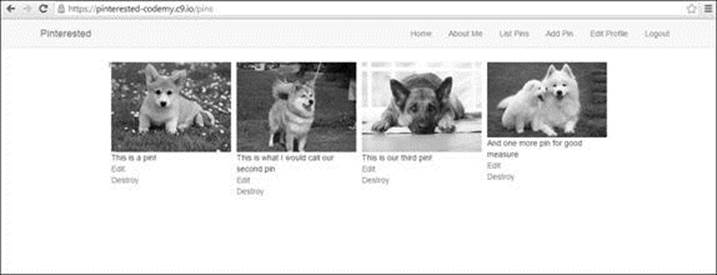
(Pins Index Page With Masonry Installed)
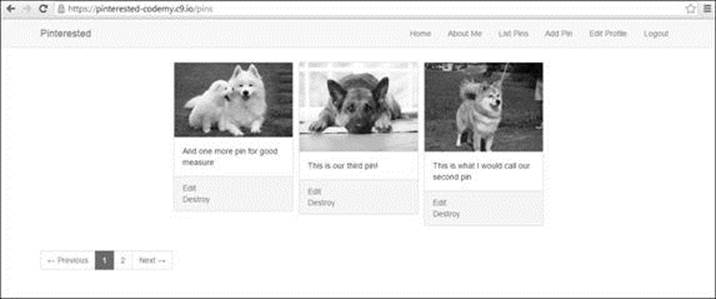
Now we can do the final step to make our pins look more like real Pinterest pins, and I think it's a perfect job for Bootstrap Panels:
/app/views/pins/index.html.erb
1 <div id="pins" class="transitions-enabled">
2 <% @pins.each do |pin| %>
3 <div class="box">
4 <div class="panel panel-default">
5 <%= link_to image_tag(pin.image.url(:medium)), pin %><br/>
6 <div class="panel-body">
7 <%= pin.description %><br/>
8 </div>
9 <% if pin.user == current_user %>
10 <div class="panel-footer">
11 <%= link_to 'Edit', edit_pin_path(pin) %><br/>
12 <%= link_to 'Destroy', pin, method: :delete, data: { confirm: 'Are you
13 sure?' } %>
14 </div>
15 <% end %>
16 </div>
17 </div>
18 <% end %>
19 </div>
20
You'll notice that I took out the link to "Add A New Pin" because we've got a link to that at the top of every page on the Navbar. Check it out:
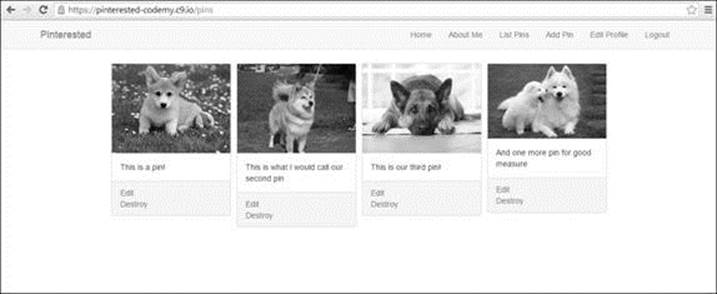
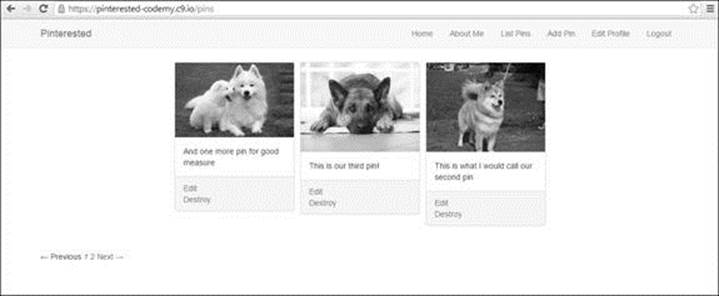
(Pins Index Page With Panels)
You'll also notice that we've placed the "Edit" and "Destroy" links in a panel-footer that only shows up if a user is logged in and if they are the one who posted that specific pin. So if we log out and view the pins page, it will look like this:
(Pins Index Page Not Logged In - No Panel Footer Links)
Basically at this point we can play around with the look and feel of these pins any way we like. I'll leave it to you to put your own spin on the final layout of your own app - have some fun with it!
TWEAKING PINS SHOW PAGE
Our pins index page looks pretty good, now let's edit our pins show page to look better:
/app/views/pins/show.html.erb
1
2 <div class="row">
3 <div class="col-md-offset-2 col-md-8">
4
5 <div class="panel panel-default">
6 <div class="panel-heading center"><%= image_tag @pin.image.url(:medium) %></div>
7 <div class="panel-body">
8
9 <%= @pin.description %><br/>
10
11 <% if @pin.user == current_user %>
12 <%= link_to 'Edit', edit_pin_path(@pin) %> |
13 <% end %>
14 <%= link_to 'Back', pins_path %>
15 </div>
16 </div>
17 </div>
18 </div>
19
The first thing I did was remove line one:
1 <p id="notice"><%= notice %></p>
2
I did that because we tweaked our pins controller a while back to output a flash message itself, so that line would result in two flash messages being shown at once and that's not cool.
Next, I wrapped the whole thing in a row div class because Bootstrap likes that, then I added line 3 to center things. Then I just wrapped the whole thing in a panel like we've done so many times in the past.
The layout is pretty simple, but gets the job done and I think we can call that done.
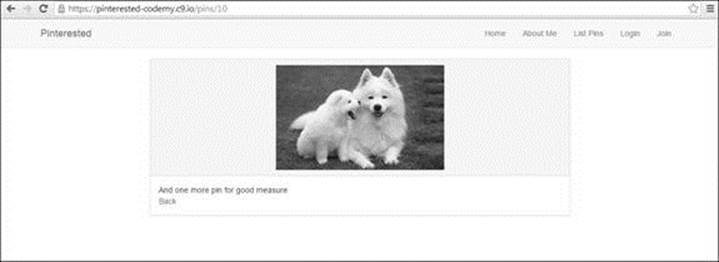
(Pins Show Page - Centered With Panels)
MAKING OUR SITE MOBILE FRIENDLY
These days your website has to be mobile friendly. Luckily for us, Bootstrap has taken care of all that for us. The only thing we have to do is add one single line to our layouts/application.html.erb file to tell the web browser that our site is mobile ready:
/app/views/layouts/application.html.erb
1 <!DOCTYPE html>
2 <html>
3 <head>
4 <title>Pinterested</title>
5 <%= stylesheet_link_tag 'application', media: 'all', 'data-turbolinks-track' => true %>
6 <%= javascript_include_tag 'application', 'data-turbolinks-track' => true %>
7 <%= csrf_meta_tags %>
8 <meta name="viewport" content="width=device-width, initial-scale=1, maximum-scale=1">
9
10 </head>
11 <body>
12 .
13 .
Line 8 is all we need to add to make our site mobile friendly. Now if you check out the site on a smart phone, you'll see that standard mobile dropdown menu at the top of the screen, and the site will resize to the size of your phone's screen.
Line 8 is a standard line of code that should go on every website you ever build, whether in Rails or otherwise.
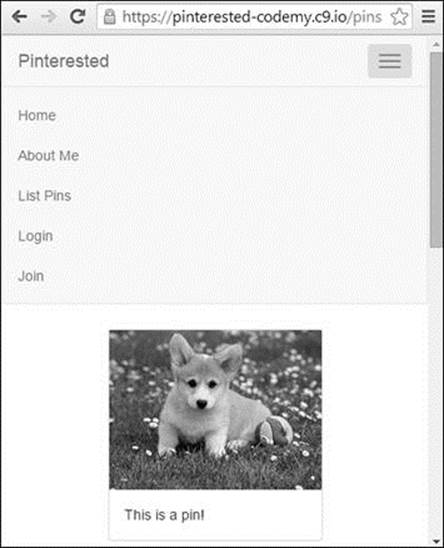
(Mobile Friendly Menu Dropdown)
REORDERING OUR PINS
Things are coming along nicely, we're almost finished! But we still have one small problem...and you may have noticed it yourself.
The pins on our pins index page are in the wrong order! Every time you add a new pin, it gets placed at the bottom of the list. Imagine if hundreds or thousands of pins were added. To see the newest one, you'd have to scroll down and down and down and down to see it.
We'd much rather have the newest pins listed at the very top of the page. Rails makes that very easy, all we have to do is edit out pins controller file a bit:
/app/controllers/pins_controller.rb
1 .
2 .
3 def index
4 @pins = Pin.all.order("created_at DESC")
5 end
6 .
7 .
8
We just slapped a ("created_at DESC") bit onto the end of our index controller. DESC stands for Descending...as opposed to Ascending. That just tells Rails to output our pins in descending order (newest to oldest).
That's all we have to do!
But it does beg the question...how many pins should we show on each page? We don't really want our pins index page to list thousands and thousands of pins, do we? Nope.
Instead, we should set some rules and break it up by only allowing so many pins to be shown on a page...say 20, or 50, or whatever you like.
We can do this by adding pagination.
As always...there's a Gem for that (or in this case, two Gems).
ADDING PAGINATION
We'll need two Gems to handle this, one to handle the actual Pagination, the other to tie Bootstrap into our Pagination so that we can use the cool looking Bootstrap Pagination classes.
/Gemfile
1 .
2 .
3 gem 'will_paginate', '~> 3.0.7'
4 gem 'will_paginate-bootstrap', '~> 1.0.1'
5
will_paginate handles the actual pagination stuff, and will_paginate-bootstrap ties our pagination into Bootstrap.
I'll leave you to look up each Gem at RubyGems.org and read the documentation. By now you should be pretty used to doing that.
To properly set up pagination, we need to make a couple of changes; one to our pins controller, and one to our pins index page. Let's look at the controller first:
/app/controllers/pins_controller.rb
1 .
2 .
3 def index
4 @pins = Pin.all.order("created_at DESC").paginate(:page => params[:page], :per_page => 3)
5 end
6 .
7 .
8
You'll remember how we just edited this file to output our pins in Descending order. Now we're tacking on a bit more to the end of that line. The only thing you need to take notice of is the '3' at the end of line 4.
That's where you choose how many pins to show per page. In our case, I've selected '3' because the pagination controls won't show up on the page unless there are as many pins as you've listed. By selecting '3', it means that the pagination will show up (since we have 4 pins and I'm too lazy to add more right now).
If this were a real commercial site that we intended to launch, I'd probably set it to 25 or 50.
Next we need to actually output our pagination onto the screen, so let's edit our pins index page:
/app/views/pins/index.html.erb
1 .
2 .
3 <%= will_paginate @posts %>
4
Just add that code to the very bottom of your pins index page. Be sure to restart your server (since we added new Gems). Let's check it out:
(Pins Index Page With Basic Pagination)
That's ok, but we'd rather style those pagination links better. Like I said, Bootstrap offers a pagination class. Head over to GetBootstrap.com and click the "Components" link, then the "Pagination" link to see the different options available.
Let's edit our pagination to incorporate Bootstrap:
/app/views/pins/index.html.erb
1 .
2 .
3 <%= will_paginate @pins, renderer: BootstrapPagination::Rails %>
4
Now reload the page and take a look:
(Pins Index Page With Bootstraped Pagination)
Much better! But we should probably center the pagination in the middle of the screen. Let's add a center class to our bootstraply.css.scss file:
/app/assets/stylesheets/bootstraply.css.scss
1 .
2 .
3 @import "bootstrap-sprockets";
4 @import "bootstrap";
5
6 .center {
7 text-align: center;
8 }
9
Be sure to put our center class code UNDER the @import lines. Now we need to call that center class on our pins index page:
/app/views/pins/index.html.erb
1 .
2 .
3 <div class="center>
4 <%= will_paginate @pins, renderer: BootstrapPagination::Rails %>
5 </div>
6
Reload the page and it should look like this...
(Pins Index Page With Centered Bootstrap Pagination)
MAKING OUR PINS INDEX PAGE OUR HOMEPAGE
So this is great! Our pins index page looks like Pinterest, we've got pagination, and everything seems to be going our way.
Now it's time to make our pins index page our main homepage. Whenever someone comes to https://pinterested-codemy.c9.io (or whatever your URL is), we want our pins index page to be shown, not the homepage that we currently have (the one with the jumbotron).
If you like the jumbotron, you can always add it to your pins index page (maybe use a partial) and just use an IF statement to only show the jumbotron if a person is not logged in. But I'll leave that to you.
Right now I'm just going to make our pins index page our main homepage by changing the route.
/config/routes.rb
1 .
2 .
3 root 'pins#index'
4 .
5 .
6
All I did here was change our old root route from root 'home#index' to root 'pins#index'.
Now when someone goes to our site, the pins index page is the one they'll see.
Now let's save our work and push it up to Heroku.
1 $ git add .
2 $ git commit -am 'added masonry, pagination, and made pins our index page'
3 $ git push
4 $ git push heroku master
5
ADDING USER NAMES
Let's do one more thing before we end this project; let's tweak our entire project to allow people to add their names to their pins. This will allow us to pull a bunch of different things that we've learned together.
**WARNING WARNING WARNING WARNING**
Before we proceed, you need to delete all the pins that you've added so far, both on your development site as well as on Heroku. I know, it's a pain in the ass, but we're going to be tinkering with the database so just do it this one last time. You should also cancel your user account again just to be on the safe side.
We're going to need to tinker with our Users database table; right now it only records a user's email address and password, and we need to add a column to record their name as well. No problem, we've done that before when we added the user_id column to our pins table.
1 $ rails generate migration AddNameToUsers name:string
2
This is the command to add a "Name" column to our "Users" table. It looks a little different than the one we used earlier to add a User_ID column:
1 $ rails generate migration add_user_id_to_pins user_id:integer:index
2
In that command we used the underscore convention add_user_id_to_pins and in the command we just used to add Name, we used the camel case style of AddNameToUsers.
Either method works in Rails, and I wanted to point them both out to you - they both do the same thing.
Finally, notice that we designated 'name' to be a string data type.
Now we need to run our rake db:migrate command to push our new migration into the database (and be sure to run heroku run rake db:migrate later when you push all this up to Heroku):
1 rake db:migrate
2
Take a look at your database schema now, you should see a Name field in the Users table and it should be listed as a string.
Piece of cake! But now we need to update a couple of files so that people can actually type in their name when they sign up, and edit their name after they've signed up when they edit their user profile.
/app/views/devise/registrations/new.html.erb>
1 .
2 .
3 <div class="form-group">
4 <%= f.label :name %>
5 <%= f.text_field :name, class: "form-control", :autofocus => true %>
6 </div>
7 .
8 .
/app/views/devise/registrations/edit.html.erb
1 .
2 .
3 <div class="form-group">
4 <%= f.label :name %>
5 <%= f.text_field :name, class: "form-control", :autofocus => true %>
6 </div>
7 .
8 .
This will add a form field and label to the new registration page so that people can add their name when they register, and also let people edit their name when they edit their user profile.
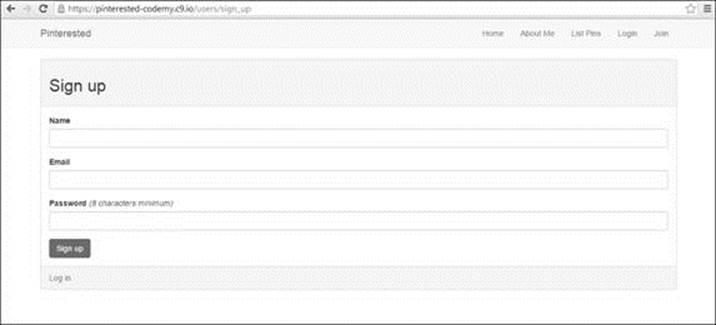
(https://pinterested-codemy.c9.io/users/sign_up With Name Field)
But we need to tell Rails that it's ok to accept a name from a web form, and we do that in the application controller.
/app/controllers/application_controller.rb
1 class ApplicationController < ActionController::Base
2 # Prevent CSRF attacks by raising an exception.
3 # For APIs, you may want to use :null_session instead.
4 protect_from_forgery with: :exception
5 before_filter :configure_permitted_parameters, if: :devise_controller?
6
7 protected
8
9 def configure_permitted_parameters
10 devise_parameter_sanitizer.for(:sign_up) << :name
11 devise_parameter_sanitizer.for(:account_update) << :name
12 end
13 end
14
And we also need to make a reference in our pin_params section of our pins controller:
/app/controllers/pins_controller.rb
1 .
2 def pin_params
3 params.require(:pin).permit(:description, :image, :name)
4 end
5 .
6 .
Just add that :name to the end of line 3. You'll see that this line already references description, and images...now we added name.
Now we just need to output each person's name under their particular pin in our pins index page and our pins show page:
/app/views/pins/index.html.erb
1 .
2 .
3 <%= link_to image_tag(pin.image.url(:medium)), pin %><br/>
4 <div class="panel-body">
5 <%= pin.description %><br/>
6 <br/><strong><%= pin.user.name if pin.user %></strong><br/>
7 </div>
8
And finally, let's update our pins show page to list the user's name as well:
/app/views/pins/show.html.erb
1 .
2 .
3 <%= @pin.description %><br/>
4 <br/><%= @pin.user.name %><br/>
5 .
6 .
7
Just add the reference to the name under the pin.description line and you should be good to go!
Now let's save our work:
1 $ git add .
2 $ git commit -am 'added user name, updated devise forms'
3 $ git push
4 $ git push heroku master
5 $ heroku run rake db:migrate
6
And that's all there is to it! That wasn't so bad.
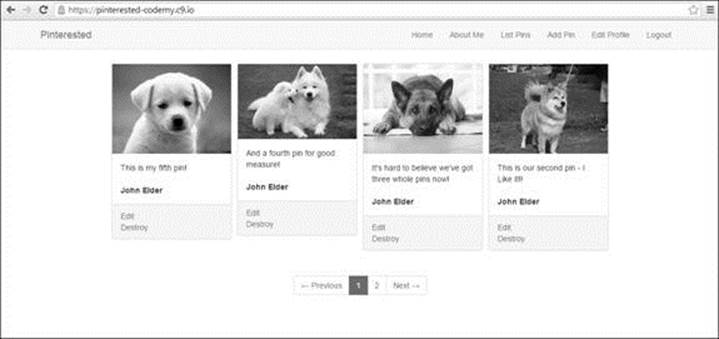
(https://pinterested-codemy.c9.io Index Page With User Names Added to Pins)
I think we're pretty much done with our app! All the major functionality exists, in the next chapter we'll make a few cosmetic changes to make the colors and whatnot look more like Pinterest...but for all intents and purposes - our site is done!
Congratulations on making it this far! You've accomplished something pretty incredible in a fairly short amount of time! Take a moment to appreciate it and we'll move along in the next chapter.
All materials on the site are licensed Creative Commons Attribution-Sharealike 3.0 Unported CC BY-SA 3.0 & GNU Free Documentation License (GFDL)
If you are the copyright holder of any material contained on our site and intend to remove it, please contact our site administrator for approval.
© 2016-2026 All site design rights belong to S.Y.A.