Learn Ruby on Rails For Web Development (2015)
Chapter 7. UPLOADING IMAGES TO OUR APP WITH PAPERCLIP
The worst is over! Now we just need to add the ability to upload images, save those images somewhere, style the output to make it look more like Pinterest, and we're basically done!
To handle images, we're going to be working with a few different things; namely ImageMagick, Paperclip, and AmazonS3.
ImageMagick is an open source command line image processing tool. It does all kinds of things behind the scenes like resize images, handle file formats, and all kinds of tricky things like that. It's important because people are going to be uploading images of all different sizes and shapes and we need to be able to resize them into a standard format automatically.
ImageMagick is not an actual Gem, we'll need to download the program into our development environment through the terminal. No worries though, it's easy.
Paperclip is a Ruby Gem that deals with uploading images. Technically it allows for image file attachments to be added to our database. We'll add it like we add all Gems.
Finally, we'll be storing our production level images on Amazon S3 and NOT on our Heroku Postgres database.
Why?
Paperclip has no problem uploading images to postgres databases, but Heroku has a problem with it. Image files take up a LOT of space, and Heroku doesn't want to be in the business of storing gazillions of images in their databases.
They'll allow you to upload images into your postgres database, but then in an hour or so those images will be automatically deleted.
So we need to store them somewhere else. Amazon S3 is a simple storage provider that allows you to easily store images in the cloud.
**NOTE** AmazonS3 does cost money...but it's not much money. For our simple app with just a little traffic and not many images stored, you can expect to pay pennies per month.
Personally, I store a TON of stuff on AmazonS3 and last month my bill was like $1.29... It's cheap.
You don't have to use Amazon S3 for this project if you just don't want to spend the pennies, but I highly recommend that you do because S3 is an industry standard and chances are, you'll have to use them some day for something, and you might as well learn how to now.
But we'll get into that later on in the chapter, first - let's get into ImageMagick.
INSTALLING IMAGEMAGICK
Like I said, ImageMagick is not a Gem, in fact it's not even really a Rails thing. It works with all sorts of web development tools.
To see whether or not ImageMagick is already installed in your development environment, punch this into the terminal:
1 $ identify
2
If you don't have ImageMagick installed already (and you probably don't), you'll get an error message that says something like "Command not found".
So let's install ImageMagick:
1 $ sudo apt-get install imagemagick
2
Apt-get is a unix/linux command that downloads and installs software from the command line. It might prompt you; asking if you would like to continue or not. Type yes and hit enter.
Now you can run the identify command and it should output a bunch of stuff. The stuff isn't important, it just tells you that ImageMagick was successfully installed and is ready to go.
That's all there is to it.
INSTALLING PAPERCLIP
Paperclip is a Ruby Gem, so we can head over to RubyGems.org and search for paperclip. As of this book, paperclip is on version 4.2.1, so copy that and add it to our Gemfile:
/Gemfile
1 .
2 .
3 gem 'paperclip', '~> 4.2.1'
4 .
5 .
6
Save that and then run bundle install as always.
1 $ bundle install
2
As you might expect, there are a few more things we need to do in order to properly install and use paperclip. We need to make a few changes to the form on our 'add new' pins page, but we also need to make a change to our pins model:
/app/models/pin.rb
1 class Pin < ActiveRecord::Base
2 belongs_to :user
3 has_attached_file :image, :styles => { :medium => "300x300>", :thumb => "100x100>" }
4 validates_attachment_content_type :image, :content_type => /\Aimage\/.*\Z/
5 end
6
Line 3 and 4 allow our pin model to allow an attached image file, and they go on to specify those images.
Checkout line 3...Notice how it designates a size of medium (300x300) and a size of thumb (100x100). This will allow us to resize images and show them in those standard sizes just by calling :medium or :thumb on our views pages.
Line 4 spells out the type of images that are allowed (jpg, png, bmp, gif, etc). Basically line 4 allows all image types to be uploaded but you could fiddle with that line if, for instance, you only wanted to allow jpg's.
Now we need to create a migration to add a column for images to our pins table:
1 $ rails generate paperclip pin image
2
And as always, we need to rake the database:
1 $ rake db:migrate
2
And be sure to do the same thing to Heroku when you finally push these changes up to Heroku (heroku run rake db:migrate).
Now, if you take a look at our database Schema file, you'll notice several references to images in the Pins table.
Finally, we need to make a small change to our pins_controller.rb file to allow images to pass as an accepted parameter on our forms.
/app/controllers/pins_controller.rb
1 .
2 .
3 def pin_params
4 params.require(:pin).permit(:description, :image)
5 end
6
You'll find that code down towards the end of the file, and we just slapped a comma and :image to the end of it. That whole line means basically "allow people to fill out the form to add a pin by adding a description and uploading an image".
CHANGING OUR WEB FORM TO ALLOW IMAGES
Now we've got the functionality to upload images, but if you go to our 'add new' pins page, you'll notice that there's no form field to actually upload an image. Let's add that now:
/app/views/pins/_form.html.erb
1 <%= form_for @pin, html: { multipart: true } do |f| %>
2 .
3 .
4 .
5 <div class="form-group">
6 <%= f.label :image %>
7 <%= f.file_field :image, class: "form-control" %>
8 </div>
9 .
10 .
11
You'll notice we did two things here. First, we changed the very first line of the file from:
1 <%= form_for(@pin) do |f| %>
2
To...
1 <%= form_for @pin, html: { multipart: true } do |f| %>
2
Basically, we just added a bit that tells our form to allow multipart stuff (ie images).
Next, we added an actual field that allows people to select files from their own computers to upload. Now if we save this file and head over to our web browser:
https://pinterested-codemy.c9.io/pins/new (or whatever your URL is)
You should see this:
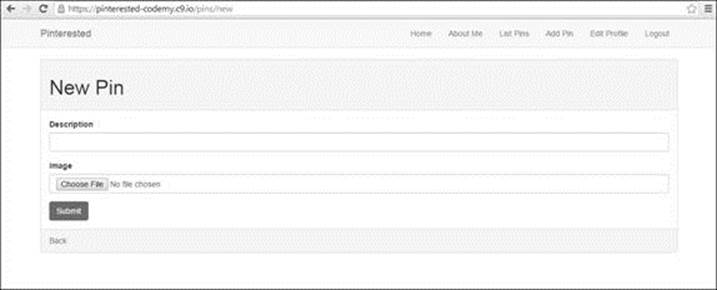
(https://pinterested-codemy.c9.io/pins/new - with new Image Field)
Give it a try, you should be able to upload images no problem...
Except that after you upload the images, nothing happens. If you return to our pins index page, there won't be any images listed. We have to update our views to actually SHOW the images now!
To do that, we would call something like this:
1 <%= image_tag pin.image.url(:medium) %>
2
Notice the :medium? That will output our 300x300 image. You could also have chosen :thumb instead and it will output our 100x100 image.
So let's add that tag to our pins index page and our pins show page:
/app/views/pins/index.html.erb
1 <h1>Listing pins</h1>
2
3 <table>
4 <thead>
5 <tr>
6 <th>Image</th>
7 <th>Description</th>
8 <th colspan="3"></th>
9 </tr>
10 </thead>
11
12 <tbody>
13 <% @pins.each do |pin| %>
14 <tr>
15 <td><%= image_tag pin.image.url(:medium) %></td>
16 <td><%= pin.description %></td>
17 <td><%= link_to 'Show', pin %></td>
18 <td><%= link_to 'Edit', edit_pin_path(pin) %></td>
19 <td><%= link_to 'Destroy', pin, method: :delete, data: { confirm: 'Are you
20 sure?' } %></td>
21 </tr>
22 <% end %>
23 </tbody>
24 </table>
25
26 <br/>
27
28 <%= link_to 'New Pin', new_pin_path %>
29
That will output our image on the pins index page, but we still need to update our pins show page:
/app/views/pins/show.html.erb
1 <p id="notice"><%= notice %></p>
2
3 <%= image_tag @pin.image.url(:medium) %><br/>
4 <strong>Description:</strong>
5 <%= @pin.description %>
6 <br/>
7
8 <%= link_to 'Edit', edit_pin_path(@pin) %> |
9 <%= link_to 'Back', pins_path %>
10
Reload and check it out...if images aren't appearing, then restart your server and hit reload again. That should do the trick.
Check out those two changes, you'll notice that we added a slightly different reference to our image on the pins index page than on the pins show page.
The pins index page image reference (line 15) has no @ sign, and the one on our pins show page (line 3) says @pin.image.url.
What gives?
You'll notice on the pins index page, line 13 already references @pins
1 <% @pins.each do |pin| %>
2
...and is executing a loop within @pins.
Our pins show page has no loop calling @pins anywhere...so when we call our image, we need to reference @pins.
Let's save our work up until now:
1 $ git add .
2 $ git commit -am 'added imagemagick and paperclip, updated pins views'
3 $ git push
4 $ git push heroku master
5 $ heroku run rake db:migrate
6
SAVING IMAGES ON AMAZON S3
Now it's time to set up and configure Amazon S3. If you don't have an account at Amazon AWS, head over to aws.amazon.com and sign up for a free account. They'll ask for your credit card, but you only get charged for bandwidth and like I said earlier, it's only going to be pennies a month for our simple app.
Like most things in Rails, there's a Gem to handle AmazonS3 and it is called: "aws-sdk". So head over to RubyGems.org and search for it. As of this book's publication, aws-sdk is on version 1.60.2 so copy the reference to that and add it to our Gemfile:
/Gemfile
1 .
2 .
3 gem 'aws-sdk', '~> 1.60.2'
4
And as always, we need to run the bundle install command:
1 $ bundle install
2
We need to make a couple more changes in order to properly configure this gem:
/app/config/environments/production.rb
1 .
2 .
3 config.paperclip_defaults = {
4 :storage => :s3,
5 :s3_credentials => {
6 :bucket => ENV['AWS_BUCKET'],
7 :access_key_id => ENV['AWS_ACCESS_KEY_ID'],
8 :secret_access_key => ENV['AWS_SECRET_ACCESS_KEY']
9 }
10 }
11 end
12
You'll remember this file from the beginning of the book when we added our Heroku URL. This is the file that gives special instructions for our production environment (ie Heroku).
It makes sense, since we're adding images to Amazon S3 in the production environment, we would have to add a little something to this file to make our app aware of it.
Let's look at the code we added. Basically we are telling paperclip to store images at S3. Now we need three things from S3: bucket name, access_key_id, and secret_access_key.
Let's look at each of these three things.
First, Amazon S3 uses a directory structure to store your files, and it names those directories "buckets". So when you log into S3, you'll create a bucket to store your files in. Our app needs to know the name of that bucket, hence the reference here.
Next, Amazon authenticates our app by checking an access key id and a secret access key. Think of them as your user name and password to gain access to Amazon S3.
You'll notice that the code we pasted in here doesn't actually HAVE the bucket name or the access key id or the secret access key listed. Why is that? Doesn't Amazon need to know those things?
Yes it does, but we don't want to type them in here. Why? Because sometimes people host their version control source files on Github.
Remember at the beginning of the book we chose to use BitBucket to host our version control because BitBucket is private and Github is public?
If you DID happen to use Github, all of your source code would be open for anyone to see...and if we typed in our Amazon secret keys here, people would be able to see them...and that's baaaad.
Rails gets around this problem by not making you type those things right here. Instead it uses environmental variables, designated by ENV['stuff here'], and those environmental variables keep your information secret.
We actually won't type in our bucket, access key, or secret key anywhere into our app, instead we'll type them directly into Heroku using a special command. Heroku will keep them on file, and whenever our program needs them, it will call the environmental variables which will then swap out the actual keys and codes from Heroku.
Confused? It's not too bad.
Before we type those three things into Heroku, we need to GET those three things. That means you need to log into Amazon AWS and find them. So let's do that now.
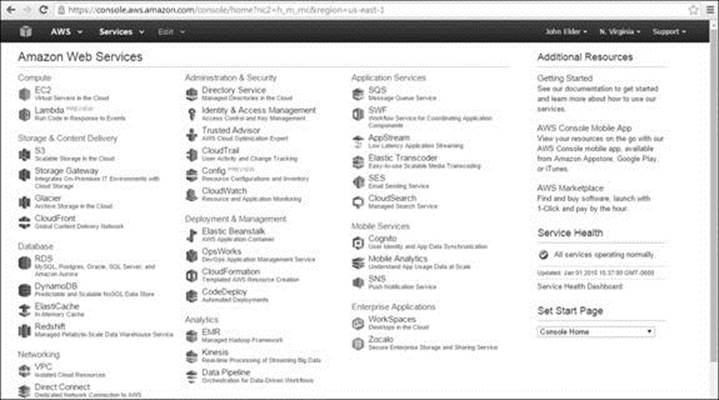
(Amazon AWS Console Screen)
Let's get our Bucket name first. From the Amazon Console, click the S3 link and then the "Create Bucket" link on the next screen.
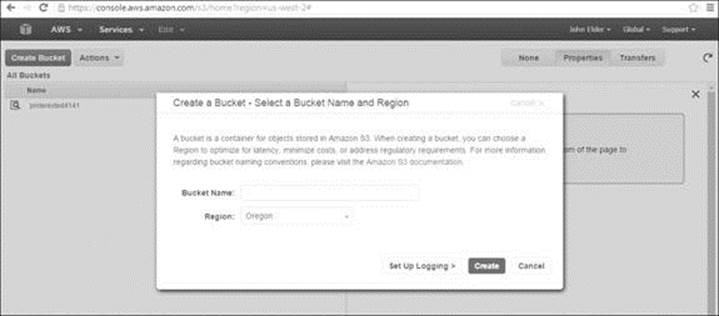
(Amazon AWS Create Bucket Screen)
From the screen that pops up, name your bucket. A Bucket must be unique so keep trying till you pick a unique one...something like pinterested99 or some other number.
For region, select "US Standard" even if you're outside the US.
Next you'll be in the S3 bucket area, and you should see your newly created bucket. Now we need to set the permissions so that anyone can upload and view images in your bucket.
Right-click on your bucket name and select "properties" and a panel should pop up on the right-hand side of the screen. Next click on "Permissions", then click the little green plus sign to "add more permissions". Click the drop down box and select "Everyone", then click the tick marks next to all the listed permissions (list, upload/delete, view permissions, edit permissions).
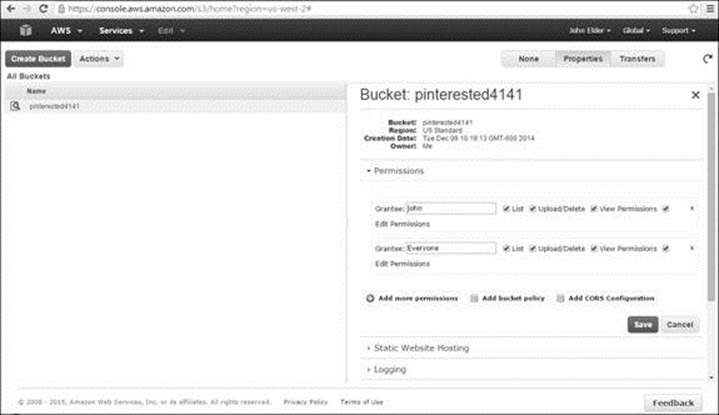
(Amazon AWS - Set Bucket Permissions)
Finally, click the "Save" button to save your new permissions. Your bucket is now ready to go, just remember the name (or write it down so you remember it).
OBTAINING AMAZON ACCESS AND SECRET KEYS
Now we just need to get a hold of an access key and secret key. If you just created a new Amazon AWS account, we'll need to do a couple of different things. If you're using an older AWS account that has already issued keys in the past, you can skip part of this.
If this is your first time...
Click on your name in the upper right-hand corner of the Amazon screen, and from the drop-down list that appears, select "Security Credentials".
Next, click on the "Create individual IAM users" link there in the middle of the screen. If you've already created an individual IAM user in the past, you don't have to do it again but I'm assuming this is your first time.
Click the "Manage Users" button that drops down.
On the next screen, click the big blue "Create New Users" button at the top of the screen.
Type in your name in one of the boxes, make sure the "generate access key for each user" box is clicked, then hit the blue "Create" button at the bottom of the page.
A screen will pop up saying that this is the last time you'll be able to get your secret key for this user, and there's a link that you can click to get the key. Click the link and copy the access key id and secret key. Save them somewhere.
Now you might think these are the access key id and secret access key that we need to enter into Heroku, but you'd be wrong.
For some reason we need to go through the whole process again to generate a new access key id and secret access key for our app. Don't ask me, I don't know why Amazon works the way it does...
Go ahead and click on your name at the top right-hand corner of the screen one more time, and select the "Security Credentials" link again.
This time, the screen that pops up will look a little different. I guess because it's no longer your first time...*shrugs*
If a box pops up asking you to either "Continue to Security Credentials" or "Get Started with IAM Users", select the security credentials option.
NOW, we'll see a link for "Access Keys (Access Key ID and Secret Access Key)" which is exactly what we want; click it.
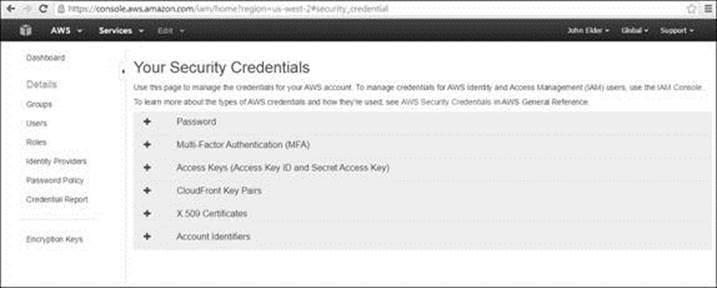
(Amazon AWS - Security Credentials Screen)
A sort of dropdown will appear with a big blue button that says "Create New Access Key"; click it.
A box should pop up telling you that your keys were created successfully. DON'T CLOSE THAT BOX!!
You only get one chance to write down your keys, and this is that one chance. You should see a little link at the bottom of that box that says something like: "Show Access Key"; click it and your keys will appear. Copy them and paste them into a notepad file or something.
Now it's time to add these guys to Heroku. There's a pretty good article about it right here:
https://devcenter.heroku.com/articles/paperclip-s3
You can read that if you want, but I'm going to walk you through it. All we need to do is tell Heroku what our bucket name is, our access key id, and our secret access key; and we've got all three of those so let's get right down to it:
1 $ heroku config:set S3_BUCKET_NAME=your_bucket_name
2 $ heroku config:set AWS_ACCESS_KEY_ID=your_access_key_id
3 $ heroku config:set AWS_SECRET_ACCESS_KEY=your_secret_access_key
4
Just replace the last little bit after the equal sign with your specific bucket name, access_key_id, and secret_access_key.
To make sure that Heroku got all that you can run this command:
1 $ heroku config
2
And it will spit out all the info it has stored about your app. If you've done everything correctly, you should see your bucket name, access key id, and secret access key.
So let's save all this work and push to heroku and see if it worked!
1 $ git add .
2 $ git commit -am 'integrated AmazonS3 with Heroku'
3 $ git push
4 $ git push heroku master
5 $ heroku run rake db:migrate
6
Now the moment of truth...head over to your heroku app, log in, and try to upload a pin. View the pin, is the image showing?
Right click on the image, and select "open image in new tab" to view the image itself. Take a look at the URL of the image after it's been opened in a new browser tab. Does the URL point to Amazon.com?
If so, everything went correctly. If not, something went wrong! But it should all be ok.
Congratulations! You're 90% done with your app! All we need to do now is add some jQuery touches and tinker with the look of our pins index page, and do a few more tiny odds and ends that won't be difficult at all...and we'll be done!
In the next chapter we'll start with the look and feel and I'll introduce you to jQuery Masonry...which is pretty cool.
All materials on the site are licensed Creative Commons Attribution-Sharealike 3.0 Unported CC BY-SA 3.0 & GNU Free Documentation License (GFDL)
If you are the copyright holder of any material contained on our site and intend to remove it, please contact our site administrator for approval.
© 2016-2025 All site design rights belong to S.Y.A.