The Well-Grounded Rubyist, Second Edition (2014)
Part 2. Built-in classes and modules
Chapter 9. Collection and container objects
This chapter covers
· Sequentially ordered collections with arrays
· Keyed collections with hashes
· Inclusion and membership tests with ranges
· Unique, unordered collections with sets
· Named arguments using hash syntax
In programming, you generally deal not only with individual objects but with collections of objects. You search through collections to find an object that matches certain criteria (like a magazine object containing a particular article); you sort collections for further processing or visual presentation; you filter collections to include or exclude particular items; and so forth. All of these operations, and similar ones, depend on objects being accessible in collections.
Ruby represents collections of objects by putting them inside container objects. In Ruby, two built-in classes dominate the container-object landscape: arrays and hashes. We’ll start this chapter by looking at the Array and Hash classes: first in comparison with each other, to establish an overall understanding, and then separately.
We’ll look at two other classes: Range and Set. Ranges are a bit of a hybrid: they work partly as Boolean filters (in the sense that you can perform a true/false test as to whether a given value lies inside a given range), but also, in some contexts, as collections. Sets are collections through and through. The only reason the Set class requires special introduction is that it isn’t a core Ruby class; it’s a standard library class, and although we’re not looking at many of those in depth in this book, sets fall nicely into place beside arrays and hashes and merit our attention.
While reading this chapter, keep in mind that it represents a first pass through a kind of mega-topic that we’ll visit in the next chapter, too. Ruby implements collections principally through the technique of defining classes that mix in the Enumerable module. That module gives you a package deal on methods that sort, sift, filter, count, and transform collections. In this chapter, we’ll look primarily at what you can do with the major collection classes other than take advantage of their Enumerable nature. Chapter 10 will deal directly with Enumerable and how it’s used. We’ll look at enough of enumerability here to bootstrap this chapter, and then we’ll come back to it in the next.
Finally, this chapter includes a throwback to chapter 2. In that chapter we looked in depth at method parameter and argument lists, and at how arguments bind to parameters. Once we’ve looked more closely at hashes, we’ll fill in a gap in chapter 2 by looking at Ruby’s named arguments, which use hash syntax.
Also, keep in mind that collections are, themselves, objects. You send them messages, assign them to variables, and so forth, in normal object fashion. They just have an extra dimension, beyond the scalar.
9.1. Arrays and hashes in comparison
An array is an ordered collection of objects—ordered in the sense that you can select objects from the collection based on a consistent, consecutive numerical index. You’ll have noticed that we’ve already used arrays in some of the examples earlier in the book. It’s hard not to use arrays in Ruby. An array’s job is to store other objects. Any object can be stored in an array, including other arrays, hashes, file handles, classes, true and false...any object at all. The contents of an array always remain in the same order unless you explicitly move objects around (or add or remove them).
Hashes in recent versions of Ruby are also ordered collections—and that’s a big change from previous versions, where hashes are unordered (in the sense that they have no idea of what their first, last, or nth element is). Hashes store objects in pairs, each pair consisting of a key and a value. You retrieve a value by means of the key. Hashes remember the order in which their keys were inserted; that’s the order in which the hash replays itself for you if you iterate through the pairs in it or print a string representation of it to the screen.
Any Ruby object can serve as a hash key and/or value, but keys are unique per hash: you can have only one key/value pair for any given key. Hashes (or similar data storage types) are sometimes called dictionaries or associative arrays in other languages. They offer a tremendously—sometimes surprisingly—powerful way of storing and retrieving data.
Arrays and hashes are closely connected. An array is, in a sense, a hash, where the keys happen to be consecutive integers. Hashes are, in a sense, arrays, where the indexes are allowed to be anything, not just integers. If you do use consecutive integers as hash keys, arrays and hashes start behaving similarly when you do lookups:
array = ["ruby", "diamond", "emerald"]
hash = { 0 => "ruby", 1 => "diamond", 2 => "emerald" }
puts array[0] # ruby
puts hash[0] # ruby
Even if you don’t use integers, hashes exhibit a kind of “meta-index” property, based on the fact that they have a certain number of key/value pairs and that those pairs can be counted off consecutively. You can see this property in action by stepping through a hash with the with_indexmethod, which yields a counter value to the block along with the key and value:
hash = { "red" => "ruby", "white" => "diamond", "green" => "emerald" }
hash.each.with_index {|(key,value),i|
puts "Pair #{i} is: #{key}/#{value}"
}
The output from this code snippet is
Pair 0 is: red/ruby
Pair 1 is: white/diamond
Pair 2 is: green/emerald
The index is an integer counter, maintained as the pairs go by. The pairs are the actual content of the hash.
Tip
The parentheses in the block parameters (key,value) serve to split apart an array. Each key/value pair comes at the block as an array of two elements. If the parameters were key,value,i, then the parameter key would end up bound to the entire [key,value] array; value would be bound to the index; and i would be nil. That’s obviously not what you want. The parenthetical grouping of (key,value) is a signal that you want the array to be distributed across those two parameters, element by element.
Conversions of various kinds between arrays and hashes are common. Some such conversions are automatic: if you perform certain operations of selection or extraction of pairs from a hash, you’ll get back an array. Other conversions require explicit instructions, such as turning a flat array ([1,2,3,4]) into a hash ({1 => 2, 3 => 4}). You’ll see a good amount of back and forth between these two collection classes, both here in this chapter and in lots of Ruby code.
In the next two sections, we’ll look at arrays and hashes in depth. Let’s start with arrays.
9.2. Collection handling with arrays
Arrays are the bread-and-butter way to handle collections of objects. We’ll put arrays through their paces in this section: we’ll look at the varied techniques available for creating arrays; how to insert, retrieve, and remove array elements; combining arrays with each other; transforming arrays (for example, flattening a nested array into a one-dimensional array); and querying arrays as to their properties and state.
9.2.1. Creating a new array
You can create an array in one of four ways:
· With the Array.new method
· With the literal array constructor (square brackets)
· With a top-level method called Array
· With the special %w{...} and %i{...} notations
You’ll see all of these techniques in heavy rotation in Ruby code, so they’re all worth knowing. We’ll look at each in turn.
Array.new
The new method on the array class works in the usual way:
a = Array.new
You can then add objects to the array using techniques we’ll look at later.
Array.new lets you specify the size of the array and, if you wish, initialize its contents. Here’s an irb exchange that illustrates both possibilities:
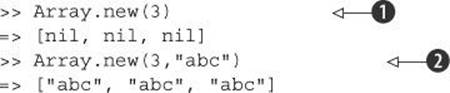
If you give one argument to Array.new ![]() , you get an array of the size you asked for, with all elements set to nil. If you give two arguments
, you get an array of the size you asked for, with all elements set to nil. If you give two arguments ![]() , you get an array of the size you asked for, with each element initialized to contain the second argument.
, you get an array of the size you asked for, with each element initialized to contain the second argument.
You can even supply a code block to Array.new. In that case, the elements of the array are initialized by repeated calls to the block:

In this example, the new array has a size of 3. Each of the three elements is set to the return value of the code block. The code inside the block ![]() , executed three times, produces the values 10, 20, and 30—and those are the initial values in the array
, executed three times, produces the values 10, 20, and 30—and those are the initial values in the array ![]() .
.
Warning
When you initialize multiple elements of an array using a second argument to Array.new—as in Array.new(3, "abc")—all the elements of the array are initialized to the same object. If you do a = Array.new(3,"abc"); a[0] << "def"; puts a[1], you’ll find that the second element of the array is now "abcdef", even though you appended "def" to the first element. That’s because the first and second positions in the array contain the same string object, not two different strings that happen to both consist of "abc". To create an array that inserts a different "abc" string into each slot, you should use Array.new(3) { "abc" }. The code block runs three times, each time generating a new string (same characters, different string object).
Preinitializing arrays isn’t always necessary, because your arrays grow as you add elements to them. But if and when you need this functionality—and/or if you see it in use and want to understand it—it’s there.
The literal array constructor: [ ]
The second way to create an array is by using the literal array constructor [] (square brackets):
a = []
When you create an array with the literal constructor, you can put objects into the array at the same time:
a = [1,2,"three",4, []]
Notice that the last element in this array is another array. That’s perfectly legitimate; you can nest arrays to as many levels as you wish.
Square brackets can mean a lot of different things in Ruby: array construction, array indexing (as well as string and hash indexing), character classes in regular expressions, delimiters in %q[]-style string notation, even the calling of an anonymous function. You can make an initial division of the various uses of square brackets by distinguishing cases where they’re a semantic construct from cases where they’re the name of a method. It’s worth practicing on a few examples like this to get a feel for the way the square brackets play out in different contexts:
![]()
Now back to array creation.
The Array method
The third way to create an array is with a method (even though it looks like a class name!) called Array. As you know from having seen the Integer and Float methods, it’s legal to define methods whose names begin with capital letters. Those names look exactly like constants, and in core Ruby itself, capitalized methods tend to have the same names as classes to which they’re related.
Some more built-in methods that start with uppercase letters
In addition to the Array method and the two uppercase-style conversion methods you’ve already seen (Integer and Float, the “fussy” versions of to_i and to_f), Ruby provides a few other top-level methods whose names look like class names: Complex, Rational, and String. In each case, the method returns an object of the class that its name looks like.
The String method is a wrapper around to_s, meaning String(obj) is equivalent to obj.to_s. Complex and Rational correspond to the to_c and to_r methods available for numerics and strings—except Complex and Rational, like Integer and Float, are fussy: they don’t take kindly to non-numeric strings. "abc".to_c gives you (0+0i), but Complex("abc") raises ArgumentError, and Rational and to_r behave similarly.
We’re not covering rational and complex numbers here, but now you know how to generate them, in case they’re of interest to you!
The Array method creates an array from its single argument. If the argument object has a to_ary method defined, then Array calls that method on the object to generate an array. (Remember that to_ary is the quasi-typecasting array conversion method.) If there’s no to_ary method, it tries to call to_a. If to_a isn’t defined either, Array wraps the object in an array and returns that:
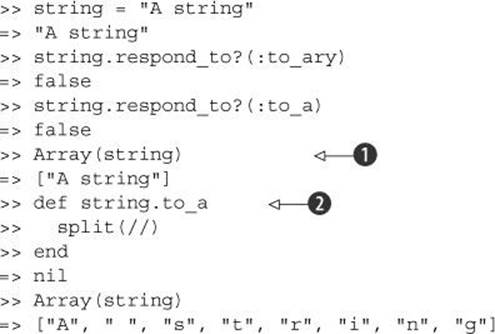
In this example, the first attempt to run Array on the string ![]() results in a one-element array, where the one element is the string. That’s because strings have neither a to_ary nor a to_a method. But after to_a is defined for the string
results in a one-element array, where the one element is the string. That’s because strings have neither a to_ary nor a to_a method. But after to_a is defined for the string ![]() , the result of calling Array is different: it now runs theto_a method and uses that as its return value. (The to_a method splits the string into individual characters.)
, the result of calling Array is different: it now runs theto_a method and uses that as its return value. (The to_a method splits the string into individual characters.)
Among the various array constructors, the literal [] is the most common, followed by Array.new and the Array method, in that order. But each has its place. The literal constructor is the most succinct; when you learn what it means, it clearly announces “array” when you see it. The Arraymethod is constrained by the need for there to be a to_ary or to_a method available.
The %w and %W array constructors
As a special dispensation to help you create arrays of strings, Ruby provides a %w operator, much in the same family as the %q-style operators you’ve seen already, that automatically generates an array of strings from the space-separated strings you put inside it. You can see how it works by using it in irb and looking at the result:
>> %w{ David A. Black }
=> ["David", "A.", "Black"]
If any string in the list contains a whitespace character, you need to escape that character with a backslash:
>> %w{ David\ A.\ Black is a Rubyist. }
=> ["David A. Black", "is", "a", "Rubyist."]
The strings in the list are parsed as single-quoted strings. But if you need double-quoted strings, you can use %W instead of %w:
>> %W{ David is #{2014 - 1959} years old. }
=> ["David", "is", "55", "years", "old."]
The %i and %I array constructors
Just as you can create arrays of strings using %w and %W, you can also create arrays of symbols using %i and %I. The i/I distinction, like the w/W distinction, pertains to single- versus double-quoted string interpretation:
>> %i{ a b c }
=> [:a, :b, :c]
>> d = "David"
=> "David"
>> %I{"#{d}"}
=> [:"\"David\""]
Let’s proceed now to the matter of handling array elements.
The try_convert family of methods
Each of several built-in classes in Ruby has a class method called try_convert, which always takes one argument. try_convert looks for a conversion method on the argument object. If the method exists, it gets called; if not, try_convert returns nil. If the conversion method returns an object of a class other than the class to which conversion is being attempted, it’s a fatal error (TypeError).
The classes implementing try_convert (and the names of the required conversion methods) are Array (to_ary), Hash (to_hash), IO (to_io), Regexp (to_regexp), and String (to_str). Here’s an example of an object putting Array.try_convert through its paces. (The other try_convert methods work similarly.)
>> obj = Object.new
=> #<Object:0x000001028033a8>
>> Array.try_convert(obj)
=> nil
>> def obj.to_ary
>> [1,2,3]
>> end
=> :to_ary
>> Array.try_convert(obj)
=> [1, 2, 3]
>> def obj.to_ary
>> "Not an array!"
>> end
=> :to_ary
>> Array.try_convert(obj)
TypeError: can't convert Object to Array (Object#to_ary gives String
9.2.2. Inserting, retrieving, and removing array elements
An array is a numerically ordered collection. Any object you add to the array goes at the beginning, at the end, or somewhere in the middle. The most general technique for inserting one or more items into an array is the setter method []= (square brackets and equal sign). This looks odd as a method name in the middle of a paragraph like this, but thanks to its syntactic sugar equivalent, []= works smoothly in practice.
To use []=, you need to know that each item (or element) in an array occupies a numbered position. The first element is at position zero (not position one). The second element is at position one, and so forth.
To insert an element with the []= method—using the syntactic sugar that allows you to avoid the usual method-calling dot—do this:
a = []
a[0] = "first"
The second line is syntactic sugar for a.[]=(0,"first"). In this example, you end up with a one-element array whose first (and only) element is the string "first".
When you have objects in an array, you can retrieve those objects by using the [] method, which is the getter equivalent of the []= setter method:
a = [1,2,3,4,5]
p a[2]
In this case, the second line is syntactic sugar for a.[](2). You’re asking for the third element (based on the zero-origin indexing), which is the integer 3.
You can also perform these get and set methods on more than one element at a time.
Setting or getting more than one array element at a time
If you give either Array#[] or Array#[]= (the get or set method) a second argument, it’s treated as a length—a number of elements to set or retrieve. In the case of retrieval, the results are returned inside a new array.
Here’s some irb dialogue, illustrating the multi-element operations of the [] and []= methods:

After initializing the array a, we grab two elements ![]() , starting at index 3 (the fourth element) of a. The two elements are returned in an array. Next, we set the fourth and fifth elements, using the [3,2] notation
, starting at index 3 (the fourth element) of a. The two elements are returned in an array. Next, we set the fourth and fifth elements, using the [3,2] notation ![]() , to new values; these new values are then present in the whole array
, to new values; these new values are then present in the whole array ![]() when we ask irb to display it at the end.
when we ask irb to display it at the end.
There’s a synonym for the [] method: slice. Like [], slice takes two arguments: a starting index and an optional length. In addition, a method called slice! removes the sliced items permanently from the array.
Another technique for extracting multiple array elements is the values_at method. values_at takes one or more arguments representing indexes and returns an array consisting of the values stored at those indexes in the receiver array:

You can perform set and get operations on elements anywhere in an array. But operations specifically affecting the beginnings and ends of arrays crop up most often. Accordingly, a number of methods exist for the special purpose of adding items to or removing them from the beginning or end of an array, as you’ll now see.
Special methods for manipulating the beginnings and ends of arrays
To add an object to the beginning of an array, you can use unshift. After this operation
a = [1,2,3,4]
a.unshift(0)
the array a now looks like this: [0,1,2,3,4].
To add an object to the end of an array, you use push. Doing this
a = [1,2,3,4]
a.push(5)
results in the array a having a fifth element: [1,2,3,4,5].
You can also use a method called << (two less-than signs), which places an object on the end of the array. Like many methods whose names resemble operators, << offers the syntactic sugar of usage as an infix operator. The following code adds 5 as the fifth element of a, just like the pushoperation in the last example:
a = [1,2,3,4]
a << 5
The methods << and push differ in that push can take more than one argument. The code
a = [1,2,3,4,5]
a.push(6,7,8)
adds three elements to a, resulting in [1,2,3,4,5,6,7,8].
Corresponding to unshift and push but with opposite effect are shift and pop. shift removes one object from the beginning of the array (thereby “shifting” the remaining objects to the left by one position), and pop removes an object from the end of the array. shift and pop both return the array element they have removed, as this example shows:
a = [1,2,3,4,5]
print "The original array: "
p a
popped = a.pop
print "The popped item: "
puts popped
print "The new state of the array: "
p a
shifted = a.shift
print "The shifted item: "
puts shifted
print "The new state of the array: "
p a
The output is
The original array: [1, 2, 3, 4, 5]
The popped item: 5
The new state of the array: [1, 2, 3, 4]
The shifted item: 1
The new state of the array: [2, 3, 4]
As you can see from the running commentary in the output, the return value of pop and shift is the item that was removed from the array. The array is permanently changed by these operations; the elements are removed, not just referred to or captured.
shift and pop can remove more than one element at a time. Just provide an integer argument, and that number of elements will be removed. The removed items will be returned as an array (even if the number you provide is 1):
>> a = %w{ one two three four five }
=> ["one", "two", "three", "four", "five"]
>> a.pop(2)
=> ["four", "five"]
>> a
=> ["one", "two", "three"]
>> a.shift(2)
=> ["one", "two"]
>> a
=> ["three"]
We’ll turn next from manipulating one array to looking at ways to combine two or more arrays.
9.2.3. Combining arrays with other arrays
Several methods allow you to combine multiple arrays in various ways—something that, it turns out, is common and useful when you begin manipulating lots of data in lists. Remember that in every case, even though you’re dealing with two (or more) arrays, one array is always the receiver of the message. The other arrays involved in the operation are arguments to the method.
To add the contents of one array to another array, you can use concat:
>> [1,2,3].concat([4,5,6])
=> [1, 2, 3, 4, 5, 6]
Note that concat differs in an important way from push. Try replacing concat with push in the example and see what happens.
concat permanently changes the contents of its receiver. If you want to combine two arrays into a third, new array, you can do so with the + method:
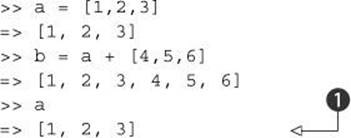
The receiver of the + message—in this case, the array a—remains unchanged by the operation (as irb tells you ![]() ).
).
Another useful array-combining method, at least given a fairly liberal interpretation of the concept of “combining,” is replace. As the name implies, replace replaces the contents of one array with the contents of another:
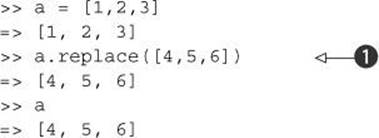
The original contents of a are gone, replaced ![]() by the contents of the argument array [4,5,6]. Remember that a replace operation is different from reassignment. If you do this
by the contents of the argument array [4,5,6]. Remember that a replace operation is different from reassignment. If you do this
a = [1,2,3]
a = [4,5,6]
the second assignment causes the variable a to refer to a completely different array object than the first. That’s not the same as replacing the elements of the same array object. This starts to matter, in particular, when you have another variable that refers to the original array, as in this code:
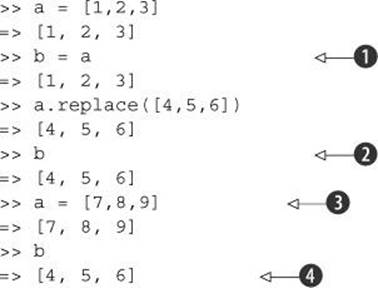
Once you’ve performed the assignment of a to b ![]() , replacing the contents of a means you’ve replaced the contents of b
, replacing the contents of a means you’ve replaced the contents of b ![]() , because the two variables refer to the same array. But when you reassign to a
, because the two variables refer to the same array. But when you reassign to a ![]() , you break the binding between a and the array; a and b now refer to different array objects: b to the same old array
, you break the binding between a and the array; a and b now refer to different array objects: b to the same old array ![]() , a to a new one.
, a to a new one.
In addition to combining multiple arrays, you can also transform individual arrays to different forms. We’ll look next at techniques along these lines.
9.2.4. Array transformations
A useful array transformation is flatten, which does an un-nesting of inner arrays. You can specify how many levels of flattening you want, with the default being the full un-nesting.
Here’s a triple-nested array being flattened by various levels:

There’s also an in-place flatten! method, which makes the change permanently in the array.
Another array-transformation method is reverse, which does exactly what it says:
>>[1,2,3,4].reverse
=> [4, 3, 2, 1]
Like its string counterpart, Array#reverse also has a bang (!) version, which permanently reverses the array that calls it.
Another important array-transformation method is join. The return value of join isn’t an array but a string, consisting of the string representation of all the elements of the array strung together:
>> ["abc", "def", 123].join
=> "abcdef123"
join takes an optional argument; if given, the argument is placed between each pair of elements:
>> ["abc", "def", 123].join(", ")
=> "abc, def, 123"
Joining with commas (or comma-space, as in the last example) is a fairly common operation.
In a great example of Ruby’s design style, there’s another way to join an array: the * method. It looks like you’re multiplying the array by a string, but you’re actually performing a join operation:
>> a = %w{ one two three }
=> ["one", "two", "three"]
>> a * "-"
=> "one-two-three"
You can also transform an array with uniq. uniq gives you a new array, consisting of the elements of the original array with all duplicate elements removed:
>> [1,2,3,1,4,3,5,1].uniq
=> [1, 2, 3, 4, 5]
Duplicate status is determined by testing pairs of elements with the == method. Any two elements for which the == test returns true are considered duplicates of each other. uniq also has a bang version, uniq!, which removes duplicates permanently from the original array.
Sometimes you have an array that includes one or more occurrences of nil, and you want to get rid of them. You might, for example, have an array of the ZIP codes of all the members of an organization. But maybe some of them don’t have ZIP codes. If you want to do a histogram on the ZIP codes, you’d want to get rid of the nil ones first.
You can do this with the compact method. This method returns a new array identical to the original array, except that all occurrences of nil have been removed:
>> zip_codes = ["06511", "08902", "08902", nil, "10027",
"08902", nil, "06511"]
=> ["06511", "08902", "08902", nil, "10027", "08902", nil, "06511"]
>> zip_codes.compact
=> ["06511", "08902", "08902", "10027", "08902", "06511"]
Once again, there’s a bang version (compact!) available.
In addition to transforming arrays in various ways, you can query arrays on various criteria.
9.2.5. Array querying
Several methods allow you to gather information about an array from the array. Table 9.1 summarizes some of them. Other query methods arise from Array’s inclusion of the Enumerable module and will therefore come into view in the next chapter.
Table 9.1. Summary of common array query methods
|
Method name/Sample call |
Meaning |
|
a.size (synonym: length) |
Number of elements in the array |
|
a.empty? |
True if a is an empty array; false if it has any elements |
|
a.include?(item) |
True if the array includes items; false otherwise |
|
a.count(item) |
Number of occurrences of item in array |
|
a.first(n=1) |
First n elements of array |
|
a.last(n=1) |
Last n elements of array |
|
a.sample(n=1) |
n random elements from array |
In the cases of first, last, and sample, if you don’t pass in an argument, you get just one element back. If you do pass in an argument n, you get an array of n elements back—even if n is 1.
Next up: hashes. They’ve crossed our path here and there along the way, and now we’ll look at them in detail.
9.3. Hashes
Like an array, a hash is a collection of objects. A hash consists of key/value pairs, where any key and any value can be any Ruby object. Hashes let you perform lookup operations based on keys. In addition to simple key-based value retrieval, you can also perform more complex filtering and selection operations.
A typical use of a hash is to store complete strings along with their abbreviations. Here’s a hash containing a selection of names and two-letter state abbreviations, along with some code that exercises it. The => operator connects a key on the left with the value corresponding to it on the right:
state_hash = { "Connecticut" => "CT",
"Delaware" => "DE",
"New Jersey" => "NJ",
"Virginia" => "VA" }
print "Enter the name of a state: "
state = gets.chomp
abbr = state_hash[state]
puts "The abbreviation is #{abbr}."
When you run this snippet (assuming you enter one of the states defined in the hash), you see the abbreviation.
Hashes remember the insertion order of their keys. Insertion order isn’t always terribly important; one of the merits of a hash is that it provides quick lookup in better-than-linear time. And in many cases, items get added to hashes in no particular order; ordering, if any, comes later, when you want to turn, say, a hash of names and birthdays that you’ve created over time into a chronologically or alphabetically sorted array. Still, however useful it may or may not be for them to do so, hashes remember their key-insertion order and observe that order when you iterate over them or examine them.
Like arrays, hashes can be created in several different ways.
9.3.1. Creating a new hash
There are four ways to create a hash:
· With the literal constructor (curly braces)
· With the Hash.new method
· With the Hash.[] method (a square-bracket class method of Hash)
· With the top-level method whose name is Hash
These hash-creation techniques are listed here, as closely as possible, in descending order of commonness. In other words, we’ll start with the most common technique and proceed from there.
Creating a literal hash
When you type out a literal hash inside curly braces, you separate keys from values with the => operator (unless you’re using the special { key: value } syntax for symbol keys). After each complete key/value pair you put a comma (except for the last pair, where it’s optional).
The literal hash constructor is convenient when you have values you wish to hash that aren’t going to change; you’ll type them into the program file once and refer to them from the program. State abbreviations are a good example.
You can use the literal hash constructor to create an empty hash:
h = {}
You’d presumably want to add items to the empty hash at some point; techniques for doing so will be forthcoming in section 9.3.2.
The second way to create a hash is with the traditional new constructor.
The Hash.new constructor
Hash.new creates an empty hash. But if you provide an argument to Hash.new, it’s treated as the default value for nonexistent hash keys. We’ll return to the matter of default values, and some bells and whistles on Hash.new, once we’ve looked at key/value insertion and retrieval.
The Hash.[ ] class method
The third way to create a hash involves another class method of the Hash class: the method [] (square brackets). This method takes a comma-separated list of items and, assuming there’s an even number of arguments, treats them as alternating keys and values, which it uses to construct a hash. Thanks to Ruby’s syntactic sugar, you can put the arguments to [] directly inside the brackets and dispense them with the method-calling dot:
>> Hash["Connecticut", "CT", "Delaware", "DE" ]
=> {"Connecticut"=>"CT", "Delaware"=>"DE"}
If you provide an odd number of arguments, a fatal error is raised, because an odd number of arguments can’t be mapped to a series of key/value pairs. However, you can pass in an array of arrays, where each subarray consists of two elements. Hash.[] will use the inner arrays as key/value pairs:
>> Hash[ [[1,2], [3,4], [5,6]] ]
=> {1=>2, 3=>4, 5=>6}
You can also pass in anything that has a method called to_hash. The new hash will be the result of calling that method.
Another hash-creation technique involves the top-level Hash method.
The Hash method
The Hash method has slightly idiosyncratic behavior. If called with an empty array ([]) or nil, it returns an empty hash. Otherwise, it calls to_hash on its single argument. If the argument doesn’t have a to_hash method, a fatal error (TypeError) is raised.
You’ve now seen a number of ways to create hashes. Remember that they’re in approximate descending order by commonness. You’ll see a lot more literal hash constructors and calls to Hash.new than you will the rest of the techniques presented. Still, it’s good to know what’s available and how the various techniques work.
Now let’s turn to the matter of manipulating a hash’s contents. We’ll follow much the same path as we did with arrays, looking at insertion and retrieval operations, combining hashes with other hashes, hash transformations, and querying hashes. Along the way, we’ll also take a separate look at setting default values for nonexistent hash keys.
9.3.2. Inserting, retrieving, and removing hash pairs
As you’ll see, hashes have a lot in common with arrays when it comes to the get- and set-style operations—though there are some important differences and some techniques that are specific to each.
Adding a key/value pair to a hash
To add a key/value pair to a hash, you use essentially the same technique as for adding an item to an array: the []= method plus syntactic sugar.
To add a state to state_hash, do this
state_hash["New York"] = "NY"
which is the sugared version of this:
state_hash.[]=("New York", "NY")
You can also use the synonymous method store for this operation. store takes two arguments (a key and a value):
state_hash.store("New York", "NY")
When you’re adding to a hash, keep in mind the important principle that keys are unique. You can have only one entry with a given key. Hash values don’t have to be unique; you can assign the same value to two or more keys. But you can’t have duplicate keys.
If you add a key/value pair to a hash that already has an entry for the key you’re adding, the old entry is overwritten. Here’s an example:

This code assigns two values to the "a" key of the hash h. The second assignment clobbers the first, as the puts statement shows by outputting 2.
If you reassign to a given hash key, that key still maintains its place in the insertion order of the hash. The change in the value paired with the key isn’t considered a new insertion into the hash.
Retrieving values from a hash
The workhorse technique for retrieving hash values is the [] method. For example, to retrieve "CT" from state_hash and assign it to a variable, do this:
conn_abbrev = state_hash["Connecticut"]
Using a hash key is much like indexing an array—except that the index (the key) can be anything, whereas in an array it’s always an integer.
Hashes also have a fetch method, which gives you an alternative way of retrieving values by key:
conn_abbrev = state_hash.fetch("Connecticut")
fetch differs from [] in the way it behaves when you ask it to look up a nonexistent key: fetch raises an exception, whereas [] gives you either nil or a default you’ve specified (as discussed in the next section). If you provide a second argument to hash, that argument will be returned, instead of an exception being raised if the key isn’t found. For example, this code
state_hash.fetch("Nebraska", "Unknown state")
evaluates to the string "Unknown state".
You can also retrieve values for multiple keys in one operation, with values_at:
two_states = state_hash.values_at("New Jersey","Delaware")
This code returns an array consisting of ["NJ","DE"] and assigns it to the variable two_states.
Now that you have a sense of the mechanics of getting information into and out of a hash, let’s circle back and look at the matter of supplying a default value (or default code block) when you create a hash.
9.3.3. Specifying default hash values and behavior
By default, when you ask a hash for the value corresponding to a nonexistent key, you get nil:
>> h = Hash.new
=> {}
>> h["no such key!"]
=> nil
But you can specify a different default value by supplying an argument to Hash.new:
>> h = Hash.new(0)
=> {}
>> h["no such key!"]
=> 0
Here we get back the hash’s default value, 0, when we use a nonexistent key. (You can also set the default on an already existing hash with the default method.)
It’s important to remember that whatever you specify as the default value is what you get when you specify a nonexistent key—and that the key remains nonexistent until you assign a value to it. In other words, saying h["blah"] doesn’t mean that h now has a "blah" key. If you want that key in the hash, you have to put it there. You can verify the fact that the hash h has no keys by examining it after performing the nonexistent key lookup in the last example:
>> h
=> {}
If you want references to nonexistent keys to cause the keys to come into existence, you can arrange this by supplying a code block to Hash.new. The code block will be executed every time a nonexistent key is referenced. Two objects will be yielded to the block: the hash and the (nonexistent) key.
This technique gives you a foot in the door when it comes to setting keys automatically when they’re first used. It’s not the most elegant or streamlined technique in Ruby, but it does work. You write a block that grabs the hash and the key, and you do a set operation.
For example, if you want every nonexistent key to be added to the hash with a value of 0, create your hash like this:
h = Hash.new {|hash,key| hash[key] = 0 }
When the hash h is asked to retrieve the value for a key it doesn’t have, the block is executed with hash set to the hash itself and key set to the nonexistent key. And thanks to the code in the block, the key is added to the hash after all, with the value 0.
Given this assignment of a new hash to h, you can trigger the block like this:
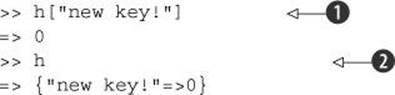
When you try to look up the key "new key!" ![]() , it’s not there; but thanks to the block, it gets added, with the value 0. Next, when you ask irb to show you the whole hash
, it’s not there; but thanks to the block, it gets added, with the value 0. Next, when you ask irb to show you the whole hash ![]() , it contains the automatically added pair.
, it contains the automatically added pair.
This technique has lots of uses. It lets you make assumptions about what’s in a hash, even if nothing is there to start with. It also shows you another facet of Ruby’s extensive repertoire of dynamic programming techniques and the flexibility of hashes.
We’ll turn now to ways you can combine hashes with each other, as we did with strings and arrays.
9.3.4. Combining hashes with other hashes
The process of combining two hashes into one comes in two flavors: the destructive flavor, where the first hash has the key/value pairs from the second hash added to it directly; and the nondestructive flavor, where a new, third hash is created that combines the elements of the original two.
The destructive operation is performed with the update method. Entries in the first hash are overwritten permanently if the second hash has a corresponding key:
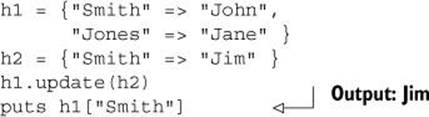
In this example, h1’s "Smith" entry has been changed (updated) to the value it has in h2. You’re asking for a refresh of your hash to reflect the contents of the second hash. That’s the destructive version of combining hashes.
To perform nondestructive combining of two hashes, use the merge method, which gives you a third hash and leaves the original unchanged:
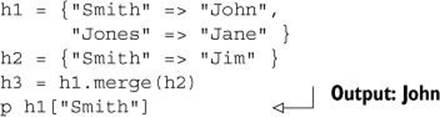
Here h1’s "Smith"/"John" pair isn’t overwritten by h2’s "Smith"/"Jim" pair. Instead, a new hash is created, with pairs from both of the other two. That hash will look like this, if examined:
{"Smith"=>"Jim", "Jones"=>"Jane"}
Note that h3 has a decision to make: which of the two Smith entries should it contain? The answer is that when the two hashes being merged share a key, the second hash (h2, in this example) wins. h3’s value for the key "Smith" will be "Jim".
Incidentally, merge!—the bang version of merge—is a synonym for update. You can use either name when you want to perform that operation.
In addition to being combined with other hashes, hashes can also be transformed in a number of ways, as you’ll see next.
9.3.5. Hash transformations
You can perform several transformations on hashes. Transformation, in this context, means that the method is called on a hash, and the result of the operation (the method’s return value) is a hash. In chapter 10, you’ll see other filtering and selecting methods on hashes that return their result sets in arrays. Here we’re looking at hash-to-hash operations.
Selecting and rejecting elements from a hash
To derive a subhash from an existing hash, use the select method. Key/value pairs will be passed in succession to the code block you provide. Any pair for which the block returns a true value will be included in the result hash:
>> h = Hash[1,2,3,4,5,6]
=> {1=>2, 3=>4, 5=>6}
>> h.select {|k,v| k > 1 }
=> {3=>4, 5=>6}
Rejecting elements from a hash works in the opposite way—those key/value pairs for which the block returns true are excluded from the result hash:
>> h.reject {|k,v| k > 1 }
=> {1=>2}
select and reject have in-place equivalents (versions that change the original hash permanently, rather than returning a new hash): select! and reject!. These two methods return nil if the hash doesn’t change. To do an in-place operation that returns your original hash (even if it’s unchanged), you can use keep_if and delete_if.
Inverting a hash
Hash#invert flips the keys and the values. Values become keys, and keys become values:
>> h = { 1 => "one", 2 => "two" }
=> {1=>"one", 2=>"two"}
>> h.invert
=> {"two"=>2, "one"=>1}
Be careful when you invert hashes. Because hash keys are unique, but values aren’t, when you turn duplicate values into keys, one of the pairs is discarded:
>> h = { 1 => "one", 2 => "more than 1", 3 => "more than 1" }
=> {1=>"one", 2=>"more than 1", 3=>"more than 1"}
>> h.invert
=> {"one"=>1, "more than 1"=>3}
Only one of the two "more than 1" values can survive as a key when the inversion is performed; the other is discarded. You should invert a hash only when you’re certain the values as well as the keys are unique.
Clearing a hash
Hash#clear empties the hash:
>> {1 => "one", 2 => "two" }.clear
=> {}
This is an in-place operation: the empty hash is the same hash (the same object) as the one to which you send the clear message.
Replacing the contents of a hash
Like strings and arrays, hashes have a replace method:
>> { 1 => "one", 2 => "two" }.replace({ 10 => "ten", 20 => "twenty"})
=> {10 => "ten", 20 => "twenty"}
This is also an in-place operation, as the name replace implies.
We’ll turn next to hash query methods.
9.3.6. Hash querying
Like arrays (and many other Ruby objects), hashes provide a number of methods with which you can query the state of the object. Table 9.2 shows some common hash query methods.
Table 9.2. Common hash query methods and their meanings
|
Method name/Sample call |
Meaning |
|
h.has_key?(1) |
True if h has the key 1 |
|
h.include?(1) |
Synonym for has_key? |
|
h.key?(1) |
Synonym for has_key? |
|
h.member?(1) |
Synonym for has_key? |
|
h.has_value?("three") |
True if any value in h is "three" |
|
h.value?("three") |
Synonym for has_value? |
|
h.empty? |
True if h has no key/value pairs |
|
h.size |
Number of key/value pairs in h |
None of the methods in table 9.2 should offer any surprises at this point; they’re similar in spirit, and in some cases in letter, to those you’ve seen for arrays. With the exception of size, they all return either true or false. The only surprise may be how many of them are synonyms. Four methods test for the presence of a particular key: has_key?, include?, key?, and member?. A case could be made that this is two or even three synonyms too many. has_key? seems to be the most popular of the four and is the most to-the-point with respect to what the method tests for.
The has_value? method has one synonym: value?. As with its key counterpart, has_value? seems to be more popular.
The other methods—empty? and size—tell you whether the hash is empty and what its size is. (size can also be called as length.) The size of a hash is the number of key/value pairs it contains.
Hashes get special dispensation in method argument lists, as you’ll see next.
9.3.7. Hashes as final method arguments
If you call a method in such a way that the last argument in the argument list is a hash, Ruby allows you to write the hash without curly braces. This perhaps trivial-sounding special rule can, in practice, make argument lists look much nicer than they otherwise would.
Here’s an example. The first argument to add_to_city_database is the name of the city; the second argument is a hash of data about the city, written without curly braces (and using the special key: value symbol notation):
add_to_city_database("New York City",
state: "New York",
population: 7000000,
nickname: "Big Apple")
The method add_to_city_database has to do more work to gain access to the data being passed to it than it would if it were binding parameters to arguments in left-to-right order through a list:
def add_to_city_database(name, info)
c = City.new
c.name = name
c.state = info[:state]
c.population = info[:population]
# etc.
Hashes as first arguments
In addition to learning about the special syntax available to you for using hashes as final method arguments without curly braces, it’s worth noting a pitfall of using a hash as the first argument to a method. The rule in this case is that you must not only put curly braces around the hash but also put the entire argument list in parentheses. If you don’t, Ruby will think your hash is a code block. In other words, when you do this
my_method { "NY" => "New York" }, 100, "another argument"
Ruby interprets the expression in braces as a block. If you want to send a hash along as an argument in this position, you have to use parentheses around the entire argument list to make it clear that the curly braces are hash-related and not block-related.
Of course, the exact process involved in unwrapping the hash will vary from one case to another. (Perhaps City objects store their information as a hash; that would make the method’s job a little easier.) But one way or another, the method has to handle the hash.
Keep in mind that although you get to leave the curly braces off the hash literal when it’s the last thing in an argument list, you can have as many hashes as you wish as method arguments, in any position. Just remember that it’s only when a hash is in the final argument position that you’re allowed to dispense with the braces.
Until Ruby 2 came along, hash arguments of this kind were the closest one could get to named or keyword arguments. That’s all changed, though. Ruby now has real named arguments. Their syntax is very hashlike, which is why we’re looking at them here rather than in chapter 2.
9.3.8. A detour back to argument syntax: Named (keyword) arguments
Using named arguments saves you the trouble of “unwrapping” hashes in your methods. Here’s a barebones example that shows the most basic version of named arguments:
>> def m(a:, b:)
>> p a,b
>> end
=> :m
>> m(a: 1, b: 2)
1
2
=> [1, 2]
On the method end, there are two parameters ending with colons. On the calling end, there’s something that looks a lot like a hash. Ruby matches everything up so that the values for a and b bind as expected. There’s no need to probe into a hash.
In the preceding example, a and b indicate required keyword arguments. You can’t call the method without them:
>> m
ArgumentError: missing keywords: a, b
>> m(a: 1)
ArgumentError: missing keyword: b
You can make keyword arguments optional by supplying default values for your named parameters—which makes the parameter list look even more hashlike:
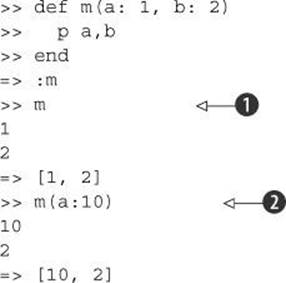
When you call m with no arguments ![]() , the defaults for a and b kick in. If you provide an a but no b
, the defaults for a and b kick in. If you provide an a but no b ![]() , you get the a you’ve provided and the default b.
, you get the a you’ve provided and the default b.
What if you go in the other direction and call a method using keyword arguments that the method doesn’t declare? If the method’s parameter list includes a double-starred name, the variable of that name will sponge up all unknown keyword arguments into a hash, as follows:
>> def m(a: 1, b: 2, **c)
>> p a,b,c
>> end
=> :m
>> m(x: 1, y: 2)
1
2
{:x=>1, :y=>2}
=> [1, 2, {:x=>1, :y=>2}]
If there’s no keyword sponge parameter, a method call like m(x:1, y:2) is just passing along a hash, which may or may not fail, depending on what arguments the method is expecting.
And of course, you can combine keyword and nonkeyword arguments:
>> def m(x, y, *z, a: 1, b:, **c, &block)
>> p x,y,z,a,b,c
>> end
=> :m
>> m(1,2,3,4,5,b:10,p:20,q:30)
1
2
[3, 4, 5]
1
10
{:p=>20, :q=>30}
=> [1, 2, [3, 4, 5], 1, 10, {:p=>20, :q=>30}]
Here the method m
· Takes two required positional arguments (x and y, bound to 1 and 2)
· Has a “sponge” parameter (z) that takes care of extra arguments following the positional ones (3, 4, 5)
· Has one optional and one required keyword argument (a and b, respectively, bound to 1 and 10)
· Has a keyword “sponge” (c) to absorb unknown named arguments (the p and q hash)
· Has a variable for binding to the code block, if any (block)
You’ll rarely see method signatures of this complexity, so if you can keep track of the elements in this one, you’re probably all set!
We’ll look next at ranges—which aren’t exactly collection objects, arguably, but which turn out to have a lot in common with collection objects.
9.4. Ranges
A range is an object with a start point and an end point. The semantics of range operations involve two major concepts:
· Inclusion —Does a given value fall inside the range?
· Enumeration —The range is treated as a traversable collection of individual items.
The logic of inclusion applies to all ranges; you can always test for inclusion. The logic of enumeration kicks in only with certain ranges—namely, those that include a finite number of discrete, identifiable values. You can’t iterate over a range that lies between two floating-point numbers, because the range encompasses an infinite number of values. But you can iterate over a range between two integers.
We’ll save further analysis of range iteration and enumeration logic for the next chapter, where we’ll look at enumeration and the Enumerable module in depth. In this section, we’ll look primarily at the other semantic concept: inclusion logic. We’ll start with some range-creation techniques.
9.4.1. Creating a range
You can create range objects with Range.new. If you do so in irb, you’re rewarded with a view of the syntax for literal range construction:
>> r = Range.new(1,100)
=> 1..100
The literal syntax can, of course, also be used directly to create a range:
>> r = 1..100
=> 1..100
When you see a range with two dots between the start-point and end-point values, as in the previous example, you’re seeing an inclusive range. A range with three dots in the middle is an exclusive range:
>> r = 1...100
=> 1...100
The difference lies in whether the end point is considered to lie inside the range. Coming full circle, you can also specify inclusive or exclusive behavior when you create a range with Range.new: the default is an inclusive range, but you can force an exclusive range by passing a third argument of true to the constructor:
>> Range.new(1,100)
=> 1..100
>> Range.new(1,100,true)
=> 1...100
Unfortunately, there’s no way to remember which behavior is the default and which is triggered by the true argument, except to memorize it.
Also notoriously hard to remember is which number of dots goes with which type of range.
Remembering .. vs. ...
If you follow Ruby discussion forums, you’ll periodically see messages and posts from people who find it difficult to remember which is which: two versus three dots, inclusive versus exclusive range.
One way to remember is to think of a range as always reaching to the point represented by whatever follows the second dot. In an inclusive range, the point after the second dot is the end value of the range. In this example, the value 100 is included in the range:
1..100
But in this exclusive range, the value 100 lies beyond the effective end of the range:
1...100
In other words, you can think of 100 as having been “pushed” to the right in such a way that it now sits outside the range.
We’ll turn now to range-inclusion logic—a section that closely corresponds to the “query” sections from the discussions of strings, arrays, and hashes, because most of what you do with ranges involves querying them on criteria of inclusion.
9.4.2. Range-inclusion logic
Ranges have begin and end methods, which report back their starting and ending points:
>> r = 1..10
=> 1..10
>> r.begin
=> 1
>> r.end
=> 10
A range also knows whether it’s an exclusive (three-dot) range:
>> r.exclude_end?
=> false
With the goal posts in place, you can start to test for inclusion.
Two methods are available for testing inclusion of a value in a range: cover? and include? (which is also aliased as member?).
Testing range inclusion with cover?
The cover? method performs a simple test: if the argument to the method is greater than the range’s start point and less than its end point (or equal to it, for an inclusive range), then the range is said to cover the object. The tests are performed using Boolean comparison tests, with a false result in cases where the comparison makes no sense.
All of the following comparisons make sense; one of them fails because the item isn’t in the range:
But this next test fails because the item being tested for inclusion isn’t comparable with the range’s start and end points:
>> r.cover?([])
=> false
It’s meaningless to ask whether an array is greater than the string "a". If you try such a comparison on its own, you’ll get a fatal error. Fortunately, ranges take a more conservative approach and tell you that the item isn’t covered by the range.
Whereas cover? performs start- and end-point comparisons, the other inclusion test, include? (or member?), takes a more collection-based approach.
Testing range inclusion with include?
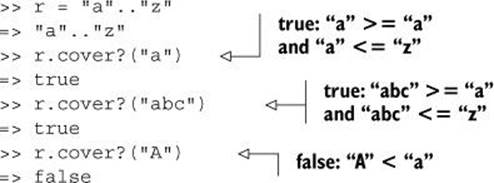
The include? test treats the range as a kind of crypto-array—that is, a collection of values. The "a".."z" range, for example, is considered to include (as measured by include?) only the 26 values that lie inclusively between "a" and "z".
Therefore, include? produces results that differ from those of cover?:
>> r.include?("a")
=> true
>> r.include?("abc")
=> false
In cases where the range can’t be interpreted as a finite collection, such as a range of floats, the include? method falls back on numerical order and comparison:
>> r = 1.0..2.0
=> 1.0..2.0
>> r.include?(1.5)
=> true
Are there backward ranges?
The anticlimactic answer to the question of backward ranges is this: yes and no. You can create a backward range, but it won’t do what you probably want it to:
>> r = 100...1
=> 100...1
>> r.include?(50)
=> false
The range happily performs its usual inclusion test for you. The test calculates whether the candidate for inclusion is greater than the start point of the range and less than the end point. Because 50 is neither greater than 100 nor less than 1, the test fails. And it fails silently; this is a logic error, not a fatal syntax or runtime error.
Backward ranges do show up in one particular set of use cases: as index arguments to strings and arrays. They typically take the form of a positive start point and a negative end point, with the negative end point counting in from the right:
>> "This is a sample string"[10..-5]
=> "sample st"
>> ['a','b','c','d'][0..-2]
=> ["a", "b", "c"]
You can even use an exclusive backward range:
>> ['a','b','c','d'][0...-2]
=> ["a", "b"]
In these cases, what doesn’t work (at least, in the way you might have expected) in a range on its own does work when applied to a string or an array.
You’ll see more about ranges as quasi-collections in the next chapter, as promised. In this chapter, we’ve got one more basic collection class to examine: the Set class.
9.5. Sets
Set is the one class under discussion in this chapter that isn’t, strictly speaking, a Ruby core class. It’s a standard library class, which means that to use it, you have to do this:
require 'set'
The general rule in this book is that we’re looking at the core language rather than the standard library, but the Set class makes a worthy exception because it fits in so nicely with the other container and collection classes we’ve looked at.
A set is a unique collection of objects. The objects can be anything—strings, integers, arrays, other sets—but no object can occur more than once in the set. Uniqueness is also enforced at the commonsense content level: if the set contains the string "New York", you can’t add the string "New York" to it, even though the two strings may technically be different objects. The same is true of arrays with equivalent content.
Note
Internally, sets use a hash to enforce the uniqueness of their contents. When an element is added to a set, the internal hash for that set gets a new key. Therefore, any two objects that would count as duplicates if used as hash keys can’t occur together in a set.
Let’s look now at how to create sets.
9.5.1. Set creation
To create a set, you use the Set.new constructor. You can create an empty set, or you can pass in a collection object (defined as an object that responds to each or each_entry). In the latter case, all the elements of the collection are placed individually in the set:
>> new_england = ["Connecticut", "Maine", "Massachusetts",
"New Hampshire", "Rhode Island", "Vermont"]
=> ["Connecticut", "Maine", "Massachusetts",
"New Hampshire","Rhode Island", "Vermont"]
>> state_set = Set.new(new_england)
=> #<Set: {"Connecticut", "Maine", "Massachusetts",
"New Hampshire", "Rhode Island", "Vermont"}>
Here, we’ve created an array, new_england, and used it as the constructor argument for the creation of the state_set set. Note that there’s no literal set constructor (no equivalent to [] for arrays or {} for hashes). There can’t be: sets are part of the standard library, not the core, and the core syntax of the language is already in place before the set library gets loaded.
You can also provide a code block to the constructor, in which case every item in the collection object you supply is passed through the block (yielded to it) with the resulting value being inserted into the set. For example, here’s a way to initialize a set to a list of uppercased strings:
>> names = ["David", "Yukihiro", "Chad", "Amy"]
=> ["David", "Yukihiro", "Chad", "Amy"]
>> name_set = Set.new(names) {|name| name.upcase }
=> #<Set: {"AMY", "YUKIHIRO", "CHAD", "DAVID"}>
Rather than using the array of names as its initial values, the set constructor yields each name to the block and inserts what it gets back (an uppercase version of the string) into the set.
Now that we’ve got a set, we can manipulate it.
9.5.2. Manipulating set elements
Like arrays, sets have two modes of adding elements: either inserting a new element into the set or drawing on another collection object as a source for multiple new elements. In the array world, this is the difference between << and concat. For sets, the distinction is reflected in a variety of methods, which we’ll look at here.
Adding/removing one object to/from a set
To add a single object to a set, you can use the << operator/method:

Here, as with arrays, strings, and other objects, << connotes appending to a collection or mutable object. If you try to add an object that’s already in the set (or an object that’s content-equal to one that’s in the set), nothing happens:
![]()
To remove an object, use delete:
>> tri_state << "Pennsylvania"
=> #<Set: {"New Jersey", "New York", "Connecticut", "Pennsylvania"}>
>> tri_state.delete("Connecticut")
=> #<Set: {"New Jersey", "New York", "Pennsylvania"}>
Deleting an object that isn’t in the set doesn’t raise an error. As with adding a duplicate object, nothing happens.
The << method is also available as add. There’s also a method called add?, which differs from add in that it returns nil (rather than returning the set itself) if the set is unchanged after the operation:
>> tri_state.add?("Pennsylvania")
=> nil
You can test the return value of add? to determine whether to take a different conditional branch if the element you’ve attempted to add was already there.
Set intersection, union, and difference
Sets have a concept of their own intersection, union, and difference with other sets—and, indeed, with other enumerable objects. The Set class comes with the necessary methods to perform these operations.
These methods have English names and symbolic aliases. The names are
· intersection, aliased as &
· union, aliased as + and |
· difference, aliased as -
Each of these methods returns a new set consisting of the original set, plus or minus the appropriate elements from the object provided as the method argument. The original set is unaffected.
Let’s shift our tri-state grouping back to the East and look at some set operations:
>> tri_state = Set.new(["Connecticut", "New Jersey", "New York"])
=> #<Set: {"Connecticut", "New Jersey", "New York"}>
# Subtraction (difference/-)
>> state_set - tri_state
=> #<Set: {"Maine", "Massachusetts", "New Hampshire", "Rhode Island",
"Vermont"}>
# Addition (union/+/|)
>> state_set + tri_state
=> #<Set: {"Connecticut", "Maine", "Massachusetts", "New Hampshire",
"Rhode Island", "Vermont", "New Jersey", "New York"}>
# Intersection (&)
>> state_set & tri_state
=> #<Set: {"Connecticut"}>
>> state_set | tri_state
=> #<Set: {"Connecticut", "Maine", "Massachusetts", "New Hampshire",
"Rhode Island", "Vermont", "New Jersey", "New York"}>
There’s also an exclusive-or operator, ^, which you can use to take the exclusive union between a set and an enumerable—that is, a set consisting of all elements that occur in either the set or the enumerable but not both:
>> state_set ^ tri_state
=> #<Set: {"New Jersey", "New York", "Maine", "Massachusetts",
"New Hampshire", "Rhode Island", "Vermont"}>
You can extend an existing set using a technique very similar in effect to the Set.new technique: the merge method, which can take as its argument any object that responds to each or each_entry. That includes arrays, hashes, and ranges—and, of course, other sets.
Merging a collection into another set
What happens when you merge another object into a set depends on what that object’s idea of iterating over itself consists of. Here’s an array example, including a check on object_id to confirm that the original set has been altered in place:
>> tri_state = Set.new(["Connecticut", "New Jersey"])
=> #<Set: {"Connecticut", "New Jersey"}>
>> tri_state.object_id
=> 2703420
>> tri_state.merge(["New York"])
=> #<Set: {"Connecticut", "New Jersey", "New York"}>
>> tri_state.object_id
=> 2703420
Merging a hash into a set results in the addition of two-element, key/value arrays to the set—because that’s how hashes break themselves down when you iterate through them. Here’s a slightly non-real-world example that demonstrates the technology:
>> s = Set.new([1,2,3])
=> #<Set: {1, 2, 3}>
>> s.merge({ "New Jersey" => "NJ", "Maine" => "ME" })
=> #<Set: {1, 2, 3, ["New Jersey", "NJ"], ["Maine", "ME"]}>
If you provide a hash argument to Set.new, the behavior is the same: you get a new set with two-element arrays based on the hash.
You might want to merge just the keys of a hash, rather than the entire hash, into a set. After all, set membership is based on hash key uniqueness, under the hood. You can do that with the keys method:
>> state_set = Set.new(["New York", "New Jersey"])
=> #<Set: {"New York", "New Jersey"}>
>> state_hash = { "Maine" => "ME", "Vermont" => "VT" }
=> {"Maine"=>"ME", "Vermont"=>"VT"}
>> state_set.merge(state_hash.keys)
=> #<Set: {"New York", "New Jersey", "Maine", "Vermont"}>
Try out some permutations of set merging, and you’ll see that it’s quite open-ended (just like set creation), as long as the argument is an object with an each or each _entry method.
Sets wouldn’t be sets without subsets and supersets, and Ruby’s set objects are sub- and super-aware.
9.5.3. Subsets and supersets
You can test for subset/superset relationships between sets (and the arguments have to be sets, not arrays, hashes, or any other kind of enumerable or collection) using the unsurprisingly named subset and superset methods:
>> small_states = Set.new(["Connecticut", "Delaware", "Rhode Island"])
=> #<Set: {"Connecticut", "Delaware", "Rhode Island"}>
>> tiny_states = Set.new(["Delaware", "Rhode Island"])
=> #<Set: {"Delaware", "Rhode Island"}>
>> tiny_states.subset?(small_states)
=> true
>> small_states.superset?(tiny_states)
=> true
The proper_subset and proper_superset methods are also available to you. A proper subset is a subset that’s smaller than the parent set by at least one element. If the two sets are equal, they’re subsets of each other but not proper subsets. Similarly, a proper superset of a set is a second set that contains all the elements of the first set plus at least one element not present in the first set. The “proper” concept is a way of filtering out the case where a set is a superset or subset of itself—because all sets are both.
We’ll pick up the set thread in the next chapter, where we’ll take another pass through collection objects in the interest of getting more deeply into the Enumerable module and the collection-based services it provides.
9.6. Summary
In this chapter you’ve seen
· How to create, manipulate, and transform collection objects, including
o Arrays
o Hashes
o Ranges
o Sets
· Named arguments
We’ve looked closely at Ruby’s major core container classes, Array and Hash. We’ve also looked at ranges, which principally operate as inclusion test criteria but know how to behave as collections when their makeup permits them to (a point that will make more sense after you’ve seen more about the Enumerable module). After ranges, we looked at sets, which are defined in the standard library and add another important tool to Ruby’s collection toolset. The source code for the Set class is written in Ruby; that gave us an opportunity to look at some real production Ruby code.
We also took a detour into named arguments, which prevent you from having to use hash keys as pseudo-keywords and “unpacking” argument hashes in your methods.
The concept of the collection in Ruby is closely associated with the Enumerable module and its principle of dependence on an each method. In the next chapter, we’ll go more deeply into Enumerable—which means looking at the many searching, filtering, sorting, and transforming operations available on objects whose classes mix in that module.