The Well-Grounded Rubyist, Second Edition (2014)
Part 3. Ruby dynamics
Chapter 15. Callbacks, hooks, and runtime introspection
This chapter covers
· Runtime callbacks: inherited, included, and more
· The respond_to? and method_missing methods
· Introspection of object and class method lists
· Trapping unresolved constant references
· Examining in-scope variables and constants
· Parsing caller and stack trace information
In keeping with its dynamic nature and its encouragement of flexible, supple object and program design, Ruby provides a large number of ways to examine what’s going on while your program is running and to set up event-based callbacks and hooks—essentially, tripwires that are pulled at specified times and for specific reasons—in the form of methods with special, reserved names for which you can, if you wish, provide definitions. Thus you can rig a module so that a particular method gets called every time a class includes that module, or write a callback method for a class that gets called every time the class is inherited, and so on.
In addition to runtime callbacks, Ruby lets you perform more passive but often critical acts of examination: you can ask objects what methods they can execute (in even more ways than you’ve seen already) or what instance variables they have. You can query classes and modules for their constants and their instance methods. You can examine a stack trace to determine what method calls got you to a particular point in your program—and you even get access to the filenames and line numbers of all the method calls along the way.
In short, Ruby invites you to the party: you get to see what’s going on, in considerable detail, via techniques for runtime introspection; and you can order Ruby to push certain buttons in reaction to runtime events. This chapter, the last in the book, will explore a variety of these introspective and callback techniques and will equip you to take ever greater advantage of the facilities offered by this remarkable, and remarkably dynamic, language.
15.1. Callbacks and hooks
The use of callbacks and hooks is a fairly common meta-programming technique. These methods are called when a particular event takes place during the run of a Ruby program. An event is something like
· A nonexistent method being called on an object
· A module being mixed in to a class or another module
· An object being extended with a module
· A class being subclassed (inherited from)
· A reference being made to a nonexistent constant
· An instance method being added to a class
· A singleton method being added to an object
For every event in that list, you can (if you choose) write a callback method that will be executed when the event happens. These callback methods are per-object or per-class, not global; if you want a method called when the class Ticket gets subclassed, you have to write the appropriate method specifically for class Ticket.
What follows are descriptions of each of these runtime event hooks. We’ll look at them in the order they’re listed above.
15.1.1. Intercepting unrecognized messages with method_missing
Back in chapter 4 (section 4.3) you learned quite a lot about method_missing. To summarize: when you send a message to an object, the object executes the first method it finds on its method-lookup path with the same name as the message. If it fails to find any such method, it raises aNoMethodError exception—unless you’ve provided the object with a method called method_missing. (Refer back to section 4.3 if you want to refresh your memory on how method_missing works.)
Of course, method_missing deserves a berth in this chapter too, because it’s arguably the most commonly used runtime hook in Ruby. Rather than repeat chapter 4’s coverage, though, let’s look at a couple of specific method_missing nuances. We’ll consider using method_missing as a delegation technique; and we’ll look at how method_missing works, and what happens when you override it, at the top of the class hierarchy.
Delegating with method_missing
You can use method_missing to bring about an automatic extension of the way your object behaves. For example, let’s say you’re modeling an object that in some respects is a container but that also has other characteristics—perhaps a cookbook. You want to be able to program your cookbook as a collection of recipes, but it also has certain characteristics (title, author, perhaps a list of people with whom you’ve shared it or who have contributed to it) that need to be stored and handled separately from the recipes. Thus the cookbook is both a collection and the repository of metadata about the collection.
To do this in a method_missing-based way, you would maintain an array of recipes and then forward any unrecognized messages to that array. A simple implementation might look like this:
class Cookbook
attr_accessor :title, :author
def initialize
@recipes = []
end
def method_missing(m,*args,&block)
@recipes.send(m,*args,&block)
end
end
Now we can perform manipulations on the collection of recipes, taking advantage of any array methods we wish. Let’s assume there’s a Recipe class, separate from the Cookbook class, and we’ve already created some Recipe objects:
cb = Cookbook.new
cb << recipe_for_cake
cb << recipe_for_chicken
beef_dishes = cb.select {|recipes| recipe.main_ingredient == "beef" }
The cookbook instance, cb, doesn’t have methods called << and select, so those messages are passed along to the @recipes array courtesy of method_missing. We can still define any methods we want directly in the Cookbook class—we can even override array methods, if we want a more cookbook-specific behavior for any of those methods—but method_missing saves us from having to define a parallel set of methods for handling pages as an ordered collection.
Ruby’s method-delegating techniques
In this method_missing example, we’ve delegated the processing of messages (the unknown ones) to the array @recipes. Ruby has several mechanisms for delegating actions from one object to another. We won’t go into them here, but you may come across both the Delegator class and theSimpleDelegator class in your further encounters with Ruby.
This use of method_missing is very straightforward (though you can mix and match it with some of the bells and whistles from chapter 4) but very powerful; it adds a great deal of intelligence to a class in return for little effort. Let’s look now at the other end of the spectrum: method_missingnot in a specific class, but at the top of the class tree and the top level of your code.
The original: BasicObject#method_missing
method_missing is one of the few methods defined at the very top of the class tree, in the BasicObject class. Thanks to the fact that all classes ultimately derive from Basic-Object, all objects have a method_missing method.
The default method_missing is rather intelligent. Look at the difference between the error messages in these two exchanges with irb:
>> a
NameError: undefined local variable or method `a' for main:Object
>> a?
NoMethodError: undefined method `a?' for main:Object
The unknown identifer a could be either a method or a variable (if it weren’t unknown, that is); and though it gets handled by method_missing, the error message reflects the fact that Ruby can’t ultimately tell whether you meant it as a method call or a variable reference. The second unknown identifier, a?, can only be a method, because variable names can’t end with a question mark. method_missing picks up on this and refines the error message (and even the choice of which exception to raise).
It’s possible to override the default method_missing, in either of two ways. First, you can open the BasicObject class and redefine method_missing. The second, more common (though, admittedly, not all that common) technique is to define method_missing at the top level, thus installing it as a private instance method of Object.
If you use this second technique, all objects except actual instances of BasicObject itself will find the new version of method_missing:
>> def method_missing(m,*args,&block)
>> raise NameError, "What on earth do you mean by #{m}?"
>> end
=> nil
>> a
NameError: What on earth do you mean by a?
from (irb):2:in `method_missing'
>> BasicObject.new.a
NoMethodError: undefined method `a' for #<BasicObject:0x4103ac>
(You can put a super call inside your new version, if you want to bounce it up to the version in BasicObject, perhaps after logging the error, instead of raising an exception yourself.)
Remember that if you define your own method_missing, you lose the intelligence that can discern variable naming from method naming:
>> a?
NameError: What on earth do you mean by a??
It probably doesn’t matter, especially if you’re going to call super anyway—and if you really want to, you can examine the details of the symbol m yourself. But it’s an interesting glimpse into the subtleties of the class hierarchy and the semantics of overriding.
method_missing, respond_to?, and respond_to_missing?
An oft-cited problem with method_missing is that it doesn’t align with respond_to?. Consider this example. In the Person class, we intercept messages that start with set_, and transform them into setter methods: set_age(n) becomes age=n and so forth. For example:
class Person
attr_accessor :name, :age
def initialize(name, age)
@name, @age = name, age
end
def method_missing(m, *args, &block)
if /set_(.*)/.match(m)
self.send("#{$1}=", *args)
else
super
end
end
end
So does a person object have a set_age method, or not? Well, you can call that method, but the person object claims it doesn’t respond to it:

The way to get method_missing and respond_to? to line up with each other is by defining the special method respond_to_missing?. Here’s a definition you can add to the preceding Person class:
def respond_to_missing?(m, include_private = false)
/set_/.match(m) || super
end
Now the new person object will respond differently given the same queries:
55
true
You can control whether private methods are included by using a second argument to respond_to?. That second argument will be passed along to respond_to_missing?. In the example, it defaults to false.
As a bonus, methods that become visible through respond_to_missing? can also be objectified into method objects using method:
![]()
Overall, method_missing is a highly useful event-trapping tool. But it’s far from the only one.
15.1.2. Trapping include and prepend operations
You know how to include a module in a class or other module, and you know how to prepend a module to a class or module. If you want to trap these events—to trigger a callback when the events occur—you can define special methods called included and prepended. Each of these methods receives the name of the including or prepending class or module as its single argument.
Let’s look closely at included, knowing that prepended works in much the same way. You can do a quick test of included by having it trigger a message printout and then perform an include operation:
module M
def self.included(c)
puts "I have just been mixed into #{c}."
end
end
class C
include M
end
You see the message "I have just been mixed into C." as a result of the execution of M.included when M gets included by (mixed into) C. (Because you can also mix modules into modules, the example would also work if C were another module.)
When would it be useful for a module to intercept its own inclusion like this? One commonly discussed case revolves around the difference between instance and class methods. When you mix a module into a class, you’re ensuring that all the instance methods defined in the module become available to instances of the class. But the class object isn’t affected. The following question often arises: What if you want to add class methods to the class by mixing in the module along with adding the instance methods?
Courtesy of included, you can trap the include operation and use the occasion to add class methods to the class that’s doing the including. The following listing shows an example.
Listing 15.1. Using included to add a class method as part of a mix-in operation
module M
def self.included(cl)
def cl.a_class_method
puts "Now the class has a new class method."
end
end
def an_inst_method
puts "This module supplies this instance method."
end
end
class C
include M
end
c = C.new
c.an_inst_method
C.a_class_method
The output from this listing is
This module supplies this instance method.
Now the class has a new class method.
When class C includes module M, two things happen. First, an instance method called an_inst_method appears in the lookup path of its instances (such as c). Second, thanks to M’s included callback, a class method called a_class_method is defined for the class object C.
Module#included is a useful way to hook into the class/module engineering of your program. Meanwhile, let’s look at another callback in the same general area of interest: Module#extended.
15.1.3. Intercepting extend
As you know from chapter 13, extending individual objects with modules is one of the most powerful techniques available in Ruby for taking advantage of the flexibility of objects and their ability to be customized. It’s also the beneficiary of a runtime hook: using the Module#extendedmethod, you can set up a callback that will be triggered whenever an object performs an extend operation that involves the module in question.
The next listing shows a modified version of listing 15.1 that illustrates the workings of Module#extended.
Listing 15.2. Triggering a callback from an extend event
module M
def self.extended(obj)
puts "Module #{self} is being used by #{obj}."
end
def an_inst_method
puts "This module supplies this instance method."
end
end
my_object = Object.new
my_object.extend(M)
my_object.an_inst_method
The output from this listing is
Module M is being used by #<Object:0x007f8e2a95bae0>.
This module supplies this instance method.
It’s useful to look at how the included and extended callbacks work in conjunction with singleton classes. There’s nothing too surprising here; what you learn is how consistent Ruby’s object and class model is.
Singleton-class behavior with extended and included
In effect, extending an object with a module is the same as including that module in the object’s singleton class. Whichever way you describe it, the upshot is that the module is added to the object’s method-lookup path, entering the chain right after the object’s singleton class.
But the two operations trigger different callbacks: extended and included. The following listing demonstrates the relevant behaviors.
Listing 15.3. Extending an object and including it into its singleton class
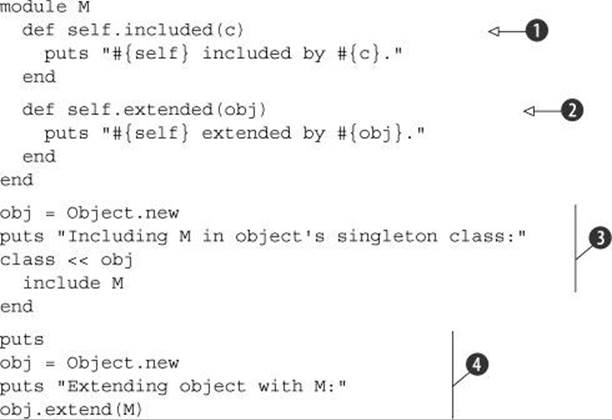
Both callbacks are defined in the module M: included ![]() and extended
and extended ![]() . Each callback prints out a report of what it’s doing. Starting with a freshly minted, generic object, we include M in the object’s singleton class
. Each callback prints out a report of what it’s doing. Starting with a freshly minted, generic object, we include M in the object’s singleton class ![]() and then repeat the process, using another new object and extending the object with M directly
and then repeat the process, using another new object and extending the object with M directly ![]() .
.
The output from this listing is
Including M in object's singleton class:
M included by #<Class:#<Object:0x0000010193c978>>.
Extending object with M:
M extended by #<Object:0x0000010193c310>.
Sure enough, the include triggers the included callback, and the extend triggers extended, even though in this particular scenario the results of the two operations are the same: the object in question has M added to its method lookup path. It’s a nice illustration of some of the subtlety and precision of Ruby’s architecture and a useful reminder that manipulating an object’s singleton class directly isn’t quite identical to doing singleton-level operations directly on the object.
Just as modules can intercept include and extend operations, classes can tell when they’re being subclassed.
15.1.4. Intercepting inheritance with Class#inherited
You can hook into the subclassing of a class by defining a special class method called inherited for that class. If inherited has been defined for a given class, then when you subclass the class, inherited is called with the name of the new class as its single argument.
Here’s a simple example, where the class C reports on the fact that it has been subclassed:
class C
def self.inherited(subclass)
puts "#{self} just got subclassed by #{subclass}."
end
end
class D < C
end
The subclassing of C by D automatically triggers a call to inherited and produces the following output:
C just got subclassed by D.
inherited is a class method, so descendants of the class that defines it are also able to call it. The actions you define in inherited cascade: if you inherit from a subclass, that subclass triggers the inherited method, and so on down the chain of inheritance. If you do this
class E < D
end
you’re informed that D just got subclassed by E. You get similar results if you subclass E, and so forth.
The limits of the inherited callback
Everything has its limits, including the inherited callback. When D inherits from C, C is D’s superclass; but in addition, C’s singleton class is the superclass of D’s singleton class. That’s how D manages to be able to call C’s class methods. But no callback is triggered. Even if you defineinherited in C’s singleton class, it’s never called.
Here’s a testbed. Note how inherited is defined inside the singleton class of C. But even when D inherits from C—and even after the explicit creation of D’s singleton class—the callback isn’t triggered:
class C
class << self
def self.inherited
puts "Singleton class of C just got inherited!"
puts "But you'll never see this message."
end
end
end
class D < C
class << self
puts "D's singleton class now exists, but no callback!"
end
end
The output from this program is
D's singleton class now exists, but no callback!
You’re extremely unlikely ever to come across a situation where this behavior matters, but it gives you a nice X-ray of how Ruby’s class model interoperates with its callback layer.
Let’s look now at how to intercept a reference to a nonexistent constant.
15.1.5. The Module#const_missing method
Module#const_missing is another commonly used callback. As the name implies, this method is called whenever an unidentifiable constant is referred to inside a given module or class:
class C
def self.const_missing(const)
puts "#{const} is undefined—setting it to 1."
const_set(const,1)
end
end
puts C::A
puts C::A
The output of this code is
A is undefined—setting it to 1.
1
1
Thanks to the callback, C::A is defined automatically when you use it without defining it. This is taken care of in such a way that puts can print the value of the constant; puts never has to know that the constant wasn’t defined in the first place. Then, on the second call to puts, the constant is already defined, and const_missing isn’t called.
One of the most powerful event callback facilities in Ruby is method_added, which lets you trigger an event when a new instance method is defined.
15.1.6. The method_added and singleton_method_added methods
If you define method_added as a class method in any class or module, it will be called when any instance method is defined. Here’s a basic example:
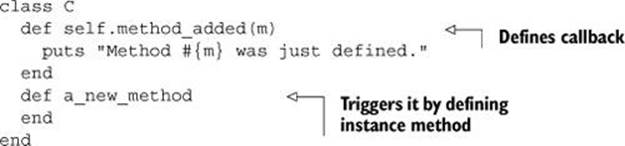
The output from this program is
Method a_new_method was just defined.
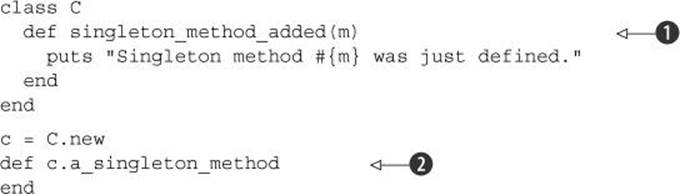
The singleton_method_added callback does much the same thing, but for singleton methods. Perhaps surprisingly, it even triggers itself. If you run this snippet
class C
def self.singleton_method_added(m)
puts "Method #{m} was just defined."
end
end
you’ll see that the callback—which is a singleton method on the class object C—triggers its own execution:
Method singleton_method_added was just defined.
The callback will also be triggered by the definition of another singleton (class) method. Let’s expand the previous example to include such a definition:
class C
def self.singleton_method_added(m)
puts "Method #{m} was just defined."
end
def self.new_class_method
end
end
The new output is
Method singleton_method_added was just defined.
Method new_class_method was just defined.
In most cases, you should use singleton_method_added with objects other than class objects. Here’s how its use might play out with a generic object:
obj = Object.new
def obj.singleton_method_added(m)
puts "Singleton method #{m} was just defined."
end
def obj.a_new_singleton_method
end
The output in this case is
Singleton method singleton_method_added was just defined.
Singleton method a_new_singleton_method was just defined.
Again, you get the somewhat surprising effect that defining singleton_method_added triggers the callback’s own execution.
Putting the class-based and object-based approaches together, you can achieve the object-specific effect by defining the relevant methods in the object’s singleton class:
obj = Object.new
class << obj
def singleton_method_added(m)
puts "Singleton method #{m} was just defined."
end
def a_new_singleton_method
end
end
The output for this snippet is exactly the same as for the previous example. Finally, coming full circle, you can define singleton_method_added as a regular instance method of a class, in which case every instance of that class will follow the rule that the callback will be triggered by the creation of a singleton method:
Here, the definition of the callback ![]() governs every instance of C. The definition of a singleton method on such an instance
governs every instance of C. The definition of a singleton method on such an instance ![]() therefore triggers the callback, resulting in this output:
therefore triggers the callback, resulting in this output:
Singleton method a_singleton_method was just defined.
It’s possible that you won’t use either method_added or singleton_method_added often in your Ruby applications. But experimenting with them is a great way to get a deeper feel for how the various parts of the class, instance, and singleton-class pictures fit together.
We’ll turn now to the subject of examining object capabilities ("abc".methods and friends). The basics of this topic were included in the “Built-in Essentials” survey in chapter 7, and as promised in that chapter, we’ll go into them more deeply here.
15.2. Interpreting object capability queries
At this point in your work with Ruby, you can set your sights on doing more with lists of objects’ methods than examining and discarding them. In this section we’ll look at a few examples (and there’ll be plenty of room left for you to create more, as your needs and interests demand) of ways in which you might use and interpret the information in method lists. The Ruby you’ve learned since we last addressed this topic directly will stand you in good stead. You’ll also learn a few fine points of the method-querying methods themselves.
Let’s start at the most familiar point of departure: listing non-private methods with the methods method.
15.2.1. Listing an object’s non-private methods
To list the non-private (i.e., public or protected) methods that an object knows about, you use the method methods, which returns an array of symbols. Arrays being arrays, you can perform some useful queries on the results of the initial query. Typically, you’ll filter the array in some way so as to get a subset of methods.
Here, for example, is how you might ask a string what methods it knows about that involve modification of case:
>> string = "Test string"
=> "Test string"
>> string.methods.grep(/case/).sort
=> [:casecmp, :downcase, :downcase!, :swapcase, :swapcase!, :upcase,
:upcase!]
The grep filters out any symbol that doesn’t have case in it. (Remember that although they’re not strings, symbols exhibit a number of stringlike behaviors, such as being greppable.) The sort command at the end is useful for most method-listing operations. It doesn’t make much of a difference in this example, because there are only seven methods; but when you get back arrays of 100 or more symbols, sorting them can help a lot.
Grepping for case depends on the assumption, of course, that case-related methods will have case in their names. There’s definitely an element of judgment, often along the lines of making educated guesses about what you think you’ll find, in many method-capability queries. Things tend to work out, though, as Ruby is more than reasonably consistent and conventional in its choice of method names.
Some of the case methods are also bang (!) methods. Following that thread, let’s find out all the bang methods a string has, again using a grep operation:
>>string.methods.grep(/.!/).sort
=> [:capitalize!, :chomp!, :chop!, :delete!, :downcase!, :encode!, :gsub!,
:lstrip!, :next!, :reverse!, :rstrip!, :scrub!, :slice!, :squeeze!,
:strip!, :sub!, :succ!, :swapcase!, :tr!, :tr_s!, :upcase!]
Why the dot before the ! in the regular expression? Its purpose is to ensure that there’s at least one character before the ! in the method name, and thus to exclude the !, !=, and !~ methods, which contain ! but aren’t bang methods in the usual sense. We want methods that end with a bang, but not those that begin with one.
Let’s use methods a little further. Here’s a question we can answer by interpreting method query results: do strings have any bang methods that don’t have corresponding non-bang methods?
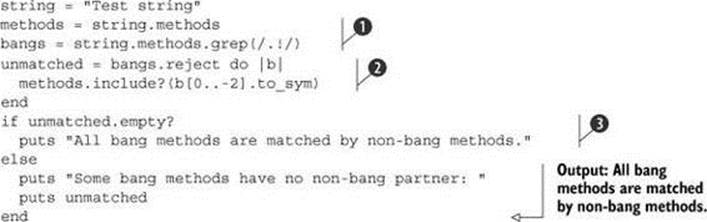
The code works by collecting all of a string’s public methods and, separately, all of its bang methods ![]() . Then, a reject operation filters out all bang method names for which a corresponding non-bang name can be found in the larger method-name list
. Then, a reject operation filters out all bang method names for which a corresponding non-bang name can be found in the larger method-name list ![]() . The [0..-2] index grabs everything but the last character of the symbol—the method name minus the !, in other words—and the call to to_sym converts the resulting string back to a symbol so that the include? test can look for it in the array of methods. If the filtered list is empty, that means that no unmatched bang method names were found. If it isn’t empty, then at least one such name was found and can be printed out
. The [0..-2] index grabs everything but the last character of the symbol—the method name minus the !, in other words—and the call to to_sym converts the resulting string back to a symbol so that the include? test can look for it in the array of methods. If the filtered list is empty, that means that no unmatched bang method names were found. If it isn’t empty, then at least one such name was found and can be printed out ![]() .
.
If you run the script as it is, it will always take the first (true) branch of the if statement. If you want to see a list of unmatched bang methods, you can add the following line to the program, just after the first line:
def string.surprise!; end
When you run the modified version of the script, you’ll see this:
Some bang methods have no non-bang partner:
surprise!
As you’ve already seen, writing bang methods without non-bang partners is usually bad practice—but it’s a good way to see the methods method at work.
You can, of course, ask class and module objects what their methods are. After all, they’re just objects. But remember that the methods method always lists the non-private methods of the object itself. In the case of classes and modules, that means you’re not getting a list of the methods that instances of the class—or instances of classes that mix in the module—can call. You’re getting the methods that the class or module itself knows about. Here’s a (partial) result from calling methods on a newly created class object:
>> class C; end
=> nil
>> C.methods.sort
=> [:!, :!=, :!~, :<, :<=, :<=>, :==, :===, :=~, :>, :>=, :__id__, :__send__,
:allocate, :ancestors, :autoload, :autoload?, :class, :class_eval,
:class_exec, :class_variable_defined?, :class_variable_get,
:class_variable_set, :class_variables, etc.
Class and module objects share some methods with their own instances, because they’re all objects and objects in general share certain methods. But the methods you see are those that the class or module itself can call. You can also ask classes and modules about the instance methods they define. We’ll return to that technique shortly. First, let’s look briefly at the process of listing an object’s private and protected methods.
15.2.2. Listing private and protected methods
Every object (except instances of BasicObject) has a private_methods method and a protected_methods method. They work as you’d expect; they provide arrays of symbols, but containing private and protected method names, respectively.
Freshly minted Ruby objects have a lot of private methods and no protected methods:
$ ruby -e 'o = Object.new; p o.private_methods.size'
72
$ ruby -e 'o = Object.new; p o.protected_methods.size'
0
What are those private methods? They’re private instance methods defined mostly in the Kernel module and secondarily in the BasicObject class. Here’s how you can track this down:
$ ruby -e 'o = Object.new; p o.private_methods -
BasicObject.private_instance_methods(false) -
Kernel.private_instance_methods(false)'
[]
Note that after you subtract the private methods defined in Kernel and BasicObject, the original object has no private methods to list. The private methods defined in Kernel are the methods we think of as “top-level,” like puts, binding, and raise. Play around a little with the method-listing techniques you’re learning here and you’ll see some familiar methods listed.
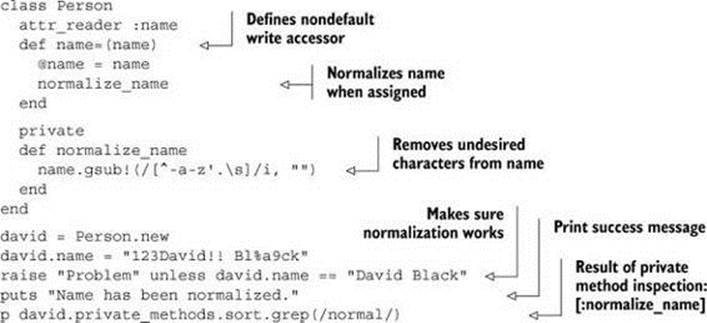
Naturally, if you define a private method yourself, it will also appear in the list of private methods. Here’s an example: a simple Person class in which assigning a name to the person via the name= method triggers a name-normalization method that removes everything other than letters and selected punctuation characters from the name. The normalize_name method is private:
Protected methods can be examined in much the same way, using the protected_ methods method.
In addition to asking objects what methods they know about, it’s frequently useful to ask classes and modules what methods they provide.
15.2.3. Getting class and module instance methods
Classes and modules come with a somewhat souped-up set of method-querying methods. Examining those available in String illustrates the complete list. The methods that are specific to classes and modules are in bold:
>> String.methods.grep(/methods/).sort
=> [:instance_methods, :methods, :private_instance_methods,
:private_methods,:protected_instance_methods, :protected_methods,
:public_instance_methods,:public_methods, :singleton_methods]
The methods shown in bold give you lists of instance methods of various kinds defined in the class or module. The four methods work as follows:
· instance_methods returns all public and protected instance methods.
· public_instance_methods returns all public instance methods.
· protected_instance_methods and private_instance_methods return all protected and private instance methods, respectively.
When calling any of these methods, you have the option of passing in an argument. If you pass in the argument false, then the list of methods you get back will include only those defined in the class or module you’re querying. If you pass in any argument with Boolean truth (anything other than false or nil), or if you pass in no argument, the list of methods will include those defined in the class or module you’re querying and all of its ancestor classes and modules.
For example, you can find out which instance methods the Range class defines, like this:
>> Range.instance_methods(false).sort
=> [:==, :===, :begin, :bsearch, :cover?, :each, :end, :eql?, :exclude_end?,
:first, :hash, :include?, :inspect, :last, :max, :member?, :min, :size,
:step, :to_s]]
Going one step further, what if you want to know which of the methods defined in the Enumerable module are overridden in Range? You can find out by performing an and (&) operation on the two lists of instance methods: those defined in Enumerable and those defined in Range:
>> Range.instance_methods(false) & Enumerable.instance_methods(false)
=> [:first, :min, :max, :member?, :include?]
As you can see, Range redefines five methods that Enumerable already defines.
We’ll look shortly at the last of the methods-style methods, singleton_methods. But first, let’s create a program that produces a list of all the overrides of all classes that mix in Enumerable.
Getting all the Enumerable overrides
The strategy here will be to find out which classes mix in Enumerable and then perform on each such class an and (&) operation like the one in the last example, storing the results and, finally, printing them out. The following listing shows the code.
Listing 15.4. Enumerable descendants’ overrides of Enumerable instance methods
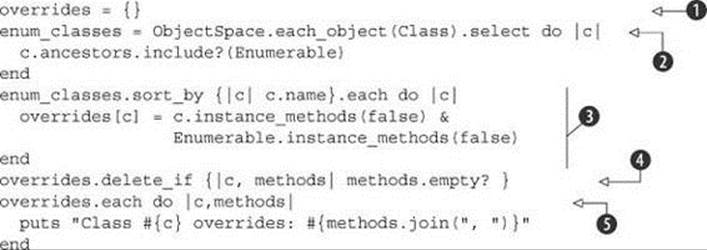
First, we create an empty hash in the variable overrides ![]() . We then get a list of all classes that mix in Enumerable. The technique for getting this list involves the ObjectSpace module and its each_object method
. We then get a list of all classes that mix in Enumerable. The technique for getting this list involves the ObjectSpace module and its each_object method ![]() . This method takes a single argument representing the class of the objects you want it to find. In this case, we’re interested in objects of class Class, and we’re only interested in those that have Enumerable among their ancestors. The each_object method returns an enumerator, and the call to select on that enumerator has the desired effect of filtering the list of all classes down to a list of only those that have mixed in Enumerable.
. This method takes a single argument representing the class of the objects you want it to find. In this case, we’re interested in objects of class Class, and we’re only interested in those that have Enumerable among their ancestors. The each_object method returns an enumerator, and the call to select on that enumerator has the desired effect of filtering the list of all classes down to a list of only those that have mixed in Enumerable.
Now it’s time to populate the overrides hash. For each class in enum_classes (nicely sorted by class name), we put an entry in overrides. The key is the class, and the value is an array of method names—the names of the Enumerable methods that this class overrides ![]() . After removing any entries representing classes that haven’t overridden any Enumerable methods
. After removing any entries representing classes that haven’t overridden any Enumerable methods ![]() , we proceed to print the results, using sort and join operations to make the output look consistent and clear
, we proceed to print the results, using sort and join operations to make the output look consistent and clear ![]() , as shown here:
, as shown here:
Class ARGF.class overrides: to_a
Class Array overrides: to_a, to_h, first, reverse_each, find_index, sort,
collect, map, select, reject, zip, include?, count, cycle, take,
take_while, drop, drop_while
Class Enumerator overrides: each_with_index, each_with_object
Class Enumerator::Lazy overrides: map, collect, flat_map, collect_concat,
select, find_all, reject, grep, zip, take, take_while, drop, drop_while,
lazy, chunk, slice_before
Class Hash overrides: to_h, to_a, select, reject, include?, member?
Class ObjectSpace::WeakMap overrides: include?, member?
Class Range overrides: first, min, max, member?, include?
Class Struct overrides: to_a, to_h, select
The first line pertains to the somewhat anomalous object designated as ARGF.class, which is a unique, specially engineered object involved in the processing of program input. The other lines pertain to several familiar classes that mix in Enumerable. In each case, you see which Enumerablemethods the class in question has overridden.
Let’s look next at how to query an object with regard to its singleton methods.
15.2.4. Listing objects’ singleton methods
A singleton method, as you know, is a method defined for the sole use of a particular object (or, if the object is a class, for the use of the object and its subclasses) and stored in that object’s singleton class. You can use the singleton_methods method to list all such methods. Note thatsingleton_methods lists public and protected singleton methods but not private ones. Here’s an example:
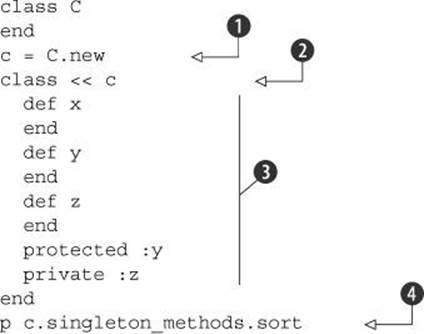
An instance of class C is created ![]() , and its singleton class is opened
, and its singleton class is opened ![]() . Three methods are defined in the singleton class, one each at the public (x), protected (y), and private (z) levels
. Three methods are defined in the singleton class, one each at the public (x), protected (y), and private (z) levels ![]() . The printout of the singleton methods of c
. The printout of the singleton methods of c ![]() looks like this:
looks like this:
[:x, :y]
Singleton methods are also considered just methods. The methods :x and :y will show up if you call c.methods, too. You can use the class-based method-query methods on the singleton class. Add this code to the end of the last example:
class << c
p private_instance_methods(false)
end
When you run it, you’ll see this:
[:z]
The method :z is a singleton method of c, which means it’s an instance method (a private instance method, as it happens) of c’s singleton class.
You can ask a class for its singleton methods, and you’ll get the singleton methods defined for that class and for all of its ancestors. Here’s an irb-based illustration:
>> class C; end
=> nil
>> class D < C; end
=> nil
>> def C.a_class_method_on_C; end
=> nil
>> def D.a_class_method_on_D; end
=> nil
>> D.singleton_methods
=> [:a_class_method_on_D, :a_class_method_on_C]
Once you get some practice using the various methods methods, you’ll find them useful for studying and exploring how and where methods are defined. For example, you can use method queries to examine how the class methods of File are composed. To start with, find out which class methods File inherits from its ancestors, as opposed to those it defines itself:
>> File.singleton_methods - File.singleton_methods(false)
=> [:new, :open, :sysopen, :for_fd, :popen, :foreach, :readlines,
:read, :select, :pipe, :try_convert, :copy_stream]
The call to singleton_methods(false) provides only the singleton methods defined on File. The call without the false argument provides all the singleton methods defined on File and its ancestors. The difference is the ones defined by the ancestors.
The superclass of File is IO. Interestingly, although not surprisingly, all 12 of the ancestral singleton methods available to File are defined in IO. You can confirm this with another query:
>> IO.singleton_methods(false)
=> [:new, :open, :sysopen, :for_fd, :popen, :foreach, :readlines,
:read, :select, :pipe, :try_convert, :copy_stream]
The relationship among classes—in this case, the fact that File is a subclass of IO and therefore shares its singleton methods (its class methods)—is directly visible in the method-name arrays. The various methods methods allow for almost unlimited inspection and exploration of this kind.
As you can see, the method-querying facilities in Ruby can tell you quite a lot about the objects, class, and modules that you’re handling. You just need to connect the dots by applying collection-querying and text-processing techniques to the lists they provide. Interpreting method queries is a nice example of the kind of learning feedback loop that Ruby provides: the more you learn about the language, the more you can learn.
We’ll turn next to the matter of runtime reflection on variables and constants.
15.3. Introspection of variables and constants
Ruby can tell you several things about which variables and constants you have access to at a given point in runtime. You can get a listing of local or global variables, an object’s instance variables, the class variables of a class or module, and the constants of a class or module.
15.3.1. Listing local and global variables
The local and global variable inspections are straightforward: you use the top-level methods local_variables and global_variables. In each case, you get back an array of symbols corresponding to the local or global variables currently defined:
x = 1
p local_variables
[:x]
p global_variables.sort
[:$!, :$", :$$, :$&, :$', :$*, :$+, :$,, :$-0, :$-F, :$-I, :$-K, :$-W, :$-a,
:$-d, :$-i, :$-l, :$-p, :$-v, :$-w, :$., :$/, :$0, :$1, :$2, :$3, :$4, :$5,
:$6, :$7, :$8, :$9, :$:, :$;, :$<, :$=, :$>, :$?, :$@, :$DEBUG, :$FILENAME,
:$KCODE, :$LOADED_FEATURES, :$LOAD_PATH, :$PROGRAM_NAME, :$SAFE, :$VERBOSE,
:$\, :$_, :$`, :$stderr, :$stdin, :$stdout, :$~]
The global variable list includes globals like $: (the library load path, also available as $LOAD_PATH), $~ (the global MatchData object based on the most recent pattern-matching operation), $0 (the name of the file in which execution of the current program was initiated), $FILENAME (the name of the file currently being executed), and others. The local variable list includes all currently defined local variables.
Note that local_variables and global_variables don’t give you the values of the variables they report on; they just give you the names. The same is true of the instance_variables method, which you can call on any object.
15.3.2. Listing instance variables
Here’s another rendition of a simple Person class, which illustrates what’s involved in an instance-variable query:
class Person
attr_accessor :name, :age
def initialize(name)
@name = name
end
end
david = Person.new("David")
david.age = 55
p david.instance_variables
The output is
[:@name, :@age]
The object david has two instance variables initialized at the time of the query. One of them, @name, was assigned a value at the time of the object’s creation. The other, @age, is present because of the accessor attribute age. Attributes are implemented as read and/or write methods around instance variables, so even though @age doesn’t appear explicitly anywhere in the program, it gets initialized when the object is assigned an age.
All instance variables begin with the @ character, and all globals begin with $. You might expect Ruby not to bother with those characters when it gives you lists of variable names; but the names you get in the lists do include the beginning characters.
The irb underscore variable
If you run local_variables in a new irb session, you’ll see an underscore:
>> local_variables
=> [:_]
The underscore is a special irb variable: it represents the value of the last expression evaluated by irb. You can use it to grab values that otherwise will have disappeared:
>> Person.new("David")
=> #<Person:0x000001018ba360 @name="David">
>> david = _
=> #<Person:0x000001018ba360 @name="David">
Now the Person object is bound to the variable david.
Next, we’ll look at execution-tracing techniques that help you determine the method-calling history at a given point in runtime.
15.4. Tracing execution
No matter where you are in the execution of your program, you got there somehow. Either you’re at the top level or you’re one or more method calls deep. Ruby provides information about how you got where you are. The chief tool for examining the method-calling history is the top-level method caller.
15.4.1. Examining the stack trace with caller
The caller method provides an array of strings. Each string represents one step in the stack trace: a description of a single method call along the way to where you are now. The strings contain information about the file or program where the method call was made, the line on which the method call occurred, and the method from which the current method was called, if any.
Here’s an example. Put these lines in a file called tracedemo.rb:
def x
y
end
def y
z
end
def z
puts "Stacktrace: "
p caller
end
x
All this program does is bury itself in a stack of method calls: x calls y, y calls z. Inside z, we get a stack trace, courtesy of caller. Here’s the output from running tracedemo.rb:
Stacktrace:
["tracedemo.rb:6:in `y'", "tracedemo.rb:2:in `x'", "tracedemo.rb:14:in
`<main>'"]
Each string in the stack trace array contains one link in the chain of method calls that got us to the point where caller was called. The first string represents the most recent call in the history: we were at line 6 of tracedemo.rb, inside the method y. The second string shows that we got to y viax. The third, final string tells us that we were in <main>, which means the call to x was made from the top level rather than from inside a method.
You may recognize the stack trace syntax from the messages you’ve seen from fatal errors. If you rewrite the z method to look like this
def z
raise
end
the output will look like this:
tracedemo.rb:10:in `z': unhandled exception
from tracedemo.rb:6:in `y'
from tracedemo.rb:2:in `x'
from tracedemo.rb:13:in `<main>'
This is, of course, just a slightly prettified version of the stack trace array we got the first time around from caller.
Ruby stack traces are useful, but they’re also looked askance at because they consist solely of strings. If you want to do anything with the information a stack trace provides, you have to scan or parse the string and extract the useful information. Another approach is to write a Ruby tool for parsing stack traces and turning them into objects.
15.4.2. Writing a tool for parsing stack traces
Given a stack trace—an array of strings—we want to generate an array of objects, each of which has knowledge of a program or filename, a line number, and a method name (or <main>). We’ll write a Call class, which will represent one stack trace step per object, and a Stack class that will represent an entire stack trace, consisting of one or more Call objects. To minimize the risk of name clashes, let’s put both of these classes inside a module, CallerTools. Let’s start by describing in more detail what each of the two classes will do.
CallerTools::Call will have three reader attributes: program, line, and meth. (It’s better to use meth than method as the name of the third attribute because classes already have a method called method and we don’t want to override it.) Upon initialization, an object of this class will parse a stack trace string and save the relevant substrings to the appropriate instance variables for later retrieval via the attribute-reader methods.
CallerTools::Stack will store one or more Call objects in an array, which in turn will be stored in the instance variable @backtrace. We’ll also write a report method, which will produce a (reasonably) pretty printable representation of all the information in this particular stack of calls.
Now, let’s write the classes.
The CallerTools::Call class
The following listing shows the Call class along with the first line of the entire program, which wraps everything else in the CallerTools module.
Listing 15.5. Beginning of the CallerTools module, including the Call class
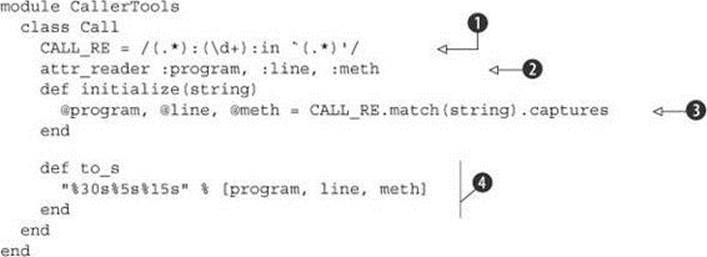
We need a regular expression with which to parse the stack trace strings; that regular expression is stored in the CALL_RE constant ![]() . CALL_RE has three parenthetical capture groupings, separated by uncaptured literal substrings. Here’s how the regular expression matches up against a typical stack trace string. Bold type shows the substrings that are captured by the corresponding regular expression subpatterns. The nonbold characters aren’t included in the captures but are matched literally:
. CALL_RE has three parenthetical capture groupings, separated by uncaptured literal substrings. Here’s how the regular expression matches up against a typical stack trace string. Bold type shows the substrings that are captured by the corresponding regular expression subpatterns. The nonbold characters aren’t included in the captures but are matched literally:
myrubyfile.rb:234:in `a_method'
.* :\d+:in ' .* '
The class has, as specified, three reader attributes for the three components of the call ![]() . Initialization requires a string argument, the string is matched against CALL_RE, and the results, available via the captures method of the MatchData object, are placed in the three instance variables corresponding to the attributes, using parallel assignment
. Initialization requires a string argument, the string is matched against CALL_RE, and the results, available via the captures method of the MatchData object, are placed in the three instance variables corresponding to the attributes, using parallel assignment ![]() . (We get a fatal error for trying to call captures on nil if there’s no match. You can alter the code to handle this condition directly if you wish.)
. (We get a fatal error for trying to call captures on nil if there’s no match. You can alter the code to handle this condition directly if you wish.)
We also define a to_s method for Call objects ![]() . This method comes into play in situations where it’s useful to print out a report of a particular backtrace element. It involves Ruby’s handy % technique. On the left of the % is a sprintf-style formatting string, and on the right is an array of replacement values. You might want to tinker with the lengths of the fields in the replacement string—or, for that matter, write your own to_s method, if you prefer a different style of output.
. This method comes into play in situations where it’s useful to print out a report of a particular backtrace element. It involves Ruby’s handy % technique. On the left of the % is a sprintf-style formatting string, and on the right is an array of replacement values. You might want to tinker with the lengths of the fields in the replacement string—or, for that matter, write your own to_s method, if you prefer a different style of output.
Now it’s time for the Stack class.
The CallerTools::Stack class
The Stack class, along with the closing end instruction for the entire CallerTools module, is shown in the following listing.
Listing 15.6. CallerTools::Stack class
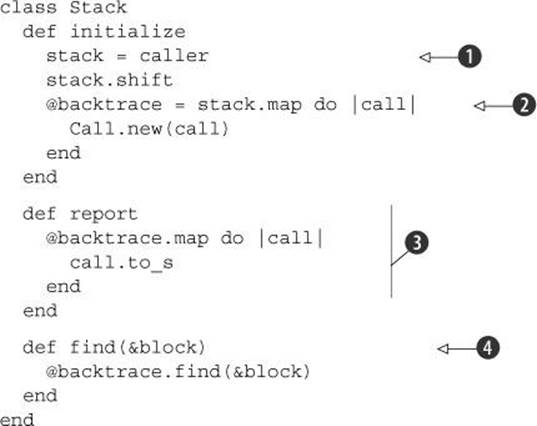
Upon initialization, a new Stack object calls caller and saves the resulting array ![]() . It then shifts that array, removing the first string; that string reports on the call to Stack.new itself and is therefore just noise.
. It then shifts that array, removing the first string; that string reports on the call to Stack.new itself and is therefore just noise.
The stored @backtrace should consist of one Call object for each string in the my_caller array. That’s a job for map ![]() . Note that there’s no backtrace reader attribute. In this case, all we need is the instance variable for internal use by the object.
. Note that there’s no backtrace reader attribute. In this case, all we need is the instance variable for internal use by the object.
Next comes the report method, which uses map on the @backtrace array to generate an array of strings for all the Call objects in the stack ![]() . This report array is suitable for printing or, if need be, for searching and filtering.
. This report array is suitable for printing or, if need be, for searching and filtering.
The Stack class includes one final method: find ![]() . It works by forwarding its code block to the find method of the @backtrace array. It works a lot like some of the deck-of-cards methods you’ve seen, which forward a method to an array containing the cards that make up the deck. Techniques like this allow you to fine-tune the interface of your objects, using underlying objects to provide them with exactly the functionality they need. (You’ll see the specific usefulness of find shortly.)
. It works by forwarding its code block to the find method of the @backtrace array. It works a lot like some of the deck-of-cards methods you’ve seen, which forward a method to an array containing the cards that make up the deck. Techniques like this allow you to fine-tune the interface of your objects, using underlying objects to provide them with exactly the functionality they need. (You’ll see the specific usefulness of find shortly.)
Now, let’s try out CallerTools.
Using the CallerTools module
You can use a modified version of the “x, y, z” demo from section 15.4.1 to try out CallerTools. Put this code in a file called callertest.rb:
require_relative 'callertools'
def x
y
end
def y
z
end
def z
stack = CallerTools::Stack.new
puts stack.report
end
x
When you run the program, you’ll see this output:
callertest.rb 12 z
callertest.rb 8 y
callertest.rb 4 x
callertest.rb 16 <main>
Nothing too fancy, but it’s a nice programmatic way to address a stack trace rather than having to munge the strings directly every time. (There’s a lot of blank space at the beginnings of the lines, but there would be less if the file paths were longer—and of course you can adjust the formatting to taste.)
Next on the agenda, and the last stop for this chapter, is a project that ties together a number of the techniques we’ve been looking at: stack tracing, method querying, and callbacks, as well as some techniques you know from elsewhere in the book. We’ll write a test framework.
15.5. Callbacks and method inspection in practice
In this section, we’ll implement MicroTest, a tiny test framework. It doesn’t have many features, but the ones it has will demonstrate some of the power and expressiveness of the callbacks and inspection techniques you’ve just learned.
First, a bit of backstory.
15.5.1. MicroTest background: MiniTest
Ruby ships with a testing framework called MiniTest. You use MiniTest by writing a class that inherits from the class MiniTest::Unit::TestCase and that contains methods whose names begin with the string test. You can then either specify which test methods you want executed, or arrange (as we will below) for every test-named method to be executed automatically when you run the file. Inside those methods, you write assertions. The truth or falsehood of your assertions determines whether your tests pass.
The exercise we’ll do here is to write a simple testing utility based on some of the same principles as MiniTest. To help you get your bearings, we’ll look first at a full example of MiniTest in action and then do the implementation exercise.
We’ll test dealing cards. The following listing shows a version of a class for a deck of cards. The deck consists of an array of 52 strings held in the @cards instance variable. Dealing one or more cards means popping that many cards off the top of the deck.
Listing 15.7. Deck-of-cards implementation with card-dealing capabilities
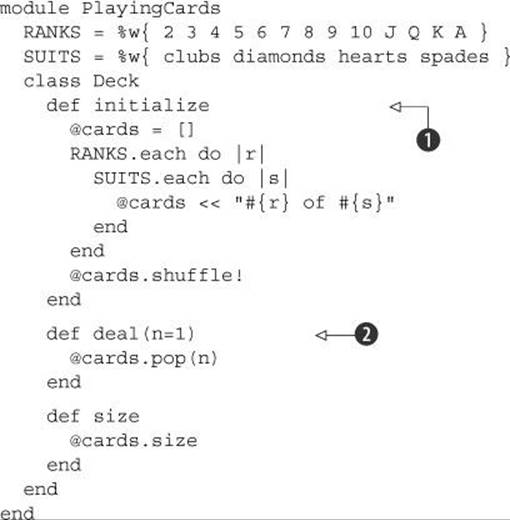
Creating a new deck ![]() involves initializing @cards, inserting 52 strings into it, and shuffling the array. Each string takes the form “rank of suit,” where rank is one of the ranks in the constant array RANKS and suit is one of SUITS. In dealing from the deck
involves initializing @cards, inserting 52 strings into it, and shuffling the array. Each string takes the form “rank of suit,” where rank is one of the ranks in the constant array RANKS and suit is one of SUITS. In dealing from the deck ![]() , we return an array of n cards, where n is the number of cards being dealt and defaults to 1.
, we return an array of n cards, where n is the number of cards being dealt and defaults to 1.
So far, so good. Now, let’s test it. Enter MiniTest. The next listing shows the test code for the cards class. The test code assumes that you’ve saved the cards code to a separate file called cards.rb in the same directory as the test code file (which you can call cardtest.rb).
Listing 15.8. cardtest.rb: Testing the dealing accuracy of PlayingCards::Deck
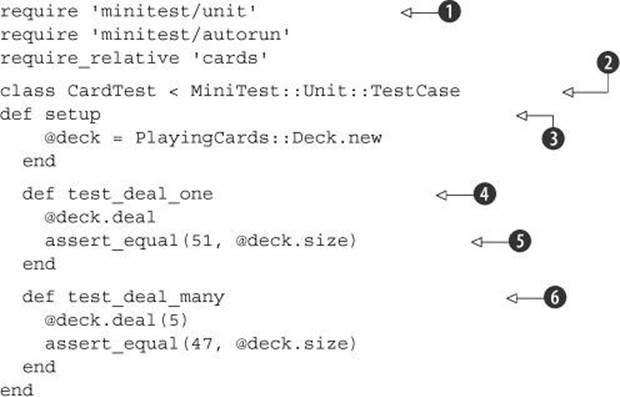
The first order of business is to require both the minitest/unit library and the cards.rb file ![]() . We also require minitest/autorun; this feature causes MiniTest to run the test methods it encounters without our having to make explicit method calls. Next, we create a CardTest class that inherits from MiniTest::Unit::TestCase
. We also require minitest/autorun; this feature causes MiniTest to run the test methods it encounters without our having to make explicit method calls. Next, we create a CardTest class that inherits from MiniTest::Unit::TestCase ![]() . In this class, we define three methods. The first is setup
. In this class, we define three methods. The first is setup ![]() . The method name setup is magic to MiniTest; if defined, it’s executed before every test method in the test class. Running the setup method before each test method contributes to keeping the test methods independent of each other, and that independence is an important part of the architecture of test suites.
. The method name setup is magic to MiniTest; if defined, it’s executed before every test method in the test class. Running the setup method before each test method contributes to keeping the test methods independent of each other, and that independence is an important part of the architecture of test suites.
Now come the two test methods, test_deal_one ![]() and test_deal_many
and test_deal_many ![]() . These methods define the actual tests. In each case, we’re dealing from the deck and then making an assertion about the size of the deck subsequent to the dealing. Remember that setup is executed before each test method, which means @deck contains a full 52-card deck for each method.
. These methods define the actual tests. In each case, we’re dealing from the deck and then making an assertion about the size of the deck subsequent to the dealing. Remember that setup is executed before each test method, which means @deck contains a full 52-card deck for each method.
The assertions are performed using the assert_equal method ![]() . This method takes two arguments. If the two are equal (using == to do the comparison behind the scenes), the assertion succeeds. If not, it fails.
. This method takes two arguments. If the two are equal (using == to do the comparison behind the scenes), the assertion succeeds. If not, it fails.
Execute cardtest.rb from the command line. Here’s what you’ll see (probably with a different seed and different time measurements):
$ ruby cardtest.rb
Run options: --seed 39562
# Running tests:
..
Finished tests in 0.000784s, 2551.0204 tests/s, 2551.0204 assertions/s.
2 tests, 2 assertions, 0 failures, 0 errors, 0 skips
The last line tells you that there were two methods whose names began with test (2 tests) and a total of two assertions (the two calls to assert_equal). It tells you further that both assertions passed (no failures) and that nothing went drastically wrong (no errors; an error is something unrecoverable like a reference to an unknown variable, whereas a failure is an incorrect assertion). It also reports that no tests were skipped (skipping a test is something you can do explicitly with a call to the skip method).
The most striking thing about running this test file is that at no point do you have to instantiate the CardTest class or explicitly call the test methods or the setup method. Thanks to the loading of the autorun feature, MiniTest figures out that it’s supposed to run all the methods whose names begin with test, running the setup method before each of them. This automatic execution—or at least a subset of it—is what we’ll implement in our exercise.
15.5.2. Specifying and implementing MicroTest
Here’s what we’ll want from our MicroTest utility:
· Automatic execution of the setup method and test methods, based on class inheritance
· A simple assertion method that either succeeds or fails
The first specification will entail most of the work.
We need a class that, upon being inherited, observes the new subclass and executes the methods in that subclass as they’re defined. For the sake of (relative!) simplicity, we’ll execute them in definition order, which means setup should be defined first.
Here’s a more detailed description of the steps needed to implement MicroTest:
1. Define the class MicroTest.
2. Define MicroTest.inherited.
3. Inside inherited, the inheriting class should...
4. Define its own method_added callback, which should...
5. Instantiate the class and execute the new method if it starts with test, but first...
6. Execute the setup method, if there is one.
Here’s a nonworking, commented mockup of MicroTest in Ruby:
class MicroTest
def self.inherited(c)
c.class_eval do
def self.method_added(m)
# If m starts with "test"
# Create an instance of c
# If there's a setup method
# Execute setup
# Execute the method m
end
end
end
end
There’s a kind of logic cascade here. Inside MicroTest, we define self.inherited, which receives the inheriting class (the new subclass) as its argument. We then enter into that class’s definition scope using class_eval. Inside that scope, we implement method_added, which will be called every time a new method is defined in the class.
Writing the full code follows directly from the comments inside the code mockup. The following listing shows the full version of micro_test.rb. Put it in the same directory as callertools.rb.
Listing 15.9. MicroTest, a testing class that emulates some MiniTest functionality

Inside the class definition (class_eval) scope of the new subclass, we define method_added, and that’s where most of the action is. If the method being defined starts with test ![]() , we create a new instance of the class
, we create a new instance of the class ![]() . If a setup method is defined
. If a setup method is defined ![]() , we call it on that instance. Then (whether or not there was a setup method; that’s optional), we call the newly added method using send because we don’t know the method’s name.
, we call it on that instance. Then (whether or not there was a setup method; that’s optional), we call the newly added method using send because we don’t know the method’s name.
Note
As odd as it may seem (in light of the traditional notion of pattern matching, which involves strings), the m in the pattern-matching operation m =~ /^test/ is a symbol, not a string. The ability of symbol objects to match themselves against regular expressions is part of the general move we’ve already noted toward making symbols more easily interchangeable with strings. Keep in mind, though, the important differences between the two, as explained in chapter 8.
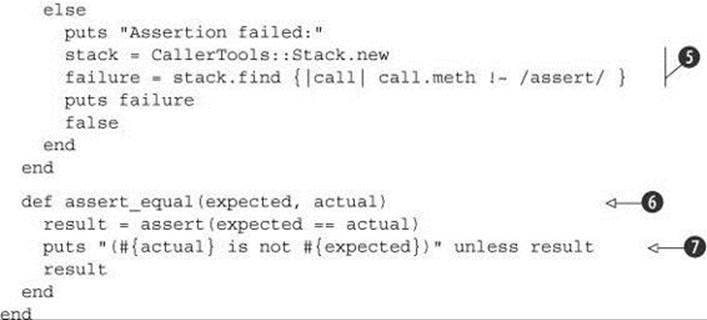
The assert method tests the truth of its single argument ![]() . If the argument is true (in the Boolean sense; it doesn’t have to be the actual object true), a message is printed out, indicating success. If the assertion fails, the message printing gets a little more intricate. We create aCallerTools::Stack object and pinpoint the first Call object in that stack whose method name doesn’t contain the string assert
. If the argument is true (in the Boolean sense; it doesn’t have to be the actual object true), a message is printed out, indicating success. If the assertion fails, the message printing gets a little more intricate. We create aCallerTools::Stack object and pinpoint the first Call object in that stack whose method name doesn’t contain the string assert ![]() . The purpose is to make sure we don’t report the failure as having occurred in the assert method nor in the assert_equal method (described shortly). It’s not robust; you might have a method with assert in it that you did want an error reported from. But it illustrates the kind of manipulation that the find method of CallerTools::Stack allows.
. The purpose is to make sure we don’t report the failure as having occurred in the assert method nor in the assert_equal method (described shortly). It’s not robust; you might have a method with assert in it that you did want an error reported from. But it illustrates the kind of manipulation that the find method of CallerTools::Stack allows.
The second assertion method, assert_equal, tests for equality between its two arguments ![]() . It does this by calling assert on a comparison. If the result isn’t true, an error message showing the two compared objects is displayed
. It does this by calling assert on a comparison. If the result isn’t true, an error message showing the two compared objects is displayed ![]() . Either way—success or failure—the result of the assertcall is returned from assert_equal.
. Either way—success or failure—the result of the assertcall is returned from assert_equal.
To try out MicroTest, put the following code in a file called microcardtest.rb, and run it from the command line:
require_relative 'microtest'
require_relative 'cards'
class CardTest < MicroTest
def setup
@deck = PlayingCards::Deck.new
end
def test_deal_one
@deck.deal
assert_equal(51, @deck.size)
end
def test_deal_many
@deck.deal(5)
assert_equal(47, @deck.size)
end
end
As you can see, this code is almost identical to the MiniTest test file we wrote before. The only differences are the names of the test library and parent test class. And when you run the code, you get these somewhat obscure but encouraging results:
Assertion passed
Assertion passed
If you want to see a failure, change 51 to 50 in test_deal_one:
Assertion failed:
microcardtest.rb 11 test_deal_one
(51 is not 50)
Assertion passed
MicroTest won’t supplant MiniTest any time soon, but it does do a couple of the most magical things that MiniTest does. It’s all made possible by Ruby’s introspection and callback facilities, techniques that put extraordinary power and flexibility in your hands.
15.6. Summary
In this chapter, you’ve seen
· Intercepting methods with method_missing
· Runtime hooks and callbacks for objects, classes, and modules
· Querying objects about their methods, on various criteria
· Trapping references to unknown constants
· Stack traces
· Writing the MicroTest framework
We’ve covered a lot of ground in this chapter, and practicing the techniques covered here will contribute greatly to your grounding as a Rubyist. We looked at intercepting unknown messages with method_missing, along with other runtime hooks and callbacks like Module.included,Module.extended, and Class.inherited. The chapter also took us into method querying in its various nuances: public, protected, private; class, instance, singleton. You’ve seen some examples of how this kind of querying can help you derive information about how Ruby does its own class, module, and method organization.
The last overall topic was the handling of stack traces, which we put to use in the CallerTools module. The chapter ended with the extended exercise consisting of implementing the MicroTest class, which pulled together a number of topics and threads from this chapter and elsewhere.
We’ve been going through the material methodically and deliberately, as befits a grounding or preparation. But if you look at the results, particularly MicroTest, you can see how much power Ruby gives you in exchange for relatively little effort. That’s why it pays to know about even what may seem to be the magic or “meta” parts of Ruby. They really aren’t—it’s all Ruby, and once you internalize the principles of class and object structure and relationships, everything else follows.
And that’s that! Enjoy your groundedness as a Rubyist and the many structures you’ll build on top of the foundation you’ve acquired through this book.