The Well-Grounded Rubyist, Second Edition (2014)
Part 1. Ruby foundations
Chapter 4. Modules and program organization
This chapter covers
· Encapsulation of behavior in modules
· Modular extension of classes
· The object method-lookup path
· Handling method-lookup failure
· Establishing namespaces with modules and nesting
This chapter will introduce you to a Ruby construct that’s closely related to classes: modules. As their name suggests, modules encourage modular design: program design that breaks large components into smaller ones and lets you mix and match object behaviors.
Like classes, modules are bundles of methods and constants. Unlike classes, modules don’t have instances; instead, you specify that you want to add the functionality of a particular module to that of a class or of a specific object.
It’s no accident that modules are similar in many respects to classes: the Class class is a subclass of the Module class, so every class object is also a module object. We discussed classes first because Ruby is object-centric and objects are instances of classes. But you could say that modules are the more basic structure, and classes are just a specialization. The bottom line is that they’re both part of Ruby, and both are available to you as you design your programs and model your data.
Looking at modules takes us further along some paths we partially walked in the previous chapter:
· You saw that all objects descend from Object; here, you’ll meet the Kernel module that contains the majority of the methods common to all objects.
· You learned that objects seek their methods in both class and superclass, all the way up the inheritance tree; in this chapter, we’ll look in considerable detail at how this method-lookup process works when both classes and modules are involved.
4.1. Basics of module creation and use
Writing a module is similar to writing a class, except you start your definition with the module keyword instead of the class keyword:
module MyFirstModule
def say_hello
puts "Hello"
end
end
When you write a class, you then create instances of the class. Those instances can execute the class’s instance methods. In contrast, modules don’t have instances. Instead, modules get mixed in to classes, using either the include method or the prepend method.
Note
prepend is new in Ruby 2.0, whereas include has been part of Ruby since the beginning.
A module “mixed in” in this manner is sometimes referred to as a “mix-in.” The result of mixing in a module is that instances of the class have access to the instance methods defined in the module.
For example, using the little module from the previous example, you can go on to do this:
class ModuleTester
include MyFirstModule
end
mt = ModuleTester.new
mt.say_hello
The ModuleTester object calls the appropriate method (say_hello) and outputs Hello. Notice that say_hello isn’t defined in the class of which the object is an instance. Instead, it’s defined in a module that the class mixes in.
The mix-in operation in this example is achieved with the call to include. Mixing in a module bears a strong resemblance to inheriting from a superclass. If, say, class B inherits from class A, instances of class B can call instance methods of class A. And if, say, class C mixes in module M, instances of class C can call instance methods of module M. In both cases, the instances of the class at the bottom of the list reap the benefits: they get to call not only their own class’s instances methods, but also those of (in one case) a superclass or (in the other case) a mixed-in module.
The main difference between inheriting from a class and mixing in a module is that you can mix in more than one module. No class can inherit from more than one class. In cases where you want numerous extra behaviors for a class’s instances—and you don’t want to stash them all in the class’s superclass and its ancestral classes—you can use modules to organize your code in a more granular way. Each module can add something different to the methods available through the class. (We’ll explore the mix-in versus inheritance choice further in section 4.4.1.)
Modules open up lots of possibilities—particularly for sharing code among more than one class, because any number of classes can mix in the same module. We’ll look next at some further examples, and you’ll get a sense of the possibilities.
4.1.1. A module encapsulating “stacklikeness”
Modules give you a way to collect and encapsulate behaviors. A typical module contains methods connected to a particular subset of what will be, eventually, the full capabilities of an object.
By way of fleshing out this statement, we’ll write a module that encapsulates the characteristic of being like a stack, or stacklikeness. We’ll then use that module to impart stacklike behaviors to objects, via the process of mixing the stacklike module into one or more classes.
As you may know from previous studies, a stack is a data structure that operates on the last in, first out (LIFO) principle. The classic example is a (physical) stack of plates. The first plate to be used is the last one placed on the stack. Stacks are usually discussed paired with queues, which exhibit first in, first out (FIFO) behavior. Think of a cafeteria: the plates are in a stack; the customers are in a queue.
Numerous items behave in a stacklike, LIFO manner. The last sheet of printer paper you put in the tray is the first one printed on. Double-parked cars have to leave in an order that’s the opposite of the order of their arrival. The quality of being stacklike can manifest itself in a wide variety of collections and aggregations of entities.
That’s where modules come in. When you’re designing a program and you identify a behavior or set of behaviors that may be exhibited by more than one kind of entity or object, you’ve found a good candidate for a module. Stacklikeness fits the bill: more than one entity, and therefore imaginably more than one class, exhibit stacklike behavior. By creating a module that defines methods that all stacklike objects have in common, you give yourself a way to summon stacklikeness into any and all classes that need it.
The following listing shows a simple implementation of stacklikeness in Ruby module form. Save this listing to a file called stacklike.rb; you’ll load this file in later examples.
Listing 4.1. Stacklike module, encapsulating stacklike structure and behavior
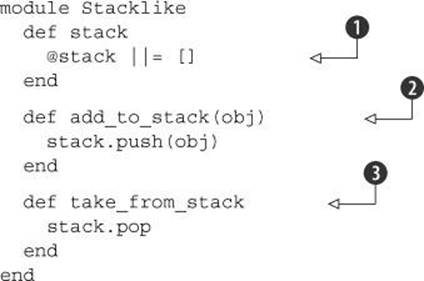
The Stacklike module in this listing uses an array (an ordered collection of objects) to represent the stack. The array is preserved in the instance variable @stack and made accessible through the method stack ![]() . That method uses a common technique for conditionally setting a variable: the||= (or-equals) operator. The effect of this operator is to set the variable to the specified value—which in this case is a new, empty array—if and only if the variable isn’t already set to something other than nil or false. In practical terms, this means that the first time stack is called, it will set@stack to an empty array, whereas on subsequent calls it will see that @stack already has a value and will simply return that value (the array).
. That method uses a common technique for conditionally setting a variable: the||= (or-equals) operator. The effect of this operator is to set the variable to the specified value—which in this case is a new, empty array—if and only if the variable isn’t already set to something other than nil or false. In practical terms, this means that the first time stack is called, it will set@stack to an empty array, whereas on subsequent calls it will see that @stack already has a value and will simply return that value (the array).
Ruby’s shortcut operators
In addition to or-equals, Ruby has another family of shortcut operators, similar in appearance to ||= but engineered a little differently. These operators expand to calls to an underlying method. A common one is the += operator; the expression a += 1 is equivalent to a = a + 1. Other members of this shortcut family include -=, *=, /=, **= (raise to a power), &= (bitwise AND), |= (bitwise OR), ^= (bitwise EXCLUSIVE OR), %= (modulo), and a (rarely used) and-equals operator (&&=) that works similarly to or-equals. Thus a -= 1 means a = a - 1, a *= 10 means a = a * 10, and so forth.
Each of these method-wrapping operators works with any object that has the relevant underlying method, including instances of your own classes. If you define a + method, for example, you can use the x += y syntax on an instance of your class (x), and the expression will be automatically expanded to x = x + y. And that, in turn, is just syntactic sugar for x = x.+(y), a call to the + method.
You’ll meet these shortcut techniques “officially” in chapter 7. Meanwhile, by all means try them out in irb.
When an object is added to the stack ![]() , the operation is handled by pushing the object onto the @stack array—that is, adding it to the end. (@stack is accessed through a call to the stack method, which ensures that it will be initialized to an empty array the first time an object is added.) Removing an object from the stack
, the operation is handled by pushing the object onto the @stack array—that is, adding it to the end. (@stack is accessed through a call to the stack method, which ensures that it will be initialized to an empty array the first time an object is added.) Removing an object from the stack ![]() involves popping an element from the array—that is, removing it from the end. (push and pop are instance methods of the Array class. You’ll see them again when we look at container objects, including arrays, in chapter 10.)
involves popping an element from the array—that is, removing it from the end. (push and pop are instance methods of the Array class. You’ll see them again when we look at container objects, including arrays, in chapter 10.)
The module Stacklike thus implements stacklikeness by selectively deploying behaviors that already exist for Array objects: add an element to the end of the array, take an element off the end. Arrays are more versatile than stacks; a stack can’t do everything an array can. For example, you can remove elements from an array in any order, whereas by definition the only element you can remove from a stack is the one that was added most recently. But an array can do everything a stack can. As long as we don’t ask it to do anything unstacklike, using an array as a kind of agent or proxy for the specifically stacklike add/remove actions makes sense.
We now have a module that implements stacklike 'margin-top:12.0pt;margin-right:0cm;margin-bottom: 0cm;margin-left:0cm;margin-bottom:.0001pt;text-align:justify;line-height:normal'>4.1.2. Mixing a module into a class
As you’ve seen, modules don’t have instances, so you can’t do this:
![]()
To create instances (objects), you need a class, and to make those objects stacklike, you’ll need to mix the Stacklike module into that class. But what class? The most obviously stacklike thing is probably a Stack. Save the code in the following listing to stack.rb, in the same directory as stacklike.rb.
Listing 4.2. Mixing the Stacklike module into the Stack class
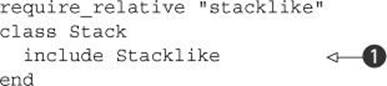
The business end of the Stack class in this listing is the include statement ![]() , which has the effect of mixing in the Stacklike module. It ensures that instances of Stack exhibit the behaviors defined in Stacklike.
, which has the effect of mixing in the Stacklike module. It ensures that instances of Stack exhibit the behaviors defined in Stacklike.
Syntax of require/load vs. syntax of include
You may have noticed that when you use require or load, you put the name of the item you’re requiring or loading in quotation marks; but with include (and prepend), you don’t. That’s because require and load take strings as their arguments, whereas include takes the name of a module in the form of a constant. More fundamentally, it’s because require and load are locating and loading disk files, whereas include and prepend perform a program-space, in-memory operation that has nothing to do with files. It’s a common sequence to require a feature and then include a module that the feature defines. The two operations thus often go together, but they’re completely different from each other.
Notice that our class’s name is a noun, whereas the module’s name is an adjective. Neither of these practices is mandatory, but they’re both common. What we end up with, expressed in everyday language, is a kind of predicate on the class: Stack objects are stacklike. That’s English for
class Stack
include Stacklike
end
To see the whole thing in action, let’s create a Stack object and put it through its paces. The code in the next listing creates a Stack object and performs some operations on it; you can enter this code at the end of your stack.rb file.
Listing 4.3. Creating and using an instance of class Stack
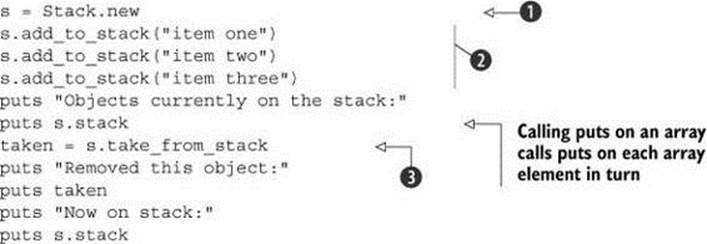
This listing starts with the innocent-looking (but powerful) instantiation ![]() of a new Stack object, which is assigned to the variable s. That Stack object is born with the knowledge of what to do when we ask it to perform stack-related actions, thanks to the fact that its class mixed in theStacklike module. The rest of the code involves asking it to jump through some stacklike hoops: adding items (strings) to itself
of a new Stack object, which is assigned to the variable s. That Stack object is born with the knowledge of what to do when we ask it to perform stack-related actions, thanks to the fact that its class mixed in theStacklike module. The rest of the code involves asking it to jump through some stacklike hoops: adding items (strings) to itself ![]() and popping the last one off itself
and popping the last one off itself ![]() . Along the way, we ask the object to report on its state.
. Along the way, we ask the object to report on its state.
Now, let’s run the program. Here’s an invocation of stack.rb, together with the output from the run:
$ ruby stack.rb
Objects currently on the stack:
item one
item two
item three
Removed this object:
item three
Now on stack:
item one
item two
Sure enough, our little Stack object knows what to do. It is, as advertised, stacklike.
The Stack class is fine as far as it goes. But it may leave you wondering: why did we bother writing a module? It would be possible, after all, to pack all the functionality of the Stacklike module directly in the Stack class without writing a module. The following listing shows what the class would look like.
Listing 4.4. Nonmodular rewrite of the Stack class
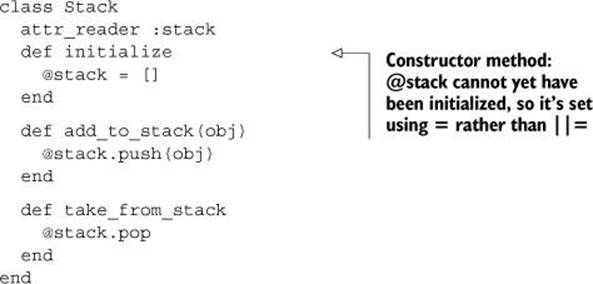
As you’ll see if you add the code in listing 4.3 to listing 4.4 and run it all through Ruby, it produces the same results as the implementation that uses a module.
Before you conclude that modules are pointless, remember what the modularization buys you: it lets you apply a general concept like stacklikeness to several cases, not just one.
So what else is stacklike?
4.1.3. Using the module further
A few examples came up earlier: plates, printer paper, and so forth. Let’s use a new one, borrowed from the world of urban legend.
Lots of people believe that if you’re the first passenger to check in for a flight, your luggage will be the last off the plane. Real-world experience suggests that it doesn’t work this way. Still, for stack practice, let’s see what a Ruby model of an urban-legendly-correct cargo hold would look like.
To model it reasonably closely, we’ll define the following:
· A barebones Suitcase class: a placeholder (or stub) that lets us create suitcase objects to fling into the cargo hold.
· A CargoHold class with two methods: load_and_report and unload.
o load_and_report prints a message reporting that it’s adding a suitcase to the cargo hold, and it gives us the suitcase object’s ID number, which will help us trace what happens to each suitcase.
o unload calls take_from_stack. We could call take_from_stack directly, but unload sounds more like a term you might use to describe removing a suitcase from a cargo hold.
Put the code in the next listing into cargohold.rb, and run it.
Listing 4.5. Using the Stacklike module a second time, for a different class
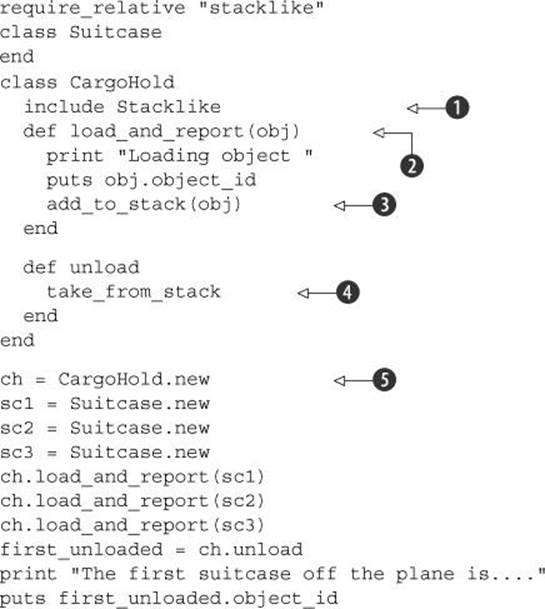
At its heart, the program in this listing isn’t that different from those in listings 4.2 and 4.3 (which you saved incrementally to stack.rb). It follows much the same procedure: mixing Stacklike into a class ![]() , creating an instance of that class
, creating an instance of that class ![]() , and adding items to
, and adding items to ![]() and removing them from
and removing them from ![]() that instance (the stacklike thing—the cargo hold, in this case). It also does some reporting of the current state of the stack
that instance (the stacklike thing—the cargo hold, in this case). It also does some reporting of the current state of the stack ![]() , as the other program did.
, as the other program did.
The output from the cargo-hold program looks like this (remember that suitcases are referred to by their object ID numbers, which may be different on your system):
Loading object 1001880
Loading object 1001860
Loading object 1001850
The first suitcase off the plane is....1001850
The cargo-hold example shows how you can use an existing module for a new class. Sometimes it pays to wrap the methods in new methods with better names for the new domain (like unload instead of take_from_stack), although if you find yourself changing too much, it may be a sign that the module isn’t a good fit.
In the next section, we’ll put together several of the pieces we’ve looked at more or less separately: method calls (message sending), objects and their status as instances of classes, and the mixing of modules into classes. All these concepts come together in the process by which an object, upon being sent a message, looks for and finds (or fails to find) a method to execute whose name matches the message.
4.2. Modules, classes, and method lookup
You already know that when an object receives a message, the intended (and usual) result is the execution of a method with the same name as the message in the object’s class or that class’s superclass—and onward, up to the Object or even BasicObject class—or in a module that has been mixed into any of those classes. But how does this come about? And what happens in ambiguous cases—for example, if a class and a mixed-in module both define a method with a given name? Which one does the object choose to execute?
It pays to answer these questions precisely. Imprecise accounts of what happens are easy to come by. Sometimes they’re even adequate: if you say, “This object has a push method,” you may succeed in communicating what you’re trying to communicate, even though objects don’t “have” methods but, rather, find them by searching classes and modules.
But an imprecise account won’t scale. It won’t help you understand what’s going on in more complex cases, and it won’t support you when you’re designing your own code. Your best course of action is to learn what really happens when you send messages to objects.
Fortunately, the way it works turns out to be straightforward.
4.2.1. Illustrating the basics of method lookup
In the interest of working toward a clear understanding of how objects find methods, let’s backpedal on the real-world references and, instead, write some classes and modules with simple names like C and M. Doing so will help you concentrate on the logic and mechanics of method lookup without having to think simultaneously about modeling a real-world domain. We’ll also write some methods that don’t do anything except print a message announcing that they’ve been called. This will help track the order of method lookup.
Look at the program in the following listing.
Listing 4.6. Demonstration of module inclusion and inheritance
module M
def report
puts "'report' method in module M"
end
end
class C
include M
end
class D < C
end
obj = D.new
obj.report
The instance method report is defined in module M. Module M is mixed into class C. Class D is a subclass of C, and obj is an instance of D. Through this cascade, the object (obj) gets access to the report method.
Still, gets access to a method, like has a method, is a vague way to put it. Let’s try to get more of a fix on the process by considering an object’s-eye view of it.
An object’s-eye view of method lookup
You’re the object, and someone sends you a message. You have to figure out how to respond to it—or whether you even can respond to it. Here’s a bit of object stream-of-consciousness:
· I’m a Ruby object, and I’ve been sent the message 'report'. I have to try to find a method called report in my method lookup path. report, if it exists, resides in a class or module.
· I’m an instance of a class called D. Does class D define an instance method report?
· No.
· Does D mix in any modules?
· No.
· Does D’s superclass, C, define a report instance method?
· No.
· Does C mix in any modules? Yes, M.
· Does M define a report method?
· Yes.
· Good! I’ll execute that method.
The search ends when the method being searched for is found, or with an error condition if it isn’t found. The error condition is triggered by a special method called method_missing, which gets called as a last resort for otherwise unmatched messages. You can override method_missing (that is, define it anew in one of your own classes or modules) to define custom behavior for such messages, as you’ll see in detail in section 4.3.
Let’s move now from object stream-of-consciousness to specifics about the method-lookup scenario, and in particular the question of how far it can go.
How far does the method search go?
Ultimately, every object in Ruby is an instance of some class descended from the big class in the sky: BasicObject. However many classes and modules it may cross along the way, the search for a method can always go as far up as BasicObject. But recall that the whole point of BasicObjectis that it has few instance methods. Getting to know BasicObject doesn’t tell you much about the bulk of the methods that all Ruby objects share.
If you want to understand the common behavior and functionality of all Ruby objects, you have to descend from the clouds and look at Object rather than Basic-Object. More precisely, you have to look at Kernel, a module that Object mixes in. It’s in Kernel (as its name suggests) that most of Ruby’s fundamental methods objects are defined. And because Object mixes in Kernel, all instances of Object and all descendants of Object have access to the instance methods in Kernel.
Suppose you’re an object, and you’re trying to find a method to execute based on a message you’ve received. If you’ve looked in Kernel and BasicObject and you haven’t found it, you’re not going to. (It’s possible to mix modules into BasicObject, thus providing all objects with a further potential source of methods. It’s hard to think of a case where you’d do this, though.)
Figure 4.1 illustrates the method search path from our earlier example (the class D object) all the way up the ladder. In the example, the search for the method succeeds at module M; the figure shows how far the object would look if it didn’t find the method there. When the message x is sent to the object, the method search begins, hitting the various classes and mix-ins (modules) as shown by the arrows.
Figure 4.1. An instance of class D looks for method x in its method search path.
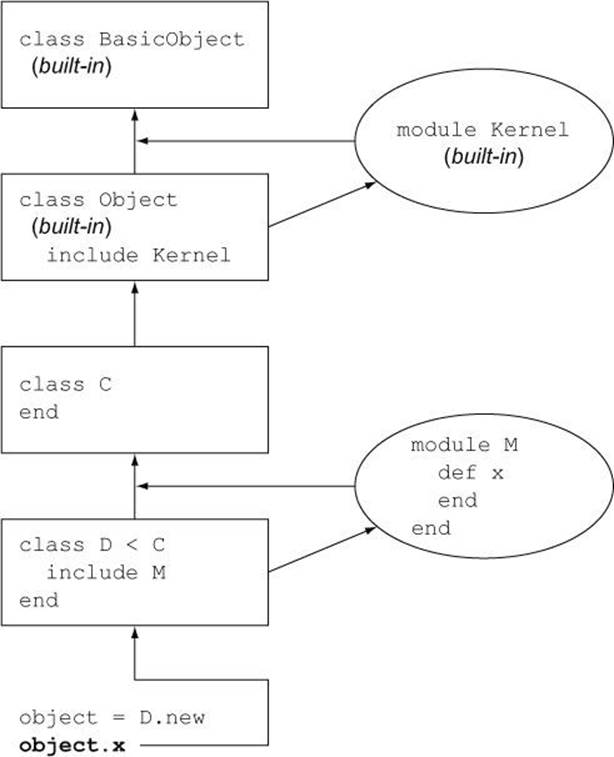
The internal definitions of BasicObject, Object, and Kernel are written in the C language. But you can get a reasonable handle on how they interact by looking at a Ruby mockup of their relations:
class BasicObject
# a scant seven method definitions go here
end
module Kernel
# over 100 method definitions go here!
end
class Object < BasicObject
# one or two private methods go here,
# but the main point is to mix in the Kernel module
include Kernel
end
Object is a subclass of BasicObject. Every class that doesn’t have an explicit superclass is a subclass of Object. You can see evidence of this default in irb:
>> class C
>> end
=> nil
>> C.superclass
=> Object
Every class has Object—and therefore Kernel and BasicObject—among its ancestors. Of course, there’s still the paradox that BasicObject is an Object, and Object is a Class, and Class is an Object. But as you saw earlier, a bit of circularity in the class model serves to jump-start the hierarchy; and once set in motion, it operates logically and cleanly.
4.2.2. Defining the same method more than once
You learned in chapter 3 that if you define a method twice inside the same class, the second definition takes precedence over the first. The same is true of modules. The rule comes down to this: there can be only one method of a given name per class or module at any given time. If you have a method called calculate_interest in your BankAccount class and you write a second method called calculate_interest in the same class, the class forgets all about the first version of the method.
That’s how classes and modules keep house. But when we flip to an object’s-eye view, the question of having access to two or more methods with the same name becomes more involved.
An object’s methods can come from any number of classes and modules. True, any one class or module can have only one calculate_interest method (to use that name as an example). But an object can have multiple calculate_interest methods in its method-lookup path, because the method-lookup path passes through multiple classes or modules.
Still, the rule for objects is analogous to the rule for classes and modules: an object can see only one version of a method with a given name at any given time. If the object’s method-lookup path includes two or more same-named methods, the first one encountered is the “winner” and is executed.
The next listing shows a case where two versions of a method lie on an object’s method-lookup path: one in the object’s class, and one in a module mixed in by that class.
Listing 4.7. Two same-named methods on a single search path
module InterestBearing
def calculate_interest
puts "Placeholder! We're in module InterestBearing."
end
end
class BankAccount
include InterestBearing
def calculate_interest
puts "Placeholder! We're in class BankAccount."
puts "And we're overriding the calculate_interest method..."
puts "which was defined in the InterestBearing module."
end
end
account = BankAccount.new
account.calculate_interest
When you run this listing, you get the following output:
Placeholder! We're in class BankAccount.
And we're overriding the calculate_interest method...
which was defined in the InterestBearing module.
Two calculate_interest methods lie on the method-lookup path of object c. But the lookup hits the class BankAccount (account’s class) before it hits the module Interest-Bearing (a mix-in of class BankAccount). Therefore, the report method it executes is the one defined in BankAccount.
An object may have two methods with the same name on its method-lookup path in another circumstance: when a class mixes in two or more modules, more than one implements the method being searched for. In such a case, the modules are searched in reverse order of inclusion—that is, the most recently mixed-in module is searched first. If the most recently mixed-in module happens to contain a method with the same name as a method in a module that was mixed in earlier, the version of the method in the newly mixed-in module takes precedence because the newer module is closer on the object’s method-lookup path.
For example, consider a case where two modules, M and N (we’ll keep this example relatively schematic), both define a report method and are both mixed into a class, C, as in the following listing.
Listing 4.8. Mixing in two modules with a same-named method defined
module M
def report
puts "'report' method in module M"
end
end
module N
def report
puts "'report' method in module N"
end
end
class C
include M
include N
end
What does an instance of this class do when you send it the “report” message and it walks the lookup path, looking for a matching method? Let’s ask it:
c = C.new
c.report
The answer is "'report' method in module N". The first report method encountered in c’s method lookup path is the one in the most recently mixed-in module. In this case, that means N—so N’s report method wins over M’s method of the same name.
To this should be added the observation that including a module more than once has no effect.
Including a module more than once
Look at this example, which is based on the previous example—but this time we include M a second time, after N:
class C
include M
include N
include M
end
You might expect that when you run the report method, you’ll get M’s version, because M was the most recently included module. But re-including a module doesn’t do anything. Because M already lies on the search path, the second include M instruction has no effect. N is still considered the most recently included module:
![]()
In short, you can manipulate the method-lookup paths of your objects, but only up to a point.
In all the examples so far, we’ve been using include to mix in modules. It’s time to bring prepend back into the discussion.
4.2.3. How prepend works
Every time you include a module in a class, you’re affecting what happens when instances of that class have to resolve messages into method names. The same is true of prepend. The difference is that if you prepend a module to a class, the object looks in that module first, before it looks in the class.
Here’s an example:
module MeFirst
def report
puts "Hello from module!"
end
end
class Person
prepend MeFirst
def report
puts "Hello from class!"
end
end
p = Person.new
p.report
The output is "Hello from module!" Why? Because we have prepended the MeFirst module to the class. That means that the instance of the class will look in the module first when it’s trying to find a method called report. If we’d used include, the class would be searched before the module and the class’s version of report would “win.”
You can see the difference between include and prepend reflected both in figure 4.2 and in the list of a class’s ancestors—which means all the classes and modules where an instance of the class will search for methods, listed in order. Here are the ancestors of the Person class from the last example, in irb:
Figure 4.2. An instance of class D looks for method x in its method search path across both included and prepended modules.
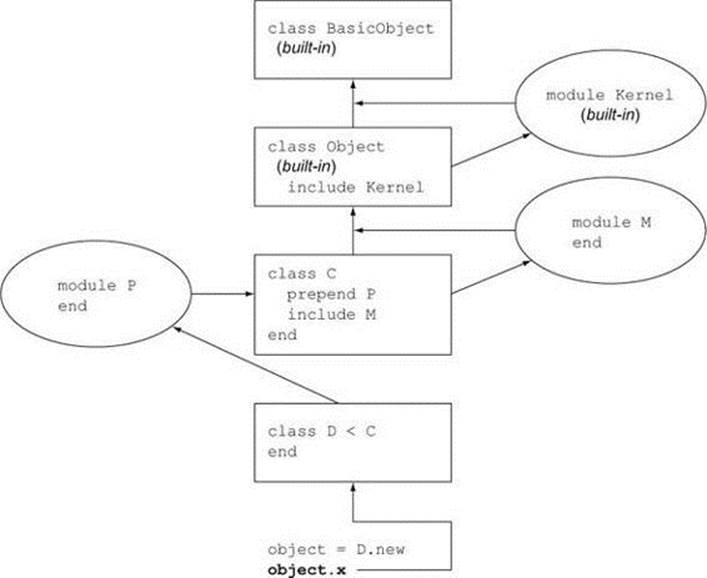
> Person.ancestors
=> [MeFirst, Person, Object, Readline, Kernel, BasicObject]
Now modify the example to use include instead of prepend. Two things happen. First, the output changes:
Hello from class!
Second, the order of the ancestors changes:
> Person.ancestors
=> [Person, MeFirst, Object, Readline, Kernel, BasicObject]
(Of course, the name MeFirst ceases to make sense, but you get the general idea.)
You can use prepend when you want a module’s version of one or more methods to take precedence over the versions defined in a given class. As mentioned earlier, prepend is new in Ruby 2.0. You won’t see it used much, at least not yet. But it’s useful to know it’s there, both so that you can use it if you need it and so that you’ll know what it means if you encounter it in someone else’s code.
4.2.4. The rules of method lookup summarized
The basic rules governing method lookup and the ordering of the method search path in Ruby 2 are illustrated in figure 4.2.
To resolve a message into a method, an object looks for the method in
1. Modules prepended to its class, in reverse order of prepending
2. Its class
3. Modules included in its class, in reverse order of inclusion
4. Modules prepended to its superclass
5. Its class’s superclass
6. Modules included in its superclass
7. Likewise, up to Object (and its mix-in Kernel) and BasicObject
Note in particular the point that modules are searched for methods in reverse order of prepending or inclusion. That ensures predictable behavior in the event that a class mixes in two modules that define the same method.
What about singleton methods?
You’re familiar from chapter 3 with the singleton method—a method defined directly on an object (def obj.talk)—and you may wonder where in the method-lookup path singleton methods lie. The answer is that they lie in a special class, created for the sole purpose of containing them: the object’s singleton class. We’ll look at singleton classes in detail later in the book, at which point we’ll slot them into the method-lookup model.
A somewhat specialized but useful and common technique is available for navigating the lookup path explicitly: the keyword super.
4.2.5. Going up the method search path with super
Inside the body of a method definition, you can use the super keyword to jump up to the next-highest definition in the method-lookup path of the method you’re currently executing.
The following listing shows a basic example (after which we’ll get to the “Why would you do that?” aspect).
Listing 4.9. Using the super keyword to reach up one level in the lookup path
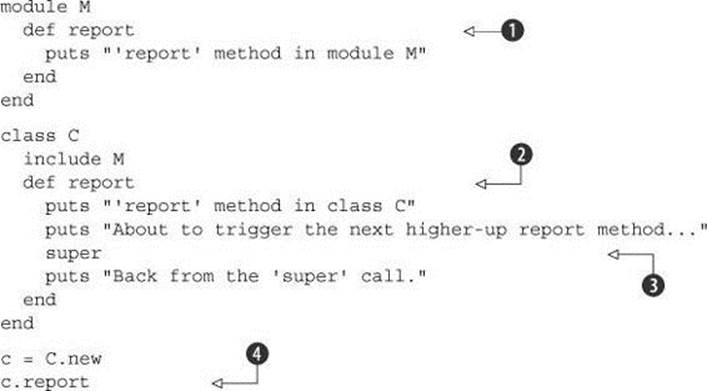
The output from running listing 4.9 is as follows:
'report' method in class C
About to trigger the next higher-up report method...
'report' method in module M
Back from the 'super' call.
An instance of C (namely, c) receives the 'report' message ![]() . The method-lookup process starts with c’s class (C)—and, sure enough, there’s a report method
. The method-lookup process starts with c’s class (C)—and, sure enough, there’s a report method ![]() . That method is executed.
. That method is executed.
Inside the method is a call to super ![]() . That means even though the object found a method corresponding to the message ('report'), it must keep looking and find the next match. The next match for report, in this case, is the report method defined in module M
. That means even though the object found a method corresponding to the message ('report'), it must keep looking and find the next match. The next match for report, in this case, is the report method defined in module M ![]() .
.
Note that M#report would have been the first match in a search for a report method if C#report didn’t exist. The super keyword gives you a way to call what would have been the applicable version of a method in cases where that method has been overridden later in the lookup path. Why would you want to do this?
Sometimes, particularly when you’re writing a subclass, a method in an existing class does almost but not quite what you want. With super, you can have the best of both worlds by hooking into or wrapping the original method, as the next listing illustrates.
Listing 4.10. Using super to wrap a method in a subclass
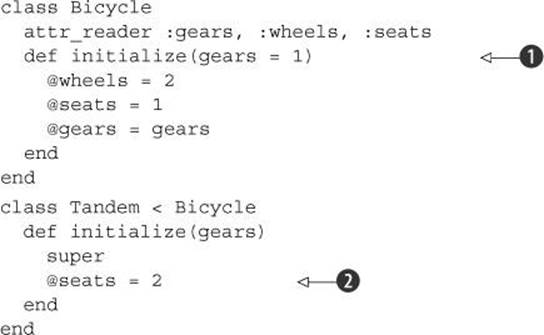
super provides a clean way to make a tandem almost like a bicycle. We change only what needs to be changed (the number of seats ![]() ), and super triggers the earlier initialize method
), and super triggers the earlier initialize method ![]() , which sets bicycle-like default values for the other properties of the tandem.
, which sets bicycle-like default values for the other properties of the tandem.
When we call super, we don’t explicitly forward the gears argument that’s passed to initialize. Yet when the original initialize method in Bicycle is called, any arguments provided to the Tandem version are visible. This is a special behavior of super. The way super handles arguments is as follows:
· Called with no argument list (empty or otherwise), super automatically forwards the arguments that were passed to the method from which it’s called.
· Called with an empty argument list—super()—super sends no arguments to the higher-up method, even if arguments were passed to the current method.
· Called with specific arguments—super(a,b,c)—super sends exactly those arguments.
This unusual treatment of arguments exists because the most common case is the first one, where you want to bump up to the next-higher method with the same arguments as those received by the method from which super is being called. That case is given the simplest syntax—you just typesuper. (And because super is a keyword rather than a method, it can be engineered to provide this special behavior.)
Now that you’ve seen how method lookup works, let’s consider what happens when method lookup fails.
4.3. The method_missing method
The Kernel module provides an instance method called method_missing. This method is executed whenever an object receives a message that it doesn’t know how to respond to—that is, a message that doesn’t match a method anywhere in the object’s method-lookup path:
>> o = Object.new
=> #<Object:0x0000010141bbb0>
>> o.blah
NoMethodError: undefined method `blah' for #<Object:0x0000010141bbb0>
It’s easy to intercept calls to missing methods. You override method_missing, either on a singleton basis for the object you’re calling the method on, or in the object’s class or one of that class’s ancestors:

When you override method_missing, you need to imitate the method signature of the original ![]() . The first argument is the name of the missing method—the message that you sent the object and that it didn’t understand. The *args parameter sponges up any remaining arguments. (You can also add a special argument to bind to a code block, but let’s not worry about that until we’ve looked at code blocks in more detail.) The first argument comes to you in the form of a symbol object. If you want to examine or parse it, you need to convert it to a string.
. The first argument is the name of the missing method—the message that you sent the object and that it didn’t understand. The *args parameter sponges up any remaining arguments. (You can also add a special argument to bind to a code block, but let’s not worry about that until we’ve looked at code blocks in more detail.) The first argument comes to you in the form of a symbol object. If you want to examine or parse it, you need to convert it to a string.
Even if you override method_missing, the previous definition is still available to you via super.
4.3.1. Combining method_missing and super
It’s common to want to intercept an unrecognized message and decide, on the spot, whether to handle it or pass it along to the original method_missing (or possibly an intermediate version, if another one is defined). You can do this easily by using super. Here’s an example of the typical pattern:
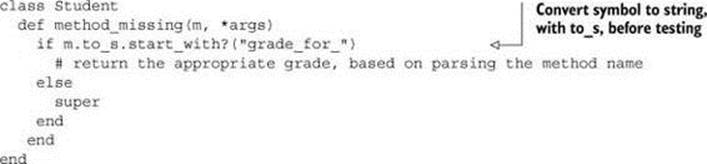
Given this code, a call to, say, grade_for_english on an instance of student leads to the true branch of the if test. If the missing method name doesn’t start with grade_for, the false branch is taken, resulting in a call to super. That call will take you to whatever the next method_missingimplementation is along the object’s method-lookup path. If you haven’t overridden method_missing anywhere else along the line, super will find Kernel’s method_missing and execute that.
Let’s look at a more extensive example of these techniques. We’ll write a Person class. Let’s start at the top with some code that exemplifies how we want the class to be used. We’ll then implement the class in such a way that the code works.
The following listing shows some usage code for the Person class.
Listing 4.11. Sample usage of the Person class
j = Person.new("John")
p = Person.new("Paul")
g = Person.new("George")
r = Person.new("Ringo")
j.has_friend(p)
j.has_friend(g)
g.has_friend(p)
r.has_hobby("rings")
Person.all_with_friends(p).each do |person|
puts "#{person.name} is friends with #{p.name}"
end
Person.all_with_hobbies("rings").each do |person|
puts "#{person.name} is into rings"
end
We’d like the output of this code to be
John is friends with Paul
George is friends with Paul
Ringo is into rings
The overall idea is that a person can have friends and/or hobbies. Furthermore, the Person class lets us look up all people who have a given friend, or all people who have a given hobby. The searches are accomplished with the all_with_friends and all_with_hobbies class methods.
The all_with_* method-name formula looks like a good candidate for handling via method_missing. Although we’re using only two variants of it (friends and hobbies), it’s the kind of pattern that could extend to any number of method names. Let’s intercept method_missing in the Person class.
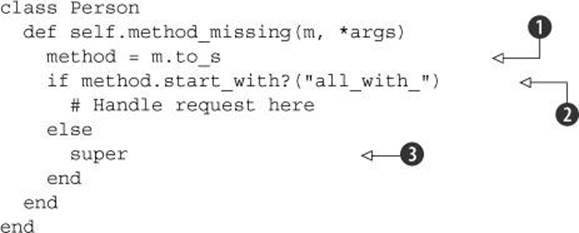
In this case, the method_missing we’re dealing with is the class method: we need to intercept missing methods called on Person. Somewhere along the line, therefore, we need a definition like this:

The method name, m, may or may not start with the substring all_with_. If it does, we want it; if it doesn’t, we toss it back—or up—courtesy of super, and let Kernel #method_missing handle it. (Remember: classes are objects, so the class object Person has access to all of Kernel’s instance methods, including method_missing.)
Here’s a slightly more elaborate (but still schematic) view of method_missing:
The reason for the call to to_s ![]() is that the method name (the message) gets handed off to method_missing in the form of a symbol. Symbols don’t have a start_with? method, so we have to convert the symbol to a string before testing its contents.
is that the method name (the message) gets handed off to method_missing in the form of a symbol. Symbols don’t have a start_with? method, so we have to convert the symbol to a string before testing its contents.
The conditional logic ![]() branches on whether we’re handling an all_with_* message. If we are, we handle it. If not, we punt with super
branches on whether we’re handling an all_with_* message. If we are, we handle it. If not, we punt with super ![]() .
.
With at least a blueprint of method_missing in place, let’s develop the rest of the Person class. A few requirements are clear from the top-level calling code listed earlier:
· Person objects keep track of their friends and hobbies.
· The Person class keeps track of all existing people.
· Every person has a name.
The second point is implied by the fact that we’ve already been asking the Person class for lists of people who have certain hobbies and/or certain friends.
The following listing contains an implementation of the parts of the Person class that pertain to these requirements.
Listing 4.12. Implementation of the main logic of the Person class
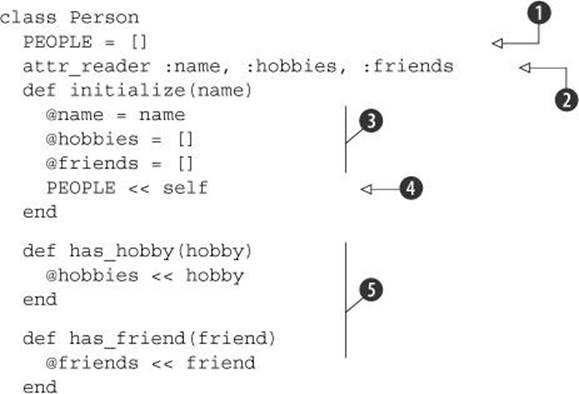
We stash all existing people in an array, held in the constant PEOPLE ![]() . When a new person is instantiated, that person is added to the people array, courtesy of the array append method <<
. When a new person is instantiated, that person is added to the people array, courtesy of the array append method << ![]() . Meanwhile, we need some reader attributes: name, hobbies, and friends
. Meanwhile, we need some reader attributes: name, hobbies, and friends ![]() . Providing these attributes lets the outside world see important aspects of the Person objects; hobbies and friends will also come in handy in the full implementation of method_missing.
. Providing these attributes lets the outside world see important aspects of the Person objects; hobbies and friends will also come in handy in the full implementation of method_missing.
The initialize method takes a name as its sole argument and saves it to @name. It also initializes the hobbies and friends arrays ![]() . These arrays come back into play in the has_hobby and has_friend methods
. These arrays come back into play in the has_hobby and has_friend methods ![]() , which are really just user-friendly wrappers around those arrays.
, which are really just user-friendly wrappers around those arrays.
We now have enough code to finish the implementation of Person.method_missing. Listing 4.13 shows what it looks like (including the final end delimiter for the whole class). We use a convenient built-in query method, public_method_defined?, which tells us whether Person (represented in the method by the keyword self) has a method with the same name as the one at the end of the all_with_ string.
Listing 4.13. Full implementation of Person.method_missing

If we have an all_with_ message ![]() , we want to ignore that part and capture the rest of the string, which we can do by taking the substring that lies in the ninth through last character positions; that’s what indexing the string with 9..-1 achieves
, we want to ignore that part and capture the rest of the string, which we can do by taking the substring that lies in the ninth through last character positions; that’s what indexing the string with 9..-1 achieves ![]() . (This means starting at the tenth character, because string indexing starts at zero.) Now we want to know whether the resulting substring corresponds to one of Person’s instance methods—specifically, hobbies or friends. Rather than hard-code those two names, we keep things flexible and scalable by checking whether the Person class defines a method with our substring as its name
. (This means starting at the tenth character, because string indexing starts at zero.) Now we want to know whether the resulting substring corresponds to one of Person’s instance methods—specifically, hobbies or friends. Rather than hard-code those two names, we keep things flexible and scalable by checking whether the Person class defines a method with our substring as its name ![]() .
.
What happens next depends on whether the search for the symbol succeeds. To start with the second branch first, if the requested attribute doesn’t exist, we raise an error with an appropriate message ![]() . If it does succeed—which it will if the message is friends or hobbies or any other attribute we added later—we get to the heart of the matter.
. If it does succeed—which it will if the message is friends or hobbies or any other attribute we added later—we get to the heart of the matter.
In addition to the all_with_* method name, the method call includes an argument containing the thing we’re looking for (the name of a friend or hobby, for example). That argument is found in args[0], the first element of the argument “sponge” array designated as *args in the argument list; the business end of the whole method_missing method is to find all people whose attr includes args[0] ![]() . That formula translates into, say, all people whose hobbies include music, or all people whose friends include some particular friend.
. That formula translates into, say, all people whose hobbies include music, or all people whose friends include some particular friend.
Note that this version of method_missing includes two conditional structures. That’s because two things can go wrong: first, we may be handling a message that doesn’t conform to the all_with_* pattern ("blah", for example); and second, we may have an all_with_* request where the * part doesn’t correspond to anything that the Person class knows about (all_with_children, for example). We treat the second as a fatal condition and raise an error ![]() . If the first condition fails, it means this particular message isn’t what this particular method_missing is looking for. We hand control upward to the next-highest definition of method_missing by calling super
. If the first condition fails, it means this particular message isn’t what this particular method_missing is looking for. We hand control upward to the next-highest definition of method_missing by calling super ![]() . Called with no arguments, super automatically gets all the arguments that came to the current method; thus the bare call to super is, in this case, equivalent to super(m, *args) (but shorter and more convenient).
. Called with no arguments, super automatically gets all the arguments that came to the current method; thus the bare call to super is, in this case, equivalent to super(m, *args) (but shorter and more convenient).
Note
We’ll look again at method_missing in chapter 15, as part of a broader look at Ruby’s runtime hooks and callbacks, of which method_missing is only one. (There’s also one called respond_to_missing?, which as its name implies is a sort of hybrid; you’ll meet it in chapter 15.) It’s worth having introduced method_missing here, though, because it’s probably the most commonly used member of the callback family, and one that you’re likely to see and hear discussed sooner rather than later in your Ruby explorations.
You now have a good grasp of both classes and modules, as well as how individual objects, on receiving messages, look for a matching method by traversing their class/module family tree, and how they handle lookup failure. Next, we’ll look at what you can do with this system—specifically, the kinds of decisions you can and should make as to the design and naming of your classes and modules, in the interest of writing clear and comprehensible programs.
4.4. Class/module design and naming
The fact that Ruby has classes and modules—along with the fact that from an object’s perspective, all that matters is whether a given method exists, not what class or module the method’s definition is in—means you have a lot of choice when it comes to your programs’ design and structure. This richness of design choice raises some considerations you should be aware of.
We’ve already looked at one case (the Stack class) where it would have been possible to put all the necessary method definitions into one class, but it was advantageous to yank some of them out, put them in a module (Stacklike), and then mix the module into the class. There’s no rule for deciding when to do which. It depends on your present and—to the extent you can predict them—future needs. It’s sometimes tempting to break everything out into separate modules, because modules you write for one program may be useful in another (“I just know I’m going to need thatThreePronged module again someday!” says the packrat voice in your head). But there’s such a thing as overmodularization. It depends on the situation. You’ve got a couple of powerful tools available to you—mix-ins and inheritance—and you need to consider in each case how to balance them.
4.4.1. Mix-ins and/or inheritance
Module mix-ins are closely related to class inheritance. In both cases, one entity (class or module) is establishing a close connection with another by becoming neighbors on a method-lookup path. In some cases, you may find that you can design part of your program either with modules or with inheritance.
Our CargoHold class is an example. We implemented it by having it mix in the Stacklike module. But had we gone the route of writing a Stack class instead of a Stacklike module, we still could have had a CargoHold. It would have been a subclass of Stack, as illustrated in the next listing.
Listing 4.14. CargoHold, inheriting from Stack instead of mixing in Stacklike
class Stack
attr_reader :stack
def initialize
@stack = []
end
def add_to_stack(obj)
@stack.push(obj)
end
def take_from_stack
@stack.pop
end
end
class Suitcase
end
class CargoHold < Stack
def load_and_report(obj)
print "Loading object "
puts obj.object_id
add_to_stack(obj)
end
def unload
take_from_stack
end
end
From the point of view of an individual CargoHold object, the process works in this listing exactly as it worked in the earlier implementation, where CargoHold mixed in the Stacklike module. The object is concerned with finding and executing methods that correspond to the messages it receives. It either finds such methods on its method-lookup path, or it doesn’t. It doesn’t care whether the methods were defined in a module or a class. It’s like searching a house for a screwdriver: you don’t care which room you find it in, and which room you find it in makes no difference to what happens when you subsequently employ the screwdriver for a task.
There’s nothing wrong with this inheritance-based approach to implementing CargoHold, except that it eats up the one inheritance opportunity CargoHold has. If another class might be more suitable than Stack to serve as CargoHold’s superclass (like, hypothetically, StorageSpace orAirplaneSection), we might end up needing the flexibility we’d gain by turning at least one of those classes into a module.
No single rule or formula always results in the right design. But it’s useful to keep a couple of considerations in mind when you’re making class-versus-module decisions:
· Modules don’t have instances. It follows that entities or things are generally best modeled in classes, and characteristics or properties of entities or things are best encapsulated in modules. Correspondingly, as noted in section 4.1.1, class names tend to be nouns, whereas module names are often adjectives (Stack versus Stacklike).
· A class can have only one superclass, but it can mix in as many modules as it wants. If you’re using inheritance, give priority to creating a sensible superclass/subclass relationship. Don’t use up a class’s one and only superclass relationship to endow the class with what might turn out to be just one of several sets of characteristics.
Summing up these rules in one example, here is what you should not do:
module Vehicle
...
class SelfPropelling
...
class Truck < SelfPropelling
include Vehicle
...
Rather, you should do this:
module SelfPropelling
...
class Vehicle
include SelfPropelling
...
class Truck < Vehicle
...
The second version models the entities and properties much more neatly. Truck descends from Vehicle (which makes sense), whereas SelfPropelling is a characteristic of vehicles (at least, all those we care about in this model of the world)—a characteristic that’s passed on to trucks by virtue of Truck being a descendant, or specialized form, of Vehicle.
Another important consideration in class/module design is the nesting of modules and/or classes inside each other.
4.4.2. Nesting modules and classes
You can nest a class definition inside a module definition like this:
module Tools
class Hammer
end
end
To create an instance of the Hammer class defined inside the Tools module, you use the double-colon constant lookup token (::) to point the way to the name of the class:
h = Tools::Hammer.new
Nested module/class chains like Tools::Hammer are sometimes used to create separate namespaces for classes, modules, and methods. This technique can help if two classes have a similar name but aren’t the same class. For example, if you have a Tools::Hammer class, you can also have aPiano::Hammer class, and the two Hammer classes won’t conflict with each other because each is nested in its own namespace (Tools in one case, Piano in the other).
(An alternative way to achieve this separation would be to have a ToolsHammer class and a PianoHammer class, without bothering to nest them in modules. But stringing names together like that can quickly lead to visual clutter, especially when elements are nested deeper than two levels.)
Class or module?
When you see a construct like Tools::Hammer, you can’t tell solely from that construct what’s a class and what’s a module—nor, for that matter, whether Hammer is a plain, old constant. (Tools has to be a class or module, because it’s got Hammer nested inside it.) In many cases, the fact that you can’t tell classes from modules in this kind of context doesn’t matter; what matters is the nesting or chaining of names in a way that makes sense. That’s just as well, because you can’t tell what’s what without looking at the source code or the documentation. This is a consequence of the fact that classes are modules—the class Class is a subclass of the class Module—and in many respects (with the most notable exception that classes can be instantiated), their behavior is similar. Of course, normally you’d know what Tools::Hammer represents, either because you wrote the code or because you’ve seen documentation. Still, it pays to realize that the notation itself doesn’t tell you everything.
We’ll look further at nested classes, modules, and other constants in the next chapter, when we talk in more detail about the subject of scope. Meanwhile, note that this ability to nest modules and classes inside each other (to any depth, in any order) gives you yet another axis along which you can plan your program’s design and structure.
4.5. Summary
Chapter 4 has been both a companion to and a continuation of the previous chapter on classes. In this chapter you’ve seen
· Modules, up close and in detail
· Similarities and differences between modules and classes (both can bundle methods and constants together, but modules can’t be instantiated)
· Examples of how you might use modules to express the design of a program
· An object’s-eye view of the process of finding and executing a method in response to a message, or handling failure with method_missing in cases where the message doesn’t match a method
· How to nest classes and modules inside each other, with the benefit of keeping namespaces separate and clear
It’s particularly important to take on board the way that objects resolve messages into methods: they go on a search through a succession of classes and modules. Objects don’t themselves have methods, even though phrasing it that way is sometimes a handy shortcut. Classes and modules have methods; objects have the ability to traverse classes and modules in search of methods.
Now that we’re nesting elements inside each other, the next topic we should and will examine in detail is scope: what happens to data and variables when your program moves from one code context to another. We’ll look at scope in conjunction with the related, often interwoven topic of self, the default object.