Learn to Program with Scratch: A Visual Introduction to Programming with Games, Art, Science, and Math (2014)
Chapter 7. Repetition: A Deeper Exploration of Loops
You’ve seen some of Scratch’s repetition structures before, but this chapter covers them in greater detail. It’s time to discuss new blocks that create loops, nested loops, and recursion. By the end of this chapter, we’ll have explored the following programming concepts:
§ Repetition structures to execute statements repeatedly
§ How to validate user input
§ Counter-controlled and event-controlled loops
§ Procedures that can call themselves with recursion
Although most people find repetitive tasks boring, computers seem to like nothing more. Repetition structures, better known as loops, are programming commands that tell a computer to repeatedly execute a statement or a sequence of statements. The simplest kind of loop is a definite loop, which repeats a sequence of statements a specific number of times. These loops are also called counter-controlled loops or counted loops. Other types of loops continue to repeat until some condition occurs; these are called condition-controlled loops or indefinite loops. Another loop, called an infinite loop, repeats forever.
In this chapter, you’ll learn about the different repetition structures available in Scratch. I’ll explain both counter-controlled and condition-controlled loops in detail, and I’ll introduce you to the stop block, which you can use to end infinite loops. You’ll learn how to use loops to validate user input, as well.
The chapter also discusses nested loops (loops that contain other loops) and shows several examples of their use. We’ll also talk about recursion—a procedure calling itself—as another way to achieve repetition. At last, we’ll develop a number of interesting applications that use both loops and conditionals, and we’ll look at incorporating loops into practical programs.
More Loop Blocks in Scratch
As you learned in Chapter 2, loop blocks allow you to repeat a command or a set of commands in a program. Scratch supports the three repetition blocks shown in Figure 7-1.

Figure 7-1. Scratch’s repeat blocks
You’ve already used two of these blocks, the repeat and the forever blocks, in many examples throughout this book. In this section, we’ll examine the third kind of loop block—the repeat until block—and explain some of the technical terms associated with loops in general.
Each repetition of a loop is called an iteration, and the word count is often used to describe the number of times a loop repeats. The repeat block, which you are very familiar with, is a counter-controlled loop because it repeats its commands a specific number of times. We usually use this loop when we know the number of repetitions the loop will need to execute, as when we want to draw a polygon with a known number of sides.
On the other hand, the repeat until block is a condition-controlled loop. The statements inside this block are repeated based on the truth or falsity of its test expression. We use this block when we don’t know in advance how many times the loop will need to repeat and want the repetition to continue until some condition is met. You can say, for example, “Repeat the ask command until the user enters a positive number.” Or, “Repeat firing missiles until the player’s energy level drops below a certain value.” The following sections explain condition-controlled loops in more detail.
The repeat until Block
Let’s say you are developing a game that presents the player with an elementary math question. If the player’s answer is incorrect, the game asks the same question again to give the player another chance. In other words, the game asks the same question until the player enters the correct answer. Clearly, the repeat block is inappropriate for this task because you don’t know in advance how many times it will take the player to enter the right answer; the first try might be a winner, or it may take 100 tries. The repeat until block can help you in scenarios like this one. The structure of the repeat until block is illustrated in Figure 7-2.
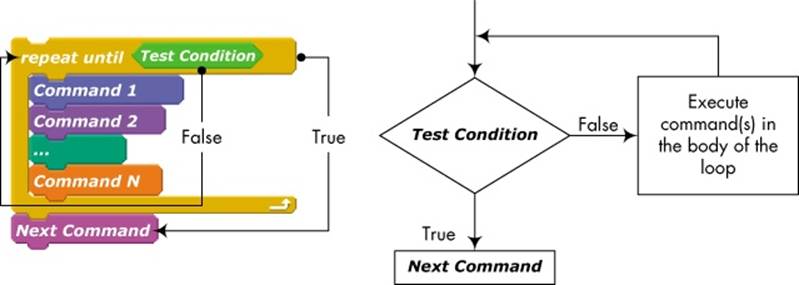
Figure 7-2. The repeat until block allows you to execute a series of instructions repeatedly until some condition is true.
This block contains a Boolean expression whose value is tested at the entry of the loop. If the expression is false, the commands inside the loop are executed. When the last command in the loop is executed, the loop starts over, and the expression is tested again. If the expression is still false, the commands inside the loop are executed again. This cycle repeats until the test expression becomes true. When that happens, the commands inside the loop are skipped, and the program moves to the command that immediately follows the loop.
Note that if the test condition is already true before the program runs the loop the first time, the commands in the loop won’t be executed. Also, the repeat until block won’t terminate unless a command (either inside the loop or in some other active part of the program) causes the test condition to become true. If the result of the test condition never becomes true, we get into an infinite loop.
Figure 7-3 shows a practical example of using the repeat until block. In this example, as long as the Player sprite is more than 100 steps away from the Guard sprite, the Guard sprite will continue to move in its current direction (horizontally in this case), bouncing when it touches the left or the right edge of the Stage. If the distance between the two sprites becomes less than 100, the repeat until block will terminate, and the Guard sprite will start to chase the Player sprite. The code for the chase is not shown in the figure. The distance to block is found in the Sensingpalette.
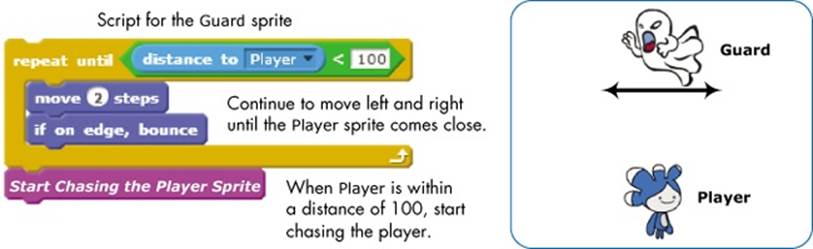
Figure 7-3. A simple example showing the repeat until block in action
TRY IT OUT 7-1
Open the application Chase.sb2 and run it. Use the arrow keys to move the Player sprite close to the Guard to see the chase in action. How would you change the test condition to unleash the Guard sprite if the y-position of the Player sprite goes outside a certain range (for example, –50 to 50)? Implement this change to check your solution.
Chase.sb2
Building a forever if Block
Infinite loops are useful in a lot of programming situations. In the previous chapters, for example, you used the forever block to play background music, and you animated sprites by changing their costumes continuously. The forever block is an unconditional infinite loop because it doesn’t have a test condition that controls the execution of the commands inside it.
You can easily change that, however, by nesting an if block inside a forever block to create a conditional infinite loop, as shown in Figure 7-4. The test condition of the if block is tested at the beginning of every iteration, and its commands only execute when the test condition is true. Note that since the forever block is supposed to execute forever, you can’t snap command blocks after it.
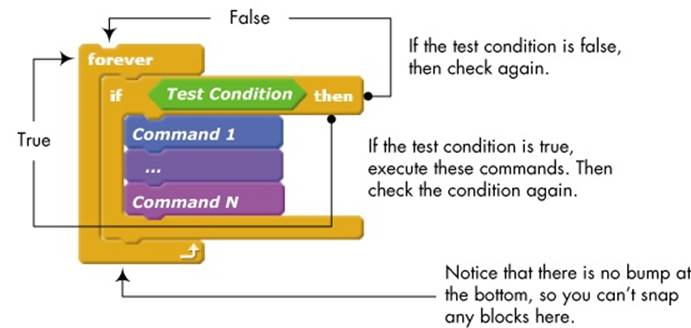
Figure 7-4. You can create a forever/if loop by combining a forever block with an if block.
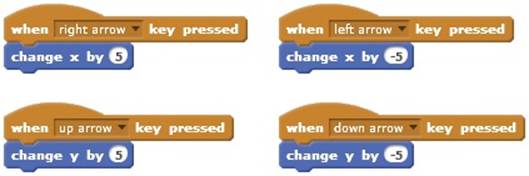
The combined forever/if structure is frequently used to control sprite movement with the keyboard arrow keys, as demonstrated in Figure 7-5.
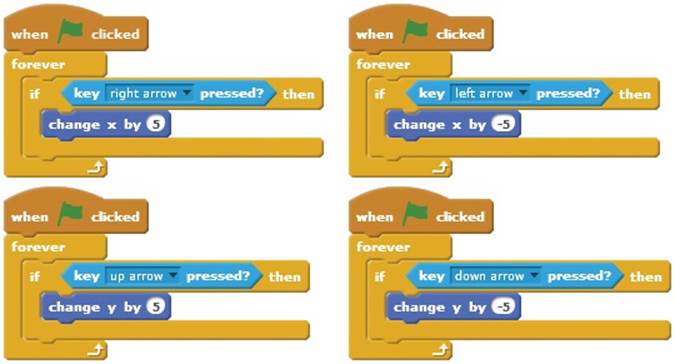
Figure 7-5. These scripts allow you to move a sprite using the keyboard arrow keys. Each script responds to one of the four keys.
ArrowKeys1.sb2
When the green flag icon is pressed, the four keyboard arrow keys (left, right, up, and down) are monitored in four independent infinite loops. When any of these keys is pressed, the corresponding loop causes a change in the x- or y-coordinate of the sprite.
Create these scripts in Scratch (or open ArrowKeys1.sb2) and run the program. Notice that if you press the up and right arrow keys simultaneously, the sprite will move diagonally in the northeast direction. Try other combinations of the arrow keys to see how the application responds.
TRY IT OUT 7-2
Another way to control the sprite’s movement with the arrow keys is shown below. Compare this method to the one shown in Figure 7-5. Which is more responsive to keyboard strokes? How does the alternate script behave if you press two keys (for example, up and right) simultaneously? Now, try placing the four if blocks in Figure 7-5 together in a single forever loop and press two arrow keys at the same time. How does the sprite’s behavior change?
Stop Commands
Let’s say you’re writing a program to find the first integer less than 1,000 that is evenly divisible by 3, 5, and 7. You can write a script that checks the numbers 999, 998, 997, and so on, one by one, in a loop. You want to stop the search when you find the number you’re looking for (945 in this example).
How can you tell Scratch to end the loop and stop the script? You can use the stop command (from the Control palette) to end active scripts. The drop-down menu provides the three options shown in Figure 7-6.

Figure 7-6. Using the stop command in Scratch
The first option immediately terminates the script that calls it. The second option, on the other hand, stops all running scripts in your application; it is equivalent to the red stop icon located at the top of the Stage. Note that you can’t snap any commands after the stop block when you use either of these two options.
StopDemo.sb2
The third stop option allows a sprite or the Stage to end all of its scripts except the one that invoked the stop block. This command is shaped as a stack block, so you can add blocks below it to execute after it suspends the sprite’s other scripts. Let’s see this command in action in a simple game, illustrated in Figure 7-7.
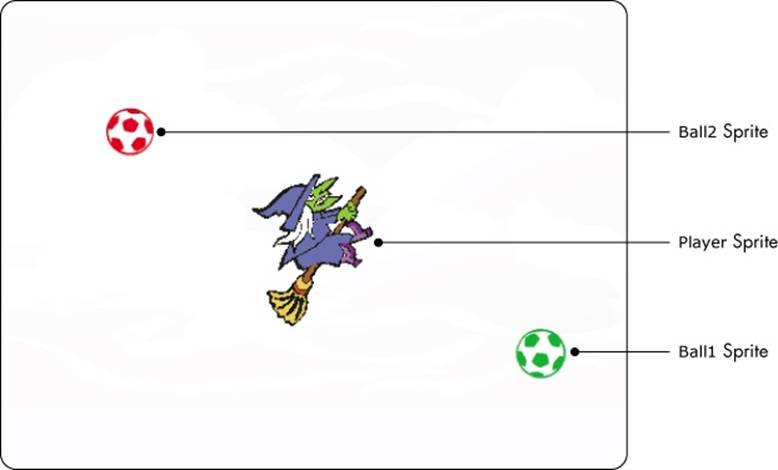
Figure 7-7. In this game, the player moves the witch on the Stage while trying to avoid the two balls.
The two balls in this figure move around the Stage and chase the witch. The player moves the witch sprite with the keyboard and tries to avoid being touched by the two balls. If the red ball touches the player at any time, the game ends. If the green ball touches the player, it will stop chasing the player, but the red ball will start to move a little faster—which makes escaping it a real challenge.
The scripts for moving the witch sprite are similar to those of Figure 7-5, so I won’t show them here. The scripts for the two balls are shown in Figure 7-8—let’s take a look at those.
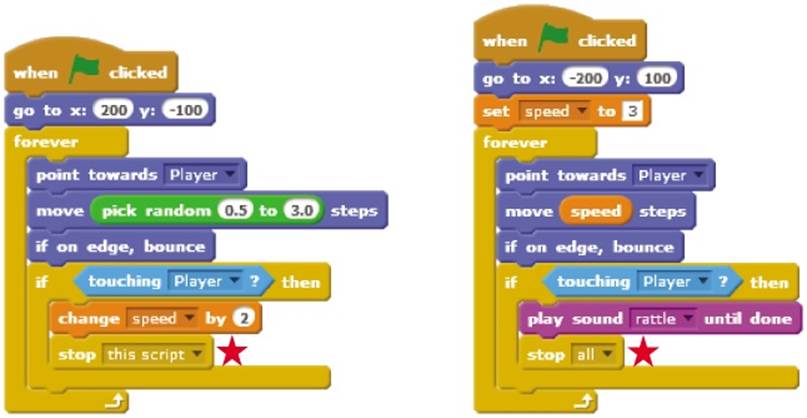
Figure 7-8. Scripts for the green ball (left) and red ball (right)
When the green ball touches the player, it increases the speed variable (which sets the movement speed of the red ball), and it invokes the stop this script command to terminate its script. All other scripts in the game should continue to run normally. Using the stop this script command works well here because we only want to speed up the red ball once. If the red ball touches the player, however, it executes the stop all command, which causes all running scripts in the application to stop.
TRY IT OUT 7-3
Load this game and play it to see how it works. Watch what happens to the yellow border around the two scripts of Figure 7-8 when the green and the red balls touch the Player.
You can also use the stop block to terminate a procedure and make it return to the caller at any point during its execution. The next section shows this concept in action.
Ending a Computational Loop
NumberSearch.sb2
Let’s say that we want to find the first power of 2 that is larger than 1,000. We’ll write a procedure that checks the numbers 21, 22, 23, 24, and so on, in a loop. When we find the number we need, we want the program to say the answer and stop the procedure. Figure 7-9 shows two ways to implement this approach.
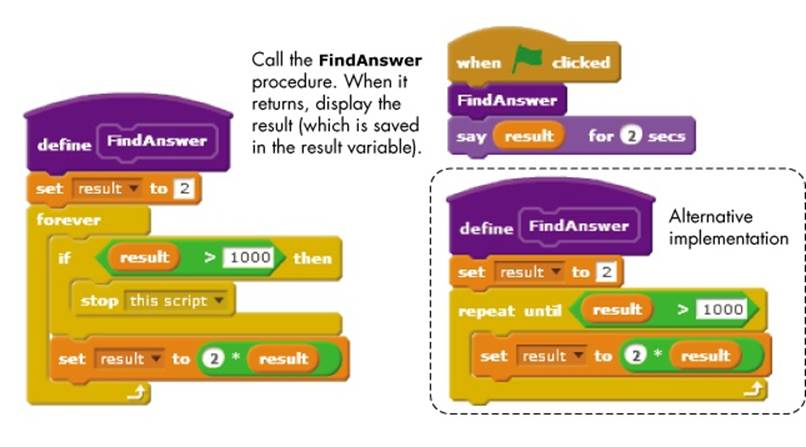
Figure 7-9. Two ways to find the first power of 2 that is larger than 1,000
The procedure on the left in Figure 7-9 initializes the result variable to 2, which is the first power of 2 to be checked, and enters an infinite loop in search for the answer. It checks the value of result in each iteration of the loop. If result is greater than 1,000, the procedure invokes thestop this script command to stop and return to the caller. Otherwise, the command after the if block (which multiplies the previous value of result by 2) executes, and the next iteration of the loop begins. If you trace through this procedure, you’ll see that the if block finds result to be 2 in the first iteration, 4 in the second iteration, 8 in the third iteration, and so on. This continues until result exceeds 1,000; at this point, the procedure stops and returns to the caller, which displays the result using the say block.
Figure 7-9 (right) shows another way to implement the procedure. Here, we used a repeat until block that continues to loop until result becomes greater than 1,000. As in the first implementation, the loop continues to double the value of result until it exceeds 1,000. When this happens, the loop terminates naturally, and the procedure returns to the caller. Note that we did not have to use the stop block in this case.
The stop block is also useful when you need to validate input from users. You’ll see an example of this practical application next.
Validating User Input
When you write an application that reads some data from the user, you should always check that the entered values are valid before starting to process the data. Repetition structures can help you with this task. If the user’s input is invalid, you can use a loop to display an appropriate error message and ask the user to reenter the value.
To demonstrate, let’s say that you are developing a game with two levels and you want to let the user select a level to play. The only valid entries in this case are the numbers 1 and 2. If the user enters a number other than these two numbers, you’d like to offer another chance to enter an acceptable value. One way to implement this check is shown in Figure 7-10.
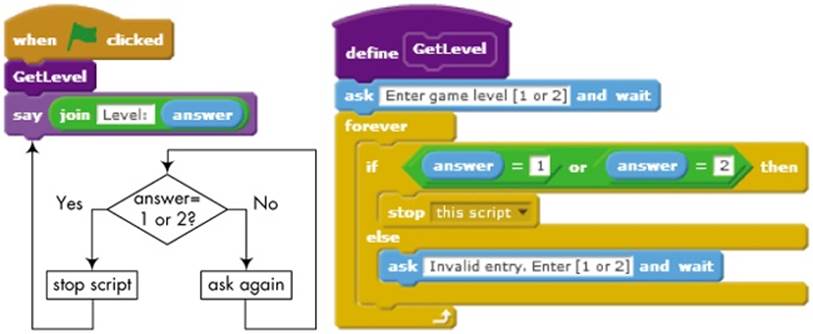
Figure 7-10. Input validation using the forever block
The GetLevel procedure asks the user to enter a choice and checks the answer inside a forever loop. If the user’s answer is invalid, the loop prompts the user to reenter the level. If the user enters a valid number, the procedure calls stop this script to terminate the loop and end the procedure. When this happens, the main script, which has been patiently waiting for the GetLevel procedure to return, moves on to execute the say command. Figure 7-11 shows how to achieve the same task using the repeat until block.
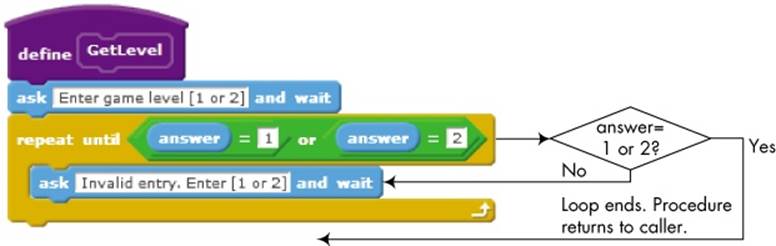
Figure 7-11. Input validation using the repeat until block
The procedure in Figure 7-11 asks the user to enter a choice and waits for the answer. If the user enters 1 or 2, the condition in the header of the repeat until block evaluates to true, which naturally terminates the loop and ends the procedure. On the other hand, if the user enters anything other than 1 or 2, the loop’s condition evaluates to false, and the ask command inside the loop executes. This command waits for the user’s input again, and the repeat until block will continue asking for input until the user enters a valid choice. Once again, note that this implementation doesn’t require a stop block.
Counters
Sometimes, you’ll need to keep track of the number of iterations a loop performs. For example, if you want to give users only three chances to enter the correct password, you’ll have to count their attempts and lock them out after the third try.
You can handle such programming scenarios by using a variable (commonly referred to as the loop counter) that counts the number of loop iterations. Let’s jump right in and explore some examples that demonstrate practical ways to use loop counters.
Check a Password
The program in Figure 7-12 asks the user to enter a password for unlocking a laptop. The Laptop sprite has two costumes: the off image indicates that the laptop is locked, and the on image indicates that the laptop is unlocked. The user will be denied access to the laptop if an invalid password is entered three times.
Password Check.sb2
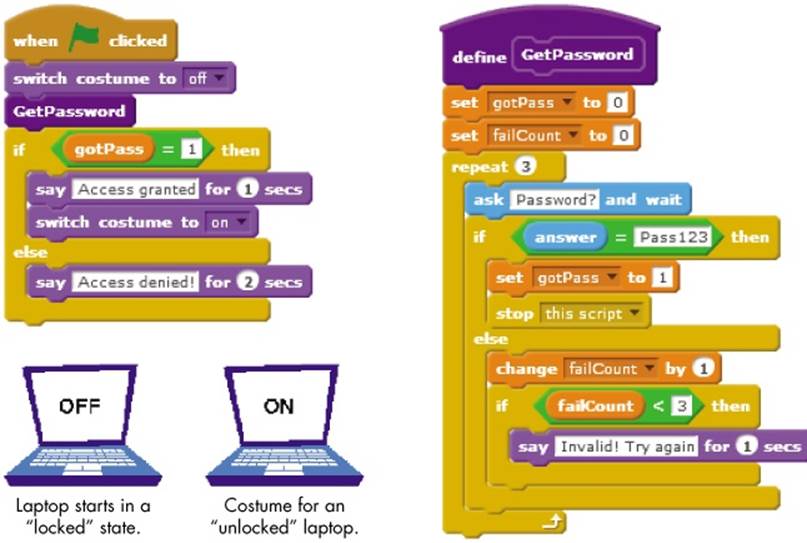
Figure 7-12. This script gives the user three chances to enter the correct password.
When the green flag is clicked, the Laptop sprite switches to the off costume and calls the GetPassword procedure to authenticate the user. This procedure is expected to return the password check result to the main script using the gotPass flag. When the procedure returns, the if/elseblock checks the gotPass flag to decide whether or not the user should be allowed to access the system. If gotPass was set to 1, meaning the user entered the correct password, the if block executes a say command that displays Access granted and changes the laptop’s costume to the onimage. Otherwise, the script displays Access denied! and the sprite continues to show its initial off costume.
The GetPassword procedure sets the gotPass flag to 0, to indicate that it hasn’t received a valid password yet, and initializes the failCount variable (our loop counter) to 0. It then executes a repeat loop with a maximum repeat count of three. During each iteration of the loop, the user is prompted to enter a password. If the user enters the correct password (Pass123 in this example), the gotPass flag is set to 1, the procedure stops itself by invoking the stop this script command, and execution returns to the caller. Otherwise, if the user hasn’t used up all three attempts, an error message is displayed, and the user is given another chance. If the user fails three consecutive times, the repeat loop automatically terminates, and the procedure returns to the caller with the value of the gotPass flag still set to 0.
TRY IT OUT 7-4
Open this application and run it. What happens if you enter paSS123 (instead of Pass123) for the password? What does this tell you about string comparison in Scratch? Try to implement the GetPassword procedure using a repeat until block.
Counting by a Constant Amount
Of course, you don’t always have to increase your counters by 1 each time through a loop. The script in Figure 7-13 at ①, for example, has a sprite count from 5 to 55 in increments of 5. The script at ② causes the sprite to count down from 99 to 0 in decrements of 11—in other words, 99, 88, 77,..., 11, 0.
CountingBy ConstAmount.sb2
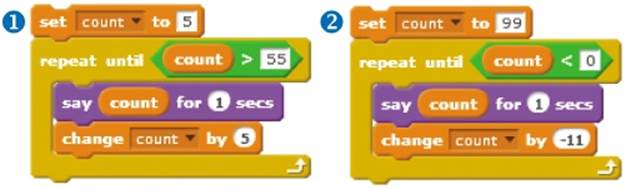
Figure 7-13. You can increment and decrement counters by amounts other than 1.
To see this counting technique in a practical application, let’s say that we want to find the sum of all even integers from 2 to 20 (inclusive). (That is, we want the sum 2 + 4 + 6 + 8 + ... + 20.) The script of Figure 7-14 does exactly that.
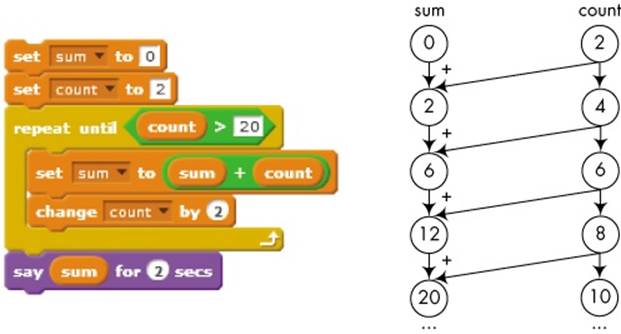
Figure 7-14. This script finds the sum of all even integers from 2 to 20.
This script starts by initializing the sum variable to 0 and the count variable to 2, and then enters a conditional loop that repeats until count exceeds 20. Each time the loop iterates, the value of count is added to the current sum and the count variable is increased by 2 to get the next even integer in the sequence. Predict the output of this script then run it to check your answer.
NON-INTEGER REPEAT COUNT
What do you think would happen if you asked Scratch to repeat a loop 2.5 times? The three examples shown below demonstrate how Scratch handles non-integer repeat counts.
Non-Integer RepeatCount.sb2
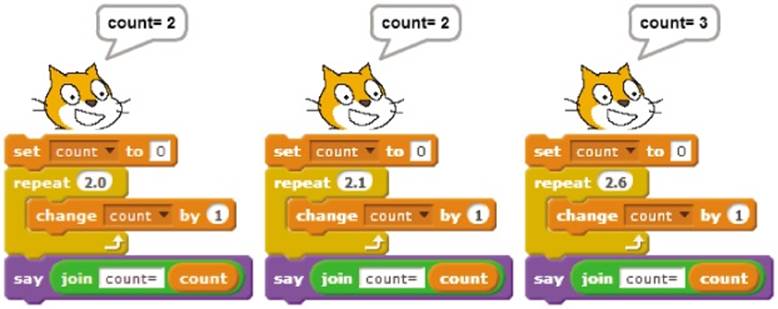
Of course, there is no such thing as “repeat 2.5 times,” but Scratch doesn’t prevent you from entering such values. Rather than giving an error message, Scratch automatically rounds a decimal repeat count to its nearest integer.
Revisiting Nested Loops
Back in Rotated Squares, we used nested loops to draw rotated squares. One loop (the inner loop) was responsible for drawing the square, while the other loop (the outer loop) controlled the number of rotations. In this section, you’ll learn how to use the concept of loop counters in conjunction with nested loops to create iterations in two (or more) dimensions. This technique is an essential part of programming and, as you’ll see in a moment, can be used to solve a wide range of programming problems.
To set the stage, let’s say that a local restaurant offers four kinds of pizza (P1, P2, P3, and P4) and three kinds of salads (S1, S2, and S3). If you ate there, you would have 12 possible combinations to choose from; you could have P1 with any of three salad types, P2 with any of three salad types, and so on. The restaurant’s owner wants to print out a menu that lists the available pizza/salad combinations along with their combined prices and calorie contents. Let’s see how nested loops can be used to generate a list of all possible combinations. (I’ll leave calculating the prices and calorie content as an exercise for you.)
If you think about it, you’ll see that we just need two loops: one loop (the outer loop) to cycle through the pizza types and another loop (the inner loop) to cycle through the salad types. The outer loop starts with P1, while the inner loop tries S1, S2, and S3. The outer loop then moves to P2, and the inner loop again chooses S1, S2, and S3. This continues until the outer loop has passed through all four pizza types. An implementation of this idea is illustrated in Figure 7-15.
NestedLoops1.sb2
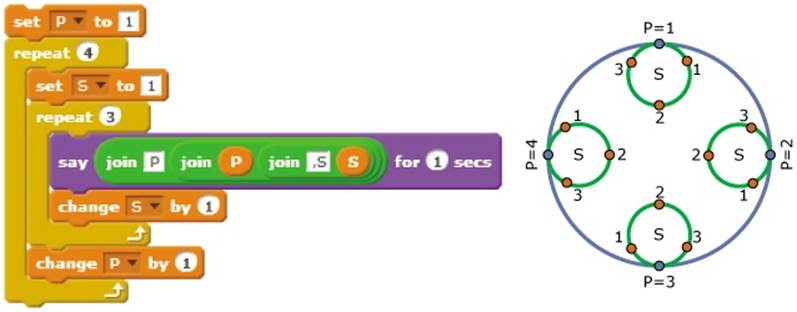
Figure 7-15. Visualizing nested loops. The variable P controls the outer loop and the variable S controls the inner loop.
The script uses two loops and two counters. The counter for the outer loop is named P, and the counter for the inner loop is named S. In the first iteration of the outer loop (where P = 1), the value of counter S is set to 1, and the inner loop repeats three times. Each time, it executes a say command to display the current values of P and S, and then it increments S by 1. Thus, the first iteration of the outer loop causes the sprite to say “P1,S1” and “P1,S2” and “P1,S3.”
When the inner loop terminates after looping three times, P is incremented by 1, and the second iteration of the outer loop starts. The value of S is reset to 1, and the inner loop is executed again. This causes the sprite to say “P2,S1” and “P2,S2” and “P2,S3.” The process continues in a similar manner, causing the sprite to say “P3,S1” and “P3,S2” and “P3,S3” and finally “P4,S1” and “P4,S2” and “P4,S3” before the script ends. Trace through this script to make sure you understand how it works.
Now that you’ve seen what nested loops can do, let’s apply this technique to solve an interesting math problem. We want to write a program to find three positive integers n1, n2, and n3 such that n1 + n2 + n3 = 25 and (n1)2 + (n2)2 + (n3)2 = 243. Because computers are good at repetitive tasks, our plan is to try all possible combinations of numbers (a technique called exhaustive search) and let the computer do the hard work.
Based on our first equation, the first number, n1, can have any value between 1 and 23 since we’ll need to add two numbers to it to get 25. (You might have noticed that n1 can’t be more than 15 because 162 = 256, which is greater than 243. But we’ll just ignore our second equation for now and set the upper limit of the loop to 23 anyway.)
The second number, n2, can be any value between 1 and 24 – n1. For example, if n1 is 10, the maximum possible value of n2 is 14 because n3 must be at least 1. If we know n1 and n2, we can compute n3 as 25 – (n1 + n2). Then, we’ll need to check whether the sum of the squares of these three numbers is 243. If it is, we are done. Otherwise, we need to try a different combination of n1 and n2. You can see the finished script to find n1, n2, and n3 in Figure 7-16.
NestedLoops2.sb2

Figure 7-16. This script searches for three positive numbers whose sum is 25 and whose sum of squares is 243.
The outer loop tries all values of n1 from 1 to 23. For each value of n1, the inner loop tries all values of n2 from 1 to (24 – n1). For each combination of n1 and n2, the script sets n3 equal to 25 – (n1 + n2), and then it checks to see whether the sum of the squares of these three numbers is 243. If it is, the script says the answer and stops.
TRY IT OUT 7-5
Create the script shown in Figure 7-16 and run it to find n1, n2, and n3. If you study the script carefully, you’ll find that it tries some (n1, n2) combinations more than once. For example, the numbers (1, 2) are tested in the first iteration of the outer loop, whereas the numbers (2, 1) are tried in the second iteration. These two tests are redundant; we only need one of them. You can fix this by having the inner loop start from n1 instead of 1. Make this change to the script and then run it to make sure it still works as expected.
Recursion: Procedures that Call Themselves
The repetition structures introduced so far allow us to repeat a command or a set of commands through iteration. Another powerful technique that produces repetition is recursion. Recursion allows a procedure to either call itself directly or do so indirectly through another procedure (for example, A calls B, B calls C, then C calls A). It may not be obvious why you want to do this, but it turns out that recursion can simplify the solution of many computer science problems. Let’s demonstrate this concept by considering the simple example shown in Figure 7-17.
Recursion.sb2
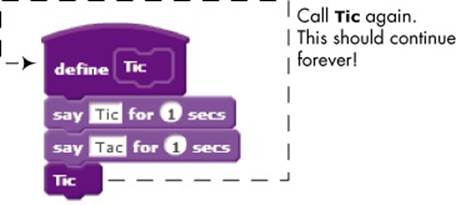
Figure 7-17. A recursive procedure
The Tic procedure executes two say commands (the first says “Tic” and the second says “Tac”), then calls itself again. The second call does the same thing, and the sprite would continue saying, “Tic Tac” forever if no outside action stopped it. Of course, the only way to stop it in this case is to click the red stop icon. Having a procedure call itself this way allowed us to repeat the two say commands forever without using any loop blocks. The form of recursion used in this example is called tail recursion because the recursive call is located at the very end of the procedure. Scratch also allows recursive calls to come before the last line, but we won’t explore that type of recursion in this book.
Since infinite recursion is generally not a good idea, you must control the execution of a recursive procedure with conditionals. For example, the procedure could include an if block that determines whether the recursive call should be made. To demonstrate this technique, Figure 7-18 shows a recursive procedure that counts from some initial number (specified by the parameter count) down to 0.
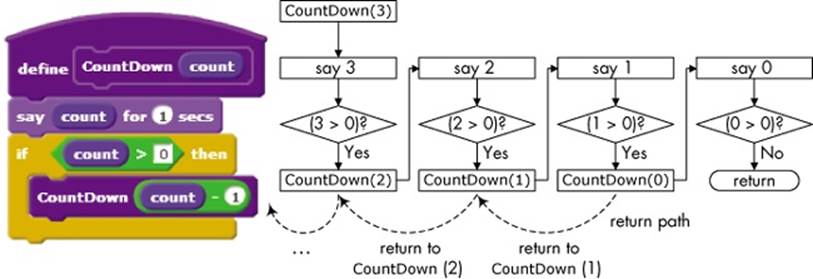
Figure 7-18. The if block is used to determine whether (or not) the recursive call should be made.
Let’s walk through how CountDown works when it is called with an argument of three. When the procedure starts, the say command shows the number 3, then checks whether count is greater than 0. Since 3 is greater than 0, the procedure subtracts 1 from count to call itself with an argument of 2.
In the second call, the procedure shows the number 2 and, because 2 is greater than 0, calls itself one more time with an argument of 1. This continues until the call CountDown(0) is made. After showing the number 0 in a voice bubble, the procedure checks whether count is greater than 0. Since the expression in the header of the if block evaluates to false, no further recursive calls will be made, and the procedure returns. Try to follow the return path shown in Figure 7-18.
Now that we’ve covered the basics of tail recursion, we can apply it to more interesting applications. Let’s consider, for example, the Blade procedure shown in Figure 7-19.
RecursionBlade.sb2
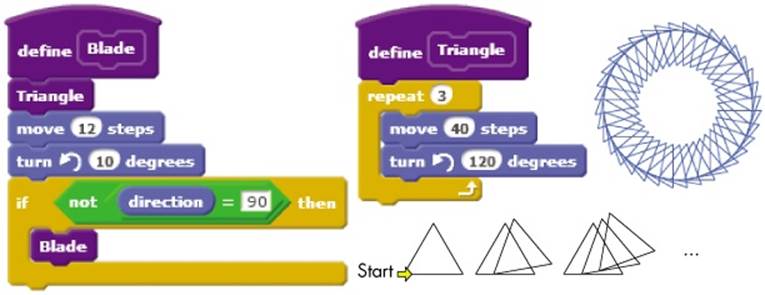
Figure 7-19. Using a sprite’s direction to stop recursion
We assume that the sprite that executes this procedure starts somewhere on the Stage pointing in the direction of 90°. After drawing an equilateral triangle, the sprite moves 12 steps forward and then turns 10° counterclockwise. The procedure then checks the new direction of the sprite. If the sprite is not pointing in the direction of 90°, the procedure calls itself again to draw the next triangle in the sequence. Otherwise, the recursive call doesn’t happen, and the procedure ends after drawing the saw blade shown in Figure 7-19.
For simple examples like the ones shown here, it is probably easier to use a repeat block to achieve the desired repetition. But as I mentioned at the start of this section, there are many problems that are easier to solve with recursion rather than iteration.
TRY IT OUT 7-6
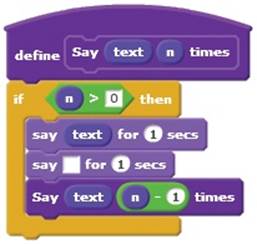
What does the following procedure do? Implement it and call it with different arguments to check your answer.
Scratch Projects
Now that you know how to use repetition to your advantage in Scratch scripts, it’s time to put what we’ve learned in this chapter to some practical use. In this section, I’ll guide you through a range of projects to help you strengthen your understanding of programming and provide you with some ideas for your own projects.
Analog Clock
The current block from the Sensing palette can report the current year, month, date, day of the week, hour, minutes, or seconds, depending on what you select from the drop-down menu. Our first project will use this block to implement the analog clock shown in Figure 7-20. The application contains four sprites: the Sec, Min, and Hour sprites, which represent the three hands of the clock, and the Time sprite (a small white dot), which displays the time in digital format (see the thought bubble in the figure).
AnalogClock.sb2
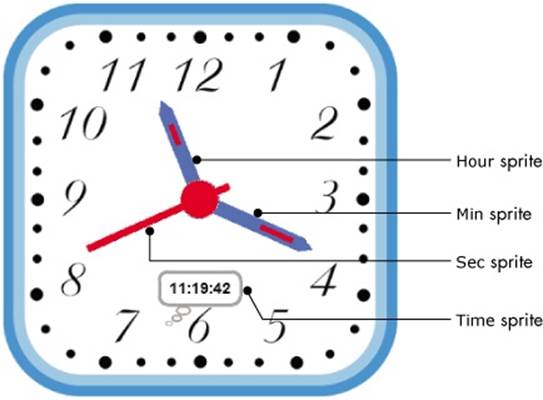
Figure 7-20. The Analog Clock application
The clock starts running when the green flag is clicked. In response, all four sprites start a forever loop to update their status based on the current system time. The scripts for the Sec and Min sprites are shown in Figure 7-21.
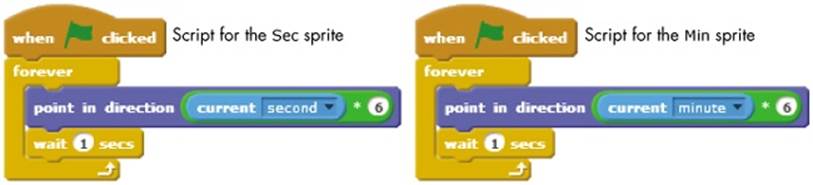
Figure 7-21. The scripts for the Sec and Min sprites
The number of seconds and minutes reported by the current block ranges from 0 to 59. When the system reports 0 seconds, the Sec sprite should point up (toward 0°), at 15 seconds, the Sec sprite should point right (toward 90°), and so on. Every second, the Sec hand should turn 6° (360° divided by 60 seconds) clockwise. A similar reasoning applies to the Min hand. If you watch this clock running, you’ll notice the Sec hand jumping every second and the Min hand jumping every minute. Now, let’s look at the script for the Hour sprite, shown in Figure 7-22.
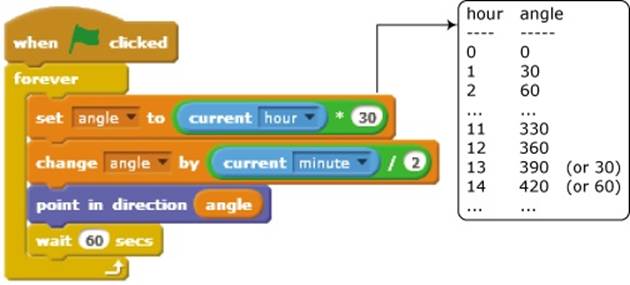
Figure 7-22. The script for the Hour sprite
The current(hour) block reports the system clock’s hour as a number from 0 to 23. We need the Hour hand to point toward 0° (that is, up) for hour 0, 30° for hour one, 60° for hour two, and so on, as illustrated in the figure. Of course, if the current time is, let’s say, 11:50, we don’t want theHour hand to point exactly at 11 but rather more toward 12. We can make this adjustment by taking the current minutes into account.
Since every hour (or 60 minutes) corresponds to 30° on the face of the clock, every minute is worth 2°. Therefore, every minute, we need to adjust the angle of the Hour hand by the current number of minutes divided by 2, as shown in the script.
The script for the Time sprite is trivial and isn’t shown here. It uses nested join blocks to construct a display string of the form hour:min:sec and shows this string in a think bubble, as shown in Figure 7-20.
TRY IT OUT 7-7
Open the application and run it. Change the script for the Min sprite to make it move smoothly, instead of jumping every minute. (Hint: Use the same idea we applied to smooth the movement of the hour hand.) Also, change the script of the Time sprite to display a string of the form “3:25:00 PM” (12-hour format) instead of “15:25:00” (24-hour format). Think of other ways to enhance the application and try to implement them as well.
Bird Shooter Game
Now, let’s make a simple game that uses most of the blocks we introduced in this chapter. The player’s goal will be to knock two birds out of the sky, and you can see the user interface in Figure 7-23.
BirdShooter.sb2
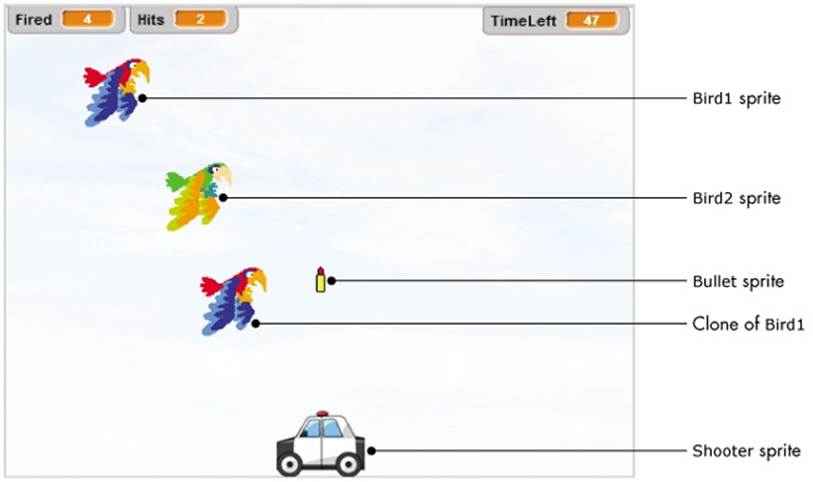
Figure 7-23. User interface of the bird shooter game
As shown, the game contains five sprites: Bird1, a clone of Bird1, Bird2, a shooter, and a bullet. The player can move the shooter horizontally using the left and right keyboard arrows. Pressing the spacebar fires a bullet into the sky. If the bullet hits Bird1 or its clone, the player gets a point. Bird2 is an endangered species, so the player isn’t allowed to shoot that one; if the bullet hits that sprite, the game ends. The player has one minute to shoot as many birds as possible.
Each bird uses two costumes. When switching between these two costumes, the birds appear to be flapping their wings.
The Stage has two backgrounds named start and end. The start background is shown in Figure 7-23. The end background is identical, with the addition of the words Game Over to the center of the image. The scripts that belong to the Stage are shown in Figure 7-24.
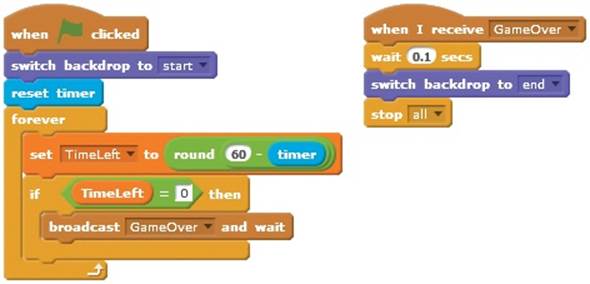
Figure 7-24. The scripts for the Stage in the bird shooter game
When the green flag icon is pressed, the Stage switches to the start background, resets the timer, and starts a loop that updates and checks the remaining game time, which is tracked by the TimeLeft variable. When TimeLeft reaches 0 or when the Stage receives the GameOver broadcast message, it executes the GameOver handler. This script waits for a short time to allow the birds to hide themselves, switches to the end backdrop, and calls stop all to end any running scripts. As you’ll see soon, the GameOver message will be sent by the Bullet sprite when it hits Bird2. Let’s now take a look at the script for the Shooter sprite, shown in Figure 7-25.
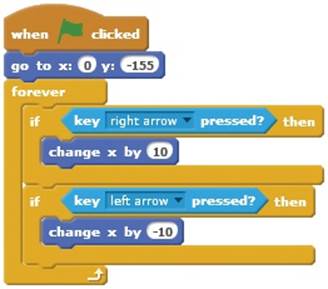
Figure 7-25. The script for the Shooter sprite
This script starts by positioning the shooter in the middle of the bottom edge of the Stage. The script then enters an infinite loop that detects whether the left or right arrow keys have been pressed and moves the shooter in the corresponding direction. Now let’s move on to the scripts forBird1, shown in Figure 7-26.
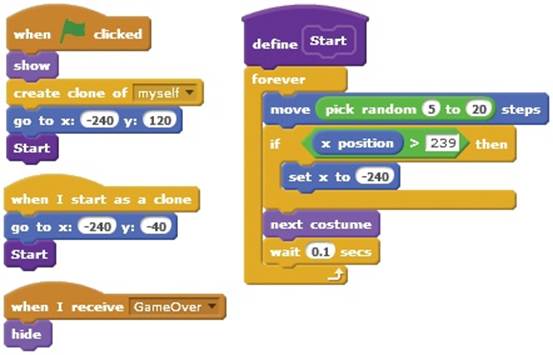
Figure 7-26. The scripts for the Bird1 sprite
When the game starts, Bird1 clones itself, moves to left edge of the Stage, and calls the Start procedure. The clone also starts at the left edge of the Stage (but at a different height) and calls Start. This procedure uses a forever loop to move the bird and its clone horizontally across the Stage, from left to right with random steps. When the bird approaches the right edge of the stage, it is moved back to the left edge, as if it wraps around and reappears. The last script hides both birds when the GameOver message is broadcast.
The scripts for Bird2 are very similar to those of Bird1, so we won’t show them here. When the green flag is clicked, Bird2 moves to the right edge of the Stage at a height of 40 and then executes a loop similar to that of the Start procedure of Figure 7-26. The bird simply moves from left to right, wrapping around when it reaches the right edge of the Stage. Bird2 also responds to the GameOver broadcast by hiding itself.
Of course, the player can’t hit any birds just by moving the shooter around, and that’s where the Bullet sprite comes in. The main script for this sprite is shown in Figure 7-27.
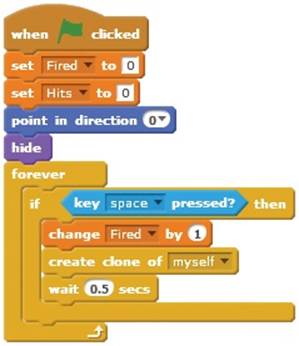
Figure 7-27. The main script of the Bullet sprite
When the green flag is clicked, this script initializes the variables Fired (the number of bullets fired) and Hits (how many birds have been hit) to 0. It then points the Bullet sprite up and hides it. After that, it enters an infinite loop to repeatedly check the status of the spacebar key. When spacebar is pressed, the script increments Fired by 1 and creates a clone of the Bullet sprite to move the bullet upward, as we’ll see next. The script then waits some time to prevent the player from firing another bullet too soon. Now we’re ready to study the script of the cloned bullet, shown in Figure 7-28.
First, the Bullet is moved to the center of the Shooter and is made visible ①. The Bullet is then moved upward in increments of 10 steps using a repeat until block ②. If the bullet’s y-coordinate exceeds 160, then the Bullet has reached the upper edge of the Stage without touching any birds. In this case, the repeat until block exits ⑤, and the clone is deleted. A hit check, however, is performed each time the bullet moves. If the bullet touches Bird1 (or its clone) ③, the script increases the Hits variable and plays a sound to make the game more exciting. On the other hand, if the bullet touches Bird2 ④, the script broadcasts GameOver to signal the end of the game. In both cases, the clone is deleted since it has finished its job.
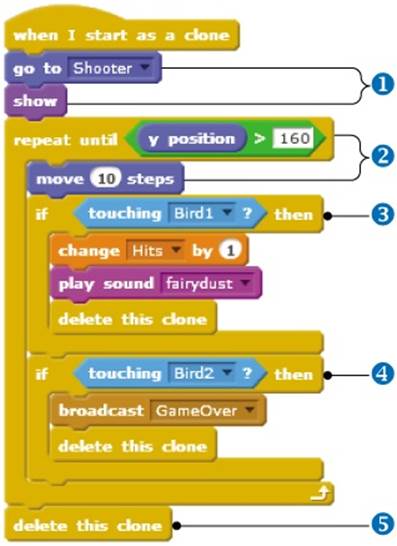
Figure 7-28. The startup handler of a cloned Bullet
The game is now fully functional, but you could add many features to it. Here are two suggestions:
§ Give the player a limited number of bullets and keep score based on the number of missed shots.
§ Add more birds and have them move at different speeds. Reward the player with more points for hitting faster birds.
TRY IT OUT 7-8
Open the game and play it to see how it works. Modify the game with some of the enhancements suggested above—or come up with a few of your own and implement those!
Free-Fall Simulation
In this section, I’ll present an application that simulates the motion of a falling object. Ignoring the effects of buoyancy and air resistance, when an object at rest is dropped from some height, the distance d (in meters) fallen by the object during time t (in seconds) is given by d = ½ gt2, where g= 9.8 m/s2 is the gravitational acceleration. The goal of this simulation is to show the position of the falling object at times 0.5 s, 1.0 s, 1.5 s, 2.0 s, and so on, until the object reaches the ground. The interface for this simulation is shown in Figure 7-29.
FreeFall.sb2
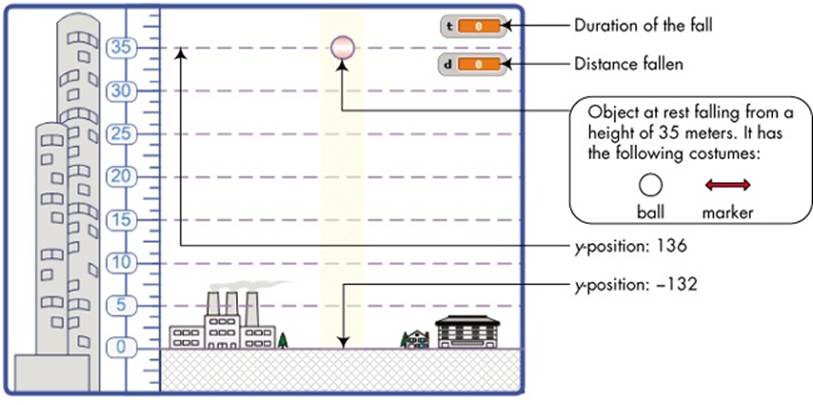
Figure 7-29. User interface for the free-fall simulation
An object at rest (the ball in the figure) will be allowed to fall from a height of 35 m. A simple substitution in the above formula shows that the object will reach the ground after ![]() s. The application has one sprite (called Ball) that has the two costumes shown in the figure. When it is time to show the position of the falling ball, the sprite changes momentarily to the marker costume, makes a stamp, and switches back to the ball costume.
s. The application has one sprite (called Ball) that has the two costumes shown in the figure. When it is time to show the position of the falling ball, the sprite changes momentarily to the marker costume, makes a stamp, and switches back to the ball costume.
The simulation starts when the green flag is clicked. In response, the Ball sprite runs the script shown in Figure 7-30.
During initialization ①, the sprite moves to its starting position, switches to the ball costume, clears its voice bubble from the previous run, and clears the Stage from any previous stamps. It then initializes t and counter to 0. The variable t represents the duration of the fall, and counterkeeps track of the number of loop repetitions.
The script then enters an infinite loop ② to calculate the simulation parameters at different time intervals. It performs those calculations and updates the ball’s position every 0.05 s ③ to ensure the ball’s smooth movement. Every 0.05 s, the value of the time variable t is updated, and the distance the ball has fallen (d) is calculated. The value of the counter variable is also incremented by 1.
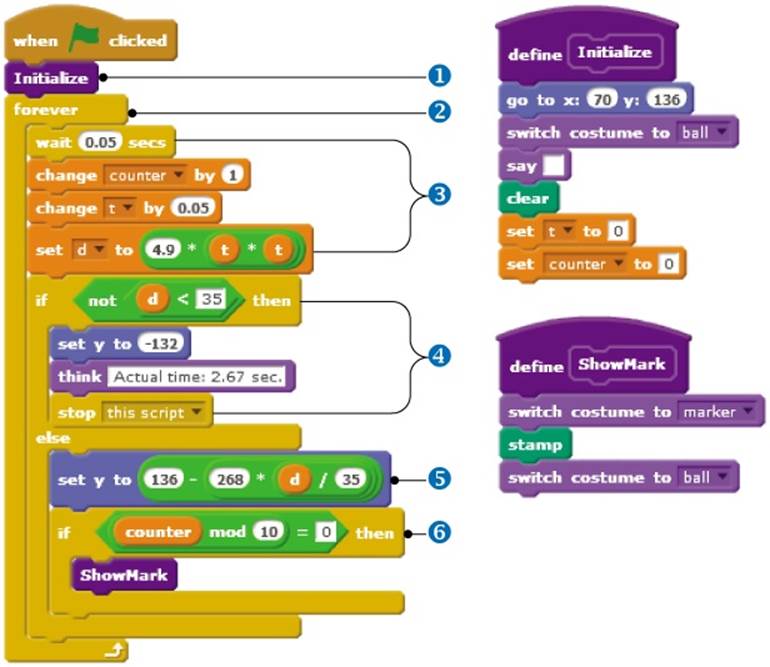
Figure 7-30. Script for the Ball sprite in the free-fall simulation
If the ball reaches the ground (which happens at d ≥ 35), the script sets the ball’s y-position to that of the ground, displays the actual duration of the journey, and stops the script to end the simulation ④.
Otherwise, the script sets the vertical position of the ball in accordance with the fallen distance ⑤. Since a height of 35 m corresponds to 268 pixels on the Stage (see Figure 7-29), a distance of d meters corresponds to 268 * (d / 35). The final y-position is established by subtracting this number from the initial y-position, which is 136.
Since the iteration duration is 0.05 s, it takes 10 iterations to get 0.5 s. Thus, when the counter becomes 10, 20, 30, and so on, the Ball sprite switches to (and stamps) the marker costume to show the position of the falling ball at those instants ⑥.
Figure 7-31 illustrates the result of running this simulation. Note how the distance fallen in each time interval increases as the object falls. Because of gravity, the ball accelerates—its velocity increases—at a rate of 9.8 m/s2.
TRY IT OUT 7-9
Open the application and run it to understand how it works. Try converting the simulation into a game in which players drop the ball to hit a moving object on the ground. You can add a score, change the speed of the target, or even set the action on another planet (change the gravitational acceleration).
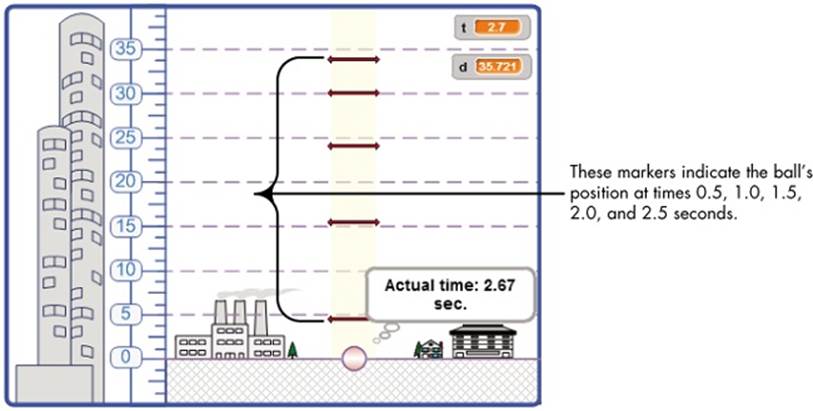
Figure 7-31. Output of the free-fall simulation
Projectile Motion Simulator
Consider a ball fired at some initial velocity (v0) from a cannon that points at an angle q from the horizontal. You can analyze the ball’s trajectory by resolving the velocity vector (v0) into its horizontal and vertical components at different times. The horizontal component remains constant, but the vertical component is affected by gravity. When the motions corresponding to these two components are combined, the resulting path is a parabola. Let’s examine the equations that govern projectile motion (neglecting air resistance).
Projectile .sb2
The origin of our coordinate system is the point at which the ball begins its flight, so the ball’s x-coordinate at any time, t, is given by x(t) = v0xt, and the y-coordinate is y(t) = v0yt – (0.5)gt2, where v0x = v0 cos q is the x- component of v0; v0y = v0 sin q is the y-component of v0; and g = 9.8 m/s2is the gravitational acceleration. Using these equations, we can calculate the total flight time, the maximum height, and the horizontal range of the ball. The equations for these quantities are shown in Figure 7-32.
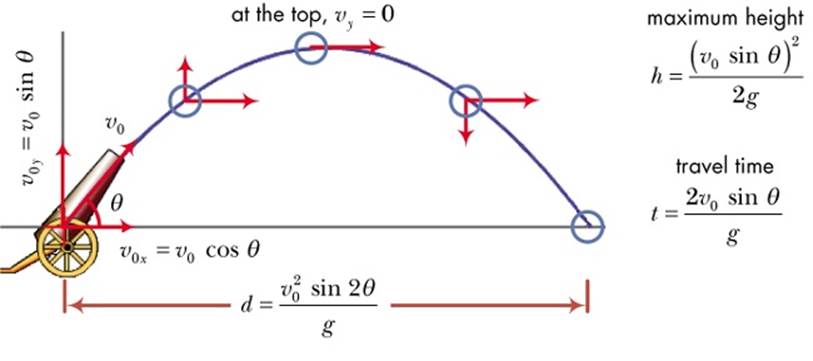
Figure 7-32. Parabolic trajectory of a ball
This information is all we need to realistically simulate the ball’s motion, so let’s create a Scratch program so we can see this bit of physics in action and deepen our understanding of trajectories. The user interface of the simulation is shown in Figure 7-33.
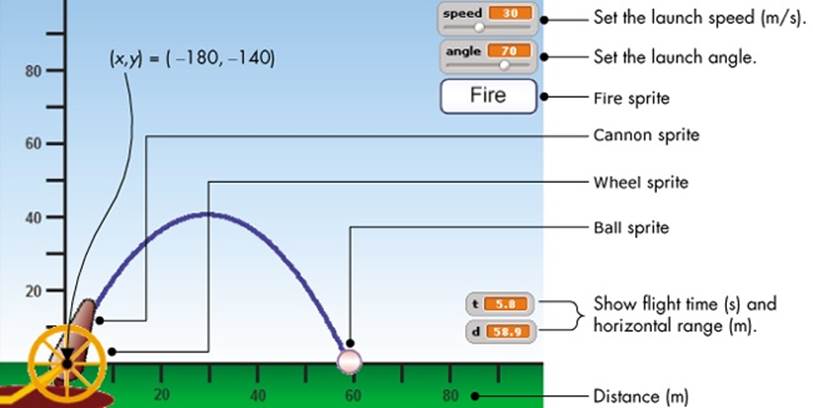
Figure 7-33. User interface for the projectile motion simulator
As shown, the application contains four sprites. The Wheel sprite provides a rotation shaft for the cannon, while the Cannon sprite, which rotates in accordance with the angle slider, provides a visual indication of the launch angle. The Fire sprite is a button that the user clicks to fire the ball, and the Ball sprite contains the main script for calculating the ball’s coordinates and drawing its trajectory. The user specifies the launch angle and the initial velocity using the two slider controls, then clicks the Fire button. The Ball starts from point (–180, –140) on the Stage and draws the parabolic trajectory for the specified parameters. The two monitors at the lower-right corner of the Stage show the flight time and the horizontal range during the flight.
The simulation starts when the green flag icon is clicked. The scripts for the Cannon sprite (not shown here) point the cannon in the direction specified by the angle slider control. The user can also specify the angle by clicking and dragging the cannon. When the user clicks the Fire button, it broadcasts a Fire message, which is received and processed by the Ball sprite via the script shown in Figure 7-34.
To prepare to fire ①, the Ball moves in front of the Cannon and the Wheel and positions itself at the launch point. It puts its pen down and clears all pen marks from the Stage. The script then calculates the horizontal (or x) and vertical (or y) components of the initial velocity (named vx andvy, respectively) and initializes the time variable (t) to 0.
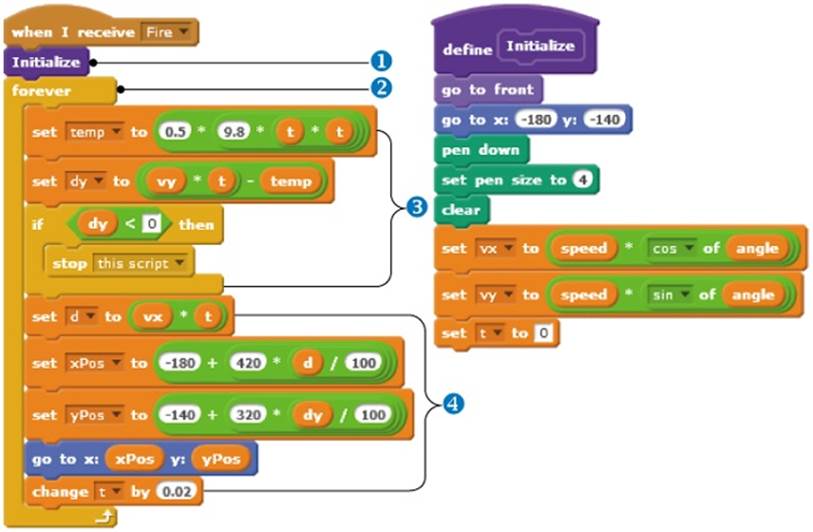
Figure 7-34. Script for the Ball sprite
The script then enters an infinite loop ②, which calculates and updates the ball’s position every 0.02 s. First, the vertical distance (dy) of the sprite is calculated ③. If the calculated value is negative, then the ball has reached ground level. When this happens, the stop this script command is called to end the simulation.
If dy is not negative, the horizontal distance (d) is calculated ④. The two distances (dy and d) are then scaled in accordance with the Stage’s backdrop. In the vertical direction, we have 320 steps (from –140 to 180) that correspond to 100 m, and in the horizontal direction, we have 420 steps (from –180 to 240) that correspond to 100 m. This means a vertical distance of dy meters is equivalent to 320 * dy / 100 steps, and a horizontal distance of d meters is equivalent to 420 * d / 100 steps. The x- and y-coordinates of the ball are updated, and the ball is moved to its current position on its trajectory. The time variable (t) is then incremented by a small amount (0.02 s in this case), and the loop is repeated to calculate the next position of the ball.
As an example, if the ball is projected with a 70° launch angle and an initial speed of 30 m/s, as shown in Figure 7-33, the total flight time is 5.75 s, and the range is 59 m. An examination of the monitors in Figure 7-33 shows that our simulation is very accurate. We could improve the simulation by updating our calculations more often (for example, every 0.01 s instead of every 0.02 s), but that would slow down the simulation. It’s necessary to adjust this parameter to achieve a good compromise between speed and accuracy.
TRY IT OUT 7-10
Open the application and run it to understand how it works. Then try converting this simulation into a game. You could, for example, show an object at a random height at the right edge of the stage and ask the player to try to hit it. If the player misses the target, the game can provide some hints on adjusting the firing angle and velocity.
Other Applications
The extra resources for this book (available at http://nostarch.com/learnscratch/) contain three more games that you can explore on your own, with full explanations of each script. The first is an educational game that can be used to test the counting skills of elementary students. It shows an amount of money in pennies and asks the player to find the smallest number of coins needed to get that amount.
MatchThat Amount.sb2
The second application is a planetary motion simulation for a simple solar system that contains a sun and a single planet. The third application is also a simulation, this one demonstrating the dynamics of motion as a single gas molecule collides with the walls of a container.
Orbit.sb2 Molecules InMotion.sb2
Open up these applications, run them, and read through my explanations to understand how they work. If you feel inspired to flex your programming muscles, try modifying the scripts to make them do new things!
Summary
In this chapter, we explored different ways to repeat commands in Scratch. We first examined the various loop blocks and explained the technical terms associated with them. Then, we discussed definite and indefinite loops and the difference between counter-controlled and condition-controlled loops. We explored the repeat until block and the forever if structure and used them in several examples. I also explained Scratch’s stop commands and how you can use them to stop infinite loops and procedures. From there, we went on to discuss using loops to validate data from user input.
You then learned how to use counters to keep track of how many iterations of a loop have passed and how to use counters with nested loops to create iterations in two or more dimensions. After that, we looked at recursion—a procedure calling itself—as another way to achieve repetition. In the last section, we developed several applications that tied these new concepts together to create practical programs.
The next chapter will expand on the topics you learned here and teach you how to use counters and loops to process strings and create a different class of interesting programs, such as a binary to decimal converter, a hangman game, and a math tutor for teaching fractions.
If you want to further explore the new concepts from this chapter, I suggest trying out some of the following problems.
Problems
|
Q: |
1. Create an input validation loop that only accepts numbers in the range of 1 through 10. |
|
Q: |
2. Write a script that asks the user, “Are you sure you want to quit [Y, N]?” The script then checks the user’s input and only accepts the letters Y and N as valid answers. |
|
Q: |
3. Write a program that calculates and displays the sum of all integers between 1 and 20. |
|
Q: |
4. Write a program that calculates and displays the sum of all odd integers between 1 and 20. |
|
Q: |
5. Write a program that displays the first 10 numbers in the following sequence (using the say command): 5, 9, 13, 17, 21, ....
|
|
Q: |
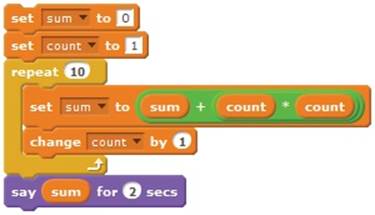
6. What does the script on the right do? Implement the script and run it to check your answer. |
|
Q: |
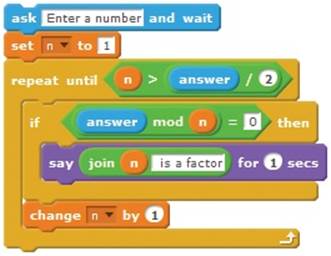
7. If the remainder of dividing a whole number (x) by another whole number (y) is 0, we say that y is a factor of x. For example, 1, 2, 4, and 8 are factors of 8. The script below finds and displays all the factors of a given number (other than the number itself). Study this script and explain how it works. What are the outputs of this script when the input numbers are 125, 324, and 419?
|
|
Q: |
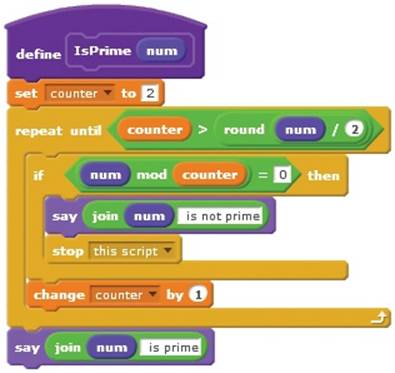
8. An integer is said to be prime if it is divisible by only 1 and itself. For example, 2, 3, 5, 7, 11 are prime numbers, but 4, 6, and 8 are not. The procedure on the next page tests whether a number is a prime number or not. Study this procedure and explain how it works. What are the outputs of this procedure for the inputs 127, 327, and 523?
|
|
Q: |
9. Although the procedure in problem 8 checks all integers up to one-half the input value, it is sufficient to set the upper limit to the square root of the input. Make this change to the procedure and test it to see if it still gives the same answers. |
|
Q: |
10. The sequence of numbers 0, 1, 1, 2, 3, 5, 8, 13, 21, 34 .... is called a Fibonacci series. The first two numbers in the series are 0 and 1. Each subsequent number is then calculated as the sum of the previous two. Write a program that calculates the nth term of the Fibonacci series, where n is entered by the user. |
|
Q: |
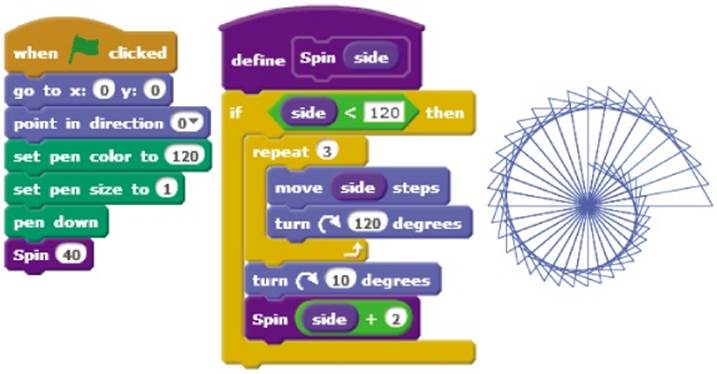
11. Consider the following program and its generated output. Re-create the program and run it to see how it works. Change the turn angle (from 10°) and the argument in the recursive call (to side + 1 or side + 3, and so on) to discover what else you can create.
|
All materials on the site are licensed Creative Commons Attribution-Sharealike 3.0 Unported CC BY-SA 3.0 & GNU Free Documentation License (GFDL)
If you are the copyright holder of any material contained on our site and intend to remove it, please contact our site administrator for approval.
© 2016-2026 All site design rights belong to S.Y.A.