SketchUp For Dummies (2017)
Part 4
Sharing What You’ve Made
Chapter 13
Exporting Images, Animations, and CAD Files
IN THIS CHAPTER
![]() Creating 2D views of your model as TIFFs, JPEGs, and PNGs
Creating 2D views of your model as TIFFs, JPEGs, and PNGs
![]() Exporting the kind of movie file you need
Exporting the kind of movie file you need
![]() Exporting a CAD-friendly DWG file
Exporting a CAD-friendly DWG file
Awesome 3D models need to be shared. The folks who create SketchUp understand this, and the software includes a multitude of ways to share your models with other people and programs. Want to send a JPEG of your newly modeled custom home to your parents? How about a movie that shows what it’s like to walk through that home? Need to turn your house model into a CAD-friendly DWG file for the builder? SketchUp can do all this and more.
SketchUp Make (the free version) can export raster images and movies. SketchUp Pro can export raster images and movies, along with vector images, CAD files, and a bunch of other 3D formats. This chapter covers the basics that most SketchUp Make or Pro beginners will need: common raster image formats, basic video formats, and CAD files.
Exporting 2D Images of Your Model
Both SketchUp Make and Pro can export 2D views of your model as raster images, which are images made of lots of tiny pixels. When you're exporting an image, it’s helpful to know a little bit about graphics file formats in general. If you’re already an aficionado about these sorts of things, or if you’re in a big hurry, you can skip ahead to the section “Exporting a raster image from SketchUp .”
 If you have SketchUp Pro, you also have LayOut, which offers a much better way to export images. In fact, LayOut may be able to replace whatever application is the reason you’re trying to export an image in the first place. Take a look at Chapter 14 for an introduction to LayOut.
Introducing raster versus vector files
Pictures on your computer are divided into two basic flavors: raster and vector. The difference between these two categories of file types has to do with how they store image information. Here’s the one-minute version:
· Raster: Raster images are made up of dots. (Technically, these dots are pixels, just like the pixels that make up images you take with a digital camera. ) Raster file formats consist of information about the location and color of each dot. When you export a raster, you decide how many dots (pixels) it should include, which directly affects how big the image can be displayed. SketchUp exports TIFF, JPEG, and PNG raster images; the Windows version also exports BMPs, although that’s nothing to get excited about. You can read more about raster images in the sidebar “Understanding rasters: Lots and lots of dots ,” later in this chapter.
· Vector: Vector images consist of instructions written as algorithms. These algorithms describe how to draw the image to whatever software tries to open it. The major advantage of using vector imagery (as opposed to raster) lies in its scalability — vectors can be resized larger or smaller without affecting their image quality, whereas rasters lose quality if you enlarge them too much.
 SketchUp Make can export only raster images, but SketchUp Pro can export vectors in both PDF and EPS file formats.
Exporting a raster image from SketchUp
The process of exporting an image of your SketchUp model is fairly straightforward. Depending on which format you choose, the export options are slightly different, but we address them all in this section.
Follow these steps to export a raster image from SketchUp:
1. Adjust your model view until you see exactly what you want to export as an image file.
SketchUp’s raster image export is WYSIWYG — What You See Is What You Get. Basically, your entire modeling window view is exported as an image, so use the navigation tools or click a scene to set up your view. Use styles, shadows, and fog to make your model look exactly the way you want it to. To change the proportions of your image, resize your SketchUp window. Follow these steps to do so:
1. Windows only: If your SketchUp window is full screen, click the Minimize button in its upper-right corner.
2. Drag the Resize tab in the lower-right corner of your SketchUp window until the modeling window is the right proportion.
In Figure 13-1 , we want to export a wide view of a house, so we adjust the proportions of the modeling window until things look right.
You may be wondering whether everything in your modeling window shows up in an exported raster image. The red, green, and blue axes don’t, which is good, but guides do, which is usually bad. If you don’t want your guides to be visible in your exported image, deselect Guides on the View menu.
2. Choose File ⇒ Export ⇒ 2D Graphic.
The File Export dialog box opens.
3. Select the file format you want to use from the Format drop-down list.
Before you choose JPEG by default, know that this file type isn’t always the best choice. For a complete description of each format (as well as recommendations for when to choose each), see the section “Looking at SketchUp’s raster formats ,” later in this chapter.
4. Choose a name and a location on your computer for your exported image.
5. Click the Options button.
The Export Options dialog box opens, where you can control how your image is exported. Figure 13-2 shows what this dialog box looks like for each of SketchUp’s raster file formats.
6. Adjust the settings in the Export Options dialog box.
Here’s a description of what the settings do:
o Use View Size: Selecting this check box tells SketchUp to export an image file that contains the same number of pixels as are currently being used to display your model on-screen. If you plan to use your exported image in an e-mail or on-screen presentation (such as PowerPoint), you can select Use View Size. However, manually setting the width and height is better.
o Width and Height: When you don’t select the Use View Size check box, you can manually enter the size of your exported image. Because this process requires a fair amount of figuring, we devote a whole section to it; take a look at “Making sure you export enough pixels ,” later in this chapter, to find out what to type into the Width and Height boxes.
o Anti-Alias: Because raster images use grids of colored squares to draw pictures, diagonal lines and edges can sometimes look jagged and, well … lousy. Anti-aliasing fills in the gaps around pixels with similar-colored pixels so that things look smooth. Figure 13-3 illustrates the concept. In general, you want to leave anti-aliasing on.
o Resolution (Mac only): This is where you tell SketchUp how big each pixel should be, and therefore how big (in inches or centimeters) your exported image should be. Pixel size is expressed in terms of pixels per inch/centimeter. This option is available only when the Use View Size check box isn’t selected. See “Making sure you export enough pixels ,” later in this chapter for help choosing a resolution.
o Transparent Background (not for JPEGs): You can export a TIFF or PNG file with a transparent background, which can make selecting your model in an image editor easier. Exporting your image with a transparent background is also a nice way to use image-editing programs like Photoshop to drop in a sky and ground plane later.
o JPEG Compression (JPEG only): This slider lets you decide two things at the same time: the file size of your exported image and how good the image will look. The two are, of course, inversely related; the farther to the left you move the slider, the smaller your file will be, but the worse it will look. Never set JPEG compression to less than 8 — your models take too long to build for you to make them look terrible on export.
7. Click OK to close the Export Options dialog box.
8. Back in the File Export dialog box, click the Export button to export your raster image file.
You can find your exported file in whatever location on your computer you specified in Step 4. What you do with it is entirely up to you — you can e-mail it, print it, or use it in another software program to create a presentation.
Don’t be alarmed if the export process takes longer than you think it should. If you export a pretty big image (one with lots and lots of pixels), the export takes a while. Take the opportunity to call your mother — she’ll appreciate it.
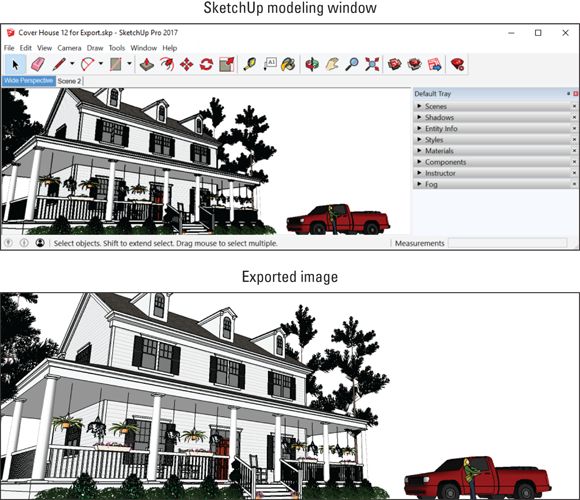
FIGURE 13-1: Adjust your view and your modeling window until things look the way you want them to in your exported image.
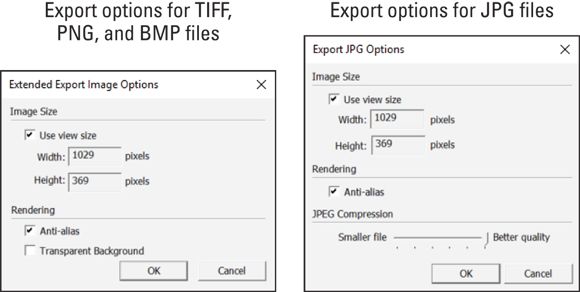
FIGURE 13-2: The Export Options dialog boxes for TIFFs, PNGs, and BMPs (left) and JPEGs.

FIGURE 13-3: A view of the same image with anti-aliasing off (left) and on.
UNDERSTANDING RASTERS: LOTS AND LOTS OF DOTS
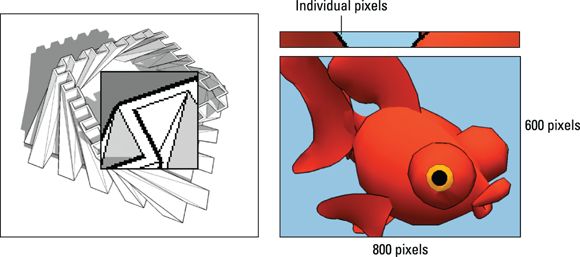
When you look at a photograph on your computer, you’re really looking at a whole bunch of tiny dots of color, or pixels. These are arranged in a rectangular grid called a raster. Digital images that are composed of pixels arranged in a raster grid are raster images, or rasters for short. Have a look at the first image in the figure below for a close-up view of a raster image. Here are some things to keep in mind about rasters:
· Rasters are everywhere. Almost every digital image you’ve ever seen is a raster. TIFF, JPEG, and PNG are three of the most common raster file formats, and SketchUp exports them all.
· Rasters are flexible. Every two-dimensional image can be displayed as a raster; a grid of colored squares is an incredibly effective way of saving and sharing picture information. As long as you have enough pixels, any image can look good as a raster.
· Rasters take up a lot of space. If you think about how raster images work, it takes a lot of information to describe a picture. Digital images are made up of anywhere from thousands to millions of pixels, and each pixel can be any one of millions of colors. To store a whole picture, a raster image file needs to include the location and color of each pixel; the bigger the picture is, the more pixels are needed to describe it, and the bigger the file size gets.
· Rasters are measured in pixels. Because every raster image is made up of a specific number of pixels, you use a raster’s pixel dimensions to describe its size. If we told you that we e-mailed you a photograph that was 800 x 600, you could expect to receive a picture that is 800 pixels wide by 600 pixels tall. (See the following figure.) Pixels don’t have a physical size on their own — they’re just dots of color. You determine a picture’s physical size by deciding how big its pixels should be; this is referred to as resolution and is generally expressed in terms of pixels per inch (ppi). Check out the section “Making sure you export enough pixels ,” later in this chapter, for the whole scoop.
Why use pixels instead of inches or centimeters to describe the size of a digital image? It all has to do with how computer screens work. Because not all screens display things at the same size, it’s impossible to predict how big an image will look when it shows up on someone’s computer. Depending on the person’s display settings, an 800-x-600-pixel image may be a few inches across, or it may take up the whole screen. Giving a digital image’s dimensions in pixels is the only accurate way of describing how “big” it is.
Looking at SketchUp’s raster formats
So you know you need to export a raster image from SketchUp, but which one do you choose? You have four choices in Windows; three of them are available on the Mac. The following sections give you the details.
 When you export a raster image, you’re saving your current view in SketchUp to a separate file somewhere on your computer. As a raster image, that file consists of tiny, colored dots, or pixels — more pixels than you can shake a stick at. When you look at all the pixels together, they form an image.
Tagged Image File (TIFF or TIF)
TIFFs are the stalwarts of the raster image file format world; everyone can read them and just about everyone can create them. TIFF stands for Tagged Image File Format, but that’s hardly important. Here’s everything you need to know about TIFFs:
· When image quality is important, choose TIFF. Unless file size is a concern (because, for example, you need to send an image by e-mail), always export a TIFF if you need a raster image. For everything from working in Photoshop to creating a layout in InDesign or QuarkXPress, a TIFF can provide the image quality you need.
· TIFFs don’t compress your image data. That means they don’t introduce any garbage like JPEGs do, but it also means that they’re really big files.
· Pay attention to your pixel count. If you’re exporting a TIFF, you’re probably looking for the best image quality you can get. And if that’s the case, you need to make sure that your TIFF is “big” enough — that it includes enough pixels — to display at the size you need. Have a look at “Making sure you export enough pixels ,” later in this chapter, for more information.
Joint Photographic Experts Group (JPEG or JPG)
JPEG stands for Joint Photographic Experts Group, which makes it sound much fancier than it really is. Almost every digital image you’ve ever seen was a JPEG (pronounced JAY-peg ); it’s the standard file format for images on the web. Check out these JPEG details:
· When file size is a concern, choose JPEG. The whole point of the JPEG file format is to compress raster images to manageable file sizes so that they can be e-mailed and put on websites. A JPEG is a fraction of the size of a TIFF file with the same number of pixels, so JPEG is a great choice if file size is more important to you than image quality.
· JPEGs compress file size by degrading image quality. This is known as lossy compression; JPEG technology basically works by tossing out a lot of the pixels in your image. JPEGs also introduce a fair amount of pixel garbage; these smudges are artifacts, and they’re awful.
·  JPEG + SketchUp = Danger. Because of the way the JPEG file format works, JPEG exports from SketchUp are particularly susceptible to looking terrible. Images from SketchUp usually include straight lines and broad areas of color, both of which JPEG has a hard time handling. If you’re going to export a JPEG from SketchUp, make sure that the JPEG Compression slider is never set less than 8. For more details, see the section “Exporting a raster image from SketchUp ,” earlier in this chapter.
Portable Network Graphics (PNG)
Hooray for PNG! Pronounced ping, this graphics file format is our hero. Unfortunately, it isn’t as widely used as it should be. If we had our druthers, every raster export from SketchUp would be a PNG. Why? Because, at least as far as SketchUp is concerned, PNG combines all the best features of TIFF and JPEG. PNG details are as follows:
· PNGs compress image data without affecting image quality. As a lossless compression technology, PNGs are smaller files than TIFFs (just like JPEGs), but they don’t mess up any pixels (totally unlike JPEGs). Granted, PNGs aren’t as small as JPEGs, but the difference in image quality is worth a few extra bits.
· If you’re exporting an image for someone who knows a thing or two about computers, choose PNG. The truth is that some software doesn’t know what to do with a PNG, so using it involves a risk. If you plan to send your exported image to someone who knows what he’s doing, go ahead and send a PNG — he’ll be impressed that you’re “in the know.” If the recipient of your export is less technologically sophisticated, a JPEG or TIFF file may be a safer choice.
The PNG file format wasn’t developed to replace JPEG or TIFF; it was supposed to stand in for GIF (Graphics Interchange Format), which is a file type that SketchUp doesn’t export. Without going into too much detail, folks use JPEG for images like photographs and GIF for things like logos. Because exported SketchUp views usually have more in common with the latter, PNG (the replacement for GIF) is the better choice. So why can’t PNG replace JPEG and TIFF? For most photographs (which are the majority of images on the web), JPEG is better than PNG because it produces smaller files, which in turn yields faster load times when you’re surfing the Internet. TIFF is more versatile than PNG because it supports different color spaces, which are important to people in the printing industry. For reasons that are beyond the scope of this book and that aren't relevant to exports from SketchUp, PNG is still the best — if not the safest — choice.
Windows Bitmap (BMP)
Windows Bitmap, or BMP, files are old school; they can be used only on Windows, and they’re big. If a BMP were a car, it would be an old van with a rusted-out floor. As you can probably guess, we don’t recommend using BMPs for anything.
Making sure you export enough pixels
With raster images, it’s all about pixels. The more pixels your image has, the sharper the image is, and the bigger it can be displayed or printed. Figure 13-4 shows the same image three times. The first image is 150 x 50, meaning that it’s 150 pixels wide by 50 pixels high. The second image is 300 x 100, and the third is 900 x 300. Notice how the image with more pixels looks a lot better? That’s the whole point of this section.
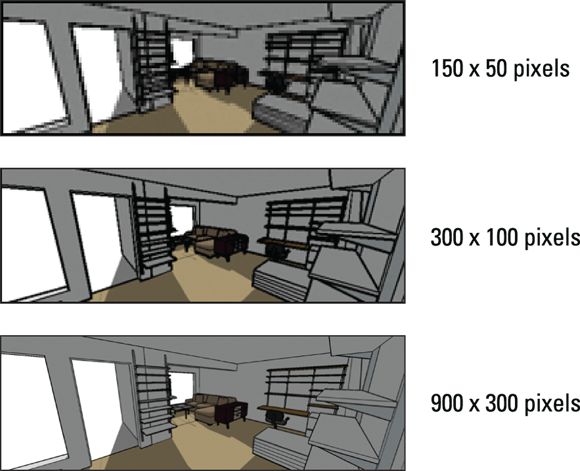
FIGURE 13-4: More pixels yield a much more detailed image.
Why not always export a truckload of pixels, just in case you need them? There are two reasons:
· Image exports with lots of pixels take a long time to process.
· Raster images are very big files. If you want to share an image digitally via e-mail or the web, you want enough pixels to make the image look good on-screen but not so many that your recipient acquires a few gray hairs or gums up their Internet connection trying to download the image.
How many pixels you need to export depends on what you’re going to use the image for. Very broadly, you can do two things with your image:
· Display or project it on a screen, digitally.
· Print it.
In the next two sections, we talk about each of these possibilities in detail.
Exporting enough pixels for a digital presentation
If you plan to use your exported image as part of an on-screen presentation, it’s helpful to know what computer monitors and digital projectors can display:
· The smallest, oldest devices currently in use have images that are 1024 pixels wide by 768 pixels high.
· At the other end of the spectrum, high-end, 30-inch LCD monitors display 2560 x 1600 pixels.
So it stands to reason that if you’re exporting an image that will be viewed only on-screen, you need to create an image that’s somewhere between 800 and 2500 pixels wide. Table 13-1 provides some guidelines on image sizes for different digital applications.
TABLE 13-1 Suggested Image Sizes for On-screen Use
|
How the Image Will Be Used |
Image Width (Pixels) |
|
|
400 to 800 |
|
Website, large image |
600 |
|
Website, small image |
200 |
|
PowerPoint presentation (full screen) |
800 or 1024 (depends on projector) |
|
PowerPoint presentation (floating image) |
400 |
Understanding resolution: Exporting images for print
Images that you want to print need to have lots more pixels than ones that are going to display only on-screen. That’s because printers — photo, inkjet, laser, and offset — all operate very differently than computer monitors and digital projectors. When you print something, the pixels in your image turn into microscopic specks of ink or toner. To make a decent-sized print of your exported image, it needs to contain enough pixels per inch of image. An image’s pixel density, expressed in pixels per inch (ppi), is its resolution. What kind of resolution you need depends on three things:
· The kind of device you print to: For home inkjet printers, you can get away with a resolution of as little as 150 ppi. If your image will be appearing in a commercially produced book, you need a resolution of at least 300 ppi.
· How far away the image will be from the audience: There’s a big difference between a magazine page and a trade-show banner. For close-up applications, a resolution of 200 to 300 ppi is appropriate. Large graphics that will be viewed from several feet away can be as low as 60 ppi.
· The subject matter of the image: Photographic images tend to consist of areas of color that blur together a bit; these kinds of images can tolerate being printed at lower resolutions than drawings with lots of intricate detail. For images with lots of lines like SketchUp models, it’s best to work with very high resolutions — 300 to 600 ppi — especially if the image will be viewed close-up.
Table 13-2 provides some guidelines for exporting images that will be printed.
TABLE 13-2 Recommended Resolutions for Prints
|
How the Image Will Be Used |
Image Resolution (Pixels/Inch) |
Image Resolution (Pixels/Centimeter) |
|
8.5-x-11 or 11-x-17 inkjet or laser print |
200 to 300 |
80 to 120 |
|
Color brochure or pamphlet |
300 |
120 |
|
Magazine or book (color and shadows) |
300 |
120 |
|
Magazine or book (linework only) |
450 to 600 |
180 to 240 |
|
Presentation board |
150 to 200 |
60 to 80 |
|
Banner |
60 to 100 |
24 to 40 |
Keep in mind that the biggest raster image that SketchUp can export is 10,000 pixels wide or tall (whichever is greater). This means that the largest banner image, printed at 100 ppi, that SketchUp can create is about 100 inches wide. To make larger images, you need to export a vector file, which requires SketchUp Pro and is beyond the scope of this book.
Follow these steps to make sure that you export enough pixels to print your image properly:
1. In the Export Options dialog box, make sure that the Use View Size check box is deselected.
To get to the Export Options dialog box, follow Steps 1-6 in the section “Exporting a raster image from SketchUp ,” earlier in this chapter.
2. Decide on the resolution that you need for your exported image. (Refer to Table 13-2 .)
Keep the resolution in your head or scribble it on a piece of paper.
3. Decide how big your exported image will be printed, in inches or centimeters.
Note your desired physical image size, just like you did with the resolution in the preceding step.
4. Multiply your resolution from Step 2 by your image size from Step 3 to get the number of pixels you need to export:
Resolution (pixels/in or cm) × Size (in or cm) = Number of pixels
In other words, if you know what resolution you need to export, and you know how big your image will be printed, you can multiply the two numbers to get the number of pixels you need. Here’s an example: 300 pixels/inch × 8 inches wide = 2400 pixels wide.
To export an image that can be printed 8 inches wide at 300 ppi, you need to export an image that’s 2400 pixels wide. Figure 13-5 gives an illustration of this example.
SketchUp’s default setting is to make your exported image match the proportions of your modeling window; that is, you can type only a width or a height, but not both. If you’re on a Mac, you can manually enter both dimensions by clicking Unlink (which looks like a chain). You can always click it again to relink the width and height dimensions later.
5. Type the width or height of the image you want to export, in pixels.
It’s usually pretty hard to know exactly how big your image will be when it’s printed, and even if you do, you probably want to leave some room for cropping. For these reasons, you might add 15-25 percent to the number of pixels you'll need. For example, if an image calls for 2400 pixels, you might export 3000 pixels, just to be safe.
If you’re on a Mac, things are a little easier because SketchUp’s designers built a pixel calculator into the Export Options dialog box. Just enter your desired resolution in the appropriate spot, change the Width and Height units from pixels to inches or centimeters, and type your desired image size. SketchUp does the arithmetic for you.
6. Click OK to close the Export Options dialog box.
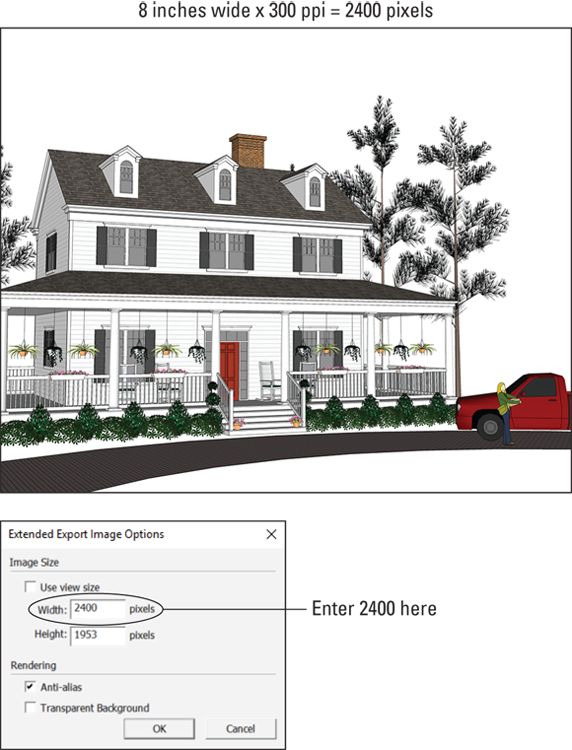
FIGURE 13-5: To figure out how many pixels you need to export, multiply the resolution by the physical size.
Making Movies with Animation Export
When it comes to having nerdy fun, exporting movie animations of your SketchUp models is right up there with Pokémon GO and store-bought fireworks. Like both these things, what’s so great about animation export is how easy it is to do.
That’s not to say that animation and digital video are simple topics — they’re not. It’d take a freight elevator to move the books that have been written about working with video on the computer, but in this section, we keep it simple. What you find here is only what you need to know in order to export an animation of a 3D SketchUp model.
Getting ready for prime time
The key to exporting animations of your SketchUp models is using scenes; if you haven’t read it already, now’s the time to check out Chapter 11 . Scenes are saved views of your model that you can arrange in any order you want. When you export an animation, SketchUp strings together the scenes in your model to create a movie file that can be played on just about any computer made in the last several years.
Follow these steps to get your model ready to export as an animation:
1. Create scenes (as described in Chapter 11 ) to build the “skeleton” of your animation.
2. To adjust the animation settings in the Model Info dialog box, choose Window ⇒ Model Info and then select the Animation panel.
Chapter 11 explains all the controls; see the section about moving from scene to scene.
3. Select the Enable Scene Transitions check box to tell SketchUp to move smoothly from one scene to the next.
4. Enter a transition time to tell SketchUp how long to spend moving between scenes.
If your Scene Delay is 0 (below), you can multiply your transition time by your number of scenes to figure out how long your exported animation will be.
5. Enter a scene delay time to pause at each scene before moving on to the next one.
If you plan to talk about each scene, use the scene delay time to pause before each one. If your animation is supposed to be a smooth walkthrough or flyover, set this to 0.
6. Adjust the proportions of your modeling window to approximate the proportions of your movie.
Unlike SketchUp’s 2D export formats, the proportions of your exported movie don’t depend on those of your modeling window; that is to say, making your modeling window long and skinny won’t result in a long and skinny movie. You choose how many pixels wide and tall you want your movie to be, so to get an idea of how much you’ll be able to see, make your modeling window match the proportions of your exported file. (The 16:9 aspect ratio is common for video formats.) Have a look at Step 1 in the section “Exporting a raster image from SketchUp ,” earlier in this chapter, for guidance on adjusting your modeling window.
7. When your project is ready to go, move on to the next section to export your animation.
Exporting a movie
SketchUp offers a veritable alphabet soup of video export formats: You can choose from seven on Windows and six on Mac. The list can seem daunting, so here’s a cheat sheet that should save you some mental anguish:
· H.264 (.mp4): This video format is as close to an industry standard as it gets. Everyone with a Mac and anyone with QuickTime on her Windows computer can readily view H.264 movies without any hassle. It’s also the upload format of choice for popular video-sharing websites like YouTube and Vimeo. SketchUp’s exported H.264 files are nicely compressed, which keeps them smallish and good-looking.
· AVI (.avi): All Windows machines and Macs with a special plugin can play AVI movies. Popular video-sharing websites like YouTube and Vimeo let you upload AVI files, but they tend to prefer H.264. SketchUp’s exported AVI animations are uncompressed, meaning that they look nice and clean but the files can get huge quickly. If you’re planning to send someone your movie file, AVI might not be your best choice.
· VP8 (.webm): Not too many years ago, the tech world started getting nervous about H.264’s dominance as a file format used to display video on websites. H.264 is proprietary, meaning that big companies have to pay licensing fees to its owner (Apple) if they want to use it. WebM is a free alternative, backed by Google, and made for use on websites that use HTML5. Translation: You don’t need to worry about WebM unless you’re planning to embed your movie on a modern website without first uploading it to YouTube or Vimeo.
· Theora (.ogv): Theora is another free, open source format meant for videos that will be embedded on websites. Unlike WebM, Theora is managed by an independent foundation that tries to keep important multimedia file formats out of the hands of big, private corporations like Apple (H.264) and Google (WebM).
· JPEG, PNG and TIFF: Choosing to export in any of these formats won’t give you a movie file that you can watch — they aren’t video file formats. Instead, you’ll get a pile of image files that each represent one frame in your animation; for a 3-second video at 30 frames per second, SketchUp would export 90 individual images. These options are useful for serious video editors who need lots of control, but most folks shouldn’t need to use them.
Although exporting animations in SketchUp is a pretty simple operation, figuring out how to set all the animation export controls can seem like landing the space shuttle.
Follow these steps to export a movie file from SketchUp:
1. Prepare your model for export as an animation.
See the section “Getting ready for prime time ,” earlier in this chapter, for a list of things you need to do before you export an animation.
2. Choose File ⇒ Export ⇒ Animation ⇒ Video.
Choosing Video provides you with file formats that yield video files. If you pick Image Set instead, you’ll see options for creating sets of still images. We explain the difference between these a little later on in this section. If you’re on a Mac, there’s no bifurcation of the Animation submenu; just choose File ⇒ Export ⇒ Animation, and you see all your format choices.
3. Give your movie file a name and then choose where to save it on your computer system.
4. Make sure that the correct file format is selected.
From the Format drop-down list, select the file format you want SketchUp to export. In most cases, this is either H.264 or AVI, but take a look at the descriptions earlier in this section for more detailed info.
5. Click the Options button to open the Animation Export Options dialog box.
6. Adjust the settings for the type of animation you want to export. (See Figure 13-6 .)
How you set up everything in this dialog box depends on how you plan to use the animation you create. Check out the next section in this chapter for a list of settings and their implications.
7. Click OK in the Export Options dialog box.
You return to the Animation Export dialog box.
8. Check to make sure that everything looks right and then click the Export button.
Because exporting an animation takes a while, it pays to double-check your settings before you click the Export button. When the export is complete, you can find your animation file in the location you specified in Step 3. Double-clicking the file causes it to open in whatever movie-playing software you have that can read it.
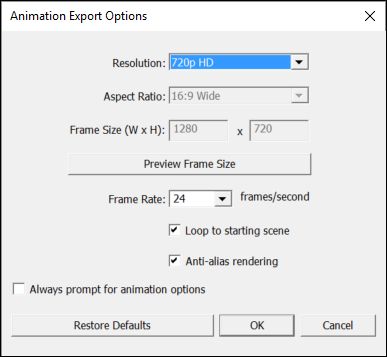
FIGURE 13-6: The Animation Export Options dialog box.
Figuring out the Animation Export Options settings
As we say earlier, digital video can be complicated. Lucky for you, you don’t really have to know exactly what everything means to export the right kind of movie; you just have to know how to set up everything. The Animation Export Options dialog box (shown in Figure 13-6 ) is the same for each of the video file formats that SketchUp offers; here’s a brief guide to the settings:
· Resolution: This use of the word resolution refers to the pixel dimensions — the physical size — of your video. SketchUp Make (the free version) lets you choose from three standard sizes, whereas SketchUp Pro provides a Custom option for more flexibility. Here’s what the terms mean:
o 1080p Full HD yields a video that is 1920 pixels wide and 1080 pixels high. This is the highest resolution that most newer televisions can display, and it’s even higher than a lot of laptops can handle natively. Choose this option only if you know you’ll need it; exporting this many pixels takes a long time.
o 720p HD, which is 1280 pixels wide by 720 pixels high, is the most common resolution for high-quality exported video. This size looks good on computer screens and televisions, and it’s the recommended upload resolution for YouTube and Vimeo. Chances are good that this is the resolution for you.
o 480p SD, at only 854 pixels wide by 480 pixels high, will probably look small on most computer screens. This is the resolution used for DVDs, which every 16-year-old knows are weird artifacts from the distant past. (Aidan has a huge collection, unfortunately.) Use 480p if file size is a concern.
o Custom is available only if you’re using the Pro version of SketchUp. Choosing this option “unlocks” settings for Aspect Ratio and Frame Size, which we describe later in this list.
· Aspect Ratio: This refers to the proportions of your video frame; the first name refers to the width and the second to the height. Common aspect ratios for film and video are 16:9 (which is wide) and 4:3 (which is more square). If you’re using SketchUp Pro, you can choose Custom and put whatever you want into the Frame Size fields below this setting.
· Frame Size: Pro users can pick their own video frame dimensions. Go nuts, big spender.
· Preview Frame Size: This is actually an incredibly handy button. Click it to see a green box preview of how big your video will look on your screen. Click the preview to make it go away when you’re done.
· Frame Rate: Different video technologies use different frame rates. Using more frames/second (fps) results in smoother motion but bigger files and longer processing times. Generally speaking, 30 fps is a good sweet spot. If you’re worried about big files, try 15 fps and see how that looks.
· Restore Defaults: Replaces your hard drive’s contents with a looping, 8-second video montage of Keanu Reaves’s greatest cinematic moments. Just making sure you’re still paying attention — this button puts everything in Export Options back the way it was before you started messing around.
· Loop to Starting Scene: Automatically ends your video on the scene you started with, rather than the last scene in the sequence. This option is handy if you want your movie to end exactly how it started.
· Anti-alias Rendering: Choosing this doubles the amount of time it takes for your animation to export, but it makes your edges look much smoother in the final movie. You’ll almost certainly want to select this option.
· Transparent Background (Mac only): If you’re planning to use your exported movie with advanced video editing software, this is something that might interest you. Otherwise, you should probably leave this option deselected.
· Always Prompt for Animation Options (Windows only): Select this to force SketchUp to show you the Animation Export Options dialog box every time you export a movie.
Exporting a CAD File
AutoCAD and other CAD-based software are popular among architects, engineers, and anyone who needs to build or make super-precise stuff. Although some professionals have totally replaced AutoCAD-based workflows with SketchUp and LayOut, others still use AutoCAD.
If you ever need to export a SketchUp model to a DWG file that works with CAD-based software, SketchUp Pro has the inner workings to translate your SKP file into a DWG file. (You cannot export a CAD file from SketchUp Make; you have to plunk down the money for Pro.) Because the SKP-to-DWG process is fairly advanced, this section mostly gives you a high-level overview of the export process so that you have a basic understanding of how it works.
Preparing your file
First, a few tasks can produce a cleaner exported file. Here's how to prepare your file before you export it as a DWG file:
· Check your units. If the unit format (inches or decimals, for example) of your SketchUp file matches the desired units for the DWG file, the export process goes much more smoothly. To check your model's units, choose Window ⇒ Model Info and select the Units pane on the left.
· Turn off problematic styles. Line styles that use endpoints or extensions don't always translate well in the export process. If you have problems with endpoints or extensions in you exported file, try turning them off. You turn off the line styles on the Edit tab of the Styles panel. See Chapter 10 for details.
· Set your view. If you're exporting a 2D DWG file, you're likely exporting a floor plan that may need to reflect a specific scale. If that's the case, make sure the model is in Parallel Projection view (choose Camera ⇒ Parallel Projection) and uses one of the standard views, such as Top or Front. (Any standard view but Iso is okay.)
Keep in mind that SketchUp layers may not translate directly to CAD layers.
Exporting a 2D DWG file
To export a SketchUp model as a 2D CAD file, follow these steps:
1. Prepare your file, as explained in the preceding section.
We don't want you to miss those tips.
2. Choose File ⇒ Export ⇒ 2D Graphic.
3. In the export dialog box that appears, choose to export your file as a DWG file. Then click the Options button.
4. Choose your desired options.
The Drawing Scale and Size section enables you to choose scale options. If your model uses profile lines (See Chapter 10 ), then you can select options here that export the profile lines as CAD polylines and customize the line width if you like. The Separate on a Layer check box, when selected, places profile lines or section cut lines on a separate layer.
5. Click OK in the Export Options dialog box. Then click the Export button.
Depending on how big your SketchUp file is, this process can take a while.
Exporting a 3D DWG file
When you export a SketchUp file to 3D DWG file, you can select what entities you want to export. For example, you may want to export only edges and leave out faces, dimensions, and text. Follow these steps to export your SketchUp model to a 3D DWG file:
1. Remember to prepare your file, as explained at the beginning of this section.
2. Choose File ⇒ Export ⇒ 3D Model.
3. In the Export Model dialog box that appears, select the DWG file type.
4. Click the Options button to select what entities you want to export. When you're done, click OK.
5. Click the Export button.
SketchUp's gears start converting your file into a CAD-friendly format.