Programming Google App Engine with Python (2015)
Chapter 10. Datastore Administration
Your data is the heart of your application, so you’ll want to take good care of it. You’ll want to watch it, and understand how it grows and how it affects your app’s behavior. You’ll want to help it evolve as your app’s functionality changes. You may even want up-to-date information about data types and sizes. And you’ll want to poke at it, and prod it into shape using tools not necessarily built into your app.
App Engine provides a variety of administrative tools for learning about, testing, protecting, and fixing your datastore data. In this chapter, we look at a few of these tools, and their associated best practices.
Inspecting the Datastore
The first thing you might want to do with your app’s datastore is see what’s in it. Your app provides a natural barrier between you and how your data is stored physically in the datastore, so many data troubleshooting sessions start with pulling back the covers and seeing what’s there.
In the Storage section of the Cloud Console is a set of panels for Cloud Datastore (Figure 10-1). This is your main view of your project’s datastore entities. The Dashboard summarizes how your storage space is used, including space for entities and their properties, as well as space for built-in and custom (composite) indexes. Select a kind from the drop-down menu to see a breakdown by named property.
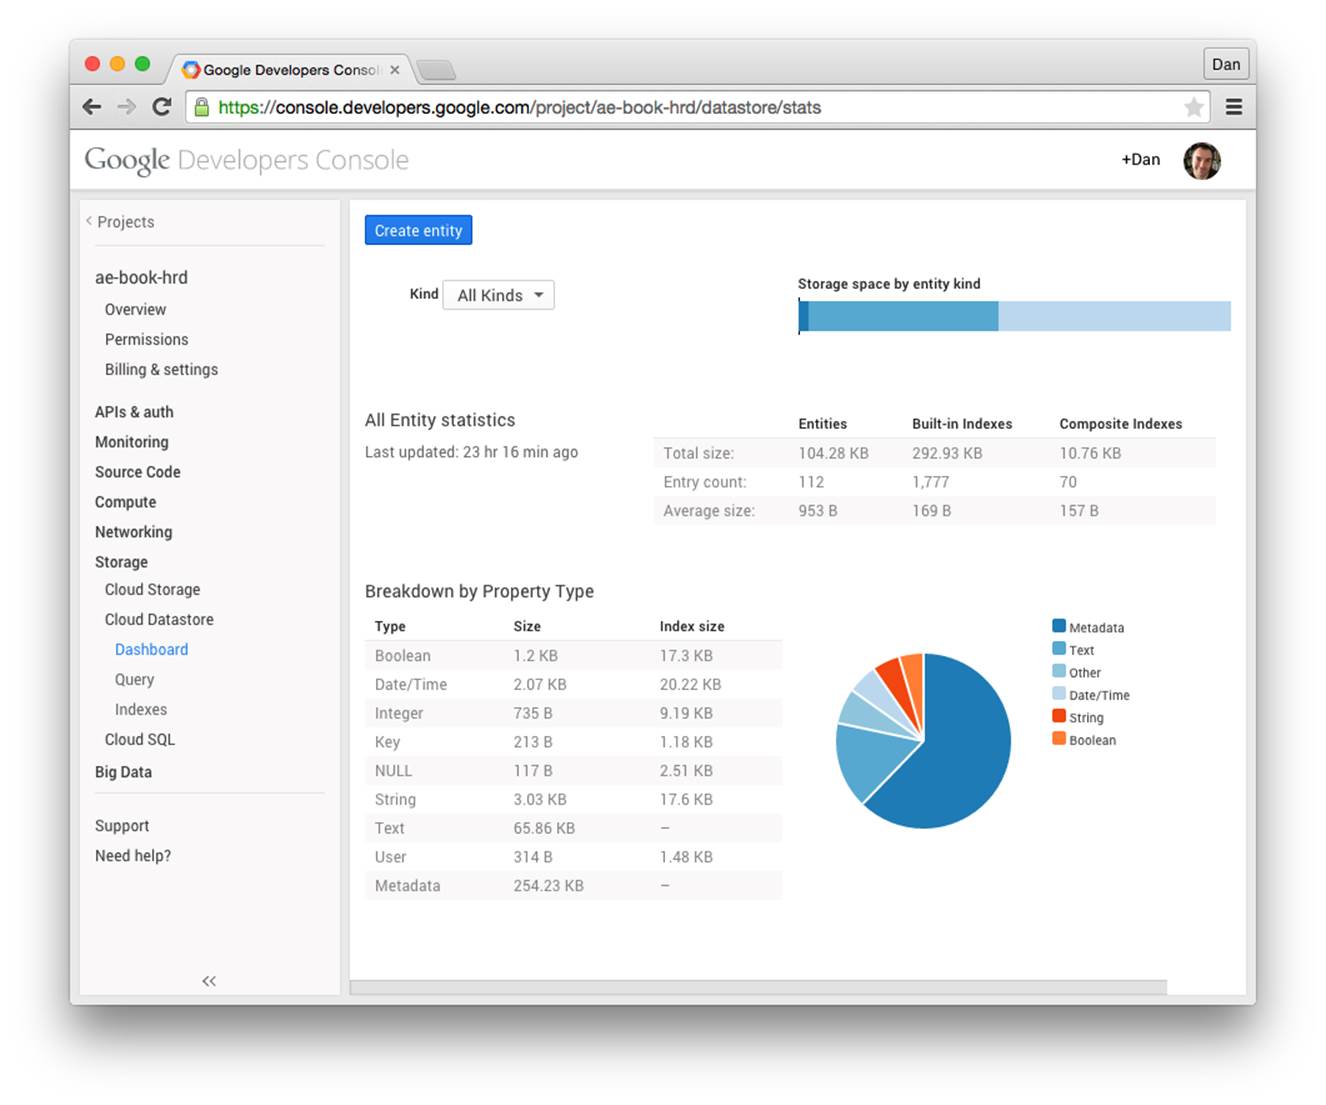
Figure 10-1. The Cloud Datastore Dashboard in the Cloud Console
In the Query panel, you can browse entities by kind. You can also apply query filters to this view by clicking the Filters button. The panel knows the names of all of the indexed properties of entities of the given kind, making it easy to compose queries on existing properties.
From any of these panels, you can click the Create Entity button to create a new entity. You can pick from a list of existing kinds, and property names and types known to be used with existing entities will appear automatically. You can also create an entity of a new kind, and add and remove arbitrary properties. Currently, only simple keys (without ancestors) are supported for entities created via the Console.
When browsing entities in the Query panel, you can click on the key of an entity to view its properties in more detail. You can also edit the properties in this view, within the limitations of the Console’s property editor.
The property value types supported by the Console for property editing and query filters include the following:
A date and time
You enter a date and time into the form field using the format YYYY-MM-DD HH:MM:SS, such as 2014-12-31 23:59:59. As with storing datetime values in general, there is no time zone component.
A string
Note that string values in the form field have leading and trailing spaces truncated, and there is no way to specify a value with leading or trailing spaces.
A number
The datastore treats integers and floating-point values as distinct types. In these panels, a number value containing a decimal point (5.0) is interpreted as a floating-point value. Without the point (5), it’s an integer.
A Boolean value
Here, the panel helps you out and displays a drop-down menu for the value (either true or false).
A Google user
The value is the current email address of the corresponding account, whether an account for that address exists or not.
A datastore key
A key value is a sequence of kind/ID pairs, with single quotes around kinds and string IDs, wrapped in a Key(…) specifier. For example: Key('MessageBoard', 'The_Archonville_Times', 'Message', 12345)
Currently, the Console does not support null values and geographical point values in the property editor and query composer. It also doesn’t support multivalued properties. You also cannot create or edit blob values (unindexed binary values) with this interface.
The datastore panels are useful for inspecting entities and troubleshooting data issues, and may be sufficient for administrative purposes with simple data structures. However, you will probably want to build a custom administrative panel for browsing app-specific data structures and performing common administrative tasks.
TIP
Applying filters in the Query panel performs a datastore query just as your application does. These filters are subject to the same restrictions, and use the same indexes as the app. If a set of filters requires a custom index (such as inequality filters on two distinct properties), that index must already be in the app’s deployed index configuration to support querying with those filters from the Console. See Chapter 7.
Managing Indexes
When you upload the datastore index configuration for an app, the datastore begins building indexes that appear in the configuration but do not yet exist. This process is not instantaneous, and may take many minutes for new indexes that contain many rows. The datastore needs time to crawl all the entities to build the new indexes.
You can check on the build status of new indexes using the Cloud Console, in the Indexes section. An index being built appears with a status of “Building.” When it is ready, the status changes to “Serving.” Figure 10-2 shows a simple example of the Indexes section.
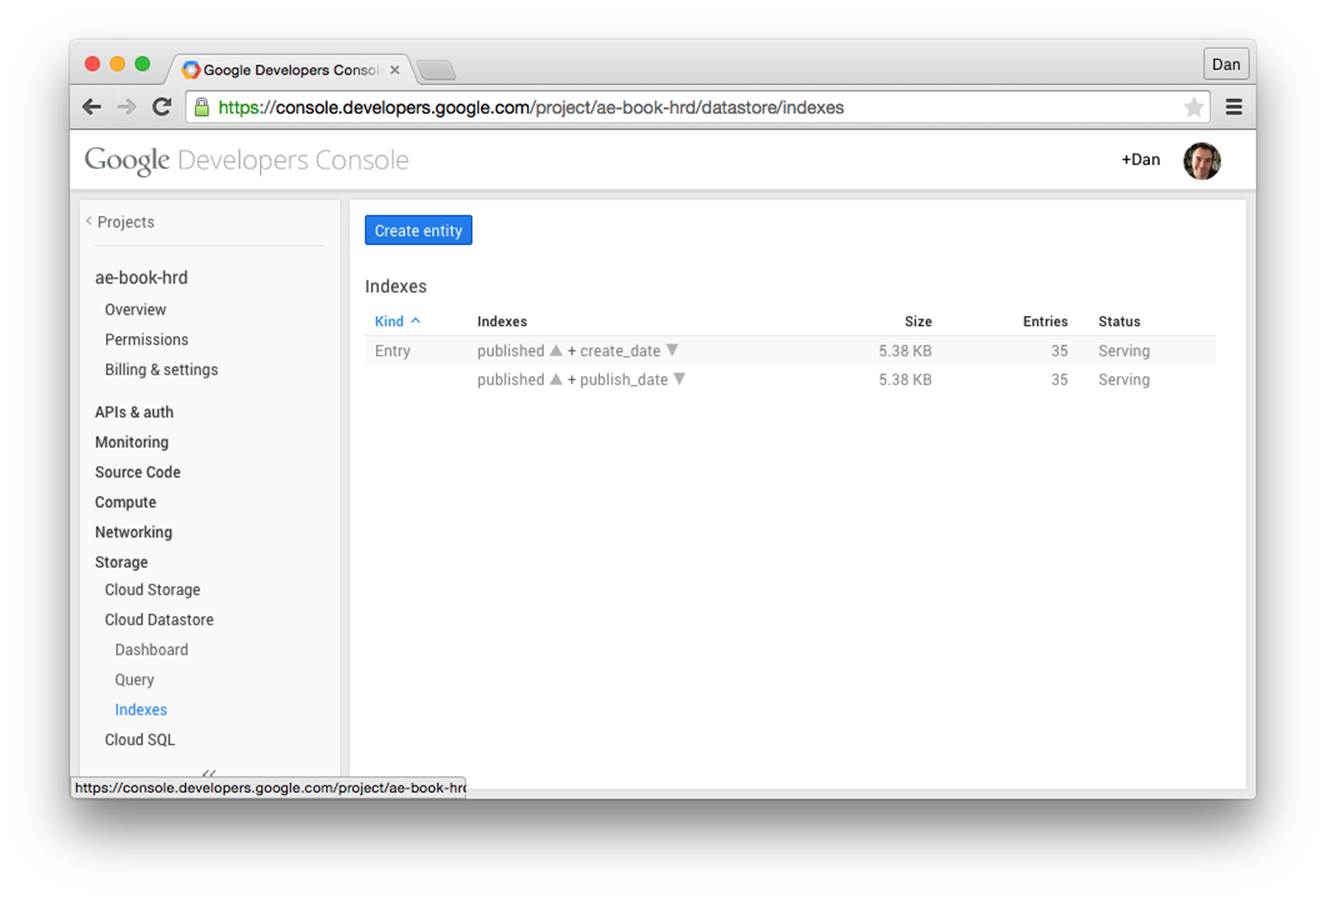
Figure 10-2. The Cloud Datastore Indexes panel in the Cloud Console
If an index’s build status is “Error,” the index build failed. It’s possible that the failure was due to a transient error. To clear this condition, you must first remove the index from your configuration and then upload the new configuration. It is also possible for an index build to fail due to an entity reaching its index property value limit. In these cases, you can delete the entities that are causing the problem. Once that is done, you can add the index configuration back and upload it again.
If your application performs a query while the index for the query is building, the query will fail. You can avoid this by uploading the index configuration, waiting until the index is built, and then making the app that uses that query available. The most convenient way to do this depends on whether you upload the new application in a new version:
§ If you are uploading the new application with the version identifier that is currently the “default” version, upload the index configuration alone using the appcfg.py update_indexes command. When the indexes are built, upload the app.
§ If you are uploading the application as a new version, or as a version that isn’t the default and that nobody is actively using, you can safely upload the application and index configuration together (appcfg.py update). Wait until the indexes are built before making the new version the default.
If you upload index configuration that does not mention an index that has already been built, the datastore does not delete the unused index, as it might still be in use by an older version of the app. You must tell App Engine to purge unused indexes. To do this, run the AppCfg command with the vacuum_indexes option. For instance:
appcfg.py vacuum_indexes app-dir
App Engine will purge all custom indexes not mentioned in the index configuration uploaded most recently. This reclaims the storage space used by those indexes.
TIP
As we saw earlier, the development server tries to be helpful by creating new index configuration entries for queries that need them as you’re testing your app. The development server will never delete an index configuration. As your app’s queries change, this can result in unnecessary indexes being left in the file. You’ll want to look through this file periodically, and confirm that each custom index is needed. Remove the unused index configuration, upload the file, and then vacuum indexes.
Accessing Metadata from the App
There are several ways to get information about the state of your datastore from within the application itself. The information visible in the Datastore Dashboard panel of the Cloud Console is also readable and queryable from entities in your app’s datastore. Similarly, the facilities that allow the Query panel to determine the current kinds and property names are available to your app in the form of APIs and queryable metadata. You can also use APIs to get additional information about entity groups, index build status, and query planning.
We won’t describe every metadata feature here. Instead, we’ll look at a few representative examples. You can find the complete details in the official App Engine documentation.
Querying Statistics
App Engine gathers statistics about the contents of the datastore periodically, usually about once a day. It stores these statistics in datastore entities in your application. The Datastore Dashboard panel of the Cloud Console gets its information from these entities. Your app can also fetch and query these entities to access the statistics.
In Python, each statistic has an ndb data model class, in the google.appengine.ext.ndb.stats module. You use these model classes to perform queries, like you would any other query. The actual kind name differs from the model class name.
Here’s an example in Python that queries storage statistics for each entity kind:
import logging
from google.appengine.ext.ndb import stats
# ...
kind_stats = stats.KindStat.query()
for kind_stat inkind_stats:
logging.info(
'Stats for kind %s: %d entities, '
'total %d bytes (%d entity bytes)',
kind_stat.kind_name, kind_stat.count,
kind_stat.bytes, kind_stat.entity_bytes)
Here’s another example that reports the properties per kind taking up more than a terabyte of space:
import logging
from google.appengine.ext.ndb import stats
# ...
q = stats.KindPropertyNameStat.query()
q = q.filter('bytes >', 1024 ** 4)
for kind_prop inq:
logging.info(
'Large property detected: %s:%s total size %d',
kind_prop.kind_name, kind_prop.property_name,
kind_prop.bytes)
Every statistic entity has a count property, a bytes property, and a timestamp property. count and bytes represent the total count and total size of the unit represented by the entity. The statistic for a kind has a bytes property equal to the total amount of storage used by entities of the kind for properties and indexes. The timestamp property is the last time the statistic entity was updated. Statistic entity kinds have additional properties specific to the kind.
The __Stat_Total__ kind (represented in Python by the GlobalStat class) represents the grand total for the entire app. The count and bytes properties represent the number of all entities, and the total size of all entities and indexes. These numbers are broken down further in several properties: entity_bytes is the storage for just the entities (not indexes), builtin_index_bytes and builtin_index_count are the total size and number of indexed properties in just the built-in indexes, and composite_index_bytes and composite_index_count are the same for just custom (composite) indexes. There is only one __Stat_Total__ entity for the app.
The __Stat_Kind__ kind (KindStat) represents statistics for each datastore kind individually, as existed at the time the statistics were last updated. There is one of these statistic entities for each kind. The kind_name property is set to the kind name, so you can query for a specific kind’s statistics, or you can iterate over all kinds to determine which kinds there are. These entities have the same statistic properties as __Stat_Total__.
The __Stat_PropertyName_Kind__ kind (KindPropertyNameStat) represents each named property of each kind. The property_name and kind_name properties identify the property and kind for the statistic. The statistic properties are count, bytes, entity_bytes,builtin_index_bytes, and builtin_index_count.
For a complete list of the statistics entity kinds, see the official App Engine website.
Querying Metadata
The datastore always knows which namespaces, kinds, and property names are in use by an application. Unlike statistics, this metadata is available immediately. Querying this metadata can be slower than querying a normal entity, but the results reflect the current state of the data.
Each namespace has an entity of the kind __namespace__. Each kind is a __kind__, and each property name (regardless of kind) is a __property__. These entities have no properties: all information is stored in the key name. For example, a __kind__ entity uses the kind name as its key name. (The full key is __kind__ / KindName.) A __property__ entity has both the kind name and the property name encoded in its key name.
This information is derived entirely from the built-in indexes. As such, only indexed properties have corresponding __property__ entities.
These all have ndb model classes defined in the google.appengine.ext.ndb.metadata module. They are named Namespace, Kind, and Property. The classes include Python property methods for accessing names, as if they were datastore properties. The module also provides several convenience functions for common queries.
Here’s a simple example in Python that lists all the kinds for which there is an entity, using a convenience function to get the list of kind names:
import logging
from google.appengine.ext.ndb import metadata
# ...
kinds = metadata.get_kinds()
for k inkinds:
logging.info('Found a datastore kind: %s', k)
Index Status and Queries
The Datastore Indexes panel of the Cloud Console reports on the indexes configured for the app, and the serving status of each. The app can get this same information by using the datastore API. A Python app can also ask the datastore which index was used to resolve a query, after the query has been executed.
You ask for the state of indexes by calling the get_indexes() function of the google.appengine.ext.ndb module. This function returns a list of tuples, each representing an index. Each tuple contains an index object, and a state value. The index object has the methods kind(),has_ancestor(), and properties(), representing the latest uploaded index configuration. The state value is one of several constants representing the index build states: datastore.Index.BUILDING, datastore.Index.SERVING, datastore.Index.DELETING, ordatastore.Index.ERROR (from the google.appengine.api.datastore module):
from google.appengine.api import datastore
from google.appengine.ext import ndb
# ...
for index inndb.get_indexes():
if index.state != datastore.Index.SERVING:
kind = index.definition.kind
ancestor_str = ' (ancestor)' if index.definition.ancestor else ''
index_props = []
for prop inindex.definition.properties:
dir_str = ('ASC'
if prop.direction == datastore.Index.ASCENDING
else 'DESC')
index_props.append(prop.name + ' ' + dir_str)
index_property_spec = ', '.join(index_props)
index_spec = '%s%s %s' % (kind, ancestor_str,
index_property_spec)
logging.info('Index is not serving: %s', index_spec)
An ndb query object has an index_list() method that returns a list of index objects representing the indexes used to resolve the query. You must execute the query before calling this method, so it knows which indexes were involved in performing the query.
Entity Group Versions
In Chapter 8, we described the datastore as using multiversioned optimistic concurrency control, with the entity group as the unit of transactionality. Each time any entity in an entity group is updated, the datastore creates a new version of the entity group. If any process reads an entity in the entity group before the new version is fully stored, the process simply sees the earlier version.
Each of these versions gets an ID number, and this number increases strictly and monotonically. You can use the metadata API to get the entity group version number for an entity.
This is the get_entity_group_version() function in the google.appengine.ext.ndb.metadata module. It takes an ndb.Key instance as an argument, and returns an integer, or None if the given entity group doesn’t exist:
from google.appengine.ext import ndb
from google.appengine.ext.ndb import metadata
class MyKind(ndb.Expando):
pass
# ...
# Write to an entity group, and get its version number.
parent = MyKind()
parent.put()
version = metadata.get_entity_group_version(parent.key)
# Update the entity group by creating a child entity.
child = MyKind(parent=parent)
child.put()
# The version number of the entire group has been incremented.
version2 = metadata.get_entity_group_version(parent.key)
Remote Controls
One of the nice features of a relational database running in a typical hosting environment is the ability to connect directly to the database to perform queries and updates on a SQL command line or to run small administrative scripts. App Engine has a facility for doing something similar, and it works for more than just the datastore: you can call any live service on behalf of your application using tools running on your computer. The tools do this using a remote proxy API.
The proxy API is a request handler that you install in your app. It is restricted to administrators. You run a client tool that authenticates as an administrator, connects to the request handler, and issues service calls over the connection. The proxy performs the calls and returns the results.
App Engine includes versions of the proxy handler in the Python libraries. The client library and related tools are also implemented in Python.
The remote shell tool opens a Python command prompt, with the App Engine Python service libraries modified to use the remote API. You type Python statements as they would appear in app code, and all calls to App Engine services are routed to the live app automatically. This is especially useful in conjunction with Python apps, where you can import your app’s own data models and request handler modules, and do interactive testing or data manipulation. You can also write your own tools in Python using the remote API, for repeated tasks.
WARNING
The remote API is clever and useful, but it’s also slow: every service call is going over the network from your local computer to the app, then back. It is not suitable for running large jobs over arbitrary amounts of data. For large data transformation jobs, you’re better off building something that runs within the app, using task queues.
Let’s take a look at how to set up the proxy, how to use the remote Python shell, and how to write a Python tool that calls the API.
Setting Up the Remote API
The remote API request handler is included in the runtime environment. To set it up, you activate a built-in in app.yaml, like so:
builtins:
- remote_api: on
This establishes a web service endpoint at the URL /_ah/remote_api/. Only clients authenticated using application administrator accounts can use this endpoint.
You can test this URL in a browser using the development server. Visit the URL (such as http://localhost:8080/_ah/remote_api), and make sure it redirects to the fake authentication form. Check the box to sign in as an administrator, and click Submit. You should see this message:
This request did not contain a necessary header.
The remote API expects an HTTP header identifying the remote API protocol version to use, which the browser does not provide. But this is sufficient to test that the handler is configured correctly.
Using the Remote Shell Tool
With the remote API handler installed, you can use a tool included with the Python SDK to manipulate a live application’s services from an interactive Python shell. You interact with the shell by using Python statements and the Python service APIs. This tool uses the remote API handler.
To start a shell session, run the remote_api_shell.py command. As with the other Python SDK commands, this command may already be in your command path:
remote_api_shell.py app-id
The tool prompts for your developer account email address and password. (Only registered developers for the app can run this tool, or any of the remote API tools.)
By default, the tool connects to the application via the domain name app-id.appspot.com, and assumes the remote API handler is installed with the URL path /_ah/remote_api. To use a different URL path, provide the path as an argument after the application ID:
remote_api_shell.py app-id /admin/util/remote_api
To use a different domain name, such as to use a specific application version, or to test the tool with the development server, give the domain name with the -s … argument:
remote_api_shell.py -s dev.app-id.appspot.com app-id
The shell can use any service API that is supported by the remote API handler. This includes URL Fetch, memcache, Images, Mail, Google Accounts, and of course the datastore. (As of this writing, XMPP is not supported by the remote API handler.) Several of the API modules are imported by default for easy access.
The tool does not add the current working directory to the module load path by default, nor does it know about your application directory. You may need to adjust the load path (sys.path) to import your app’s classes, such as your data models.
Here is an example of a short shell session:
% remote_api_shell.py clock
Email: juliet@example.com
Password:
App Engine remote_api shell
Python 2.7.6 (v2.7.6:3a1db0d2747e, Nov 10 2013, 00:42:54)
[GCC 4.2.1 (Apple Inc. build 5666) (dot 3)] on darwin
The db, users, urlfetch, and memcache modules are imported.
clock> import os.path
clock> import sys
clock> sys.path.append(os.path.realpath('.'))
clock> import models
clock> books = models.Book.query().fetch(6)
clock> books
[<models.Book object at 0x7a2c30>, <models.Book object at 0x7a2bf0>,
<models.Book object at 0x7a2cd0>, <models.Book object at 0x7a2cb0>,
<models.Book object at 0x7a2d30>, <models.Book object at 0x7a2c90>]
clock> books[0].title
u'The Grapes of Wrath'
clock> from google.appengine.api import mail
clock> mail.send_mail('juliet@example.com', 'test@example.com',
'Test email', 'This is a test message.')
clock>
To exit the shell, press Ctrl-D.
Using the Remote API from a Script
You can call the remote API directly from your own Python scripts by using a library from the Python SDK. This configures the Python API to use the remote API handler for your application for all service calls, so you can use the service APIs as you would from a request handler directly in your scripts.
Here’s a simple example script that prompts for a developer account email address and password, then accesses the datastore of a live application:
#!/usr/bin/python
import getpass
import sys
# Add the Python SDK to the package path.
# Adjust these paths accordingly.
sys.path.append('~/google_appengine')
sys.path.append('~/google_appengine/lib/yaml/lib')
from google.appengine.ext.remote_api import remote_api_stub
import models
# Your app ID and remote API URL path go here.
APP_ID = 'app_id'
REMOTE_API_PATH = '/_ah/remote_api'
def auth_func():
email_address = raw_input('Email address: ')
password = getpass.getpass('Password: ')
return email_address, password
def initialize_remote_api(app_id=APP_ID,
path=REMOTE_API_PATH):
remote_api_stub.ConfigureRemoteApi(
app_id,
path,
auth_func)
remote_api_stub.MaybeInvokeAuthentication()
def main(args):
initialize_remote_api()
books = models.Book.query().fetch(10)
for book inbooks:
print book.title
return 0
if __name__ == '__main__':
sys.exit(main(sys.argv[1:]))
The ConfigureRemoteApi() function (yes, it has a TitleCase name) sets up the remote API access. It takes as arguments the application ID, the remote API handler URL path, and a callable that returns a tuple containing the email address and password to use when connecting. In this example, we define a function that prompts for the email address and password, and pass the function to ConfigureRemoteApi().
The function also accepts an optional fourth argument specifying an alternative domain name for the connection. By default, it uses app-id.appspot.com, where app-id is the application ID in the first argument.
The MaybeInvokeAuthentication() function sends an empty request to verify that the email address and password are correct, and raises an exception if they are not. (Without this, the script would wait until the first remote call to verify the authentication.)
Remember that every call to an App Engine library that performs a service call does so over the network via an HTTP request to the application. This is inevitably slower than running within the live application. It also consumes application resources like web requests do, including bandwidth and request counts, which are not normally consumed by service calls in the live app.
On the plus side, because your code runs on your local computer, it is not constrained by the App Engine runtime sandbox or the 30-second request deadline. You can run long jobs and interactive applications on your computer without restriction, using any Python modules you like—at the expense of consuming app resources to marshal service calls over HTTP.