Programming Google App Engine with Python (2015)
Chapter 15. Sending and Receiving Instant Messages with XMPP
So far, we’ve seen two mechanisms an app can use to communicate with the outside world. The first and most prominent of these is HTTP: an app can receive and respond to HTTP requests, and can send HTTP requests to other hosts and receive responses with the URL Fetch service. The second is email: an app can send email messages by using the Mail service, and can receive messages via a proxy that calls a request handler for each incoming email message.
In this chapter, we introduce a third method of communication: XMPP, also known as “instant messages,” or simply “chat.” An app can participate in a chat dialogue with a user of any XMPP-compatible chat service. The XMPP service is useful for chat interfaces, such as a chat-based query engine, or a customer service proxy. App Engine does not act as an XMPP service itself. Instead, it connects to Google’s own XMPP infrastructure to participate as a chat user.
Sending and receiving XMPP messages works similarly to email messages. To send a message, an app calls the XMPP service API. To receive a message, the app declares that it accepts such messages in its configuration, and then handles HTTP requests sent by the XMPP service to special-purpose URLs. Figure 15-1 illustrates the flow of incoming XMPP messages.
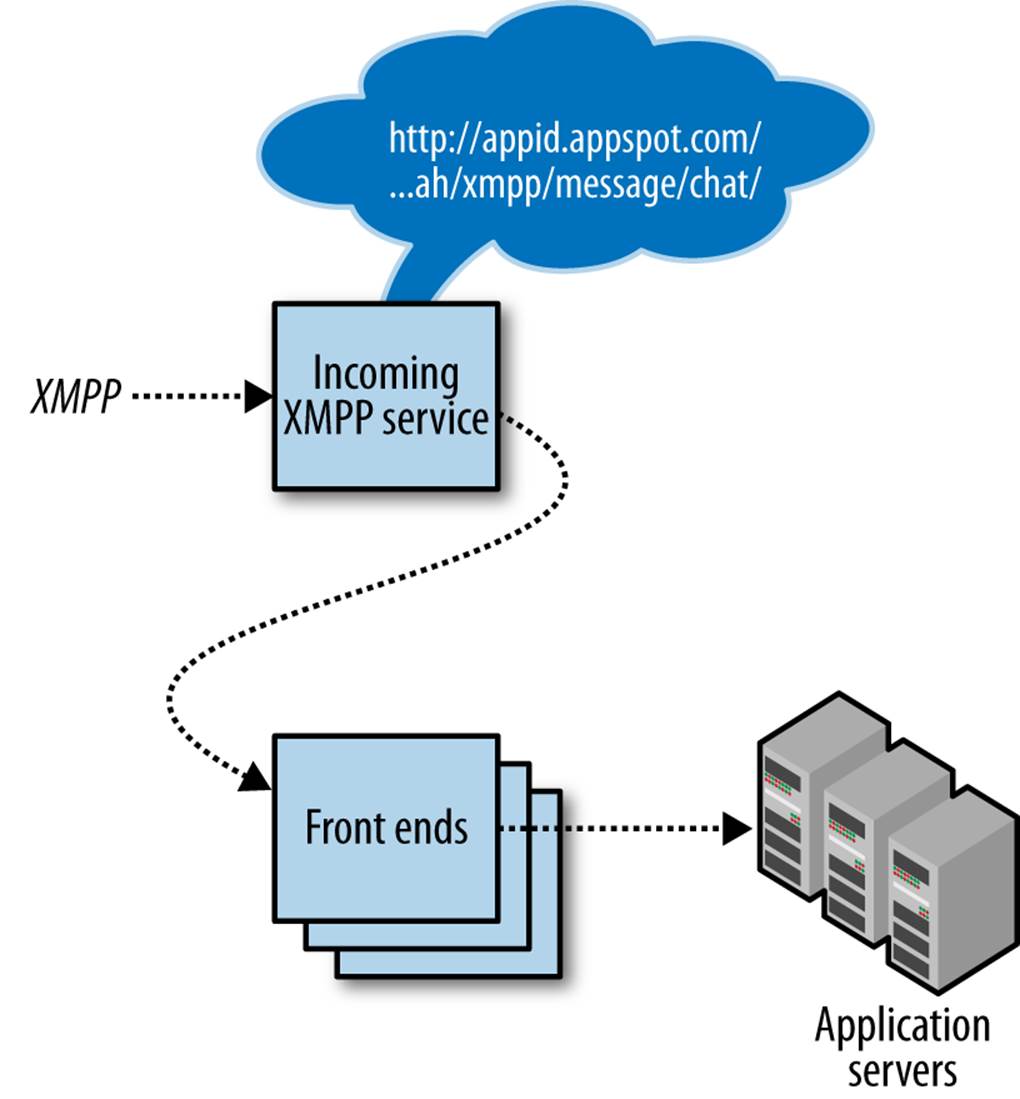
Figure 15-1. Architecture of incoming XMPP messages, calling web hooks in response to incoming message events
Each participant in an XMPP communication has an address similar to an email address, known as a JID. (JID is short for “Jabber ID,” named after the Jabber project, where XMPP originated.) A JID consists of a username, an “at” symbol (@), and the domain name of the XMPP server. A JID can also have an optional “resource” string, which is used to identify specific clients connected to the service with the username. A message sent to the ID without the resource goes to all connected clients:
username @ domain / resource
To send a message, a chat participant sends an XMPP message to its own XMPP server. The participant’s chat service contacts the recipient service’s host by using the domain name of the JID and a standard port, then delivers the message. If the remote service accepts messages for the JID and someone is connected to the service with a chat client for that JID, the service delivers the message to the client.
As with email, each app has its own set of JIDs, based on its application ID. For XMPP chat, the app can receive messages at addresses of these forms:
app-id@appspot.com
anything@app-id.appspotchat.com
(Notice the differences in the domain names from the options available for incoming email.)
App Engine does not support XMPP addresses on a custom domain. This is one of only a few cases where exposing your application ID to users cannot be avoided.
Let’s take a look at the features and API of the XMPP service.
Inviting a User to Chat
Before a user of an XMPP-compatible instant messaging service will see any messages your app sends, the service needs to know that the user is expecting your messages. This can happen in two ways: either the user explicitly adds your app’s JID to her contact list, or she accepts an invitation to chat sent by the app.
An app can send an invitation to chat by calling the XMPP service API. For apps, it’s polite to get the user’s permission to do this first, so the complete workflow looks something like this:
1. The user visits the website, and activates the chat-based feature of the service, providing a JID.
2. The app sends an invitation to chat to the user’s JID.
3. The user accepts the invitation in her chat client.
4. The user and app exchange chat messages.
The alternative where the user adds the app’s JID to her contact list is usually equivalent to sending an invitation to the app. App Engine accepts all such invitations automatically, even if the app does not accept chat messages.
An accepted invitation entitles both parties to know the other party’s presence status, whether the party is connected and accepting messages. This includes the ability to know when an invitation is accepted. (For more information, see “Managing Presence”.)
In the development server, inviting a user to chat emits a log message, but otherwise does nothing.
To invite a user to chat, you call the send_invite() function in the google.appengine.api.xmpp module. It takes the recipient JID as its first argument, and an optional sender JID (from_jid) as its second argument. By default, it uses app-id@appspot.com as the sender JID:
from google.appengine.api import xmpp
jid = 'juliet@example.com'
xmpp.send_invite(jid) # from app-id@appspot.com
xmpp.send_invite(jid, from_jid='support@app-id.appspotchat.com')
Sending Chat Messages
An XMPP message includes a sender address, one or more recipient addresses, a message type, and a message body.
The sender address must be one of the app’s incoming XMPP addresses. These are of the form app-id@appspot.com or anything@app-id.appspotchat.com, where app-id is your application ID and anything can be any string that’s valid on the left side of a JID (it can’t contain an @ symbol). Unlike incoming email addresses, it’s not as convenient to use the “anything” form for creating IDs on the fly, because the recipient needs to accept an invitation from that ID before receiving messages. But it can still be useful for sessions that begin with an invitation, or addresses that represent specific purposes or users of the app support@app-id.appspotchat.com.
If the version of the app that is sending an XMPP message is not the default version, App Engine modifies the sender address to a version-specific address, so replies go directly to the correct version: either anything@version.app-id.appspotchat.com or app-id@version.app-id.appspotchat.com.
App Engine adds a “resource” to the end of the sender JID (after the domain name) that looks like this: /bot. This is mostly just to comply with the best practice of sending messages using JIDs with resources. It isn’t noticed by chat users, and is not needed when a user wishes to send a message to the app. You’ll see it in log messages.
The message type can be any of the types in the XMPP standard, including chat, error, groupchat, headline, and normal. An app can only receive messages of the types chat, normal, and error, and so cannot participate in group chats. For straightforward communication between an app and a chat user, you usually want to send chat messages. For an app and a custom client, you can do what you like.
Messages are sent asynchronously. The service call returns immediately, and reports success only if the XMPP service enqueued the message successfully. You can configure the app to receive error messages, such as to be notified if a sent message was not received because the user went offline. (See “Handling Error Messages”.)
When an app is running in the development server, sending an XMPP chat message or invitation causes the server to print the message to the console. The development server does not contact the XMPP service or send messages.
To send a chat message in Python, you call the send_message() function in the google.appengine.api.xmpp module. The function takes a JID or list of JIDs, the body of the message, and an optional sender JID (from_jid). It returns a success code, or a list of success codes, one for each recipient JID:
result = xmpp.send_message(
'juliet@example.com',
'Your dog has reached level 12!')
if result != xmpp.NO_ERROR:
# ...
By default, this sends a message of the “chat” type. You can send a message of a different type by setting the message_type parameter. Acceptable values include:
§ xmpp.MESSAGE_TYPE_CHAT (the default)
§ xmpp.MESSAGE_TYPE_ERROR
§ xmpp.MESSAGE_TYPE_GROUPCHAT
§ xmpp.MESSAGE_TYPE_HEADLINE
§ xmpp.MESSAGE_TYPE_NORMAL
Complete XMPP messages are sent over the network as XML data. By default, send_message() treats the text of the message as plain text, and knows to escape XML characters. Instead of a text message, you can send an XML stanza. This is included verbatim (assuming the stanza is well formed) in the XMPP message, so you can send structured data to XMPP clients. To tell send_message() that the content is an XML stanza so it doesn’t escape XML characters, provide the raw_xml=True parameter.
The send_message() function returns a status code for each recipient JID, as a single value if called with a single JID, or as a list of codes if called with a list of JIDs. The possible status values are:
§ xmpp.NO_ERROR
§ xmpp.INVALID_JID
§ xmpp.OTHER_ERROR
Receiving Chat Messages
As with email, to receive incoming XMPP messages, you must first enable the feature by adding the XMPP inbound services to your app’s app.yaml configuration file:
inbound_services:
- xmpp_message
This is the same configuration list as the mail inbound service. If you’re enabling both email and XMPP, you provide one list of inbound services with all the items.
Deploy your app, and confirm that incoming XMPP is enabled using the Cloud Console, under Application Settings. If your app does not appear to be receiving HTTP requests for incoming XMPP messages, check the Console and update the configuration if necessary.
The xmpp_message inbound service routes incoming XMPP messages of the types chat and normal to your app.
An app receives XMPP messages at several addresses. Messages sent to addresses of these forms are routed to the default version of the app:
app-id@appspot.com
anything@app-id.appspotchat.com
Messages sent to addresses of this form are routed to the specified version of the app, useful for testing:
anything@version.app-id.appspotmail.com
Each message is delivered to the app as an HTTP POST request to a fixed URL path. Chat messages (both chat and normal) become POST requests to this URL path:
/_ah/xmpp/message/chat/
(Unlike incoming email, the sender JID is not included in these URL paths.)
The body content of the HTTP POST request is a MIME multipart message, with a part for each field of the message:
from
The sender’s JID
to
The app JID to which this message was sent
body
The message body content (with characters as they were originally typed)
stanza
The full XML stanza of the message, including the previous fields (with XML special characters escaped); useful for communicating with a custom client using XML
The API includes classes for parsing the request data into objects. (See the sections that follow.)
The development server console (http://localhost:8000/) includes a feature for simulating incoming XMPP messages by submitting a web form. The development server cannot receive actual XMPP messages.
NOTE
When using the development server console to simulate an incoming XMPP message, you must use a valid JID for the app in the “To:” field, with the application ID that appears in the app’s configuration. Using any other “To:” address in the development server is an error.
To handle the incoming messages, you map the URL path to a script handler in the app.yaml file, as usual:
handlers:
- url: /_ah/xmpp/message/chat/
script: handle_xmpp.application
login: admin
As with all web hook URLs in App Engine, this URL handler can be restricted to admin to prevent anything other than the XMPP service from activating the request handler.
The Python library provides a Message class that can contain an incoming chat message. You can parse the incoming message into a Message object by passing a mapping of the POST parameters to its constructor. With the webapp2 framework, this is a simple matter of passing the parsed POST data (a mapping of the POST parameter names to values) in directly:
from google.appengine.api import xmpp
from google.appengine.ext import webapp2
class IncomingXMPPHandler(webapp2.RequestHandler):
def post(self):
message = xmpp.Message(self.request.POST)
message.reply('I got your message! '
'It had %d characters.' % len(message.body))
application = webapp2.WSGIApplication([('/_ah/xmpp/message/chat/',
IncomingXMPPHandler)],
debug=True)
The Message object has attributes for each message field: sender, to, and body. (The attribute for the “from” field is named sender because from is a Python keyword.) It also includes a convenience method for replying to the message, reply(), which takes the body of the reply as its first argument.
Handling Commands over Chat
The Message class includes methods for parsing chat-style commands of this form:
/commandname args
If the chat message body is of this form, the command attribute of the Message is the command name (without the slash), and the arg attribute is everything that follows. If the message is not of this form, command is None.
webapp includes a request handler base class that makes it easy to implement chat interfaces that perform user-issued commands. Here’s an example that responds to the commands /stats and /score username, and ignores all other messages:
from google.appengine.api import xmpp
from google.appengine.ext import webapp2
from google.appengine.ext.webapp import xmpp_handlers
def get_stats():
# ...
def get_score_for_user(username):
# ...
class UnknownUserError(Exception):
pass
class ScoreBotHandler(xmpp_handlers.CommandHandler):
def stats_command(self, message):
stats = get_stats()
if stats:
message.reply('The latest stats: %s' % stats)
else:
message.reply('Stats are not available right now.')
def score_command(self, message):
try:
score = get_score_for_user(message.arg)
message.reply('Score for user %s: %d' % (message.arg, score))
except UnknownUserError, e:
message.reply('Unknown user %s' % message.arg)
application = webapp2.WSGIApplication(
[('/_ah/xmpp/message/chat/', ScoreBotHandler)],
debug=True)
The CommandHandler base class, provided by the google.appengine.ext.webapp.xmpp_handlers package, parses the incoming message for a command. If the message contains such a command, the handler attempts to call a method named after the command. For example, consider a scenario where the app receives this chat message:
/score druidjane
The handler will call the score_command() method with a message where message.arg is 'druidjane'.
If there is no method for the parsed command, the handler will call the unhandled_command() method, whose default implementation replies to the message with “Unknown command.” You can override this method to customize its behavior.
The base handler calls the command method with the Message object as an argument. The method can use the command and arg properties to read the parsed command.
If the incoming message does not start with a /commandname-style command, the base handler calls the text_message() method with the Message as its argument. The default implementation does nothing, and you can override it to specify behavior in this case.
This package also contains a simpler handler class named BaseHandler, with several useful features. It parses incoming messages, and logs and ignores malformed messages. If a message is valid, it calls its message_received() method, which you override with the intended behavior. The class also overrides webapp.RequestHandler’s handle_exception() method to send an XMPP reply with a generic error message when an uncaught exception occurs, so the user isn’t left to wonder whether the message was received. (CommandHandler extends BaseHandler, and so also has these features.)
Handling Error Messages
When an app calls the XMPP service to send a message, the message is queued for delivery and sent asynchronously with the call. The call will only return with an error if the message the app is sending is malformed. If the app wants to know about an error during delivery of the message (such as the inability to connect to a remote server), or an error returned by the remote XMPP server (such as a nonexistent user), it can listen for error messages.
Error messages are just another type of chat message, but the XMPP service separates incoming error messages into a separate inbound service. To enable this service, add the xmpp_error inbound service to the app’s app.yaml configuration file:
inbound_services:
- xmpp_message
- xmpp_error
Error messages arrive as POST requests at this URL path:
/_ah/xmpp/error/
You handle an error message just as you would a chat message: create a request handler, map it to the URL path, and parse the POST request for more information.
The SDK’s library doesn’t provide any assistance parsing incoming error messages. While XMPP error messages are similar in structure to chat messages (with a type of error), minor differences are not recognized by the message parsers provided. You can examine the XML data structure in the POST message body, which conforms to the XMPP message standard. (See the XMPP specification for details.)
Managing Presence
After the user accepts an app’s invitation to chat, both parties are able to see whether the other party is available to receive chat messages. In XMPP RFC 3921, this is known as presence. The process of asking for and granting permission to see presence is called subscription. For privacy reasons, one user must be successfully subscribed to the other before she can send messages, see presence information, or otherwise know the user exists.
When a user accepts an app’s invitation to chat (subscription request), the user’s client sends a “subscribed” message to the app, to confirm that the app is now subscribed. If, later, the user revokes this permission, the client sends an “unsubscribed” message. While the app is subscribed to a user, the user’s client will send all changes in presence to the app as another kind of message.
Conversely, a user can also send “subscribe” and “unsubscribe” messages to the app. It’s the app’s responsibility to maintain a list of subscribed users to use when sending presence updates.
If you’d like to receive these new message types (and be billed for the bandwidth), you must enable these as separate inbound services. Subscription information (invitation responses and subscription requests) use the xmpp_subscribe service, and presence updates use thexmpp_presence service.
Here’s the configuration for app.yaml that enables all four XMPP inbound message types:
inbound_services:
- xmpp_message
- xmpp_error
- xmpp_subscribe
- xmpp_presence
TIP
If you want to know when a user accepts or revokes your app’s chat invitation, but otherwise do not need to see the user’s presence updates, you can enable the xmpp_subscribe service without the xmpp_presence service. This can save on costs associated with the incoming bandwidth of changes in the user’s presence, which can be frequent.
As with chat messages, you can simulate incoming subscription and presence messages in the development server by using the development server console. Outgoing subscription and presence messages in the development server are logged to the console, but not actually sent.
Managing Subscriptions
An app subscribes to a user when it sends an invitation to chat, with the send_invite() function. An app cannot send an explicit “unsubscribe” message, only “subscribe.”
When the user accepts the invitation, her chat client sends a subscribed message to the app. If the user later revokes the invitation, the client sends an unsubscribed message.
These messages arrive via the xmpp_subscribe inbound service as POST requests on the following URL paths:
/_ah/xmpp/subscription/subscribed/
/_ah/xmpp/subscription/unsubscribed/
A user can send an explicit subscription request (invitation to chat) to the app by sending a subscribe message. Similarly, the user can explicitly unsubscribe from presence updates by sending an unsubscribe message. These arrive at the following URL paths:
/_ah/xmpp/subscription/subscribe/
/_ah/xmpp/subscription/unsubscribe/
The subscription process typically happens just once in the lifetime of the relationship between two chat users. After the users are successfully subscribed, they remain subscribed until one party explicitly unsubscribes from the other (unsubscribe), or one party revokes the other party’s invitation (unsubscribed).
If you intend for your app to have visible changes in presence, the app must maintain a roster of subscribers based on subscribe and unsubscribe messages, and send updates only to subscribed users.
Incoming subscription-related requests include form-style fields in the POST data, with the following fields:
from
The sender’s JID
to
The app JID to which this message was sent
stanza
The full XML stanza of the subscription message, including the previous fields
Because the POST data for these requests does not contain a body field, you cannot use the SDK’s Message class to parse the data. You access these fields simply as POST form fields in the request.
The app gets the subscription command from the URL path.
Here is an outline for a request handler that processes subscription-related messages, using Python and webapp2:
import webapp2
from google.appengine.api import xmpp
def truncate_jid(jid):
# Remove the "resource" portion of a JID.
if jid:
i = jid.find('/')
if i != -1:
jid = jid[:i]
return jid
class SubscriptionHandler(webapp2.RequestHandler):
def post(self, command):
user_jid = truncate_jid(self.request.POST.get('from'))
if command == 'subscribed':
# User accepted a chat invitation.
# ...
if command == 'unsubscribed':
# User revoked a chat invitation.
# ...
if command == 'subscribe':
# User wants presence updates from the app.
# ...
if command == 'unsubscribed':
# User no longer wants presence updates from the app.
# ...
application = webapp2.WSGIApplication(
[('/_ah/xmpp/subscription/(.*)/', SubscriptionHandler)],
debug=True)
As mentioned earlier, an app sends a subscription request ('subscribe') to a user by calling the xmpp.send_invite(jid) function. There is no way to send an 'unsubscribe' message from an app. If the app no longer cares about a user’s presence messages, the only choice is to ignore the incoming presence updates from that user.
Managing Presence Updates
While an app is subscribed to a user, the user sends changes in presence to the app. If the app is configured to receive inbound presence messages via the xmpp_presence service, these messages arrive as POST requests on one of these URL paths:
/_ah/xmpp/presence/available/
/_ah/xmpp/presence/unavailable/
Chat clients typically send an available message when connecting, and an unavailable message when disconnecting (or going “invisible”).
A presence message can also contain additional status information: the presence show (“show me as”) value and a status message. Most chat clients represent the show value as a colored dot or icon, and may display the status message as well. And of course, most chat clients allow the user to change the show value and the message. The possible show values, along with how they typically appear in chat clients, are as follows:
chat
The user is available to chat. Green, “available.”
away
The user is away from her computer temporarily and not available to chat. Yellow, “away.” A typical chat client switches to this presence show value automatically when the user is away from the keyboard.
dnd
“Do not disturb”: the user may be at her computer, but does not want to receive chat messages. Red, “busy.”
xa
“Extended away”: the user is not available to chat and is away for an extended period. Red.
In XMPP, availability and the presence show value are distinct concepts. For a user to appear as “busy,” the user must be available. For example, a red-colored “busy” user is available, with a show value of “dnd.” Chat clients represent unavailable users either with a grey icon or by showing the user in another list.
An incoming presence update request includes form-style fields in the POST data, with the following fields:
from
The sender’s JID
to
The app JID to which this message was sent
show
One of several standard presence show values; if omitted, this implies the “chat” presence
status
A custom status message; only present if the user has a custom status message set, or is changing her status message
stanza
The full XML stanza of the subscription message, including the previous fields
An app can notify users of its own presence by sending a presence message. If the app’s presence changes, it should attempt to send a presence message to every user known to be subscribed to the app. To support this, the app should listen for “subscribe” and “unsubscribe” messages, and keep a list of subscribed users, as described in “Managing Subscriptions”.
An app should also send a presence message to a user if it receives a presence probe message from that user. (See “Probing for Presence”.)
As with chat and subscription messages, the development server can simulate incoming presence messages. However, it cannot include presence show and status strings in these updates.
Here is an outline for a request handler for processing incoming presence updates, using webapp2:
import webapp2
from google.appengine.api import xmpp
def truncate_jid(jid):
# Remove the "resource" portion of a JID.
if jid:
i = jid.find('/')
if i != -1:
jid = jid[:i]
return jid
class PresenceHandler(webapp2.RequestHandler):
def post(self, command):
user_jid = truncate_jid(self.request.POST.get('from'))
if command == 'available':
# The user is available.
show = self.request.POST.get('show')
status_message = self.request.POST.get('status')
# ...
elif command == 'unavailable':
# The user is unavailable (disconnected).
# ...
application = webapp2.WSGIApplication(
[('/_ah/xmpp/presence/(.*)/', PresenceHandler)],
debug=True)
To send a presence update to a single user in Python, you need to call the xmpp.send_presence() method:
xmpp.send_presence(user_jid,
status="Doing fine.",
presence_type=xmpp.PRESENCE_TYPE_AVAILABLE,
presence_show=xmpp.PRESENCE_SHOW_CHAT)
The send_presence() function takes the jid, a status message (up to 1 kilobyte), the presence_type, and the presence_show as arguments. presence_type is either xmpp.PRESENCE_TYPE_AVAILABLE or xmpp.PRESENCE_TYPE_UNAVAILABLE. presence_show is one of the standard presence show values, which are also available as library constants: xmpp.PRESENCE_SHOW_CHAT, xmpp.PRESENCE_SHOW_AWAY, xmpp.PRESENCE_SHOW_DND, and xmpp.PRESENCE_SHOW_XA.
TIP
When the app wishes to broadcast a change in presence, it must call send_presence() once for each user currently subscribed to the app. Unlike send_message(), you can’t pass a list of JIDs to send_presence() to send many updates in one API call. A best practice is to use task queues to query your data for subscribed users and send presence updates in batches. (SeeChapter 16 for more information on task queues.)
Probing for Presence
Chat services broadcast presence updates to subscribed users as a user’s presence changes. But this is only useful while the subscribed users are online. When a user comes online after a period of being disconnected (such as if her computer was turned off or not on the Internet), the user’s client must probe the users in her contact list to get updated presence information.
When a user sends a probe to an app, it comes in via the xmpp_presence inbound service, as a POST request to this URL path:
/_ah/xmpp/presence/probe/
The POST data contains the following fields:
from
The sender’s JID
to
The app JID to which this message was sent
stanza
The full XML stanza of the subscription message, including the previous fields
If your app receives this message, it should respond immediately by sending a presence update just to that user.
An app can send a presence probe message to a user. If the app is subscribed to the user, the user will send a presence message to the app in the usual way.
In the development server, outgoing probe messages are logged to the console, and not actually sent. There is currently no way to simulate an incoming probe message in the development console.
Here’s how you would extend the PresenceHandler in the previous Python example to respond to presence probes:
class PresenceHandler(webapp2.RequestHandler):
def post(self, command):
user_jid = truncate_jid(self.request.POST.get('from'))
if command == 'available':
# ...
elif command == 'unavailable':
# ...
elif command == 'probe':
# The user is requesting the app's presence information.
xmpp.send_presence(
user_jid,
presence_type=xmpp.PRESENCE_TYPE_AVAILABLE,
presence_show=xmpp.PRESENCE_SHOW_CHAT)
To send a presence probe to a user, you call xmpp.send_presence() with a presence_type of xmpp.PRESENCE_TYPE_PROBE:
xmpp.send_presence(jid, presence_type=xmpp.PRESENCE_TYPE_PROBE)
The reply comes back as a presence update message.
All materials on the site are licensed Creative Commons Attribution-Sharealike 3.0 Unported CC BY-SA 3.0 & GNU Free Documentation License (GFDL)
If you are the copyright holder of any material contained on our site and intend to remove it, please contact our site administrator for approval.
© 2016-2026 All site design rights belong to S.Y.A.