Automate the Boring Stuff with Python: Practical Programming for Total Beginnerso (2015)
Part II. Automating Tasks
Chapter 8. Reading and Writing Files
Variables are a fine way to store data while your program is running, but if you want your data to persist even after your program has finished, you need to save it to a file. You can think of a file’s contents as a single string value, potentially gigabytes in size. In this chapter, you will learn how to use Python to create, read, and save files on the hard drive.
Files and File Paths
A file has two key properties: a filename (usually written as one word) and a path. The path specifies the location of a file on the computer. For example, there is a file on my Windows 7 laptop with the filename projects.docx in the path C:\Users\asweigart\Documents. The part of the filename after the last period is called the file’s extension and tells you a file’s type. project.docx is a Word document, and Users, asweigart, and Documents all refer to folders (also called directories). Folders can contain files and other folders. For example, project.docx is in the Documentsfolder, which is inside the asweigart folder, which is inside the Users folder. Figure 8-1 shows this folder organization.

Figure 8-1. A file in a hierarchy of folders
The C:\ part of the path is the root folder, which contains all other folders. On Windows, the root folder is named C:\ and is also called the C: drive. On OS X and Linux, the root folder is /. In this book, I’ll be using the Windows-style root folder, C:\. If you are entering the interactive shell examples on OS X or Linux, enter / instead.
Additional volumes, such as a DVD drive or USB thumb drive, will appear differently on different operating systems. On Windows, they appear as new, lettered root drives, such as D:\ or E:\. On OS X, they appear as new folders under the /Volumes folder. On Linux, they appear as new folders under the /mnt (“mount”) folder. Also note that while folder names and filenames are not case sensitive on Windows and OS X, they are case sensitive on Linux.
Backslash on Windows and Forward Slash on OS X and Linux
On Windows, paths are written using backslashes (\) as the separator between folder names. OS X and Linux, however, use the forward slash (/) as their path separator. If you want your programs to work on all operating systems, you will have to write your Python scripts to handle both cases.
Fortunately, this is simple to do with the os.path.join() function. If you pass it the string values of individual file and folder names in your path, os.path.join() will return a string with a file path using the correct path separators. Enter the following into the interactive shell:
>>> import os
>>> os.path.join('usr', 'bin', 'spam')
'usr\\bin\\spam'
I’m running these interactive shell examples on Windows, so os.path.join('usr', 'bin', 'spam') returned 'usr\\bin\\spam'. (Notice that the backslashes are doubled because each backslash needs to be escaped by another backslash character.) If I had called this function on OS X or Linux, the string would have been 'usr/bin/spam'.
The os.path.join() function is helpful if you need to create strings for filenames. These strings will be passed to several of the file-related functions introduced in this chapter. For example, the following example joins names from a list of filenames to the end of a folder’s name:
>>> myFiles = ['accounts.txt', 'details.csv', 'invite.docx']
>>> for filename in myFiles:
print(os.path.join('C:\\Users\\asweigart', filename))
C:\Users\asweigart\accounts.txt
C:\Users\asweigart\details.csv
C:\Users\asweigart\invite.docx
The Current Working Directory
Every program that runs on your computer has a current working directory, or cwd. Any filenames or paths that do not begin with the root folder are assumed to be under the current working directory. You can get the current working directory as a string value with the os.getcwd() function and change it with os.chdir(). Enter the following into the interactive shell:
>>> import os
>>> os.getcwd()
'C:\\Python34'
>>> os.chdir('C:\\Windows\\System32')
>>> os.getcwd()
'C:\\Windows\\System32'
Here, the current working directory is set to C:\Python34, so the filename project.docx refers to C:\Python34\project.docx. When we change the current working directory to C:\Windows, project.docx is interpreted as C:\ Windows\project.docx.
Python will display an error if you try to change to a directory that does not exist.
>>> os.chdir('C:\\ThisFolderDoesNotExist')
Traceback (most recent call last):
File "<pyshell#18>", line 1, in <module>
os.chdir('C:\\ThisFolderDoesNotExist')
FileNotFoundError: [WinError 2] The system cannot find the file specified:
'C:\\ThisFolderDoesNotExist'
NOTE
While folder is the more modern name for directory, note that current working directory (or just working directory) is the standard term, not current working folder.
Absolute vs. Relative Paths
There are two ways to specify a file path.
§ An absolute path, which always begins with the root folder
§ A relative path, which is relative to the program’s current working directory
There are also the dot (.) and dot-dot (..) folders. These are not real folders but special names that can be used in a path. A single period (“dot”) for a folder name is shorthand for “this directory.” Two periods (“dot-dot”) means “the parent folder.”
Figure 8-2 is an example of some folders and files. When the current working directory is set to C:\bacon, the relative paths for the other folders and files are set as they are in the figure.
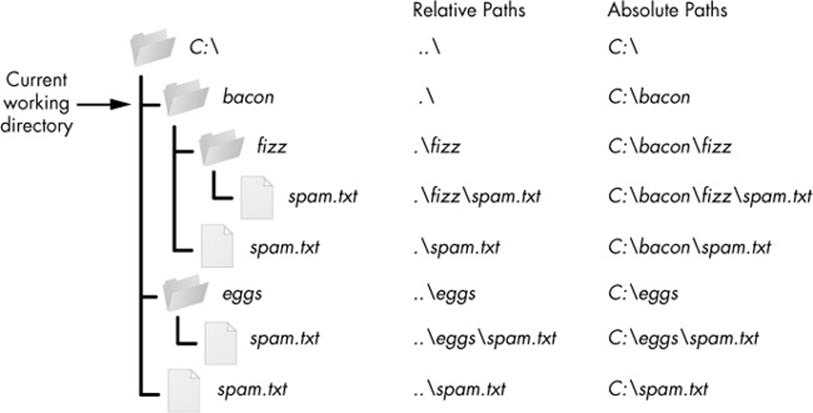
Figure 8-2. The relative paths for folders and files in the working directory C:\bacon
The .\ at the start of a relative path is optional. For example, .\spam.txt and spam.txt refer to the same file.
Creating New Folders with os.makedirs()
Your programs can create new folders (directories) with the os.makedirs() function. Enter the following into the interactive shell:
>>> import os
>>> os.makedirs('C:\\delicious\\walnut\\waffles')
This will create not just the C:\delicious folder but also a walnut folder inside C:\delicious and a waffles folder inside C:\delicious\walnut. That is, os.makedirs() will create any necessary intermediate folders in order to ensure that the full path exists. Figure 8-3 shows this hierarchy of folders.
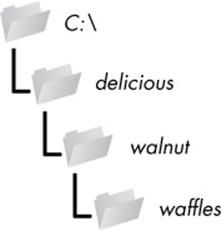
Figure 8-3. The result of os.makedirs('C:\\delicious \\walnut\\waffles')
The os.path Module
The os.path module contains many helpful functions related to filenames and file paths. For instance, you’ve already used os.path.join() to build paths in a way that will work on any operating system. Since os.path is a module inside the os module, you can import it by simply runningimport os. Whenever your programs need to work with files, folders, or file paths, you can refer to the short examples in this section. The full documentation for the os.path module is on the Python website at http://docs.python.org/3/library/os.path.html.
NOTE
Most of the examples that follow in this section will require the os module, so remember to import it at the beginning of any script you write and any time you restart IDLE. Otherwise, you’ll get a NameError: name 'os' is not defined error message.
Handling Absolute and Relative Paths
The os.path module provides functions for returning the absolute path of a relative path and for checking whether a given path is an absolute path.
§ Calling os.path.abspath(path) will return a string of the absolute path of the argument. This is an easy way to convert a relative path into an absolute one.
§ Calling os.path.isabs(path) will return True if the argument is an absolute path and False if it is a relative path.
§ Calling os.path.relpath(path, start) will return a string of a relative path from the start path to path. If start is not provided, the current working directory is used as the start path.
Try these functions in the interactive shell:
>>> os.path.abspath('.')
'C:\\Python34'
>>> os.path.abspath('.\\Scripts')
'C:\\Python34\\Scripts'
>>> os.path.isabs('.')
False
>>> os.path.isabs(os.path.abspath('.'))
True
Since C:\Python34 was the working directory when os.path.abspath() was called, the “single-dot” folder represents the absolute path 'C:\\Python34'.
NOTE
Since your system probably has different files and folders on it than mine, you won’t be able to follow every example in this chapter exactly. Still, try to follow along using folders that exist on your computer.
Enter the following calls to os.path.relpath() into the interactive shell:
>>> os.path.relpath('C:\\Windows', 'C:\\')
'Windows'
>>> os.path.relpath('C:\\Windows', 'C:\\spam\\eggs')
'..\\..\\Windows'
>>> os.getcwd() 'C:\\Python34'
Calling os.path.dirname(path) will return a string of everything that comes before the last slash in the path argument. Calling os.path.basename(path) will return a string of everything that comes after the last slash in the path argument. The dir name and base name of a path are outlined inFigure 8-4.
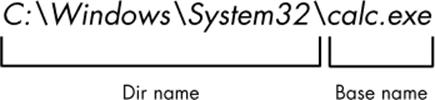
Figure 8-4. The base name follows the last slash in a path and is the same as the filename. The dir name is everything before the last slash.
For example, enter the following into the interactive shell:
>>> path = 'C:\\Windows\\System32\\calc.exe'
>>> os.path.basename(path)
'calc.exe'
>>> os.path.dirname(path)
'C:\\Windows\\System32'
If you need a path’s dir name and base name together, you can just call os.path.split() to get a tuple value with these two strings, like so:
>>> calcFilePath = 'C:\\Windows\\System32\\calc.exe'
>>> os.path.split(calcFilePath)
('C:\\Windows\\System32', 'calc.exe')
Notice that you could create the same tuple by calling os.path.dirname() and os.path.basename() and placing their return values in a tuple.
>>> (os.path.dirname(calcFilePath), os.path.basename(calcFilePath))
('C:\\Windows\\System32', 'calc.exe')
But os.path.split() is a nice shortcut if you need both values.
Also, note that os.path.split() does not take a file path and return a list of strings of each folder. For that, use the split() string method and split on the string in os.sep. Recall from earlier that the os.sep variable is set to the correct folder-separating slash for the computer running the program.
For example, enter the following into the interactive shell:
>>> calcFilePath.split(os.path.sep)
['C:', 'Windows', 'System32', 'calc.exe']
On OS X and Linux systems, there will be a blank string at the start of the returned list:
>>> '/usr/bin'.split(os.path.sep)
['', 'usr', 'bin']
The split() string method will work to return a list of each part of the path. It will work on any operating system if you pass it os.path.sep.
Finding File Sizes and Folder Contents
Once you have ways of handling file paths, you can then start gathering information about specific files and folders. The os.path module provides functions for finding the size of a file in bytes and the files and folders inside a given folder.
§ Calling os.path.getsize(path) will return the size in bytes of the file in the path argument.
§ Calling os.listdir(path) will return a list of filename strings for each file in the path argument. (Note that this function is in the os module, not os.path.)
Here’s what I get when I try these functions in the interactive shell:
>>> os.path.getsize('C:\\Windows\\System32\\calc.exe')
776192
>>> os.listdir('C:\\Windows\\System32')
['0409', '12520437.cpx', '12520850.cpx', '5U877.ax', 'aaclient.dll',
--snip--
'xwtpdui.dll', 'xwtpw32.dll', 'zh-CN', 'zh-HK', 'zh-TW', 'zipfldr.dll']
As you can see, the calc.exe program on my computer is 776,192 bytes in size, and I have a lot of files in C:\Windows\system32. If I want to find the total size of all the files in this directory, I can use os.path.getsize() and os.listdir() together.
>>> totalSize = 0
>>> for filename in os.listdir('C:\\Windows\\System32'):
totalSize = totalSize + os.path.getsize(os.path.join('C:\\Windows\\System32', filename))
>>> print(totalSize)
1117846456
As I loop over each filename in the C:\Windows\System32 folder, the totalSize variable is incremented by the size of each file. Notice how when I call os.path.getsize(), I use os.path.join() to join the folder name with the current filename. The integer that os.path.getsize() returns is added to the value of totalSize. After looping through all the files, I print totalSize to see the total size of the C:\Windows\System32 folder.
Checking Path Validity
Many Python functions will crash with an error if you supply them with a path that does not exist. The os.path module provides functions to check whether a given path exists and whether it is a file or folder.
§ Calling os.path.exists(path) will return True if the file or folder referred to in the argument exists and will return False if it does not exist.
§ Calling os.path.isfile(path) will return True if the path argument exists and is a file and will return False otherwise.
§ Calling os.path.isdir(path) will return True if the path argument exists and is a folder and will return False otherwise.
Here’s what I get when I try these functions in the interactive shell:
>>> os.path.exists('C:\\Windows')
True
>>> os.path.exists('C:\\some_made_up_folder')
False
>>> os.path.isdir('C:\\Windows\\System32')
True
>>> os.path.isfile('C:\\Windows\\System32')
False
>>> os.path.isdir('C:\\Windows\\System32\\calc.exe')
False
>>> os.path.isfile('C:\\Windows\\System32\\calc.exe')
True
You can determine whether there is a DVD or flash drive currently attached to the computer by checking for it with the os.path.exists() function. For instance, if I wanted to check for a flash drive with the volume named D:\ on my Windows computer, I could do that with the following:
>>> os.path.exists('D:\\')
False
Oops! It looks like I forgot to plug in my flash drive.
The File Reading/Writing Process
Once you are comfortable working with folders and relative paths, you’ll be able to specify the location of files to read and write. The functions covered in the next few sections will apply to plaintext files. Plaintext files contain only basic text characters and do not include font, size, or color information. Text files with the .txt extension or Python script files with the .py extension are examples of plaintext files. These can be opened with Windows’s Notepad or OS X’s TextEdit application. Your programs can easily read the contents of plaintext files and treat them as an ordinary string value.
Binary files are all other file types, such as word processing documents, PDFs, images, spreadsheets, and executable programs. If you open a binary file in Notepad or TextEdit, it will look like scrambled nonsense, like in Figure 8-5.
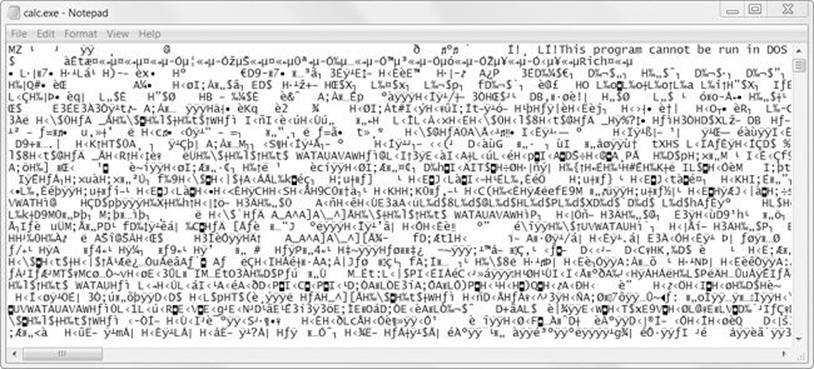
Figure 8-5. The Windows calc.exe program opened in Notepad
Since every different type of binary file must be handled in its own way, this book will not go into reading and writing raw binary files directly. Fortunately, many modules make working with binary files easier — you will explore one of them, the shelve module, later in this chapter.
There are three steps to reading or writing files in Python.
1. Call the open() function to return a File object.
2. Call the read() or write() method on the File object.
3. Close the file by calling the close() method on the File object.
Opening Files with the open() Function
To open a file with the open() function, you pass it a string path indicating the file you want to open; it can be either an absolute or relative path. The open() function returns a File object.
Try it by creating a text file named hello.txt using Notepad or TextEdit. Type Hello world! as the content of this text file and save it in your user home folder. Then, if you’re using Windows, enter the following into the interactive shell:
>>> helloFile = open('C:\\Users\\your_home_folder\\hello.txt')
If you’re using OS X, enter the following into the interactive shell instead:
>>> helloFile = open('/Users/your_home_folder/hello.txt')
Make sure to replace your_home_folder with your computer username. For example, my username is asweigart, so I’d enter 'C:\\Users\\asweigart\\ hello.txt' on Windows.
Both these commands will open the file in “reading plaintext” mode, or read mode for short. When a file is opened in read mode, Python lets you only read data from the file; you can’t write or modify it in any way. Read mode is the default mode for files you open in Python. But if you don’t want to rely on Python’s defaults, you can explicitly specify the mode by passing the string value 'r' as a second argument to open(). So open('/Users/asweigart/ hello.txt', 'r') and open('/Users/asweigart/hello.txt') do the same thing.
The call to open() returns a File object. A File object represents a file on your computer; it is simply another type of value in Python, much like the lists and dictionaries you’re already familiar with. In the previous example, you stored the File object in the variable helloFile. Now, whenever you want to read from or write to the file, you can do so by calling methods on the File object in helloFile.
Reading the Contents of Files
Now that you have a File object, you can start reading from it. If you want to read the entire contents of a file as a string value, use the File object’s read() method. Let’s continue with the hello.txt File object you stored in helloFile. Enter the following into the interactive shell:
>>> helloContent = helloFile.read()
>>> helloContent
'Hello world!'
If you think of the contents of a file as a single large string value, the read() method returns the string that is stored in the file.
Alternatively, you can use the readlines() method to get a list of string values from the file, one string for each line of text. For example, create a file named sonnet29.txt in the same directory as hello.txt and write the following text in it:
When, in disgrace with fortune and men's eyes,
I all alone beweep my outcast state,
And trouble deaf heaven with my bootless cries,
And look upon myself and curse my fate,
Make sure to separate the four lines with line breaks. Then enter the following into the interactive shell:
>>> sonnetFile = open('sonnet29.txt')
>>> sonnetFile.readlines()
[When, in disgrace with fortune and men's eyes,\n', ' I all alone beweep my
outcast state,\n', And trouble deaf heaven with my bootless cries,\n', And
look upon myself and curse my fate,']
Note that each of the string values ends with a newline character, \n, except for the last line of the file. A list of strings is often easier to work with than a single large string value.
Writing to Files
Python allows you to write content to a file in a way similar to how the print() function “writes” strings to the screen. You can’t write to a file you’ve opened in read mode, though. Instead, you need to open it in “write plaintext” mode or “append plaintext” mode, or write mode and append mode for short.
Write mode will overwrite the existing file and start from scratch, just like when you overwrite a variable’s value with a new value. Pass 'w' as the second argument to open() to open the file in write mode. Append mode, on the other hand, will append text to the end of the existing file. You can think of this as appending to a list in a variable, rather than overwriting the variable altogether. Pass 'a' as the second argument to open() to open the file in append mode.
If the filename passed to open() does not exist, both write and append mode will create a new, blank file. After reading or writing a file, call the close() method before opening the file again.
Let’s put these concepts together. Enter the following into the interactive shell:
>>> baconFile = open('bacon.txt', 'w')
>>> baconFile.write('Hello world!\n')
13
>>> baconFile.close()
>>> baconFile = open('bacon.txt', 'a')
>>> baconFile.write('Bacon is not a vegetable.')
25
>>> baconFile.close()
>>> baconFile = open('bacon.txt')
>>> content = baconFile.read()
>>> baconFile.close()
>>> print(content)
Hello world!
Bacon is not a vegetable.
First, we open bacon.txt in write mode. Since there isn’t a bacon.txt yet, Python creates one. Calling write() on the opened file and passing write() the string argument 'Hello world! /n' writes the string to the file and returns the number of characters written, including the newline. Then we close the file.
To add text to the existing contents of the file instead of replacing the string we just wrote, we open the file in append mode. We write 'Bacon is not a vegetable.' to the file and close it. Finally, to print the file contents to the screen, we open the file in its default read mode, call read(), store the resulting File object in content, close the file, and print content.
Note that the write() method does not automatically add a newline character to the end of the string like the print() function does. You will have to add this character yourself.
Saving Variables with the shelve Module
You can save variables in your Python programs to binary shelf files using the shelve module. This way, your program can restore data to variables from the hard drive. The shelve module will let you add Save and Open features to your program. For example, if you ran a program and entered some configuration settings, you could save those settings to a shelf file and then have the program load them the next time it is run.
Enter the following into the interactive shell:
>>> import shelve
>>> shelfFile = shelve.open('mydata')
>>> cats = ['Zophie', 'Pooka', 'Simon']
>>> shelfFile['cats'] = cats
>>> shelfFile.close()
To read and write data using the shelve module, you first import shelve. Call shelve.open() and pass it a filename, and then store the returned shelf value in a variable. You can make changes to the shelf value as if it were a dictionary. When you’re done, call close() on the shelf value. Here, our shelf value is stored in shelfFile. We create a list cats and write shelfFile['cats'] = cats to store the list in shelfFile as a value associated with the key 'cats' (like in a dictionary). Then we call close() on shelfFile.
After running the previous code on Windows, you will see three new files in the current working directory: mydata.bak, mydata.dat, and mydata.dir. On OS X, only a single mydata.db file will be created.
These binary files contain the data you stored in your shelf. The format of these binary files is not important; you only need to know what the shelve module does, not how it does it. The module frees you from worrying about how to store your program’s data to a file.
Your programs can use the shelve module to later reopen and retrieve the data from these shelf files. Shelf values don’t have to be opened in read or write mode — they can do both once opened. Enter the following into the interactive shell:
>>> shelfFile = shelve.open('mydata')
>>> type(shelfFile)
<class 'shelve.DbfilenameShelf'>
>>> shelfFile['cats']
['Zophie', 'Pooka', 'Simon']
>>> shelfFile.close()
Here, we open the shelf files to check that our data was stored correctly. Entering shelfFile['cats'] returns the same list that we stored earlier, so we know that the list is correctly stored, and we call close().
Just like dictionaries, shelf values have keys() and values() methods that will return list-like values of the keys and values in the shelf. Since these methods return list-like values instead of true lists, you should pass them to the list() function to get them in list form. Enter the following into the interactive shell:
>>> shelfFile = shelve.open('mydata')
>>> list(shelfFile.keys())
['cats']
>>> list(shelfFile.values())
[['Zophie', 'Pooka', 'Simon']]
>>> shelfFile.close()
Plaintext is useful for creating files that you’ll read in a text editor such as Notepad or TextEdit, but if you want to save data from your Python programs, use the shelve module.
Saving Variables with the pprint.pformat() Function
Recall from Pretty Printing that the pprint.pprint() function will “pretty print” the contents of a list or dictionary to the screen, while the pprint.pformat() function will return this same text as a string instead of printing it. Not only is this string formatted to be easy to read, but it is also syntactically correct Python code. Say you have a dictionary stored in a variable and you want to save this variable and its contents for future use. Using pprint.pformat() will give you a string that you can write to .py file. This file will be your very own module that you can import whenever you want to use the variable stored in it.
For example, enter the following into the interactive shell:
>>> import pprint
>>> cats = [{'name': 'Zophie', 'desc': 'chubby'}, {'name': 'Pooka', 'desc': 'fluffy'}]
>>> pprint.pformat(cats)
"[{'desc': 'chubby', 'name': 'Zophie'}, {'desc': 'fluffy', 'name': 'Pooka'}]"
>>> fileObj = open('myCats.py', 'w')
>>> fileObj.write('cats = ' + pprint.pformat(cats) + '\n')
83
>>> fileObj.close()
Here, we import pprint to let us use pprint.pformat(). We have a list of dictionaries, stored in a variable cats. To keep the list in cats available even after we close the shell, we use pprint.pformat() to return it as a string. Once we have the data in cats as a string, it’s easy to write the string to a file, which we’ll call myCats.py.
The modules that an import statement imports are themselves just Python scripts. When the string from pprint.pformat() is saved to a .py file, the file is a module that can be imported just like any other.
And since Python scripts are themselves just text files with the .py file extension, your Python programs can even generate other Python programs. You can then import these files into scripts.
>>> import myCats
>>> myCats.cats
[{'name': 'Zophie', 'desc': 'chubby'}, {'name': 'Pooka', 'desc': 'fluffy'}]
>>> myCats.cats[0]
{'name': 'Zophie', 'desc': 'chubby'}
>>> myCats.cats[0]['name']
'Zophie'
The benefit of creating a .py file (as opposed to saving variables with the shelve module) is that because it is a text file, the contents of the file can be read and modified by anyone with a simple text editor. For most applications, however, saving data using the shelve module is the preferred way to save variables to a file. Only basic data types such as integers, floats, strings, lists, and dictionaries can be written to a file as simple text. File objects, for example, cannot be encoded as text.
Project: Generating Random Quiz Files
Say you’re a geography teacher with 35 students in your class and you want to give a pop quiz on US state capitals. Alas, your class has a few bad eggs in it, and you can’t trust the students not to cheat. You’d like to randomize the order of questions so that each quiz is unique, making it impossible for anyone to crib answers from anyone else. Of course, doing this by hand would be a lengthy and boring affair. Fortunately, you know some Python.
Here is what the program does:
§ Creates 35 different quizzes.
§ Creates 50 multiple-choice questions for each quiz, in random order.
§ Provides the correct answer and three random wrong answers for each question, in random order.
§ Writes the quizzes to 35 text files.
§ Writes the answer keys to 35 text files.
This means the code will need to do the following:
§ Store the states and their capitals in a dictionary.
§ Call open(), write(), and close() for the quiz and answer key text files.
§ Use random.shuffle() to randomize the order of the questions and multiple-choice options.
Step 1: Store the Quiz Data in a Dictionary
The first step is to create a skeleton script and fill it with your quiz data. Create a file named randomQuizGenerator.py, and make it look like the following:
#! python3
# randomQuizGenerator.py - Creates quizzes with questions and answers in
# random order, along with the answer key.
➊ import random
# The quiz data. Keys are states and values are their capitals.
➋ capitals = {'Alabama': 'Montgomery', 'Alaska': 'Juneau', 'Arizona': 'Phoenix',
'Arkansas': 'Little Rock', 'California': 'Sacramento', 'Colorado': 'Denver',
'Connecticut': 'Hartford', 'Delaware': 'Dover', 'Florida': 'Tallahassee',
'Georgia': 'Atlanta', 'Hawaii': 'Honolulu', 'Idaho': 'Boise', 'Illinois':
'Springfield', 'Indiana': 'Indianapolis', 'Iowa': 'Des Moines', 'Kansas':
'Topeka', 'Kentucky': 'Frankfort', 'Louisiana': 'Baton Rouge', 'Maine':
'Augusta', 'Maryland': 'Annapolis', 'Massachusetts': 'Boston', 'Michigan':
'Lansing', 'Minnesota': 'Saint Paul', 'Mississippi': 'Jackson', 'Missouri':
'Jefferson City', 'Montana': 'Helena', 'Nebraska': 'Lincoln', 'Nevada':
'Carson City', 'New Hampshire': 'Concord', 'New Jersey': 'Trenton', 'New
Mexico': 'Santa Fe', 'New York': 'Albany', 'North Carolina': 'Raleigh',
'North Dakota': 'Bismarck', 'Ohio': 'Columbus', 'Oklahoma': 'Oklahoma City',
'Oregon': 'Salem', 'Pennsylvania': 'Harrisburg', 'Rhode Island': 'Providence',
'South Carolina': 'Columbia', 'South Dakota': 'Pierre', 'Tennessee':
'Nashville', 'Texas': 'Austin', 'Utah': 'Salt Lake City', 'Vermont':
'Montpelier', 'Virginia': 'Richmond', 'Washington': 'Olympia', 'West
Virginia': 'Charleston', 'Wisconsin': 'Madison', 'Wyoming': 'Cheyenne'}
# Generate 35 quiz files.
➌ for quizNum in range(35):
# TODO: Create the quiz and answer key files.
# TODO: Write out the header for the quiz.
# TODO: Shuffle the order of the states.
# TODO: Loop through all 50 states, making a question for each.
Since this program will be randomly ordering the questions and answers, you’ll need to import the random module ➊ to make use of its functions. The capitals variable ➋ contains a dictionary with US states as keys and their capitals as values. And since you want to create 35 quizzes, the code that actually generates the quiz and answer key files (marked with TODO comments for now) will go inside a for loop that loops 35 times ➌. (This number can be changed to generate any number of quiz files.)
Step 2: Create the Quiz File and Shuffle the Question Order
Now it’s time to start filling in those TODOs.
The code in the loop will be repeated 35 times — once for each quiz — so you have to worry about only one quiz at a time within the loop. First you’ll create the actual quiz file. It needs to have a unique filename and should also have some kind of standard header in it, with places for the student to fill in a name, date, and class period. Then you’ll need to get a list of states in randomized order, which can be used later to create the questions and answers for the quiz.
Add the following lines of code to randomQuizGenerator.py:
#! python3
# randomQuizGenerator.py - Creates quizzes with questions and answers in
# random order, along with the answer key.
--snip--
# Generate 35 quiz files.
for quizNum in range(35):
# Create the quiz and answer key files.
➊ quizFile = open('capitalsquiz%s.txt' % (quizNum + 1), 'w')
➋ answerKeyFile = open('capitalsquiz_answers%s.txt' % (quizNum + 1), 'w')
# Write out the header for the quiz.
➌ quizFile.write('Name:\n\nDate:\n\nPeriod:\n\n')
quizFile.write((' ' * 20) + 'State Capitals Quiz (Form %s)' % (quizNum + 1))
quizFile.write('\n\n')
# Shuffle the order of the states.
states = list(capitals.keys())
➍ random.shuffle(states)
# TODO: Loop through all 50 states, making a question for each.
The filenames for the quizzes will be capitalsquiz<N>.txt, where <N> is a unique number for the quiz that comes from quizNum, the for loop’s counter. The answer key for capitalsquiz<N>.txt will be stored in a text file named capitalsquiz_answers<N>.txt. Each time through the loop, the%s placeholder in 'capitalsquiz%s.txt' and 'capitalsquiz_answers%s.txt' will be replaced by (quizNum + 1), so the first quiz and answer key created will be capitalsquiz1.txt and capitalsquiz_answers1.txt. These files will be created with calls to the open() function at ➊ and ➋, with 'w' as the second argument to open them in write mode.
The write() statements at ➌ create a quiz header for the student to fill out. Finally, a randomized list of US states is created with the help of the random.shuffle() function ➍, which randomly reorders the values in any list that is passed to it.
Step 3: Create the Answer Options
Now you need to generate the answer options for each question, which will be multiple choice from A to D. You’ll need to create another for loop — this one to generate the content for each of the 50 questions on the quiz. Then there will be a third for loop nested inside to generate the multiple-choice options for each question. Make your code look like the following:
#! python3
# randomQuizGenerator.py - Creates quizzes with questions and answers in
# random order, along with the answer key.
--snip--
# Loop through all 50 states, making a question for each.
for questionNum in range(50):
# Get right and wrong answers.
➊ correctAnswer = capitals[states[questionNum]]
➋ wrongAnswers = list(capitals.values())
➌ del wrongAnswers[wrongAnswers.index(correctAnswer)]
➍ wrongAnswers = random.sample(wrongAnswers, 3)
➎ answerOptions = wrongAnswers + [correctAnswer]
➏ random.shuffle(answerOptions)
# TODO: Write the question and answer options to the quiz file.
# TODO: Write the answer key to a file.
The correct answer is easy to get — it’s stored as a value in the capitals dictionary ➊. This loop will loop through the states in the shuffled states list, from states[0] to states[49], find each state in capitals, and store that state’s corresponding capital in correctAnswer.
The list of possible wrong answers is trickier. You can get it by duplicating all the values in the capitals dictionary ➋, deleting the correct answer ➌, and selecting three random values from this list ➍. The random.sample() function makes it easy to do this selection. Its first argument is the list you want to select from; the second argument is the number of values you want to select. The full list of answer options is the combination of these three wrong answers with the correct answers ➎. Finally, the answers need to be randomized ➏ so that the correct response isn’t always choice D.
Step 4: Write Content to the Quiz and Answer Key Files
All that is left is to write the question to the quiz file and the answer to the answer key file. Make your code look like the following:
#! python3
# randomQuizGenerator.py - Creates quizzes with questions and answers in
# random order, along with the answer key.
--snip--
# Loop through all 50 states, making a question for each.
for questionNum in range(50):
--snip--
# Write the question and the answer options to the quiz file.
quizFile.write('%s. What is the capital of %s?\n' % (questionNum + 1,
states[questionNum]))
➊ for i in range(4):
➋ quizFile.write(' %s. %s\n' % ('ABCD'[i], answerOptions[i]))
quizFile.write('\n')
# Write the answer key to a file.
➌ answerKeyFile.write('%s. %s\n' % (questionNum + 1, 'ABCD'[
answerOptions.index(correctAnswer)]))
quizFile.close()
answerKeyFile.close()
A for loop that goes through integers 0 to 3 will write the answer options in the answerOptions list ➊. The expression 'ABCD'[i] at ➋ treats the string 'ABCD' as an array and will evaluate to 'A','B', 'C', and then 'D' on each respective iteration through the loop.
In the final line ➌, the expression answerOptions.index(correctAnswer) will find the integer index of the correct answer in the randomly ordered answer options, and 'ABCD'[answerOptions.index(correctAnswer)] will evaluate to the correct answer’s letter to be written to the answer key file.
After you run the program, this is how your capitalsquiz1.txt file will look, though of course your questions and answer options may be different from those shown here, depending on the outcome of your random.shuffle() calls:
Name:
Date:
Period:
State Capitals Quiz (Form 1)
1. What is the capital of West Virginia?
A. Hartford
B. Santa Fe
C. Harrisburg
D. Charleston
2. What is the capital of Colorado?
A. Raleigh
B. Harrisburg
C. Denver
D. Lincoln
--snip--
The corresponding capitalsquiz_answers1.txt text file will look like this:
1. D
2. C
3. A
4. C
--snip--
Project: Multiclipboard
Say you have the boring task of filling out many forms in a web page or software with several text fields. The clipboard saves you from typing the same text over and over again. But only one thing can be on the clipboard at a time. If you have several different pieces of text that you need to copy and paste, you have to keep highlighting and copying the same few things over and over again.
You can write a Python program to keep track of multiple pieces of text. This “multiclipboard” will be named mcb.pyw (since “mcb” is shorter to type than “multiclipboard”). The .pyw extension means that Python won’t show a Terminal window when it runs this program. (See Appendix B for more details.)
The program will save each piece of clipboard text under a keyword. For example, when you run py mcb.pyw save spam, the current contents of the clipboard will be saved with the keyword spam. This text can later be loaded to the clipboard again by running py mcb.pyw spam. And if the user forgets what keywords they have, they can run py mcb.pyw list to copy a list of all keywords to the clipboard.
Here’s what the program does:
§ The command line argument for the keyword is checked.
§ If the argument is save, then the clipboard contents are saved to the keyword.
§ If the argument is list, then all the keywords are copied to the clipboard.
§ Otherwise, the text for the keyword is copied to the keyboard.
This means the code will need to do the following:
§ Read the command line arguments from sys.argv.
§ Read and write to the clipboard.
§ Save and load to a shelf file.
If you use Windows, you can easily run this script from the Run... window by creating a batch file named mcb.bat with the following content:
@pyw.exe C:\Python34\mcb.pyw %*
Step 1: Comments and Shelf Setup
Let’s start by making a skeleton script with some comments and basic setup. Make your code look like the following:
#! python3
# mcb.pyw - Saves and loads pieces of text to the clipboard.
➊ # Usage: py.exe mcb.pyw save <keyword> - Saves clipboard to keyword.
# py.exe mcb.pyw <keyword> - Loads keyword to clipboard.
# py.exe mcb.pyw list - Loads all keywords to clipboard.
➋ import shelve, pyperclip, sys
➌ mcbShelf = shelve.open('mcb')
# TODO: Save clipboard content.
# TODO: List keywords and load content.
mcbShelf.close()
It’s common practice to put general usage information in comments at the top of the file ➊. If you ever forget how to run your script, you can always look at these comments for a reminder. Then you import your modules ➋. Copying and pasting will require the pyperclip module, and reading the command line arguments will require the sys module. The shelve module will also come in handy: Whenever the user wants to save a new piece of clipboard text, you’ll save it to a shelf file. Then, when the user wants to paste the text back to their clipboard, you’ll open the shelf file and load it back into your program. The shelf file will be named with the prefix mcb ➌.
Step 2: Save Clipboard Content with a Keyword
The program does different things depending on whether the user wants to save text to a keyword, load text into the clipboard, or list all the existing keywords. Let’s deal with that first case. Make your code look like the following:
#! python3
# mcb.pyw - Saves and loads pieces of text to the clipboard.
--snip--
# Save clipboard content.
➊ if len(sys.argv) == 3 and sys.argv[1].lower() == 'save':
➋ mcbShelf[sys.argv[2]] = pyperclip.paste()
elif len(sys.argv) == 2:
➌ # TODO: List keywords and load content.
mcbShelf.close()
If the first command line argument (which will always be at index 1 of the sys.argv list) is 'save' ➊, the second command line argument is the keyword for the current content of the clipboard. The keyword will be used as the key for mcbShelf, and the value will be the text currently on the clipboard ➋.
If there is only one command line argument, you will assume it is either 'list' or a keyword to load content onto the clipboard. You will implement that code later. For now, just put a TODO comment there ➌.
Step 3: List Keywords and Load a Keyword’s Content
Finally, let’s implement the two remaining cases: The user wants to load clipboard text in from a keyword, or they want a list of all available keywords. Make your code look like the following:
#! python3
# mcb.pyw - Saves and loads pieces of text to the clipboard.
--snip--
# Save clipboard content.
if len(sys.argv) == 3 and sys.argv[1].lower() == 'save':
mcbShelf[sys.argv[2]] = pyperclip.paste()
elif len(sys.argv) == 2:
# List keywords and load content.
➊ if sys.argv[1].lower() == 'list':
➋ pyperclip.copy(str(list(mcbShelf.keys())))
elif sys.argv[1] in mcbShelf:
➌ pyperclip.copy(mcbShelf[sys.argv[1]])
mcbShelf.close()
If there is only one command line argument, first let’s check whether it’s 'list' ➊. If so, a string representation of the list of shelf keys will be copied to the clipboard ➋. The user can paste this list into an open text editor to read it.
Otherwise, you can assume the command line argument is a keyword. If this keyword exists in the mcbShelf shelf as a key, you can load the value onto the clipboard ➌.
And that’s it! Launching this program has different steps depending on what operating system your computer uses. See Appendix B for details for your operating system.
Recall the password locker program you created in Chapter 6 that stored the passwords in a dictionary. Updating the passwords required changing the source code of the program. This isn’t ideal because average users don’t feel comfortable changing source code to update their software. Also, every time you modify the source code to a program, you run the risk of accidentally introducing new bugs. By storing the data for a program in a different place than the code, you can make your programs easier for others to use and more resistant to bugs.
Summary
Files are organized into folders (also called directories), and a path describes the location of a file. Every program running on your computer has a current working directory, which allows you to specify file paths relative to the current location instead of always typing the full (or absolute) path. The os.path module has many functions for manipulating file paths.
Your programs can also directly interact with the contents of text files. The open() function can open these files to read in their contents as one large string (with the read() method) or as a list of strings (with the readlines() method). The open() function can open files in write or append mode to create new text files or add to existing text files, respectively.
In previous chapters, you used the clipboard as a way of getting large amounts of text into a program, rather than typing it all in. Now you can have your programs read files directly from the hard drive, which is a big improvement, since files are much less volatile than the clipboard.
In the next chapter, you will learn how to handle the files themselves, by copying them, deleting them, renaming them, moving them, and more.
Practice Questions
|
Q: |
1. What is a relative path relative to? |
|
Q: |
2. What does an absolute path start with? |
|
Q: |
3. What do the os.getcwd() and os.chdir() functions do? |
|
Q: |
4. What are the . and .. folders? |
|
Q: |
5. In C:\bacon\eggs\spam.txt, which part is the dir name, and which part is the base name? |
|
Q: |
6. What are the three “mode” arguments that can be passed to the open() function? |
|
Q: |
7. What happens if an existing file is opened in write mode? |
|
Q: |
8. What is the difference between the read() and readlines() methods? |
|
Q: |
9. What data structure does a shelf value resemble? |
Practice Projects
For practice, design and write the following programs.
Extending the Multiclipboard
Extend the multiclipboard program in this chapter so that it has a delete <keyword> command line argument that will delete a keyword from the shelf. Then add a delete command line argument that will delete all keywords.
Mad Libs
Create a Mad Libs program that reads in text files and lets the user add their own text anywhere the word ADJECTIVE, NOUN, ADVERB, or VERB appears in the text file. For example, a text file may look like this:
The ADJECTIVE panda walked to the NOUN and then VERB. A nearby NOUN was
unaffected by these events.
The program would find these occurrences and prompt the user to replace them.
Enter an adjective:
silly
Enter a noun:
chandelier
Enter a verb:
screamed
Enter a noun:
pickup truck
The following text file would then be created:
The silly panda walked to the chandelier and then screamed. A nearby pickup
truck was unaffected by these events.
The results should be printed to the screen and saved to a new text file.
Regex Search
Write a program that opens all .txt files in a folder and searches for any line that matches a user-supplied regular expression. The results should be printed to the screen