Beginning Python Games Development With Pygame (2015)
CHAPTER 11
Lights, Camera, Action!
In Chapters 8 and 9, you learned how to manipulate 3D information and use OpenGL to display simple models. In this chapter we will cover how to work with images to create more visually appealing scenes. We will also discuss how to read a 3D model from a file, which is an important step in creating a polished game.
Working with Textures
In Chapter 9 you learned how to create a 3D model from shaded polygons, but in order to make an object look really convincing you need to use textures, which are images that have been stretched into the shape of a polygon. Vertices and polygons create the shape of a model, but textures define the final look of any 3D object. You could transform a model of a futuristic soldier to a zombie, or even a statue, simply by changing which images are used for its textures.
OpenGL has excellent support for textures and can be used to create highly detailed models and scenery in a game.
Uploading Textures with OpenGL
Before you can use an image as a texture with OpenGL, you first have to upload it. This takes the raw image information and sends it to the high-speed video memory of your graphics card. Images used as textures must be at least 64 x 64 pixels in size, and both the width and height must be a power of 2 (64, 128, 256, etc.). If your image isn’t a power of 2, you should scale it to fit in the next power of 2 up. Listing 11-1 is a function that can calculate the next power of 2, given one of the dimensions.
Listing 11-1. Calculating the Next Power of 2
from math import log, ceil
def next_power_of_2(size):
return 2 ** ceil(log(size, 2))
![]() Note Some graphics cards do have the capability to use textures that aren’t a power of 2, but it is best to stick to power of 2 for maximum compatibility.
Note Some graphics cards do have the capability to use textures that aren’t a power of 2, but it is best to stick to power of 2 for maximum compatibility.
The upper limit for the size of textures varies across graphics cards. You can ask OpenGL for the maximum supported texture size by calling glGetIntegerv(GL_MAX_TEXTURE_SIZE). On my computer this returns 16384, which is a very large texture indeed!
The following list outlines the steps required to upload image data and create a texture in OpenGL:
· Load the image with pygame.image.load.
· Use the pygame.image.tostring function to retrieve a string containing the raw image data.
· Generate an id with glGenTextures that you can use to identify the texture.
· Set any parameters that affect how the texture will be used when rendering polygons.
· Upload the raw image data with the glTexImage2D function.
Loading the image is done in the same way as you would load an image in a 2D game—just call pygame.image.load with the image filename. For example, the following line loads an image called sushitex.png and returns a surface:
texture_surface = pygame.image.load("sushitex.png")
Once you have a Pygame surface containing your image, call pygame.image.tostring to retrieve a string with the raw image data. The first parameter to pygame.image.tostring is the surface; the second should be RGB for opaque images, or RGBA if the image has an alpha channel. The last parameter should be set to True, which tells Pygame to flip the rows in the returned data (otherwise, the texture would be upside down). The following line retrieves the raw image data for the surface that we loaded earlier:
texture_data = pygame.image.tostring(texture_surface, 'RGB', True)
Every texture in OpenGL must be assigned an id value (a number) with the glGenTextures function. These ids are used to select the texture to use when drawing OpenGL primitives. The glGenTextures function takes the number of ids you want to generate and returns a list of ID values, or a single value if you asked for just one. Texture ids are generally allocated sequentially (so the first three textures will probably be named 1, 2, and 3), but this may not always be the case.
![]() Caution Texture ids are integer values, and not objects. Deleting a texture id, or letting it go out of scope, will not clean up the texture. You should manually delete textures that you no longer want to use (see the “Deleting Textures” section a bit later).
Caution Texture ids are integer values, and not objects. Deleting a texture id, or letting it go out of scope, will not clean up the texture. You should manually delete textures that you no longer want to use (see the “Deleting Textures” section a bit later).
Once you have assigned a texture id, call glBindTexture to tell OpenGL that all subsequent texture-related functions should use that texture. The glBindTexture function takes two parameters; the first should be GL_TEXTURE_2D for standard 2D textures, and the second parameter is the id that you want to bind. The following two lines create a single id for the sushitex.png texture and bind it for use:
texture_id = glGenTextures(1)
glBindTexture(GL_TEXTURE_2D, texture_id)
Before uploading the image data, we need to set a few texture parameters, which are values that affect how OpenGL will use the texture when rendering. To set a texture parameter call glTexParameteri for integer parameters, or glTexParameterf for float parameters. Both functions take the same three parameters; the texture type (GL_TEXTURE_2D for standard 2D textures) followed by the name of the parameter you want to set and the value you want to set it to. Most parameters are optional and will use default values if you don’t change them.
Two parameters that we need to set for all textures are GL_TEXTURE_MIN_FILTER and GL_TEXTURE_MAX_FILTER, which tell OpenGL what method it should use to scale textures up or down. The GL_TEXTURE_MIN_FILTER parameter is used when the pixels of the texture (often called texels) are smaller than the pixels on the screen. The GL_TEXTURE_MAX_FILTER parameter is used when texels become larger than pixels. The following two lines set both parameters to GL_LINEAR, which makes scaled textures appear smooth and not so pixelated. We will cover other possible values later.
glTexParameteri(GL_TEXTURE_2D, GL_TEXTURE_MAG_FILTER, GL_LINEAR)
glTexParameteri(GL_TEXTURE_2D, GL_TEXTURE_MIN_FILTER, GL_LINEAR)
Next we need to call glPixelStorei(GL_UNPACK_ALIGNMENT, 1), which tells OpenGL how the rows in the raw image data have been packed together, then call glTexImage2D to upload the image data. The following lines upload the texture_data we retrieved earlier. Once this step is complete, the texture can be used to draw triangles, quads, and any other OpenGL primitive.
glPixelStorei(GL_UNPACK_ALIGNMENT, 1)
width, height = texture_surface.get_rect().size
glTexImage2D( GL_TEXTURE_2D,
0, # First mip-level
3, # Bytes per pixel
width,
height,
0, # Texture border
GL_RGB,
GL_UNSIGNED_BYTE,
texture_data)
There are a lot of parameters to glTexImage2D because OpenGL was designed to be very flexible in the image formats it supports. Fortunately we can generally stick with the parameters we described earlier when uploading texture data from a Pygame surface, although for surfaces with an alpha channel you should change the 3 to a 4, and the GL_RGB to GL_RGBA. See Table 11-1 for a more detailed explanation of the parameters to glTexImage2D.
Table 11-1. Parameters for glTexImage2D (in Function Call Order)
|
Parameter |
Explanation |
|
target |
Will typically be GL_TEXTURE_2D for image textures. OpenGL supports one-dimensional and three-dimensional textures, but these are less commonly used in games. |
|
level |
The mip map level, where 0 is the first (largest) level and 1 is the next size down. I’ll explain mip maps in a bit. |
|
internalFormat |
Indicates how the data is stored in video memory. Generally this is 3 for opaque images and 4 for images with an alpha channel, but it also accepts a number of constants for other formats. |
|
width |
Width of the image, in pixels. |
|
height |
Height of the image, in pixels. |
|
border |
Sets a border for the textures. Can be either 0 for a border, or 1 for a single-pixel border. |
|
format |
The format of the image data that is to be uploaded. This is generally either GL_RGB for opaque images, or GL_RGBA for images with an alpha channel. |
|
type |
Specifies how the components of the image are stored; typically this is GL_UNSIGNED_BYTE, for image data retrieved from a Pygame surface. |
|
data |
A string containing raw image data. |
Once the texture has been uploaded, the original Pygame surface object is no longer needed because OpenGL has a copy of it. You can either let it go out of scope and let Python clean it up for you, or call del to delete the reference. Explicit is always better than implicit, so you should use del here, but it works either way.
Texture Coordinates
When textures are enabled in OpenGL, every vertex can be assigned a texture coordinate that defines a position within the texture. When a textured polygon is rendered to the screen, the texture will be stretched between these coordinates.
OpenGL uses normalized texture coordinates, which means that no matter how many pixels are in the texture image, the width and height of the texture are always 1.0 (see Figure 11-1). So a texture coordinate of (0.5, 0.5) is always in the center of the texture. The bottom left of a texture is coordinate (0, 0) and the top right is (1, 1). The advantage of using normalized coordinates is that they will remain the same if you change the dimensions of the image.
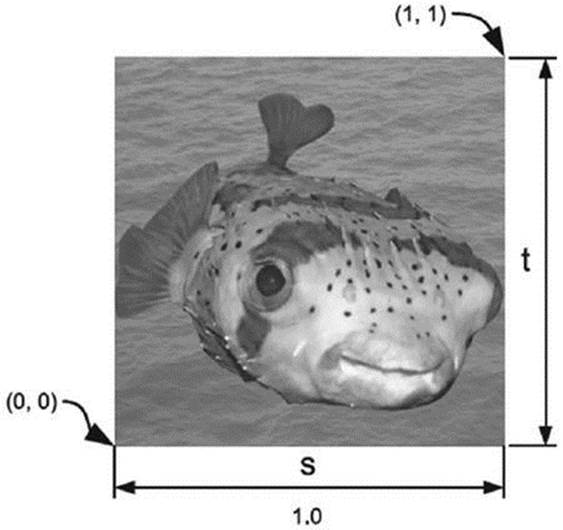
Figure 11-1. Texture coordinates
Texture coordinates can be stored in the same way that you would store a two-dimensional vector: either a tuple or a Vector2 object. Components of a texture coordinate are called s and t in OpenGL, but you can still use a Vector2 object for convenience and refer to the components as x and y. Generally, though, you rarely have to do anything with texture coordinates other than store them and send them to OpenGL as needed, so a tuple is usually the best choice.
![]() Note Some 3D APIs, tools, and books refer to texture coordinates as u and v, rather than s and t.
Note Some 3D APIs, tools, and books refer to texture coordinates as u and v, rather than s and t.
Rendering Textures
To use a texture when rendering a polygon, or any other OpenGL primitive, you must supply a texture coordinate for each vertex with the glTexCoord2f function, which takes the s and t components as parameters. The primitive will be drawn with the last texture that was bound with theglBindTexture function.
The following code draws a single quad aligned with the x and y axes. It uses texture coordinates for the four corners so that the entire image will be drawn in the quad.
# Draw a quad (4 vertices, 4 texture coords)
glBegin(GL_QUADS)
# Top left corner
glTexCoord2f(0, 1)
glVertex3f(-100, 100, 0)
# Top right corner
glTexCoord2f(1, 1)
glVertex3f(100, 100, 0)
# Bottom right corner
glTexCoord2f(1, 0)
glVertex3f(100, -100, 0)
# Bottom left corner
glTexCoord2f(0, 0)
glVertex3f(-100, -100, 0)
glEnd()
Deleting Textures
Each texture uses up video memory, which is a limited resource. When you have finished with a texture (switching levels, exiting the game, etc.), you should delete it with a call to glDeleteTextures, to free up its video memory. This function takes the id you want to delete, or a list ofids. Once the texture has been deleted, it is an error to bind it again, so you should discard the id value.
The following line deletes a single textured ID called texture_id:
glDeleteTextures(texture_id)
Seeing Textures in Action
Let’s write a script to demonstrate uploading a texture and using it when rendering an OpenGL primitive. We are going to draw a single textured quad, and to show that it isn’t simply a sprite we will rotate it around the x axis.
In the init function of Listing 11-2 is a call to glEnable(GL_TEXTURE_2D), which enables OpenGL textures. If you ever have problems getting textures to work in OpenGL, check whether you have made this call.
Listing 11-2. Textures in Action (opengltex.py)
from math import radians
from OpenGL.GL import *
from OpenGL.GLU import *
import pygame
from pygame.locals import *
SCREEN_SIZE = (800, 600)
def resize(width, height):
glViewport(0, 0, width, height)
glMatrixMode(GL_PROJECTION)
glLoadIdentity()
gluPerspective(60.0, float(width)/height, .1, 1000.)
glMatrixMode(GL_MODELVIEW)
glLoadIdentity()
def init():
glEnable(GL_TEXTURE_2D)
glClearColor(1.0, 1.0, 1.0, 0.0)
def run():
pygame.init()
screen = pygame.display.set_mode(SCREEN_SIZE, HWSURFACE|OPENGL|DOUBLEBUF)
resize(*SCREEN_SIZE)
init()
# Load the textures
texture_surface = pygame.image.load("sushitex.png")
# Retrieve the texture data
texture_data = pygame.image.tostring(texture_surface, 'RGB', True)
# Generate a texture id
texture_id = glGenTextures(1)
# Tell OpenGL we will be using this texture id for texture operations
glBindTexture(GL_TEXTURE_2D, texture_id)
# Tell OpenGL how to scale images
glTexParameteri( GL_TEXTURE_2D, GL_TEXTURE_MAG_FILTER, GL_LINEAR )
glTexParameteri( GL_TEXTURE_2D, GL_TEXTURE_MIN_FILTER, GL_LINEAR )
# Tell OpenGL that data is aligned to byte boundries
glPixelStorei(GL_UNPACK_ALIGNMENT, 1)
# Get the dimensions of the image
width, height = texture_surface.get_rect().size
# Upload the image to OpenGL
glTexImage2D( GL_TEXTURE_2D,
0,
3,
width,
height,
0,
GL_RGB,
GL_UNSIGNED_BYTE,
texture_data)
clock = pygame.time.Clock()
tex_rotation = 0.0
while True:
for event in pygame.event.get():
if event.type == QUIT:
pygame.quit()
quit()
time_passed = clock.tick()
time_passed_seconds = time_passed / 1000.
tex_rotation += time_passed_seconds * 360.0 / 8.0
# Clear the screen (similar to fill)
glClear(GL_COLOR_BUFFER_BIT)
# Clear the model-view matrix
glLoadIdentity()
# Set the modelview matrix
glTranslatef(0.0, 0.0, -600.0)
glRotate(tex_rotation, 1, 0, 0)
# Draw a quad (4 vertices, 4 texture coords)
glBegin(GL_QUADS)
glTexCoord2f(0, 1)
glVertex3f(-300, 300, 0)
glTexCoord2f(1, 1)
glVertex3f(300, 300, 0)
glTexCoord2f(1, 0)
glVertex3f(300, -300, 0)
glTexCoord2f(0, 0)
glVertex3f(-300, -300, 0)
glEnd()
pygame.display.flip()
glDeleteTextures(texture_id)
if __name__ == "__main__":
run()
The run function performs the five steps required to read in the sushitex.png image and upload the image data to OpenGL. It then draws a textured quad by sending OpenGL four texture coordinates and four vertices. Texture coordinates are sent with the glTexcoord2f function, which takes the s and t components as parameters. An alternative to glTexcoord2f is the glTexCoord2fv function, which takes a sequence (tuple, Vector2, etc.) rather than individual values.
The rotation is done with the glRotate function, which creates a rotation matrix about an axis and multiplies it by the current model-view matrix. It takes four parameters: the first parameter is the angle you want to rotate by (in degrees), followed by the x, y, and z component of the axis. For example, a call to glRotate(45, 1, 0, 0) would rotate 45 degrees around the x axis, and a call to glRotate(-30, 0, 1, 0) would rotate negative 30 degrees (i.e., 30 degrees clockwise) around the y axis. You can also use this function to rotate around any axis, and not just the three basic axes.
When you run Listing 11-2, you will see something like Figure 11-2, with a large textured quad rotating around the x axis. Try experimenting with the texture coordinate values to see the effect they have on the quad.
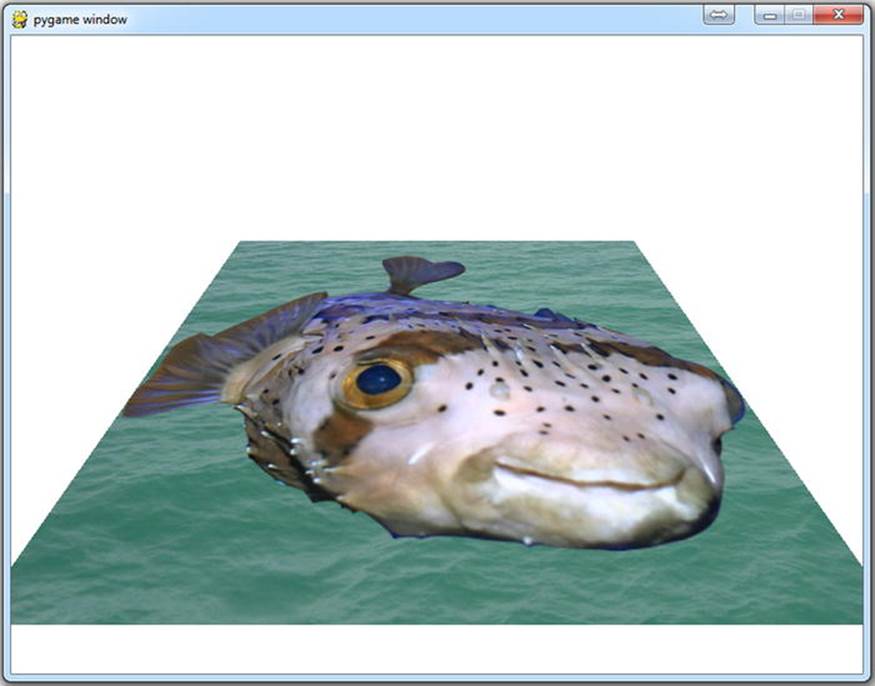
Figure 11-2. opengltex.py
Mip Mapping
When there are fewer pixels in a polygon than there are pixels from the texture it is drawn with, OpenGL has to skip some of the pixels from the texture in order to make it fit. This can result in a distortion effect in the rendered polygon, an effect that worsens the more the texture is scaled down. This distortion can be distracting in an animated 3D scene and reduces the overall quality of the visuals.
Mip mapping is a technique to minimize this effect. It works by precalculating progressively smaller versions of the texture, each with half the dimensions of the previous texture (see Figure 11-3). For instance, a texture with 256 x 256 pixels will also have a 128 x128-pixel version followed by a 64 x64-pixel version, and further smaller versions of the texture where each is half the size of the texture preceding it, down to the final texture (which is a single pixel that is an average of all the pixels in the original). When OpenGL renders a polygon with a mip mapped texture, it will use the mip level that is closest to the size of the polygon on screen, which reduces the number of skipped pixels and improves visual quality.

Figure 11-3. Mip maps
![]() Note Mip is an acronym for multum in parvo, which is Latin for “much in a small space.”
Note Mip is an acronym for multum in parvo, which is Latin for “much in a small space.”
You can upload image data for each mip level by setting the second parameter to glTexImage2D. The original—and largest—texture is mip level 0. The first mip level is 1, which should be half the dimensions of the original, and the second mip level is 2, which should be one quarter of the size of the original.
Because calculating mip levels is a common task, there is a function from the OpenGL Utility library (OpenGL.GLU) that we can use to create and upload all the mip levels in one call. The gluBuild2DMipmaps function can replace a call to glTexImage2D, and takes the same parameters, with the exception of level and border (which are not needed). For example, the following call can replace the call to glTexImage2D in Listing 11-2 (See 11-2.1.py in the source code documents for full example):
gluBuild2DMipmaps( GL_TEXTURE_2D,
3,
width,
height,
GL_RGB,
GL_UNSIGNED_BYTE,
texture_data )
The only downside of using mip mapped textures is that they use a third more video memory than non–mip mapped textures, but the improvement in visual quality is well worth it. I recommend using mip mapping for all textures used in 3D scenes. You won’t need to use mip maps for textures that aren’t scaled, such as fonts or the heads-up display.
Texture Parameters
OpenGL is very flexible in the way it renders 3D scenes. There are a number of texture parameters that can be set to create visual effects and adjust how textures are used to render polygons. This section covers some commonly used texture parameters—the full list is beyond the scope of this book, but you can read the OpenGL documentation online (https://www.opengl.org/sdk/docs/HYPERLINK “http://www.opengl.org/sdk/docs/man/)”) for all the details.
Min and Max Filters
In Listing 11-2 we set two texture parameters, GL_TEXTURE_MIN_FILTER and GL_TEXTURE_MAX_FILTER, which define the minimizing and maximizing filters for texture scaling. Both were set to GL_LINEAR, which gives good results in most cases, but there are other values that you can use to fine-tune the scaling.
When OpenGL renders a textured polygon to the screen, it samples the texture at regular intervals to calculate the color of pixels in the polygon. If the texture is mip mapped (see our earlier discussion), OpenGL also has to decide which mip level(s) it should sample. The method it uses to sample the textures and select a mip level is defined by the minimizing or maximizing filter parameter.
The only values you can set for the maximizing filter (GL_TEXTURE_MAX_FILTER) are GL_NEAREST and GL_LINEAR. Generally it is best to stick with GL_LINEAR, which makes OpenGL use bilinear filtering to smooth the texture when scaled, but textures can appear blurry at high scales. The alternative is GL_NEAREST, which looks sharper but blocky. These values are also supported by the minimizing filter (GL_TEXTURE_MIN_FILTER), in addition to four other constants that tell OpenGL how to include the mip level in the color calculation (see Table 11-2). The highest-quality setting for the minimizing filter is GL_LINEAR_MIPMAP_LINEAR, which softens the texture like GL_LINEAR but also blends between the two nearest mip levels (known as trilinear filtering). The following lines set the minimizing and maximizing filter methods to the highest-quality settings (The full code for this example is in 11-2.2.py in the source code documents):
glTexParameteri(GL_TEXTURE_2D, GL_TEXTURE_MAG_FILTER, GL_LINEAR)
glTexParameteri(GL_TEXTURE_2D, GL_TEXTURE_MIN_FILTER, GL_LINEAR_MIPMAP_LINEAR)
Table 11-2. Potential Values for Min and Max Filter Parameters
|
Parameter Constant |
Sample Effect |
|
GL_NEAREST |
Selects the texel nearest to the sample point. This keeps the texture looking sharp, but can appear low quality. |
|
GL_LINEAR |
Selects the four texels nearest to the sample point and blends between them. This smoothes the rendered texture and makes it appear less jagged when scaled. |
|
GL_NEAREST_MIPMAP_NEAREST |
Selects the texel nearest to the sample point, and the mip level that is closest to the size of the pixel being rendered. Minimizing filter only. |
|
GL_LINEAR_MIPMAP_NEAREST |
Blends between the four texels nearest to the sample point and selects the mip level that is closest to the size of the pixel being rendered. Minimizing filter only. |
|
GL_NEAREST_MIPMAP_LINEAR |
Selects the texel nearest to the sample point and blends between the two mip levels that most closely match the size of the pixel being rendered. Minimizing filter only. |
|
GL_LINEAR_MIPMAP_LINEAR |
Blends between the four texels nearest to the sample point and blends between the two mip levels that most closely match the size of the pixel being rendered. Minimizing filter only. |
Texture Wrapping
A texture coordinate with components in the zero to one range will refer to a point inside the texture, but it is not an error to have a texture coordinate with components outside that range—in fact, it can be very useful. How OpenGL treats coordinates that are not in the zero to one range is defined by the GL_TEXTURE_WRAP_S and GL_TEXTURE_WRAP_T texture parameters. The default for these parameters is GL_REPEAT, which causes samples that go off one edge of the texture to appear on the opposite edge. This creates the effect of tiling the texture, so that multiple copies of it are placed edge to edge. You can see this in action by editing the calls to glTexCoord2f in Listing 11-2. Try replacing the lines between the calls to glBegin and glEnd with the following (see 11-2.3.py in the source code documents for this code included in the entire script):
glTexCoord2f(0, 3)
glVertex3f(-300, 300, 0)
glTexCoord2f(3, 3)
glVertex3f(300, 300, 0)
glTexCoord2f(3, 0)
glVertex3f(300, -300, 0)
glTexCoord2f(0, 0)
glVertex3f(-300, -300, 0)
If you run the edited Listing 11-2, you should see something like Figure 11-4. Only a single quad is drawn, but the texture is repeated 9 times because the texture components range from 0 to 3. Tiling textures like this is useful in games because you can texture very large polygons without having to break them up in to smaller pieces. For example, a long piece of fence could be created with a single elongated quad and a tiled texture, which is more efficient than small quads for each piece of fence.

Figure 11-4. Repeating texture coordinates
Repeating textures has the same effect as transforming the components of every texture coordinate with the following Python function (although the wrapping is done by your graphics card and not Python). The % symbol is the modulus operator, which returns the remainder in a division, so % 1.0 would return the fractional part of a number.
def wrap_repeat(component):
return component % 1.0
![]() Tip Tiling works best with textures that have been designed to be seamless—that is, if you place them side by side you can’t see where one ends and the other begins.
Tip Tiling works best with textures that have been designed to be seamless—that is, if you place them side by side you can’t see where one ends and the other begins.
An alternative setting for the wrap parameter is GL_MIRRORED_REPEAT, which is similar to GL_REPEAT but mirrors the sample point when it goes over the texture edge. To see this in action, insert the following two lines before the while True: line in the run function of Listing 11-2, see 11-2.4 in the source code documents for the full example:
glTexParameteri(GL_TEXTURE_2D, GL_TEXTURE_WRAP_S, GL_MIRRORED_REPEAT)
glTexParameteri(GL_TEXTURE_2D, GL_TEXTURE_WRAP_T, GL_MIRRORED_REPEAT)
Now when you run Listing 11-2 you should see that the repeated images are mirrored around the s and t axes of the texture. The mirrored repeat setting is a good way of making textures appear seamless, even if they weren’t designed to be. The Python equivalent ofGL_MIRRORED_REPEAT is as follows:
def wrap_mirrored_repeat(component):
if int(component) % 2:
return 1.0 - (component % 1.0)
else:
return component % 1.0
The final texture wrap setting we will look at is GL_CLAMP_TO_EDGE, which saturates the texture components to a range of zero to one. If a texture component goes outside of that range, it is set to zero or one, depending on which is closest to the original value. The visual effect of saturating the texture components is that the outside edge of the texture is repeated indefinitely when OpenGL samples outside the texture borders. This setting is useful when you have texture coordinates that are very near to the texture edges but you want to make sure that OpenGL doesn’t sample a point over the texture edge (which can happen if you have the GL_LINEAR filter setting enabled). To see the effect of this setting, change the calls to glTexParameteri to the following (see 11-2.5.py for a full-code example in the source code documents):
glTexParameteri(GL_TEXTURE_2D, GL_TEXTURE_WRAP_S, GL_CLAMP_TO_EDGE)
glTexParameteri(GL_TEXTURE_2D, GL_TEXTURE_WRAP_T, GL_CLAMP_TO_EDGE)
The following function is the Python equivalent of GL_CAMP_TO_EDGE:
def wrap_clamp_to_edge(component):
if component > 1.0:
return 1.0
elif component < 0.0:
return 0.0
return component
We have been setting the values of GL_TEXTURE_WRAP_S and GL_TEXTURE_WRAP_T to the same value, but they can be set independently if you need to. To create a fence quad, for example, we might want the texture to repeat horizontally (on the s component), but not vertically (t component).
Try experimenting with Listing 11-2 to see the effects of combining texture wrap parameters.
Working with Models
Three-dimensional models are rarely defined directly in code. Generally they are read in from files produced with 3D applications such as 3D Studio or Blender. This section covers how 3D models are stored in files, and how to read and display them in the game.
Storing Models
As with images, there are a variety of file formats that can be used to store a 3D model, each produced by a different manufacturer with a different set of features in mind. Unlike images, there are no clear winners when it comes to storing models for a game, and there are many to choose from.
Models can be stored either as binary or text. Binary formats pack the information very efficiently and tend to produce smaller files, whereas text formats store the information as lines of text, which produces files that are larger but easier to work with.
Files for storing 3D information will contain at least a list of vertices, and will probably also contain a list of texture coordinates and normals. Many also contain additional information regarding textures and lighting. You don’t have to use all the information in a 3D model, but the more features of the format you implement, the more closely it will resemble the model that was created by the artist.
![]() Tip Many game developers publish the 3D model format used in their games. You may be able to test your game with characters taken from a commercial game—but be careful about breaking copyright laws!
Tip Many game developers publish the 3D model format used in their games. You may be able to test your game with characters taken from a commercial game—but be careful about breaking copyright laws!
OBJ Format for 3D Models
To work with 3D models we are going to use the Wavefront OBJ format (extension .obj), which is a simple text format that has been in existence for many years. Most software that works with 3D models will be able to at least write OBJ files, and probably read them as well. They are text based, so you can open them in a text editor such as Windows Notepad, or the equivalent on other platforms.
OBJ files often come with a material library file (with the extension .mtl), which contains various settings that define how the polygons in the model should be rendered, including the filename of the texture.
Parsing OBJ Files
Each line in an OBJ file defines a single piece of information (vertex, texture coordinate, etc.) and consists of one or more words, separated by spaces. The first word indicates what the line contains, and the remaining words are the information itself. For example, the following line defines a single vertex at (–100, 50, –20):
v –100 50 –20
Python is very good at reading text files and has built-in support for reading one line at a time. If you iterate over an open file object, it will return a string containing each line. Here is how we might begin writing Python code to parse a 3D model stored in an OBJ file:
obj_file = file("tank.obj")
for line in obj_file:
words = line.split() # Split line on spaces
command = words[0]
data = words[1:]
Each pass through the for loop returns the next line in the file. Inside the loop we split the line into words. The first word is named command and the remaining words are stored in a list called data. A complete parser would select an action based on the value of command, and use any information contained in the data list.
Table 11-3 contains some commonly used commands in an OBJ file. There are more possible commands, but these can be used to store the kind of 3D models that are used in a game. We can use the information in Table 11-3 to read and display a 3D model of a tank.
Table 11-3. Lines in a Wavefront OBJ File
|
Line |
Explanation |
|
# |
Indicates the line is a comment and should be ignored by the software. |
|
f <vertex1> <vertex2> etc. |
Defines a face in the model. Each word consists of three values separated by forward slashes: the vertex index, the texture coordinate index, and the normal index. There is a triplet of values for each point in the face (3 for a triangle, 4 for a quad, etc.). |
|
mtllib <filename> |
Specifies the material library for the OBJ file. |
|
usemtl <material name> |
Selects a material from the material library. |
|
v <x> <y> <z> |
Defines a vertex at x, y, z. |
|
vt <s> <t> |
Defines a texture coordinate. |
Material Library Files
Wavefront OBJ files are often partnered with a material library file that contains the texture and lighting information. When you encounter a mtlib command in the OBJ file, it introduces a material library file that contains this extra information. The filename of the material library is given in the first word of the command data, and should be appended with the extension .mtl.
Material libraries are also text files, and can be parsed in the same way as the parent OBJ file. In the material library file, the newmtl command begins a new material, which contains a number of parameters. One of these parameters is the texture filename, which is introduced with themap_Kd command. For example, the following lines from a material file would define a texture called tankmaterial that has a texture with the filename tanktexture.png:
newmtl tankmaterial
map_Kd tanktexture.png
Seeing Models in Action
Let’s write a class to load a Wavefront OBJ file and render it with OpenGL. I have created a model of a futuristic tank (see Figure 11-5), which was built with AC3D (www.inivis.com/) and exported it as mytank.obj and mytank.mtl. My artistic skills are limited; feel free to replace my model with your own 3D object. You can use any 3D modeler software that has the capability to export OBJ files.
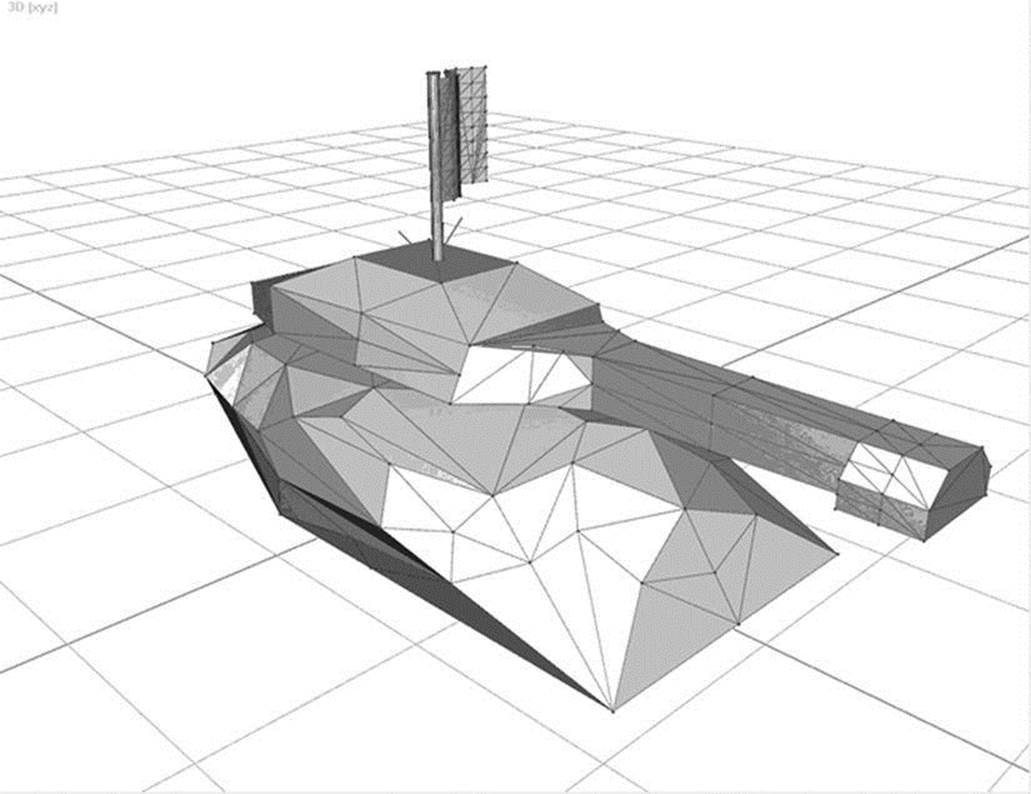
Figure 11-5. Futuristic tank object in AC3D
The class we are building is called Model3D and is responsible for reading the model and storing its geometry (vertices, texture coordinates, models, etc.). It can also send the geometry to OpenGL to render the model. See Table 11-4 for the details of what Model3D needs to store.
Table 11-4. Information Stored in the Model3D Class
|
Name |
Purpose |
|
self.vertices |
A list of vertices (3D points), stored as tuples of three values (for x, y, and z). |
|
self.tex_coords |
A list of texture coordinates, stored as tuples of two values (for s and t). |
|
self.normals |
A list of normals, stored as tuples of three values (for x, y, and z). |
|
self.materials |
A dictionary of Material objects, so we can look up the texture filename given the name of the material. |
|
self.face:groups |
A list of FaceGroup objects that will store the faces for each material. |
|
self.display_list_id |
A display list id that we will use to speed up OpenGL rendering. |
In addition to the Model3D class, we need to define a class to store materials and face groups, which are polygons that share the same material. Listing 11-3 is the beginning of the Model3D class.
Listing 11-3. Class Definitions in model3d.py
# A few imports we will need later
from OpenGL.GL import *
from OpenGL.GLU import *
import pygame
import os.path
class Material(object):
def init (self):
self.name = ""
self.texture_fname = None
self.texture_id = None
class FaceGroup(object):
def init (self):
self.tri_indices = []
self.material_name = ""
class Model3D(object):
def init (self):
self.vertices = []
self.tex_coords = []
self.normals = []
self.materials = {}
self.face:groups = []
# Display list id for quick rendering
self.display_list_id = None
Now that we have the basic class definitions, we can add a method to Model3D that will open an OBJ file and read the contents. Inside the read_obj method (see Listing 11-4), we go through each line of the file and parse it into a command string and a data list. A number of ifstatements decide what to do with the information store in data.
Listing 11-4. Method to Parse OBJ Files
def read_obj(self, fname):
current_face:group = None
file_in = open(fname)
for line in file_in:
# Parse command and data from each line
words = line.split()
command = words[0]
data = words[1:]
if command == 'mtllib': # Material library
model_path = os.path.split(fname)[0]
mtllib_path = os.path.join( model_path, data[0] )
self.read_mtllib(mtllib_path)
elif command == 'v': # Vertex
x, y, z = data
vertex = (float(x), float(y), float(z))
self.vertices.append(vertex)
elif command == 'vt': # Texture coordinate
s, t = data
tex_coord = (float(s), float(t))
self.tex_coords.append(tex_coord)
elif command == 'vn': # Normal
x, y, z = data
normal = (float(x), float(y), float(z))
self.normals.append(normal)
elif command == 'usemtl' : # Use material
current_face:group = FaceGroup()
current_face:group.material_name = data[0]
self.face:groups.append( current_face:group )
elif command == 'f':
assert len(data) == 3, "Sorry, only triangles are supported"
# Parse indices from triples
for word in data:
vi, ti, ni = word.split('/')
indices = (int(vi) - 1, int(ti) - 1, int(ni) - 1)
current_face:group.tri_indices.append(indices)
for material in self.materials.values():
model_path = os.path.split(fname)[0]
texture_path = os.path.join(model_path, material.texture_fname)
texture_surface = pygame.image.load(texture_path)
texture_data = pygame.image.tostring(texture_surface, 'RGB', True)
material.texture_id = glGenTextures(1)
glBindTexture(GL_TEXTURE_2D, material.texture_id)
glTexParameteri( GL_TEXTURE_2D,
GL_TEXTURE_MAG_FILTER,
GL_LINEAR)
glTexParameteri( GL_TEXTURE_2D,
GL_TEXTURE_MIN_FILTER,
GL_LINEAR_MIPMAP_LINEAR)
glPixelStorei(GL_UNPACK_ALIGNMENT,1)
width, height = texture_surface.get_rect().size
gluBuild2DMipmaps( GL_TEXTURE_2D,
3,
width,
height,
GL_RGB,
GL_UNSIGNED_BYTE,
texture_data)
One of the first commands in an OBJ file is usually mtllib, which tells us the name of the material library file. When this command is encountered, we pass the filename of the material library to the read_mtllib method (which we will write later).
If the command consists of geometry (vertex, texture coordinate, or normal), it is converted to a tuple of float values and stored in the appropriate list. For instance, the line v 10 20 30 would be converted to the tuple (10, 20, 30) and appended to self.vertices.
Before each group of faces is a usemtl command, which tells us which material subsequent faces will use. When read_obj encounters this command, it creates a new FaceGroup object to store the material name and the face information that will follow.
Faces are defined with the f command, and consist of a word for each vertex in the face (3 for triangles, 4 for quads, etc.). Each word contains indices into the vertex, texture coordinate, and normal lists, separated by a forward slash character (/). For instance, the following line defines a triangle where the first point uses vertex 3, texture coordinate 8, and normal 10. These triplets of indices are stored in the current face group, and will be used to reconstruct the model shape when we come to render it.
Following the code to parse each line in the OBJ file we enter a loop that reads the textures in the material dictionary and uploads them to OpenGL. We will be using mip mapping and high-quality texture scaling.
![]() Note For simplicity, the Model3D class only works with OBJ files that contain triangles. If your model contains quads or other polygons, you will need to convert it to triangles with your 3D modeler.
Note For simplicity, the Model3D class only works with OBJ files that contain triangles. If your model contains quads or other polygons, you will need to convert it to triangles with your 3D modeler.
The method to read the materials is similar to the read_obj method, but simpler because we are only interested in the texture name. There is other information stored in the material, but for the sake of simplicity we will ignore it for now.
In a material library file, the newmtl command begins a new material definition, and the map_Kd command sets the texture filename. The read_mtllib method (Listing 11-5) extracts this information and stores it in the self.materials dictionary.
Listing 11-5. Parsing the Material Library
def read_mtllib(self, mtl_fname):
file_mtllib = open(mtl_fname)
for line in file_mtllib:
words = line.split()
command = words[0]
data = words[1:]
if command == 'newmtl':
material = Material()
material.name = data[0]
self.materials[data[0]] = material
elif command == 'map_Kd':
material.texture_fname = data[0]
These two functions (read_obj and read_mtllib) are enough to read all the information we need from OBJ files, and we can now write the code to send the geometry to OpenGL. The draw method (see Listing 11-6) goes through each of the face groups, binds a texture, and sends OpenGL the data from the geometry lists.
Listing 11-6. Sending the Geometry to OpenGL
def draw(self):
vertices = self.vertices
tex_coords = self.tex_coords
normals = self.normals
for face:group in self.face:groups:
material = self.materials[face:group.material_name]
glBindTexture(GL_TEXTURE_2D, material.texture_id)
glBegin(GL_TRIANGLES)
for vi, ti, ni in face:group.tri_indices:
glTexCoord2fv( tex_coords[ti] )
glNormal3fv( normals[ni] )
glVertex3fv( vertices[vi] )
glEnd()
def draw_quick(self):
if self.display_list_id is None:
self.display_list_id = glGenLists(1)
glNewList(self.display_list_id, GL_COMPILE)
self.draw()
glEndList()
glCallList(self.display_list_id)
Sending the geometry one vertex at a time can be slow, so there is also a draw_quick method that compiles a display list containing the model geometry, which can then be rendered with a single call to glCallList.
The Model3D class now contains everything we need to load and render a 3D model, but before we use it we should write the code to clean up the OpenGL resources we have used. Listing 11-7 adds a free_resources method to Model3D that deletes the display list and any texture that were created. This method can be called when you no longer need the model, or you can let it be called automatically by the __del__ method, which is called by Python when there are no more references left to the object.
Listing 11-7. Cleaning Up OpenGL Resources
def __del__(self):
#Called when the model is cleaned up by Python
self.free_resources()
def free_resources(self):
# Delete the display list and textures
if self.display_list_id is not None:
glDeleteLists(self.display_list_id, 1)
self.display_list_id = None
# Delete any textures we used
for material in self.materials.values():
if material.texture_id is not None:
glDeleteTextures(material.texture_id)
# Clear all the materials
self.materials.clear()
# Clear the geometry lists
del self.vertices[:]
del self.tex_coords[:]
del self.normals[:]
del self.face:groups[:]
![]() Note It is a good idea to manually call the free_resources function, because it may cause errors if Python cleans up your Model3D object after PyOpenGL has quit.
Note It is a good idea to manually call the free_resources function, because it may cause errors if Python cleans up your Model3D object after PyOpenGL has quit.
Using the Model3D Class
Let’s write a script that uses our Model3D class to load and render a model. Listing 11-8 creates a Model3D object and uses it to read mytank.obj (and materials).
Listing 11-8. Rendering the Tank Model (tankdemo.py)
from math import radians
from OpenGL.GL import *
from OpenGL.GLU import *
import pygame
from pygame.locals import *
# Import the Model3D class
import model3d
SCREEN_SIZE = (800, 600)
def resize(width, height):
glViewport(0, 0, width, height)
glMatrixMode(GL_PROJECTION)
glLoadIdentity()
gluPerspective(60.0, float(width)/height, .1, 1000.)
glMatrixMode(GL_MODELVIEW)
glLoadIdentity()
def init():
# Enable the GL features we will be using
glEnable(GL_DEPTH_TEST)
glEnable(GL_LIGHTING)
glEnable(GL_COLOR_MATERIAL)
glEnable(GL_TEXTURE_2D)
glEnable(GL_CULL_FACE)
glShadeModel(GL_SMOOTH)
glClearColor(1.0, 1.0, 1.0, 0.0) # white
# Set the material
glMaterial(GL_FRONT, GL_AMBIENT, (0.0, 0.0, 0.0, 1.0))
glMaterial(GL_FRONT, GL_DIFFUSE, (0.2, 0.2, 0.2, 1.0))
glMaterial(GL_FRONT, GL_SPECULAR, (1.0, 1.0, 1.0, 1.0))
glMaterial(GL_FRONT, GL_SHININESS, 10.0)
# Set light parameters
glLight(GL_LIGHT0, GL_AMBIENT, (0.0, 0.0, 0.0, 1.0))
glLight(GL_LIGHT0, GL_DIFFUSE, (0.4, 0.4, 0.4, 1.0))
glLight(GL_LIGHT0, GL_SPECULAR, (1.0, 1.0, 1.0, 1.0))
# Enable light 1 and set position
glEnable(GL_LIGHT0)
glLight(GL_LIGHT0, GL_POSITION, (0, .5, 1, 0))
def run():
pygame.init()
screen = pygame.display.set_mode(SCREEN_SIZE, HWSURFACE|OPENGL|DOUBLEBUF)
resize(*SCREEN_SIZE)
init()
clock = pygame.time.Clock()
# Read the model
tank_model = model3d.Model3D()
tank_model.read_obj('mytank.obj')
rotation = 0.0
while True:
for event in pygame.event.get():
if event.type == QUIT:
pygame.quit()
quit()
glClear(GL_COLOR_BUFFER_BIT | GL_DEPTH_BUFFER_BIT)
time_passed = clock.tick()
time_passed_seconds = time_passed / 1000.0
glLoadIdentity()
glRotatef(15, 1, 0, 0)
glTranslatef(0.0, -1.5, -3.5)
rotation += time_passed_seconds * 45.0
glRotatef(rotation, 0, 1, 0)
tank_model.draw_quick()
pygame.display.flip()
if __name__ == "__main__":
run()
The init function in Listing 11-8 enables the OpenGL features we will be using. It also sets parameters for the material and light, which will give the tank a metallic look. We will cover material and lighting parameters in the next chapter.
Before the tank is drawn, the model-matrix is set so that the camera is slightly above the tank and looking down on it—this gives a slightly more interesting viewpoint than looking at it along the z axis.
The call to glRotatef(15, 1, 0, 0) creates a rotation matrix of 15 degrees around the x axis, which is the equivalent of looking down a little. This rotation matrix is multiplied by a translation matrix, with a call to glTranslatef(0.0, -1.5, -3.5), which effectively moves the tank down by 1.5 units and back by 3.5 units. The second call to glRotatef makes the tank rotate about the y axis so we can see it in motion.
When you run Listing 11-8, you should see a formidable-looking tank rotating about the y axis (see Figure 11-6). If you have a better model you would like to use in place of the tank, then replace mytank.obj with the filename of your model.
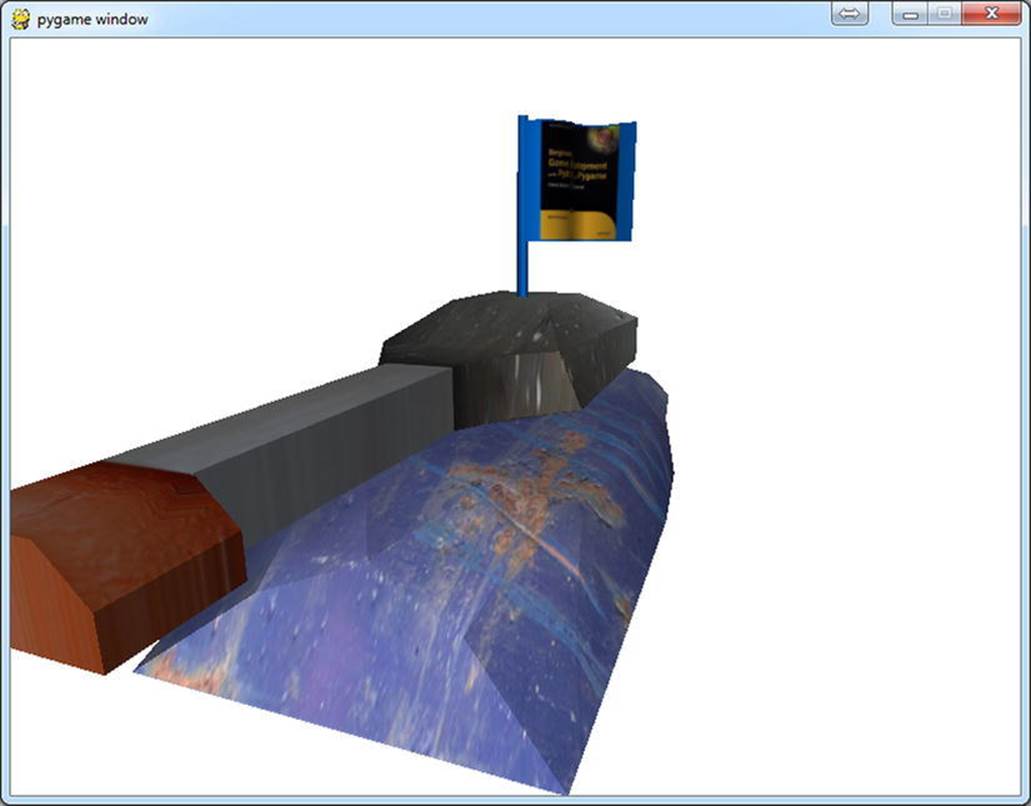
Figure 11-6. tankdemo.py
![]() Note Not all 3D modeler applications use the same scale. If you find that your model is extremely large or very small, you may have to scale it before exporting, or change the code to view the object at a different distance.
Note Not all 3D modeler applications use the same scale. If you find that your model is extremely large or very small, you may have to scale it before exporting, or change the code to view the object at a different distance.
Summary
Textures are the primary way of making a 3D scene look convincing because you can apply images of the real world to objects in your game. Photographs are a great way of creating textures—a digital camera is a fantastic tool for game development! Or you can use images from other sources; the Pygame wiki (www.pygame.org/wiki/resources) has a great collection of links to sites with free textures.
Because OpenGL was created independently of Pygame, there is no one function that you can use to read and upload an image to be used as a texture; a few steps are required to get the image data from a file to high-speed video memory. If you use the steps outlined in this chapter, you should have no problem working with textures. Be sure to set the minimizing and maximizing texture parameters, as well as the wrapping functions.
You learned how to read a 3D model from a file and render it with OpenGL. The Wavefront OBJ format is well supported, and you may find the Model3D class adequate for any games you write. Or you may want to expand the read_obj method to cover more features (e.g., quads). If you want to support other formats in your game, you can probably find the documentation you need on the Web. Writing parsers can be challenging, but it’s a great way to come to grips with the details of 3D model creation.
In the next chapter, you will learn how to work with OpenGL lighting and create impressive special effects that will add polish to your game.
All materials on the site are licensed Creative Commons Attribution-Sharealike 3.0 Unported CC BY-SA 3.0 & GNU Free Documentation License (GFDL)
If you are the copyright holder of any material contained on our site and intend to remove it, please contact our site administrator for approval.
© 2016-2026 All site design rights belong to S.Y.A.