Beginning Python Games Development With Pygame (2015)
CHAPTER 12
Setting the Scene with OpenGL
You’ve come quite far with OpenGL, having learned how to render and manipulate objects in a 3D scene. In this chapter, we will cover lighting in more detail and introduce you to other OpenGL features that will help you to add polish to your game.
Understanding Lighting
I introduced you to OpenGL’s lighting capabilities in Chapter 7, but glossed over some of the details. In this section, we will explore how to work with lights and use them to add greater realism to a 3D scene.
OpenGL uses the normals that you assign to the vertices or faces of a model to calculate the color of light that will be seen by the player. These colors are used when rendering polygons in the scene, either by assigning a single color per face (flat shading), or by blending colors between the vertices (if smooth shading is enabled). The more detailed a model is, the more convincing the lighting will be, because colors are only calculated for entire faces or vertices and not for every pixel in the polygon.
OpenGL supports three types of lights:
· Directional lights: A directional light is a source of light where the rays are parallel to one another. The sun is generally treated as a directional light—even though it is technically a point light source—because it is so far away that by the time the light has reached the earth the rays are virtually parallel.
· Point lights (also called positional lights): A point light is a light source that is emitted from a single point and is used to represent most close-by lights in a scene. Common uses for point light sources are bulbs, flames, and special effects.
· Spotlights: A spotlight is similar to a point light in that it is emitted from a single point but the rays are focused onto a circular area, creating a cone shape with the point as the tip. We won’t cover OpenGL spotlights here, because they are not often used in games, but if you are interested, see the OpenGL documentation online at www.opengl.org/sdk/ docs/man/. Spotlight-like effects can be achieved in other ways, usually with blending, which I cover later in this chapter.
Enabling Lighting
To enable lighting in OpenGL, simply call glEnable(GL_LIGHTING). If you need to disable lighting temporarily—to render fonts, for example—call glDisable(GL_LIGHTING). You will also need to enable the individual lights you want to use in a scene, which you can also do with glEnable by passing in one of the light constants (GL_LIGHT0 to GL_LIGHT7).
Setting Light Parameters
There are a number of parameters for lights that can be set with the glLight function. This function takes a constant for the light you want to set (GL_LIGHT0 through GL_LIGHT7), followed by a constant for the parameter you want to set and the value you want to set it to. See Table 12-1 for a list of the light parameters. (This table doesn’t cover the parameters used in spotlights. See the OpenGL documentation for the full list.)
Table 12-1. Light Parameters
|
Parameter Name |
Type |
Explanation |
|
GL_POSITION |
Point |
Sets the position of the light GL_AMBIENT |
|
GL_AMBIENT |
Color |
Sets the ambient intensity of the light |
|
GL_DIFFUSE |
Color |
Sets the diffuse color of light |
|
GL_SPECULAR |
Color |
Sets the color of the specular highlight the light will create |
|
GL_CONSTANT_ATTENUATION |
Number |
Specifies the constant attenuation factor |
|
GL_LINEAR_ATTENUATION |
Number |
Specifies the linear attenuation factor |
|
GL_QUADRATIC_ATTENUATION |
Number |
Specifies the quadratic attenuation factor |
The GL_POSITION parameter is used to set the position and type of light that will be created. It takes the x, y, and z coordinates of the position and an additional parameter called w. The light will be directional if w is set to 0.0, or positional (a point light), if w is set to 1.0. The following two lines create a directional light at (1.0, 1.0, 1.0), and a positional light at coordinate (50.0, 100.0, 0.0):
glLight(GL_LIGHT0, GL_POSITION, (1.0, 1.0, 1.0, 0.0))
glLight(GL_LIGHT1, GL_POSITION, (50.0, 100.0, 0.0, 1.0))
Directional lights send out parallel rays in the direction of the origin, so the positional light at (1.0, 1.0, 1.0) would simulate an infinitely faraway light source that is above-right and behind the current viewpoint. The positional light sends rays in all directions from coordinate (50.0, 100.0, 0.0).
There are also three-color values that can be set for lights: ambient, diffuse, and specular. Ambient color is used to simulate the effects of indirect light reflected from other objects in the scene. On a sunny day, the ambient color would be quite bright, because even in shade there would be enough light to see by. Conversely, in a cave illuminated with a single oil lamp, the ambient color would be dark, possibly even black, to create pitch-blackness in unlit areas.
The diffuse color of a light is the main color of the light that will illuminate the surrounding scene, and depends on the light source you are trying to simulate; sunlight will likely be bright white, but other light sources, such as candles, fireballs, and magic spells, may have different colors.
The final color value for light is the specular color, which is the color of highlights produced by reflective or polished surfaces. If you look at a shiny object, you will see bright points where the light is reflected directly into your eye. In OpenGL, the color of these bright spots is determined with the specular color parameter.
The following three calls to glLight would create a light that would work well as a fireball or rocket:
glLight(GL_LIGHT1, GL_AMBIENT, (0.05, 0.05, 0.05))
glLight(GL_LIGHT1, GL_DIFFUSE, (1.0, 0.2, 0.2))
glLight(GL_LIGHT1, GL_SPECULAR, (1.0, 1.0, 1.0))
The ambient is a dark gray because we want the effect to be localized and not contribute much light outside of a short distance. The diffuse is a bright flame red, and the specular is intense white to cause brilliant highlights in nearby surfaces.
Lights also have three attenuation factors, which define how the brightness of a point light source changes over distance. The three factors, constant, linear, and quadratic, are used by OpenGL to calculate a single number that is multiplied by the colors produced by the lighting calculations. The formula that OpenGL uses is equivalent to the get_attenuation function in Listing 12-1, which takes the distance of a point from the light source followed by the three attenuation factors. The return value of get_attenuation is a number that indicates the brightness of the light at a distance from the source.
Listing 12-1. Function That Calculates the Attenuation Factor
def get_attenuation(distance, constant, linear, quadratic):
return 1.0 / (constant + linear * distance + quadratic * (distance ** 2))
![]() Note The maximum brightness level that OpenGL can use is 1.0—values greater than 1.0 will not have any additional effect.
Note The maximum brightness level that OpenGL can use is 1.0—values greater than 1.0 will not have any additional effect.
For a fireball effect, we would probably want to make the emitted light intense in the immediate area surrounding the visual effect but fade away quickly. The following calls to glLight set the three attenuation factors so that the light is at full intensity in a one-unit radius but quickly drops off until it barely contributes any light a few units away:
glLight(GL_LIGHT1, GL_CONSTANT_ATTENUATION, 0.5)
glLight(GL_LIGHT1, GL_LINEAR_ATTENUATION, 0.3)
glLight(GL_LIGHT1, GL_QUADRATIC_ATTENUATION, 0.2)
![]() Note Attenuation requires OpenGL to do a little more work for each polygon rendered and can have a performance impact on your game—although it probably won’t be noticeable unless you have an old graphics card. Our game here has very few polygons relative to what modern games put out, so it definitely should not be an issue here.
Note Attenuation requires OpenGL to do a little more work for each polygon rendered and can have a performance impact on your game—although it probably won’t be noticeable unless you have an old graphics card. Our game here has very few polygons relative to what modern games put out, so it definitely should not be an issue here.
Working with Materials
A material in OpenGL is a collection of parameters that define how polygons should interact with light sources. These parameters are set with the glMaterial function, and are combined with the light parameters to generate the final colors used when rendering. The first parameter toglMaterial is typically GL_FRONT, which sets the parameters for polygons facing the camera, but can also be GL_BACK for polygons facing away from the camera—or GL_FRONT_AND_BACK for both. For models that are completely enclosed—that is, you can’t see inside them—you can stick with GL_FRONT because only the front faces will be visible (unless you are inside the model!). The second parameter to glMaterial is a constant for the material parameter you want to set, and the final parameter is the value you want to set it to. Table 12-2 lists the material parameters you can use.
Table 12-2. Material Parameters
|
Parameter Name |
Type |
Explanation |
|
GL_AMBIENT |
Color |
Sets the ambient contribution of the material color. |
|
GL_DIFFUSE |
Color |
Sets the diffuse color of the material. |
|
GL_SPECULAR |
Color |
Sets the color of specular highlights on a material. |
|
GL_SHININESS |
Number |
Specifies a value, between 0 and 128, that defines the shininess of the material. |
|
GL_EMISSION |
Color |
Specifies the emissive color of the material. |
The ambient, diffuse, and specular color parameters have the same meaning as they do for lights, and are combined with the corresponding light parameter. The GL_SHININESS parameter defines the size of specular highlights on a material. Higher values produce small highlights, which make the material appear hard or polished. Lower values create more matte-looking materials. The GL_EMISSION parameter defines the emissive color of the material, which is the color of light emitted from the material itself. Materials can’t be used as light sources in OpenGL, but setting the emissive color will make a model appear to have its own internal illumination.
Tweaking Parameters
Selecting parameters for the material and lights is more of an art than a science; experimentation is generally the best way of getting the look you are looking for. The material and light settings for the spinning tank in the previous chapter (Listing 11-8) were selected to make the tank appear metallic. Try experimenting with the material values for the tank to create a different look. You should be able to make it look like a plastic toy or a wooden model by changing some of the parameters.
![]() Tip Lighting parameters can be varied over time to produce some interesting effects.
Tip Lighting parameters can be varied over time to produce some interesting effects.
Managing Lights
You have at least eight OpenGL lights at your disposal when rendering a scene, but it is easy to imagine a need for more than this. Consider a scene set in a church; there may moonlight from the windows, a few flickering lamps, and numerous candles on the altar. We can’t have all those light sources active in one frame, so how do we manage them all? The first step is to combine close light sources into a single light. The candles on the altar are a perfect candidate for this; although there are many light sources, the player probably won’t notice if they are replaced with a single point light source being emitted from somewhere in the center of a group of candles. The next step to reducing the number of lights used is to prioritize bright and/or close lights over lights that are further away or not very bright. If we perform these steps for every frame, we can keep the number of lights down without impacting the visual quality of the scene.
The number of lights in a scene can also affect the frame rate of your game because OpenGL has to do a set of calculations for each additional light. You may want to set the maximum number of lights used in your game to be lower than the maximum that OpenGL can handle, in order to improve performance.
Understanding Blending
So far when we have rendered polygons, the colors from the textures have completely replaced the pixels of the screen beneath them—which is what we need when rendering solid objects but won’t help us render translucent objects. For this we need to make use of OpenGL’s blendingfeatures, which combine the colors from the texture with the colors from the surface underneath it.
Blending is also essential for creating many of the effects that players take for granted in today’s games as it can be used to create anything from a smudge on a car windshield to spectacular explosions. In this section, we will explore how to use blending in your game, and examine some of the effects that can be created with it.
Using Blending
When OpenGL performs blending, it samples a color from the source and destination (i.e., the texture and the screen), and then combines the two colors with a simple equation to produce the final color that is written to the screen. OpenGL does the math on the colors, but if it were written in Python it may look something like this:
src = texture.sample_color()
dst = screen.sample_color()
final_color = blend_equation(src * src_factor, dst * dst_factor)
screen.put_color(final_color)
The src and dst values are the two colors sampled from the texture and screen. These colors are each multiplied by a blend factor (src_factor and dst_factor), and combined with a blend_equation function that produces the final color written to the screen. Combining different blend factors and blend equations can produce a large number of visual effects.
In OpenGL terms, the blend factors are set with the glBlendFunc function, which takes two constants for the source and destination factors. For example, a call to glBlendFunc(GL_SRC_ALPHA, GL_ONE_MINUS_SRC_ALPHA) would multiply the source color by the source’s alpha component and the destination color by one minus the source’s alpha component. See Table 12-3 for a full list of possible blend factors.
Table 12-3. Blend Factor Constants
|
Blend Factor Constant |
Explanation |
|
GL_ZERO |
Multiplies by zero |
|
GL_ONE |
Multiplies by one |
|
GL_SRC_COLOR |
Multiplies by source |
|
GL_ONE_MINUS_SRC_COLOR |
Multiplies by one minus the source color |
|
GL_DST_COLOR |
Multiplies by destination |
|
GL_ONE_MINUS_DST_COLOR |
Multiplies by one minus the destination color |
|
GL_SRC_ALPHA |
Multiplies by the source alpha component |
|
GL_ONE_MINUS_SRC_ALPHA |
Multiplies by the inverse of the source alpha component |
|
GL_DST_ALPHA |
Multiplies by the destination alpha |
|
GL_ONE_MINUS_DST_ALPHA |
Multiplies by the inverse of the destination alpha |
|
GL_CONSTANT_COLOR |
Multiplies by a constant color (set with glBlendColor) |
|
GL_ONE_MINUS_CONSTANT_COLOR |
Multiplies by the inverse of a constant color |
|
GL_CONSTANT_ALPHA |
Multiplies by the constant alpha |
|
GL_ONE_MINUS_CONSTANT_ALPHA |
Multiplies by the inverse of a constant alpha |
|
GL_SRC_ALPHA_SATURATE |
Specifies the minimum of the source alpha and one minus the source alpha |
The blending equation is set with the glBlendEquation function, which takes one of a number of potential blending equation constants. The default is GL_ADD, which simply adds together the source and destination colors (after being multiplied by the blend factors). See Table 12-4for a complete list of the blend equation constants.
Table 12-4. Blending Equation Constants
|
Blend Equation Constant |
Explanation |
|
GL_FUNC_ADD |
Adds the source and destination colors |
|
GL_FUNC_SUBTRACT |
Subtracts the destination from the source color |
|
GL_FUNC_REVERSE_SUBTRACT |
Subtracts the source from the destination color |
|
GL_MIN |
Calculates the minimum (darkest) of the source and destination colors |
|
GL_MAX |
Calculates the maximum (brightest) of the source and destination colors |
|
GL_LOGIC_OP |
Combines the source and destination colors with a logic operation (see the OpenGL documentation for information on logic operations) |
Another OpenGL function involved in blending is glBlendColor, which sets a constant color that is used in some of the blending factors. This function takes the red, green, blue, and alpha components to be used as the constant color. For instance, glBlendColor(1.0, 0.0, 0.0, 0.5) would set a constant color of 50 percent translucent red.
The steps for enabling blending in your game are as follows:
· Enable blending with a call to glEnable(GL_BLEND).
· Call the glBlendFunc function to set the blending factors. See Table 12-3 for a complete list of blending factors.
· Call the glBlendEquation function to set the blending equation. See Table 12-4 for a complete list of the blend equations.
· If you have used one of the blending factors that refer to a constant color, you will also need to call the glBlendColor function, which takes the red, green, blue, and alpha color components as parameters.
OpenGL supports a number of potential blending effects through the various blending options. The following sections cover some effects commonly used in games and the blend options needed to create them.
Alpha Blending
One of the most commonly used blending effects is alpha blending, which uses the alpha channel in an image to control the opacity of the pixels. Alpha blending can be used to create texture with holes or irregular edges, such as a torn flag.
We can set alpha blending with the following function calls:
glBlendFunc(GL_SRC_ALPHA, GL_ONE_MINUS_SRC_ALPHA)
glBlendEquation(GL_FUNC_ADD)
This tells OpenGL to multiply the source color with the source alpha, and multiply the destination color with 1.0 minus the source alpha. It then combines the two colors with the GL_FUNC_ADD blend equation—which simply adds them together to produce the final color that is written to the screen. The effect is to interpolate the colors based on the alpha component of the source color, and is equivalent to the alpha_blend function in Listing 12-2.
Listing 12-2. Python Alpha Blend Function
def alpha_blend(src, dst):
return src * src.a + dst * (1.0—src.a)
This kind of alpha blending is useful for creating detail in places where many small polygons would otherwise be required. For instance, a tuft of weeds in an off-road racing game could be created with a single texture with translucent areas rather than a detailed model.
Blending can also be done with the constant alpha component instead of using the alpha channel in the textures. This is useful for varying the opacity of textures as a whole rather than for individual texels. Constant alpha blending can be used to render anything from windows to force fields. The following calls would make textures 50 percent transparent—or 50 percent opaque, if you prefer.
glBlendColor(1.0, 1.0, 1.0, 0.5)
glBlendFactor(GL_CONSTANT_ALPHA, GL_ONE_MINUS_CONSTANT_ALPHA)
glBlendEquation(GL_ADD)
Additive Blending
Another useful blending technique is additive blending, which is similar to basic alpha blending, with the exception that source color is added directly to the destination so that it brightens the underlying image. This creates a glowing effect, which is why additive blending is often used to render flame, electricity, or similar crowd-pleasing special effects. The following function calls select additive blending:
glBlendFunc(GL_SRC_ALPHA, GL_ONE)
glBlendEquation(GL_FUNC_ADD)
The only difference between this and regular alpha blending is that the destination blend factor is set to GL_ONE, which multiplies the color by 1.0—in effect, not changing it at all. Additive blending is equivalent to the additive_blend function in Listing 12-3.
Listing 12-3. Python Additive Blend Function
def additive_blend(src, dst):
return src * src.a + dst
Subtractive Blending
The reverse of additive blending is subtractive blending, where the source color is subtracted from the underlying image, making it darker. The following function calls set the blend options for subtractive blending:
glBlendFunc(GL_SRC_ALPHA, GL_ONE)
glBlendEquation(GL_FUNC_REVERSE_SUBTRACT)
The blend equation is set to GL_FUNC_REVERSE_SUBTRACT rather than GL_FUNC_SUBTRACT because we want to subtract the source from the destination and not the other way around.
There is no reverse version of GL_ADD because A+B is always the same as B+A (the same is not true for subtraction; A–B is not always the same as B–A).
Subtractive blending is great for rendering smoke because several layers result in solid black. The subtractive_blend function in Listing 12-4 is the Python equivalent of subtractive blending.
Listing 12-4. Python Subtractive Blend Function
def subtractive_blend(src, dst):
return dst—src * src.a
Seeing Blending in Action
Let’s write some code to help us visualize some commonly used blending effects. When you execute Listing 12-5, you will see a background image and another smaller image—of our friend fugu—that can be moved around with the mouse. The fugu image contains alpha information, but because no blending options have been set, you will see parts of the image that would normally be invisible. If you press the 1 key on your keyboard, it will enable alpha blending and the background pixels of the fugu image will become invisible (see Figure 12-1). Pressing 2 selects additive blending, which gives the fugu a ghostly glow, and pressing 3 selects subtractive blending, which creates a dark shadow fugu.
Listing 12-5. Demonstrating Blending Effects (blenddemo.py)
from OpenGL.GL import *
from OpenGL.GLU import *
import pygame
from pygame.locals import *
SCREEN_SIZE = (800, 600)
def resize(width, height):
glViewport(0, 0, width, height)
glMatrixMode(GL_PROJECTION)
glLoadIdentity()
gluPerspective(45.0, float(width)/height, .1, 1000.)
glMatrixMode(GL_MODELVIEW)
glLoadIdentity()
def init():
glEnable(GL_TEXTURE_2D)
glEnable(GL_BLEND)
glClearColor(1.0, 1.0, 1.0, 0.0)
def upload_texture(filename, use_alpha=False):
# Read an image file and upload a texture
if use_alpha:
format, gl_format, bits_per_pixel = 'RGBA', GL_RGBA, 4
else:
format, gl_format, bits_per_pixel = 'RGB', GL_RGB, 3
img_surface = pygame.image.load(filename)
#img_surface = premul_surface(img_surface)
data = pygame.image.tostring(img_surface, format, True)
texture_id = glGenTextures(1)
glBindTexture(GL_TEXTURE_2D, texture_id)
glTexParameteri( GL_TEXTURE_2D, GL_TEXTURE_MAG_FILTER, GL_LINEAR )
glTexParameteri( GL_TEXTURE_2D, GL_TEXTURE_MIN_FILTER, GL_LINEAR )
glPixelStorei(GL_UNPACK_ALIGNMENT, 1)
width, height = img_surface.get_rect().size
glTexImage2D( GL_TEXTURE_2D,
0,
bits_per_pixel,
width,
height,
0,
gl_format,
GL_UNSIGNED_BYTE,
data )
# Return the texture id, so we can use glBindTexture
return texture_id
def draw_quad(x, y, z, w, h):
# Send four vertices to draw a quad
glBegin(GL_QUADS)
glTexCoord2f(0, 0)
glVertex3f(x-w/2, y-h/2, z)
glTexCoord2f(1, 0)
glVertex3f(x+w/2, y-h/2, z)
glTexCoord2f(1, 1)
glVertex3f(x+w/2, y+h/2, z)
glTexCoord2f(0, 1)
glVertex3f(x-w/2, y+h/2, z)
glEnd()
def run():
pygame.init()
screen = pygame.display.set_mode(SCREEN_SIZE, HWSURFACE|OPENGL|DOUBLEBUF)
resize(*SCREEN_SIZE)
init()
# Upload the background and fugu texture
background_tex = upload_texture('background.png')
fugu_tex = upload_texture('fugu.png', True)
while True:
for event in pygame.event.get():
if event.type == QUIT:
pygame.quit()
quit()
if event.type == KEYDOWN:
if event.key == K_1:
# Simple alpha blending
glBlendFunc(GL_SRC_ALPHA, GL_ONE_MINUS_SRC_ALPHA)
glBlendEquation(GL_FUNC_ADD)
elif event.key == K_2:
# Additive alpha blending
glBlendFunc(GL_SRC_ALPHA, GL_ONE)
glBlendEquation(GL_FUNC_ADD)
elif event.key == K_3:
# Subtractive blending
glBlendFunc(GL_SRC_ALPHA, GL_ONE)
glBlendEquation(GL_FUNC_REVERSE_SUBTRACT)
glClear(GL_COLOR_BUFFER_BIT | GL_DEPTH_BUFFER_BIT)
# Draw the background
glBindTexture(GL_TEXTURE_2D, background_tex)
glDisable(GL_BLEND)
draw_quad(0, 0, -SCREEN_SIZE[1], 600, 600)
glEnable(GL_BLEND)
# Draw a texture at the mouse position
glBindTexture(GL_TEXTURE_2D, fugu_tex)
x, y = pygame.mouse.get_pos()
x -= SCREEN_SIZE[0]/2
y -= SCREEN_SIZE[1]/2
draw_quad(x, -y, -SCREEN_SIZE[1], 256, 256)
pygame.display.flip()
# Free the textures we used
glDeleteTextures(background_tex)
glDeleteTextures(fugu_tex)
if __name__ == "__main__":
run()
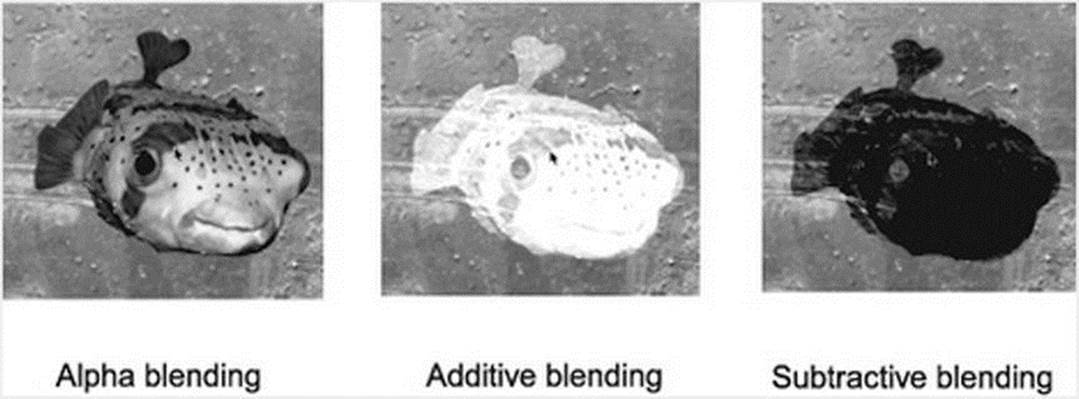
Figure 12-1. Blending effects
Try changing the constants in the glBlendFunc and glBlendEquation to produce some more interesting effects. If there is a particular effect you want to implement that isn’t covered here, you will likely be able to find the parameters on the Web.
Blending Issues
There are a few potential problems with blending if you use it heavily in a scene. When you render a blended polygon, it will still write information to the depth buffer, which OpenGL uses to keep background objects from overlapping foreground objects. The problem with this is that once a translucent polygon has been drawn, no more polygons can be drawn behind it. A good solution is to draw all the opaque polygons, then draw the translucent polygons from back to front so that the farthest away polygon is drawn first.
Blended polygons also tend to take longer to render than opaque polygons, so if you find that your scene is rendering slowly, try reducing the number of translucent polygons.
Understanding Fog
Fog is an OpenGL feature that can be used to simulate the effects of the atmosphere on rendered objects. When the fog feature is enabled, OpenGL will blend polygons toward a solid color over distance, so that as an object moves from the foreground to the background it gradually takes on the fog color until it becomes a solid silhouette. Fog was often used in older games to hide the fact that objects could not be drawn very far into the distance. Rather than scenery suddenly appearing from nowhere, it would blend in from the background color over a few frames. Modern games suffer less from this problem because they can render scenery much farther into the distance, but fog is still often used to subtly blend in faraway objects as they come into range of the camera.
Fog is also useful for creating visual effects in its own right; the most obvious use is to simulate real fog, but you can also use the feature to enhance a gloomy indoor scene by fogging to black or to simulate red haze on Mars.
Fog Parameters
Call glEnable(GL_FOG) to have OpenGL apply fog to all polygons that are rendered. There are a number of fog parameters you can set with the glFog range of functions, which take a constant for the value you want to set followed by the value itself.
The color of the fog can be set with a call to glFogfv with the GL_FOG_COLOR constant, followed by the color you want to use. For example, the following line sets the fog color to pure white (to simulate a snow blizzard, perhaps):
glFogfv(GL_FOG_COLOR, (1.0, 1.0, 1.0))
OpenGL has three different fog modes, which define how the fog varies over distance. These fog modes can be set with the glFogi function. For instance, the following line would set the fog to use GL_LINEAR mode:
glFogi(GL_FOG_MODE, GL_LINEAR)
The GL_LINEAR fog mode is most often used to mask the effect of distance scenery coming into view, because the start and end points can be set independently and the fog will fade in between them. For instance, if you have a racing game that can render 1,000 units into the distance, and you want distance track and trees to fade in over the final unit, you set the following fog parameters:
glFogi(GL_FOG_MODE, GL_LINEAR)
glFogf(GL_FOG_START, 999.0)
glFogf(GL_FOG_END, 1000.0)
The GL_FOG_START and GL_FOG_END parameters mark the distance from the camera where the fog should begin and end.
The other potential values for the GL_FOG_MODE parameters are GL_EXP and GL_EXP2. Both produce a more natural-looking fog and are better for simulating real fog or haze. The GL_EXP mode blends the fog in quickly for objects near the camera but more slowly for objects that are farther away. The GL_EXP2 is similar but starts off with less fog color in the foreground.
Both GL_EXP and GL_EXP2 use a single density value rather than a value for the start and stop point. Density can be set with the GL_FOG_DENSITY parameter, which is a value between 0.0 and 1.0—higher values create thicker fog. The following calls would create a convincing Martian haze with red GL_EXP2 fog of density of 0.2:
glFogfv(GL_FOG_COLOR, (1.0, 0.7, 0.7))
glFogi(GL_FOG_MODE, GL_EXP2)
glFogf(GL_FOG_DENSITY, 0.2)
Seeing Fog in Action
Rather than write an entire script to test fog, let’s modify the spinning tank from the previous chapter (see Listing 11-8). We will start by adding a few lines to the init function to enable fog and set the fog parameters. The following lines create a simple linear fog that fades to white:
glEnable(GL_FOG)
glFogfv(GL_FOG_COLOR, (1.0, 1.0, 1.0))
glFogi(GL_FOG_MODE, GL_LINEAR)
glFogf(GL_FOG_START, 1.5)
glFogf(GL_FOG_END, 3.5)
If you run the modified Listing 11-8 now, you will see something like Figure 12-2. The fog starts at 1.5 units from the camera and ends at 3.5 units from the camera, which makes part of the tank completely obscured by fog. It is not a very useful fog because it would obscure anything that isn’t very close to the camera, but it does demonstrate the effect well.
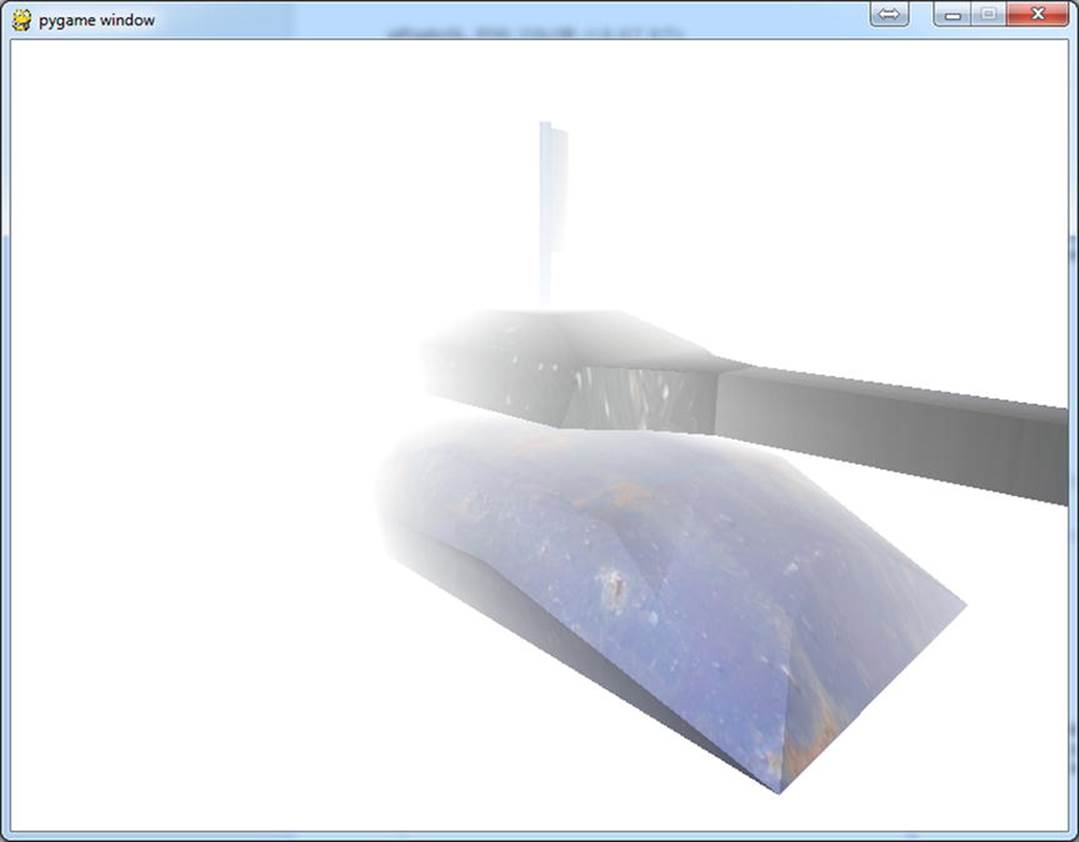
Figure 12-2. A heavily fogged tank
Another useful modification to the spinning tank demo is the ability to move the tank relative to the camera so that we can see how the fog changes over distance. Replace the call to glTranslate in the run function with the following lines, to move the tank with the mouse:
tank_distance = pygame.mouse.get_pos()[1] / 50.0
glTranslatef(0.0, -1.5, -tank_distance)
Now when you run the tank demo, you can control the tank’s distance from the camera by moving the mouse up and down. Try replacing the calls to glFogi that we added to the init function with the settings for Martian haze, or experiment with your own values to come up with new effects. You might also want to change the clear color to be similar to the fog color so that a heavily fogged tank disappears completely into the background.
Rendering the Backdrop
A tank game would likely be set in an outdoors environment, possibly a desolate, post-apocalyptic wasteland with mountains in the far distance. Naturally we would want to render the background scenery with as much detail as possible to provide a good backdrop for the game action, but even if we could model every mountain it would still be too slow to render 3D visuals all the way to the horizon. This is a common problem with any game where the player can potentially see the horizon (even games set indoors would be affected if they have a window).
Skyboxes
A common solution to the problem of rendering distant scenery is the skybox, which is simply a textured cube with scenery on each side. The front, back, left, and right sides of the cube show a view toward the horizon. The top of the cube is an image of the sky and the bottom of the cube is the ground. When the skybox is drawn around the camera, the player is surrounded on all sides with images of distance scenery, which creates a convincing illusion of being there.
Creating Skyboxes
A skybox is a model of a cube, and can be created in the modeler software of your choice—all 3D applications I have used offer the option of creating a cube primitive. The skybox should be created around the origin, so that the center of the cube is at (0, 0, 0). Each side of the cube should be assigned one of the six scenery textures from the skybox.
![]() Note You may have to flip the normals on the faces of the cube, which makes them point inward rather than outward. The reason for this is that the cube will be viewed from the inside rather than the outside, and you want the polygons to be facing the camera.
Note You may have to flip the normals on the faces of the cube, which makes them point inward rather than outward. The reason for this is that the cube will be viewed from the inside rather than the outside, and you want the polygons to be facing the camera.
Generating the skybox textures may require a little more effort because each texture must seamlessly align with the four other textures it shares an edge with. If you are artistically inclined, you can draw or paint these textures, but it is probably easier to use 3D modeling software to render six views of a scene for each face of the skybox. An excellent choice for rendering skyboxes is Terragen (www.planetside.co.uk/terragen/), which creates remarkably realistic-looking images of virtual landscapes. I used Terragen to create the skycube textures in Figure 12-3 that we will be using in the skybox sample code.
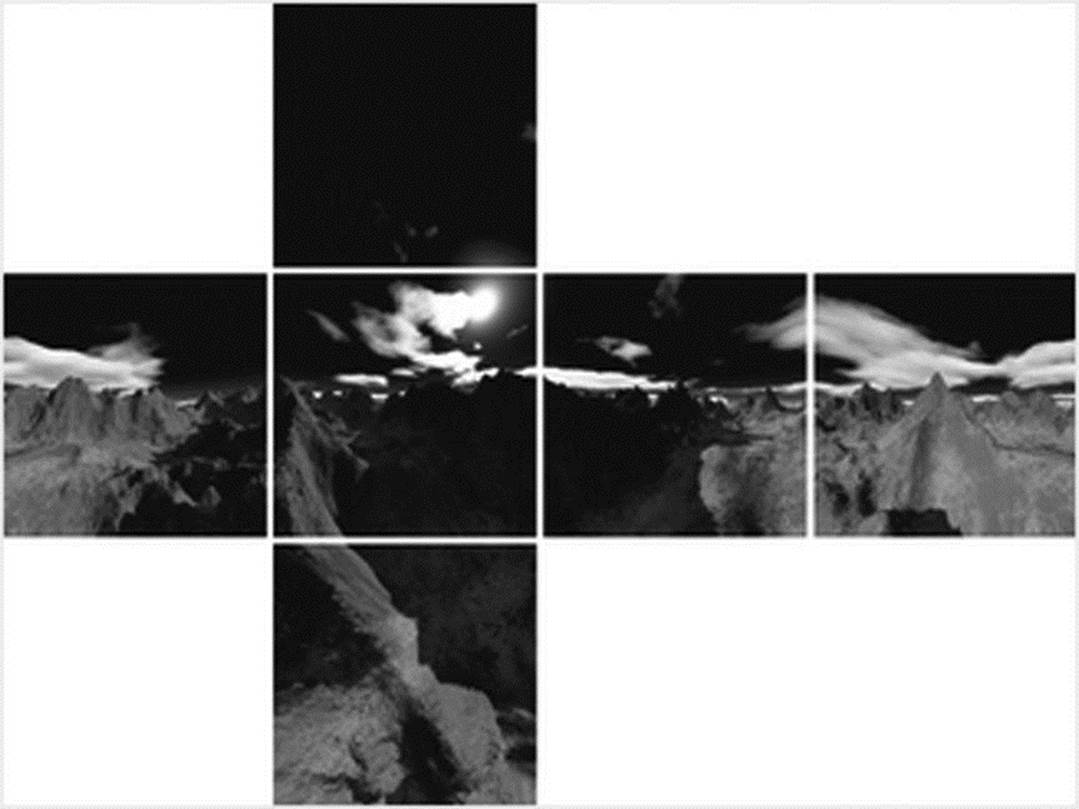
Figure 12-3. The texture of a skybox
Rendering Skyboxes
Rendering the skybox should be the first thing done in a new frame, and negates the need to clear the color buffer (although you will still need to clear the depth buffer).
Because a skybox is just a model of a cube, it can be stored as any other model, but there are a few additional steps required prior to rendering:
· Set the wrap mode of all the textures in the skybox to GL_CLAMP_TO_EDGE. This is necessary to avoid seams in the skybox, where the cube faces meet. See the previous chapter for more information on wrapping modes. This step needs to be done only once.
· Set the position of the skybox to be the same as the camera (i.e., the player). This is because the skybox represents very distant scenery that can never be reached by the player.
· Disable lighting with glDisable(GL_LIGHTING). We don’t need to use OpenGL’s lighting features because the textures of the skybox have effectively been prelit. With lighting disabled, OpenGL will render the textures with the original brightness levels.
· Disable the depth buffer with glDepthMask(False). Normally if the player was inside a cube he would not be able to see anything outside of the cube, which is obviously not want we want. Setting the depth mask to False with glDepthMask(False) tells OpenGL to ignore the depth information in the skybox, so that other models will be rendered on top of it.
Once the skybox has been rendered, be sure to reenable lighting and the depth mask, or the other models in the scene may not render correctly. The following two lines should follow the call to render the skybox:
glEnable(GL_LIGHTING)
glDepthMask(True)
Seeing Skyboxes in Action
Let’s write code to render a skybox. Listing 12-6 uses the Model3D class from the previous chapter to load a skybox model and its associated textures. When you run it, you will see a scenic view of mountains, and if you adjust the viewpoint with the mouse you will be able to see the landscape from any direction.
Listing 12-6. Rendering a Skybox (skybox.py)
from math import radians
from OpenGL.GL import *
from OpenGL.GLU import *
import pygame
from pygame.locals import *
# Import the Model3D class
import model3d
SCREEN_SIZE = (800, 600)
def resize(width, height):
glViewport(0, 0, width, height)
glMatrixMode(GL_PROJECTION)
glLoadIdentity()
gluPerspective(60.0, float(width)/height, .1, 1000.)
glMatrixMode(GL_MODELVIEW)
glLoadIdentity()
def init():
# Enable the GL features we will be using
glEnable(GL_DEPTH_TEST)
glEnable(GL_LIGHTING)
glEnable(GL_TEXTURE_2D)
glShadeModel(GL_SMOOTH)
# Enable light 1 and set position
glEnable(GL_LIGHTING)
glEnable(GL_LIGHT0)
glLight(GL_LIGHT0, GL_POSITION, (0, .5, 1))
def run():
pygame.init()
screen = pygame.display.set_mode(SCREEN_SIZE, FULLSCREEN|HWSURFACE|OPENGL|DOUBLEBUF)
resize(*SCREEN_SIZE)
init()
# Read the skybox model
sky_box = model3d.Model3D()
sky_box.read_obj('tanksky/skybox.obj')
# Set the wraping mode of all textures in the sky-box to GL_CLAMP_TO_EDGE
for material in sky_box.materials.values():
glBindTexture(GL_TEXTURE_2D, material.texture_id)
glTexParameteri(GL_TEXTURE_2D, GL_TEXTURE_WRAP_S, GL_CLAMP_TO_EDGE)
glTexParameteri(GL_TEXTURE_2D, GL_TEXTURE_WRAP_T, GL_CLAMP_TO_EDGE)
# Used to rotate the world
mouse_x = 0.0
mouse_y = 0.0
#Don't display the mouse cursor
pygame.mouse.set_visible(False)
while True:
for event in pygame.event.get():
if event.type == QUIT:
pygame.quit()
quit()
if event.type == KEYDOWN:
pygame.quit()
quit()
# We don't need to clear the color buffer (GL_COLOR_BUFFER_BIT)
# because the skybox covers the entire screen
glClear(GL_DEPTH_BUFFER_BIT)
glLoadIdentity()
mouse_rel_x, mouse_rel_y = pygame.mouse.get_rel()
mouse_x += float(mouse_rel_x) / 5.0
mouse_y += float(mouse_rel_y) / 5.0
# Rotate around the x and y axes to create a mouse-look camera
glRotatef(mouse_y, 1, 0, 0)
glRotatef(mouse_x, 0, 1, 0)
# Disable lighting and depth test
glDisable(GL_LIGHTING)
glDepthMask(False)
# Draw the skybox
sky_box.draw_quick()
# Re-enable lighting and depth test before we redraw the world
glEnable(GL_LIGHTING)
glDepthMask(True)
# Here is where we would draw the rest of the world in a game
pygame.display.flip()
if __name__ == "__main__":
run()
Skybox Enhancements
Although a skybox creates a convincing illusion of distance scenery, there are enhancements that can be used to add some more visual flare to the backdrop. One of the downsides of the skybox technique is that it doesn’t change over time because the image has been prerendered. Animating parts of the skybox, or adding atmospheric effects on top of it, can add a little extra realism. For example, making the sun shimmer a little or rendering lightning in the distance can enhance a skybox. It is also possible to layer translucent skyboxes and animate one or more of them. For instance, there could be a skybox for distant mountains and another for clouds. Rotating the cloud skybox independently would create realistic-looking weather effects.
Skyboxes aren’t the only method of rendering a backdrop in a game; a skydome is a similar technique that uses a sphere, or hemisphere, to display distant scenery. A dome may be a more obvious choice than a cube because the real sky is spherical in nature, but a sphere is not quite as easy to texture as a cube. A cylinder is another alternative, if the player will never look directly up.
Where to Go for Help
One of the joys of games programming is that it offers up many interesting problems that give a real sense of accomplishment when you finally solve them. Every time you figure out how to make something work, or fix a mistake you made, your game gets a little closer to how you imagined it. So facing problems and fixing bugs are part of the process of developing a game and not something to be afraid of. More often than not, all it takes is a short break from programming and a little bit of thought for the answer to come to you. Occasionally, though, even experienced game developers face problems they can’t find the solution to. It’s this point where you should seek assistance.
Chances are that another programmer has faced the same issue and has documented it on the Web, which is why the Internet is the programmer’s best debugger tool. Try using Google, or another search engine, for keywords that relate to the problem you are facing. If you don’t come up with the answer, you could post a message about your problem to a mailing list or newsgroup. For Python-related questions head to http://www.reddit.com/r/learnpython/ and post your question. The programming community is incredibly helpful, and willing to put in a lot of effort to help you, so long as you are also putting in some effort. You can also post questions on http://stackoverflow.com/.
Summary
In this chapter, we covered OpenGL’s lighting features in some detail. OpenGL lighting is very powerful and can greatly enhance the realism of your games. Combinations of light and material parameters will help you create the kind of mood you are looking for in your game, whether it is a bright and cheerful cartoon world or a nightmarish landscape with unspeakable monsters lurking around every corner.
Blending is the key to creating a multitude of special effects but can also be used to simply render translucent objects. We covered only a few of the effects that can be created with OpenGL’s blending features; combining blend factors and equations can create many more.
Fog is another OpenGL feature that can enhance your game by simulating atmospheric effects, or disguise the effects of distance scenery popping in as it comes into range of the camera. Fog is easy to add to a scene because it only takes a few lines to enable and set the parameters—so you can experiment with fog without changing your render code.
We also discussed skyboxes, which are a great way of adding a backdrop to your game. Skyboxes may be old technology, but they are still used in modern games, including cutting-edge console titles.
Game development is a constantly expanding field, which makes it a fascinating hobby or profession. Most developers—whether they are novices or industry veterans—are extremely enthusiastic about what they do, and are happy to share knowledge and code with others. Once you have built a game, you should consider submitting it to the Pygame website (http://www.pygame.org) to share it with the Pygame community. www.pyweek.org.
We hope you enjoyed reading this book. If you have any questions about any of the topics we covered, we would be happy to answer them. You can find our contact details on our websites:
Original Author—Will McGugan: http://www.willmcgugan.com
Updating Author—Harrison Kinsley: http://pythonprogramming.net