Beginning Python Games Development With Pygame (2015)
CHAPTER 8
Moving into the Third Dimension
Games generally try to mimic the real world, or create a world that is not so far from reality that the player will still in some way be able to identify with it. In the past this required a real leap of faith on behalf of the player because technology wasn’t yet capable of creating visuals that looked much like reality. But as the technology advanced, game designers began to push the hardware to create more convincing graphics.
Initially everything was in two dimensions because drawing a 2D sprite is a fairly simple operation that consoles and computers can do rather well. Even with only 2D capabilities, game designers attempted to create a three-dimensional look with shading and movement. Eventually gaming hardware became capable of creating more convincing 3D graphics, and developers were free to experiment with an extra dimension. Early 3D games had crude graphics, generated with lines and flat, unshaded triangles, but soon these graphics evolved into rich scenes with thousands of multilayered polygons and realistic lighting.
Nowadays the majority of games are in 3D, and home computers have graphics cards with hardware dedicated to creating 3D visuals. The computer on your desktop can generate 3D images in a fraction of a second—something that would have taken hours a few decades ago—and you can access these capabilities in your Pygame application. This chapter covers the basics of storing 3D information and creating an image out of it.
Creating the Illusion of Depth
Like just about everything else in a computer game, 3D is an illusion. Televisions and monitors are still only capable of displaying a two-dimensional image. If you move your head from side to side when playing a game, you won’t see any more of the scene, because it is essentially flat and has no real depth. If you’re using a VR device, you may actually get some movement. Despite how it makes you feel, this too is an illusion.
The illusion can be quite a convincing one because our brains are highly tuned to recognize characteristics of a three-dimensional world. The main way that our brains judge the depth of what we are viewing is by combining the two images from each eye. But even if you close one eye, you will find that you are able to judge distances and get around without bumping into things (even if it is a little harder than before). This is because visual clues such as perspective and shading are also used to make sense of the image from each eye, and our brains subconsciously use this information to help us understand depth. So even if the image onscreen is flat, it still appears to have depth if it contains perspective and shading.
Games with 3D graphics must have objects that move in the way you would expect them to in the real world. Sometimes it is enough that objects move in a plausible way to create the illusion of depth. Listing 8-1 is an example of how movement alone can create visuals with an apparent third dimension.
Listing 8-1. Illusion of Depth (parallaxstars.py)
import pygame
from pygame.locals import *
from random import randint
class Star(object):
def init (self, x, y, speed):
self.x = x
self.y = y
self.speed = speed
def run():
pygame.init()
screen = pygame.display.set_mode((640, 480), FULLSCREEN)
stars = []
# Add a few stars for the first frame
for n in xrange(200):
x = float(randint(0, 639))
y = float(randint(0, 479))
speed = float(randint(10, 300))
stars.append( Star(x, y, speed) )
clock = pygame.time.Clock()
white = (255, 255, 255)
while True:
for event in pygame.event.get():
if event.type == QUIT:
return
if event.type == KEYDOWN:
return
# Add a new star
y = float(randint(0, 479))
speed = float(randint(10, 300))
star = Star(640., y, speed)
stars.append(star)
time_passed = clock.tick()
time_passed_seconds = time_passed / 1000.
screen.fill((0, 0, 0))
# Draw the stars
for star in stars:
new_x = star.x - time_passed_seconds * star.speed
pygame.draw.aaline(screen, white, (new_x, star.y), (star.x+1., star.y))
star.x = new_x
def on_screen(star):
return star.x > 0
# Remove stars that are no longer visible
stars = filter(on_screen, stars)
pygame.display.update()
if name == " main__":
run()
When you run Listing 8-1, you will see a fairly convincing star field with stars at various distances moving past the screen. Although the star field looks 3D, you won’t find anything particularly unfamiliar in the code; all it does is move a number of points across the screen at varying speeds. The impression of depth is a result of your brain assuming that quick objects are close to you and slower objects are farther away.
Understanding 3D Space
To store the position of an entity in a 2D game, you use a coordinate system with two components, x and y, that correspond to the physical pixels on the screen. For a 3D game you need to use a coordinate system with an additional component called z (see Figure 8-1). This extra component is used to measure the distance into, or out from, the screen. Of course, Pygame can’t actually draw anything using 3D coordinates because the screen is flat. So 3D coordinates will eventually have to be converted to 2D before they are used to render anything to the screen. We will cover how to do this later in the chapter, but first we need to know how to store a 3D coordinate with Python.
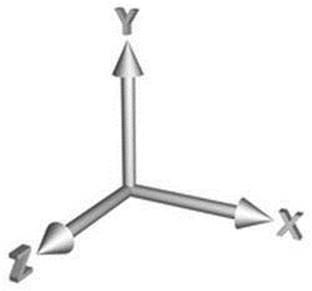
Figure 8-1. A three-dimensional coordinate system
In a 3D coordinate system, x points right and y points up. This is different from the coordinate system we have been using to create 2D graphics, where y points down the screen. In 3D, if you increase the y component, the coordinate will move up the screen and not down.
The z axis in a 3D coordinate system can point in one of two ways depending on the graphics technology used; either it points into the screen (away from the viewer), or it points out of the screen (toward the viewer). In this book, we will be using a coordinate system with a positive z that points out of the screen. Figure 8-2 shows the 3D coordinate system with a spy droid—represented by a circle—at coordinate (7, 5, 10). Because this isn’t a pop-up book, the extra axis is represented as a diagonal line.
The units for a 3D coordinate could represent anything depending on the scale of the game. If you are writing a first-person shooter, the units may be meters or even centimeters, but for a space game the units may represent a much larger scale (maybe light-years)! Assuming that the droid’s coordinates are in meters and soldier alpha (the player character) is standing at coordinate (0, 0, 0) facing along the negative z axis, the droid would be hovering 10 meters in the air, behind and to the right of the player.
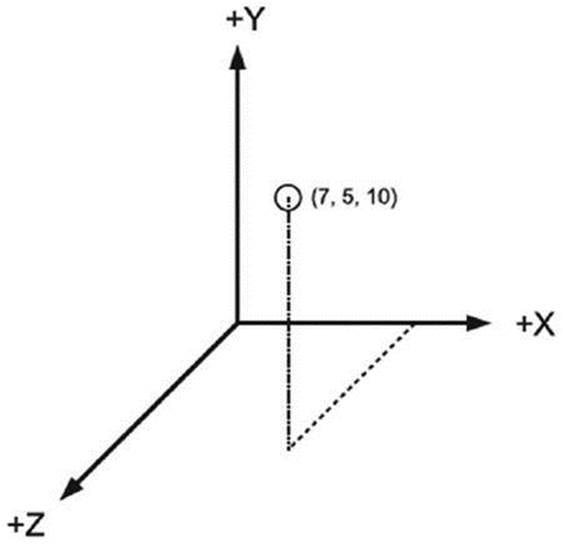
Figure 8-2. A droid in a 3D coordinate system
Using 3D Vectors
By now you will be comfortable with the two-dimensional vectors we have been using to represent positions and headings in the 2D samples. Vectors in 3D are similar to their 2D counterparts but with three components rather than two. These 3D vectors have many of the same capabilities as 2D; they can be added, subtracted, scaled, and so forth. Three-dimensional vectors can be stored in a tuple or list, but using a dedicated class will make calculations easier. Listing 8-2 shows how we might begin to define a 3D Vector class.
Listing 8-2. Beginning a 3D Vector Class
from math import sqrt
class Vector3(object):
def init (self, x, y, z):
self.x = x
self.y = y
self.z = z
def add (self, x, y, z):
return Vector3(self.x + x, self.y + y, self.z + z)
def get_magnitude(self):
return sqrt(self.x ** 2 + self.y ** 2 + self.z ** 2)
Most operations that can be done in 3D can be extended to take into account the z component. The _add_ function, for example, is very similar to the 2D version, but it also adds the z component of the two vectors.
We will be using the Vector3 class defined in the Game Objects library for the 3D code. Listing 8-3 shows how we would import and use this class.
Listing 8-3. Using the Game Objects Vector3 Class
from gameobjects.vector3 import *
A = Vector3(6, 8, 12)
B = Vector3(10, 16, 12)
print("A is", A)
print("B is", B)
print("Magnitude of A is", A.get_magnitude())
print("A+B is", A+B)
print("A-B is", A-B)
print("A normalized is", A.get_normalized())
print("A*2 is", A * 2)
Running this code generates the following output:
A is (6, 8, 12)
B is (10, 16, 12)
Magnitude of A is 15.620499351813308
A+B is (16, 24, 24)
A-B is (-4, -8, 0)
A normalized is (0.384111, 0.512148, 0.768221)
A*2 is (12, 16, 24)
Time-Based Movement in 3D
We can use the Vector3 class to do time-based movement in 3D in much the same way as we do in two dimensions. As an example, let’s use a little 3D vector math to calculate a target vector and work out the intermediate coordinates for a projectile weapon (see Figure 8-3).
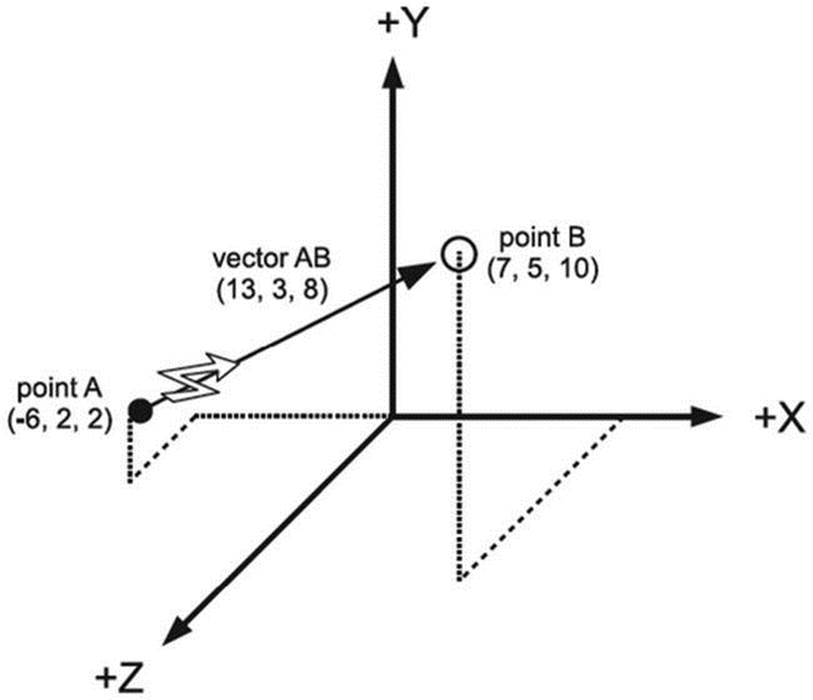
Figure 8-3. Calculating a target vector
Soldier Alpha has walked a few meters away from his original position in Figure 8-2, and is now standing at point (–6, 2, 0). The spy droid is still hovering at (7, 5, 10), monitoring Alpha’s actions. Fortunately Alpha’s acute hearing (or the player’s speakers) pick up the faint whirring noise of its antigravity engine and he decides to take out the droid. To fire at the droid, Alpha needs to calculate a vector from his shoulder-mounted plasma rifle to the droid’s location.
Alpha may be standing over point (–6, 2, 0), but his shoulder is 2 meters above the ground at point (–6, 2, 2), so this is the starting point for the vector calculation. The vector to his target is produced by subtracting the droid’s position—point B at (7, 5, 10)—from the starting point A at (–6, 2, 2), giving us a target vector of (13, 3, 8). Normalizing this vector produces a heading vector that can be used in time-based movement. Listing 8-4 shows how to do these calculations in code.
Listing 8-4. Creating a Target Vector
from gameobjects.vector3 import *
A = (-6, 2, 2)
B = (7, 5, 10)
plasma_speed = 100 # meters per second
AB = Vector3.from_points(A, B)
print("Vector to droid is", AB)
distance:to_target = AB.get_magnitude()
print("Distance to droid is", distance:to_target, "meters")
plasma_heading = AB.get_normalized()
print("Heading is", plasma_heading)
Running Listing 8-4 produces this output:
Vector to droid is (13, 3, 8)
Distance to droid is 15.556349186104045 meters
Heading is (0.835672, 0.192847, 0.514259)
If we use these values to render a plasma bolt in a game, we can calculate how far the plasma bolt has moved since the previous frame by multiplying the heading vector by the time passed since the previous frame and the speed of the plasma bolt. Adding the result to the bolt’s current location gives us its new location. The code would look something like this:
bolt_location += plasma_heading * time_passed_seconds * plasma_speed
Before you can create 3D projectiles in a Pygame application, you first have to learn how to turn a 3D coordinate into a 2D coordinate to render it to the screen—which is the topic of the next section.
Projecting 3D Points
Storing points in 3D space is as simple as creating a tuple of three values, or a Vector3 object, but we can’t use either in Pygame’s drawing functions because they all take coordinates as 2D points. To draw anything at a 3D coordinate, we first have to project it onto a 2D screen.
Parallel Projections
One way to convert a 3D coordinate into a 2D coordinate is to simply discard the z component, which is known a parallel projection. Listing 8-5 shows a very simple function that we can use to convert a 3D coordinate into 2D with a parallel projection.
Listing 8-5. Function That Performs a Parallel Projection
def parallel_project(vector3):
return (vector3.x, vector3.y)
Although parallel projections are quick and easy to do, they are not often used in games because by ignoring the z component there is no impression of depth. A 3D scene rendered with a parallel projection is kind of like looking through a zoom lens with a high level of magnification; the world appears flat, and objects at varying distances seem as though they are next to each other. Figure 8-4 shows a cube rendered with a parallel projection.
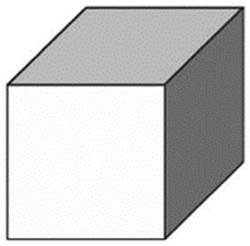
Figure 8-4. A cube rendered with a parallel projection
Perspective Projections
A far more common projection in games and 3D computer graphics in general is the perspective projection, because it takes into account the distance of an object from the viewer. A perspective projection replicates the way that objects farther from the viewer appear smaller than objects close up. Objects rendered with a perspective projection will also appear to narrow toward the horizon, an effect known as foreshortening (see Figure 8-5). Listing 8-6 is a function that projects a 3D coordinate with a perspective projection and returns the result.
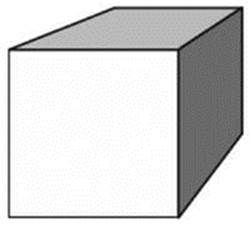
Figure 8-5. A cube rendered with a perspective projection
Listing 8-6. Function That Performs a Perspective Projection
def perspective_project(vector3, d):
x, y, z = vector3
return (x * d/z, –y * d/z)
There’s a little more math involved in perspective projection than there is for a simple parallel projection. The perspective_project function multiplies the x and y coordinates by the d value (which we will discuss later), and divides by the z component. It also negates the y component (–y) because the y axis is in the opposite direction in 2D.
The d value in perspective_project is the viewing distance, which is the distance from the camera to where units in the 3D world units correspond directly to the pixels on the screen. For instance, if we have an object at coordinate (10, 5, 100), projected with a viewing distance of 100, and we move it one unit to the right at (11, 5, 100), then it will appear to have moved exactly one pixel onscreen. If its z value is anything but 100, it will move a different distance relative to the screen.
Figure 8-6 shows how the viewing distance relates to the width and height of the screen. Assuming the player (indicated by the smiley face) is sitting directly in front of the screen, then the viewing distance would be approximately the distance, in pixel units, from the screen to the player’s head.
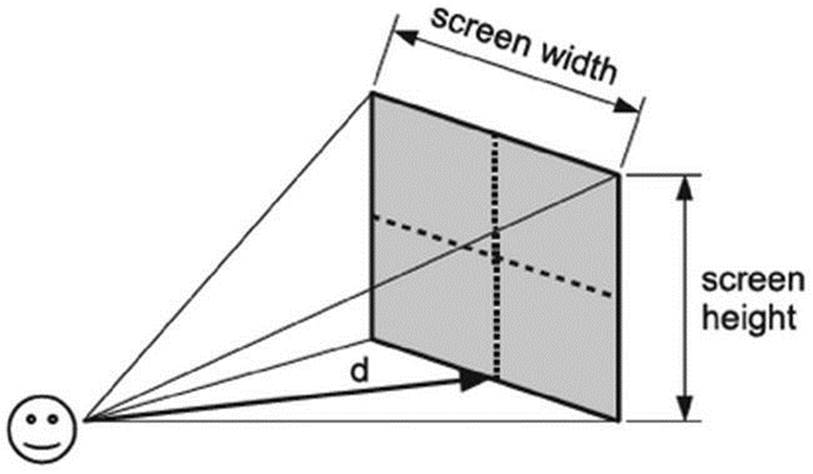
Figure 8-6. The viewing distance in a perspective projection
Field of View
So how do we select a good value for the viewing distance (d)? We could just experiment to find a value that makes the 3D scene look convincing, but we can take the guesswork out of it by calculating d from the field of view (fov), which is the angular range of the scene that is visible at one moment. For human beings, the fov is the range from the left eye to the right eye, which is about 180 degrees. Figure 8-7 shows the relationship between fov and viewing distance. When the fov angle increases (grows wider), the viewing distance decreases as more of the scene becomes visible. The opposite happens when the fov decreases (becomes narrower); viewing distance increases and less of the scene is visible.
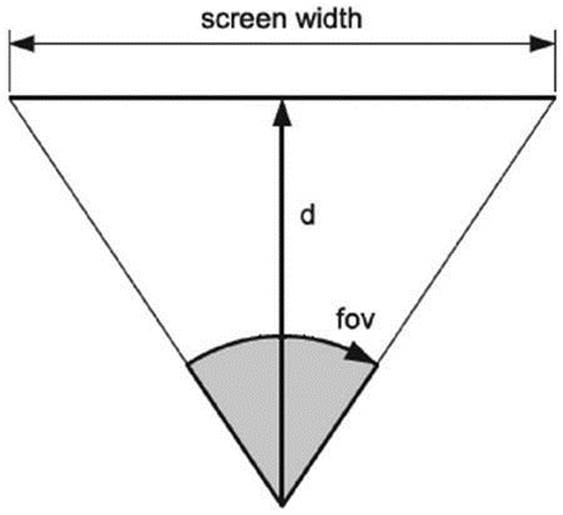
Figure 8-7. Field of view
Field of view is a better way to define how much perspective there will be in your 3D scene, but we still need a value for d in the perspective projection. To calculate d from the fov, we need to use a little trigonometry. Listing 8-7 is a function that takes the fov plus the screen width, and uses the tan function in the math module to calculate the viewing distance.
![]() Tip You can accomplish a lot in 3D graphics by looking up formulas on the Internet, but occasionally you may need to work out a little math yourself. Don’t let that scare you if math is not your strong point—you only need the basics, particularly in trigonometry.
Tip You can accomplish a lot in 3D graphics by looking up formulas on the Internet, but occasionally you may need to work out a little math yourself. Don’t let that scare you if math is not your strong point—you only need the basics, particularly in trigonometry.
Listing 8-7. Calculating the Viewing Distance
from math import tan
def calculate_viewing_distance(fov, screen_width):
d = (screen_width/2.0) / tan(fov/2.0)
return d
I usually use a value between 45 and 60 degrees for my fov, which gives a natural-looking perspective. Higher values may be good for racing games, because the increased perspective exaggerates the effect of speed. Lower values may be better for strategy games because they show more of the scene.
You may also want to adjust the fov depending on what is happening in the game. A great sniper rifle effect can be achieved by quickly narrowing the fov so that the camera zooms in, then moving it back when the player fires.
A 3D World
Let’s write an application to test the concepts we have covered so far. Because we haven’t yet explored how to draw 3D objects, we will build a scene by drawing an image at 3D points projected on the 2D screen. This creates a recognizable 3D scene, even though the images don’t change size as they approach the camera (see Figure 8-8).
If you run Listing 8-8, you will see a cube formed from a number of sphere images along its edges. By pressing the cursor keys you can pan the “camera” horizontally and vertically; pressing Q and A moves forward and back in the scene. The W and S keys adjust the viewing distance of the perspective projection. You can see the effect this has from how the cube looks and by viewing the diagram (in green). Experiment with the viewing distance and fov—notice that a wide fov makes the cube appear elongated, and a narrow fov makes the cube appear flatter.
![]() Note A camera in a 3D scene is just the current viewpoint; it may be the view from the player character’s eyes, or any other view in the game.
Note A camera in a 3D scene is just the current viewpoint; it may be the view from the player character’s eyes, or any other view in the game.
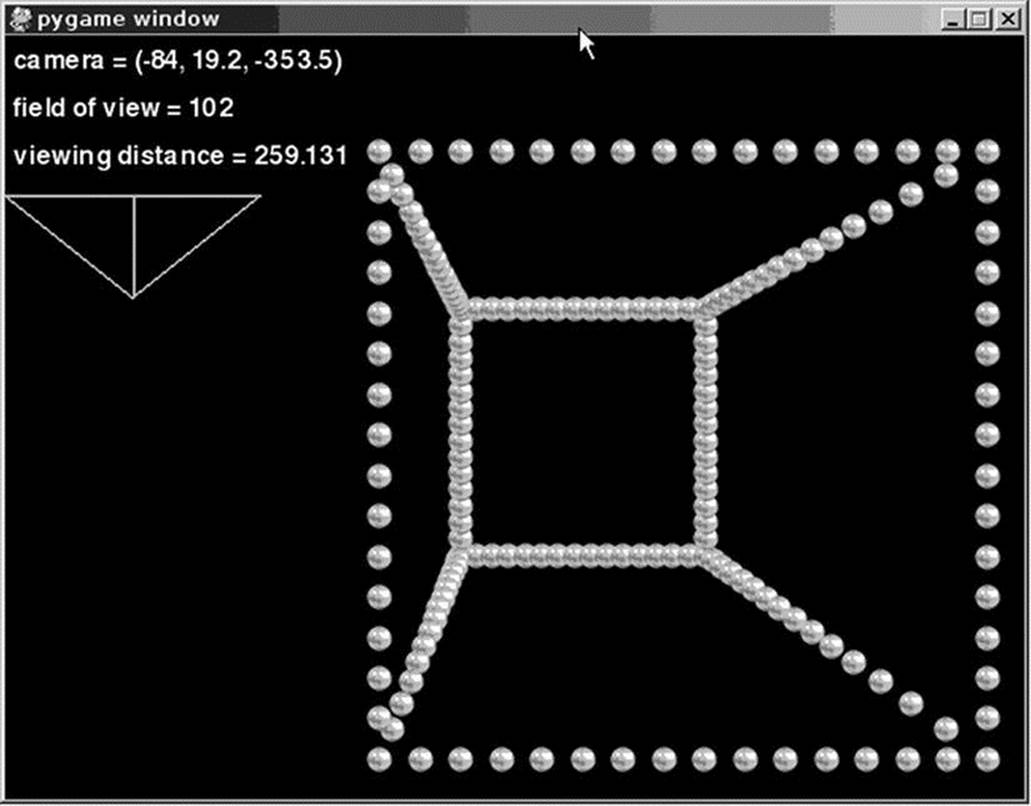
Figure 8-8. A simple 3D engine in Pygame
Listing 8-8. Simple 3D Engine (simple3d.py)
import pygame
from pygame.locals import *
from gameobjects.vector3 import Vector3
from math import *
from random import randint
SCREEN_SIZE = (640, 480)
CUBE_SIZE = 300
def calculate_viewing_distance(fov, screen_width):
d = (screen_width/2.0) / tan(fov/2.0)
return d
def run():
pygame.init()
screen = pygame.display.set_mode(SCREEN_SIZE, 0)
default_font = pygame.font.get_default_font()
font = pygame.font.SysFont(default_font, 24)
ball = pygame.image.load("ball.png").convert_alpha()
# The 3D points
points = []
fov = 90. # Field of view
viewing_distance = calculate_viewing_distance(radians(fov), SCREEN_SIZE[0])
# Create a list of points along the edge of a cube
for x in range(0, CUBE_SIZE+1, 20):
edge_x = x == 0 or x == CUBE_SIZE
for y in range(0, CUBE_SIZE+1, 20):
edge_y = y == 0 or y == CUBE_SIZE
for z in range(0, CUBE_SIZE+1, 20):
edge_z = z == 0 or z == CUBE_SIZE
if sum((edge_x, edge_y, edge_z)) >= 2:
point_x = float(x) - CUBE_SIZE/2
point_y = float(y) - CUBE_SIZE/2
point_z = float(z) - CUBE_SIZE/2
points.append(Vector3(point_x, point_y, point_z))
# Sort points in z order
def point_z(point):
return point.z
points.sort(key=point_z, reverse=True)
center_x, center_y = SCREEN_SIZE
center_x /= 2
center_y /= 2
ball_w, ball_h = ball.get_size()
ball_center_x = ball_w / 2
ball_center_y = ball_h / 2
camera_position = Vector3(0.0, 0.0, -700.)
camera_speed = Vector3(300.0, 300.0, 300.0)
clock = pygame.time.Clock()
while True:
for event in pygame.event.get():
if event.type == QUIT:
pygame.quit()
quit()
screen.fill((0, 0, 0))
pressed_keys = pygame.key.get_pressed()
time_passed = clock.tick()
time_passed_seconds = time_passed / 1000.
direction = Vector3()
if pressed_keys[K_LEFT]:
direction.x = -1.0
elif pressed_keys[K_RIGHT]:
direction.x = +1.0
if pressed_keys[K_UP]:
direction.y = +1.0
elif pressed_keys[K_DOWN]:
direction.y = -1.0
if pressed_keys[K_q]:
direction.z = +1.0
elif pressed_keys[K_a]:
direction.z = -1.0
if pressed_keys[K_w]:
fov = min(179., fov+1.)
w = SCREEN_SIZE[0]
viewing_distance = calculate_viewing_distance(radians(fov), w)
elif pressed_keys[K_s]:
fov = max(1., fov-1.)
w = SCREEN_SIZE[0]
viewing_distance = calculate_viewing_distance(radians(fov), w)
camera_position += direction * camera_speed * time_passed_seconds
# Draw the 3D points
for point in points:
x, y, z = point - camera_position
if z > 0:
x = x * viewing_distance / z
y = -y * viewing_distance / z
x += center_x
y += center_y
screen.blit(ball, (x-ball_center_x, y-ball_center_y))
# Draw the field of view diagram
diagram_width = SCREEN_SIZE[0] / 4
col = (50, 255, 50)
diagram_points = []
diagram_points.append( (diagram_width/2, 100+viewing_distance/4) )
diagram_points.append( (0, 100) )
diagram_points.append( (diagram_width, 100) )
diagram_points.append( (diagram_width/2, 100+viewing_distance/4) )
diagram_points.append( (diagram_width/2, 100) )
pygame.draw.lines(screen, col, False, diagram_points, 2)
# Draw the text
white = (255, 255, 255)
cam_text = font.render("camera = "+str(camera_position), True, white)
screen.blit(cam_text, (5, 5))
fov_text = font.render("field of view = %i"%int(fov), True, white)
screen.blit(fov_text, (5, 35))
txt = "viewing distance = %.3f"%viewing_distance
d_text = font.render(txt, True, white)
screen.blit(d_text, (5, 65))
pygame.display.update()
if __name__ == "__main__":
run()
Listing 8-8 starts out by creating a list of Vector3 objects with coordinates along the edges of a cube. The points are then sorted by their z components, so that when they are rendered, the points nearer the viewer are drawn first. Otherwise, distance points may overlap those that are close to the viewer and it will break the illusion of 3D.
Inside the main loop, the camera position is changed depending on which keys are currently pressed. You can see that the code to move a 3D point is very similar to moving a 2D sprite, with only an additional z component that moves forward and back in the 3D scene. The code to update the position with time-based movement is actually identical to the 2D calculation; it just used Vector3 objects rather than Vector2 objects.
Next in the code is a loop that draws all the points in the scene. First, the point is adjusted so that it is relative to the camera by subtracting the camera_position variable. If the resulting z component is greater than 0, it means that the point is in front of the camera and may be visible—otherwise, there is no point in drawing it. When the point is in front of the camera, it is projected by multiplying the x and y components by the viewing distance and dividing by the z component. The y axis is also flipped to point in the right direction for the 2D drawing functions. Finally the 2D coordinate is adjusted to place the “world” in the center of the screen by adding half the width (center_x) to the x component and half the height (center_y) to the y component.
The remaining code draws a small diagram that shows how the viewing distance relates to the width of the screen and the fov. It also displays a few pieces of information onscreen so that you can see what effect the key presses have.
If you want to experiment with this demonstration, try adding other lists of points that create other objects, such as pyramids and spheres. You might also want to make these “objects” move in 3D in the same way as we have done with 2D sprites in the preceding chapters.
Summary
Games with 3D visuals have the most potential to draw players in and keep them entertained. This is true not because the graphics are more realistic—early 3D games actually looked crude in comparison to their 2D counterparts—but because they feel more natural. Objects in a 3D game can rotate and be viewed at different angles, just like in the real world.
Storing information about 3D points and directions is a simple extension to 2D; we just need an extra component for the extra dimension. If you use the Vector3 class from the Game Objects library, you will find that much of the math is virtually identical to 2D because the vector class handles the extra component. All that we have done differently so far in the move to 3D is to project the points onto the screen to use Pygame’s drawing capabilities. There are actually many types of projection, but perspective projection is by far the most common because it creates natural-looking scenes.
In the next chapter we will explore how to create rich 3D scenes with OpenGL, the technology behind many commercial games, including the Quake series. You will discover that some of what we have covered in this chapter is actually done automatically by OpenGL, but I haven’t wasted your time—understanding projection and field of view will help you when you’re creating OpenGL-powered visuals.
All materials on the site are licensed Creative Commons Attribution-Sharealike 3.0 Unported CC BY-SA 3.0 & GNU Free Documentation License (GFDL)
If you are the copyright holder of any material contained on our site and intend to remove it, please contact our site administrator for approval.
© 2016-2026 All site design rights belong to S.Y.A.