Teach Your Kids to Code: A Parent-Friendly Guide to Python Programming (2015)
Appendix B. Pygame Setup for Windows, Mac, and Linux
After installing Python (see Appendix A), you’ll want to install Pygame to run the animations and games in Chapter 8 through Chapter 10. This appendix will get you up and running. If you’re installing Pygame on a computer at school or work, you may need help or permission from the IT department to perform the installation. If you run into issues, ask IT for help.
Pygame for Windows
For Windows, we’ll use Pygame 1.9.2 for Python 3.2 (see Appendix A for help setting up Python 3.2.5).
1. Go to http://pygame.org/ and click the Downloads link on the left, as shown in Figure B-1.
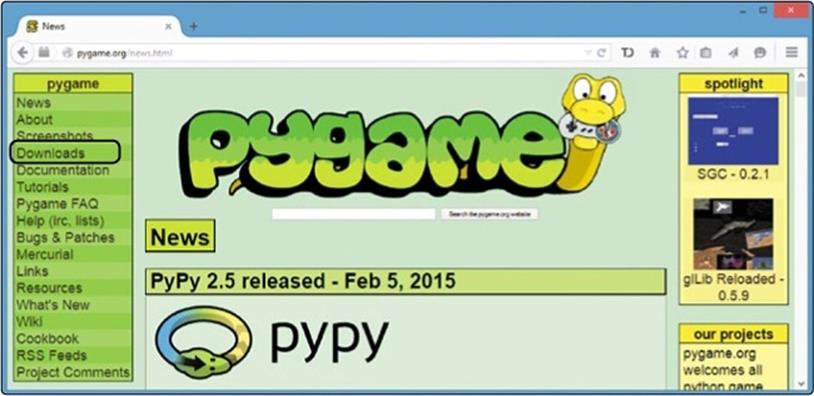
Figure B-1. Click the Downloads link.
2. Under the Windows section, find the link for pygame-1.9.2a0 .win32-py3.2.msi and click it to download the installer program, as shown in Figure B-2.
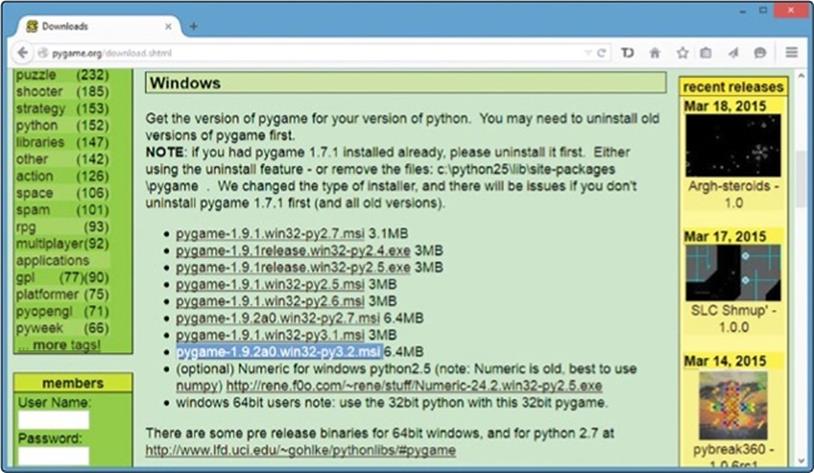
Figure B-2. Download the installer program for Windows.
3. When the download finishes, open your Downloads folder to find the pygame-1.9.2a0.win32-py3.2 Windows Installer program file, as shown in Figure B-3. Double-click the file to begin installation. If a Security Warning window comes up, click Run. Windows is just letting you know the software is trying to install on your computer.

Figure B-3. Double-click the installer in your Downloads folder.
4. The installer might ask if you would like to install Pygame for all users or just for yourself. It’s usually best to choose Install for all users, but if that isn’t allowed at your school or office or you can’t get it to work, try Install just for me. Click Next >, as shown in Figure B-4.
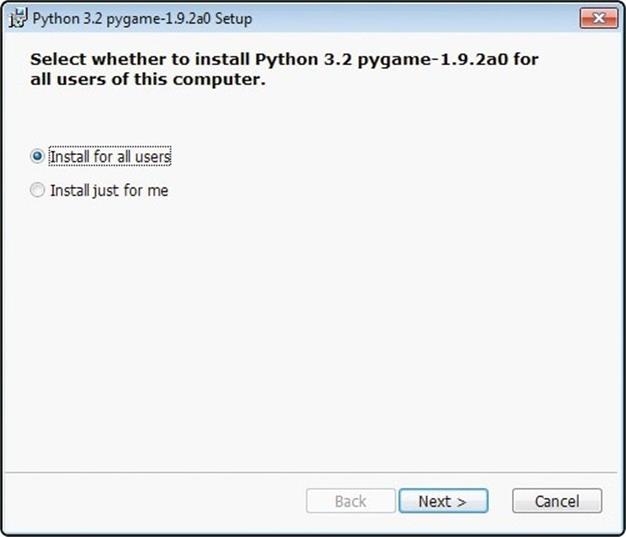
Figure B-4. Install for all users.
5. The program should find your Python 3.2.5 installation from Appendix A. Select Python 3.2 from registry. Click Next > to keep installing, as shown in Figure B-5. (If you’re installing at school or work and run into trouble, your IT staff may need to select the option for Python from another location.)
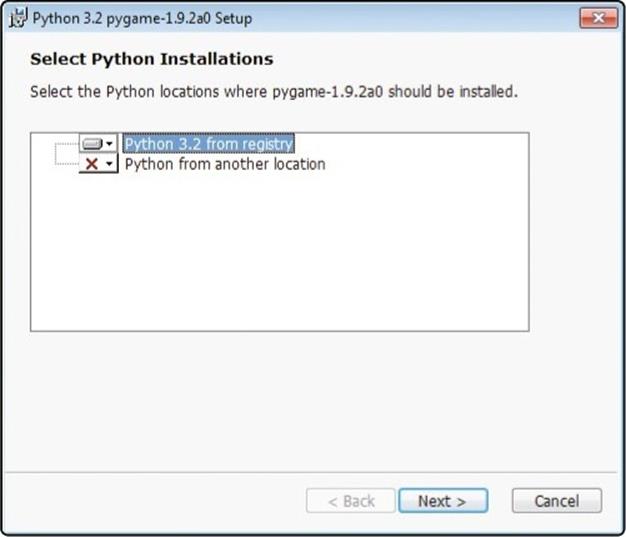
Figure B-5. Select Python 3.2 from registry.
6. Once you’ve completed the installer, click Finish to exit, as shown in Figure B-6.
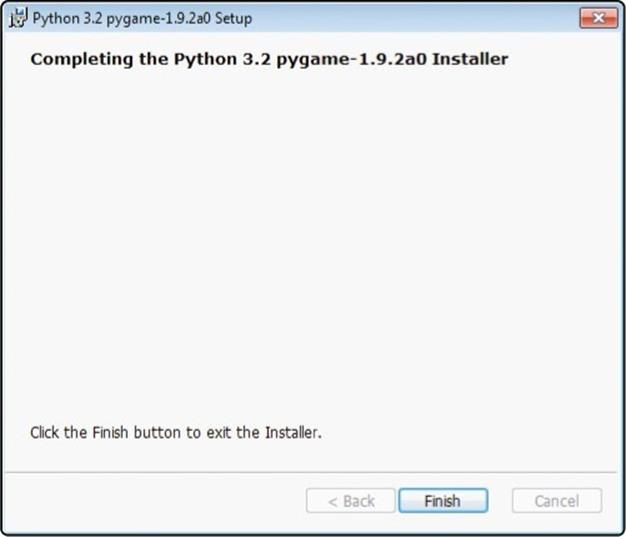
Figure B-6. Click Finish to exit.
7. Go to Start▸Programs▸Python 3.2▸IDLE (Python GUI), as shown in Figure B-7. (On Windows 8 and later, you can press the Windows/Start button, go to the Search tool, and type IDLE).
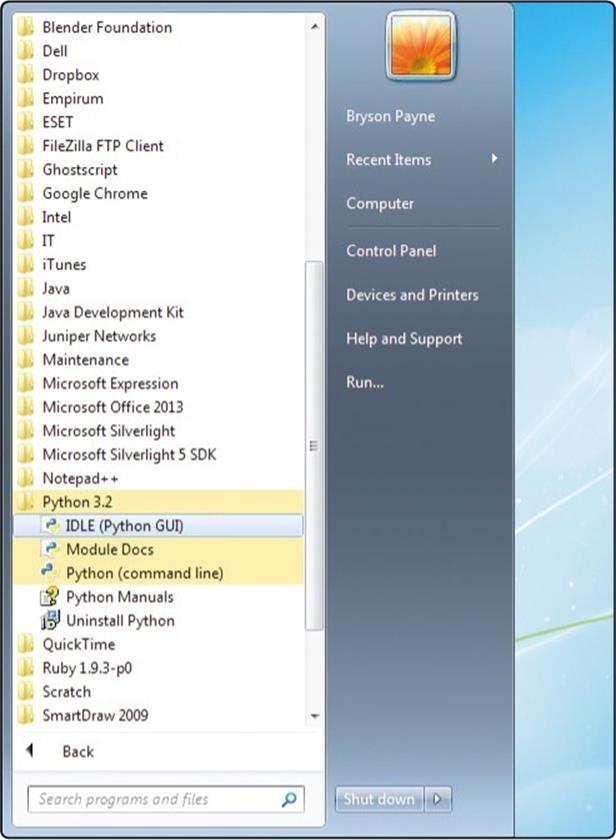
Figure B-7. Open IDLE from the Start menu.
8. In the Python shell editor, type import pygame and press ENTER. The Python shell should respond with >>>, as shown in Figure B-8. If it does, then you know Pygame installed correctly and is ready to use.
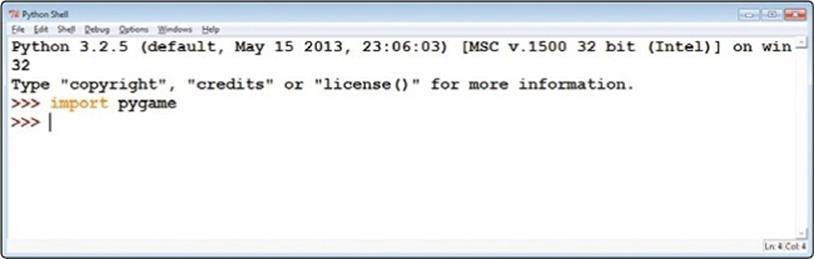
Figure B-8. Import Pygame in the Python shell.
Now you’re ready to run the programs from Chapter 8 through Chapter 10. Happy coding!
Pygame for Mac
Installing Pygame on a Mac is more complicated than on a PC. You have three options:
1. If you have access to a Windows PC, you may find it easier to install the Windows versions of Python and Pygame in order to run the programs from Chapter 8 through Chapter 10. If you choose this option, follow the steps in Python for Windows. Then follow the steps in Pygame for Windows.
2. You can install an older version of Python, like Python 2.7.9, along with Pygame 1.9.2 for OS X in order to run the Pygame programs in Chapter 8 through Chapter 10. Installing Python 2.7.9 and Pygame 1.9.2 is easier than making Pygame work with Python 3.4.2. But there are differences between Python 2 and 3, so for Chapter 1 through Chapter 7, I recommend sticking to Python 3.4.2 to make sure the examples work. Then, for Chapter 8 through Chapter 10, you can use Python 2.7 and Pygame 1.9.2 to run the Pygame examples. If you choose this option, follow the steps under Python 2.7 and Pygame 1.9.2 in the next section.
3. To install Pygame for Python 3.4 on your Mac, see the instructions online at http://www.nostarch.com/teachkids/. If you’re doing this at school or work, you will almost certainly need IT support. Give your IT professional the online instructions to use as a guide.
Python 2.7 and Pygame 1.9.2
Newer Macs come with a version of Python 2.7 preinstalled by Apple as part of OS X. But the version of Python that Apple provides may not work with the Pygame installer. I recommend installing the latest version of Python 2.7 from http://python.org/ before you try to install Pygame.
1. To install Python 2.7 on your Mac, go back to Appendix A and start following the steps under Python for Mac again. But this time, instead of downloading the 3.4.2 installer from the Mac downloads page at http://python.org/, download and run the 2.7 installer (2.7.9 as of this writing), as shown in Figure B-9.

Figure B-9. Install Python 2.7.
2. The installation process for Python 2.7 should be similar to the installer for 3.4. Continue following the steps under Python for Mac in Appendix A until you complete the installation.
3. Check your Applications folder. There should now be a Python 2.7 folder in addition to your Python 3.4 folder, as shown in Figure B-10.
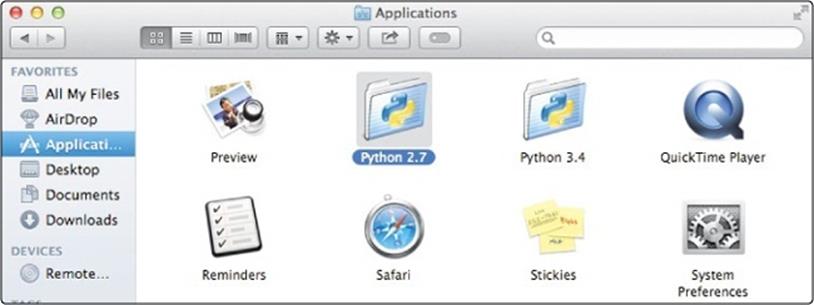
Figure B-10. You should have both Python 2.7 and Python 3.4.
4. Go to http://pygame.org/, go to the Downloads page, and download the Pygame 1.9.2 installer for Python 2.7: pygame-1.9.2pre-py2.7-macosx10.7.mpkg.zip.
5. Run the Pygame installer by holding down the CONTROL key, clicking the file, and selecting Open with▸Installer from the pop-up menu that appears. The steps will be similar to those for installing Python: click Continue a few times, accept the license, and choose the installation drive. Click Close when the installer finishes.
6. To test your Pygame installation, go to your Applications folder, select Python 2.7, and open IDLE. In IDLE for Python 2.7, type import pygame. IDLE should respond with >>>, as shown in Figure B-11.
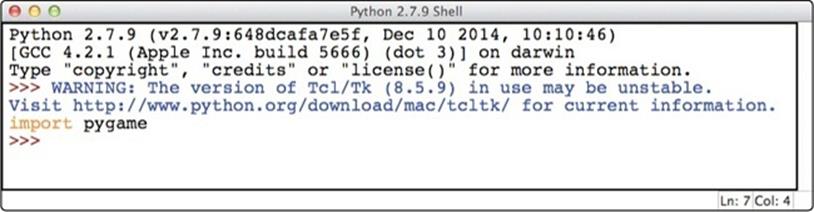
Figure B-11. Import Pygame in the Python shell.
7. You might get a pop-up notice like the one in Figure B-12 saying that you need to install X11, a windowing system used by Pygame. Click Continue to go to the XQuartz website, http://xquartz.macosforge.org/. Download XQuartz-2.7.7.dmg, open the file, and run the installer package.
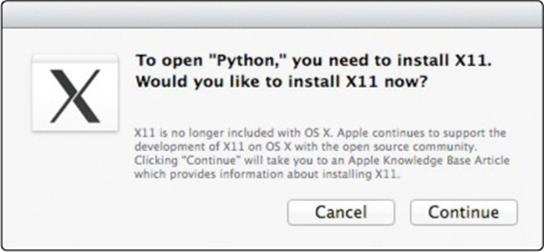
Figure B-12. Click Continue to install X11.
8. To run the Pygame programs in Chapter 8 through Chapter 10, use Python 2.7 IDLE instead of Python 3.4 IDLE.
NOTE
On newer Macs with Retina displays, using Pygame with Python 2.7 looks a bit different than it does on other computers because Retina displays use a higher screen resolution. Your programs should work fine, but they will appear in a smaller area of the screen.
Pygame for Linux
Similar to installing Pygame on a Mac, you have two options for Pygame on Linux:
1. You can install Pygame for Python 2, the version of Python that is likely to have come pre-installed as part of your version of Linux. For Chapter 1 through Chapter 7, you’ll need to use Python 3, so follow the instructions in Appendix A and use that version of IDLE for the apps in the first seven chapters. Then, for Chapter 8 through Chapter 10, you can use Pygame for Python 2 to run the Pygame examples in those chapters. If you choose this option, follow the steps under Pygame for Python 2 in the next section.
2. To install Pygame for Python 3.4 on Linux, see the instructions online at http://www.nostarch.com/teachkids/. If you’re doing this at school or work, you will likely need IT support. Give your IT professional the online instructions to use as a guide.
Pygame for Python 2
Most Linux operating systems come with Python installed already, usually Python 2. The game-based and graphical apps in Chapter 8 through Chapter 10 can run just fine on this older version of Python. The following steps will get Pygame up and running on your Linux system.
1. In the Dash menu, go to System Tools and run the Synaptic Package Manager or similar application for your version of Linux. Figure B-13 shows the package manager running on Lubuntu.
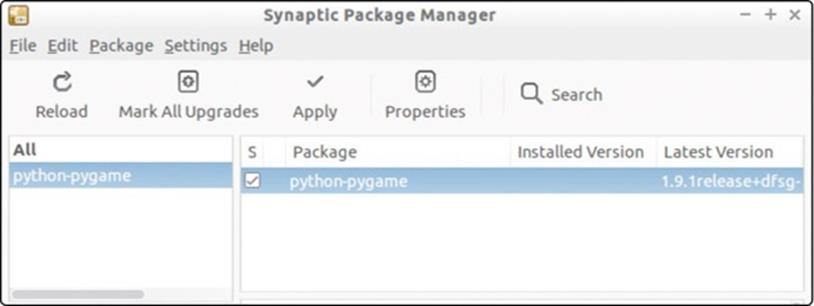
Figure B-13. Installing Pygame for Python 2 on Linux
2. Search for python-pygame. Check the box next to python-pygame in the search results and click Apply to complete the installation.
3. Run System Tools▸Terminal (or XTerm or a similar application for your version of Linux). You can start Python 2 by entering python2 in the terminal window. Then test your Pygame installation by entering import pygame at the >>> prompt as shown in Figure B-14. Python should reply with >>> to let you know that Pygame was successfully imported.
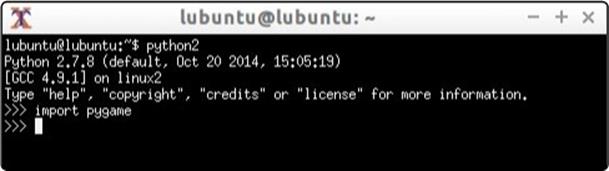
Figure B-14. You can test your installation of Pygame for Python 2 from the Linux command line terminal.
4. You can use the Software Center (as shown in Python for Linux) or the Synaptic Package Manager shown in Figure B-13 to search for and install IDLE for Python 2. Use this version of IDLE when running the Pygame apps from Chapter 8 through Chapter 10.
All materials on the site are licensed Creative Commons Attribution-Sharealike 3.0 Unported CC BY-SA 3.0 & GNU Free Documentation License (GFDL)
If you are the copyright holder of any material contained on our site and intend to remove it, please contact our site administrator for approval.
© 2016-2026 All site design rights belong to S.Y.A.