Teach Your Kids to Code: A Parent-Friendly Guide to Python Programming (2015)
Chapter 2. Turtle Graphics: Drawing with Python
In this chapter, we’ll write short, simple programs to create beautifully complex visuals. To do this, we’ll use turtle graphics. In turtle graphics, you write instructions that tell a virtual, or imaginary, turtle to move around the screen. The turtle carries a pen, and you can instruct the turtle to use its pen to draw lines wherever it goes. By writing code to move the turtle around in cool patterns, you can make it draw amazing pictures.
Using turtle graphics, not only can you create impressive visuals with a few lines of code, but you can also follow along with the turtle and see how each line of code affects its movement. This will help you understand the logic of your code.
Our First Turtle Program
Let’s write our first program using turtle graphics. Type the following code into a new window in IDLE and save it as SquareSpiral1.py. (You can also download this program, and all the others in the book, at http://www.nostarch.com/teachkids/.)
SquareSpiral1.py
# SquareSpiral1.py - Draws a square spiral
import turtle
t = turtle.Pen()
for x in range(100):
t.forward(x)
t.left(90)
When we run this code, we get a pretty neat picture (Figure 2-1).
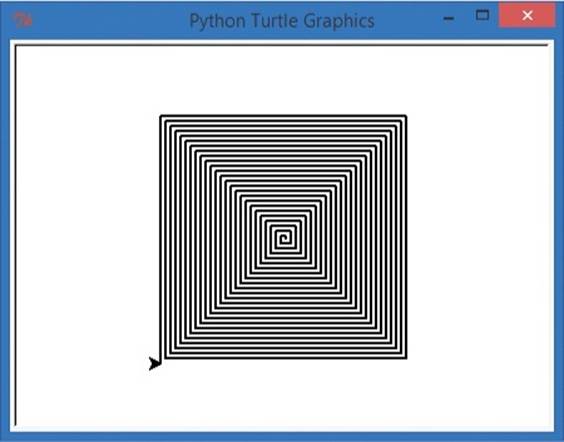
Figure 2-1. A hypnotic square spiral, created with the short program SquareSpiral1.py
How It Works
Let’s break the program down line by line to see how it works.
The first line of SquareSpiral1.py is a comment. As you learned in Chapter 1, a comment begins with a hash mark (#). Comments allow us to write notes in our programs to ourselves or to other humans who might read the program later. The computer doesn’t read or try to understand anything after the hash mark; the comment is just for us to write something about what the program is doing. In this case, I’ve put the name of the program in the comment, as well as a brief description of what it does.
The second line imports the ability to draw turtle graphics. Importing code that’s already been written is one of the coolest things about programming. If you program something interesting and useful, you can share it with other people and even reuse it yourself. Some cool Python programmers built a library — a reusable set of code — to help other programmers use turtle graphics in Python, even though turtle graphics are originally from the Logo programming language of the 1960s.[1] When you type import turtle, you’re saying that you want your program to be able to use the code that those Python programmers wrote. The little black arrow in Figure 2-1 represents the turtle, drawing with its pen as it moves around the screen.
The third line of our program, t = turtle.Pen(), tells the computer that we’ll use the letter t to stand for the turtle’s pen. This will allow us to draw with the turtle’s pen as the turtle moves around the screen just by typing t.forward() instead of writing out turtle.Pen().forward(). The lettert is our shortcut for telling the turtle what to do.
The fourth line is the most complex. Here we’re creating a loop, which repeats a set of instructions a number of times (it loops through those lines of code over and over again). This particular loop sets up a range, or list, of 100 numbers from 0 to 99. (Computers almost always start counting at 0, not 1 like we usually do.) The loop then steps the letter x through each of the numbers in that range. So x starts as 0, and then it becomes 1, then 2, and so on as it counts all the way up to 99, for a total of 100 steps.
This x is called a variable.[2] (In the program YourName.py in Chapter 1, name was a variable.) A variable stores a value that can change, or vary, as we move through our program. We’ll be using variables in almost every program we write, so it’s good to get to know them early.
The next two lines are indented, or spaced over from the left. That means that they are in the loop and go with the line above, so they’ll be repeated each time x gets a new number in the range from 0 to 99, or 100 times.
What Happens
Let’s see what happens the first time Python reads this set of instructions. The command t.forward(x) tells the turtle pen to move forward x dots on the screen. Because x is 0, the pen doesn’t move at all. The last line, t.left(90), tells the turtle to turn left by 90 degrees, or a quarter turn.
Because of that for loop, the program continues to run, and it goes back to the starting position of our loop. The computer adds 1 to move x to the next value in the range, and since 1 is still in the range from 0 to 99, the loop continues. Now x is 1, so the pen moves forward 1 dot. The pen then moves again to the left by 90, because of t.left(90). This continues again and again. By the time x gets to 99, the last time through the loop, the pen is drawing the long lines around the outside of the square spiral.
Here is a step-by-step visual of the loop as x grows from 0 toward 100:
for x in range(100):
t.forward(x)
t.left(90)
|
|
Loops 0 to 4: The first four lines are drawn (after x = 4). |
|
|
Loops 5 to 8: Another four lines are drawn; our square emerges. |
|
|
Loops 9 to 12: Our square spiral grows to 12 lines (three squares). |
The dots, or pixels, on your computer screen are probably too tiny for you to see them very well. But, as x gets closer to 100, the turtle draws lines consisting of more and more pixels. In other words, as x gets bigger, t.forward(x) draws longer and longer lines.
The turtle arrow on the screen draws for a while, then turns left, draws some more, turns left, and draws again and again, with longer lines each time.
By the end, we have a hypnotizing square shape. Turning left 90 degrees four times gives us a square, just like turning left four times around a building will take you around the building and back where you started.
The reason we have a spiral in this example is that every time we turn left, we go a little farther. The first line that’s drawn is just 1 step long (when x = 1), then 2 (the next time through the loop), then 3, then 4, and so on, all the way through 100 steps, when the line is 99 pixels long. Again, the pixels are probably so tiny on your screen that you can’t easily see the individual dots, but they’re there, and you can see the lines get longer as they contain more pixels.
By making all the turns 90-degree angles, we get the perfect square shape.
Turtle on a Roll
Let’s see what happens when we change one of the numbers in the program. One way to learn new things about a program is to see what happens when you change one part of it. You won’t always get a pretty result, but you can learn even when something goes wrong.
Change just the last line of the program to t.left(91) and save it as SquareSpiral2.py.
SquareSpiral2.py
import turtle
t = turtle.Pen()
for x in range(100):
t.forward(x)
t.left(91)
I mentioned that a 90-degree left turn creates a perfect square. Turning just a little more than 90 degrees — in this case, 91 degrees every turn — throws the square off just a bit. And because it’s already off a bit when it makes the next turn, our new shape looks less and less like a square as the program continues. In fact, it makes a nice spiral shape that starts to swirl to the left like a staircase, as you can see in Figure 2-2.
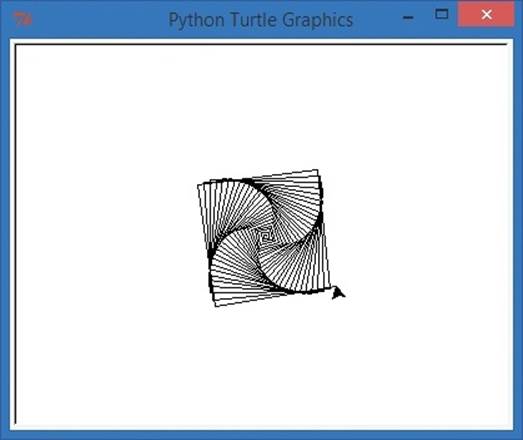
Figure 2-2. The square spiral program with one tiny change becomes a spiral staircase.
This is also a nice visual to help you understand how being off by just one number can drastically change the result of your program. One degree doesn’t seem like a big deal, unless you’re off by one degree 100 times (which adds up to 100 degrees), or 1,000 times, or if you’re using a program to land an airplane . . .
If you don’t know how degrees work yet, don’t worry about it for now. Just play with the numbers and see what happens. Change the number of lines the program draws to 200, or 500, or 50, by changing the value in parentheses after range.
Also try changing the angle in the last line to 91, 46, 61, or 121, and so on. Remember to save the program each time. Then run it to see how your changes affect what the program draws. Older readers who know a bit of geometry will see some familiar shapes based on the angles used and may even be able to predict the shape based on the angle before the program runs. Younger readers can just enjoy changing things up a bit, and this exercise might come back to them when they’re in a geometry class someday.
Turtle Roundup
Speaking of geometry, turtle graphics can draw lots more interesting shapes than just straight lines. We’ll come back to the square shape again in the next section, but let’s take a short detour to check out more of the Python Turtle library.
Let’s change one more line of code: t.forward(x). We saw earlier that this command, or function, moves the turtle’s pen forward x pixels and draws a straight line segment; then the turtle turns and does it again. What if we changed that line of code to draw something more complex, like a circle?
Fortunately for us, the command to draw a circle of a certain size, or radius, is as simple to code as the command to draw a straight line. Change t.forward(x) to t.circle(x), as shown in the following code.
CircleSpiral1.py
import turtle
t = turtle.Pen()
for x in range(100):
t.circle(x)
t.left(91)
Wow! Changing one command from t.forward to t.circle gave us a much more complex shape, as you can see in Figure 2-3. The t.circle(x) function tells the program to draw a circle of radius x at the current position. Notice that this drawing has something in common with the simpler square spiral shape: there are four sets of circle spirals just like there were four sides to our square spiral. That’s because we’re still turning left just a little over 90 degrees with the t.left(91) command. If you’ve studied geometry, you know that there are 360 degrees around a point, like the four 90-degree corners in a square (4 × 90 = 360). The turtle draws that spiral shape by turning just a little more than 90 degrees each time around the block.
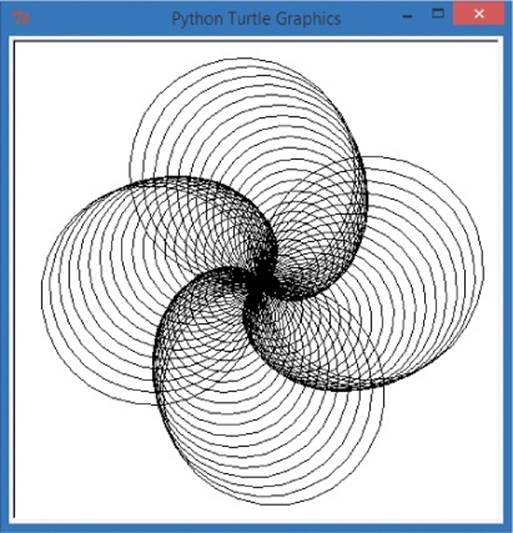
Figure 2-3. Just one more change gives us a beautiful set of four spiraling circles.
One difference you’ll see is that the circle spiral is larger than the square spiral — about twice the size, in fact. This is because t.circle(x) is using x as the radius of the circle, which is the distance from the center to the edge, or one-half of the circle’s width.
A radius of x means that the diameter, or total width, of the circle will be two times x. In other words, t.circle(x) draws a circle 2 pixels across when x is equal to 1, 4 pixels across when x is 2, all the way up to 198 pixels across when x is 99. That’s almost 200 pixels across, or twice the size of our biggest side in the square, so the circle spiral is about double the size of our square spiral — and maybe twice as cool, too!
Adding a Touch of Color
These spirals are nice shapes, but wouldn’t it be cooler if they were a bit more colorful? Let’s go back to our square spiral code and add one more line to our program, right after the t = turtle.Pen() line, to set the pen color to red:
SquareSpiral3.py
import turtle
t = turtle.Pen()
t.pencolor("red")
for x in range(100):
t.forward(x)
t.left(91)
Run the program, and you’ll see a more colorful version of our square spiral (Figure 2-4).
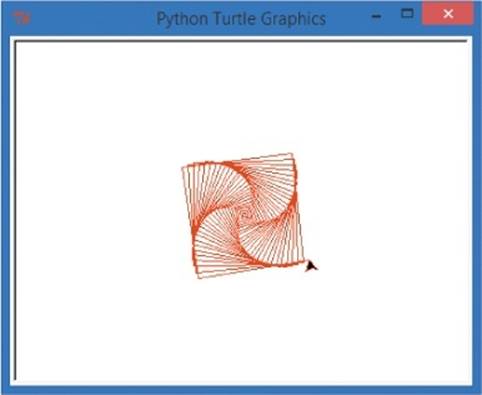
Figure 2-4. The square spiral gets a little more colorful.
Try replacing "red" with another common color, like "blue" or "green", and run the program again. You can use hundreds of different colors with the Turtle library, including some weird ones like "salmon" and "lemon chiffon". (Visit http://www.tcl.tk/man/tcl8.4/TkCmd/colors.htm for a full list.) Making the whole spiral a different color is a nice step, but what if we wanted to make each side a different color? That’s going to take a few more changes to our program.
A Four-Color Spiral
Let’s think through the algorithm — that is, the set of steps — that will turn our one-color spiral into a four-color spiral. Most of the steps are the same as in our previous spiral programs, but there are a few added twists:
1. Import the turtle module and set up a turtle.
2. Tell the computer which colors we’d like to use.
3. Set up a loop to draw 100 lines in our spiral.
4. Pick a different pen color for each side of the spiral.
5. Move the turtle forward to draw each side.
6. Turn the turtle left to get ready to draw the next side.
First, we need a list of color names instead of a single color, so we’re going to set up a list variable called colors and put four colors in the list, like this:
colors = ["red", "yellow", "blue", "green"]
This list of four colors will give us one color for each side of our square. Notice we put the list of colors inside square brackets, [ and ]. Make sure that each color name is inside quote marks just like the words we printed out in Chapter 1, because these color names are strings, or text values, that we will pass to the pencolor function shortly. As noted, we’re using a variable called colors to store our list of four colors, so whenever we want to get a color from the list, we’ll use the colors variable to stand for the color of the pen. Remember, variables store values that change. It’s right in their name: they vary!
The next thing we need to do is change the pen color every time we step through the drawing loop. To do this, we need to move the t.pencolor() function into the group of instructions under the for loop. We also need to tell the pencolor function that we want to use one of the colors from the list.
Type the following code and run it.
ColorSquareSpiral.py
import turtle
t = turtle.Pen()
colors = ["red", "yellow", "blue", "green"]
for x in range(100):
t.pencolor(colors[x%4])
t.forward(x)
t.left(91)
The list of four colors makes sense, and we can see them in the running example (Figure 2-5). So far, so good.
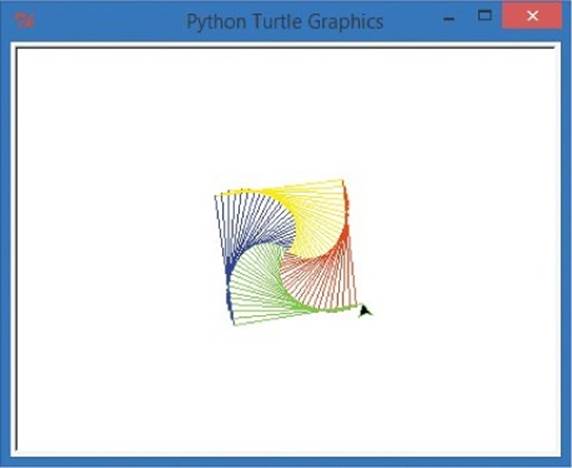
Figure 2-5. A much more colorful version of our square spiral program
The only new part is the (colors[x%4]) in the pencolor function. The x inside the statement is the same variable we’re using elsewhere in the program. So x will continue to grow from 0 to 99, just like we’ve seen before. The colors variable name inside the parentheses tells Python to choose a color from the list of color names called colors that we added earlier in the program.
The [x%4] part tells Python that we will use the first four colors in the colors list, numbered 0 through 3, and rotate through them every time x changes. In this case, our color list only has four colors, so we’ll rotate through these four colors over and over:
colors = ["red", "yellow", "blue", "green"]
0 1 2 3
The % symbol in [x%4] is called the modulo, or mod, operator and represents the remainder in long division (5 ÷ 4 equals 1 with a remainder of 1, because 4 goes evenly into 5 once with 1 left over; 6 ÷ 4 has a remainder of 2; and so on). The mod operator is useful when you want to rotate through a certain number of items in a list, like we’re doing with our list of four colors.
In 100 steps, colors[x%4] will loop through four colors (0, 1, 2, and 3, for red, yellow, blue, and green) a total of 25 times. If you have the time (and a magnifying glass), you could count 25 red, 25 yellow, 25 blue, and 25 green segments in Figure 2-5. The first time through the drawing loop, Python uses the first color in the list, red; the second time, it uses yellow; and so on. Then the fifth time through the loop, Python goes back to red, then yellow, and so on, and always cycles back around to red after every fourth pass through the loop.
Changing Background Colors
Let’s mix things up a bit again to see if we can create something even more beautiful than Figure 2-5. For example, as my five-year-old son Alex pointed out, the yellow sides are hard to see. That’s because, just like yellow crayons on white drawing paper, the yellow pixels on the screen don’t show up well against the white background color. Let’s fix that by changing the background color to black. Type the following line of code anywhere after the import line in our program:
turtle.bgcolor("black")
Adding this one line gives us an even neater picture: all of the colors now stand out on the black background. Notice that we’re not changing anything about the turtle’s pen (represented by the variable t in our program). Instead, we’re changing something about the turtle screen, namely the background color. The turtle.bgcolor() command allows us to change the color of the entire drawing screen to any of the named colors in Python. In the line turtle.bgcolor("black"), we’ve chosen black as the screen color, so the bright red, yellow, blue, and green show up nicely.
While we’re at it, we can change the range() in our loop to 200, or even more, to make larger squares in our spiral. See Figure 2-6 for the new version of our picture with 200 lines on a black background.

Figure 2-6. Our square spiral has come a long way from its simple beginnings.
Always willing to help make my programs more awesome, Alex asked for one more change: what if we replaced the line segments with circles now? Wouldn’t that be the coolest picture of all? Well, yes, I have to agree — it is even cooler. Here’s the full code.
ColorCircleSpiral.py
import turtle
t = turtle.Pen()
turtle.bgcolor("black")
colors = ["red", "yellow", "blue", "green"]
for x in range(100):
t.pencolor(colors[x%4])
t.circle(x)
t.left(91)
You can see the result in Figure 2-7.
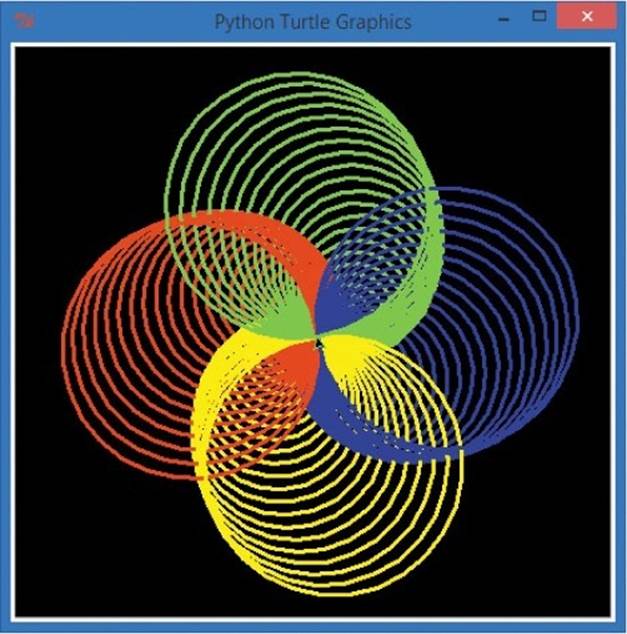
Figure 2-7. Alex’s awesome color circle spiral — eight lines of code, simple and elegant
One Variable to Rule Them All
So far, we’ve used variables to change the color, size, and turning angle of our spiral shapes. Let’s add another variable, sides, to represent the number of sides in a shape. How will this new variable change our spiral? To find out, try this program, ColorSpiral.py.
ColorSpiral.py
import turtle
t = turtle.Pen()
turtle.bgcolor("black")
# You can choose between 2 and 6 sides for some cool shapes!
sides = 6
colors = ["red", "yellow", "blue", "orange", "green", "purple"]
for x in range(360):
t.pencolor(colors[x%sides])
t.forward(x * 3/sides + x)
t.left(360/sides + 1)
t.width(x*sides/200)
You can change the value of sides from 6 down to 2 (one side’s not very interesting, and you won’t be able to use bigger numbers unless you add more colors to the list in the sixth line of the program). Then save and run the program as many times as you’d like. Figure 2-8 shows the pictures created with sides = 6, sides = 5, all the way down to sides = 2, which is the weird, flat spiral shown in Figure 2-8(e). You can change the order of the colors in the list, and you can use bigger or smaller numbers in any of the functions in the drawing loop. If you break the program, just go back to the original ColorSpiral.py and play some more.
The ColorSpiral.py program uses one new command, t.width(); this changes the width of the turtle’s pen. In our program, the pen gets wider (its lines get thicker) as it draws larger and larger shapes. We’ll revisit this program and others like it in Chapter 3 and Chapter 4 as you learn the skills needed to create programs like this from scratch.
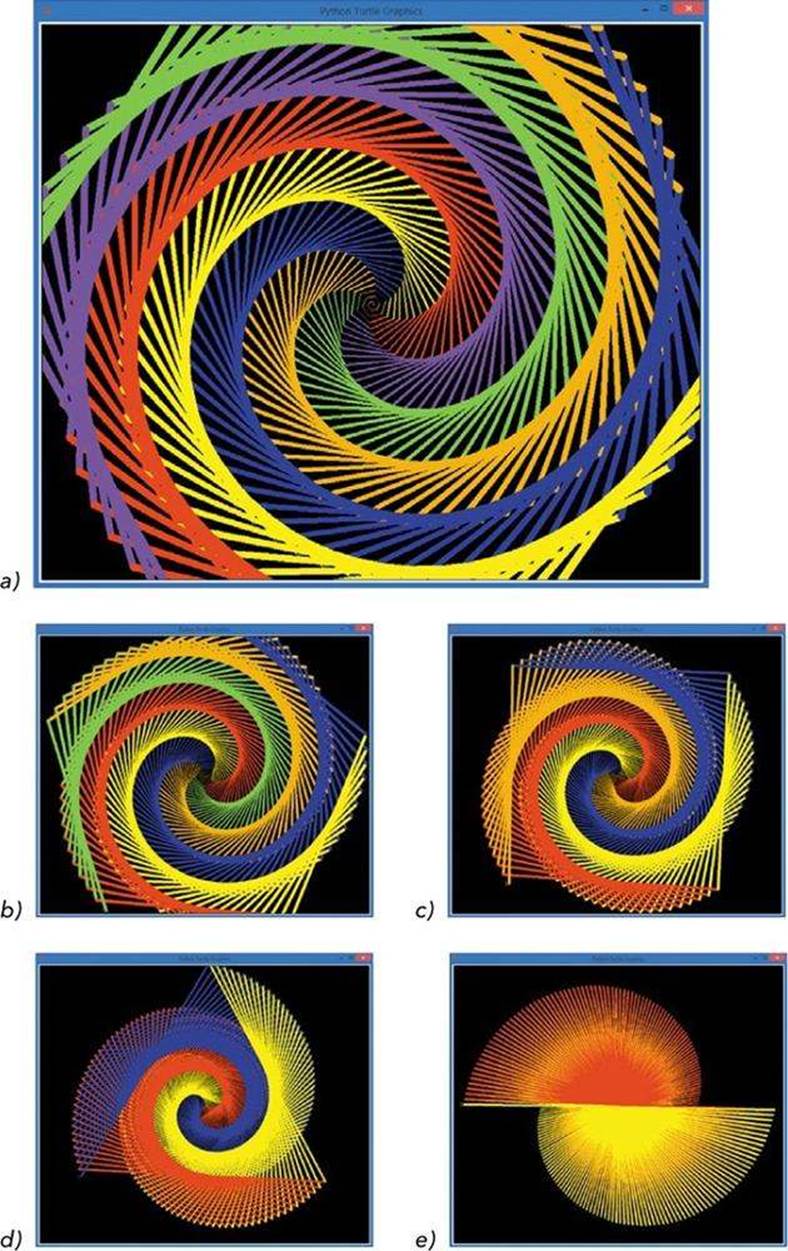
Figure 2-8. Five colorful shapes created by changing the variable sides from 6 (a) down to 2 (e)
What You Learned
In this chapter, we drew impressive, colorful shapes in Python using the Turtle library of tools. We brought this library into our program by using the import command, and you learned that reusing code in this way is one of the most powerful things about programming. Once we’ve written something useful, or borrowed code that someone else has been kind enough to share, we not only save time but can also use that imported code to do neat new things.
You’ve also been introduced to variables like x and sides in our programs. These variables store, or remember, a number or value so that you can use it multiple times in a program and even change the value as you go. In the next chapter, you’ll learn more about the power of variables and how Python can even help you do your math homework!
At this point, you should be able to do the following:
§ Draw simple graphics with the Turtle library.
§ Use variables to store simple number values and strings.
§ Change, save, and run programs in IDLE.
PROGRAMMING CHALLENGES
Try these challenges to practice what you’ve learned in this chapter. (If you get stuck, go to http://www.nostarch.com/teachkids/ for sample answers.)
#1: CHANGING THE NUMBER OF SIDES
We used a variable, sides, in the ColorSpiral.py program in One Variable to Rule Them All, but we didn’t vary it much or change its value except for editing, saving, and running the program again. Try changing the value of sides to another number, say 5. Save and run the program to see how this affects your drawing. Now try 4, 3, 2, and even 1! Now, add two or more colors, in quotes, separated by commas, to the list of colors in the sixth line of the program. Increase the value of sides to use this new number of colors — try 8 or 10 or more!
#2: HOW MANY SIDES?
What if you want to let a user decide the number of sides while the program runs? Using what you learned in Chapter 1, you can ask the user for a number of sides and store that input in the variable sides. Our only extra step is to evaluate the number the user enters. We can find out which number the user typed with the eval() function, like this:
sides = eval(input("Enter a number of sides between 2 and 6: "))
Replace the line sides = 6 in ColorSpiral.py with the preceding line. Your new program will ask how many sides the user wants to see. Then, the program will draw the shape the user asks for. Give it a try!
#3: RUBBER-BAND BALL
Try changing the ColorSpiral.py program into a more tangled and abstract shape just by adding an extra turn inside the end of the drawing loop. Add a line like t.left(90) to the bottom of the for loop to make the angles sharper (remember to indent, or space over, to keep the statement in the loop). The result, shown in Figure 2-9, looks like a geometric toy or perhaps a ball made of colored rubber bands.
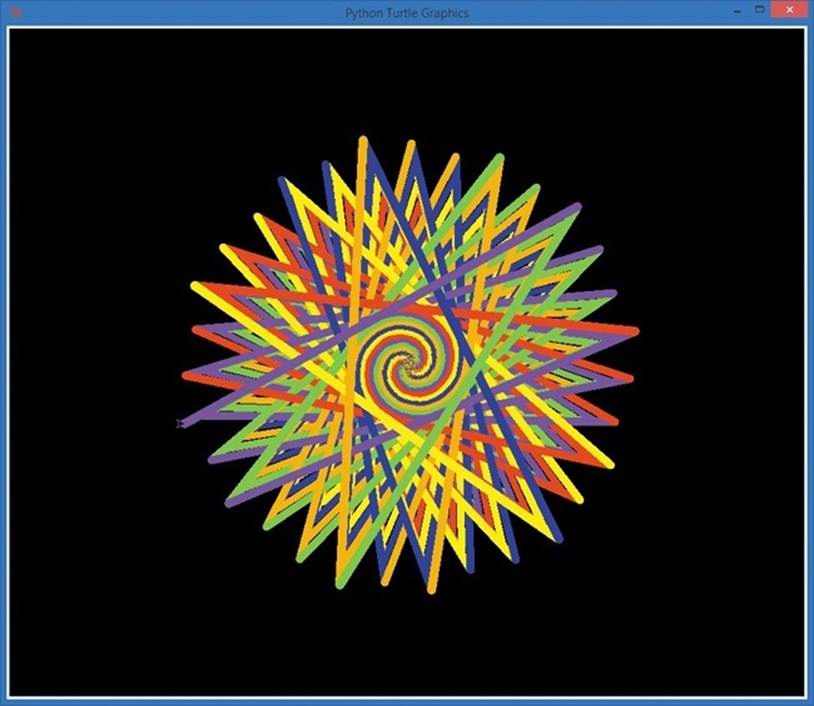
Figure 2-9. Adding an extra 90 degrees to each turn in ColorSpiral.py turns it into RubberBandBall.py.
Save this new version as RubberBandBall.py, or go to http://www.nostarch.com/teachkids/ and find the program in the source code for Chapter 2.
[1] The Logo programming language was created in 1967 as an educational programming language, and five decades later, it’s still useful for learning the basics of coding. Cool, huh?
[2] Younger readers may recognize x as the unknown, like when they solve x + 4 = 6 to find the unknown x. Older readers may recognize x from an algebra class or another mathematics course; this is where early programmers borrowed the concept of a variable from. There’s a lot of good math in coding: we’ll even see some cool geometry examples as we move forward.