Digital Archaeology (2014)
15. Fighting Antiforensics
One problem the archaeologist rarely deals with is having the civilization under study deliberately hiding evidence of their existence. That is something the digital investigator faces on a regular basis. People who operate computers with malicious intent frequently understand that their activities can be traced and will go to great lengths to cover their tracks. Common roadblocks to the investigator include secure deletion of data, hiding of data, and booby traps that destroy data or systems when certain events are triggered. If the intent of an action or procedure is to hamper the efforts of a computer investigation, it can be considered antiforensics. Kessler (2007) lists four categories of antiforensic 'margin-top:4.0pt;margin-right:0cm;margin-bottom:4.0pt; margin-left:40.0pt;text-indent:-7.5pt;line-height:normal'>• Artifact destruction
• Data hiding
• Trail obfuscation
• Attacks against forensic tools
The first part of this chapter will cover actions to take when data is overwritten so completely that no conventional methods will permit recovery. This does not mean merely erasing files. A suspect may well leave the file intact, but erase metadata that the investigator may need to reconstruct events. This book will refer to these concepts generically as artifact destruction. After this will follow a discussion of different ways in which users can hide data on a storage device.
As with everything else discussed in this book, it is best if the actions described in this chapter be performed against a forensic image of the system being examined. If the forensic image can be mounted as a file system, that is the best way to work. Paraben Software’s free utility P2 Explorer is a tool that performs this trick. The latest version as of this writing is ver. 3.1. It is capable of mounting Paraben’s own Forensic Replicator images. It also mounts Encase, Safeback, SMART, FTK, and DD images as well.
Artifact Destruction
The most common form of destruction is file deletion. Incriminating evidence is removed from the drive, and efforts are made to prevent an investigator from restoring that information. This destruction could be files, records from databases, e-mail messages, or calendar entries. If the reader has learned nothing else from this book, she should at least understand that simply deleting a file initially doesn’t do anything to remove the actual data. This was discussed in some detail in Chapter 8, “Finding Lost Files.” Astute criminals are as aware of this as any investigator and will take the extra effort necessary to wipe the data along with the file entries.
Literally hundreds of utilities exist that overwrite the media surfaces in order to discourage the recovery of deleted files. Most of these operate by recording a string of 0s over the clusters that hosted the file, erasing them, writing a string of 1s, and repeating the process numerous times. Some utilities write random strings of 1s and 0s. Recovering actual data after a wipe utility has been used is feasible using highly specialized hardware and software, but for the typical investigator, it isn’t possible.
That isn’t to say that the investigator cannot prove that the file once existed. It also doesn’t mean that other versions or artifacts of the file won’t still exist on the media. The Windows registry can be a source of information regarding previously opened files. Also, as discussed in Chapter 8, file system metadata may still contain entries to the file. Additionally, many applications constantly create temporary files that are deleted whenever the file is closed by the application. This deleted temporary file may well be recoverable.
Extracting History from the Windows Registry
On Windows systems a search of the registry can be quite educational. Several different registry entries list the most recently used (MRU) files, even if the files have been deleted. Figure 15.1 shows the Windows registry listing the last several files opened by an application.
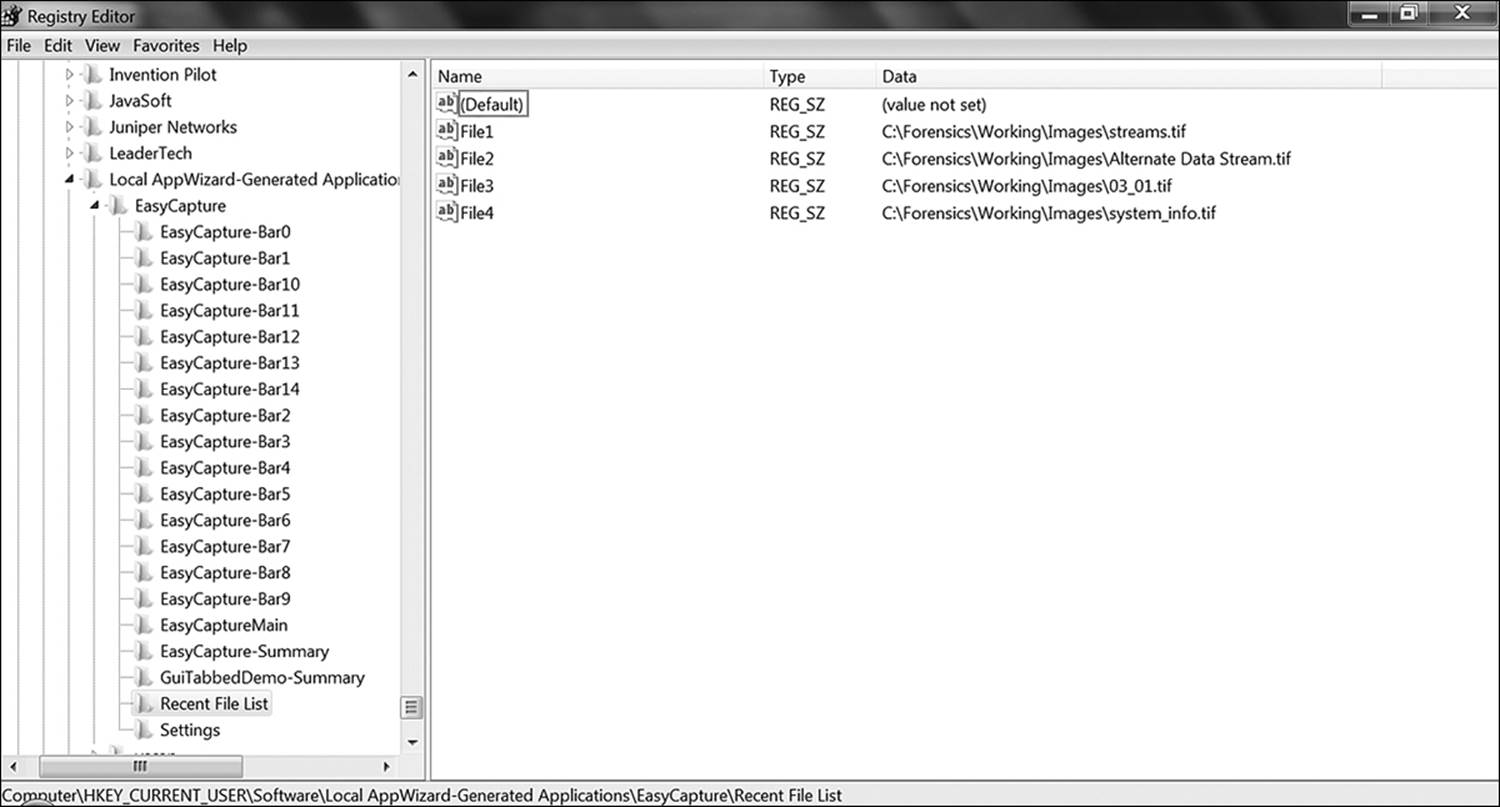
Figure 15.1 The registry stores lists of recently used files, even if those files have been deleted.
Several MRU lists are accessible in the registry. Not all are called MRU or even include the letters in the name. The example in Figure 15.1 shows a hive entry entitled Recent File List. Most applications maintain an MRU, and the OS keeps several as well. Start with HKEY_USERS. Each user with an account on the system will have a subhive with their preferences. The registry will not list users by name, but rather have a lengthy numerical identifier called the Security Identifier (SID), with several clusters of numbers separated by hyphens. The shorter user IDs under HKEY_USERS represent default accounts. These are S-1-5-18 (the local system account), S-1-5-19 (the local service account), and S-1-5-20 (the network service account). These rarely have information relevant to the investigation.
Following these numbers will be one or more numbers beginning with S-1-5-21, followed by a long string of numbers. These represent actual user accounts, past and present. In an organization where one computer might be used by several users, each user who logs on will automatically generate a hive in the registry for their account. This is where all the user-specific preferences and properties are maintained. If working under orders to target a specific user, it will be necessary to identify which subkey belongs to that user. In order to do this, open the folder called Volatile Environment. The user name is listed in plain text in this location.
Now under that folder, open the HKEY_USERS > Software hive. Each application that is installed is listed here. Note also that applications that were uninstalled will continue to be represented by a folder in this hive unless the user took specific action to remove the folder. This can be introduced as evidence of previous applications if desirable. Some places to look for various applications (and this is an abbreviated list) include the following:
• Adobe Acrobat (Reader or Professional): HCKU/Adobe/Acrobat Reader/{version number}/AVGeneral/cRecentFiles
• Internet Explorer: HCKU/Microsoft/Internet Explorer/TypedURLs
• Microsoft Access: HCKU/Microsoft/Office/(version)/Access/File MRU
• Microsoft Excel: HCKU/Microsoft/Office/(version)/Excel/File MRU
• Microsoft Excel: HCKU/Microsoft/Office/(version)/Excel/Place MRU
• Microsoft Management Console: HCKU/Microsoft/Microsoft Management Console/Recent File List
• Microsoft Publisher: HCKU/Microsoft/Office/(version)/Common/Publisher/File MRU
• Microsoft Publisher: HCKU/Microsoft/Office/(version)/Publisher/File MRU
• Microsoft Word: HCKU/Microsoft/Office/(version)/Word/File MRU
• Microsoft Word: HCKU/Microsoft/Office/(version)/Word/Place MRU
• Offline Files Use: Microsoft/Office/Offline/Files
• Roxio Photo Suite: HCKU/PhotoSuite(ver)/RoxioPhotoSuite/MRUFiles
• Softland doPDF: HCKU/Softland/doPDF/doPDF v(x)/
• TechSmith SnagIt: HCKU/TechSmith/SnagIt/(ver. no.)/SnagItEditor/Recent File List
• Explorer:
• HKCU\Microsoft\Windows\CurrentVersion\Explorer\ComDlg32\OpenSaveMRU
• HKCU\Software\Microsoft\Windows\CurrentVersion\Explorer\ComDlg32\LastVisitedMRU
• HKCU\Software\Microsoft\Windows\CurrentVersion\Explorer\RecentDocs
The HKEY_CURRENT_USER hive contains all of this information as it is relevant to the user currently logged in. In reality, it is merely a symbolic link to the registry hive associated to the SID of the user logged in. However, if imaging a live system, be sure to examine the CURRENT-USER area in the same general locations.
The registry can also provide evidence that applications that do not currently reside on the system once did. HKEY_CURRENT_USER > Software records all software installed by that user. Even applications that have been removed are likely to retain folders, as the uninstall process of Windows is imprecise at best. The view of the registry seen in Figure 15.2 shows a long list of applications. The Advanced Port Scanner highlighted is not currently installed on the machine being examined. However, the fact that it was once present might be relevant to the investigation at hand.
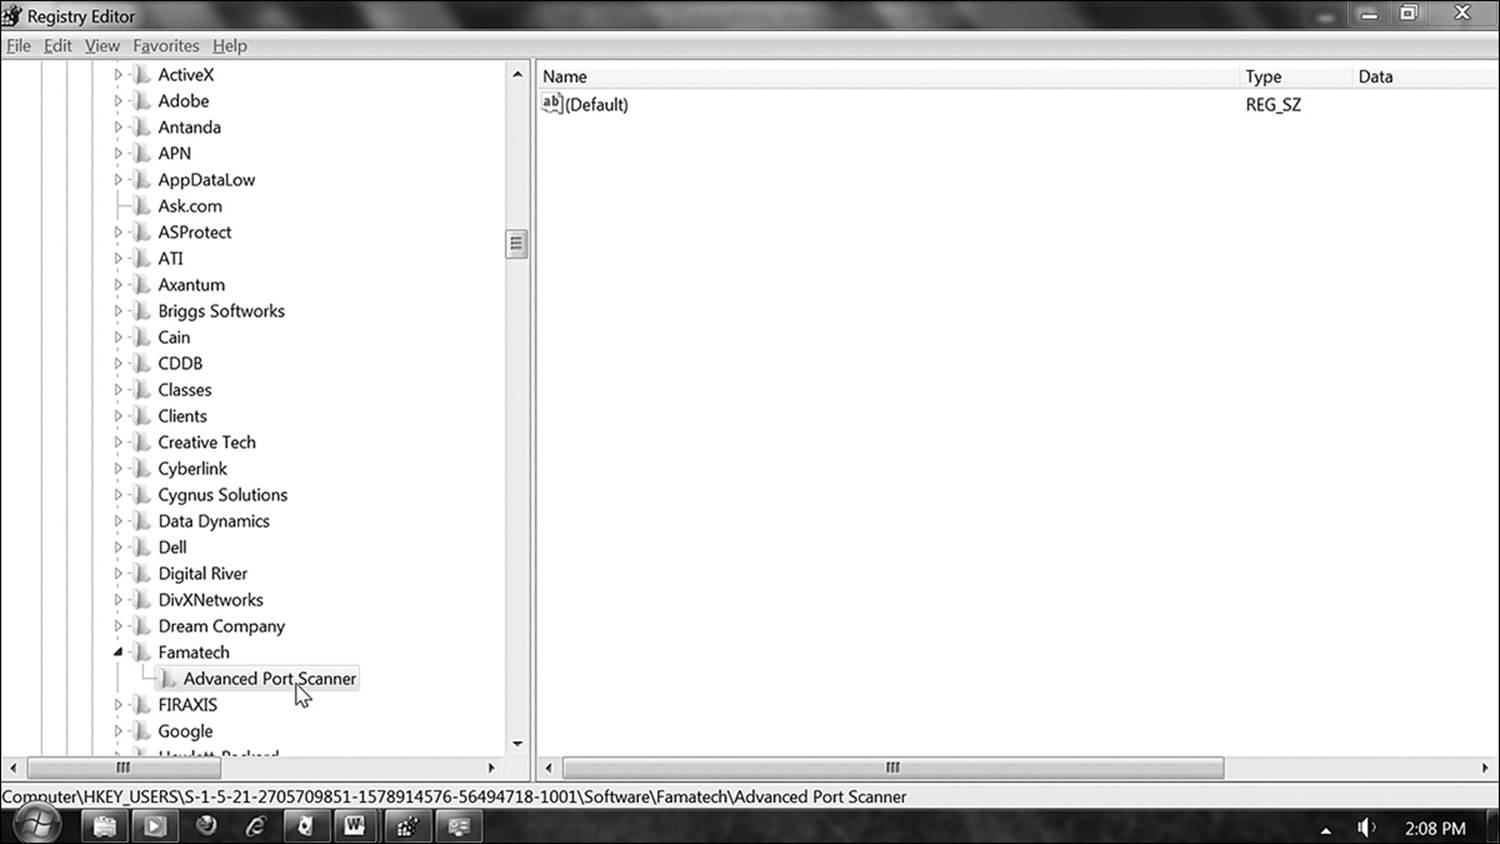
Figure 15.2 Applications no longer installed on a system might still have registry entries associated to them.
Manually searching the registry is a time-consuming and imprecise method for analysis. Most of the forensic suites offer some form of registry analysis as a function of their package. Access Data’s FTK allows live capture of registry entries loaded in memory as well. Paraben’s P2 Commander has a built-in registry analysis tool as well.
A very handy tool for the investigator is RegRipper by Harlen Carvey. This open-source tool will create reports that incorporate many of the MRU lists described earlier from a GUI. A command-line version of the utility offers even more utility to the person willing to take the time to learn the various triggers to manipulate the command. RegRipper is not designed to run against a live machine. Run this utility only against forensic images of machines.
File System Metadata
Every time a file is created or deleted on a computer, today’s operating systems log that event. These logs are not easily readable or even accessible to the average user. On a Windows system, the metadata consists of several hidden, read-only files. These files exist in an area of the hard disk known as the Device Configuration Overlay (DCO).
The interesting attribute to these files is that, even if the user selects the option to view hidden and system files in Windows Explorer, the metadata files still cannot be browsed by the user. Specialized utilities, such as the Directory Snoop used in other parts of this book or the disk editing utilities available in virtually all forensic suites, are required to view file system metadata (Figure 15.3). Metadata files were discussed in greater detail in Chapter 8, “Finding Lost Files.” Table 15.1 provides a recap.
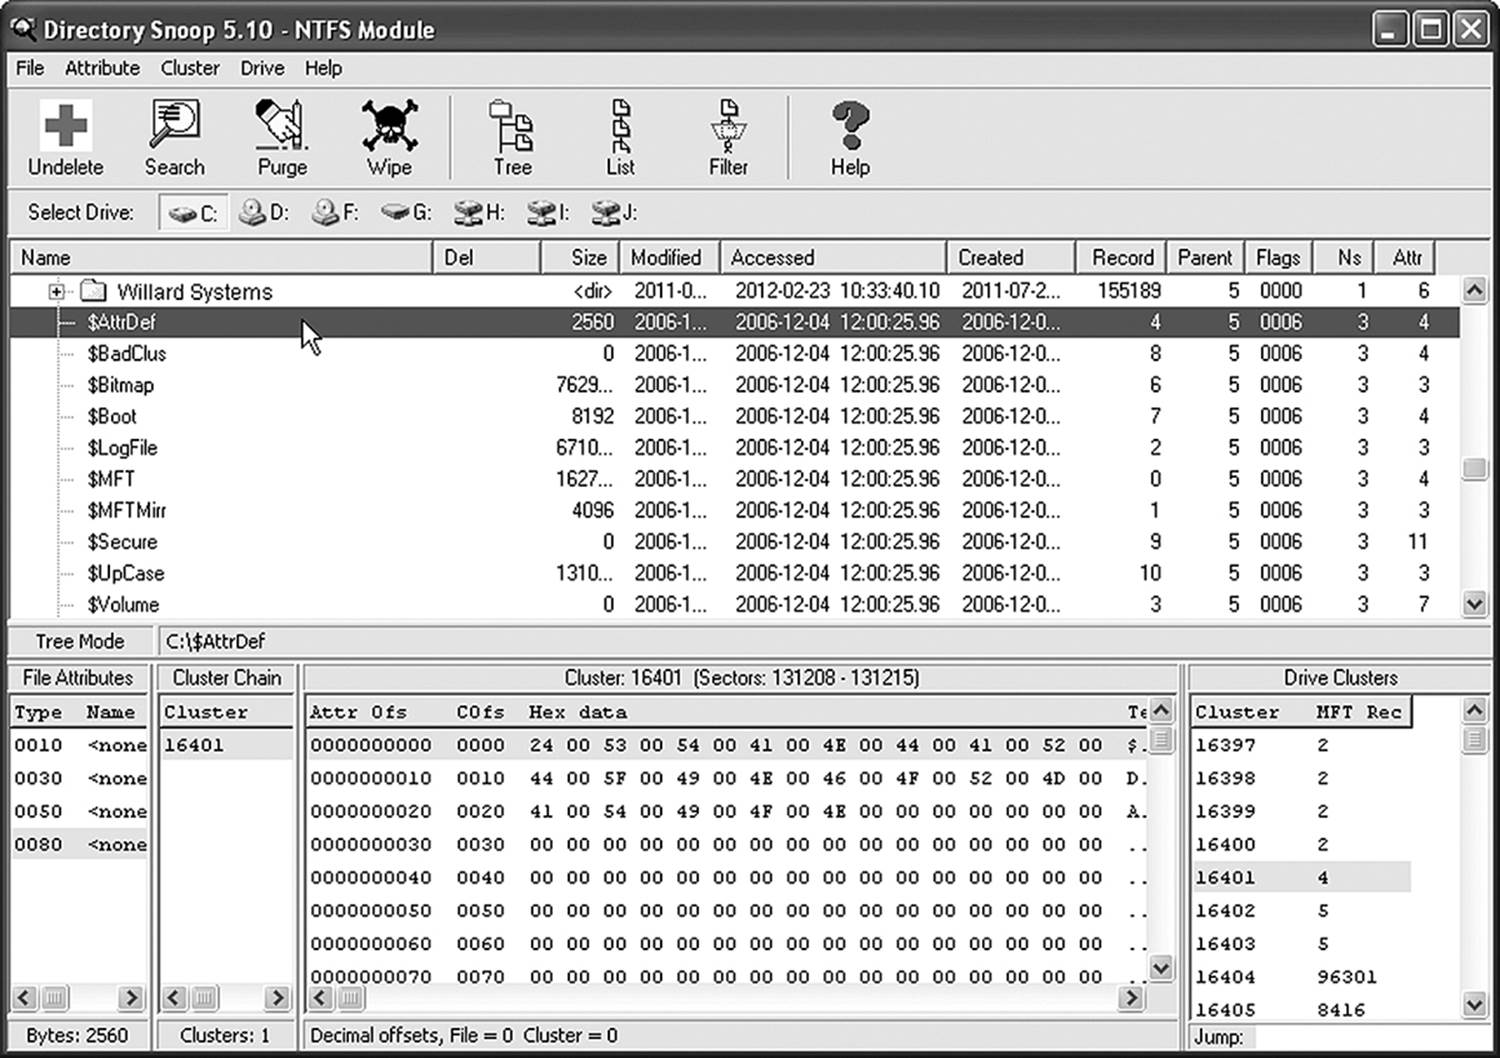
Figure 15.3 File system metadata files can only be viewed by specialized applications, such as Directory Snoop, shown here.
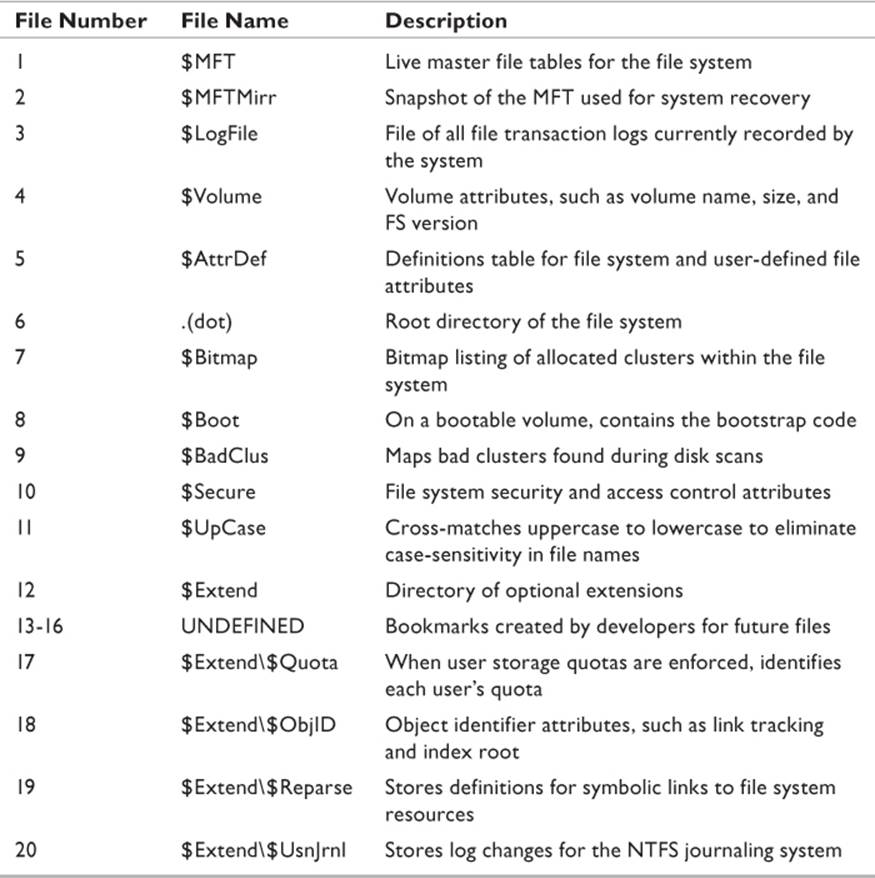
Table 15.1 NTFS Metafiles
The master file table, represented by the file $MFT, still retains records for files long after they are deleted, even if dumped from the recycle bin. If the goal is simply to prove that a file once existed on the system and you do not necessarily have to present the actual file, this might be a good approach. In Figure 15.4, the MP3 file tao1.mp3 is highlighted in the details pane. This file was deleted and then wiped for the purposes of this exercise. (It was, however, backed up on another drive because the song is just too good to lose!)
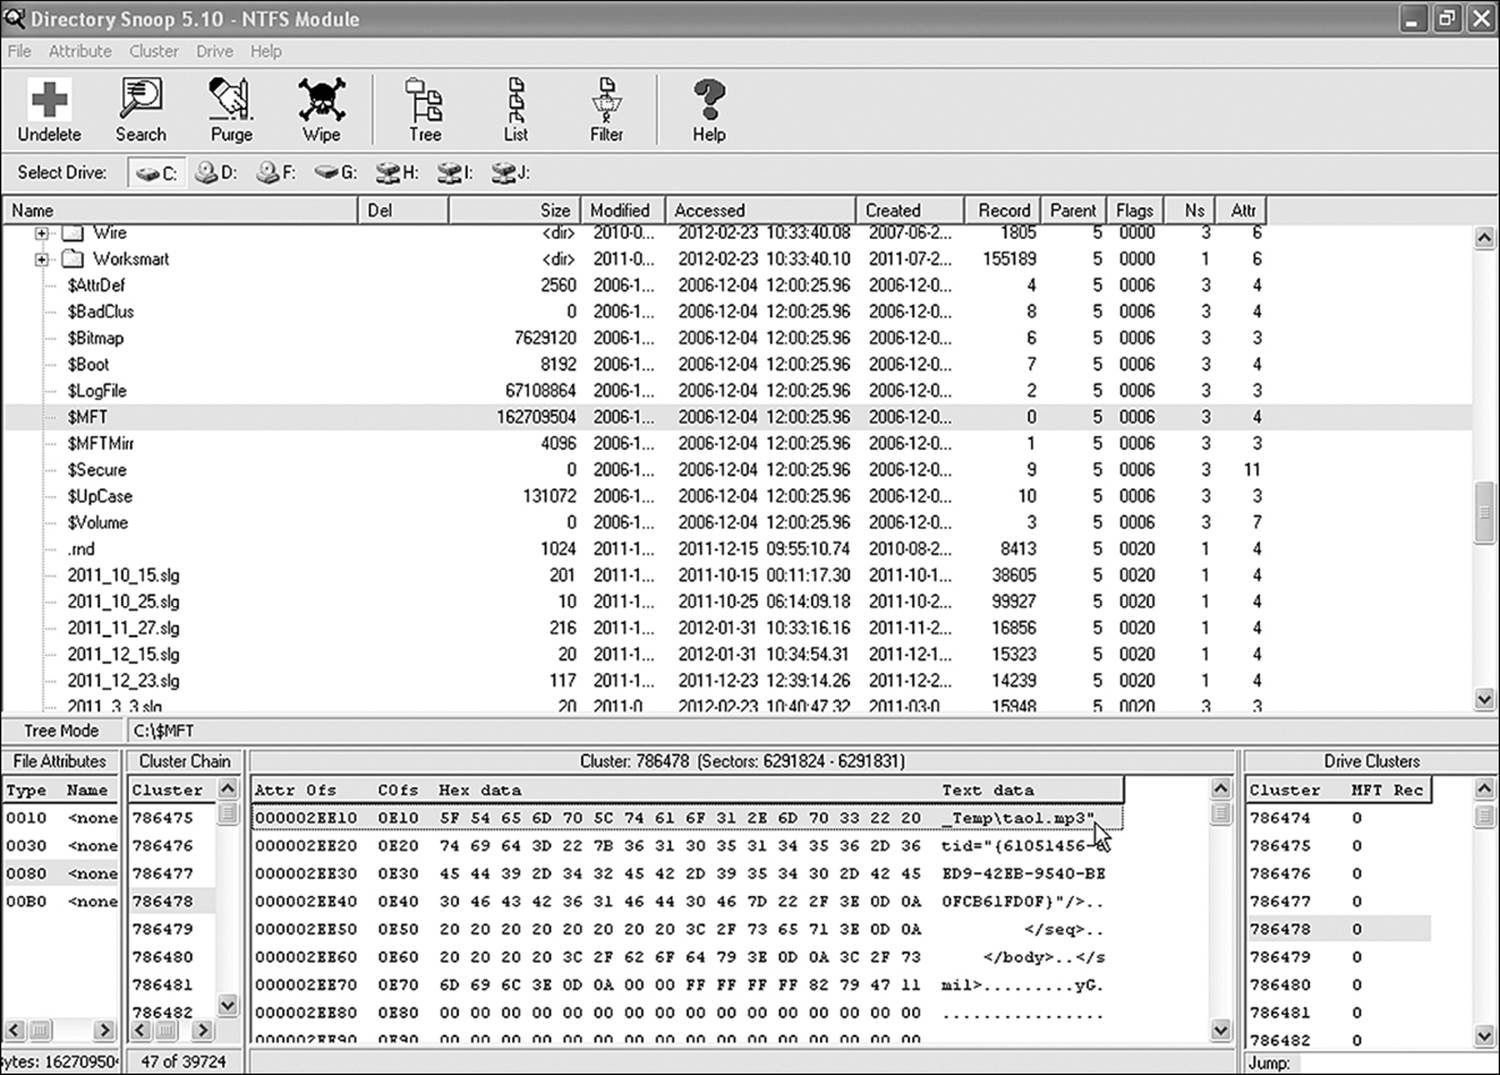
Figure 15.4 A search of a file name being sought by an investigator finds an entry in the MFT that reveals that it once existed on the computer.
A string search for the characters TAO1 across all clusters, including slack space, also revealed an entry for the file in Media Player’s current database. We learn that the file is a Flamenco piece by Tao Ruspoli. Because it exists as an entry in Media Player’s database, we also know that the existence of the file was known by at least one user, and that the file has been manipulated. This relates back to the discussion in Chapter 11, “Web Forensics,” regarding points the prosecutor needs to prove in order to establish culpability.
We now have more information about the file than when we started. And yet the file no longer exists on the computer.
Microsoft makes a utility called nfi, which is part of the original Windows 2000 debugging tool kit. The nfi utility extracts information about the NTFS file structure and outputs it in humanly readable form. (As of this writing, the toolkit is still available for download athttp://support.microsoft.com/kb/253066.) To use the tool, open a command prompt (as administrator), and type the command nfi c > MFT.txt. It takes a while to process the file, especially on a large hard drive.
A few notes about the tool are in order. The command works on a single volume at a time. The command nfi C runs the tool against the C drive. Do not use the :\ suffix, as that will only output the MFT information relating to the root directory. If you want the entire file system of the drive, you type only the letter. The trigger > MFT.txt pipes the output to a text file called MFT.txt in the directory from which the utility is run. If you want to output to a different drive and directory, you must type the full path to that location. For example, nfi c > F:\Evidence\CASE001\MFTDRIVEC.TXT creates a text file called MFTDRIVEC on my thumb drive in the CASE001 subdirectory of my evidence folder. The results look like those seen in Figure 15.5. Here we see a logical link left behind by the mystical TAO1.MP3.
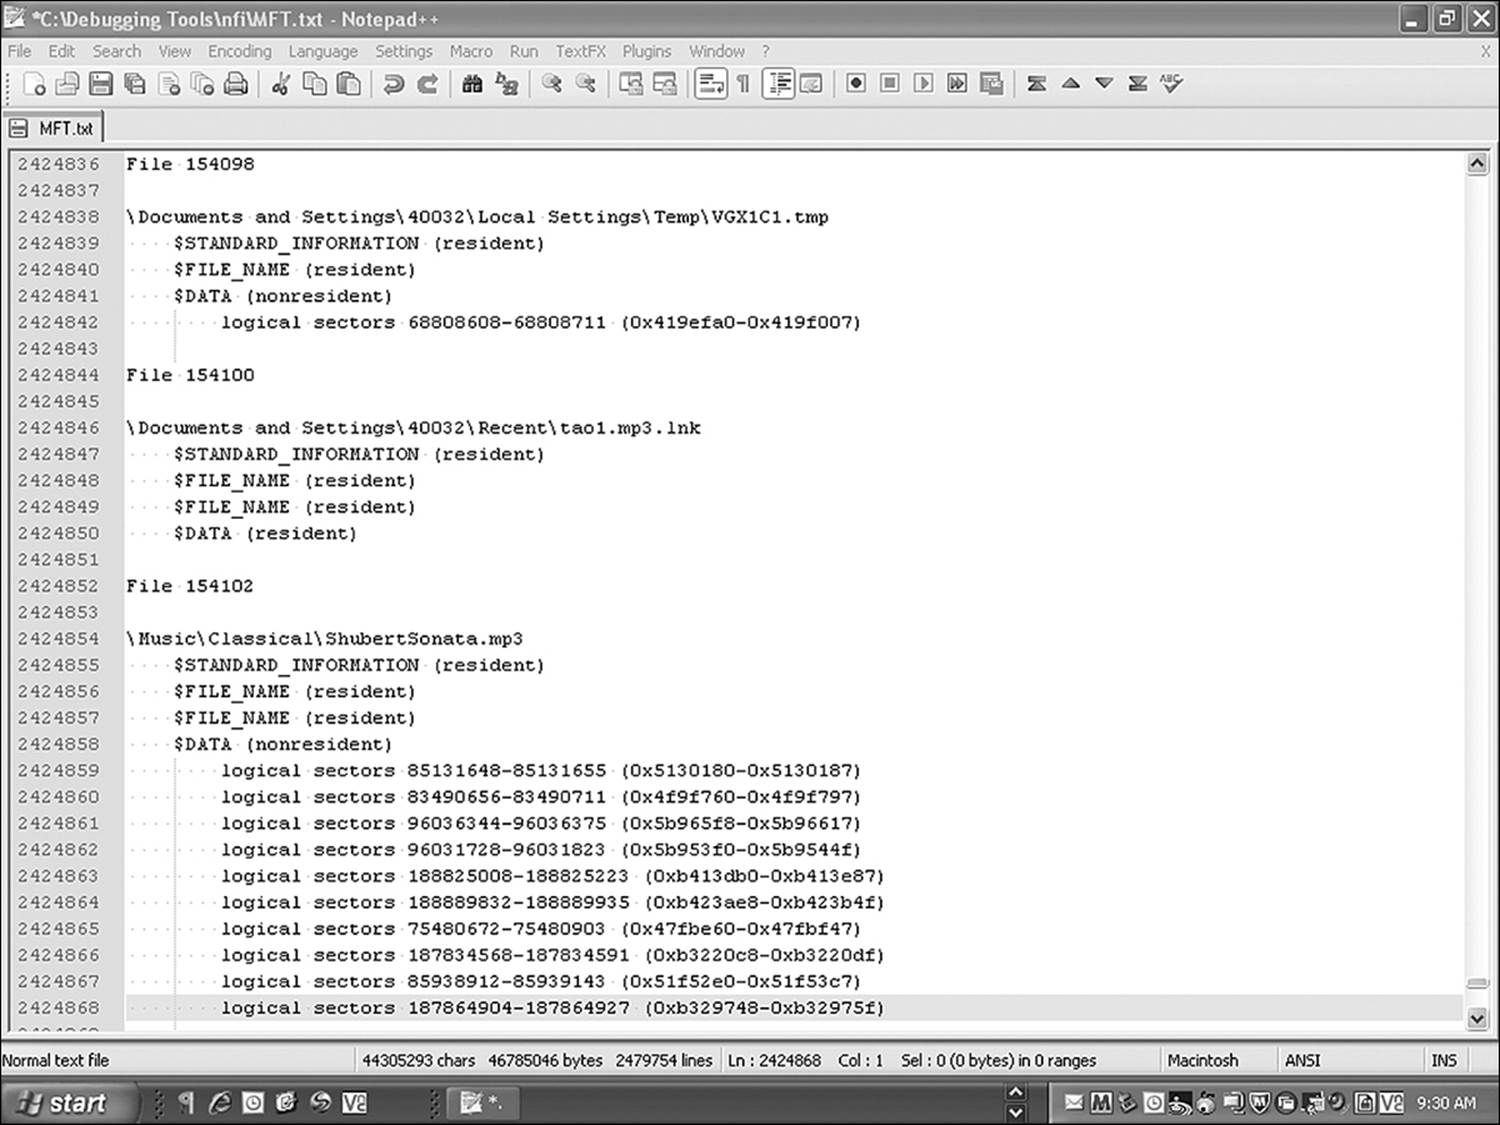
Figure 15.5 The nfi utility from Microsoft will output the contents of $MFT in readable form.
Examining Temporary Files
One feature most appreciated by computer users the world over is the magical ability to “do over.” If a writer makes a mistake in his forensics book, it is a simple matter of clicking the Undo button and the error goes away. How is that possible if the change has already been made in the file?
Microsoft Word is a good example of an application that relies heavily on temporary files. Temporary files are helpful not just for the purposes of editing but also because they can speed up performance and protect data integrity (Microsoft 2010). There are four default temporary files that Word creates when the application is started.
A file named ~wrf0000.temp is a DOS-based file that acts as a pointer to reserve four file handles within the operating system. A scratch file, named ~mfxxxx.tmp (where the x’s are replaced by a number generated by the application), becomes the target for the first round of edits. Two additional temporary files are created at startup that are a bit more complicated. One is a transacted compound file with the name of ~dftxxx.tmp (where the x’s are replaced by a number generated by the application), and the other is a direct compound file called ~wrf0001.tmp.
A transacted compound file allows the application to store a document into this container and then lets other applications, such as a spreadsheet program or a drawing program, make changes directly to the file. When the file is saved, the contents of the temporary file get merged with the original file. The direct compound file is a document file that is created with each Save As or Save function.
Throughout the process of creating a document, Word is constantly automatically saving the document. Still, if the user works for an hour on a document and then decides that none of the changes are worth keeping, the original file remains intact. The autosave temporary files are named ~wraxxxx.wbk (where the x’s are replaced by a number generated by the application) in earlier versions of Word and a file with the same name as the original. Later versions of the autorecover file carry an extension of .asd. ASD files are likely to carry file names such as “Autorecover save of MyDocument.asd.”
Virtually all applications that feature autosave functionality or a redo function will create temporary files. There are far too many applications on the market to attempt a complete list. It would be a good policy of every investigation to do an inventory of all software installed on the target system and systematically research how those that are likely to affect the investigation generate temporary files. Also note that version changes sometimes result in changes to the extensions of temporary files. Table 15.2 contains an abbreviated list of important temporary files to look for during an investigation.

Table 15.2 Temporary Files
It is possible to recover deleted files from unallocated space using standard file carving techniques described in Chapter 8, “Finding Lost Files.” Slack space in clusters that are partially overwritten may contain text or file metadata that can be useful as well. Therefore do not restrict the search for temporary files to those viewable in the file system.
Hiding Data on the System
Centuries ago, when the Roman generals wanted to send a secret message and time permitted, they would shave the messenger’s head, tattoo the message onto the scalp, and then wait for the hair to grow back before sending the message along the way. Needless to say, this was not the preferred method for emergency communications. So they also found methods to hide messages inside of seemingly innocuous texts, encoding the data or finding interesting places on the messenger’s body to hide the message capsule.
Today’s computer criminals have easier ways of hiding data. The term dark data is used to describe files and other information that are misplaced, concealed, or otherwise missing. Data can be hidden within the various components of the structure of the OS. Places to hide data are called the warrens (not warrants, as in “get one before you search,” but rather warrens, as in “where a bunny hides when you let the dogs out”), where data hides from predators. Just like rabbits have warrens, so do digital criminals.
Many manufacturers have a hidden partition where system information such as BIOS and device configuration data are stored. This is called the Host Protected Area (HPA). The HPA does not show up in typical file system browsers such as Windows Explorer or the Linux file browsers. Another hidden area of the hard disk is the DCO described in the previous section. Lastly, certain advanced utilities allow the user to manage slack space as though it were a separate file system.
HPA/DCO Data Hiding
Many people have information that does not need to be regularly accessed, but cannot be forgotten. Perhaps the documents are critical, but read only under rare circumstances. The criminal often needs to keep this information from ever being found.
By using partitioning software to change the size of the HPA, a relatively large amount of data can be stored. The HPA is relatively small, comparatively speaking. Typically, it is under 100MB for most systems, but can be 10GB or larger. The size of the HPA depends on how the manufacturer intended the partition to be used. For example, some models of Fujitsu Siemens computers store a complete OS image on a 10GB HPA.
There are tools that allow the size of the HPA to be modified by the end user. The legitimate use for these utilities is that they allow a manufacturer to use different models of hard disk and have them all consistently read the same apparent size to end users. Two of these tools are HDAT2 and MHDD. Once the HPA partition has been modified, disk editing utilities can be used to copy the desired data into that partition.
Copying the HPA is not a major problem for forensic duplication utilities. Even the venerable DD utility can copy hidden partitions. In order to search the partition, data carving utilities such as Scalpel can find common file formats. String searches using strings in Windows or GREP in Linux or Unix can locate specific text passages.
Hiding Data in the Slack
The concept of file slack has already been discussed in multiple places within this book. Here is another area where it comes into play. Covert utilities, such as Slacker from the Metasploit suite, can manage slack space as if it were a separate and hidden file system. A directory containing a large number of files, each of which contain only a byte or two of data, is created as a repository. Slacker then uses this, along with any other slack space available on the system, to create ghost partitions. Ghost partitions work for the OS in the same way as any other partition, with one key difference. Conventional file browsing utilities cannot detect them.
So how does the owner of the partition access it if it cannot be detected? Generally, a small executable program (such as Slacker) that can exist anywhere on the system launches a shell that manages the ghost partition as if it were a separate file system. The file can be innocently named and even appear to be one of the standard OS system files. Only those “in the know” are aware of what program to launch. This is one place where the analysis of the registry may show some light. Check for recently run programs and program hives that appear out of place. Something like Slacker is unlikely to create much of a footprint, so external evidence might suggest the possibility of a ghost partition. Do all the legitimate hidden partitions and system partitions add to up the right size for the hard disk that hosts them all? A 2TB disk that only reports 1.5TB of partitions is a logical candidate for a drive with ghost partitions.
Take note if a disk appears to have an inordinate number of partitions. The process of partitioning disks creates another form of disk slack known as partition slack. The area between the end of any logical partition and the end of the block of sectors assigned to the partition can be relatively significant. It is not accessible to the file system, but it can be used by Slacker to increase the size of the hidden volume it creates.
Storing Data in Bad Clusters
The $BadClus metadata file is actually an artifact left over from the days of early hard drive technology. Current hard disks have the capability of managing bad sectors built into the firmware and do not depend on the OS for such functionality. The hard disk has a reserved space of spare sectors at the end of the drive. When the drive detects a questionable sector, it marks it as bad, moves the data to a new sector and releases a spare from the reserve supply. In the old days, the OS detected bad sectors and moved the data, and in this metadata file, the file system identified the sector by its geometrical location.
Hiding data using a disk editor such as Directory Snoop or WinHex, a user could conceivably edit the $BadClus file to include the sectors of a file she is trying to hide. This is a theoretical method discussed in a lot of the literature, but one that is rarely (if ever) found in the field. The reason for this is that in addition to editing the $BadClus metafile, it is also necessary to alter the $Bitmap metafile in order to mark the clusters as either available or unavailable. There are far too many other methods of hiding data that are easier and less detectable.
It’s easy enough to detect if a perpetrator has successfully used bad clusters to hide data. Virtually any system in use today will contain $BadClus metafiles with a size of zero bytes. If the file exhibits a value of other than zero, you should copy the clusters defined in this metafile into a file system file for examination.
Hiding Data in the Registry
There has already been a lot of discussion about using the registry to find evidence. Now it is time to consider it as a place to hide evidence intentionally. To understand how this is done, it is necessary to understand a little about the registry’s structure.
Every key within the registry has three components. The name is obviously what identifies the key, but is unfortunately not always the best way to find a key. The maximum size of a key name is 255 characters. Many key names are generated by the OS and consist of 32-bit or 64-bit values. It is not exactly intuitive for the investigator to understand that the key labeled {0AFACED1-E838-11D1-9187-B532F1E9575D} defines a specific property for Windows Explorer. Nothing in that name is something that is going to jump right out as a logical search string. Looking for Explorer.exe did find it.
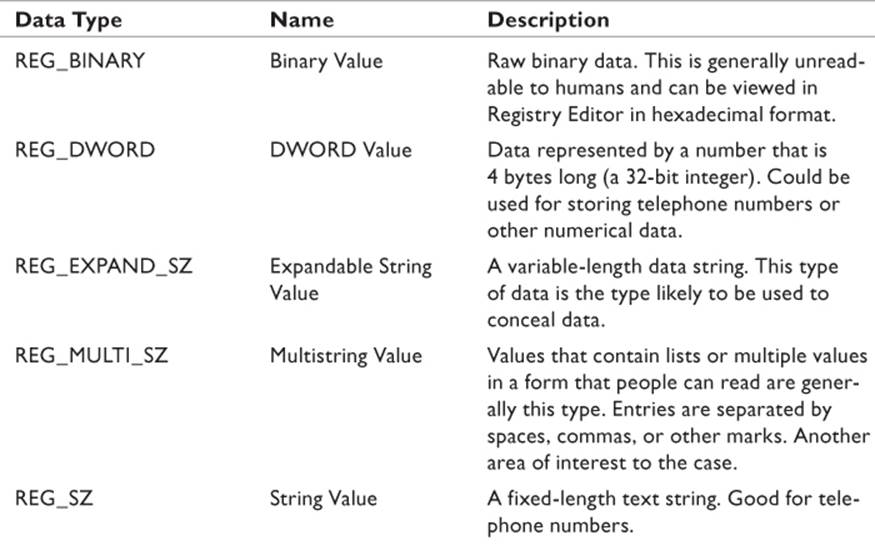
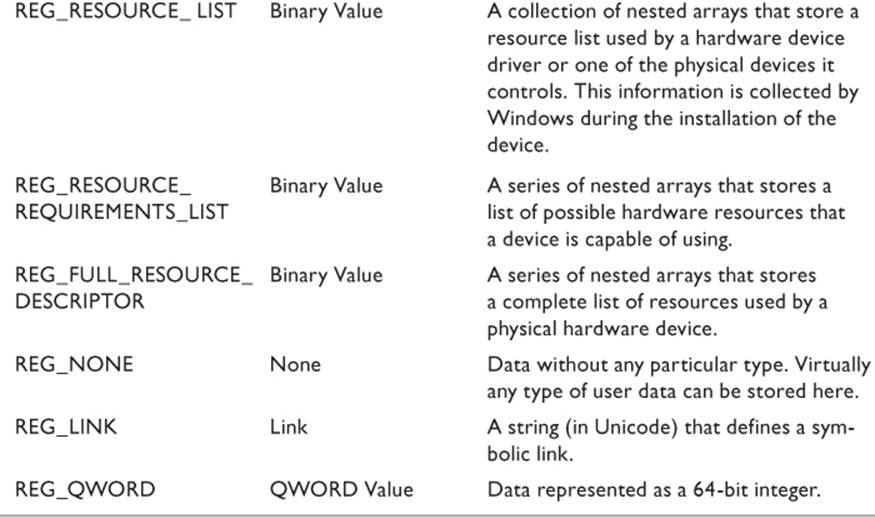
A second component of the key is its type. Here is where the investigator gets interested. There is a fairly wide variety of key types, and any given type can be used for different purposes. The maximum size for a key, including name, value, and data is 64KB. While this does not sound like a lot, up to 70 pages of ASCII text can be stored in less space than that. Table 15.3 lists the different key types and the kind of data that can be stored in each one.
Source: Microsoft 2008.
Table 15.3 Registry Key Types
The final element of the registry key is the data within the key. In the Registry Editor (type regedit in the Run line) keys are viewed, edited, and created. There are also utilities that can generate registry entries that are imported into the registry as .reg files. Creating new hives and keys is simple and straightforward. In Figure 15.6, I have created a Software entry called Bubba’s Revenge.
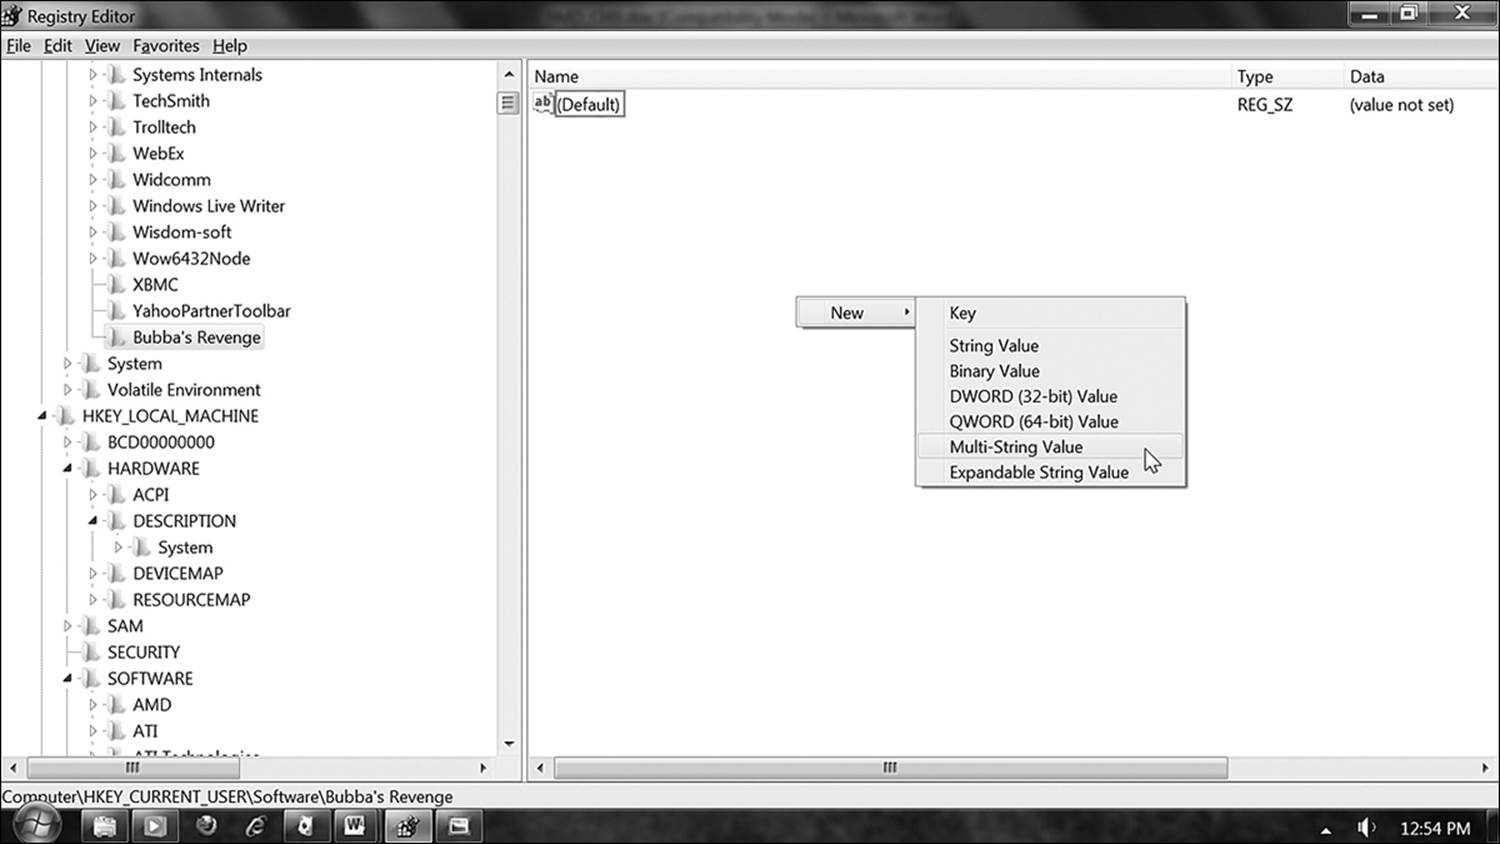
Figure 15.6 It is a simple matter to create new keys in the registry.
Now in order to create a key inside of the entry, it is a simple matter of right-clicking anywhere in the details pane and then selecting the data type of your new key. I’ve selected a multistring value here. In the next step, I named the key Recipes and subsequently copied the entire contents of one of this book’s chapters into the value data (Figure 15.7).
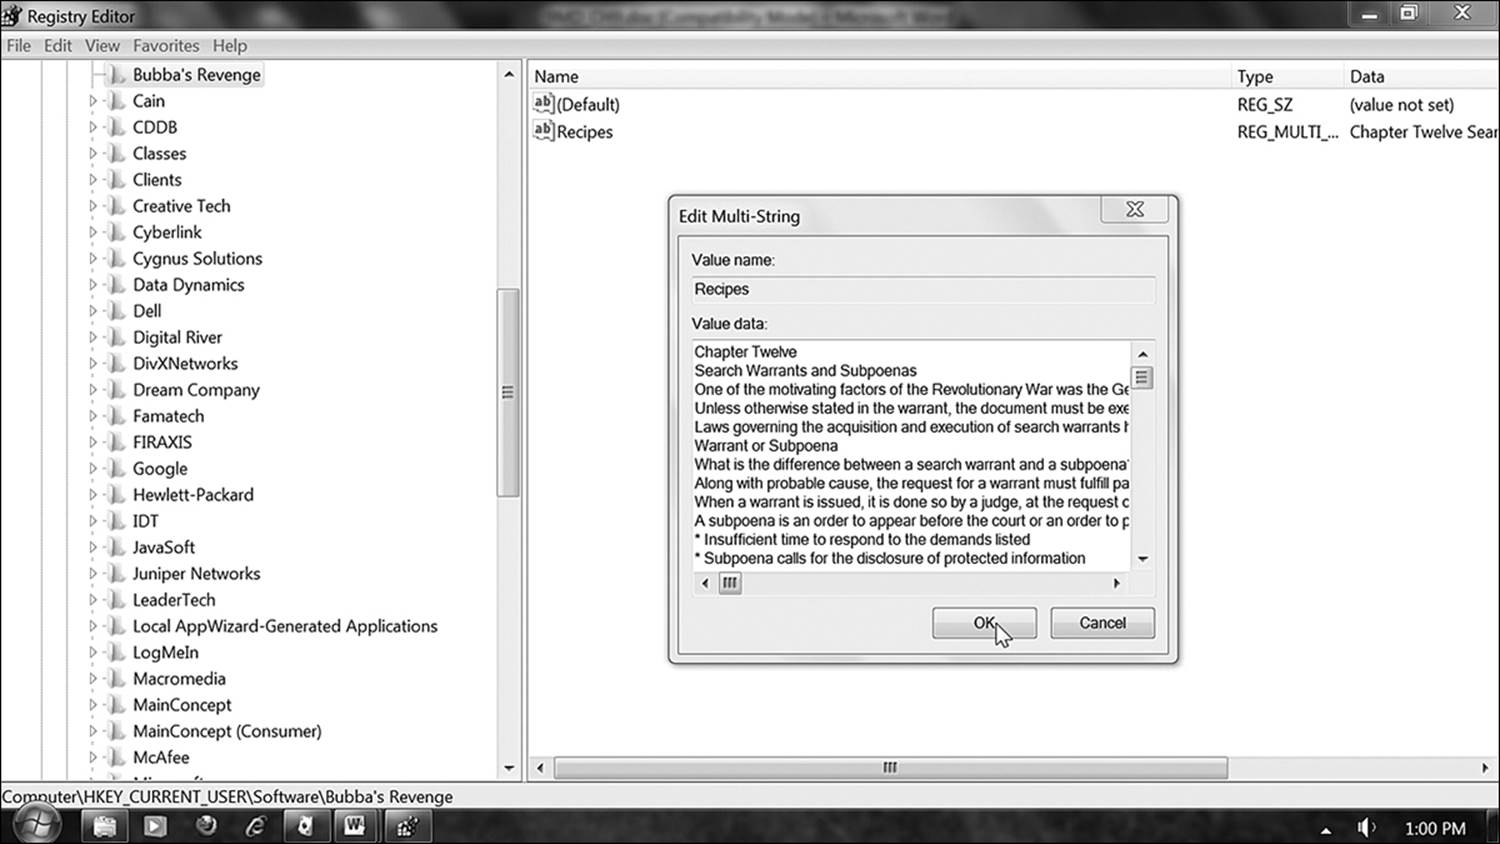
Figure 15.7 Relatively large amounts of text can be stored in a multistring registry key.
Finding this data won’t be quite as easy as it may seem. In this particular example, the name of the key makes it stand out. But what if I named the key {0AFACED1-E838-11D1-9187-B532F1E9575D}? Still, it is not an impossible task.
Microsoft distributes a free utility called LogParser (current version is 2.2). This powerful command line utility can read registry entries as well as log files. It allows the investigator to run SQL queries against the live registry or against static files from a disk image. It is also possible to examine the registry of any computer that can be reached on the network. The output is extracted from the fields listed in Table 15.4.

Table 15.4 Registry Field Values
It should be noted that since the registry is a very large database, a little care is in order when executing commands. While it is beyond the scope of this book to provide detailed instructions in how to use LogParser, a few pointers are in order. The syntax of a basic query is all one line:
LogParser "SELECT * INTO reg.csv FROM HKCU" –i:REG –o:CSV
This simple query creates a database of the entire Current User hive of the registry in comma-delimited text and stores it as a file called reg.csv. Since there were no additional parameters specified, the file landed in the C:\Program Files\Log Parser 2.2 directory.
An attempt to load the file in its entirety directly into Excel results in an error message that reports that the file did not completely load. The reason for this is that there are far too many rows generated by this command. A useful utility to own is Notepad++ (currently available athttp://notepad-plus-plus.org/). This is a replacement for the Windows Notepad utility that has the capacity to load substantially larger files. After loading the output file generated by the computer, Notepad++ demonstrated that it contained 95,421 lines, each of which translates into an Excel row.
Excel has a limitation of 65,536 rows. In order to load the entire output file, it is necessary to split the file into multiple sections, all of which contain fewer than 65,536 lines. The end result is a file that looks like the one displayed in Figure 15.8.
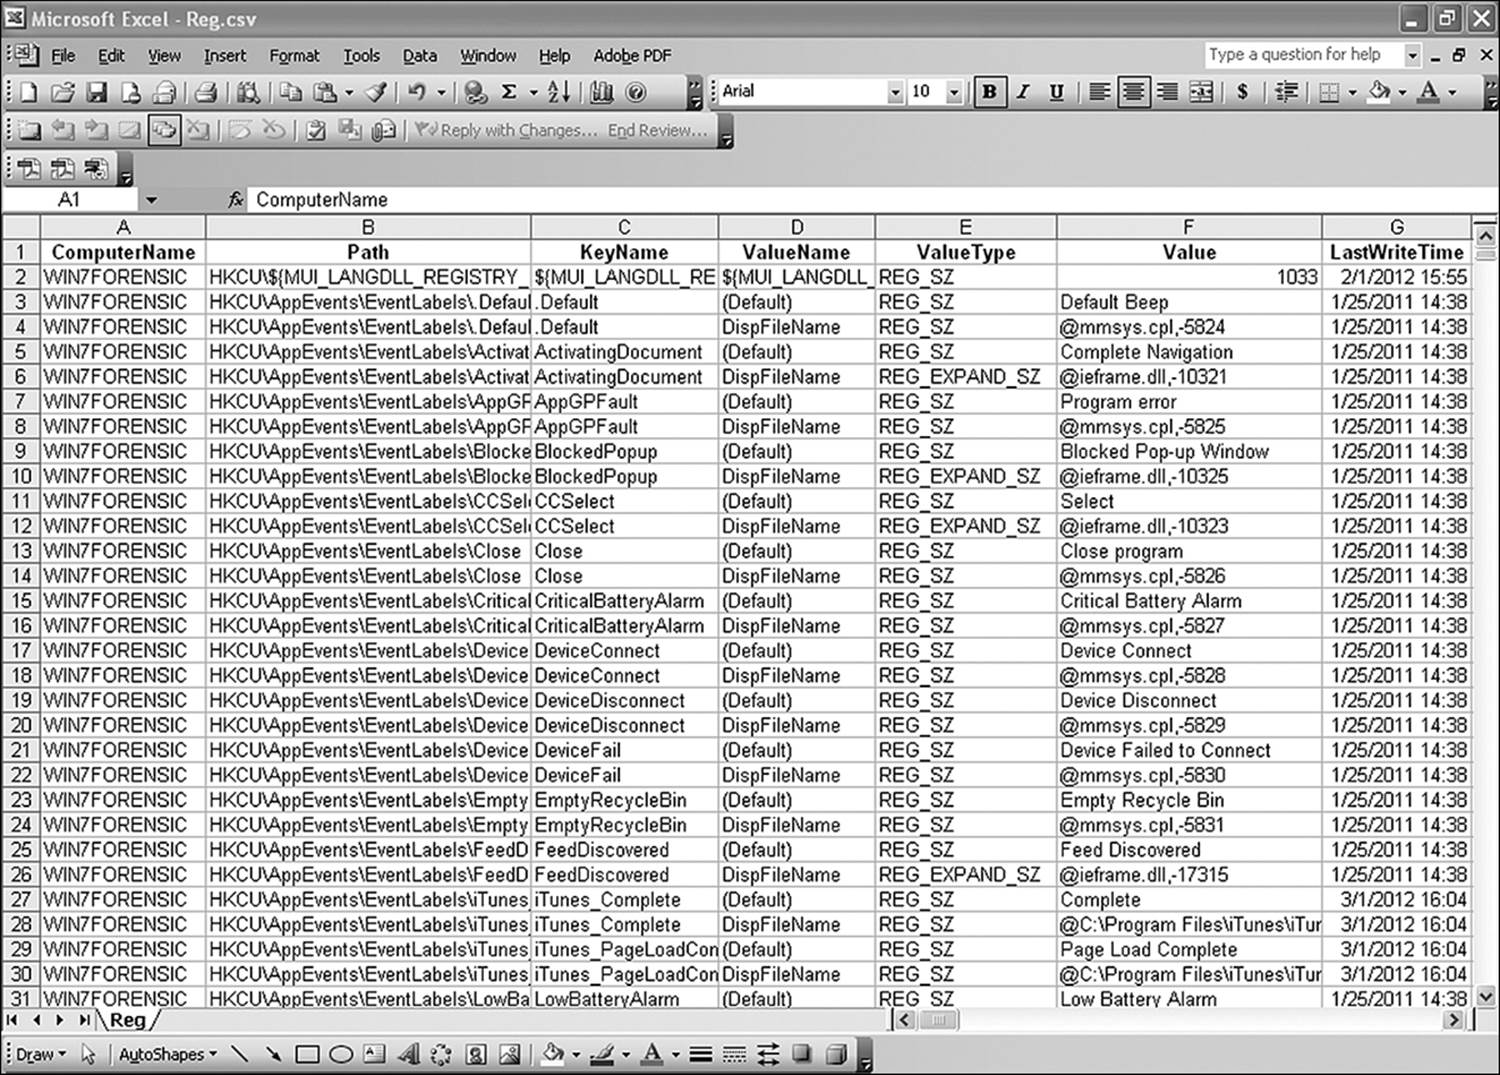
Figure 15.8 Data from Log Parser 2.2 can be output into CSV and subsequently opened in Excel.
Now the extracted data can be analyzed using any of Excel’s tools. For example, the LastWriteTime field can be sorted in ascending value, and all the rows that fall between certain dates moved to a new worksheet. Now only values that were altered during that time period are available for subsequent searches.
It is also possible to prefilter by a range of dates. However, since it is likely that other registry analysis will be done, a full output file is desirable.
Hiding Data and Applications in Alternate Data Streams
For Windows users using NTFS, a common approach to hiding a small executable program such as Slacker is to add it as an alternate data stream (ADS) to a legitimate file. An ADS is very much like an attribute to a file. It does not show up in the directory structure. It adds nothing to the file size, and it goes wherever the file goes. If you delete a file with an ADS, you delete the ADS.
Once an ADS has been attached to a file, the correct file name looks something like filename.txt:alternatestream. A simple directory command will only show the file called filename.txt.
Unlike the other hiding techniques described in this section, there are no special tools involved and only minimal computer expertise is required. As an example, let’s put the Microsoft Calc application into a simple text file called Streams.txt:
1. Open a command console.
2. Create an empty text file called Streams.txt. Right-click on the desired target folder in Windows Explorer, and select New > Text file and name it Streams. In this example, the path will be C:\AA_Temp.
3. From the command prompt, type the following command (Note that the complete path to the executable and to the target file are required):
C:\Windows\System32\calc.exe > C:\AA_Temp\ streams.txt:calc
4. To run the executable from the text file, type the following command:
START c:\AA_Temp\streams.txt:calc.exe
The results will look like the image in Figure 15.10. Needless to say, the actual start command in use will vary, depending on the path where the streamed file is located. In Figure 15.9, the file has been moved to the Assets directory, and the command modified accordingly. Files hidden in data streams can be launched from shortcuts, from scripts, or from a RUN key in the registry.
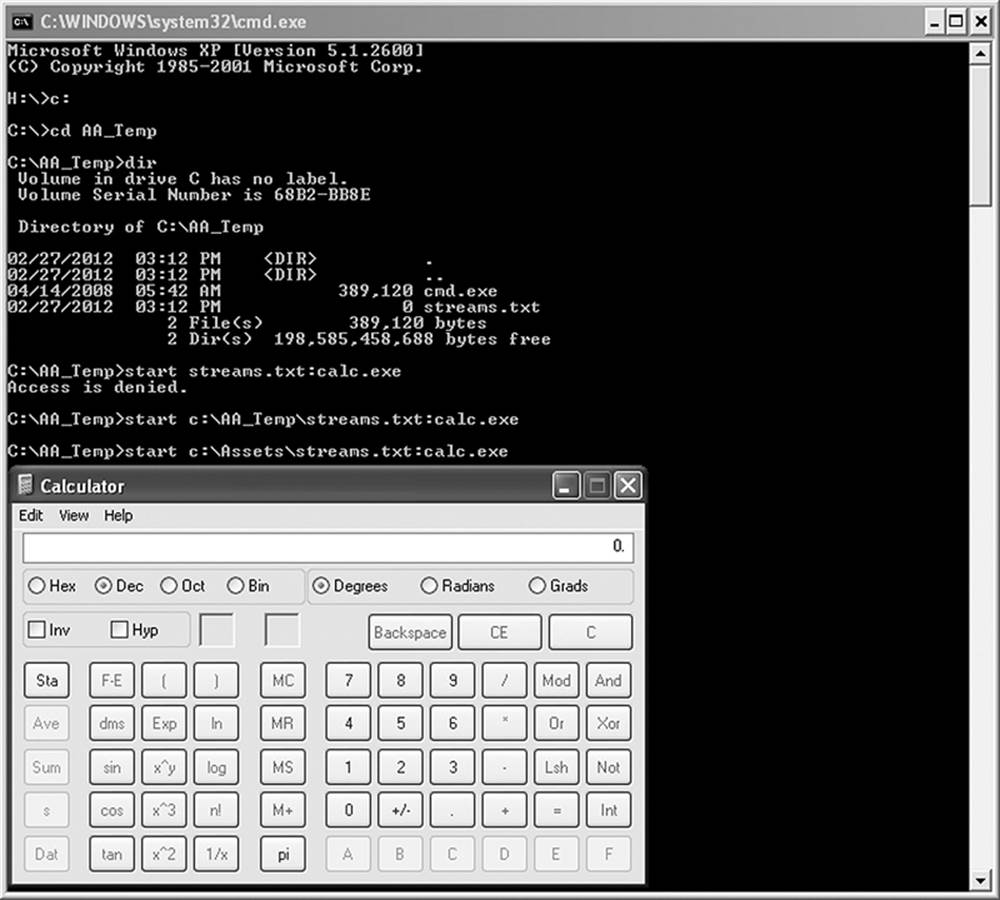
Figure 15.9 Alternate data streams allow executable programs to be hidden in seemingly benign files.
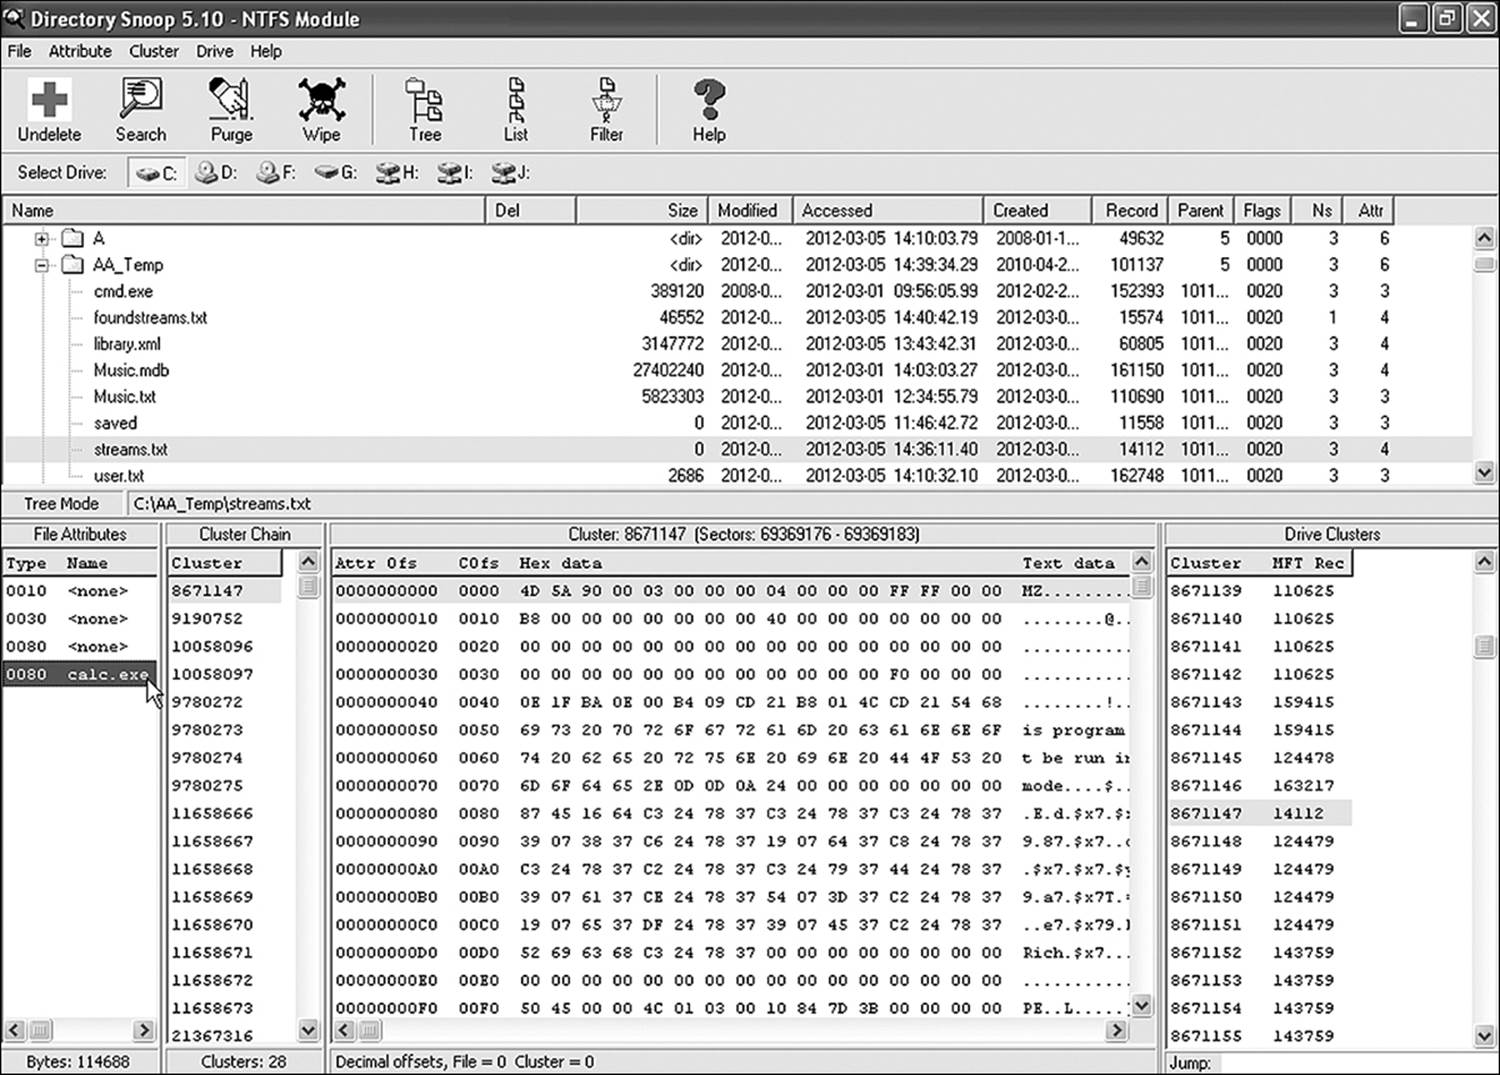
Figure 15.10 Alternate data streams show up as an extra data attribute in disk editors such as Directory Snoop.
Now let us examine the streams.txt file in Directory Snoop. If you look closely at Figure 15.10 where the cursor points, it will be clear that there are two data attributes applied to the file. The second is named calc.exe. Of course, in this situation, we knew precisely where to look.
To find hidden streams files, the streams utility in the SYSINTERNALS suite is the best solution. To find all ADS pointers on the system, the command is
Streams –s c:\
The –s trigger tells the command to search the C: drive recursively, digging down into all the directories and subdirectories. The search will reveal a surprising number of files with alternate streams attached. Most are not to be worried about. Many files, especially the ones named “thumbs,” have a stream named “encryptable.” This is as is should be . . . and a fine example of why you should not use the other option in the utility to automatically delete all streams. Those files with a “:SummaryInformation” stream are also to be expected. You should not be seeing files with .exe extensions or any extensions for standard document types, such as .doc, .tif, .jpg, and so forth.
Covert Data
Other methods of hiding data involve putting it out there in plain sight for everybody to see. Covert dark data is intentionally concealed dark data. Two common methods of concealing data are encryption and steganography. Technically speaking, one of these methods isn’t really a form of hiding. Encryption of data leaves it in place, but unreadable to anyone except the one who has the encryption key. Steganography is a little trickier. This is a method of placing data into existing files that everyone sees and assumes are innocent.
Encryption
NTFS 5.0, as part of its structure, includes the Encrypting File System (EFS). EFS provides encryption/decryption services within the operating system using a combination of the Data Encryption Standard eXORed (DESX) and a public key exchange. The most recent incarnation of this feature is known as BitLocker Drive Encryption.
Methods of Encryption
Accessing an encrypted drive in BitLocker is accomplished in one of three ways. First, the user may have simply assigned a password to the encrypted file or folder. Second, it can be configured to work with a Smart card. Smart cards are plastic security cards with a built-in computer chip. To access the encrypted drive, a card reader must be installed on the computer. The user swipes the card and gains access. An associated personal identification number (PIN) must be entered as well. The third way involves using the login credentials of the user to authenticate encryption and decryption. When the user logs on, his or her credentials are passed on to the security engine of the OS and provide the encryption key.
When the third method is used, EFS is transparent to the user. The user’s private key is stored as part of their profile. A public key is maintained in the OS so that a recovery agent can access the encrypted files if necessary. The recovery agent is an individual (usually an administrator) whose permissions extend to that of accessing encryption keys.
For an investigator, encryption poses a unique set of challenges. For one thing, encrypted drives and folders will be password protected. Despite what the prime time crime shows will have you believe, cracking a password is not a simple process. Additionally, the suspect is likely to be protected by a variety of laws and even the Fifth Amendment of the Constitution. You might have a warrant to examine her computer, but the warrant does not put her under any obligation to give you her encryption password. If there is any reason to suspect that a computer might be encrypted, and it has been left on—do not turn it off. There are two optional paths to proceed with the investigation when this happens. Which path you choose should be the result of a conversation with legal counsel (if possible) and any investigating officers involved.
Option one involves performing a live capture of the system. Perform as thorough a live response investigation as is made possible by your resources while operating within the constraints of your warrant or other authorization. Get a live capture of memory, and collect as much information from the hard disk as possible. Document each and every step you take along the way. Any live data capture is going to have consequences (remember Locard’s principle from Chapter 6, “First Response and the Digital Investigator”). You will be making changes to the system. There will be somebody somewhere along the way pointing the finger at investigative procedure at every opportunity. Try not to give them any opportunities.
Option two is to transport the computer, while running, back to the lab for analysis. This is why one of the devices listed in the portable tool kit is a battery backup that will keep the system powered.
Cracking Encryption Passwords
A more likely scenario is that the investigator is going to need to acquire the encryption password prior to continuing the search. The obvious first step is to ask the user to give it to you. If you ask, there is a remote possibility the user will give you the password. If you never ask, there is a 100% possibility they won’t.
The next attempt should be an effort to guess the password. Operating systems and company policies require far more complex password requirements than they did just a few years ago. A common password requirement for organizations is a combination of uppercase and lowercase letters, combined with numbers and special characters. Most users have a hard time keeping up with all the password rules and look for easy ways to remember their passwords. One commonly found password is the user’s e-mail address.
Dictionary words with the rules in place are common. An example of this would be C@m3ra—a short but complex alliteration of the word “camera.” According to a study by Kuo et al. (2006), 11% of the passwords studied were cracked using a dictionary of 1.2 million words. The fastest I ever guessed another user’s password was when the person’s cubicle was decorated with old cameras and several black and white photographs he had taken. On the sixth try, the string Ph0t0grapher got me into the system. Rarely is it that easy.
Another method—which makes a password harder for investigators to guess and much more difficult for password-cracking software to resolve—is the use of mnemonics. An example of this technique is the password IluvmyK1tty. I love my kitty, too, but I’m not going to use that as a password. The same study cited above found that only 4% of passwords using mnemonics were successfully cracked.
The most likely approach that most investigators will take is to use a software-based password cracking solution. Virtually all of the forensic suites ship with at least one variation of password attacking software. Some stand-alone programs include such hacker favorites as John the Ripper, Cain and Abel, or Crack. These tools attack the problem in two ways.
The fastest of the two ways, when it works, is to use a standard dictionary. The software tests each word in the dictionary against the targeted user account. Various permutations of each word are tested, including changing the case of each letter, substituting letters for commonly used character replacements or numbers for letters (such as @ for a and 1 for i). If this fails, then the application will revert to a brute-force attack. In this method, every possible character is tried against every possible position in a password. This is incredibly time-consuming, even for today’s fastest supercomputers. For example, a password encrypted with a 56-bit key yields 72,057,594,037,927,936 possible password combinations. Tests performed by Nobis (2011) showed that a computer equipped with a 3.2GHz 64-bit multicore processor could test approximately 4,366,723 combinations per second. His calculations suggested that if every possible combination had to be tested, it would take 58 years to find the password.
Most cases need to be solved more quickly than that. Therefore, algorithms have been created to provide “short cuts.” One of these methods is to use frequency. Generally speaking, certain characters appear far more frequently than others. As a general principle, the at sign (@) appears in a very high percentage of passwords. This is partially because it serves as a character replacement for the letter A, and also because it is part of an e-mail address. As mentioned before, e-mail addresses are frequently used.
Most of the more advanced password crackers make use of rainbow tables (which are an offshoot of Hellman tables). Since the OS does not store passwords as text but rather as hashed strings, it makes sense that comparing a table of known hash strings against those found in specific areas of the system would be faster than brute force attacks.
Hellman tables were created by Martin Hellman in 1980. In this method, every character is hashed in all of the current algorithms and the values stored in a table. Then, combinations of two characters are hashed, combinations of three, and on up the ladder. When cracking a password, the hash values are compared against possible password combinations. While this method dramatically speeds up the process of cracking passwords, it is extremely memory intensive.
The problem with Hellman tables is that there is a lot of redundant processing as different tables are loaded and unloaded into memory. Rainbow tables are sorted into columns, with each column representing the results of a different method of reducing the hash values. This greatly reduces the number of redundant processing cycles the computer is forced to generate.
There are several sources for downloading rainbow tables. A great deal of care is in order regarding the source selected. Rainbow tables are a favorite place for hackers to hide malicious software. You don’t want the tools you select for fighting crime to be the ones criminals use for fighting you.
Steganography
The word steganography is derived from the Greek word steganos, meaning impregnable or impenetrable. Archaeologists have found examples of steganography dating back as far as 475 BC. General Pausanias was recalled from the field by way of a graphic image made from wax on wood. Beneath the wax were the written orders to return (Molin 2005). In 1462, Johannes Trithemius authored a book entitled Steganographia.
Computer files offer a marvelous platform for hiding data. Virtually any file can be used, but files that are typically compressed are the best ones for the purpose. Image files and music files are the most commonly used, but the wise investigator does not limit the search to just those files. PDFs, document files, and databases also offer a lot of slack space for hiding peripheral data. Since image files are far and away the most commonly used, the following discussion will be based on piggybacking data onto a digital image.
Steganography Methodology
Compression can be accomplished in two manners. Lossless compression does not allow any pixels to be left behind. Every byte of compressed data is restored when the file is uncompressed. Lossy compression assumes that a few missing or a few incorrect bytes won’t do that much harm. Unless, of course, that compressed file happens to be carting around the extra load of a top-secret phone book. Then, losing bytes is a bad thing. Therefore, lossless compression methods are preferred for the purposes of steganography. Lossless image files include .BMP, .TIF, and .GIF files. Lossless music files include .RAW, .MSC, and .WAV; .JPEG images and MP3 music files all involve a degree of data loss, although there are methods of hiding data in these files as well.
Embedding data in a stego file involves the creation of two files. The first, called the cover file or carrier, is a seemingly innocuous image. The second file, called the message, is the data to be hidden. Specialized software combines the two files into a single file known as the stegoimage.Along with the message, a digital code is included for unlocking the files and separating them. This is the stegokey. Generally speaking, most steganographic applications use a simple password for the key, but that password can be as complex as the user wants it to be.
Three ways exist for inserting the data into the image. Least significant bit (LSB) insertion allows the stego application to store three bits of data into each pixel of a 24-bit image. A typical ASCII character will accordingly be spread across three pixels. A 24-bit 1280 × 768 image has 983,040 pixels and therefore could conceal 2,949,120 bits—about what one would need to store a 360KB file. This has minimal impact on the appearance of the image file, because typically the bits being replaced are spread across the three primary colors. Instead of each color being defined by 8 bits, it is defined by 7 bits. Adding the three bits of data to the pixel alters the color of each one very slightly. Therefore, a slight loss of contrast or color saturation may result, but without having an unaltered image to compare with, who’s to know? Eight-bit images can be used, but the amount of data that can be stored is significantly less and the alterations to image quality are more easily noticed. Compressing the file can destroy the embedded information.
Masking and filtering steganography is restricted to 24-bit color and gray-scale images. It basically consists of a hidden watermark embedded in the image. A good example of this technique would be a one-page list of names and phone numbers. This list could be hidden as a watermark or as an invisible secondary layer on a dark image, such as a black cat in a pile of coal at midnight. By adjusting the luminosity of the secondary layer, the text becomes visible. Compressing the file has little or no impact on the hidden message.
Algorithms and transformation is a method that allows the cover file to be manipulated, edited, and changed to a certain extent without negatively impacting the message. Redundant pattern encoding breaks the message file up into smaller bits and scatters pieces of it throughout the cover file. This technique minimizes the impact of minor image edits or compression. This technique has opened the door to embedding data into JPEGS. Encrypt and scatter also breaks the message up, but encrypts each piece before embedding it into the cover file.
Steganography Tools
More complex steganography tools can split the message up and embed it in multiple files. Most tools offer this option. However, there are three things to consider regarding the technique. If one of the cover files goes missing, the embedded data is lost. If one of the cover files gets corrupted or subjected to excessive manipulation, the data is lost. Getting the message back requires that the carrier files be processed in the correct order. These points can be considered a threat or a security feature, depending on how you employ it. Splitting a critical file up into multiple files and sending it by way of multiple carriers reduces the threat that intercepting the file compromises the message. Unfortunately, so does accidentally losing one.
Tools used for creating steganography include (Johnson 2011)
• Hermetic Stego
• JP Hide and Seek
• Open Stego
• OpenPuff
• Red JPEG
• Steganographic Laboratory
• Steganography Studio
• StegoDOS
• STools
• White Noise Storm
This is not an all-inclusive list and readers should assume that many other tools exist that might cross their paths. Johnson (2011) lists over 100 different applications purported to enable steganography. For the following explanation of the process of hiding images, Hermetic Stego was used to hide one of the chapters from this book into a screenshot of the product.
When the program is first launched, a window similar to the one shown in Figure 15.11 will appear. The file with data to be hidden is the desired message. The Input Images folder is the directory that contains a list of potential bitmap images that can be used for hiding the data. The Stego images folder is the target directory where the combined file will be located. To identify the key for unlocking the message from the carrier, click “Specify key” and type in the selected key—preferably something a little less easy to guess than the one in the figure. Click “Hide the data,” and you now have a stegoimage.
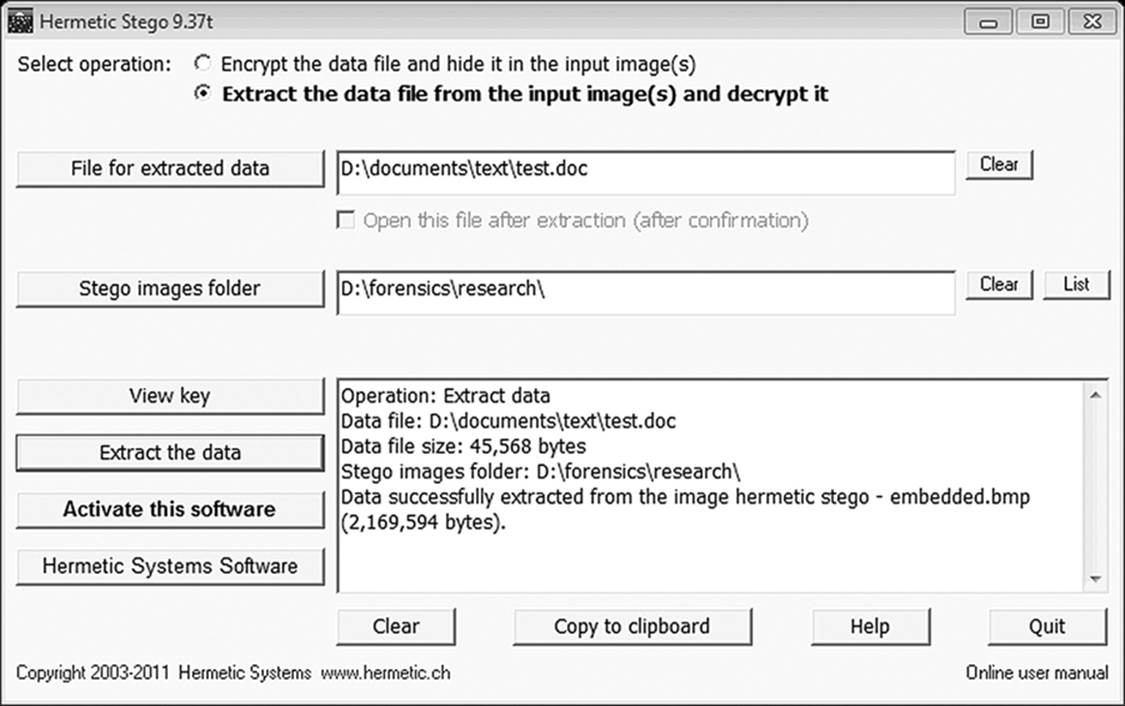
Figure 15.11 Hiding data using steganography tools could hardly be easier.
The interesting thing about the process is that since the message is replacing existing bytes in the image file, the size of the file doesn’t change (Figure 15.12). The hash values will change. The existence of two identical files with different hashes suggests that the files need a closer examination.
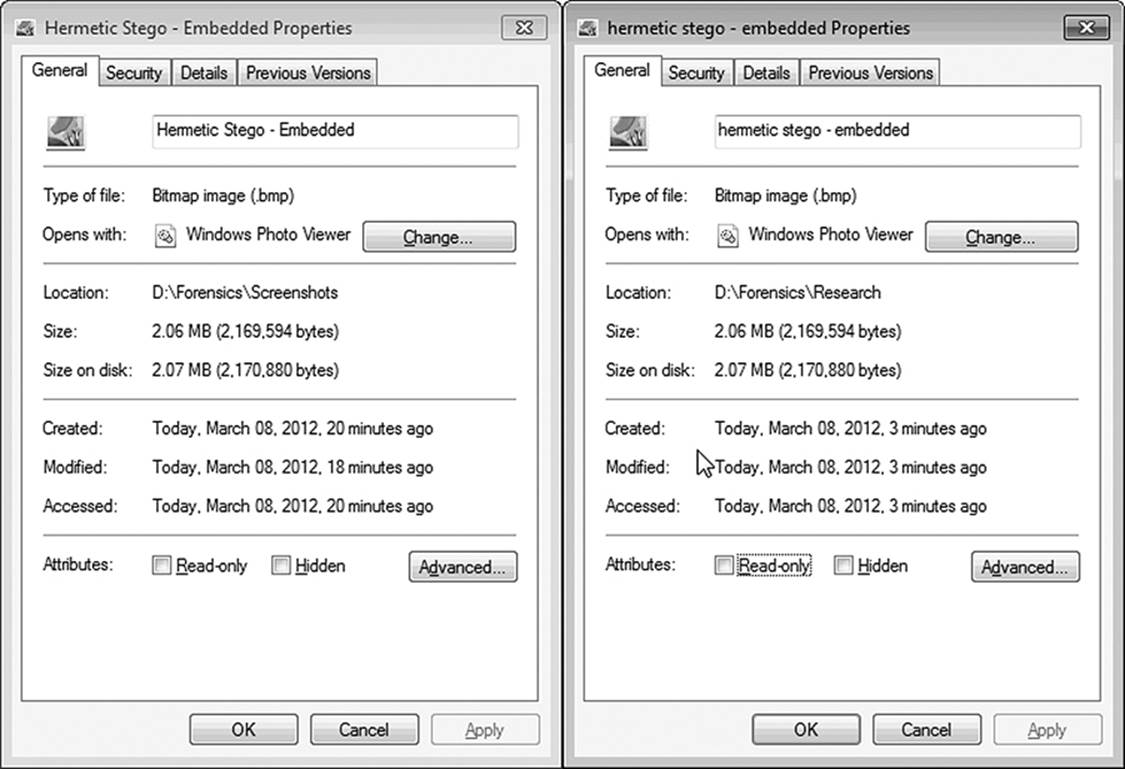
Figure 15.12 Two files—one with hidden data and one without. Yet they are the same size.
The process of detecting these hidden messages is known as steganalysis. The investigator can take two approaches to determining if steganography is at play. Some applications, such as Gargoyle by Wetstone Technologies or Maresware, detect the presence of stego software on the system. If the software exists, it becomes a foregone conclusion that steganography files exist. Others, such as Stego Watch (also by Wetstone) and StegDetect, look for files that are likely carriers. StegAlyzer AS can detect registry keys specific to steganography applications as well as other program artifacts left behind. It does not identify files containing secret data. Its sister product, Stegalyzer SS, does that job. It examines the byte pattern of files looking for byte patterns—or signatures—left that stegoimages typically exhibit.
As Kessler (2011) points out, it is one thing to identify that a file contains steganography. It’s an entirely different matter to extract it. Two applications that utilize a dictionary attack against known stego files are Stegbreak and Stego Watch. Standard password cracking utilities will not work in finding the password associated with steganography.
Another form of steganography that does not require any specialized software at all is the null cipher. This simple little trick takes a seemingly innocuous message and embeds a completely different message within by using a predefined pattern or template. Somebody who knows the pattern can translate the real message. Consider this message:
I have decided that I will not be able to accept your generous offer. Be that as it may, home sounds very good. Perhaps I’ll find a way. At the very worst, the seven of us should go out on the town tonight.
If we apply a template of 4,8,4,8, we take the first word, skip four words, and take the next word. Then after skipping eight, we have our next word. Continue the pattern all the way through the message.
I have decided that I will not be able to accept your generous offer. Be that as it may, home sounds very good. Perhaps I’ll find a way. At the very worst, the seven of us should go out on the town tonight.
The encoded message is “I will be home at seven tonight.” If my kids got the message, by the time I get home, their friends will be out of the house and the mess cleaned up.
Chapter Review
1. What are four categories of antiforensic behavior? Explain each category briefly.
2. The HKEY_USERS hive of the registry can offer several clues as to what has gone on with a computer. How do the MRUs of the registry aid in an investigation? What do software keys potentially tell you?
3. Temporary files can be a gold mine of information in many situations. Describe several different forms of temporary file that might be of use to the investigator. What types of information, aside from the raw data they contain, can these files provide?
4. The registry can be used to hide data by creating fake registry keys. What type of key is best used for storing data? Potentially how much data can be stored?
5. Describe the concept of alternate data streams. What are they? How can they be used to hide information? How do you detect them?
Chapter Exercises
1. Download and install the Stream utility from the SysInternals Web site. (As of this writing, it can be found at http://technet.microsoft.com/en-us/sysinternals/bb897440.aspx). Run the utility against your computer, and take a look at the different files you find that contain alternate data streams. Using the instructions found earlier in the chapter, embed a small application into a music file. Run the utility again, and see what there is to see.
2. Open a Microsoft Word document, and do a few minor edits. Wait a few minutes until the first autosave occurs. Now do the unthinkable. Unplug the machine without shutting down. Reboot and see if you can find the temporary files created by Word. (Hint: Make use of MAC attributes in a search, using a utility such as Directory Snoop.)
References
Johnson, N. 2011. Steganography software. www.jjtc.com/Steganography/tools.html (accessed March 9, 2011).
Kessler, G. 2011. An overview of steganography for the computer forensics examiner. www.garykessler.net/library/fsc_stego.html (accessed March 9, 2010).
Kessler, G. 2007. Antiforensics and the digital investigator. Proceedings of the Fifth Australian Digital Forensics Conference. http://ro.ecu.edu.au/cgi/viewcontent.cgi?article=1000&context=adf&sei-edir=1&referer=http%3A%2F%2Fscholar.google.com%2Fscholar%3Fq%3Dantiforensics%26hl%3Den%26as_sdt%3D1%252C22%26as_sdtp%3Don#search=%22antiforensics%22 (accessed February 22, 2012).
Kuo, C., S. Romanosky, and L. Cranor. 2006. Human selection of mnemonic phrase-based passwords. Pittsburgh: Carnegie Mellon University, Institute for Software Research.
Microsoft. 2008. Windows registry information for the advanced user. Technet. http://support.microsoft.com/kb/256986 (accessed February 23, 2012).
Microsoft. 2010. Description of how Word creates temporary files. Technet. http://support.microsoft.com/kb/211632 (accessed February 23, 2012).
Molin, R. 2005. Codes: The guide to secrecy from modern to ancient times. Boca Raton: Chapman & Hall.
Nobis, J. 2011. Rainbow tables: Past, present, and future. Presented at the DFW Security Professionals. http://insomnia.quelrod.net/docs/dfwitsecpro_2011-03_frt.pdf (accessed March 7, 2012).
All materials on the site are licensed Creative Commons Attribution-Sharealike 3.0 Unported CC BY-SA 3.0 & GNU Free Documentation License (GFDL)
If you are the copyright holder of any material contained on our site and intend to remove it, please contact our site administrator for approval.
© 2016-2026 All site design rights belong to S.Y.A.