Digital Archaeology (2014)
18. Tools of the Digital Investigator
In order to excavate the data of a digital device, you will need to have access to certain tools. Some of these tools are software applications, some are devices specific to the field, and others are general devices used by many occupations. This chapter is not intended to be a tutorial on how to use each device, but rather more of a shopping list for the person starting a new We Be Forensics and Stuff location. Looking on the bright side: some of the software tools are free, so they don’t damage the wallet.
Software Tools
Software tools can be broken down into three basic categories:
• Utilities built into the OS
• Open-source applications
• Commercial applications and suites
As you might imagine, each of these applications will perform specific functions. In order to make full use of a particular product, you will need to practice with it quite a bit before trying to use it in the field. Don’t expect to be able to dive in and use a command-line utility for the first time in your life while having the chief of detectives hanging over your shoulder.
In addition to the software categories, software tools can be broken down into functional categories as well. A good toolkit will have a utility or application that will work on the following levels:
• Physical media capture and analysis
• Data capture
• File system analysis
• Media management
• Memory capture and examination
• Application analysis
• Network capture and analysis
Data Abstraction Layers
Before you can begin to understand how a tool works against a file or file system, you have to have a basic understanding of how data is interpreted by a machine. A realization that evades even some advanced computer users is the fact that everything you see, hear, and do on a computer system is a result of abstraction. Nothing you see is real. The term abstract means literally difficult to understand. For the vast majority of the human race, this definition applies perfectly to any computer code ever written. On the most basic level, every bit of information stored on a computer system—whether it be a text file, a photograph of an orange, or a Shubert Symphony—exists as a stream of 0s and 1s. Since people don’t communicate in binary, it is up to the programmers of the world to create tools that convert that stream of bits into a usable structure. In most cases, there is a series of steps that any given file goes through before it is humanly accessible. These steps are known as abstraction layers. The abstraction layer is an application interface that the computer applies to a data stream to convert it into another format. As data moves down the layers from the user to the CPU, it must get more and more specific, until it eventually can be processed in a series of commands.
An example of an abstraction layer is a simple text editor. Computers have long employed a series of character sets that are readable symbols that represent binary data as readable information. One common character set is the American Standard Code for Information Interchange (ASCII). ASCII takes a standard character, such as a letter, a number, or a punctuation mark, and represents it as a stream of data eight bits long. The lowercase letter a is represented in ASCII as 0110 0001. Capital B is 0100 0010 and a lowercase d is 0110 0100. The lowercase letters o and y are 0110 1111 and 0111 1001, respectively. Now, when reprimanding your son, are you more likely to say he is a “Bad Boy” or that he is a “0100 0010 0110 0001 0110 0100 0100 0010 0110 1111 0111 1001”?
A simple text editor takes that string of bits, applies a few simple rules, and outputs the characters we know and love. Figure 18.1 abstractly illustrates that concept.
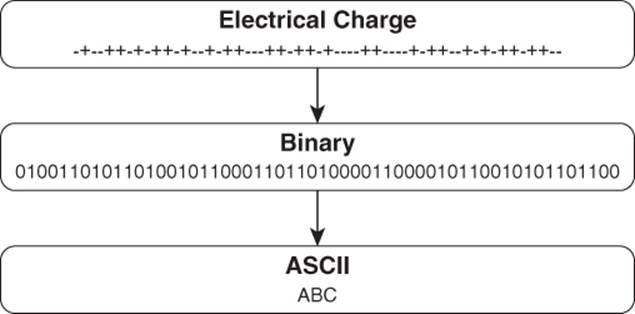
Figure 18.1 Data moves through several abstraction layers to get from raw binary data into a usable format.
File systems use abstraction layers in order to translate a very complex collection of binary data into the lovely little file cabinet analogy with which we’ve all grown accustomed. In Figure 18.2, you see the familiar Windows Explorer screen with its folder icons and easy to navigate interface. The F drive shows up with a listing of directories and file folders contained within. Therefore, that’s all there is to see, right?
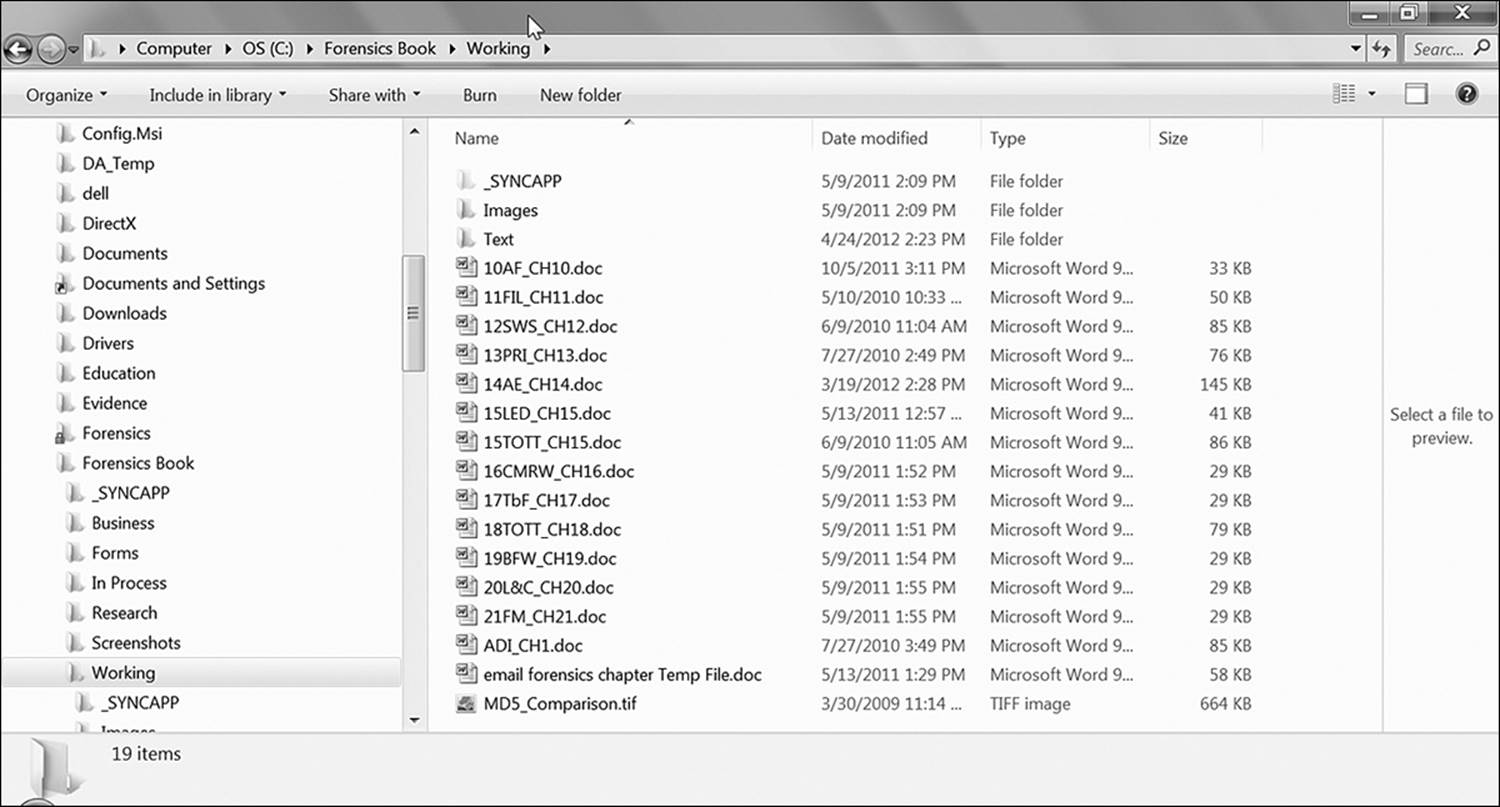
Figure 18.2 Windows Explorer provides a user-friendly interface for viewing the file structure of a storage device.
Figure 18.3 strips away several abstraction layers and shows the root directory of the F drive in hexadecimal. Aside from the fact that it’s not very user friendly, this view also shows data that is used by the system and is all but useless to the average user. Figure 18.4 moves up a step in the abstraction layers, showing the file structure once again in the file cabinet analogy. However, this utility displays entries in the file allocation tables for directories and files that have been deleted.
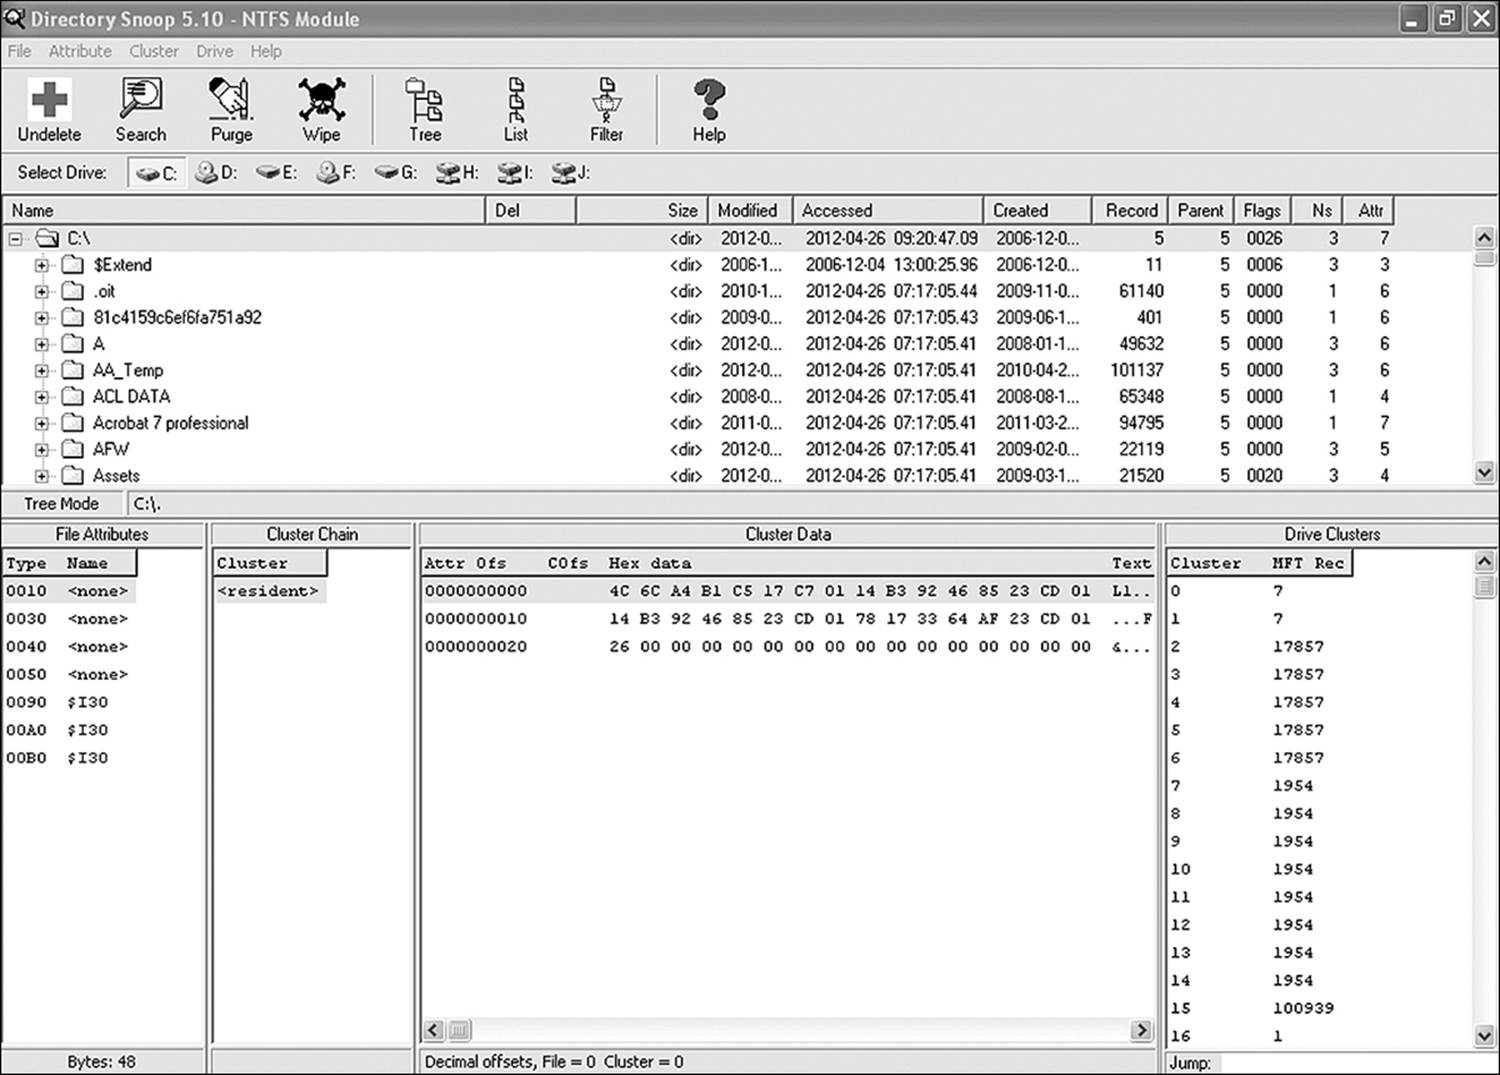
Figure 18.3 Actual directory entries aren’t quite as friendly as Windows Explorer would have you believe.
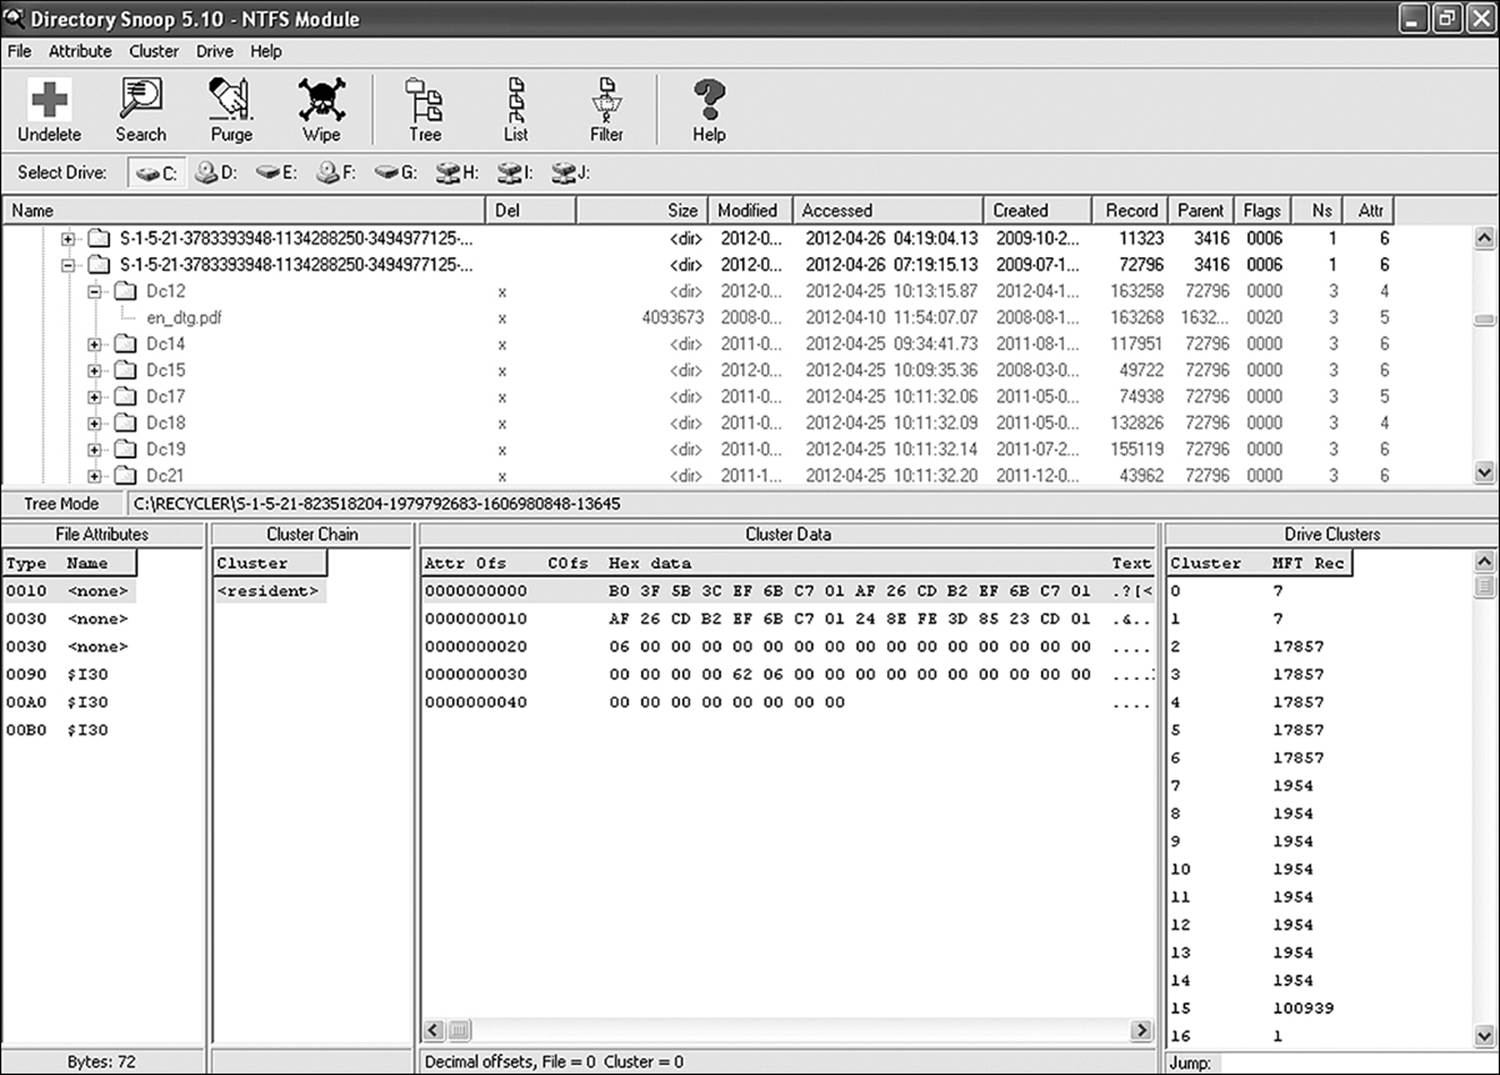
Figure 18.4 More powerful browsing tools, such as Directory Snoop, can display deleted entries alongside of live data entries.
So how does this relate to the digital archaeologist? That depends on the format of your data source. If you work from a forensic image, you may or may not be able to mount the volume, depending on the sophistication of your tool. To mount a volume is to load its directory tables into the OS so that utilities such as Explorer can work their magic on the metadata stored within. If an image cannot be mounted, it is nothing more than a single, very long stream of bits. The software tools of the trade provide the abstraction layers necessary for viewing data in a useful manner.
Software Tool Suitability
Before settling on an individual utility to perform a specific application, there are some things to take into consideration. The previous section discussed how data moves through layers of abstraction to get from stored digital code into readable format. Abstraction layers will either be lossless layers or they will be lossy layers. Lossless layers will make no changes to information as it moves up the levels of abstraction. What you start with is what you end with. With lossy algorithms, a certain amount of interpretation of data goes on.
How accurately an application performs this interpretation will dictate its utility as a forensic tool. An OS application such as Windows Explorer will be lossless. Most hex editors are lossless as well. Network capture utilities and intrusion detection systems are looking for patterns in data and can be open to interpretation. Incorrect interpretation leads to error. Therefore, they are considered lossy tools.
In the vast majority of cases, the forensic analyst will not be using OS utilities. Third-party utilities and applications can be measured by
• Accuracy
• Verification capabilities
• Consistency
• Usability
If a tool is missing even one of these attributes, it isn’t suitable for forensic detection. In order for a tool to be useful, it must provide a comprehensible interface, it must output data in a useful format at every level of abstraction, and it must provide the same results on the same set of data every time. Another user should be able to perform the same analysis on the same set of data and see the same results, even if the user comes to a different conclusion.
In order to assure that a tool meets certain standards for obtaining, storing, and analyzing evidence data, the Computer Forensic Tool Testing (CFTT) group—a functioning group of the National Institute of Standards and Technology (NIST)—puts together lists of specifications that define a usable tool for forensic investigations. Similar standards can be applied to data mining tools and memory extraction tools as well. The important criteria used in measuring the capabilities of a tool include
• All digital data from a source must be accurately copied and subsequently written to nonvolatile storage. This copy, referred to as the image, must be stored on non-erasable, non-rewritable media.
• No new data can be written to the source medium.
• In the event that input/output (I/O) errors occur while reading the source data, a predefined value must be written to the corresponding locations in the target image. The utility must log the type of error and the memory address range in which the error occurred.
• There must be a documented procedure, with the steps performed duly recorded, along with the results obtained, detailing the hardware and software resources that it uses to read the source data.
• In the event that the destination medium is of a larger capacity than the source, the start and end locations of source data must be clearly and accurately recorded within the destination image.
• Should the destination medium be of smaller capacity than the source, the application must notify the user. Then it will either abort the acquisition or copy as much data as possible into the destination. Details of the event must be documented.
If a particular utility is used during the course of an investigation that does not meet NIST requirements, an opposing attorney or a judge may insist that the evidence collected by that tool be declared inadmissible. That is not to say that such tools cannot be used. You may simply have to defend your choice and provide solid evidence that the information you gathered is accurate. If your tools can pass the scrutiny of the four tests of the Daubert Process, then it is likely that the judge will accept the evidence produced by your procedures. The Daubert Process asks four questions:
• Can the evidence presented be or has it been tested empirically, and can it be falsified?
• Has the approach or technique been the subject of peer review and publication?
• Is the technique generally accepted within the scientific or professional community?
• Does the technique or procedure contain a high known or potential rate of error?
Why is it called the Daubert Process? This is because the rules were defined in a case entitled Daubert v. Merrell Dow Pharmaceuticals presented before the U.S. Supreme Court in 1993. In this case the court laid out the opinion that has since provided the guidelines for determining the validity of expert witnesses, which would include scientists and computer professionals.
OS Utilities
In the real world, there are many different operating systems in use, and you certainly face the possibility that you will encounter all of them at least once in your life. However, it’s likely that over 99% of the computers you encounter will run one of the basic three:
• Windows
• Linux
• Macintosh OSX
It’s possible that you will encounter Macintosh OS9 and Unix as well. Unix is similar enough to Linux that most of the utilities will be the same. OS9 is not similar to OSX in several respects, but in many cases, the same utilities are available for both OS9 and OSX.
Windows
Since Microsoft Windows is far and away the most popular operating system in existence, it shouldn’t come as much of a surprise that there are more utilities available to support it. There is also an impressive number of utilities packaged into the system. Others are available for download on their Technet site (currently located at http://technet.microsoft.com/en-us/bb403698.aspx). Some of these utilities are fairly handy for extracting hidden information and helping you find a user’s footprints in the digital sand. The ones discussed here are
• Regedit
• Event Viewer
• SysInternals
Regedit
The registry is a set of configuration files that tells a Microsoft OS how to run. For the most part, the registry is best left alone. Most configuration changes can be made in the OS within different applets or fields, which were discussed in Chapter 9, “Document Analysis.” However, once in a while, it is necessary for a technician to manually edit entries in the registry. This is done through a command-line utility called regedit. Later versions of Windows also included regedt32. Regedit was included in the first version of WIN95 as a 16-bit registry editor and has been included in every version of Windows released since that date. As its name implies, regedt32 is a 32-bit editor.
The registry editor is not accessed through any shortcut. It is a command-line item, although it can also be accessed from the Start menu. To open regedit, click Start. Run and type regedit into the command field. A screen like the one in Figure 18.5 will open.
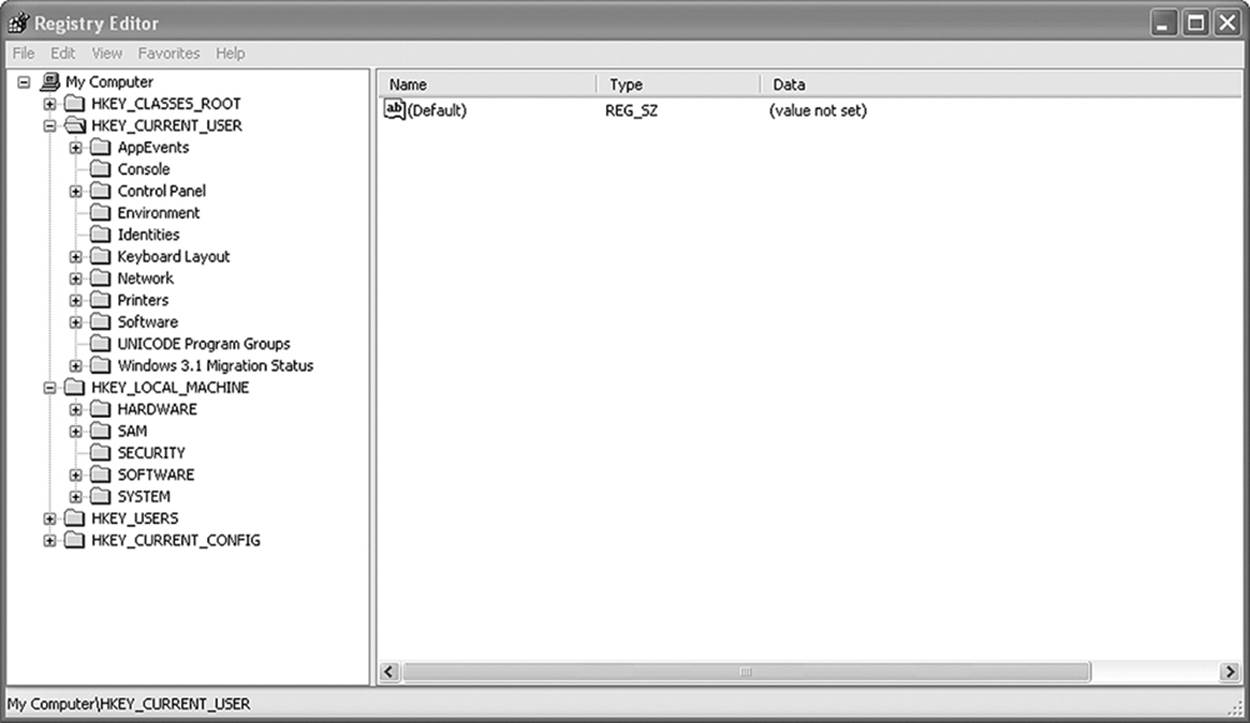
Figure 18.5 The Windows REGEDIT utility
Regedit also keeps track of some of the things Windows has done recently. It is through the registry that MS Word knows what files to list in the Recent Files list on the File menu. One thing it can give you is a list of files recently opened on a computer, even if the user has cleared their recent history. Assuming a user is technically savvy enough to clear the history after deleting files, there are a number of settings that retain historical data. Chapter 7, “Data Acquisition,” discussed this in more detail.
Event Viewer
Microsoft’s Event Viewer utility is used more for network forensics than for excavation. It is included in all Microsoft OS versions since Windows 2000. Several logs keep track of different types of incident, recording them as informational events, warnings, or errors. Three logs of interest to us are the Application, Security, and System logs. While not as useful as the registry editor, Event Viewer can tell you about things such as failed logon attempts, access denials, and write attempts to removable storage.
In Figure 18.6, you can see all three of the icons indicating the severity of an event. The lowercase i indicates an informational event. Nothing bad happened; Windows just thought you should know. The triangle with the exclamation point is a warning. Windows didn’t like something it saw, but whatever it was wasn’t enough to set off the major alarms. The circle with an X through the middle is an error. These are the messages that indicate something is wrong and deserves your attention.

Figure 18.6 The Windows Event Viewer
SysInternals
The SysInternals suite of utilities distributed by Microsoft offers some very powerful tools. All together, there are over 60 utilities (and counting) included, and they are available as a free download from Microsoft. (And you thought Microsoft never gave anything away for free!) Of those, only a small number are of use to the forensics professional:
• Autoruns: Identifies every process configured to start automatically when Windows loads.
• EFSDump: Shows what accounts are authorized to access an encrypted file.
• PendMoves: Lists all files that have been tagged for removal on the next reboot. This may help prevent the loss of files from a running file system configured to autodestruct on the next boot.
• PSFile: Identifies files open on the computer, including those being accessed remotely. Useful during live capture.
• PSList: During a live data capture, identifies all processes running on the computer.
• PSService: During a live data capture, identifies all services running on the computer.
• RootkitRevealer: Locates and tries to identify root kits installed on a system.
• Streams: Locates alternate data streams on an NFTS drive.
• Strings: Locates a particular text string anywhere on the disk.
While the documentation for these utilities won’t win any awards, it is sufficient to get you started using these very nice tools. They are prime examples of why you should practice with a utility before using it in the field.
Userdump and Dumpchk
A critical point to live data capture is the ability to record what is in memory while the system is running. Microsoft provides a utility, available for free download, called Userdump. It copies all bits stored in RAM and stores that information in a disk file. Later on, another utility called dumpchk.exe allows you to examine and analyze that data.
Linux
Many investigators choose to configure their forensic analysis systems as Linux boxes for a variety of reasons. Many of the utilities used by Linux can work on Windows and Macintosh computers. The reverse can’t be said of those two machines. Also, there is a wide variety of software available through open source for a Linux box. The interesting thing about the Linux OS is that everything connects to the system as an installable package. Distribution packs include a large collection of various applications and utilities, but if you need something different, it’s easy enough to add. Some of the following utilities are likely to be included in whatever Linux distribution a user chooses to install. Others might need to be downloaded and installed separately.
Disk Dump (DD)
The seemingly simple Disk Dump utility carries a lot more power than any of the integrated Microsoft utilities. It creates a direct copy of a disk by copying block by block or bit by bit. (In UNIX-type file systems, a block is the equivalent of a cluster.) DD can do simple backups, directly clone a hard disk, or create a bit-by-bit image of a disk. An impressive variety of command-line switches allows a knowledgeable user to strictly manage the way data is copied.
The key word here is knowledgeable. Since it is a command-line utility running on a UNIX-based OS, getting things wrong in the syntax can be disastrous. For example, if you get the source and the target disk in the wrong order when typing the command, you will overwrite the data disk with a blank one. This might not be the worst thing to happen to you in your life, but if it is a critical evidence disk, it might be the worst to happen in your career. Chapter 7 provided a full section on acquiring a forensic image using this utility.
GREP
GREP is a command-line utility that works as long as you know the name and extension of the file you wish to recover. Primarily targeted at text files, GREP can be used to recover binary files using the –a trigger.
Linux Disk Editor (LDE)
If you require the ability to view the actual contents of the disk, Linux Disk Editor is one utility to use. It allows editing as well, but that activity goes against the grain of what the investigator is trying to do. It works with the ext2 and ext2fs file systems as well as minix and xiafs. In addition, it provides rudimentary support for FAT and NFTS as a hex editor. Using the –recoverable trigger, this utility can locate inodes that contain recoverable data.
PhotoRec
Primarily designed to recover digital image files from memory sticks, this utility can also be used to recover document files, PDFs, and audio files from other media such as hard disks and CD-ROMs. It works over FAT, NTFS, HFS, ext3, and ext3. Document formats it can recover include Microsoft Word, Open Office, XML, MS Works, and several others. Altogether the developer’s site lists over a hundred different file formats it can recover. Its unique claim to fame is that it can ignore the file system and carve data directly off the disk surface.
Macintosh OSX
Like Linux, the OSX OS used by Macintosh (Mac) computers is loosely based on Unix. Therefore, it isn’t surprising that some of the utilities are the same, only different. As with Linux, the file system used by Macs is a journaling system and self-maintained. Therefore, recovering deleted files is not as easy (and frequently not possible). However, it’s an easier system to hide stuff in. Some of these utilities will help.
GREP
The Macintosh version of the GREP command-line utility searches files or directories, looking for specific text strings. A wide variety of triggers lets the user control how the command behaves. A good feature is the –text trigger that allows a binary file to be processed as text. It can look for patterns of text as well as fixed strings.
HEAD
HEAD is another command-line utility. If you suspect you have a file that has been renamed to disguise the contents, you can use this nifty little program to view the first few lines of the program. The default is ten lines, but the –count trigger allows you to specify how many lines to display. To make the utility even handier, more than one file can be processed at a time. In this case, the output results are preceded with a text string identifying the file name.
Finder
Finder is the OSX equivalent to Windows Explorer. It searches the disk for files based on user search parameters. Like Windows Explorer, Finder searches file contents as well as file table information. With Finder, this is a default behavior. If you type in Doberman, it first searches the HFS file tables and then searches file contents, finally displaying every file that contains that particular string anywhere in the directory name, file name, or within the file itself.
Spotlight
Spotlight is an offshoot of finder. It takes advantage of the services of another OSX feature known as the Metadata Server and lets the user perform selection-based searches. Unlike Finder, which uses indexes of file names and of text, Spotlight uses indexes created from metadata stored by various files on the system.
Metadata is information embedded within a file that provides information about the file. As you will see in several places throughout this book, metadata plays an important role in tracing footsteps and in identifying critical information. The Metadata Server is a service running on OSX that scans each file on the system as it is added and indexes that information. Chapter 9, “Document Analysis,” covers metadata in much greater detail.
Commercial Applications and Suites
Most professional computer archaeologists are going to take advantage of one of the dedicated suites of applications available. There are a number of these suites available, and since most are somewhat expensive, you should know what you need your applications to do before you invest. The courts are fairly strict about how data is extracted, archived, and analyzed. The suites automate most of the functions required to meet legal standards and eliminate much of the “grunt labor” involved in the process.
Suites
A forensic suite is a unified collection of utilities that provide a wide variety of functions. Most also include automated reporting capabilities. At a bare minimum, a good forensics suite includes a forensic imaging utility, data search and recovery functions, and a hash generator. The better ones can search slack space and unallocated space, and even scrub the file tables for latent entries. The ones worth looking into are
• Windows
• AccessData
• Guidance Software
• Paraben
• X-Ways Forensics/Investigator
• Linux
• The Sleuth Kit
• FCCU Forensic Boot CD
• Forensic or Rescue Kit (FoRK)
These vary in the number and variety of tools included, and some have more powerful reporting functions. Since it isn’t the role of this book to act as sales counselor, refer to the various companies for more details.
Applications
For the investigator who elects to pick and choose individual utilities, most of the same companies that offer suites offer one or more dedicated applications or utilities as well. In addition to the ones listed above, a number of companies specialized in dedicated utilities. The following tools perform powerful functions:
• AccessData
• EDiscovery: Provides a systematic approach for preparing a system for e-discovery
• SilentRunner: Monitors network traffic and performs pattern and content analysis
• Guidance Software
• Encase Forensics: Performs file system analysis, data searches, and common reporting
• Neutrino: Portable device data acquisition
• Paraben
• P2 Commander: Analyzes e-mail, chat logs, and file systems
• Forensic Replicator: Provides a forensically sound copy of the data source
• Decryption Collection: Cracks up to 35 types of file encryption password
• Lockdown: Write-protects a device for analysis
• Pinpoint Labs
• SafeCopy: Provides a forensically sound copy of the data source without altering metadata
• Metadiscover: Searches files for metadata fields and provides a detailed report
• PG Pinpoint: Confirms identity of known file types by comparing hash values
• X-Ways
• WinHex: Provides file system analysis, data recovery, and disk editing
• Capture: Provides a forensically sound image of data
• Trace: Deciphers browser activity
Open-Source Applications and Utilities
There is a plethora of freeware and shareware utilities available that perform functions useful to the investigator. A bit of caution is in order here in that if your investigation is headed for court, the lawyers and judge are going to look very carefully at the tools you use to extract and examine data. Specifically, they will be looking at an applications target function, its documented reliability, and exactly how you used the tool to arrive at your conclusions.
That does not mean that the courts will disallow information extracted by these tools. Simply make sure that you are well versed in what a particular utility does and that you use it as intended. In particular, there are some powerful tools that help in analyzing a file system, extracting data, and tracing computer activity.
I’ve listed a few personal favorites here, along with a short description of their function. Freeware means that you never pay a royalty fee, and shareware means that after a designated trial period you are expected to pay a clearly defined registration fee for continued use.
• Pinpoint Tools by Pivotal Guidance
• Safecopy: Freeware that copies data without altering metadata.
• Metaviewer: Freeware that extracts metadata from MS Office documents.
• Hash: Freeware that creates hash values of any file or image.
• Filematch: Freeware that identifies duplicate files in a volume.
• Runtime
• Disk Explorer for NTFS: Shareware (with a nominal fee to register) that allows you to examine the contents of a disk on a very granular level. You can view MFT entries, boot records, partition entries, and file contents, copying all contents (including slack space) to a file for recovery.
• Disk Explorer for FAT: Same as Disk Explorer for NTFS (with a nominal fee to register), but is used for FAT12, FAT16, and FAT32 formatted drives.
• DriveImageXL: Freeware intended for individual use. It is a file copy utility and is not used for forensic images.
• Captain Nemo: Shareware (with a nominal fee to register) that allows you to mount an NT, Linux, or Novell drive image on a Windows based computer.
• DriveLook: Freeware utility that allows you to search a data source for suspect content.
• Disk Investigator: Freeware that allows you to search a data source sector by sector. It can undelete files that were removed from Recycle Bin as long as they haven’t been overwritten.
• Directory Snoop: Shareware (with a nominal fee to register) that acts as a powerful ally to the investigator that examines hard disks, removable media, flash drives, and camera cards. It can view MFT and file table entries and even identify names of files that once existed on the drive, but were deleted and even wiped. Raw cluster data can be copied and saved to a file.
• Winhex: A freeware version of the Winhex tool mentioned in the previous section is available from http://winhex.en.softonic.com/. The nice thing about Winhex is that it can be used to examine any form of data, regardless of the host file system.
Working with “Court-Approved” Tools
A lot of ink and digital space gets devoted to what constitutes a court-approved tool. In fact, while there are several instances of a court accepting a tool because it has been used successfully in previous case history, our judicial system is not actively involved in the testing and approval of forensic tools. Additionally, just because a judge in one case accepted the results of a tool as evidence in court, there is no guarantee that another judge will follow suit. This might possibly explain why the majority of first-page Web hits for the search “Court Approved Forensic Tool” are sites sponsored by manufacturers of forensic tools.
Any legitimate tool used in a forensically sound manner will produce forensically sound results, just like any sufficiently sharp saw will cut wood. The key question therefore is not “What tools does the court approve?” Rather it is “How can I convince the court to approve the evidence produced by the tools I use?” In the final act, it will be the investigator, testifying from the stand, who delivers the presentation that must convince judge and jury. In order to do that, the investigator must do these things:
• Use tools that are generally accepted throughout the industry.
• Understand precisely how those tools work.
• Demonstrate that the tools were used in a professional, sound manner.
• Document which tool was used for every step in the investigative process.
What Tools Are Accepted in the Industry?
If the idea was to produce a 700-page book here, we could simply put together a list of every piece of software or hardware ever used in the process of a digital investigation and have our page count. The list is seemingly endless. The purpose of this discussion is to determine what makes a tool acceptable.
In 2004, the National Institute of Justice established the Computer Forensics Tool Testing (CFTT) program. According to their Web site (NIJ 2012), the purpose of this program is to
• Streamline the process of testing digital forensics tools.
• Provide unbiased standards for testing digital forensics tools.
• Provide manufacturers with feedback for improvements.
• Aid law enforcement agencies in making better informed purchasing decisions.
• Increase understanding among law enforcement of the different tools and their respective capabilities.
• Provide a methodology for testing that can be replicated by other law enforcement officials.
The program does not just test software and hardware tools. It also concentrates on developing testing methods, testing criteria and sample data sets for testing tools that other organizations can use in the development of new tools or the testing of existing ones.
Over the ensuing years, over a hundred different products have passed through CFTT. All of the commercial forensic suites have had various components tested. In addition, a large number of open-source and freeware applications have passed muster. Making use of a product that has passed CFTT examination is a good first step in assuring that your evidence will be admissible.
It is not sufficient, however, to assume that since the tool used to image the drive came right off of CFTT’s approved list that all will be well. The investigator must also be able to verify that a sound and tested version of the product was used. For example, launching a memory capture utility directly on a compromised machine opens the door for the argument that the tool was affected by code on the machine. A brand-new write-protection device that has not been tested prior to first use to confirm its capabilities can be challenged. Know your tools and never stop testing them. This is where the sample data sets and test criteria developed by CFTT come in handy.
Understanding How the Tools Work
When presenting evidence from the witness stand, an investigator is going to play one of two roles. If called as a material witness, the investigator will be fielding questions pertaining to what actions were taken, how they were taken, and what results were obtained. Only facts will be accepted as answers. Opinions are unlikely to be solicited, and unsolicited opinions are unlikely to be welcome. As an expert witness, opinions might be requested. However, they are only going to be accepted as long as the witness can back up her opinion with fact.
In either case, it is probable that since the jury is filled with mostly lay people who have no technical expertise in digital forensics, an investigator will probably be asked to explain how the tools performed the task claimed. For example, opposing counsel may want to know how you can be so sure that in the process of capturing live memory, you didn’t insert new data into the mix. To adequately answer that question, you need to know exactly what the memory footprint of the tool you used is and, if possible, what address range it occupied in the system during the capture.
Always test any new tool against a known data set in order to get a good idea of the tool’s reliability and functional limitations. Any time that a tool gets upgraded or reinstalled, it is critical that the tests be run again and the results compared. If you have not tested a piece of software against a known data set, you can never be sure that it is working exactly as it should against the unknown. More importantly, you cannot successfully argue the validity of your results against a hostile cross-examination.
Demonstrating Sound Use
Here we go back to the consistent mantra heard throughout this book. Document everything that you do. At the beginning of any investigation, regardless of how large or small it might be, a case log must be started. Various pieces of documentation will be collected and attached to this log as the case progresses. See Chapter 17, “Case Management and Report Writing,” for a detailed discussion on documentation.
In situations where multiple computer systems are involved, it is a good idea to keep a separate case log for each system. This minimizes the possibility that actions taken on one system will not be confused with those taken on another. Additionally, an activity log must be kept for each piece of media analyzed, detailing each action taken against the media, the tools used to analyze it, and each step taken during the course of analysis.
Document the exact time each step was initiated and the exact time at which it was completed. When making a forensic copy of original media, calculate hash values in both MD5 and SHA256 algorithms. After the copy is completed, perform the same calculations on the copy. They should match. If not, recalculate the hash on the original. If it has changed, there is something wrong with either your software or (more likely) your write-protection device is not functioning properly. (Remember the part about testing everything before you begin?)
Both the original and the initial copy will now be stored in a secure location. Make a second copy for processing. Once again, calculate the hash values and make sure they match. You should have recorded in your activity log the times and dates begun and completed for each of these steps.
As you progress through the examination of the device, as each tool is employed, describe each step you take and record the times and durations as before. If there is any variable involved, such as triggers to command-line tools or optional settings, those must be recorded as well. Figure 18.7 shows an example of different options available when making a disk image with FTK Imager.
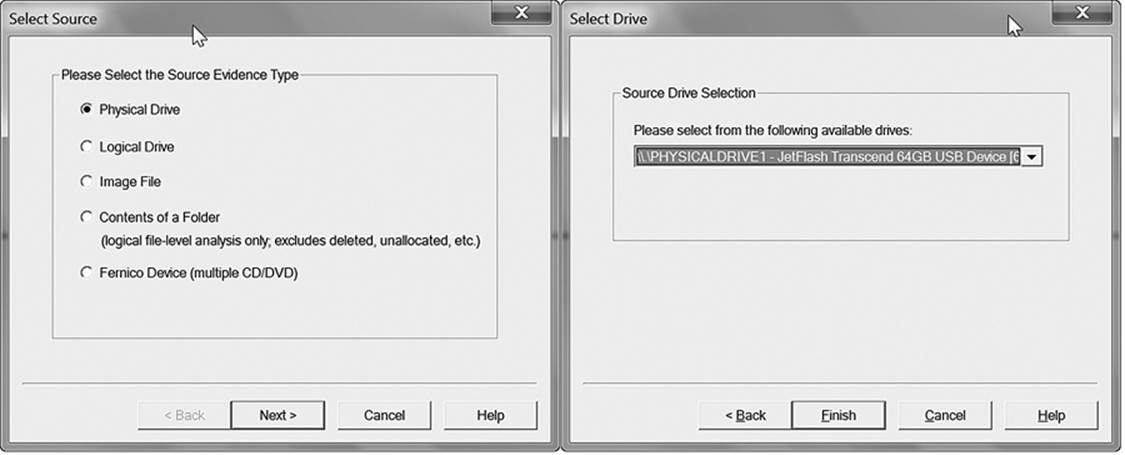
Figure 18.7 Various options are available when making a disk image using FTK Imager.
Hardware Tools
Not everything the investigator does deals with code. There are several pieces of equipment that are absolutely necessary for the success of an investigation. This section offers a brief overview of the following tools:
• Technician’s standard toolkit
• Write-protect interfaces
• External storage units
• Forensics workstations
While a detailed explanation of how to use each of these tools is beyond the scope of this book, it is essential to introduce you to their form and function.
Technician’s Standard Toolkit
You wouldn’t think that a forensics investigator would find herself wearing a PC technician’s hat. But there does come a time when part of data acquisition involves removing one or more disk drives. Most of today’s computers are considered “tool-free,” meaning that you only need about a dozen tools to take them apart instead of the usual 20 or 30. In addition to the standard set, there are a few that, while you don’t use them so frequently, when you need one of them, nothing else will do the trick. If you’re going to do this right, invest in the following tools:
• No. 0 and No. 1 Phillips screwdrivers
• 1/8-inch, 1/4-inch, and 3/16-inch flat screwdrivers
• T7, T10, and T15 Torx screwdrivers
• 3/16-inch and 1/4-inch nut drivers
• 3-claw part grip
• Tweezers
• 5-inch needle nose pliers
• Reverse-action tweezers
• A plastic scribe
The screwdrivers and nut drivers should be self-explanatory. They are for removing and replacing screws when going inside a computer system. The claw grip and tweezers are for picking up the screws you will inevitably drop into the computer while working. If you’ve never used reverse-action tweezers, then you don’t fully appreciate how useful they are. They open when you squeeze and clamp down when you release. With this useful tool, you don’t have to maintain your grip while you work. The scribe is useful for opening plastic cases without damaging them. Many of these tools are shown in Figure 18.8, and a good set can be inexpensive.
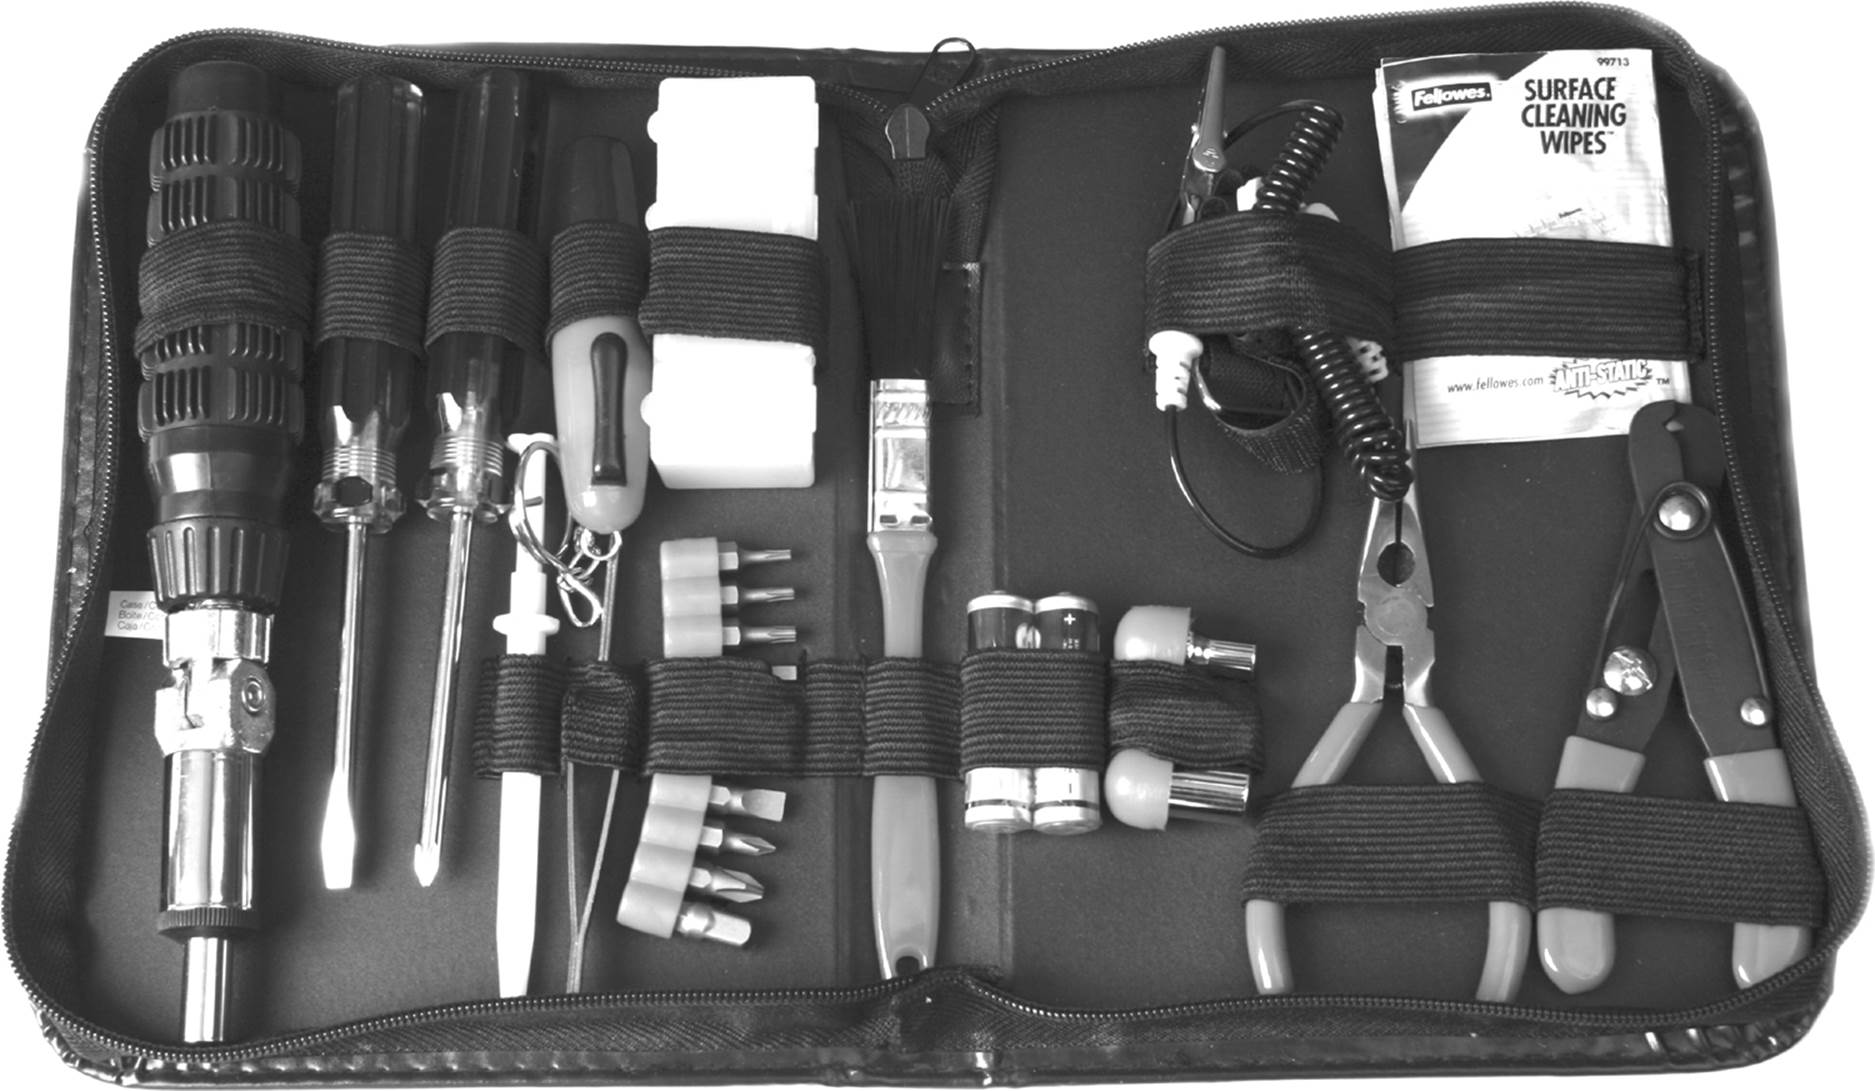
Figure 18.8 A usable technician’s toolkit need not be expensive. This one was under $20 at a local office supply store.
Write-Protect Interfaces
In order to make a forensically sound copy of a device, it is essential that you not allow new data to be written to the source media. To do so would cause two problems. From an investigatory standpoint, writing new data to the medium could possibly overwrite evidence that exists in slack space, deleted files, or unallocated clusters. (This was discussed in further detail in Chapter 7, “Data Acquisition.”) From a legal standpoint, if the source image is different in any way than the acquired image, as evidenced by the hash values of each one, then unless you can satisfactorily explain the difference, your procedure and results can be called into question by the opposition.
Several companies make devices that allow data extraction and prevent data from traveling from the target system to the source medium. Devices range from simple interfaces that permit only unidirectional data transfer to fancy disk duplicators that allow several drives to be imaged at once. They are available for a variety of interfaces, and it is likely that you will need more than one device in order to image the different systems you will encounter over time. There are too many of these devices to mention each one. Among the more prominent (in alphabetical order) are
• Advanced Test Products: Write-protect interfaces
• Digital Intelligence: Write-protect interfaces
• Forensic Computers, Inc.: Write-protect interfaces and forensic disk duplicators
• Forensic PC: Write-protect interfaces and forensic disk duplicators plus memory card duplicators
• Guidance Software: Write-protect interfaces
• Intelligent Computer Systems: Write-protect interfaces and forensic disk duplicators
Of particular interest is a device distributed by WiebeTech (Figure 18.9) that includes interfaces for IDE, SATA, and SCSI all in one kit.
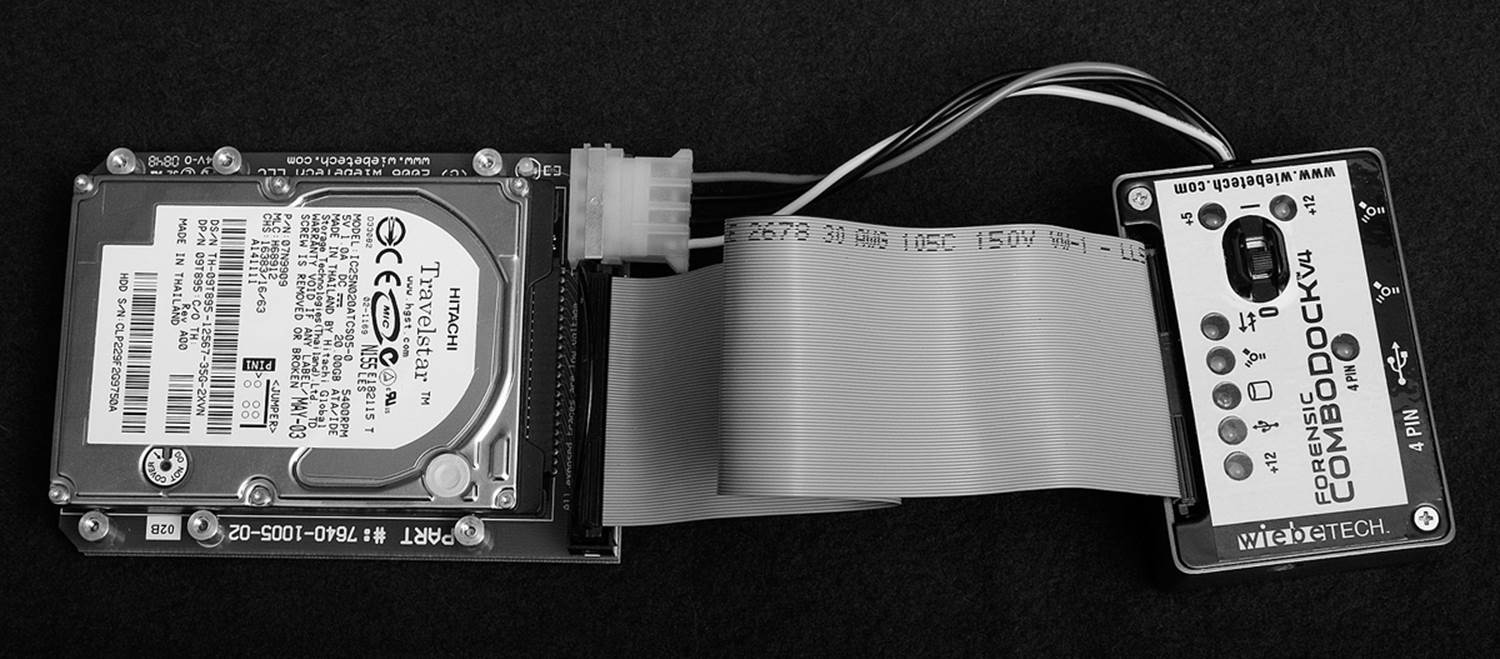
Figure 18.9 Write-protecting the source disk is essential in obtaining a forensic image.
External Storage Units
If working in the field, you will need a verifiable repository for the target image to reside after capture. In addition, if doing live data capture, you need a place other than the local hard disk to point the data. You can’t choose local disk storage for a memory dump because you might overwrite valuable evidence, and you will also alter the source image before you even acquire it!
There are three basic external storage units that should be part of your arsenal. A USB thumb drive is good for memory captures as well as creating documentation as you work. For creating non-rewritable images, a good DVD recorder is necessary. And for creating a forensic image of a larger device, make sure you have available an external hard disk.
As of this writing, it is possible to get eSATA devices that store up to 16TB of data, if you don’t mind carting around a large device. For imaging single drives, a 1TB external drive with a Firewire interface is available for under $200.00. Before using external hard disks for a forensic image, make sure you are familiar with the laws and regulations pertaining to the case with which you are involved.
Forensics Workstations
Most forensics labs have one or more dedicated systems used only for investigative work. In addition, they will have field units configured from high-end laptops. These are the forensic workstations. For the most part, the workstation is simply a more powerful personal computer equipped with a few extra accessories. Because of the nature of its task, a workstation features
• Multiprocessor capability: Most current processors are multicore. This helps immensely, but the addition of a second processor greatly speeds up the machine.
• Extra memory: If running a 32-bit OS, install 4GB of RAM. A 64-bit OS should have at least 8GB.
• Disk capacity: In addition to the primary disk running the OS and system applications, there should be one or more hard disks configured to accept target images. SATA drives of up to 2TB are currently available which allow large target images.
• Hot-swappable hard disk bays: These disk bays allow you to install a source disk into a caddy and mount it on the workstation without dismantling the workstation.
• External SATA connectors allow the investigator to connect SATA drives via an easily accessible port.
• External SCSI connectors allow the connection of SCSI devices.
• Memory card readers are necessary for reading flash memory.
• ZIP disk drives are not as commonly seen, but still occasionally appear.
• Built-in write-protect devices: For USB, Firewire, SATA, IDE, and SCSI.
• Multiple-monitor capability: Having multiple monitors is a luxury, but one you will quickly grow to appreciate as you work with multiple browsers and run applications simultaneously.
The same rules apply to the field workstation as do the lab station. The only difference is that the majority of the accoutrements will be externally connected devices and you will “field-dress” your system at the scene.
Building a Forensics Workstation
An organization with a staff of hardware technicians might find it more economical to build a forensics workstation than to purchase one preconfigured. This is especially true if you expect to run Linux and use open-source applications such as Sleuth. This process does presume that the person doing the building already has a strong background in PC hardware support. For more information on building systems from scratch, see PC Hardware Maintenance and Repair (Graves 2001). The next chapter covers this subject in detail.
The hardest part of building a workstation from scratch is sourcing some of the unique components used in its construction. The construction is simple assembly and configuration. Keep in mind that your workstation has some specific requirements:
• It must support IDE, SCSI, and SATA busses (write protected).
• Hardware disk duplication is necessary (write protected).
• Hot-swappable drive bays are needed.
• It must have network connectivity.
• It has to reside behind a powerful firewall.
• It should be able to read all standard memory card formats.
• The BIOS should support booting remote images.
From a software standpoint, you need to be able to read from any file system. All graphics file formats need to be readable. Installed applications must be able to collect evidence in a fashion recognized by the courts.
Nontechnical Tools
Not all of the necessary tools needed by the investigator are targeted to the geek. Some essential accessories under any other circumstances might well qualify as toys for grownups. However, since you need them to do your job, not only do you have an excuse for buying them, but your tax accountant might even be able to claim them as deductions on your next return. Some of the other devices won’t be quite so fun to own, but if you don’t have them, you’ll regret it. These devices include
• A laptop computer
• A digital camera\video recorder
• A digital audio recorder
• A Faraday shield
• Antistatic bags
• Presslock evidence bags
• Adhesive labels and a felt-tipped pen
Happy shopping.
Laptop Computer
It would probably be best if you decide what forensics software you intend to use before sinking money into a laptop. The OS dictates what software you can run. If you know you’re going to use a Windows-based application, then buying an Apple laptop is probably a poor choice. Most of the Intel-based laptops (including Apple) can be reconfigured to run Linux. Some brands, including Dell and HP, will ship a laptop with Linux preinstalled. Therefore, if you plan to run The Sleuth Kit or the Forensics Research Kit, these would be the logical choice.
Make sure you get a full-featured notebook—preferably one that will allow you to add an optional docking station. A field computer for the forensics analyst needs to be able to hook up to a wide variety of devices, including proprietary I/O devices, external storage units, and so forth. Most of the so-called “netbooks” fall short in these capabilities. They also don’t allow you to install sufficient RAM. As of this writing, the top-of-the-line netbooks feature 2GB of RAM. Get a notebook with at least 4GB. The nice thing about a current model of notebook is that I don’t have to caution you to make sure that it comes equipped with USB or FireWire. They all do.
What you do have to watch for is the ability to add an optical disk. An internal disk is best for field work because you have to use it all the time. An external accessory drive is usable, but quickly becomes a pain.
Digital Camera/Video Recorder
Two years ago, it would have been more difficult to combine cameras and video recorders. You could get a digital camera that did short video clips, or a video camera that offered a still option. But the clips were too short to be useful on the digital camera, and the stills offered by video cameras were of insufficient resolution to offer decent detail. All of that has changed.
To make the specifications for a digital camera/recorder make sense, you have to understand a few basic principles. Digital images are measured in pixels per inch (ppi) if viewed on a display and in dots per inch (dpi) if printed on paper. To be useful, a still image should be printed to 8.5” x 11” and have a minimum of 240dpi. To get this sort of resolution from the tiny imaging sensor (usually a charge-coupled device, CCD), you need a camera rated as 3 megapixel (MP) or better. Virtually all still cameras on the market do that these days. But most are limited to a maximum of 15-second video clips.
The purpose of a video camera in the field is so that you can do a 360-degree sweep of the scene as you initially find it. This will require far more than the 15-second clips offered by still cameras. So your best bet for professional work is a digital video camera that offers the ability to make 3MP still images. Fortunately, there is a fairly wide variety of those on the market, and many of them sell for well under a thousand dollars. You’re not looking for the best in creative imaging here. Field records are not going to make you the next Steven Spielberg. The basics will do just fine. Look for a rugged camera, because it will get bounced around in and out of car trunks and desk drawers a lot.
Digital Audio Recorder
The digital audio recorder is one device that you can get by without as long as you’re the type of person who takes detailed (and readable) notes in the field or are willing to stop everything you’re doing once every 60 seconds or so to type your observations into your notebook computer. Someone like me, however, has trouble reading his hen-scratching ten minutes after it lands on the paper. And since I type 126 mistakes per minute, the audio recorder is, for me anyway, the way to go.
You don’t need anything super expensive or elaborate. You just need something that does high-quality voice recordings. A sensitive microphone is nice, because you might find it necessary to set the device down in one place and have it pick up your voice as you walk around the room. Most video cameras offer reasonably good audio quality, but are a bit inconvenient to use when working at a computer or interviewing a witness. A separate recorder will pay for itself in short order simply in reduced frustration.
Faraday Shield
A Faraday shield is an enclosure made from conductive material that blocks electromagnetic waves. It is named after the physicist Michael Faraday, who made the first one back in 1836. Any electrical field surrounding the enclosure is intercepted by the conductive exterior and drawn away from anything enclosed. The enclosure can be anything from a small bag just big enough to transport a cell phone to entire rooms in which several people can work at once. The idea is that as long as the device resides inside of a Faraday shield, nobody can tap into it using wireless technology and alter the digital contents.
Antistatic Bags
Most computer devices are far more sensitive to electrostatic discharge (ESD) than most people realize. Electrostatic discharge is that tiny spark that jumps from your finger to the door after walking across a carpet. Five thousand volts of ESD is enough to damage one of the chips used in a computer system. It takes as much as fifty thousand volts for you to feel it. Several companies make bags that you can use to transport digital devices that protect anything within from ESD. Always pack electronic devices in antistatic bags. If it is a wireless device, place the ESD-protected device into a Faraday shield for transport.
Presslock Evidence Bags
For smaller pieces of evidence that are not particularly sensitive to electromagnetic or electrostatic energy, a simpler storage and transport container is suitable. The standard presslock bags you buy for sandwiches work quite well for floppy disks, Zip disks, thumb drives, and other small devices you find on the scene. It is easy to apply a label to them, and they keep dust and moisture away from whatever is stored within.
Adhesive Labels and a Felt-Tipped Pen
Label everything that you acquire from the scene. Label it with permanent ink, but in a way that does not permanently deface the object being identified. For this reason, it is important to select the type of label that uses nonresidue adhesive. Avery makes a label that they identify with the number 8160 that is a good size for the purpose. Any other brand will do as long as it is nonresidue. The marker needs to be a fine-tipped marker that writes in indelible ink. Black is best, but any dark color will do.
Chapter Review
1. Explain the concept of abstraction layers. What are they? How does an understanding of the concept assist in designing and testing forensic tools? What do the terms lossy and lossless mean in this regard?
2. What are the four standards against which a tool is measured in regards to suitability for forensic use? How much impact does the failure of one measurement have on the usability of the tool?
3. Explain the value of the Windows Event Viewer to the forensic analysis. What are the significant logs it generates, and how can they be used in analyzing data?
4. In spite of their expense, there are a few significant advantages to using one of the commercially available suites as a standard in your investigative process. What are these advantages?
5. Why are write-protect interfaces so significant to the investigator? How are they used?
Chapter Exercises
1. Go online and research as much information about three forensic suites as you can find. Put together a spreadsheet that compares the various costs of using each suite, what tools each one offers, what standards they support, and what proprietary methods they employ. Then find out which, if any, of these tools have been tested by the National Institute of Science and Technology. Based on what you have discovered, which of these suites would you select for a new practice just getting started?
2. Using the same process as in the previous exercise, do the same level of research on at least two different forensic hardware toolkits.
References
Graves, M. 2001. PC hardware maintenance and repair. Albany, NY: Prompt Publications.
NIJ. 2012. CFTT project overview. www.cftt.nist.gov/project_overview.htm (accessed August 16, 2012).