Digital Archaeology (2014)
7. Data Acquisition
A key rule of digital forensic investigation is that one never works with the original data. In some cases, as with live memory, that isn’t feasible in any case. The primary reason, however, is that working on a copy offers several advantages:
• The hash codes of the original can be compared to the copy to assure authenticity.
• If one makes a mistake, it is easy enough to start over on a fresh copy.
• The approach used for one type of data may not work well with another type, and a fresh copy, complete with matching hash values, assures integrity of the data.
• Loss, theft, or corruption of the copy image does not end the investigation.
• The courts insist that investigators work that way unless demonstrably impossible.
This chapter deals with acquiring forensic images of various types of data. The most commonly imaged device is currently still the hard drive, but that is rapidly changing as more cases rely on evidence derived from cell phones. However, the first line of data often seen by the investigator is a live and running system. Therefore, a live memory capture is where this chapter will begin.
Order of Volatility
If there is one constant in the world of computers, it is that data is volatile. Even information “safely” stored on a hard disk can be wiped. To the investigator, it is critical that information be collected based on its degree of volatility. The Guidelines for Evidence Collection and Archiving(Brezinski and Killalea 2002) lists the following priority list for data acquisition:
• Registers, cache
• Routing tables, ARP cache, process tables, kernel statistics, memory
• Temporary file systems
• Disk
• Remote logging and monitoring data that is relevant to the system in question
• Physical configuration, network topology
• Archival media
The first two items can only be collected effectively by doing a live memory capture, as described in the next section. On a laptop computer, it is possible to collect historical artifacts of previous live sessions by copying the hibernation file from the hard disk. Processes, routing tables, and other volatile information from the session immediately prior to the system going into hibernation will be part of this file.
Additionally, any system that has ever “blue-screened” will have a .DMP file stored some place on the hard drive. Depending on the OS of the system involved and how the system was configured, this may be a truncated “snapshot” of memory, or it may be a complete memory dump. While this data archive may not have anything directly related to the current system status, it is possible that evidence of previous events may be derived. It may even contribute toward building an effective time line.
Memory and Running Processes
In the old days when a computer was suspected to contain data that would be of value to a legal investigation, the first-response team would immediately pull the plug on the machine, pack it up, and haul it back to the lab for analysis. The philosophy behind this thinking was that performing a graceful shutdown on a running machine would overwrite files and delete temporary files that might be of use later on down the road.
Recent years have seen the increasing importance of live response to incidents. Live response is the collection of data from a running machine that will be forever lost if it is shut down for removal. The advantages of live response are numerous. Information that will not be available from static archives can be used to establish remote connections. It may be possible to retrieve passwords from computer memory. And while the system is still logged in by the original users, an encrypted disk is available to the investigator without requiring a password.
One of the primary reasons for live response is to be able to acquire a live memory capture that as closely as possible represents the running state of the computer at the time of the incident. The sooner the capture is made, the more accurate the results will be. In any case, an exact replica of the state of the machine at the moment of the incident will never be possible.
For one thing, the investigator will always be the victim of Locard’s exchange principle. This fundamental truth states that the mere act of taking a snapshot of the memory image is intrinsically altering it in some way. Merely moving the mouse changes the contents of RAM to a certain extent. Attaching an external drive makes additional changes to memory, as well as changes to the Windows Registry (if using a Windows operating system). Every step of the acquisition process should be documented, if possible. This makes it easier to factually justify any minor differences in data sets that may emerge.
In addition to the changes made by the investigator, the simple passage of time affects what is captured. Every minute that passes results in some changes to system memory. The amount of change that occurs over time is directly related to the amount of installed memory on the system. A study by Walters and Petroni (2007) showed that after ten minutes standing idle, a system with 256MB of RAM (low by today’s standards) was approximately 93% identical to the initial measured state. An identical system configured with 512MB retained a similarity of 98%.
While 93% seems significant, it also means that 7% changed. At 120 minutes, these numbers dropped to 79.8% and 96%, respectively. Any activity on the machine at all would dramatically decrease the similarity. This includes simple network connectivity with no overt action by the user.
As a live-response function, it is necessary for the investigator to understand that the process is going to alter the computer as it is executed. Nobody will be able to come along later in the investigation and repeat the process. Much of what the technician does is wholly dependent on the (possibly false) assumption that the OS running on the machine is reliable and not infected with a rootkit. It is possible that mistakes made at this point are unredeemable.
The downside to that approach was that live data, such as routing tables, running processes, and user data stored in memory (including passwords), but not yet written to the drive, is permanently lost. It is also possible to detect the presence of a rootkit before it can do any damage. Rootkits are small applications installed on a computer by an intruder that can successfully conceal themselves from standard system utilities. They can allow the intruder to take control of the machine or to intercept and send pseudo-responses back to the OS. Therefore, it often becomes desirable to grab a copy of live memory while the machine is still running and then pull the plug. There are several forensically valuable pieces of information that can be collected from a running computer that would be irretrievably lost if the computer were powered down before it was captured:
• Passwords in plain text
• Running processes
• Unencrypted data that is stored in encrypted form on the hard drive
• Instant messages
• Currently logged-in user information
• Open ports
• Evidence of attached devices
Much of the information found in memory can be particularly valuable whenever the situation involves breaches across the network or the Internet—especially if there is any possibility that there may still be open ports to the perpetrator. If it is deemed necessary to perform a live query of the system, it is also possible to connect to the target system with a tool such as Netcat and execute commands remotely on the system with minimal impact on static information stored on the computer.
One thing the investigator needs to keep in mind is that making a hash of the memory image for later comparison is not a viable option. The contents of memory are dynamically changing all the time. The connection made to the computer to collect and analyze data made some changes. This is unavoidable. But the impact can be kept to a minimum if the proper tools and technique are used.
A final point to be made is that system memory—as defined by the installed memory chips in the computer—and addressable memory are not the same thing. A system with 4GB of installed memory does not have 4GB of addressable memory. Different approaches to estimating memory can deliver different values. Look at Figure 7.1, for example. Typing the mem command in a command prompt yields these results.
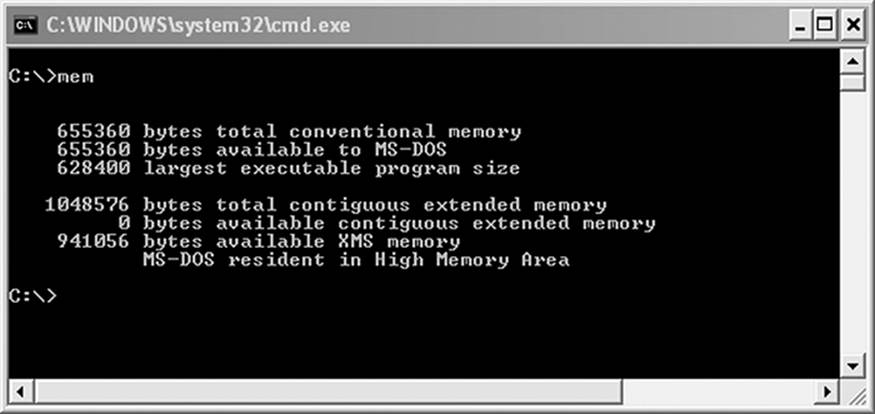
Figure 7.1 MEM reports 4GB of RAM
According to WIN64DD (Figure 7.2), the total addressable space is 5,368,709,120 bytes. In binary, this works out to precisely 5GB. Why is this? Other devices attached to the system bus are also equipped with memory. For example, the hard disk on the system currently in use by the author contains 32MB of cache memory. A video card can have several megabytes to more than a gigabyte of addressable memory. A typical SCSI adapter has anywhere from 512MB to as much as 4GB of addressable memory as well. Therefore, a system with 4GB of installed RAM will generate an address space to support these extra devices.
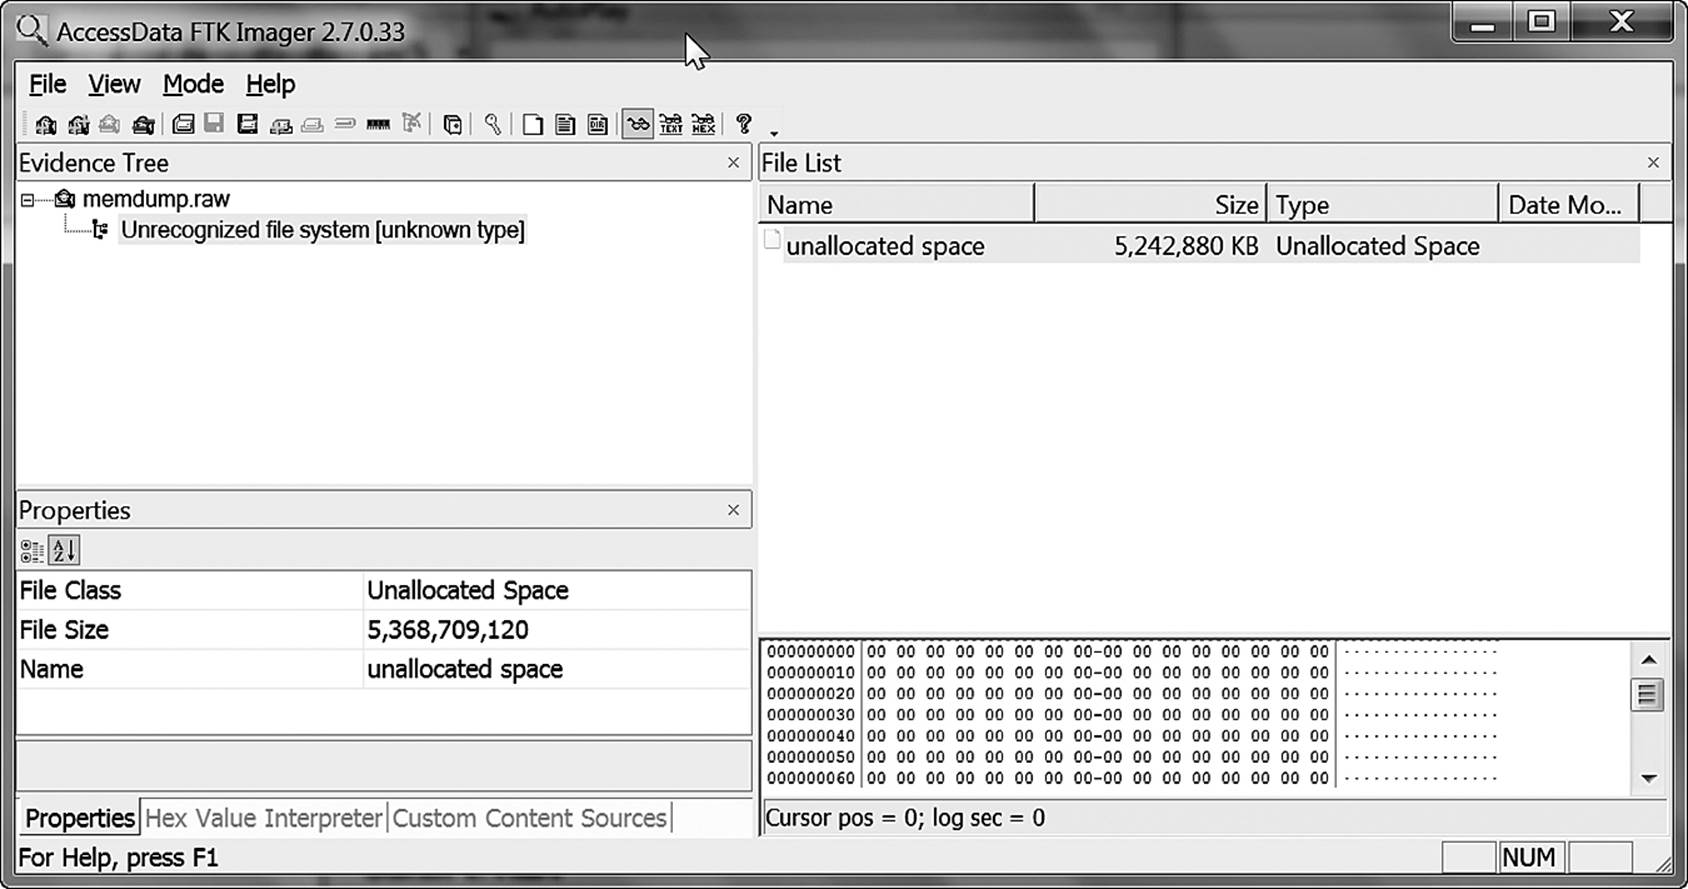
Figure 7.2 A forensic memory capture utility recognizes 5GB of addressable memory.
Memory as a Device
The thing to remember about memory is that it is just another device. Devices can be accessed in either user mode or kernel mode. User mode is a low-privilege level of access. Certain commands or processes just aren’t allowed. Kernel mode is the level of access granted to the core operating system and to the CPU. Anything goes. Memory is a highly protected device, so accessing it indirectly can be a challenge. All operating systems need a path to any data, and that includes data stored on devices. User-mode access to memory is denied by the OS; only kernel-mode calls are accepted. Therefore, devices utilities that directly access RAM or device cache memory must do so in kernel mode. To do so, the path to the device must be specified. The paths to memory used by different operating systems include
• Linux, Unix, and OSX: /dev/mem and/dev/kmem
• Windows 2000, XP, and so on: //physicalmemory
The Windows path can look a bit confusing to the beginner, but is actually quite simple. The dot between the two sets of backslashes is replaced by an IP address or computer name. For example, if the investigator is connected to a suspect computer over a Netcat connection that has an IP address of 192.168.2.1, the string would be \\192.168.2.1\PhysicalMemory.
It is possible to directly copy RAM from the machine on computers running Windows XP or earlier using readily available utilities. With Windows XP, SP2, and later, the memory device is protected from user applications, and special applications are required to obtain a memory capture.
When capturing live memory, it is important for the investigator to understand that the software is really capturing a snapshot of what is in memory for a fleeting duration. In fact, the actual content of memory changes as the snapshot is being made. This is commonly referred to as a smear image. It is impossible under current technology to get an instantaneous capture of memory. The mere fact that the investigator is intruding on the system changes system memory.
All manufacturers of forensic software used to capture memory claim to have “small footprints.” By this, they mean that the software is overwriting a minimum amount of system memory while it makes its copy. The smallest reported footprint is approximately 80KB (HBGary 2010). In a world of 64-bit machines with 4GB to 8GB of RAM, this seems inconsequential. However, that means that the equivalent of a ten-page text document or a small JPEG image can be overwritten by the tool designed to capture it.
Software Memory Capture
Most forensic software suites offer some form of memory capture and analysis utility as part of the package. Encase offers the HBGary solution. Access Data’s FTK offers RAM dump analysis as part of its basic package. There are also a number of open-source utilities on the market that accomplish this task. The following sections describe some interesting utilities, along with how they work and what tricks they can do.
Memoryze
Mandiant Systems is a developer of forensic software that offers the community a free utility for capturing images of live memory. This utility, called Memoryze, not only captures an image of memory from a target system but also provides tools for analyzing the data obtained. It boasts the ability to interface with the 64-bit systems managed by Vista and Windows 7.
An interesting aspect of Memoryze is that the investigator can first acquire a copy of the memory as an image and then perform certain live analysis tasks on the running system. Some of the things Memoryze can do include
• Identify running processes
• Identify open ports
• Identify memory handles
• Find and identify loaded DLLs
• Identify running device drivers
• Identify all loaded modules, including executables and DLLs
It can also detect the presence of rootkits and hooks to operating system components. (A hook is a string of code inserted into a program to perform a specific function. Many programs, including operating systems, include interfaces for accepting user input or for directing the application based on user input. Hackers might use these interfaces for inserting malevolent code.)
WinDD
The DD (short for disk dump) utility has been a favorite among Linux users for many years. It can capture bit-level images of drives or partitions, and even live memory, without affecting the contents of the source data. WinDD is a Windows-based version of this utility. It is a freely available utility distributed by SourceNet and described as “Safe, effort-free backup for FAT, FAT32, NTFS, ext2, ext3 partitions.”
Current versions of WinDD include Win32dd and Win64dd, which are supplied in the MoonSols toolkit. These tools allow for a raw memory dump from the target device to a specified file. The executables represent 32-bit and 64-bit versions of the utility for specific Windows operating systems.
WinDD is best run from over a network connection, although it can be run from a write-protected USB device as well. Applications can be run remotely over a network on target machines using a utility called Netcat. Netcat establishes a TCP/IP connection between the local machine and a target device, and then allows the user to “plant” an executable on the target machine.
Either the USB or the Netcat method will leave footprints on the machine under investigation. A footprint is the amount of live memory that is overwritten by the executable core of the device loaded in order to capture the memory image. The smaller the footprint, the better. Any data you overwrite might be data you wish you had later. Be aware that inserting a USB device also makes other changes to the system. These changes include loading device drivers (which overwrites memory) and making changes to the registry. The executable of WinDD has a footprint of slightly less than 1MB.
FTK Imager
While primarily known for its abilities to image physical disks, FTK Imager from Access Data can also be used to capture a memory image. Imager is a Windows tool that can run from an external device, such as a USB drive or CD-ROM. It is included with the Helix CD and can be obtained as a free download from http://accessdata.com/support/adownloads#FTKImager. One caveat to Imager is that Access Data does not guarantee that the utility will not make write attempts to the target drive. Personal tests by the author indicate that it in fact does write to the target disk. Therefore, it is highly recommended that a write-protect device such as the Wiebetech Forensic Ultra Dock be used (as described later in the chapter) between the source and the target disks.
The verify image option calculates either an MD5 or SHA1 hash of the acquired image. This option should be routinely selected. The format of the image file can be Access Data’s proprietary Smart format, EO1 as used by Encase Data, or the raw DD image format. More details on image format are presented later in this chapter. In addition to the actual image created by the utility, a log file is generated that includes the following investigator-defined information:
• Case data
• Case number
• Evidence identification number
• Description
• Examiner name
• Notes
• Disk information (drive geometry, make and model, interface, volume size, and number of sectors)
• Time and date the acquisition started
• Time and date the acquisition completed
• A list of segments that failed to copy successfully
• Image verification results, include hash values calculated
The image and log files will be stored in the target location configured by the investigator.
Hardware Memory Capture
Memory can be captured by hardware devices or forensic utilities designed for the task. One proposed hardware device patented by Brian Carrier and Joe Grand is the Tribble. Named after the Star Trek creature, the Tribble is a device that, if installed in a host computer, can capture memory with no need for intrusive software elements. As of this writing, the Tribble exists only as a proof of concept device, so it could not be tested. One shortcoming pointed out by Carrier (2004) in his paper A Hardware-Based Memory Acquisition Procedure for Digital Investigations is that the device must be installed in the machine prior to the incident under investigation. Postmortem installation will not accomplish anything. Therefore, it might be a useful preemptive tool for larger organizations, but it is not likely to be of much use to the field investigator.
The research done by Carrier has led to some interesting products that are currently available. Two devices are of particular interest. Forensic Dossier by Logicube is a hardware/software combination that can capture up to 8TB of stored data as well as capture live memory. Its NetConnect Live Acquisition permits the capture of running memory as well as up to 8GB of static storage from the same target machine.
Memory Grabber Forensic Tool by System Research and Application Corporation is a PCMCIA card that grabs memory from laptops or other devices equipped with a compatible slot. Memory Grabber is OS agnostic, meaning it ignores the operating system in use on the system and only makes a copy of data that exists in physical memory. When plugged into the suspect computer, the card provides an interface to a controlled system running forensics software that can be used to analyze the image.
Procedures in Collecting Live Data
Because the information collected during live capture cannot be repeated, it is essential that the investigator document every step taken in the process. It won’t be possible for anyone else to re-create the same image to verify results. There is only one shot at a good image.
• Document preliminary information, including
• Date and time
• Complete log of the command history
• A photograph of the scene as found
• Operating system running on machine
• Document the exact time of each step in the capture process to establish an audit trail of each forensic tool or command used.
• Collect all types of volatile system and network information:
• Memory dump
• Paging files
• Hibernation files
• Document time that the process is completed.
Regardless of the investigator’s choice of utility for conducting the capture, it is essential that it be run from a collection of binaries known to be good. There always exists the possibility that a perpetrator may have planted rootkits or other malware into the host operating system of the target device. Run the executables from a read-only device, such as a CD-ROM or a USB device configured to run in read-only mode. While it is true that there will be a measurable impact on memory by the insertion of the device (remember Locard’s principle?), the choice is relative clear. By capturing live memory, the investigator runs the risk of losing some evidence. Not capturing it at all guarantees that none of the potential evidence that exists in RAM will be collected.
Collecting a memory dump with free utilities is possible. The DD utility allows a raw dump of memory. It will work with any version of UNIX or Linux and any version of OSX prior to 10.4. It is a command-line utility. To be successful, the command must be configured with the input file(if), which is the target you are trying to acquire, and an output file (of), where the target image is to be stored. Some optional triggers include specifying a block size and some conversion options. For a forensic copy, the conversion option noerror is generally necessary. The noerror option forces the utility to continue working even if it encounters an error. Without this trigger, the utility will stop on the first error it encounters. An example of a memory capture in Windows is as follows:
From a command prompt, type
dd if= \.\\PhysicalMemory of=F:\Evidence\memory.dd conv=noerror
This will put the image of the memory onto a flash drive, in the Evidence directory. The problem with a DD image is that typical memory diagnostic utilities won’t open them. String searches for possible passwords are possible, but getting a process map out of the file can be problematic.
Dedicated forensic utilities, such as Access Data Corporation’s FTK Imager, will create an image that can be analyzed in FTK. In this utility, a live process tree can be extracted.
Once the dump file has been collected, run a hashing utility against the file. Then, make two copies. Hash both copies, and confirm that the values match. One copy will become the archive copy and will only be used for making additional working copies. The other becomes the initial working copy used for analysis.
Under no circumstances should an application that modifies MAC data on stored files be utilized. This includes system utilities such as COPY, XCOPY, MOVE, TAR, and several others. Before using a utility in the field, test it to verify that MAC data is left untouched.
Acquiring Media
The process of capturing forensic copies of hard disks is more straightforward than that of memory capture. The information the investigator is targeting exists as a static record. As long as the media being copied is not changed, the process is verifiable and repeatable. Several types of media may be targeted in any given investigation:
• Hard disks
• Floppy disks
• Zip disks
• Optical disks (CD-ROM, DVD, etc.)
• USB flash media (thumb drives, memory cards, etc.)
• Removable and portable hard disks
• Personal electronic devices (digital recorders, music players, PDAs, telephones, etc.)
There are several key points to remember. Encrypted devices can be a problem. Unless you have or can acquire the password, once the device has been shut off, the encrypted data is a collection of meaningless bits and bytes. Several options exist for recovering passwords (to be discussed later in the book), so the copy should be made. However, if encryption is known to exist, as much information as possible should be collected during live response. As with every other aspect of the investigation, every step of the process should be documented, including the steps that were taken, who performed each task, and what tools were used. All target media where copies of suspect data are to be stored should be brand new, or at the very least forensically wiped using DoD-approved tools. The target media should be hashed prior to copying and the hash of the copy compared. Matching values indicated a forensically sound copy.
The tools used for acquiring media copies must provide write protection to the source. Most operating system utilities used to copy data make numerous changes. This must not be allowed. Forensic tools, such as the Wiebetech device shown in Figure 7.3, intercept any calls made by the operating system and return the anticipated response, without actually writing any data to the media.
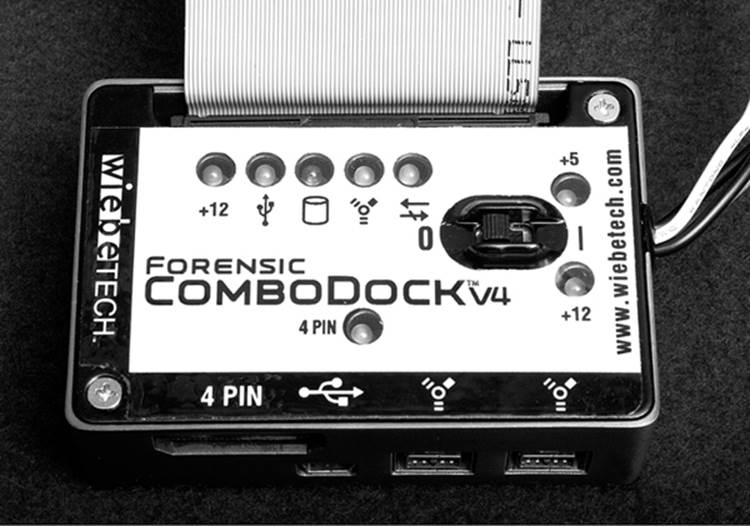
Figure 7.3 The Forensic Combodock is a forensically sound write-protected port replicator for acquiring copies of digital media.
Case Law: A Legal Argument for a Good Imaging Process
In The State of Ohio v. Cook, defense counsel attempted to discredit the forensic image used to convict Brian Cook for the possession of potentially pornographic images of children. On appeal, defense contended that the process used to capture the image was invalid.
The initial search was visual and consisted of finding and subsequently copying files from a hard disk to floppy disks by an interested party not associated with the government. A warrant was issued and the computer subsequently seized in April of 1999. While a mirror image was made of the hard disk at the time, an image made with a forensically sound tool was not made until two years later, as the case was coming to trial.
Defense argued that the first image was not forensically sound and that the second was taken too long after the events occurred, and therefore the evidence was unreliable. The entire process of acquiring the disk, from the removal of the device to its subsequent imaging, was called into question. On appeal, the court found that since there was ample documentation that the processes used were reliable and that there was little or no possibility of tampering with the evidence, all evidence was admissible. The conviction was upheld.
File Formats for Disk Images
Another thing to consider is the format in which to save the image file. There are several basic file formats generally used by the forensic community for storing images:
• DD Images (bit-for-bit)
• Expert Witness Format (EWF)
• Advanced Forensic Format (AFF)
• Safeback (by NTI)
• ILook Imager
• ProDiscover File Format
Each of these formats has its own advantages and disadvantages. Many investigators (including this author) prefer to store an image in both DD and one of the other compressed formats whenever possible. The last four items on the list are all proprietary and will not be discussed in this chapter. I did, however, feel a need to make sure that readers were aware of their existence.
DD Images
A time-tested and easily authenticated format is the bit copy generated by the DD utility discussed earlier in the chapter. Several different analysis tools can mount this image as a virtual drive, allowing it to be searched with file system utilities. Since DD does not incorporate any form of file compression, the resultant image can be quite large. This can be overcome in the Linux/UNIX version of DD by using the command in conjunction with the SPLIT command. This is made possible by the fact that DD (as with most *nix command-line utilities) can be piped to another command. Piping is an action that sends the output of one command over to another command for processing. Multiple pipes are possible. An example of the DD utility used in place with the SPLIT utility is
dd if=/dev/hda | split –b 2000m - /mnt/hdb/
In the above command, the source of the data being copied is identified as /dev/hda, which is the *nix way of identifying the primary hard disk on the first controller. In Windows, this would be the C:\ drive. The pipe character informs the command to output the results of DD to SPLIT. The –b trigger defines the block size into which the target file will be split, with the number immediately following identifying the block size. The default value, with no letter following the number, tells SPLIT that the block size is measured in bytes. The 2000m qualifier specifies a block size of 2000MB (or 2GB). Had the number been followed by a k, the block size would have been 2000KB, or 2MB. The dash following the block size is rather important. It tells the SPLIT command to read from standard input. Lastly, /mnt/hdd/ identifies the target medium for the files as the mounted hard disk identified by the kernel as HDB. This means that it is the second IDE device located on the machine. Linux recognizes USB drives as SCSI devices, so in the above example, the first USB thumb drive installed on the system would be seen as SDA instead of HDA.
Expert Witness Format (EWF)
Some of the proprietary forensic suites incorporate proprietary file formats. Encase by Guidance Software can save image files into a format called the Expert Witness Format (EWF). Several other suites, including FTK and PyFlag, have embedded EWF support even if they do not utilize the format by default. Linux users can obtain EWF images using utilities such as EWFACQUIRE.
The EWF format copies the target image, breaks it into 32Kb chunks, compresses the chunks, and then stores them together in a single file. As the chunks are generated, the EWF algorithm creates relative indexes that can be used by the applications that support the format for random access of the data in the image. Certain predefined metadata, including jump tables and file pointers, can be stored in the header to speed up random searches. (Jump tables tell the file system what clusters on a hard disk to skip over to when a file is fragmented on the drive.)
Some limitations to EWF should be noted. With Encase version 5 and earlier, EWF was limited to 2GB file sizes. This was due to a 31-bit offset value embedded in the code. Target disks larger than 2GB had to be split and then recombined for processing. Version 6 gets around that limitation by replacing the 31-bit offset with a base offset (see sidebar on offsets for an explanation).
What Is an Offset?
Computers store and then subsequently find data by assigning address ranges. A base address is typically a memory area equivalent to a single piece of data as wide as the OS can read in a single operation. This is the base address. A 32-bit OS has a base address 32 bits wide, while a 64-bit OS has a 64-bit address. Simple, isn’t it? However, often, an application needs to assign much larger areas. An offset value is a method of addressing that the OS uses to locate information in memory beyond the absolute address.
The early versions of Encase used an addressing mechanism known as absolute direct. This provided an effective address of the absolute address plus a specified jump to the next address. In the case of EWF, the jump was 31 bits wide. Two to the 31st power results in a value of 2,147,483,648—or effectively, 2GB (see Figure 7.4).
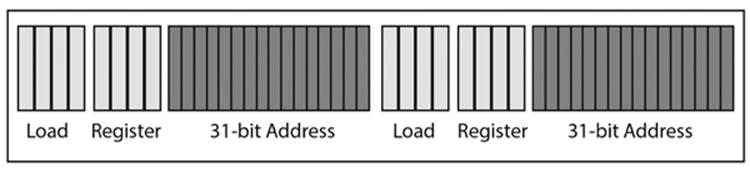
Figure 7.4 Indexed absolute addressing
The base + offset addressing scheme allows the programmer (or program) to assign any size of address to a function. A 32-bit processor will allow a 32-bit address to be assigned. By 32-bit address, this does not mean that the address is only 32-bits wide, but rather a 32-bit value. Two to the 32nd power is 4,294,967,296, so a 32-bit processor allows a 4GB address to be defined. A 64-bit processor could handle 18 petabytes. This ought to be more than any investigator will ever need—to paraphrase a famous quotation.
Advanced Forensic Format (AFF)
The Advanced Forensic Format is the choice preferred by many investigators. A key advantage of AFF is that it allows arbitrary metadata to be stored with the target image. To use an example of what this means, an open-source tool called AImage allows the operator to define several custom fields for metadata storage. In addition to the disk image, it also stores the version of the library tools used to create the image (AFFLIB), identifies the computer from which the image was acquired, prompts the investigator to enter her name, and identifies the sector size used by the device acquired. An advantage of AFF was that it introduced the capability of compressing the image, allowing larger targets to be acquired. Data was acquired from the target in 16MB “pages.”
AFF was not without its shortcomings. The original incarnation of AFF (version 1) was unable to acquire live memory images. The names generated for the segments created during capture were not encrypted. And the 16MB page size led to issues in capturing the NTFS MFT metafiles. AFF Version 4 (AFF4) overcomes most of the faults of AFF1. Data can be captured in segments or streams. This means that fragmented information (such as the NTFS MFT) can be easily captured. Segment capture can be used for acquiring smaller blocks of data. The actual target image is created as an image stream in order to retain an accurate hash value of the image. The actual image will be stored in multiple segments, with each segment identified with a Uniform Resource Name (URN).
Proprietary Formats
Several forensic software manufacturers support file formats specific to their products. There are Safeback (by NTI), ILook Image, Paraben’s Forensic Image Format, and the ProDiscover File Format. Since this text attempts to be as vendor-neutral as possible, there is no detailed discussion of these formats. However, a general familiarity of each one is important.
Safeback
The developers of Safeback do not publish any specific details concerning their product line. Therefore, the technical details surrounding it are not available for study. They describe the file structure as self-authenticating. By this, they mean that SHA256 hash values are calculated before and after capture.
Safeback can be launched from a boot disk or operated remotely over a network. Disk images can consist of bit-by-bit copies of entire devices, or individual partitions. As with any other forensically sound utility, Safeback copies slack space and unallocated space. While it works, it maintains a time-date stamped audit trail of each activity performed by the software on the target device.
iLook
As with Safeback, the technical details of iLook Investigator are not published. It is provided by the Internal Revenue Service only to qualified law enforcement officers and agencies. The software is available in 32-bit and 64-bit versions. The imaging utility that is provided, IXimager, will output the source file into any one of three formats.
The iLook Default Image Format (IDIF) stores the image in compressed form. An interesting feature of this format is its proclaimed ability to detect changes to the source image that occur after the beginning of the capture event. The application reportedly logs any user activity that occurs during this time. (Insomuch as the author works in private industry and education, the software was not available for review and testing.) The iLook Raw Bitstream Format (IRBF) is identical to IDIF in all aspects, except that it stores the final image as a raw binary file. No compression is performed. The iLook Encrypted Image Format (IEIF) stores the final image in encrypted form, as its name implies. A user key is required to access the image.
IXimager runs from either a bootable CD or a bootable floppy diskette. It can acquire images of RAID systems as well as individual volumes. Images can also be acquired over FireWire, SCSI, or USB connections. The files produced by IXimager can be read and analyzed only by iLook Investigator. In order for the image file to be accessed outside of Investigator, it must first be converted into raw bitstream format, similar to the output of the DD utility described earlier.
Prodiscover Format
Prodiscover is a product by Technology Pathways that provides a relatively complete suite of tools to the forensic investigator. It provides bit-for-bit copies of a hard disk or other device, and captures hidden areas, including slack space, HPA partitions, and unallocated space. Links to alternate data streams are maintained, and can subsequently be analyzed and the data recovered.
A Prodiscover file consists of five parts. A 16-bit file header includes a hash signature to validate the file along with a version number for that file. Following the file header is a 681-byte image header that contains user inputted metadata, including investigator name and case information. This is followed by the data block. If an uncompressed file was selected at the beginning of the capture, this will be a single binary file. If file compression was selected, there will be a series of blocks of compressed data. The fourth section exists only when file compression is selected. It is a data array that identifies the compressed blocks in the previous section along with their respective sizes. The last section is an error log of any I/O errors that occurred during capture.
Chapter Review
1. Why is it important what order you follow in collecting evidentiary material? Discuss the order of volatility and why this is critical.
2. What are some important pieces of evidence that can be collected from a live memory capture? What are some tools you can use to capture live memory?
3. You are acquiring memory from a Dell laptop equipped with 4GB of RAM. Your memory image is 5GB. Explain the discrepancy. Your colleague used a different tool and did get a 4GB image. Why is that?
4. What is a “footprint” in memory, and what significance does it have to your work?
5. A lot of emphasis was placed on the necessity of using a write-protection device when capturing images of media. What does a write-protection device do, and why is its function so important?
Chapter Exercises
1. Go online and research some tools that would be valuable in collecting both live memory images and images of various forms of media. Put together a shopping list for your manager that includes one list that adheres to a tight budget and another in which cost is no object.
2. See if you can find a court case in which a live memory image of a computer played a significant role in the outcome.
3. You have three tools that you want to test for their ability to do memory capture. Put together a test script that you will use in testing. What are the various things you will be examining?
References
Brezinski, D., and T. Killalea. 2002. Guidelines for evidence collection and archiving. www.faqs.org/rfcs/rfc3227.html (accessed July 5, 2011).
Carrier, B. 2004. A hardware-based memory acquisition procedure for digital investigations. Digital Investigation Journal 1(1):59.
HBGary. 2010. Fastdump—A memory acquisition tool. www.hbgary.com/solutions/memory-forensics/ (accessed August 17, 2010).
State v. Cook, 149 Ohio App. 3d 422 - Ohio: Court of Appeals, 2nd Appellate Dist. (2002).
Walters, A., and N. Petroni. 2007. Volatools: Integrating volatile memory forensics into the digital investigation process. A white paper by Black Box, Inc. www.orkspace.net/secdocs/Conferences/BlackHat/Federal/2007/Volatools_-Integrating_Volatile_Memory_Forensics_into_the_Digital_Investigation_Process-paper.pdf (accessed July 12, 2011).